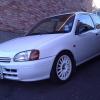
vizzioarts Posted May 15, 2013 Share Posted May 15, 2013 (edited) Started life as a totally standard n/a, no mods or problems. Dad has owned the car from about 2000 miles, well looked after ever since. After removing the runners down the sides snapped up this pic in Feb 2012 August 2012 installed 30mm springs, and bought a set of 15" alloys cheap and got them fitted to it. The car sat like this over winter with no additional mods until now. 14th May 2013 Saw a TTE backbox exhaust come up on Gumtree and just had to have it as I haven't seen one for sale locally in the past year of keeping an eye out.Got it home, polished the tip up a bit and got it fitted last night. Results on car The sound makes a huge difference from standard, really helps the car out at lower and mid-range revs. Also gave PlastiDip a go last week on the rear Toyota badge. Pretty pleased with the results, this stuff is a gift to work with, love it. Before Cleaned, masked off and 1st coat 2nd coat 3rd and 4th coat, and masking removed Started to work on peeling the edges and the center Finished Result Further upgrades in mind (other suggestions welcome!) Engine-Intake manifold and pod filter-Exhaust Manifold Interior-Glanza interior (seats and door-cards)-SR dials-Cup holders Exterior-Front badge Plastidipped (maybe)-All blemishes touched up on paintwork-Speedline Alloys-Color coded mirrors (maybe)-Engine bay clean and tidyup-Calipers and drums painted (maybe)-And a good machine polish P.s. Since exterior pictures were taken square front plate has been installed. Updates soon hopefully,Cheers for reading,Chris Edited June 4, 2015 by vizzioarts Quote Link to post Share on other sites
EliteMilk Posted May 15, 2013 Share Posted May 15, 2013 I like to have a dabble with dipping looks fun Quote Link to post Share on other sites
PaulStarletSR Posted May 15, 2013 Share Posted May 15, 2013 looks smart mate! keep the mods cumin Quote Link to post Share on other sites
vizzioarts Posted May 15, 2013 Author Share Posted May 15, 2013 I like to have a dabble with dipping looks fun Plastidip is great fun, bought a tin around Christmas time to give it a go. Best part is if you dont like it/go wrong, just peel it off. Surprised at how well it stands up to cleaning etc. Great stuff looks smart mate! keep the mods cumin Thinking about a Glanza rear bumper to house the exhaust a little better. Inspired from @drongo boi dads SR after reading through his thread. Quote Link to post Share on other sites
PaulStarletSR Posted May 15, 2013 Share Posted May 15, 2013 aye mate and the skirts and a lip at the front,will look sweet Quote Link to post Share on other sites
Jamie93DLZ Posted May 15, 2013 Share Posted May 15, 2013 Looking well mate, good to see your on here..Was going to lift that tte exhuast myself this week Quote Link to post Share on other sites
vizzioarts Posted May 15, 2013 Author Share Posted May 15, 2013 Looking well mate, good to see your on here..Was going to lift that tte exhuast myself this week awhh man Surprised at the amount of NI&ROI members on here! Good to see. Quote Link to post Share on other sites
Flynn Posted May 15, 2013 Share Posted May 15, 2013 Nice work mate and the plans sound good too! TTE exhaust was a good buy....see if you can find a front lip to match!? Glanza bum will sort the rear out and as you say accommodate the exhaust a bit better! Quote Link to post Share on other sites
vizzioarts Posted May 15, 2013 Author Share Posted May 15, 2013 Nice work mate and the plans sound good too! TTE exhaust was a good buy....see if you can find a front lip to match!? Glanza bum will sort the rear out and as you say accommodate the exhaust a bit better! Never thought of a front lip, but ill keep an eye out. Future plans are all subject to the funds i have for it haha. Quote Link to post Share on other sites
Billy SR Posted May 16, 2013 Share Posted May 16, 2013 (edited) your the fucking fucker that managed to snap up the tte box before me, i was wondering why he didn't get back to me after he said it was provisionally sold, nice choice in mods though, she's gonna be sweet Edited May 16, 2013 by Billy SR Quote Link to post Share on other sites
ro55ifumi Posted May 16, 2013 Share Posted May 16, 2013 Nice project John Quote Link to post Share on other sites
vizzioarts Posted May 16, 2013 Author Share Posted May 16, 2013 your the fucking fucker that managed to snap up the tte box before me, i was wondering why he didn't get back to me after he said it was provisionally sold, nice choice in mods though, she's gonna be sweet Uhmm, yeah, probably me haha! Anyway spring clean today, Got the car cleaned up, de-tared and a coat of wax on it. Took a few pics just in the driveway. Also got a set of SR clocks coming sometime next week - thanks to Lew91 Quote Link to post Share on other sites
Starlet-Joshy Posted May 17, 2013 Share Posted May 17, 2013 Looking good buddy!, keep the progress coming Quote Link to post Share on other sites
vizzioarts Posted May 21, 2013 Author Share Posted May 21, 2013 New Update:SR clocks arrived today from @Lew91Spent the day tracing the back of the clocks and getting myself a wiring diagram sorted for the n/a and the SR boards.Finally came up with the exact wire that needed changing, jumped in the deep end and switched the pins around and everything worked as it should Pics of SR dials: Jobs a gud'in Quote Link to post Share on other sites
vizzioarts Posted May 21, 2013 Author Share Posted May 21, 2013 Is a detailed tutorial on what i did useful to anybody? Looked through a few tutorials but some people reported errors when they tried it, so just went through the pain myself.. haha If it is, ill get one up Quote Link to post Share on other sites
Chris Green Posted May 21, 2013 Share Posted May 21, 2013 Coming along nicely pal. Yeah the guide for the Paseo dials didn't work 100% been meaning to do one my self. Its good to have guides. Quote Link to post Share on other sites
Lew91 Posted May 21, 2013 Share Posted May 21, 2013 Looking good matey, glad they turned up safely. You didn't hang around getting them in Quote Link to post Share on other sites
vizzioarts Posted May 21, 2013 Author Share Posted May 21, 2013 You didn't hang around getting them in Nah did not haha. Nothing better to do today so why not Quote Link to post Share on other sites
vizzioarts Posted May 21, 2013 Author Share Posted May 21, 2013 Put up a quick tutorial on what i did anyway, may be use to someone Link : http://www.ukstarletowners.com/topic/65688-clock-conversion-starlet-na-to-starlet-sr-cluster/ Quote Link to post Share on other sites
vizzioarts Posted May 28, 2013 Author Share Posted May 28, 2013 Also repping the forum now Quote Link to post Share on other sites
vizzioarts Posted August 19, 2013 Author Share Posted August 19, 2013 Out with the old in with the new: Rear Glanza Bumper thanks to @rmsnoel Quote Link to post Share on other sites
jonnygt Posted August 19, 2013 Share Posted August 19, 2013 Glanza bumper tidys it up well! Much better, need one myself Quote Link to post Share on other sites
Flynn Posted August 19, 2013 Share Posted August 19, 2013 Out with the old in with the new: Rear Glanza Bumper thanks to @rmsnoel New bum looks sweet but please tell me there's a gap between the drivers door and that wall? Quote Link to post Share on other sites
vizzioarts Posted August 19, 2013 Author Share Posted August 19, 2013 New bum looks sweet but please tell me there's a gap between the drivers door and that wall? Pics look deceiving, but yeah there is a few cm of a gap!! Quote Link to post Share on other sites
Chris Green Posted August 19, 2013 Share Posted August 19, 2013 (edited) Looking well dude! Edited August 19, 2013 by chrisgreen1993 Quote Link to post Share on other sites

Recommended Posts
Join the conversation
You can post now and register later. If you have an account, sign in now to post with your account.