enzo_e492901 Posted January 17, 2014 Author Share Posted January 17, 2014 (edited) Good to see you haven't left the project, always wondered whether we'd see you about again Yeah cheers, I have been about a little bit here and there. Now back for good but the project is still going to take a long time. This is epic! Your attention to details is absolutely unreal... It seems as though to build this you must have had a sealed lab or something. Cleanliness is unreal! Keep up the hard work. Sorry to hear about the reasons it was shelved! Id love to see you turbo this setup! Altho I fear you've come too far for that! MAJOR Respect! Cheers Socks. Some would say too clean, but it won't stay that clean when on the road. I'm not one to keep cleaning the bay like some do. Haha you should see the state of my shed! As for turboing it I have given it alot of thought and it's something I never wanted to do but kinda always knew I would some day. I still think it's possible because for example the Corolla ecu I'm going to use basically uses turbo sensors so it's half the job. I just want to see what the N/A can do first. Gavin Edited January 20, 2014 by enzo_e492901 Quote Link to post Share on other sites
Kosha Posted January 18, 2014 Share Posted January 18, 2014 Lost for words mate !! Stunning build !! Quote Link to post Share on other sites
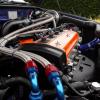
rmsnoel Posted January 20, 2014 Share Posted January 20, 2014 Tidy work enzo, that pierburg throttlebody will feel alot nicer than the austin ones. Youve put some amount of work into it. Did you drill out the butterfly bolts?Ive the corolla exhaust manifold on my car, it lines up sweet with the standard exhaust at the flexi. Keep up the good work and thanks for the photos keep them coming Quote Link to post Share on other sites
enzo_e492901 Posted January 20, 2014 Author Share Posted January 20, 2014 (edited) Lost for words mate !! Stunning build !! Cheers bud. Tidy work enzo, that pierburg throttlebody will feel alot nicer than the austin ones. Youve put some amount of work into it. Did you drill out the butterfly bolts?Ive the corolla exhaust manifold on my car, it lines up sweet with the standard exhaust at the flexi. Keep up the good work and thanks for the photos keep them coming Yeah the pierburg throttle body is of visibly better quality with an 8mm shaft instead of 10mm and bronze shaft bushings instead of pressed steel. Cheers mate, means alot. No, just a little heat and the right size torx bit. That's really good to know about the manifold/downpipe lining up! Gavin Edited January 20, 2014 by enzo_e492901 Quote Link to post Share on other sites
Xpect Posted January 21, 2014 Share Posted January 21, 2014 Awesome buold.Whar is the paint code of the light blue one? Quote Link to post Share on other sites
enzo_e492901 Posted January 21, 2014 Author Share Posted January 21, 2014 (edited) Thanks mate. The paint colour code is 8M7. Gavin Edited January 21, 2014 by enzo_e492901 Quote Link to post Share on other sites
rmsnoel Posted January 21, 2014 Share Posted January 21, 2014 Yeah I filed the standard throttlebody shaft down to 7mm and Ive had no issues, if could get the pierburg to work with the auto gearbox Id use it as the feel through the pedal is far nicier because of the finer spring. My sister done the cfm maths for me on the two and the pierburg is by far the better option because of the shaft diameter. Gimme a shout when the cars roadworthy, ive a 100ps ecu I might part with7500rpm Quote Link to post Share on other sites
Happyb Posted January 21, 2014 Share Posted January 21, 2014 nice work lad! where did you get the covering for the loom if ya dont mind me asking and was it dear and what did you use to paint all the brackets black? Quote Link to post Share on other sites
enzo_e492901 Posted January 21, 2014 Author Share Posted January 21, 2014 Yeah I filed the standard throttlebody shaft down to 7mm and Ive had no issues, if could get the pierburg to work with the auto gearbox Id use it as the feel through the pedal is far nicier because of the finer spring. My sister done the cfm maths for me on the two and the pierburg is by far the better option because of the shaft diameter. Gimme a shout when the cars roadworthy, ive a 100ps ecu I might part with7500rpm I can't wait to feel the pedal! lol. I was under the under the impression the Gen 1 Corolla ECU had a 7500rpm limit too? Because power figures are quoted as 88HP @ 6600RPM. Our n/a limit is what 6500-6700RPM? nice work lad! where did you get the covering for the loom if ya dont mind me asking and was it dear and what did you use to paint all the brackets black? Thank you. The corrugated split loom tubing came from ebay. The tee's came from http://www.thetoolboxshop.com/. Both are Durite brand. I'm doing mine again with braided sleeving soon. It's just normal paint with a petrol resistant lacquer over the top. The texture comes from a dusting of lacquer to give a matt/satin finish. Gavin Quote Link to post Share on other sites
Starlet-Joshy Posted January 23, 2014 Share Posted January 23, 2014 Dat blue <3 same as my first starlet, such a nice colour! Quote Link to post Share on other sites
Westley Posted April 3, 2014 Share Posted April 3, 2014 MMMM! Blue and Orange... My favourite colour scheme combo aha Quote Link to post Share on other sites
Bluebear Posted April 3, 2014 Share Posted April 3, 2014 Completely missed this topics revival!! Brilliant to see you back Enzo, always loved your blurple Starlet, Quote Link to post Share on other sites
enzo_e492901 Posted April 3, 2014 Author Share Posted April 3, 2014 Dat blue <3 same as my first starlet, such a nice colour! Yeah I like this light blue. I was after one from the very first time I saw one this colour. MMMM! Blue and Orange... My favourite colour scheme combo aha Yeah orange is my favourite colour and blue is my second favourite so all good. lol Completely missed this topics revival!! Brilliant to see you back Enzo, always loved your blurple Starlet, Thanks bud, I really do miss the 8K9 colour but love this new one more. So guys I should have another update soon. Gavin Quote Link to post Share on other sites
enzo_e492901 Posted May 17, 2015 Author Share Posted May 17, 2015 (edited) Another year, another update. Well I guess even an update that is a year late is better than no update at all. Let’s start with some photos of what I've been up to over the last year. I've made half the Coolant Swirl/Constant Bleed system. This is the custom DIY Constant Bleed Pot. It's made from brass silver soldered together and has a machined neck to suit a TRD Rad Cap. I've finally managed to get a pair of Genuine Glanza Wind Deflectors and clips. I bought the other half of my gauges. I now have my complete set. I finally managed to get a 100HP Gen 1 JDM ECU (P/N:89661-10120) EP82 Engine and EP82 ECU finally reunited in a EP91. It's going to be beautiful. And I got some Toyota Denso Direct Mount Coils (P/N:90919-02230) Now to the good stuff. I have already got the JDM ECU working in my car. To make testing the ECU easy and because some of the pins might interfere with the ECU, I disconnected some sensor pins and the immobiliser pins, 8 in total, I also swapped 1 of the pins position. When this ECU is fitted for good the 8 pins need new wiring because of the difference in sensors. Now, anyone with a sharp brain might be wondering how I'm going to use the coils with the JDM ECU. Well that brings be to the "something that's very interesting" I mentioned a few posts above. I am in the process of designing and building an upgrade to the ignition system. This system won't give each coil independent timing control but because of the separate coils it will give some benefits. There are no HT Leads for starters and each coil has more recovery time. This will result in a stronger spark, smoother idle, smoother running and the ability to run a larger spark plug gap. Here are some photos. Prototype v1 electronics on a Bread Board. Prototype v1 Crank/Cam Sensor. Prototype v1 distributor housing. Parts of prototype v2 electronics on a PCB. The components used for the prototypes of the electronics are called through hole but the parts I will use for the finished electronics will be surface mount, this will mean the complete electronics will fit inside the new distributor housing along with the new Crank/Cam Sensor. Through hole VS surface mount components. As soon as this system is working you will be the first to know. That's it for now, hopefully more soon. Gavin Edited September 29, 2020 by enzo_e492901 Quote Link to post Share on other sites
Rich-k Posted May 17, 2015 Share Posted May 17, 2015 Great thread!!! Quote Link to post Share on other sites
5e colin Posted May 17, 2015 Share Posted May 17, 2015 niiiiice Quote Link to post Share on other sites
enzo_e492901 Posted May 17, 2015 Author Share Posted May 17, 2015 Cheers guys. Gavin Quote Link to post Share on other sites
enzo_e492901 Posted May 24, 2015 Author Share Posted May 24, 2015 (edited) Small update, nothing exciting. I got some more DIY custom parts made this week. Now I can start making the bigger, more interesting parts. I also managed to de-anodise and paint the old style TD Fuel Rail I've had for so long. Hopefully within the next month I should be able to order a JUN lightweight flywheel and Zep brake and clutch hoses. As ever photos speak a thousand words... Hose joiners for the custom cooling system plumbing. I've made 4 so far but I think I might need a couple more. Splitter blocks for the custom 2 way oil catch can and breather system. Idle stabilization valve modified with a slightly bigger reservoir. Idle stabilization valve sandwich plate. Spark plug extenders. Spark plug nuts silvered soldered to PCB standoffs. The painted TD fuel rail. More soon Gavin Edited September 29, 2020 by enzo_e492901 Quote Link to post Share on other sites
Rich-k Posted May 24, 2015 Share Posted May 24, 2015 That is some work right there pal Quote Link to post Share on other sites
Bluebear Posted May 24, 2015 Share Posted May 24, 2015 Nice to see you still posting mate! Some lovely machining work happening here Quote Link to post Share on other sites
enzo_e492901 Posted May 25, 2015 Author Share Posted May 25, 2015 That is some work right there pal Thank you buddy. Nice to see you still posting mate! Some lovely machining work happening here Yeah I'm still here. I am determined to finish this project no matter how long it takes. Cheers mate. Gavin Quote Link to post Share on other sites
Westley Posted July 27, 2015 Share Posted July 27, 2015 Wow it's been over a year since I checked this thread and the updates still baffle me now! xD can't wait to see more of this car, and even more so to join all you guys in the EP91 scene ;) Good job so far! Quote Link to post Share on other sites
maddox710 Posted July 27, 2015 Share Posted July 27, 2015 Epic Quote Link to post Share on other sites
glanzarep Posted July 27, 2015 Share Posted July 27, 2015 such a awesome build attention to detail unreal Quote Link to post Share on other sites
enzo_e492901 Posted July 28, 2015 Author Share Posted July 28, 2015 (edited) Thank you guys, really means a lot. Update: I am still working on this although very slowly. loL Gavin Edited September 29, 2020 by enzo_e492901 Quote Link to post Share on other sites

Recommended Posts
Join the conversation
You can post now and register later. If you have an account, sign in now to post with your account.