Wardy Posted November 7, 2010 Share Posted November 7, 2010 (edited) Well here we go!I have finally got my new car! Its a Toyota Starlet GT Turbo 1995 quadlight in white!I had a couple of mates come with me to look at it in high wycombe and tbh it was a dog. Mechanically sound but cosmeticly needs a good going over. Priced at £2250 and got him down to £1750 but still wasnt happy so we left. The next day i had a call from the seller saying he would let it go for my original price which was £1500 sorted!My mate and the missus drove me down to it last saturday to go and collect it so here are the pics when i got itPics of the damageSo i thought i would get started straight away on making the car my own First things first, get rid of those horrible shopping lists!!I needed nails so enilisted the missus to help lolGot rid of the rear Starlet and GT Turbo stickers aswellThen i started to go about cleaning Took the wheels off and jet sprayed the arches and the wheels because i have never seen anything so MINGING!! (apart from the missus in the morning )BEFOREAFTERAdd some nice new shiney blue wheel nutsThen i wanted to strip it as i love the stripped look!BEFOREAFTERDecided to give it a bit of a clean as it was minging aswell!So here it is overall!Have also been Hammeriting the boot and seat pans in white and so far the first coat looks very good!Also i have a De-cat/screamer pipe to fit, lower arm and going to get timing belt done next week Plans over the next couple of months will be Coiilies, front and rear ARB's, Polybushed, Adjustable panhard rod, Rear strut brace, c-pillar bar and cross section braces.Watch this space for more updates! Edited June 12, 2014 by Wardy Quote Link to post Share on other sites
Sanchez Posted November 7, 2010 Share Posted November 7, 2010 Nice one mate, seems you have done well with this right from the off getting the price down and now gone about making it your own.Keep up the good work mate! Quote Link to post Share on other sites
drongo boi Posted November 7, 2010 Share Posted November 7, 2010 looks proper smart dude Quote Link to post Share on other sites
Wardy Posted November 7, 2010 Author Share Posted November 7, 2010 cheers guys! Just trying to make it look clean and simple but with some goodies. Focusing on the bits like suspension and brakes first before i start adding serious power as i want the rest of the car to cope Quote Link to post Share on other sites
nazzurro19 Posted November 8, 2010 Share Posted November 8, 2010 i have that sun strip just your red bits on mine its blue Quote Link to post Share on other sites
Stulet-GTT Posted November 8, 2010 Share Posted November 8, 2010 Looks alot better with out shoppin list strait away...Nice smooth boot to, thats what im after doing to mine...Keep up the good work as its looking 100% already... Quote Link to post Share on other sites
Sparky Posted November 8, 2010 Share Posted November 8, 2010 Looka alot better already Keep up the good work, not a fan of the smooth rear though I am afraid. Quote Link to post Share on other sites
LukeSR Posted November 8, 2010 Share Posted November 8, 2010 Looks a nice base mate, I'm not to sure on the rear myself Quote Link to post Share on other sites
Wardy Posted November 8, 2010 Author Share Posted November 8, 2010 Cheers guys, the smoothed boot was al done before i bought it but i think it looks a bit different to the other starlets about Quote Link to post Share on other sites
Liam_D Posted November 9, 2010 Share Posted November 9, 2010 Looks like a awesome base to start with matey, Its going in the right direction too which is nice to see ;) Looking forward to seeing some more updates mate. Quote Link to post Share on other sites
Andrew Miller Posted November 9, 2010 Share Posted November 9, 2010 looks really nice mate ;). Im getting these wheels for mine. Nice to see them on another starlet first ;). Quote Link to post Share on other sites
Wardy Posted November 9, 2010 Author Share Posted November 9, 2010 Yer they dont look to bad actually, think they will look epic on a Black EP82 ;) Quote Link to post Share on other sites
bowdengtturbo Posted July 12, 2012 Share Posted July 12, 2012 Nice car mate loving the smoothed boot seriously considering doin it too mine Nice car mate loving the smoothed boot seriously considering doin it too mine Quote Link to post Share on other sites
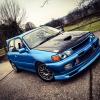
Wardy Posted October 21, 2012 Author Share Posted October 21, 2012 Have also been Hammeriting the boot and seat pans in white and so far the first coat looks very good!Also i have a De-cat/screamer pipe to fit, lower arm and going to get timing belt done next week Plans over the next couple of months will be Coiilies, front and rear ARB's, Polybushed, Adjustable panhard rod, Rear strut brace, c-pillar bar and cross section braces.Watch this space for more updates!I have now completed the boot Now to the outside of the car, I recently bought some JD Tuning tow eyes for front and back of the car. They came powdercoated in red so i decided to sand it all down and put my own personal touch to it to more match the car, sooo out came my dads left over ford diamond white lol! and this was the finished result with JD Tuning Graphic attached.Fitted to the carAlso that same day i fitted my Screamer Pipe and Decat and it sounds really good! Pops the odd flame or two No pics as of yetSome pics i took the other day I had standard springs and dampers on the Starlet so i decided to go and speak to Jerrick from MeisterR and grab a set of coilies which are very highly rated!Heres the old onesThey were mullered! It was leaking oil and flying around like a bouncy castle!New MeisterR Coilovers FittedRides and handles amazingly! absolutly love them! Fully adjustable for dampening rate, spring rate, toe in and out, Camber +/-Then a month after that the gearbox went bang! So me being me i thought why dont i look at getting something different Indeed i did!I bout a EP91 Gearbox which has shorter ratios and has just been reconditioned with hiding inside a ATS 2 way LSD Old boxPictures of the new one!Clutch Then i decided to upgrade the intercooler to a front mount intercoolerHeres a few pics of it at the momentThen i decided hmmm.... LSD, Coilovers and slightly stripped, it needs to lose more weight!! So heres what happened!Add a rear strut brace and c-pillar barPlus some 4 point takata Harnesses More suspension componets then started to arrive Old and New Whiteline Panhard RodNew Whiteline 24mm Front ARBAlso comes with Polybushed drop linksThen i got hold of some lighter front wishbones with polybushed bushes and Anti Lift kit, These also gave it a slight bit of negitive camber.A few Pictures of Me and Mark411 at Cadwell ParkSome very low resolution pictures of me going round CadwellAfter going round cadwell park i thought to myself i need brakes! I boiled my brake fluid and my standard brakes just wasnt up to the job! and i wanted just a little more power for now aswell so i started on the exhaust system by buying a secondhand custom made manifoldAdd some heatwrapThen a Side Exit ExhaustThat is also heatwrapped and chucks out constant flamage!Few other little bits included a full service, iridium plugs, new 8.5mm HT Leads Front mount airfilterAlso to keep it cool i got a Civic twin core radiatorAlso a Spal 12" FanNow to my braking!rears were done first so i got some normal sizes rear discs but grooved with O.E Spec mintex padsFittedThen i wanted something a bit more special and wanted to go different from the rest of the crowd so i bought these They are WMS 4 Pot calipers with 277mm x24mm discs and Ferodo DS3000 Pads and all i can say is they are AMAZING!!FittedThen i had a bit of a problem with my turbo where is was smoking on idle so we all put our heads together and thought it must be the turbo oil seals so i bought another one for £40 and Brad gave me a hand fit the new turbo at the farm in a barn! 3 hours later and no smoke TurboGot my hands on a Greddy Profec E0-1 boost controller Now i have just bought some new wheels, They are SSR Speedstars in white and are very nice! Just have to get some 10mm spacers to fit over my new brakes :S Quote Link to post Share on other sites
Starbuck Posted October 21, 2012 Share Posted October 21, 2012 Looking good. Quote Link to post Share on other sites
Wardy Posted October 21, 2012 Author Share Posted October 21, 2012 Some other little updatesNew SSR wheels and R888 tyres ;)Some random pics i tookBought a 6 point Roll Cage off of Rinseep and got it bolted in but now has been sent off for paint Need to bash the rest of the sound deadening out and then Hammerite the front whiteAlso fitted some polybushed engine mounts as the old ones were fudged! Quote Link to post Share on other sites
hughes21 Posted October 21, 2012 Share Posted October 21, 2012 Looking good mate . Where you from sure I've seen this in Folkestone a few times ?? Quote Link to post Share on other sites
pick1 Posted October 21, 2012 Share Posted October 21, 2012 Looking very smart Quote Link to post Share on other sites
Wardy Posted October 22, 2012 Author Share Posted October 22, 2012 Cheers guys, its looking a bit sorry for its self at the moment but it will all fall together eventually!Looking good mate . Where you from sure I've seen this in Folkestone a few times ??You probably have mate i go down there at the weekend sometimes Quote Link to post Share on other sites
Wardy Posted October 28, 2012 Author Share Posted October 28, 2012 Busy day on the GT saturday! I decided to have a go at the sound deadening!First it looked like thisThen i bashed, hammered, chistled and even sliced my fingers open for it to look like this!I then got a drill and a steel brush wheel to get rid of the crap which lay underneath.Looks a bit better and with the seats inNow just got to tape up and sort the loom out ready for hammerite Quote Link to post Share on other sites
Liam_D Posted October 29, 2012 Share Posted October 29, 2012 Some awesome mods on this dude! Quote Link to post Share on other sites
Socks Posted October 29, 2012 Share Posted October 29, 2012 Going to look fresh when you paint all the inside buddy! Looking Good! Quote Link to post Share on other sites
Wardy Posted October 29, 2012 Author Share Posted October 29, 2012 Cheers lads! Just for the masking up and stuff now :/ Quote Link to post Share on other sites
lew777 Posted October 30, 2012 Share Posted October 30, 2012 come along way since you bought it mate keep it up Quote Link to post Share on other sites
drongo boi Posted October 30, 2012 Share Posted October 30, 2012 looking good dude keep up the good work Quote Link to post Share on other sites

Recommended Posts
Join the conversation
You can post now and register later. If you have an account, sign in now to post with your account.