

Browner
-
Content Count
2532 -
Joined
-
Last visited
Content Type
Profiles
Forums
Wiki
Media Demo
Store
Calendar
Posts posted by Browner
-
-
Cheers mate
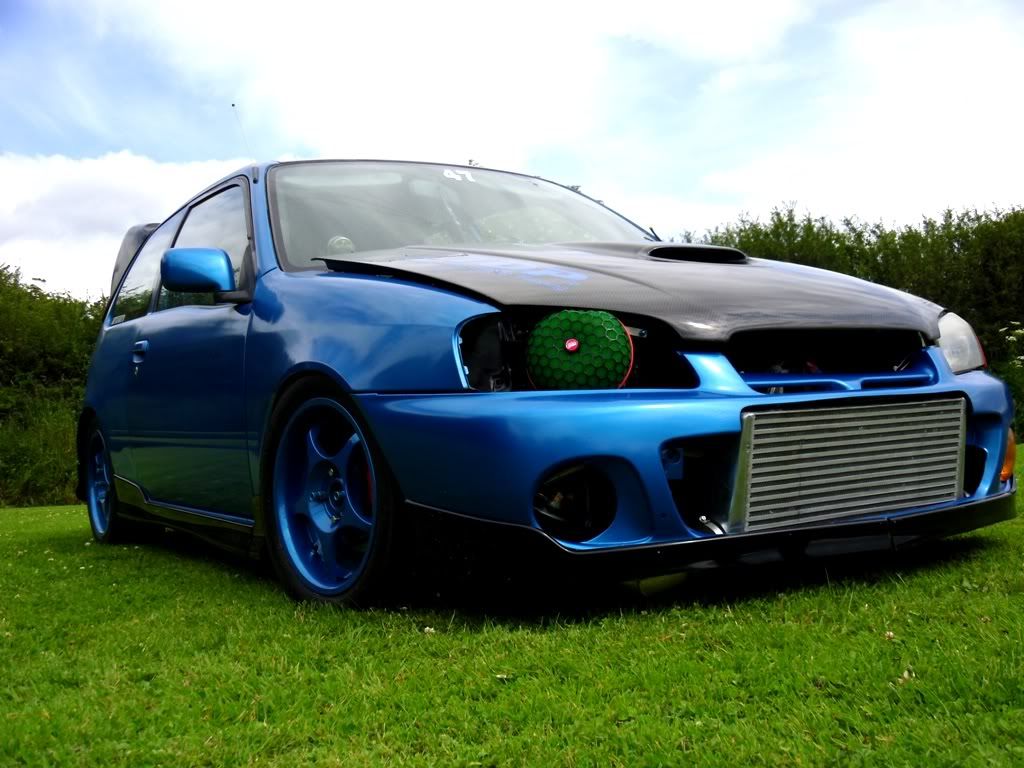
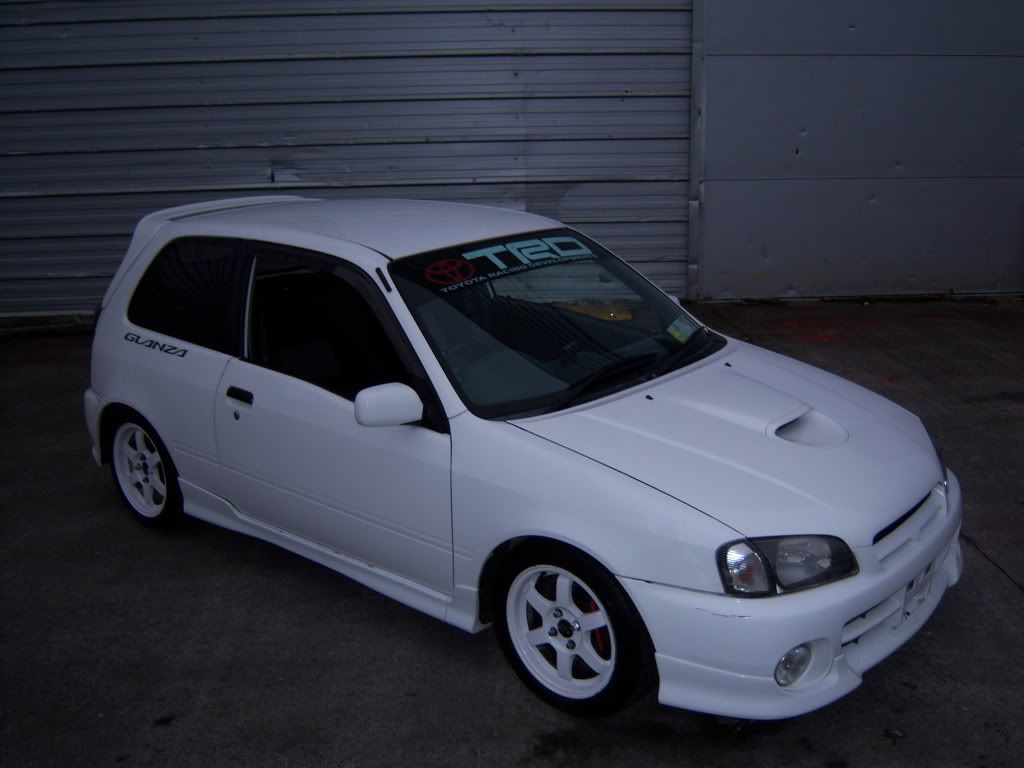
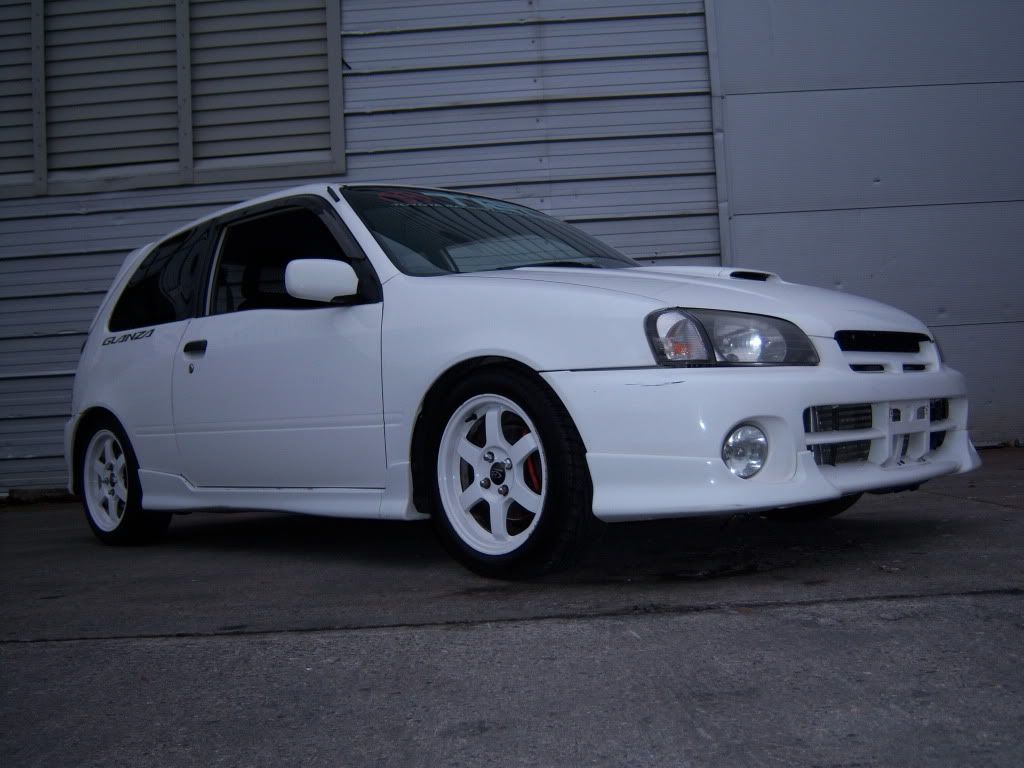
Got these today dunno which set I prefer tho what yas think lads? There's a few 98 spec Glanzas after appearing around my may that are white with bubble lights and white Rays wheels or White Rota Grids. I want to be a bit different so am putting on white standard Glanza alloys and maybe these lights. Not sure though.
Both sets are mint...
-
Well AnimalGT never posted any build thread whatsoever so I certainly wouldn't say I'm as bad as him lol. Just had this before mate I modified my Glanza the way I wanted some mods were right for the car others weren't but you don't know til you try. I had every Tom, Dick and Harry before slating parts I used and putting me off certain things and giving wrong or bad opinions on parts I'd used so I just said feck it I'll just keep it to myself to save the hassle.
I wouldn't be on this site if I didn't have an interest in tuning these cars I am here to learn and also share my own experiences but sometimes, as you know yourself from modding your own car, these cars can just turn out to be a complete head melter! Lol
-
Looking well rob keep it up
-
Leader boards and pats on the back don't really interest me mate. I just wanted a fast road car and that's what I got. Don't want to give away too much about the spec
-
Taggy it's a homemade piece of sheet metal fabrication lol. Looks the part though doesn't it

-
That power on 550cc? Also interested in turbo setup?
No I recently upgraded to 1000cc RC Evo injectors as it says near the end of the post.
Your not the only one interested in where the power comes from mate ;)
-
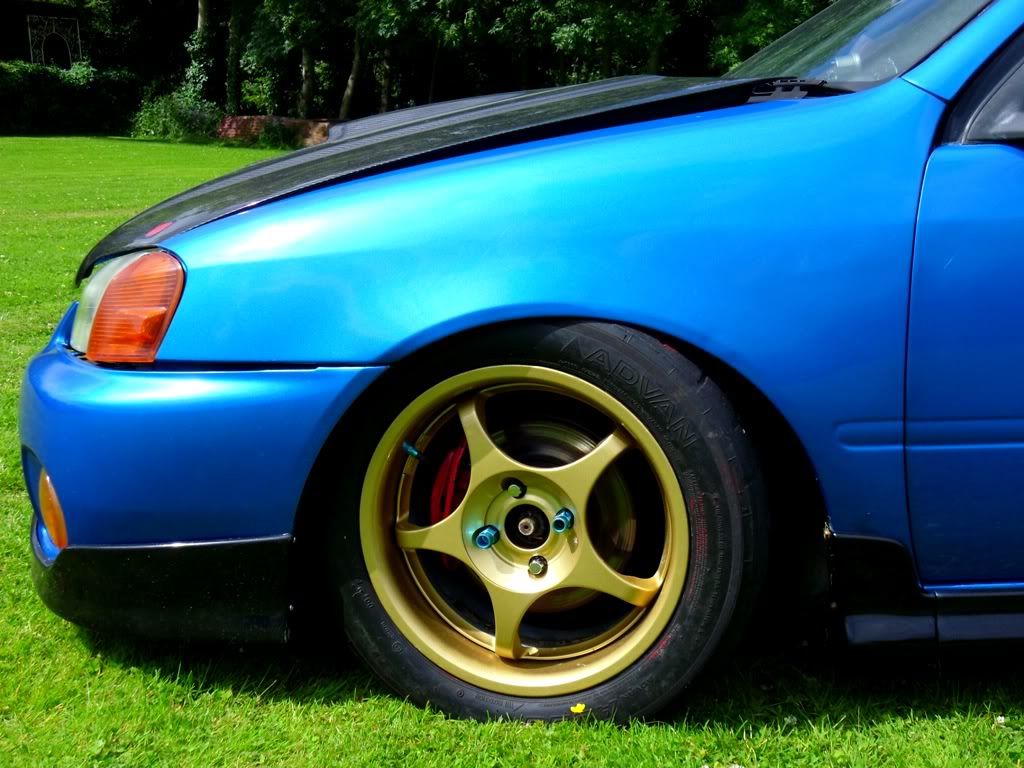
Yeah I hated the wheels aswel mate. They are gone off the car now. Wanted to do something unique and not go down the Superlites route so have 14" standard Glanza alloys here getting painted in 040 white for it
-
I have all angles covered lol totally obsessed with them now at this stage! The boxy is my old school baby and the white one is mint. The track car is just sat in the shed stripped at the minute. I had a mint red glands as a runaround but sold it to a Donegal boy today for good money. Was a real peach of a car only 80,000kms on it was in storage for 4 years before I bought it
-
Yeah it's a bit leggy. That's why I'm hesitant on fitting cams they can only add more lag to it. Gonna run VP Imports fuel it's 120 Ron. We should get big bang out of her then
-
What turbo are you running now? Thats some figures to get on Pump fuel!

A big one ;)
-
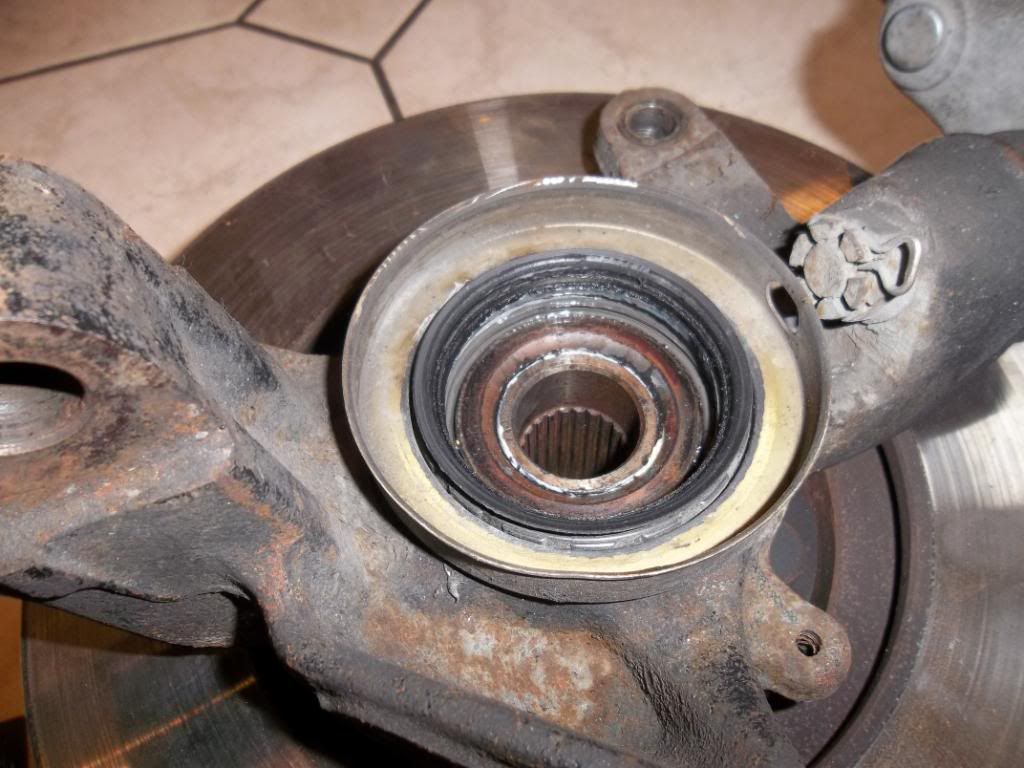
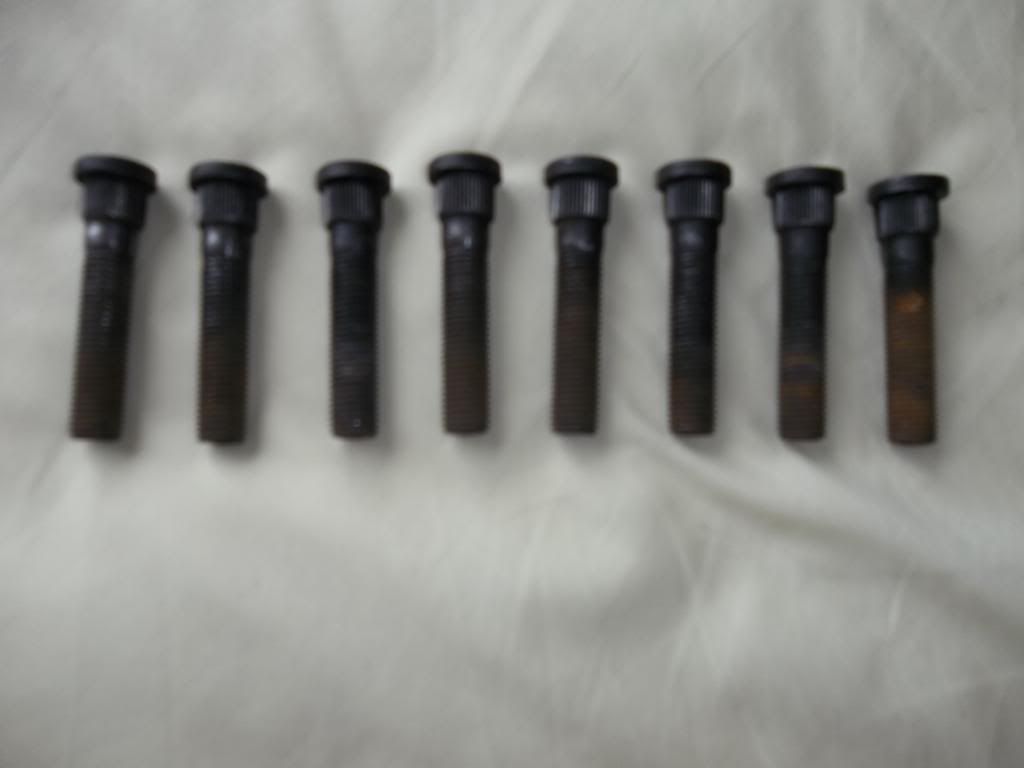
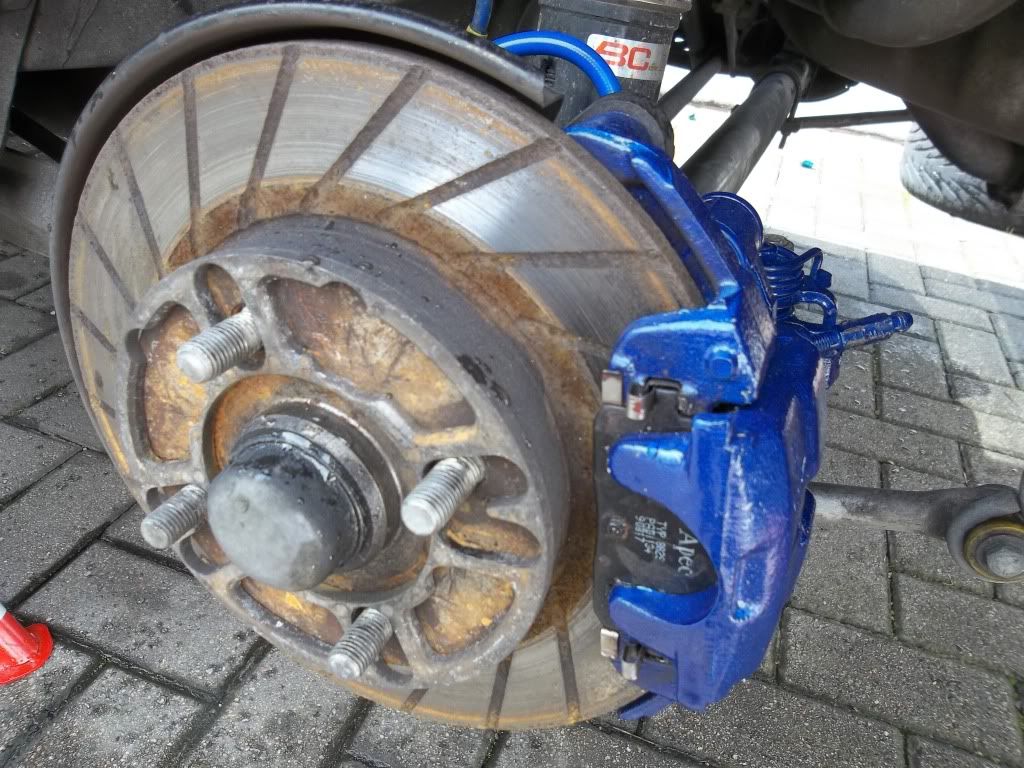
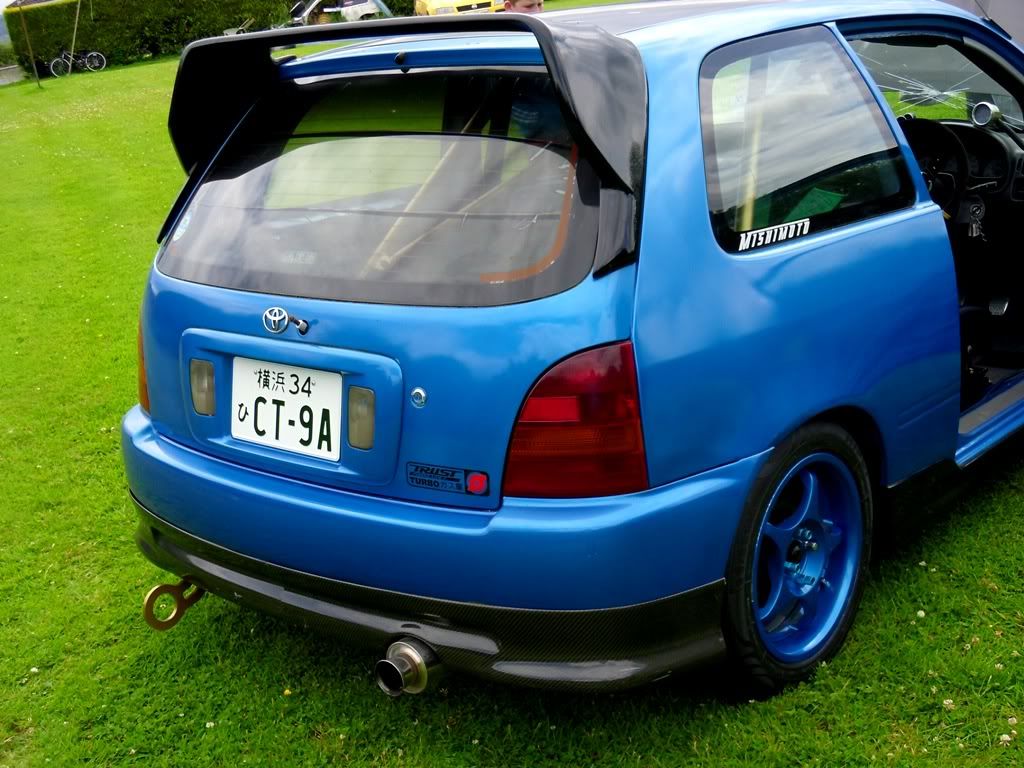
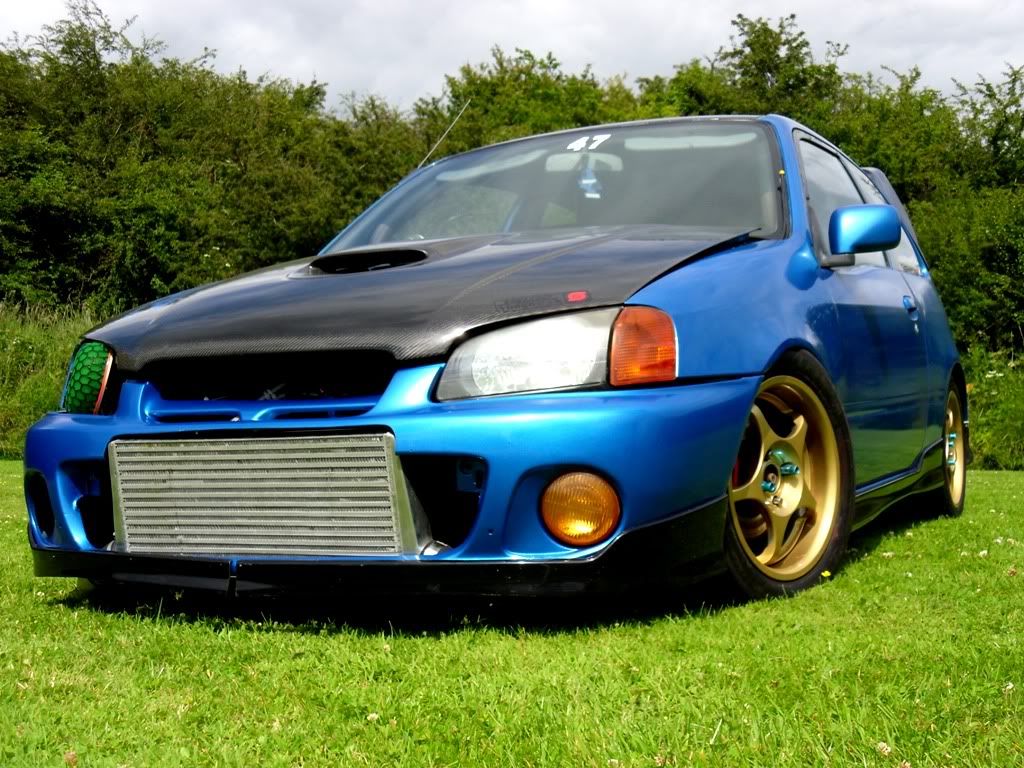
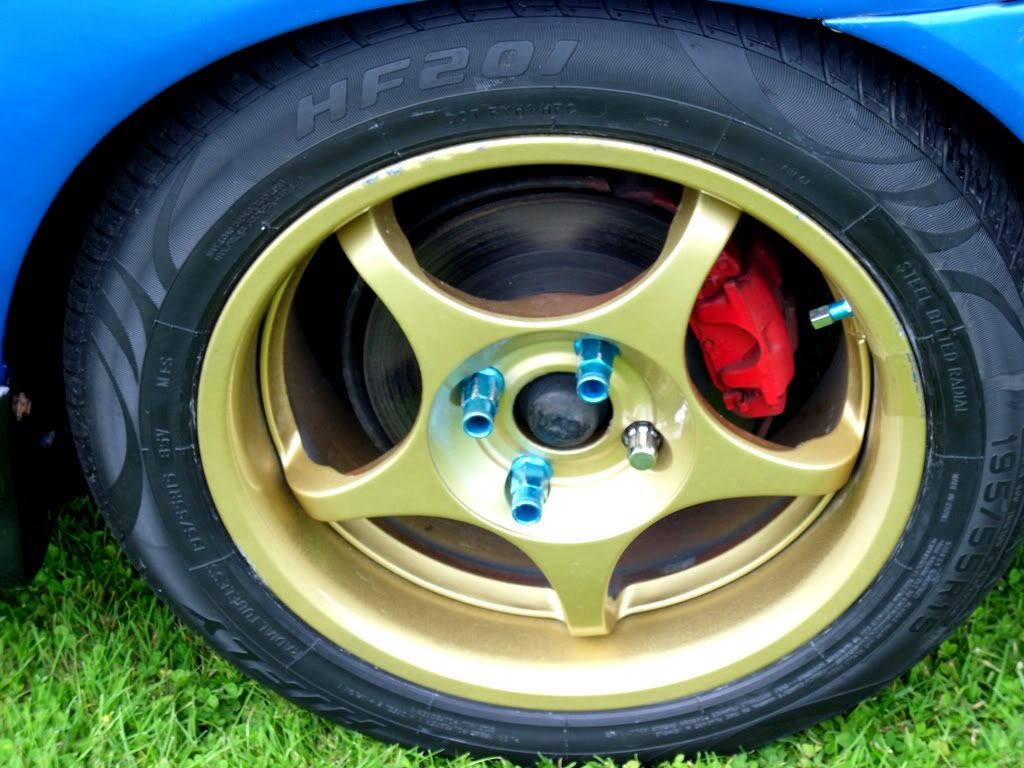
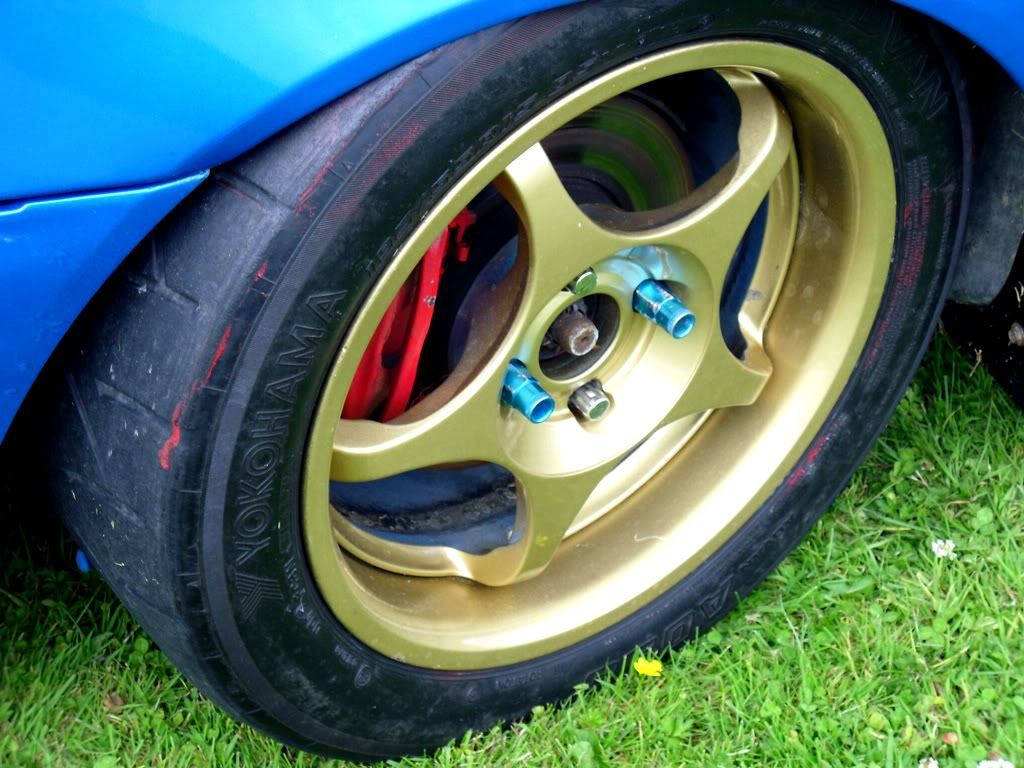
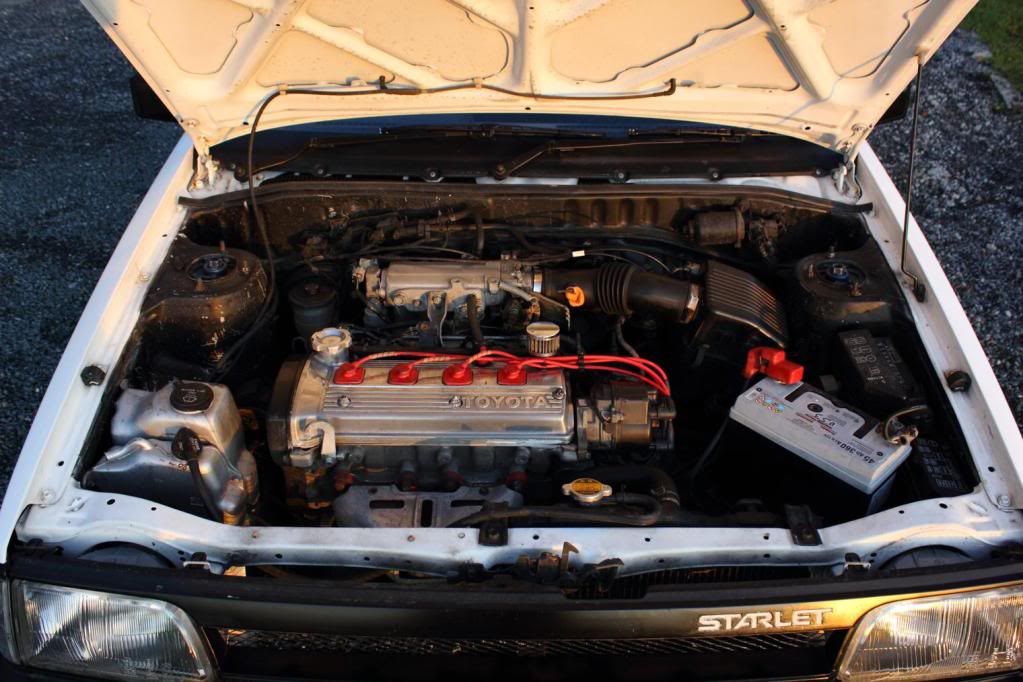
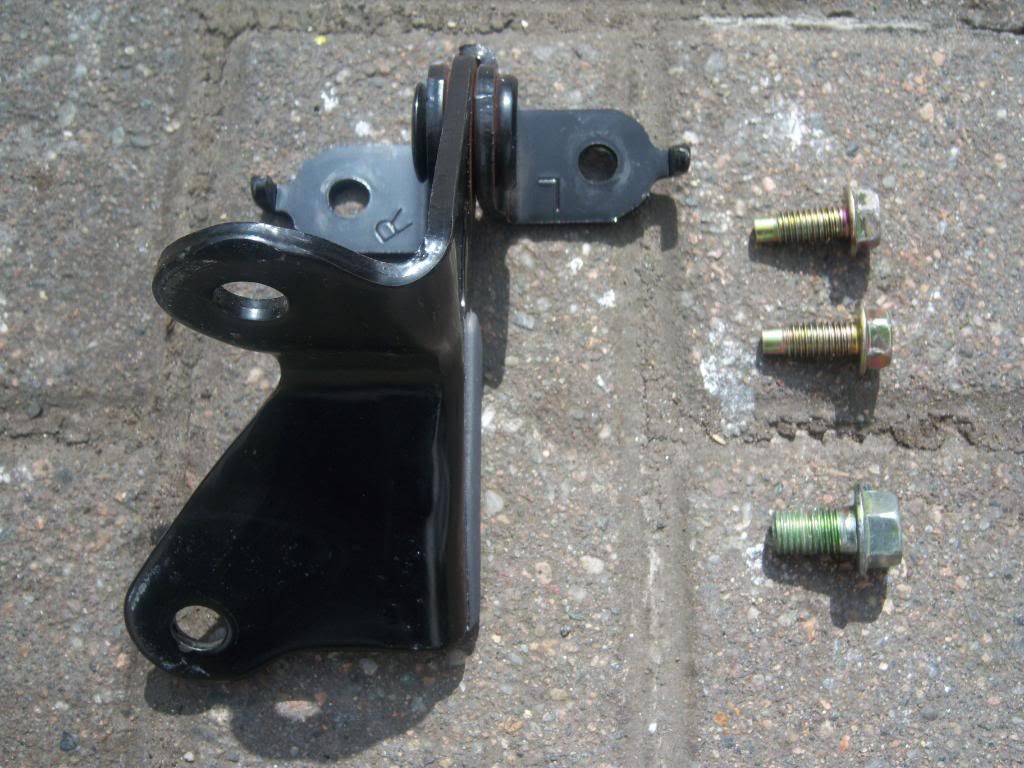
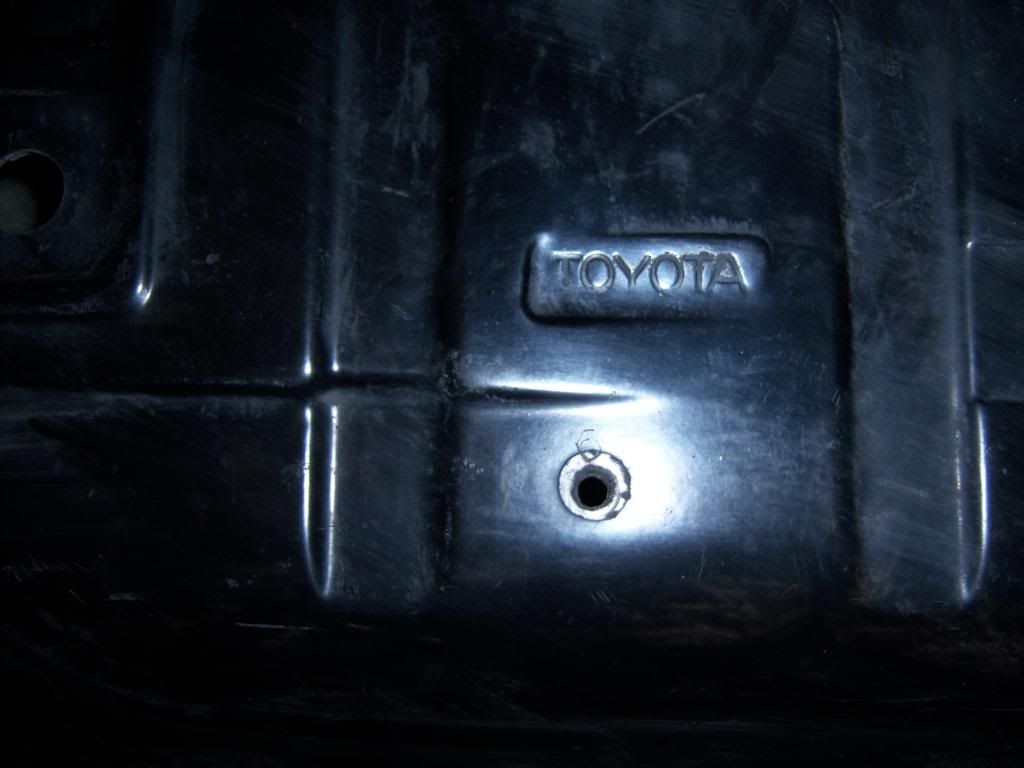
In the meantime I have started to upgrade my brakes. No point in running such big power and not being able to stop. I got a set of Toyota Levin twin pot calipers for the from with custom discs and spacers to fit my Glanza. The wheel bearings on the hubs are almost brand new and the 65mm extended wheel studs will bring the wheel out nicely in the arch. I also got a new set of 8 65mm extended wheel studs for the rear to bring the back wheels out the same as the front.
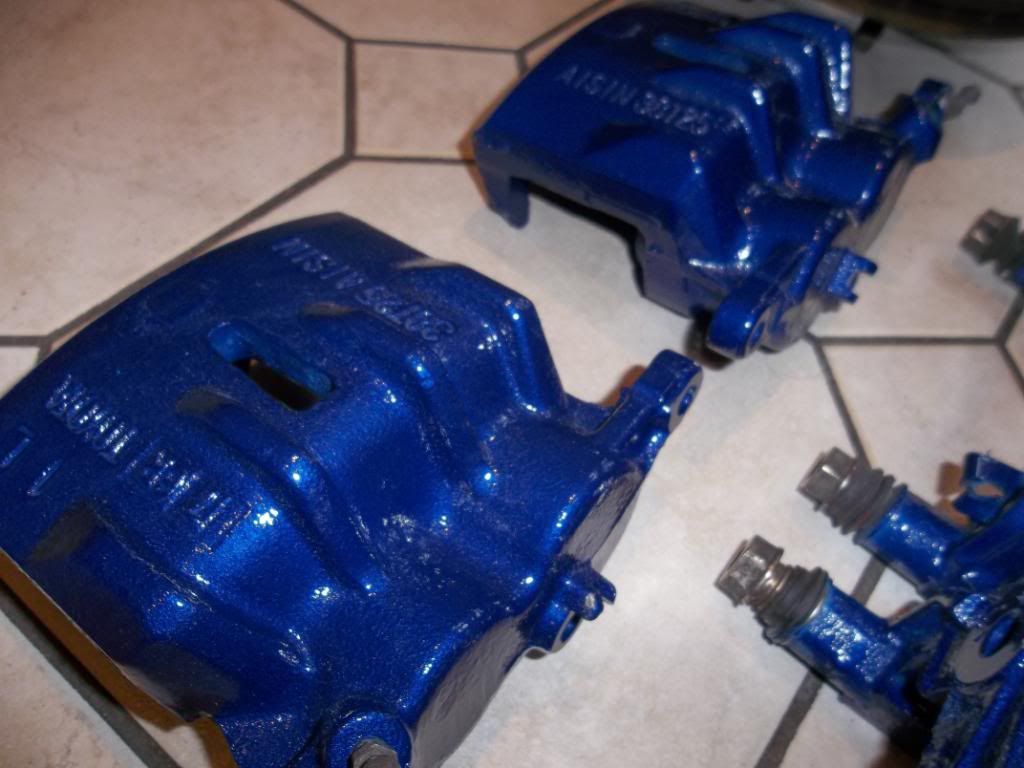
I stripped off the old discoloured red caliper paint and resprayed the calipers and carriers in Performance Blue. This colour matches my engine bay hoses and oil cooler so helps in the overall look of the car. They came out well...
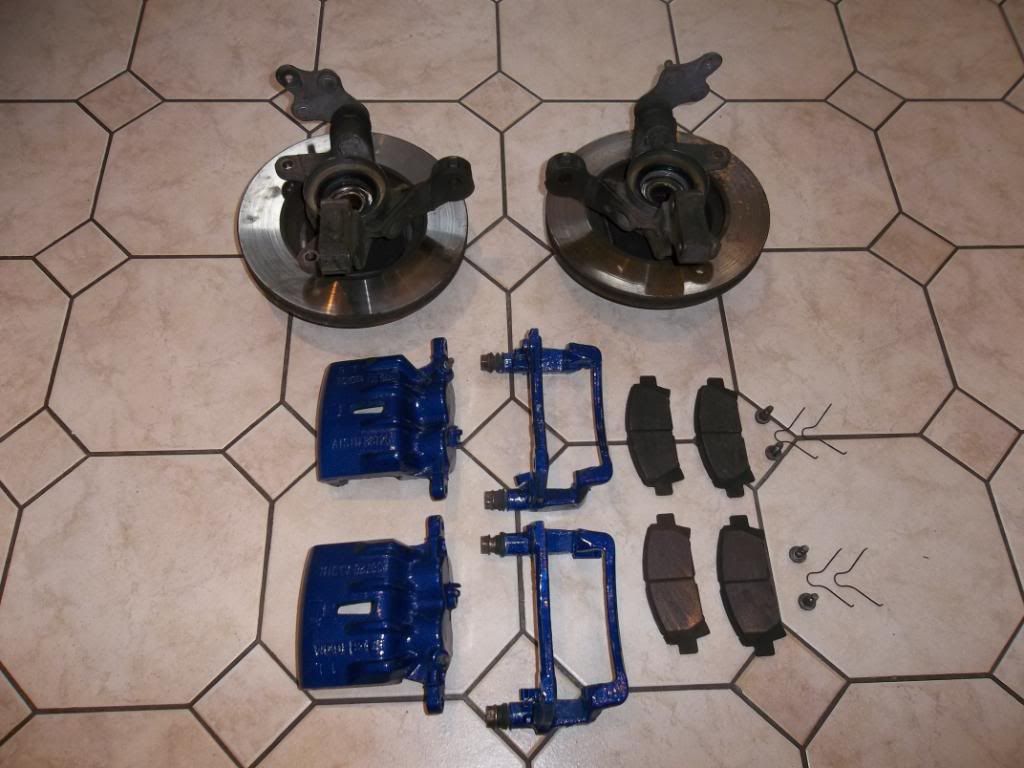
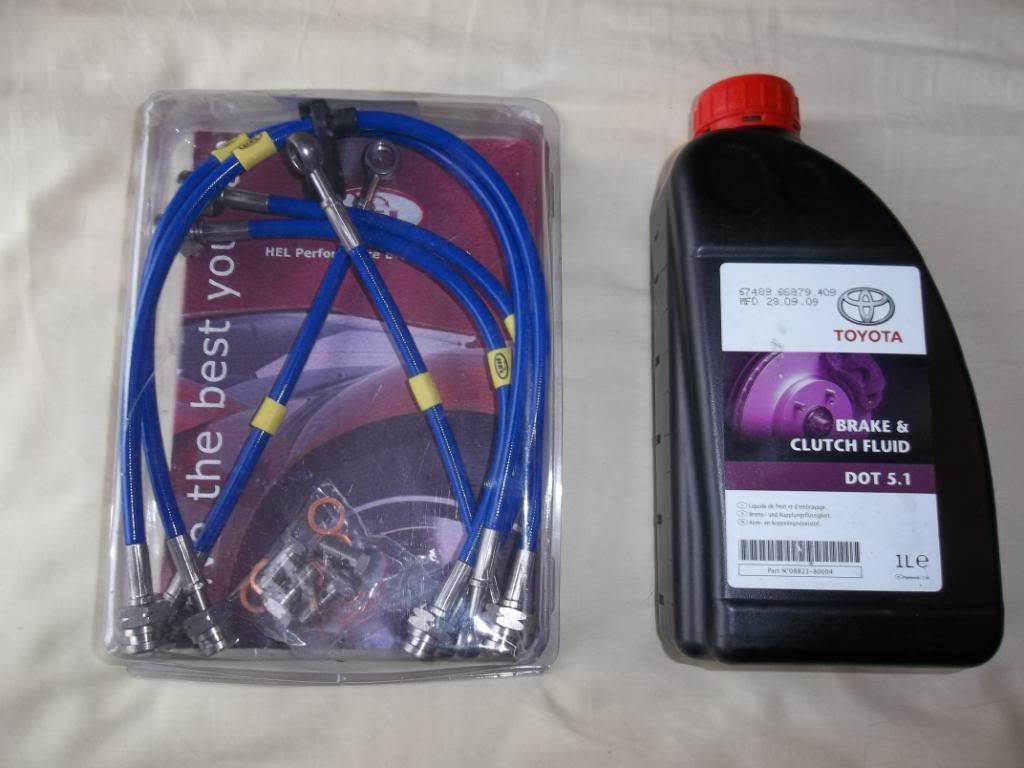
I also bought a set of 6 brand new HEL braided brake lines in blue and a bottle of genuine Toyota brake fluid.
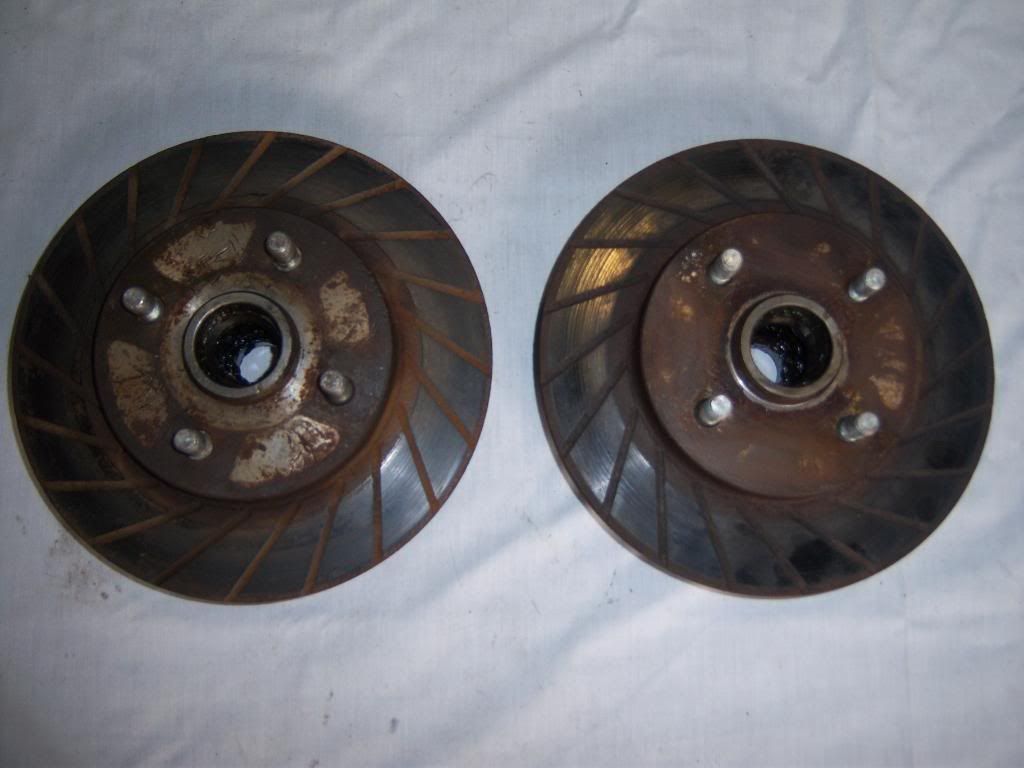
I am fitting these rear grooved discs to help the back a bit, although the majority of the braking is to the front. Just have to press in two new rear wheel bearings before they are fitted...
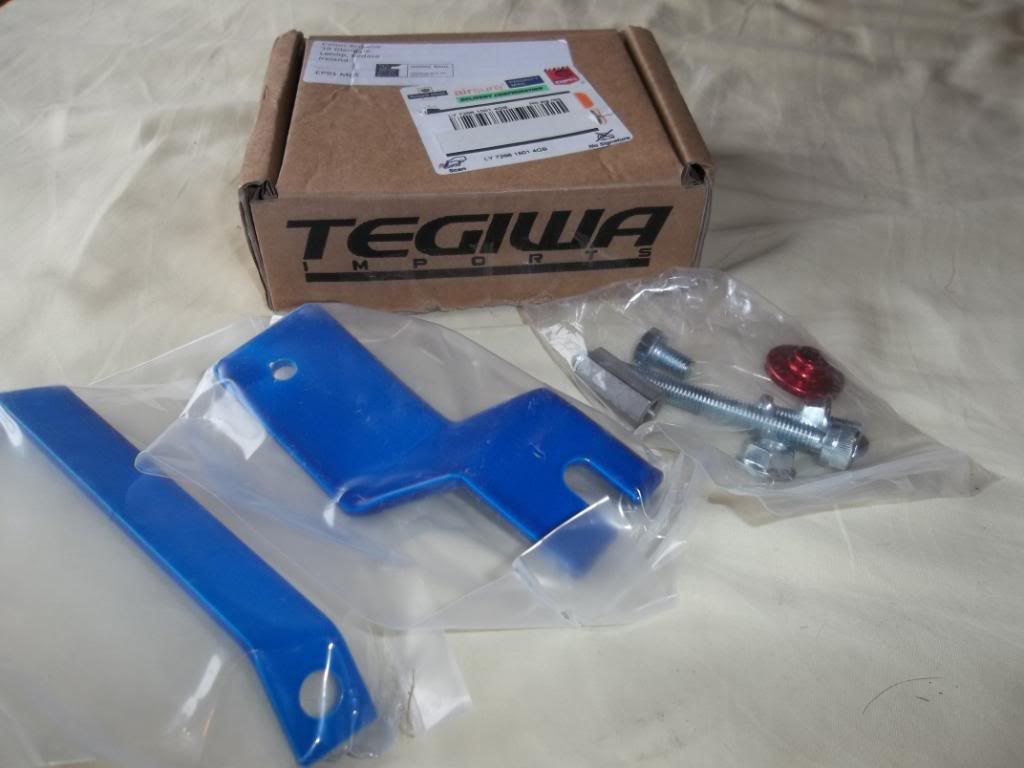
To finish off the brakes I have just received a Tegiwa brake cylinder stopper, again in blue. The bulkhead by the brake master cylinder flexes under heavy braking, which can sometimes lead to a spongy brake pedal feel. This powder coated stopper bolts to the bulkhead and brake cylinder itself, dramatically reducing this flex.
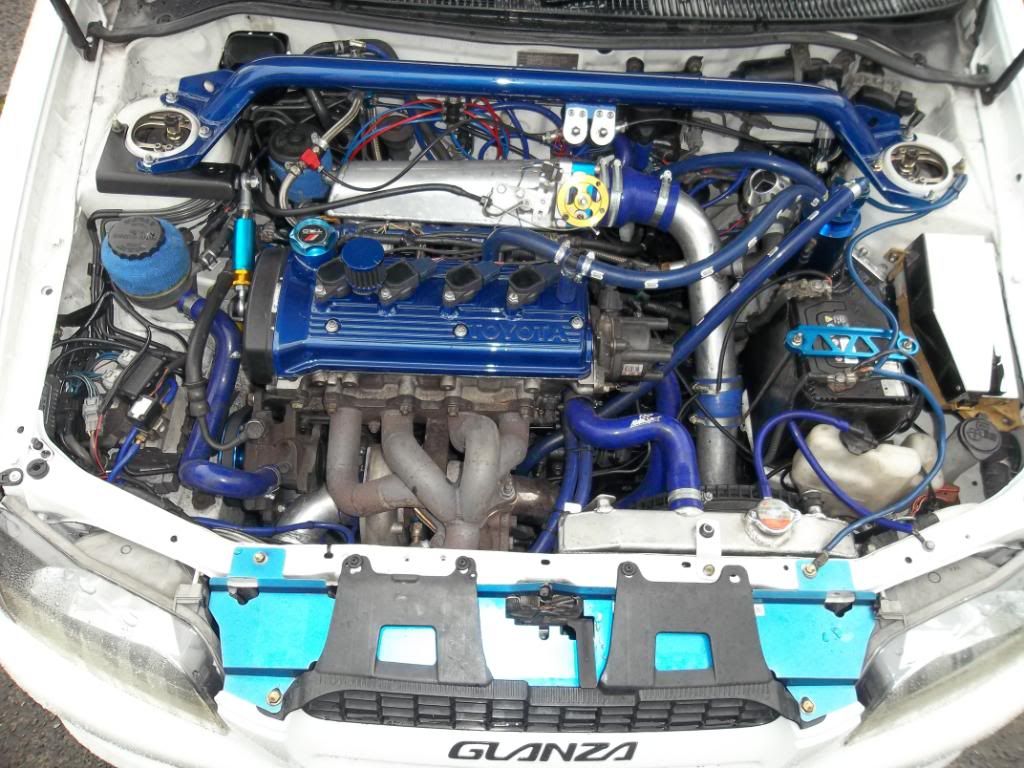
Went a bit mad with the spray again today! I want to colour co-ordinate my whole engine bay white and blue, and maybe some polished stainless aswel. I am toying with either a blue, white or polished fuel rail until I can afford a high flow fuel rail. What do yous think?

In the end I opted for the blue fuel rail. It was a pig to fit with so many fittings in the way but it looked well once finished. Whilst off I noticed one of the rubbers on the injectors was worn so I replaced that too while I was there.

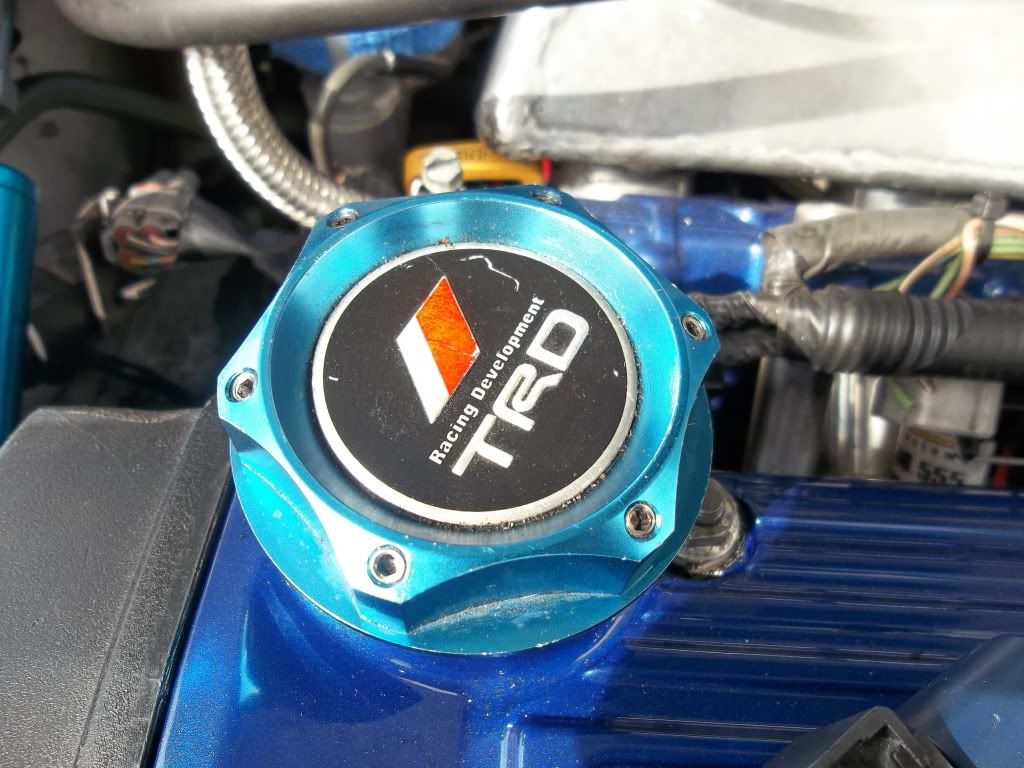
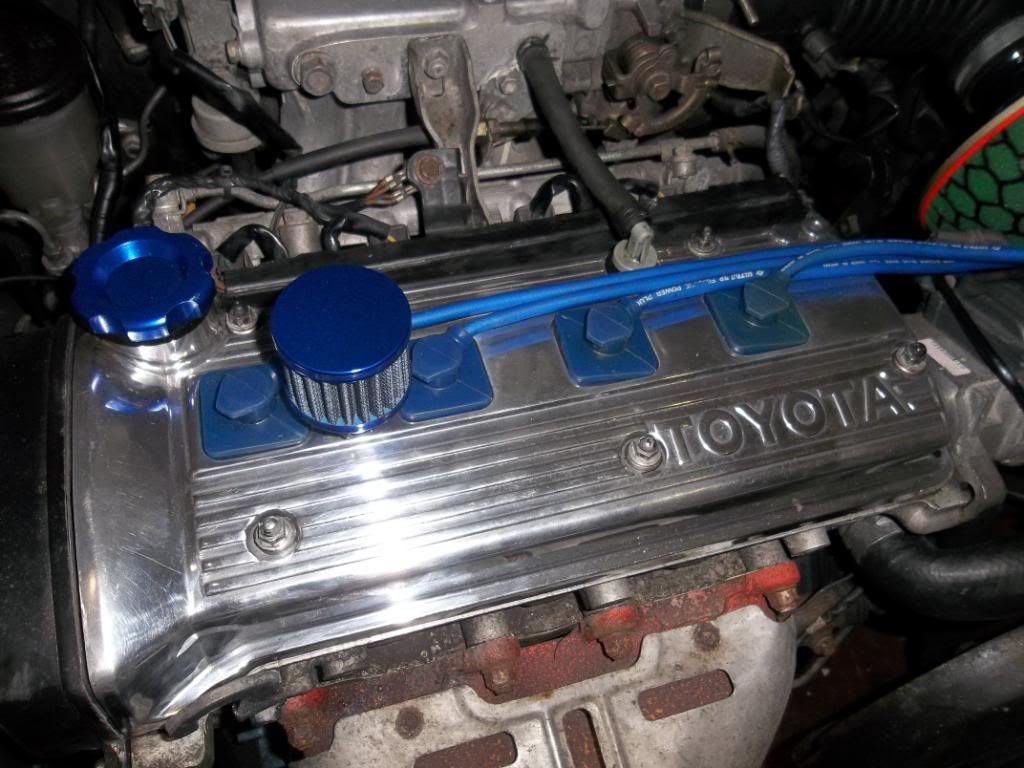
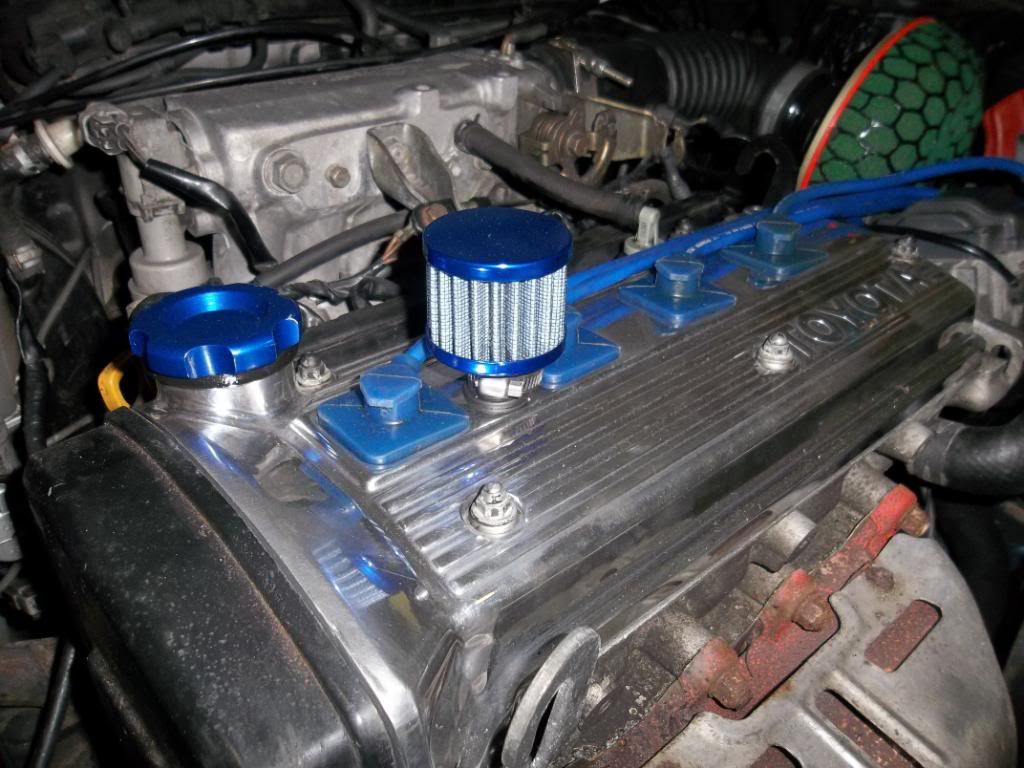
Also fitted a blue genuine TRD oil cap
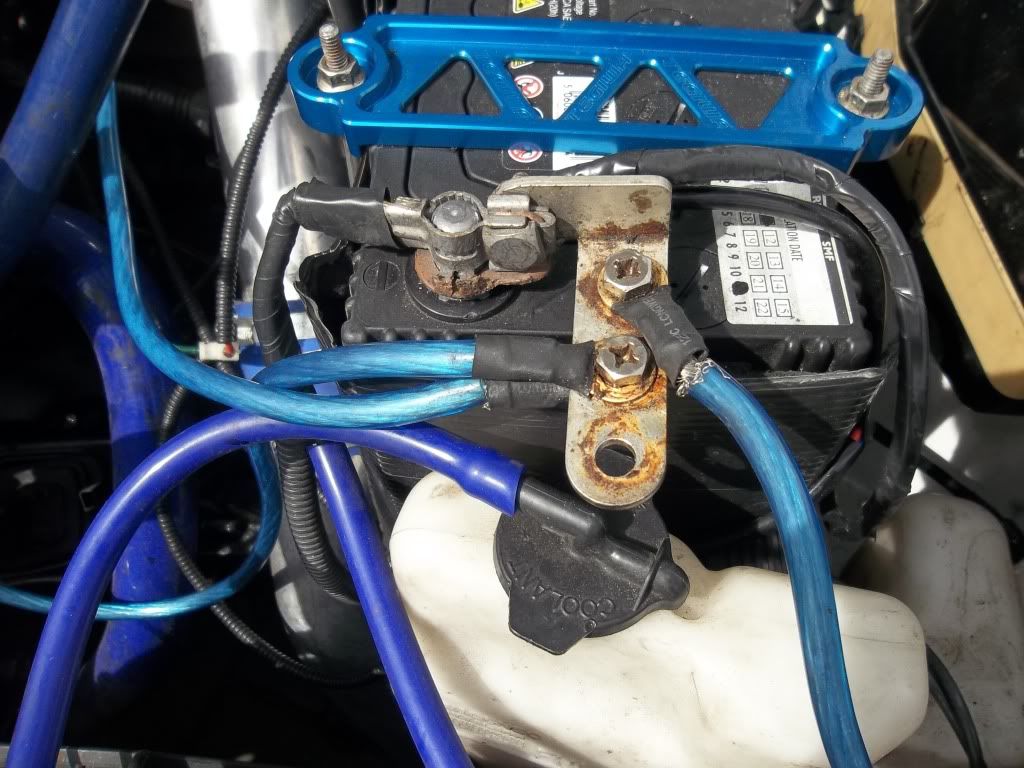
A nice blue earthing kit from a car I broke recently will suit my build down to the ground


I want to remove and sand down and polish the terminals to remove the rust but it's ok for now... Pics of it fitted:
I also got a custom made polished fusebox cover. I really like it
I am going to polish my civic rad, intercooler pipes, dumpvalve, intake etc to match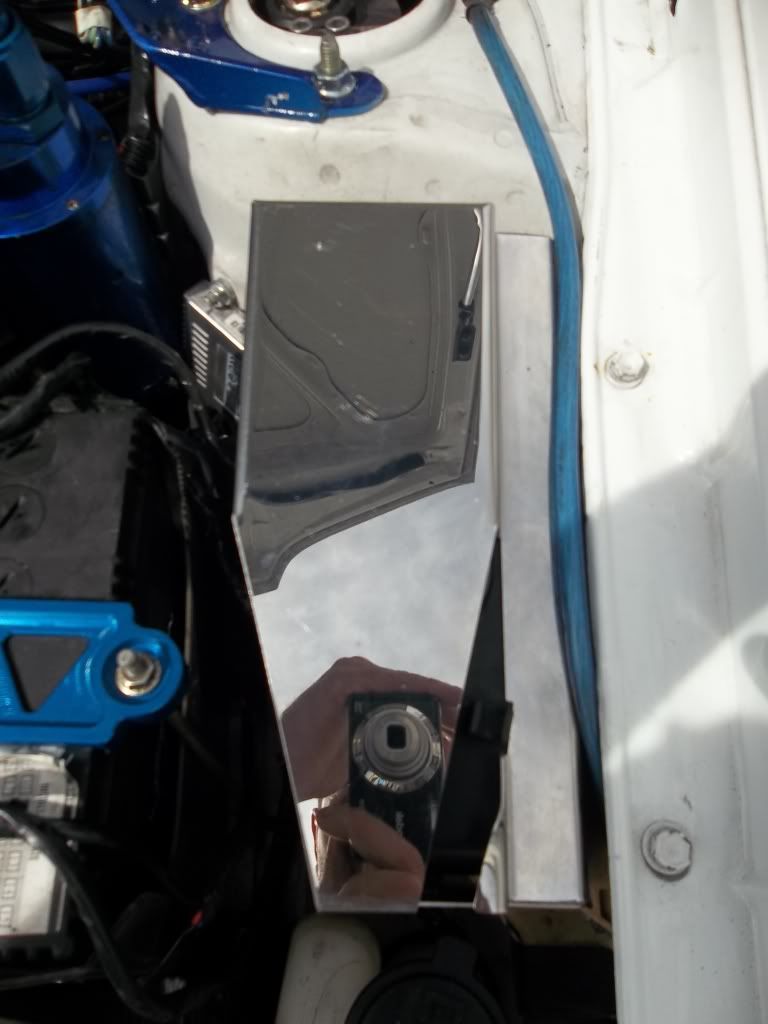
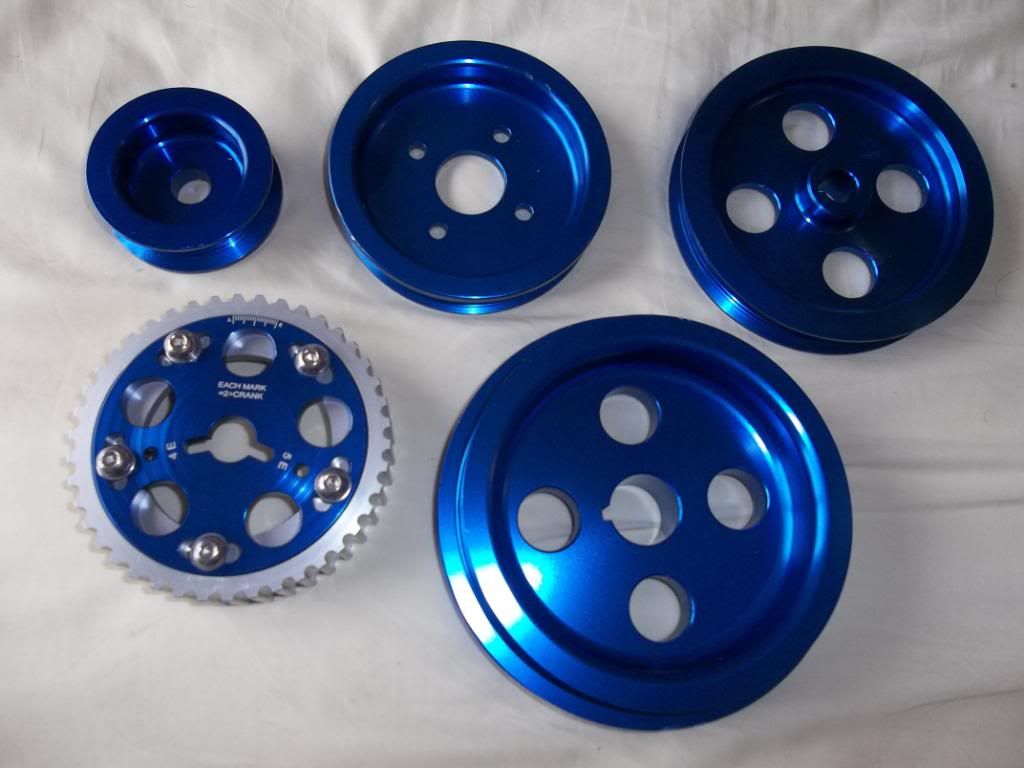
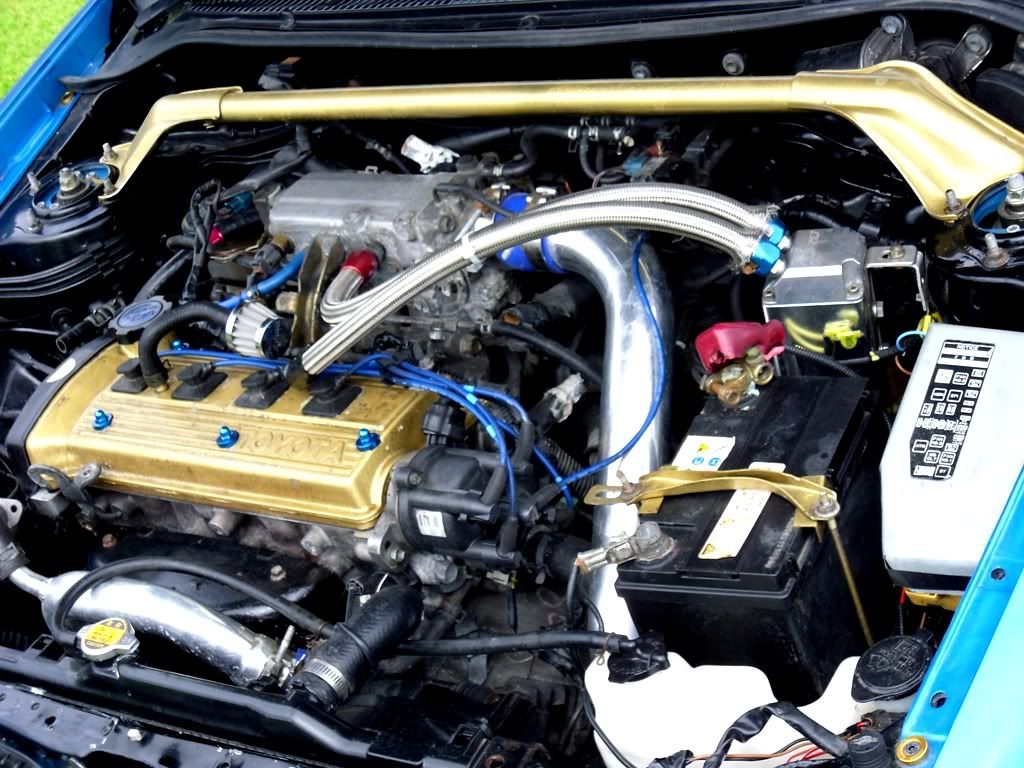
Just got these blue lightweight pulleys and adjustable cam gear from Corofin12345.The cam gear will be useful for advancing the timing on the new high lift cams. Cheers mate
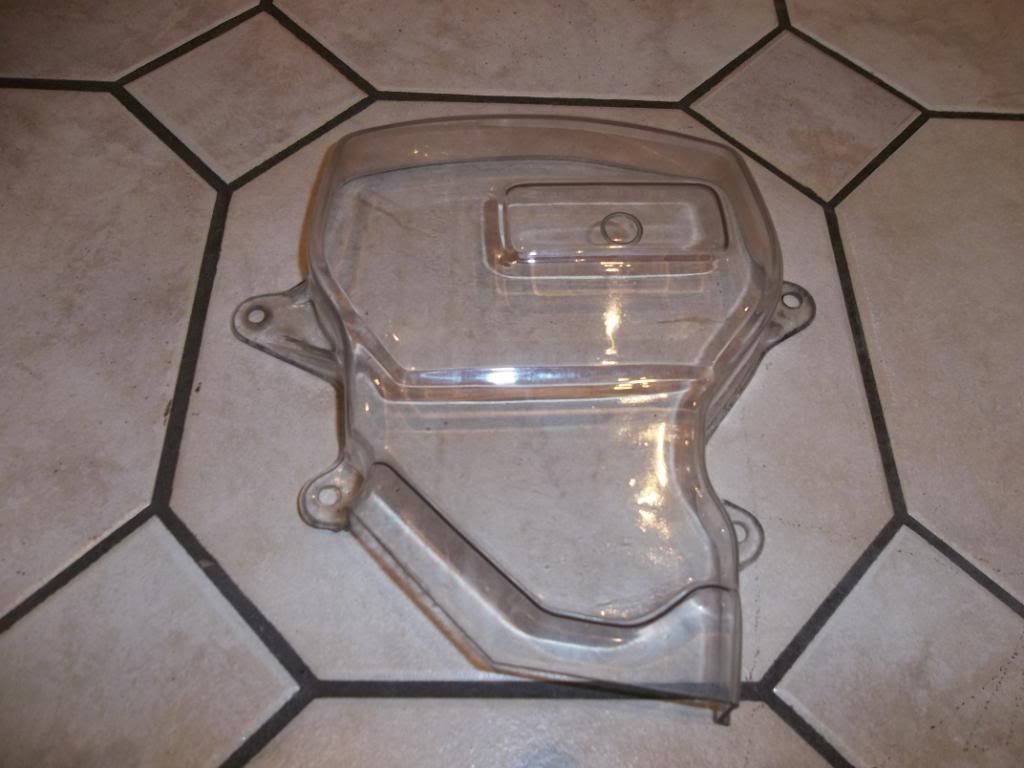
To match the new pulleys I think this clear cambelt cover will look the job. Can't wait to fit it. First pic is my one and below is one fitted on another car...
Everyone knows I am mad for original factory extras that came from Japan and was after a key barrel light and footwell light for ages. I got a car in with a set in it. What luck!
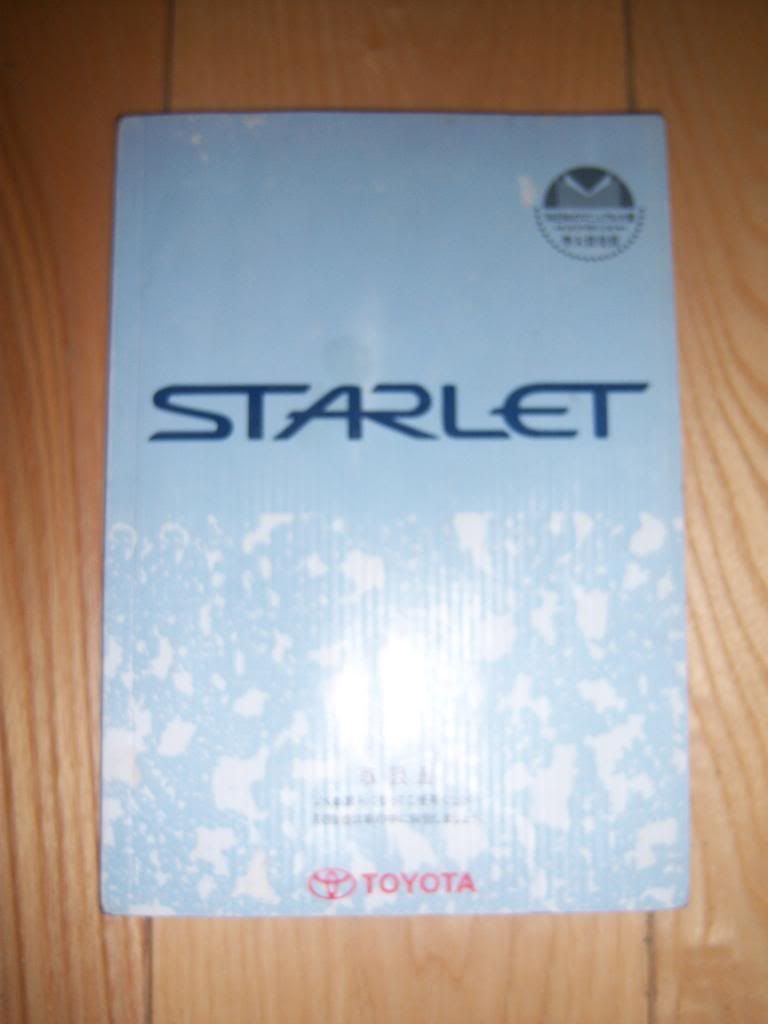
Added a few nice new books to my Starlet literature aswel
All original copies and all "may not be as advertised". Clockwise from top left: Original Hyper Rev Starlet Tuning Magazine in Japanese, Original Glanza Brochure in Japanese, Original Starlet Owners Manual in Japanese, Starlet Workshop Manual in English, Starlet Owners Manual in English and Haynes Starlet Owners Workshop Manual.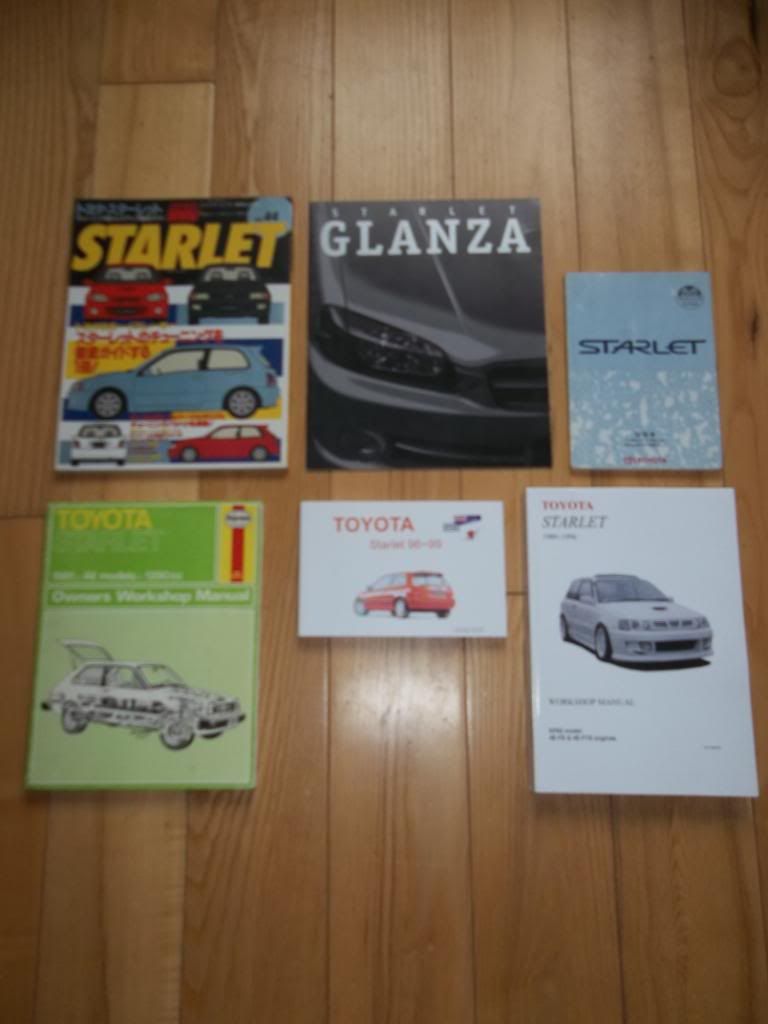
/>http://www.youtube.com/watch?v=thJQycmiBHI&feature=youtube_gdata_playerA 356bhp M3 was smoked by a certain white starlet... lol
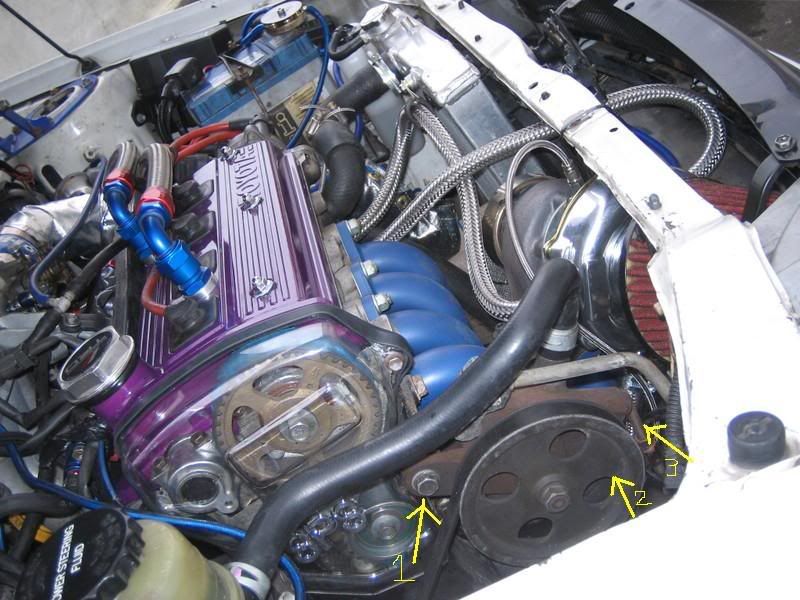
/>http://www.youtube.com/watch?v=41wC0n3LNTYBeen busy with the car this week. I fitted the Levin twin pot brake kit to the front and also the HEL blue braided brake lines.
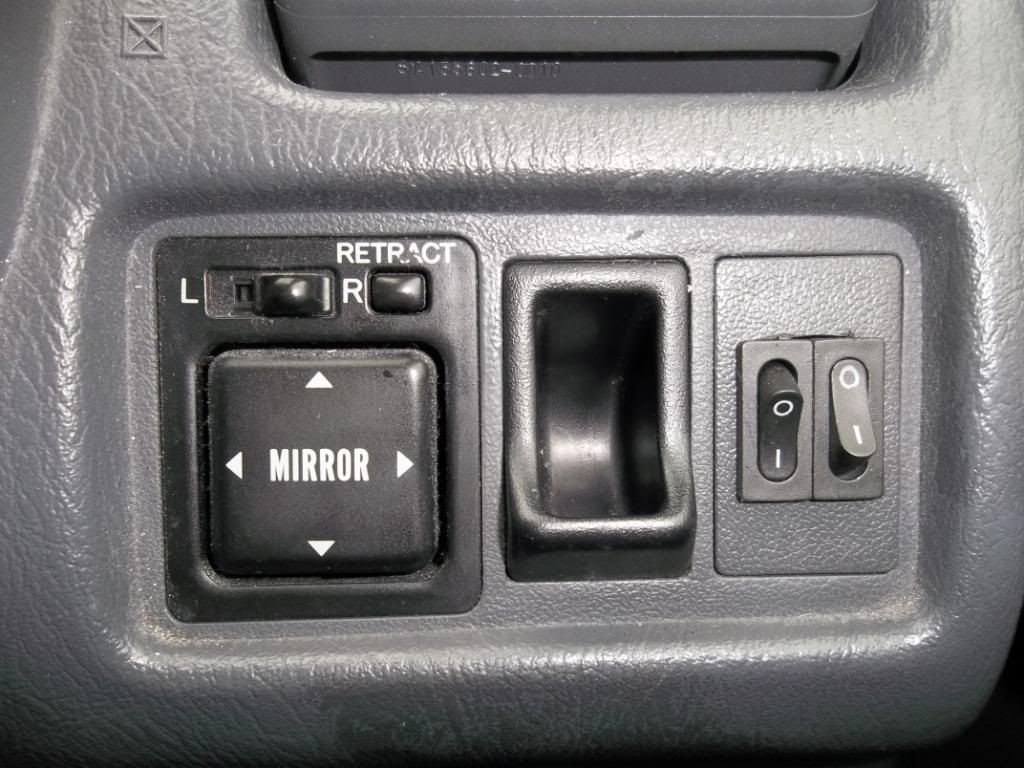
Plans for tomorrow is fit the rear grooved discs, braided brake lines and rand new rear padsand change the alternator as the bearing is making noise. I have the solder iron ready to solder in my new Defi gauges. I modified a m.int pillar pod I bought to accomodate such a large gauge. The fit is superb I am very happy with it. I also have my Glanza factory extra double din CD player and original Toyota speakers to fit tomorrow too.
I got a cool oil filter to match my hoses


This is the car as it stands today after a quick wash. Over the weekend I am doing a full bodywork treatment and a complete detail valet plus an engine bay clean
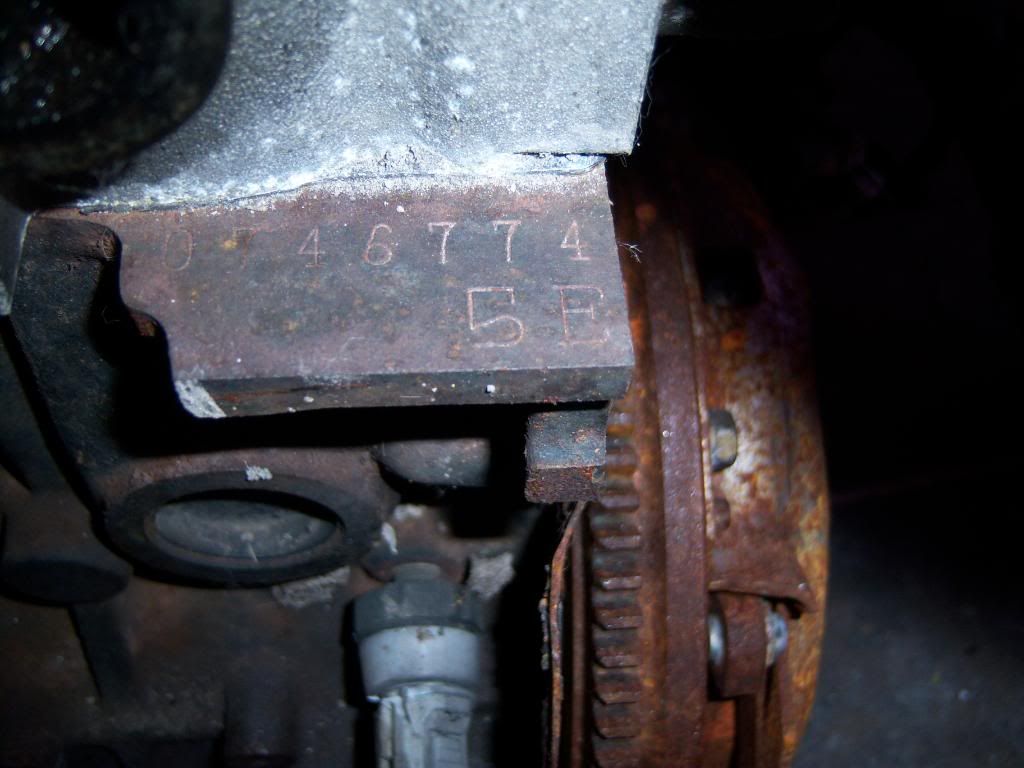
Just dropped the car in to get the noisy head re shimmed today. We checked the shim clearances with a feeler gauge and they were huge, hence the tappy head. I am getting it re shimmed tighter today. I will post pictures and videos of before and fater and see what yous all think.
At the bottom of the page is the new clearances after the head was re-shimmed. Bang on
At least it is right at last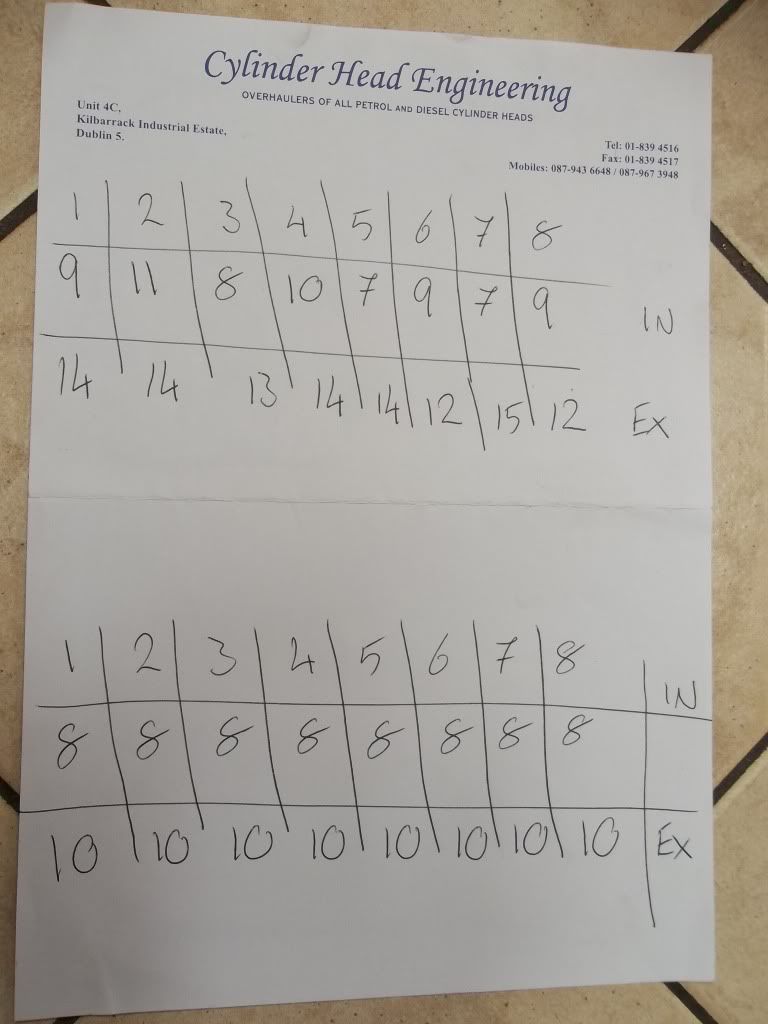
I fancied a change of look and seen these boot struts off a 00 Nissan Micra in the scrapyard today.
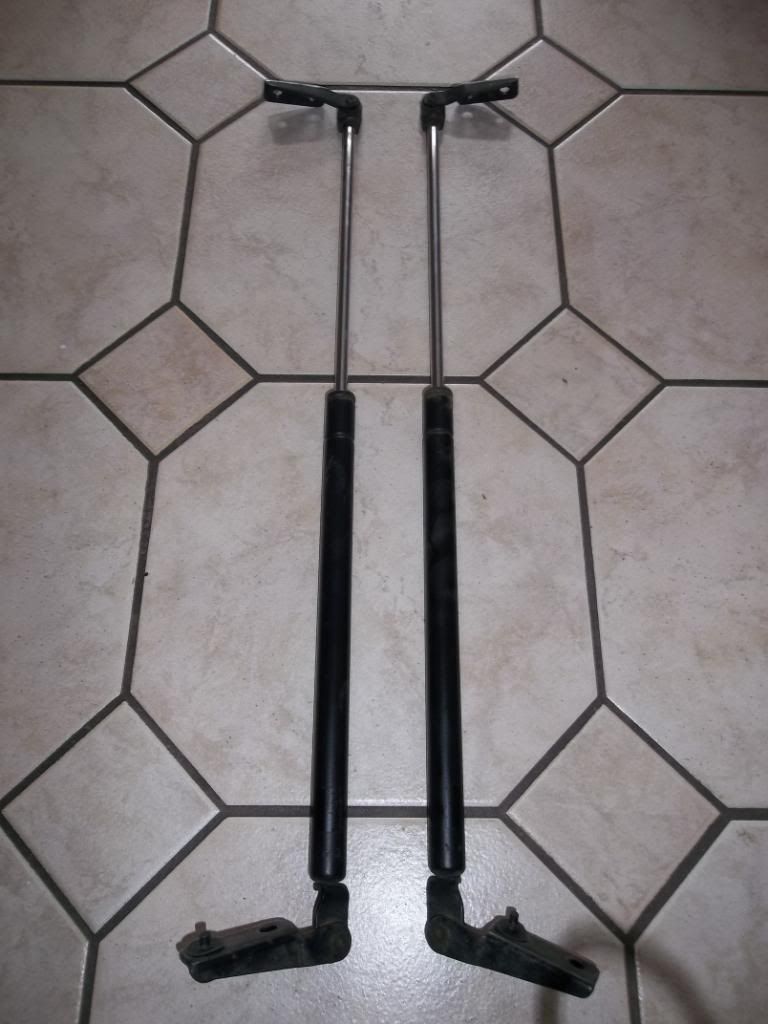
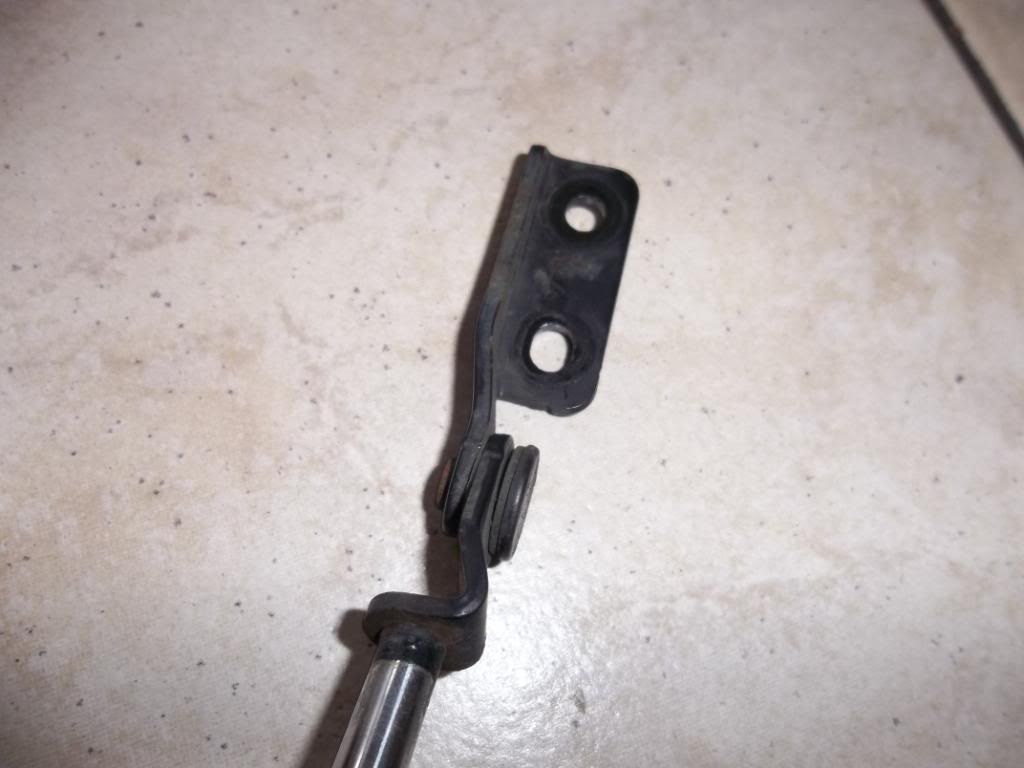
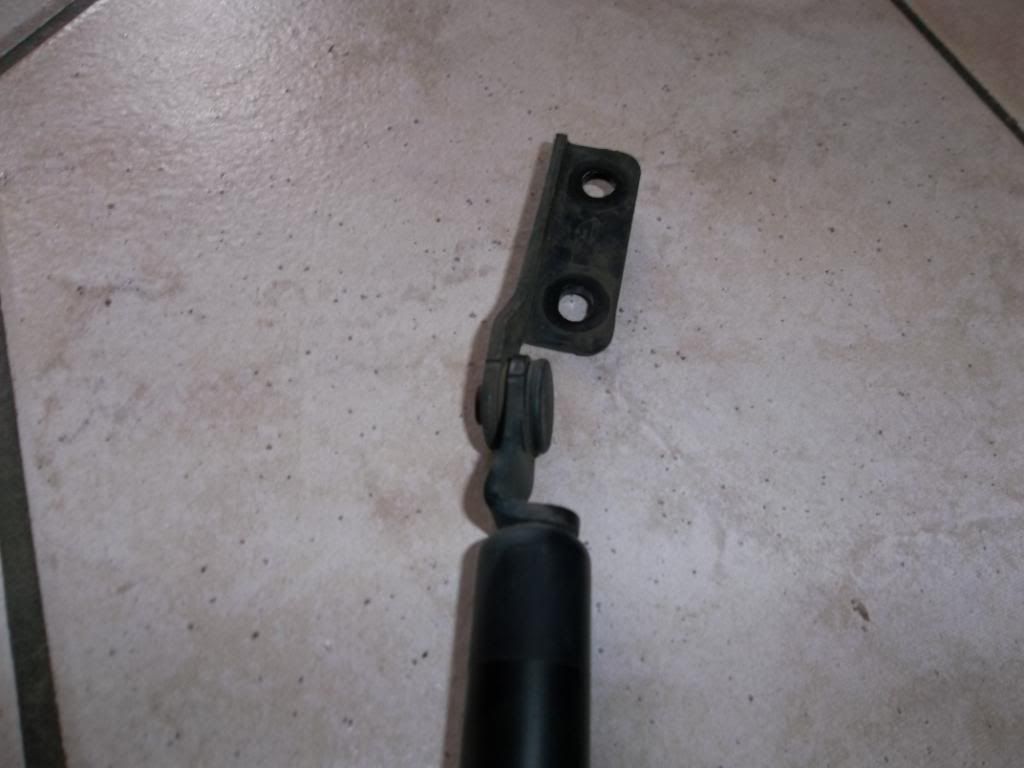
They have screw holes on both ends so are simple to use as nifty DIY bonnet struts. I placed them on the wing and they fitted fine with the bonnet closed so with some careful measuring, marking and drilling this is how they look...!
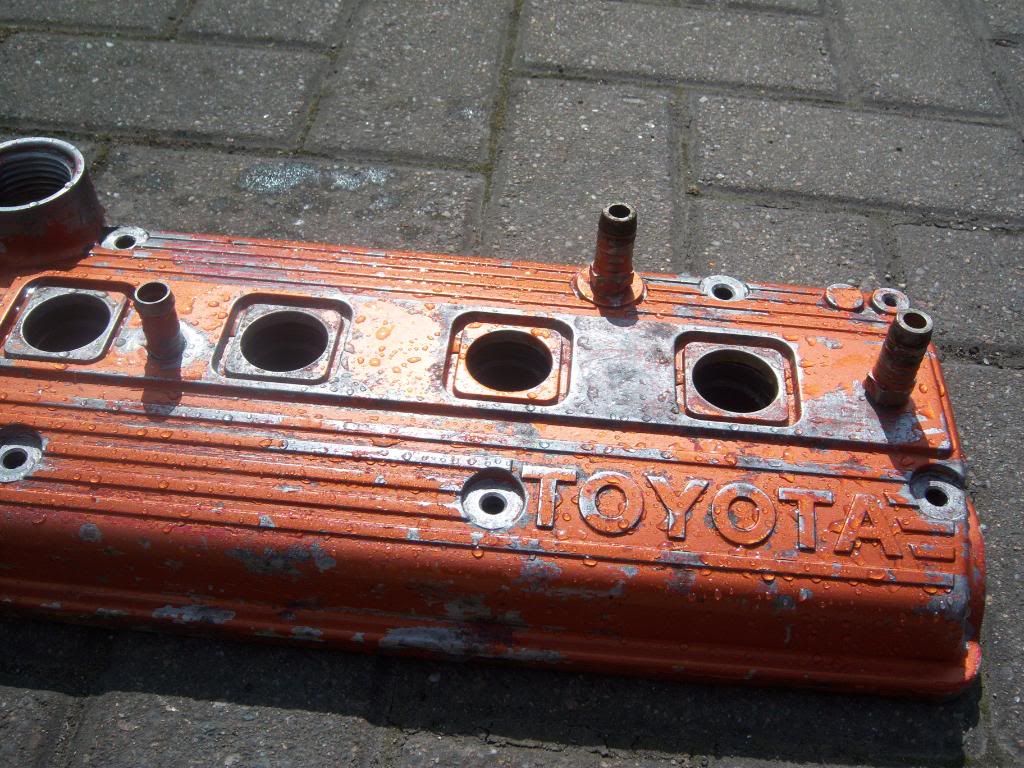
I got my rocker cover powder coated today. Ordinary paint was just flaking off with the heat from the forged engine. I originally got the rocker cover powdercoated white with the raised parts blue but I didnt like it so got it resprayed.
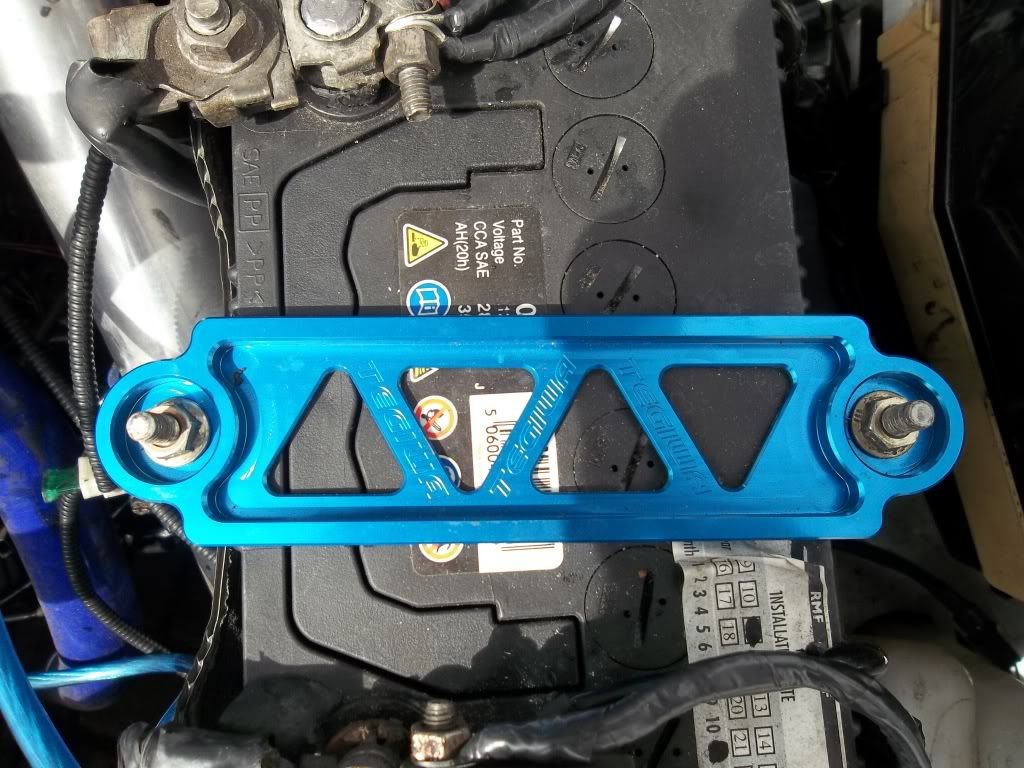
I fitted a blue anodised battery clamp and a few other bits and pieces.
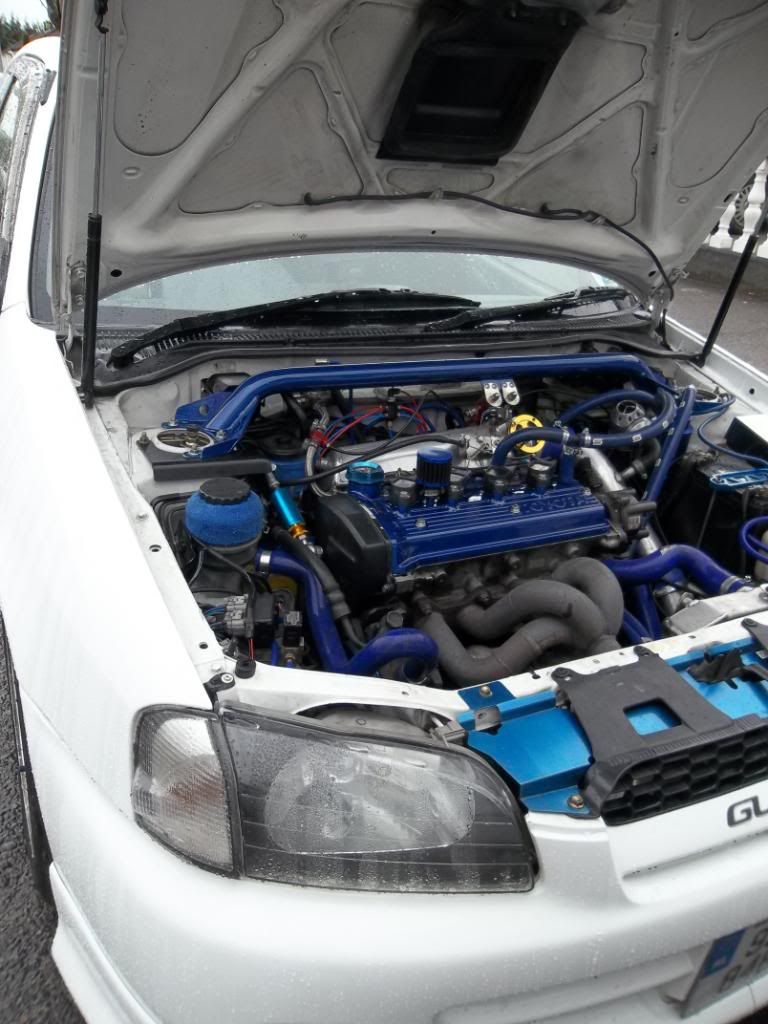
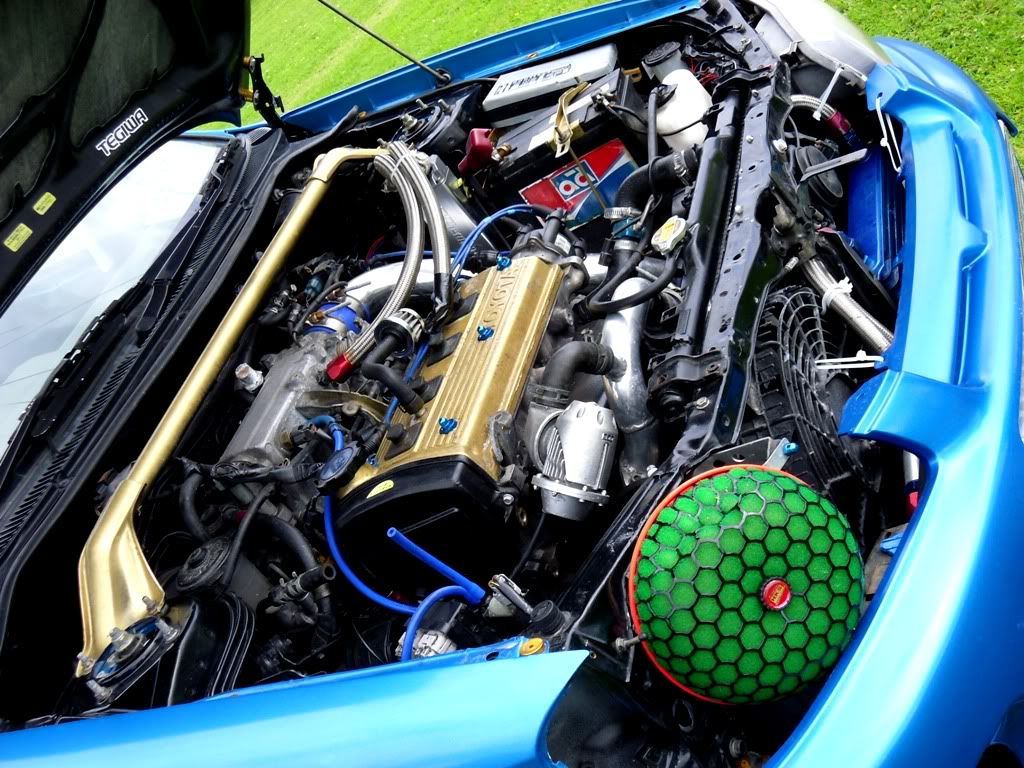
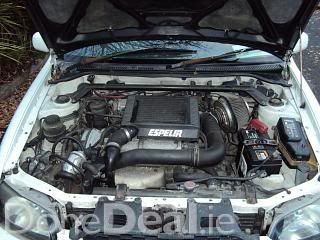
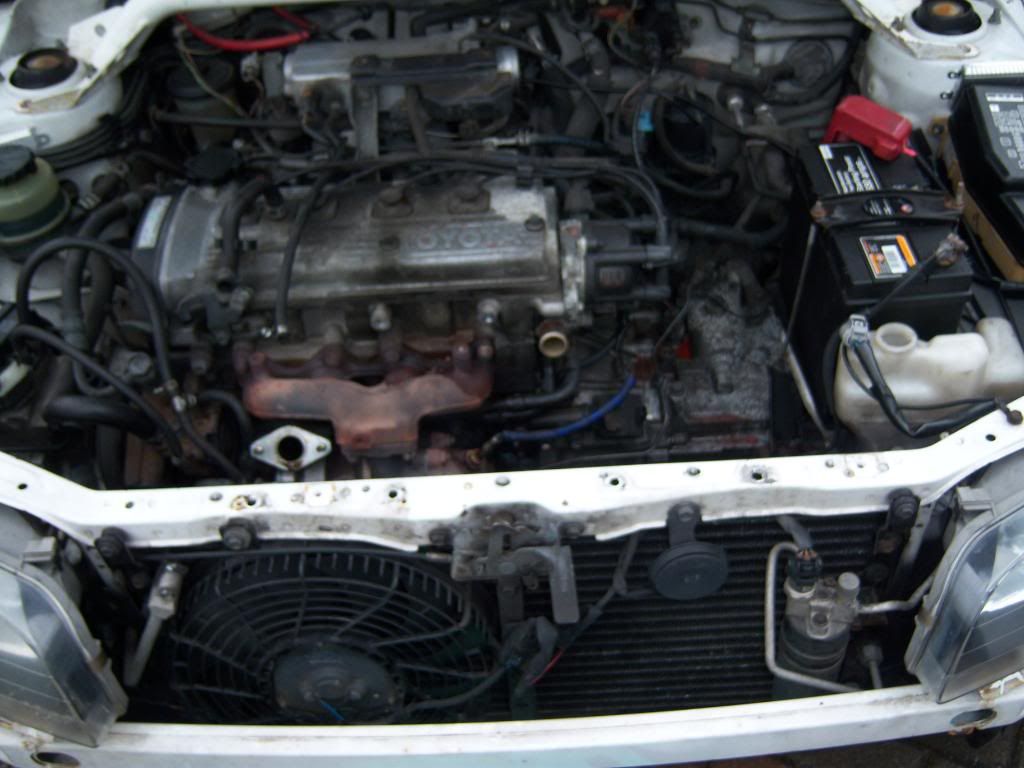
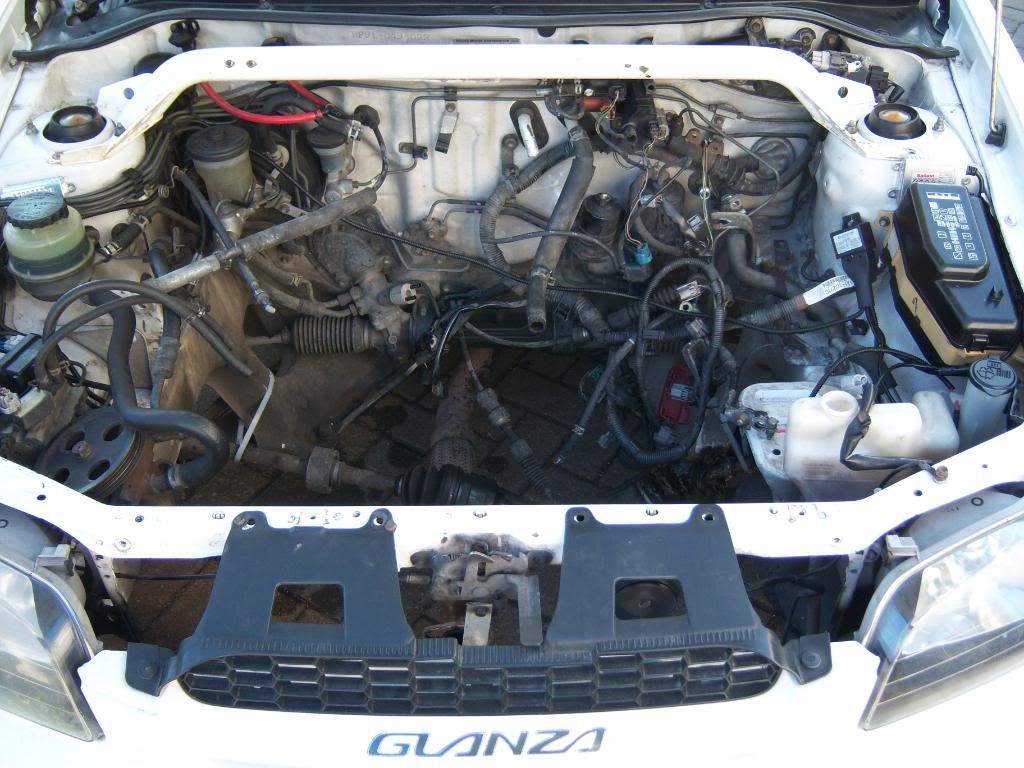
This is the engine bay as it sits now...
The engine bay is still very dirty and greasy but the next plan is to clean that from head to toe. I am going to take off the exhaust manifold and power steering pump and paint them black too.
I have added a few bits of optional extra goodness to the build also. Excuse the state of the car I am still working on it and then its getting a full valet from myself
genuine factory extra coin holder...
genuine factory extra flare and flare holder...
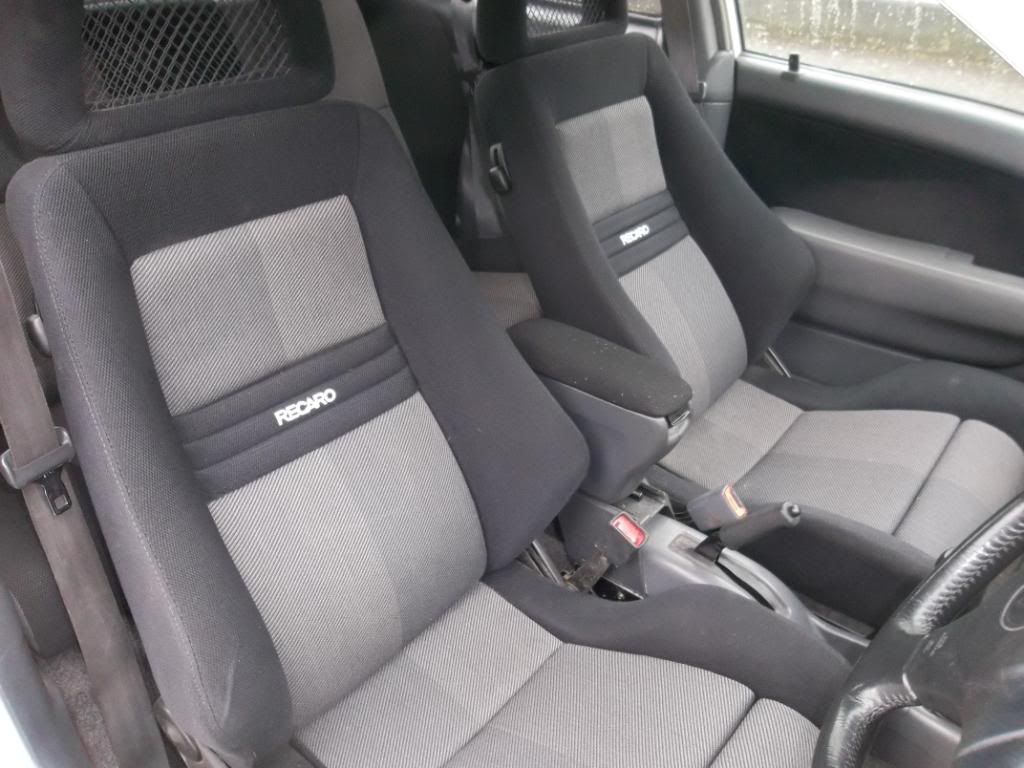
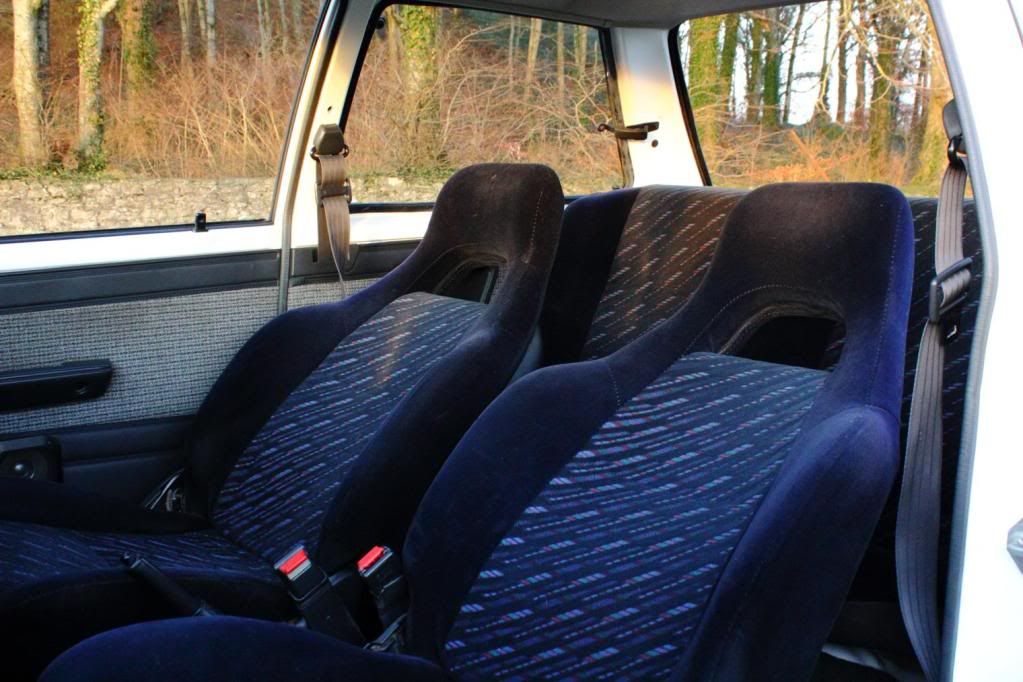
genuine factory extra 3 point rear strut fitted with top caps... Check out my new split rear Recaros too
Genuine 98/99 spec and very, very hard got! 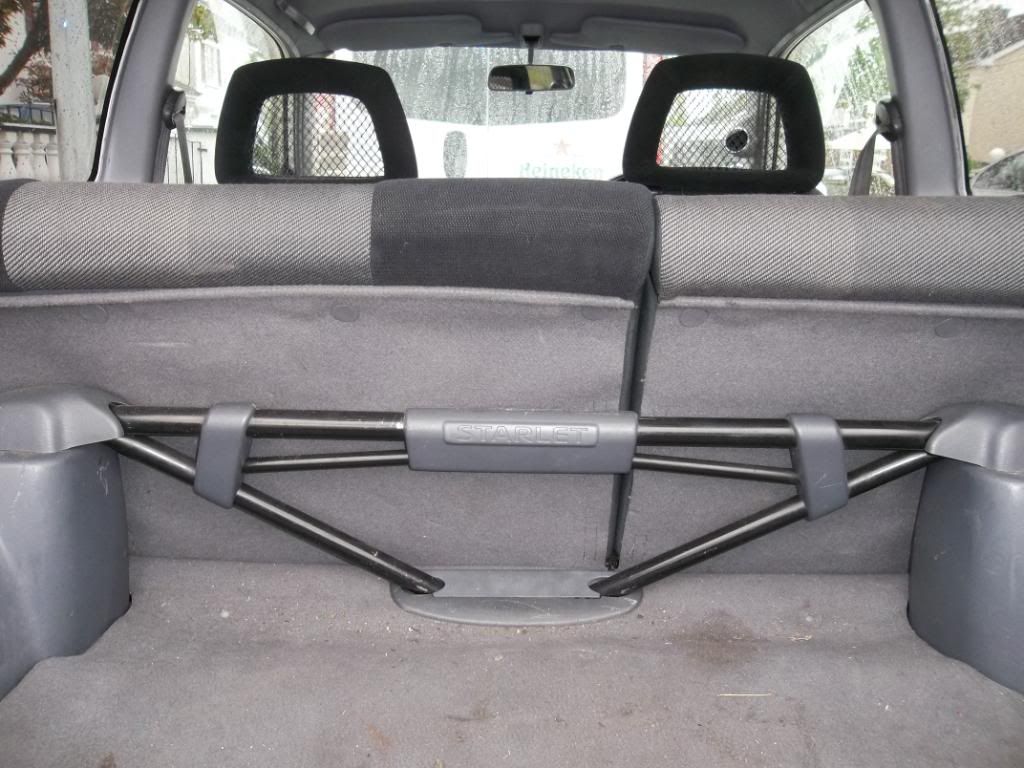
My m.int Starlet fishnet Recaros and extremely rare Recaro center armrest
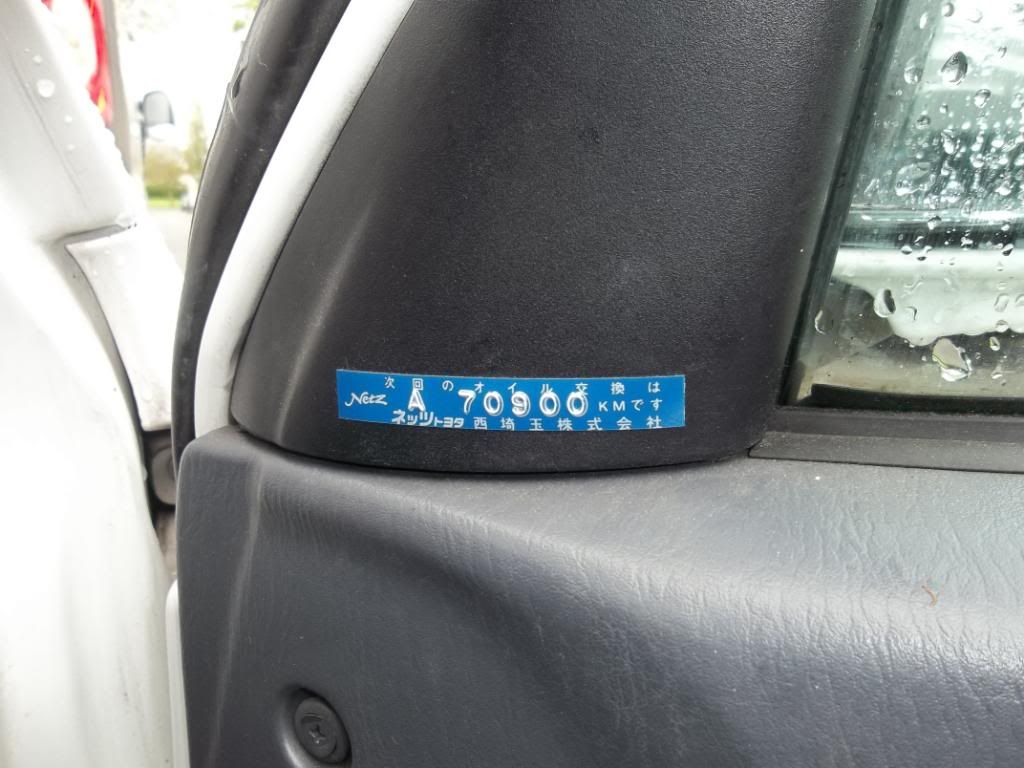
Original Jap service stickers...
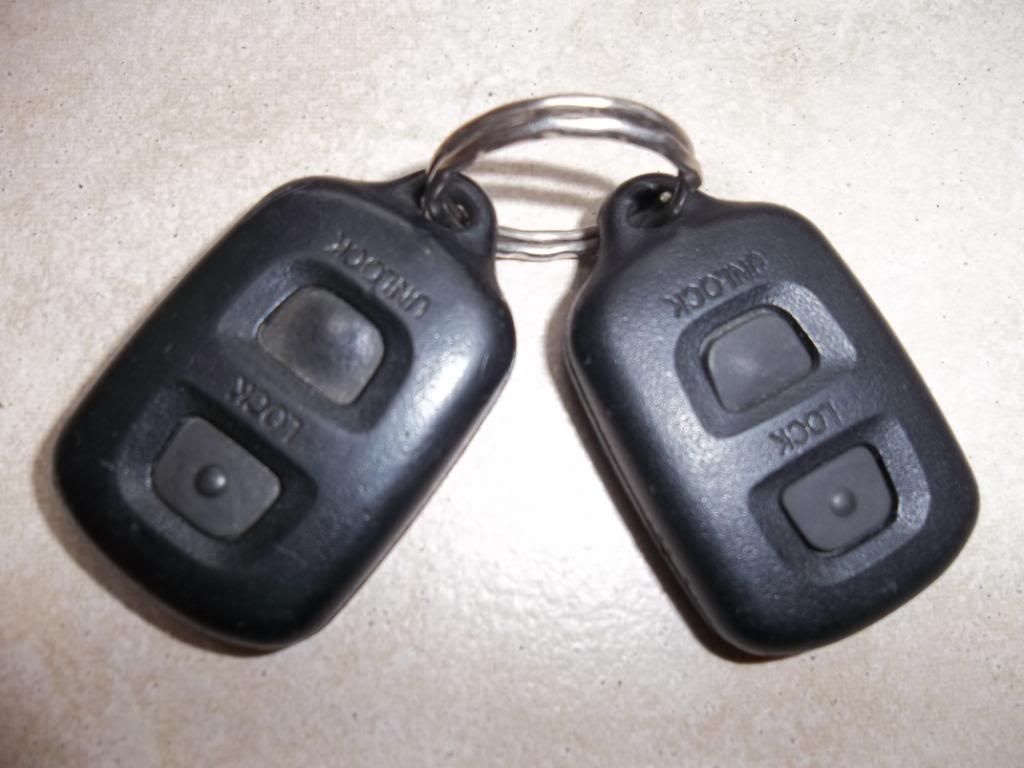
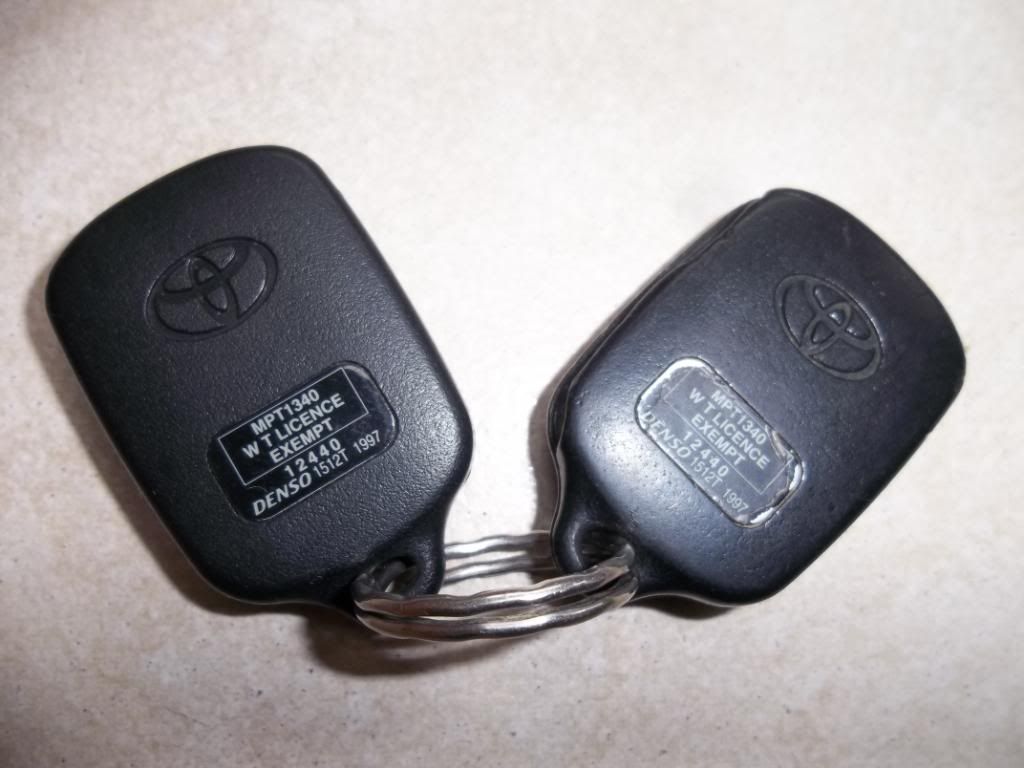
Original Toyota Glanza remote central locking fobs... Usually long lost at this stage but cool to have nonetheless
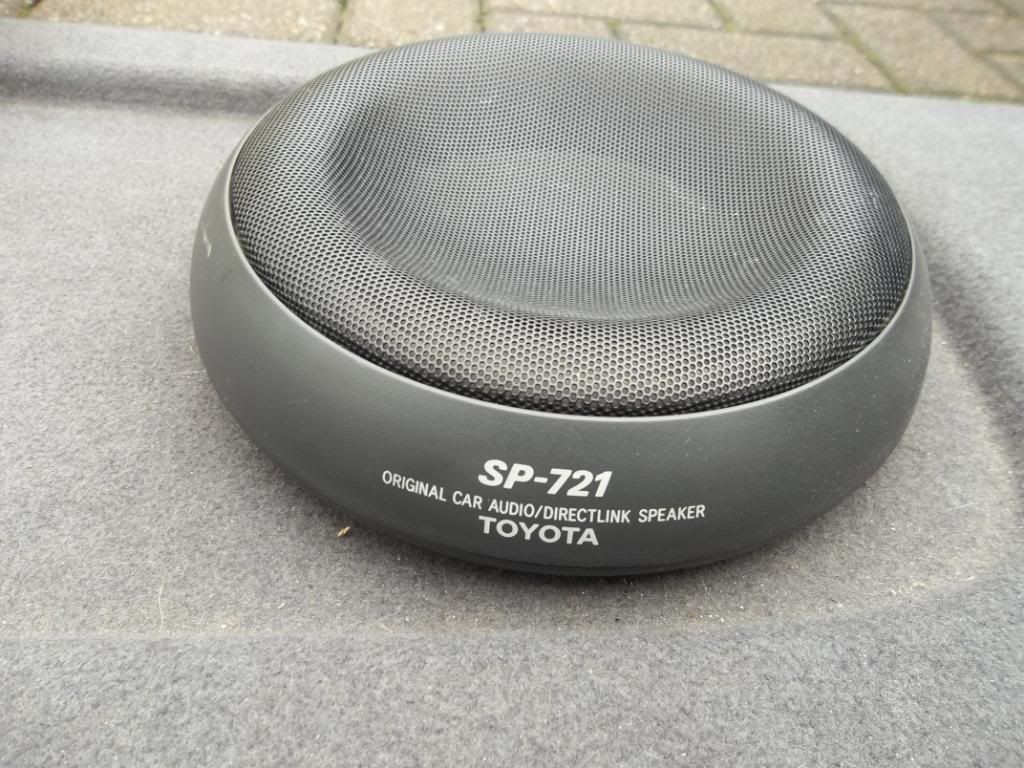
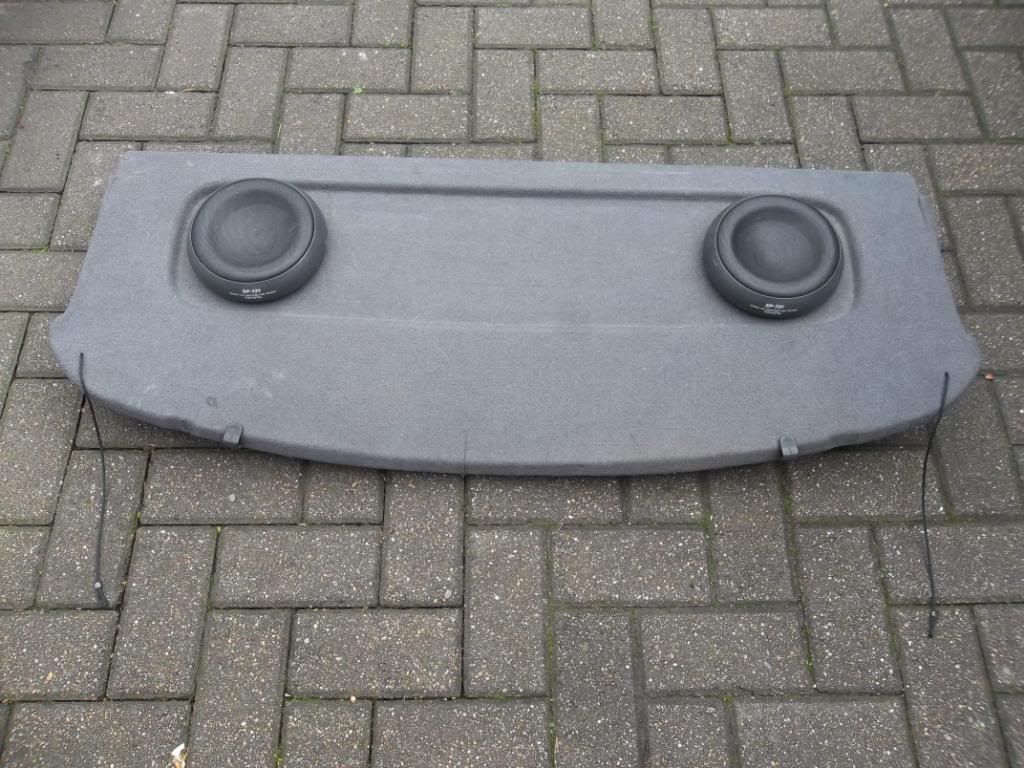
The original factory extra Toyota speakers I got didnt work, the bass was gone in them, so while I'm hunting for a new set of speakers to refit into the casings, I have fitted these original Toyota pod speakers. What beauty's! I have a "may not be as advertised" parcel shelf to fit them to as the one they came in is cracked as you can see...
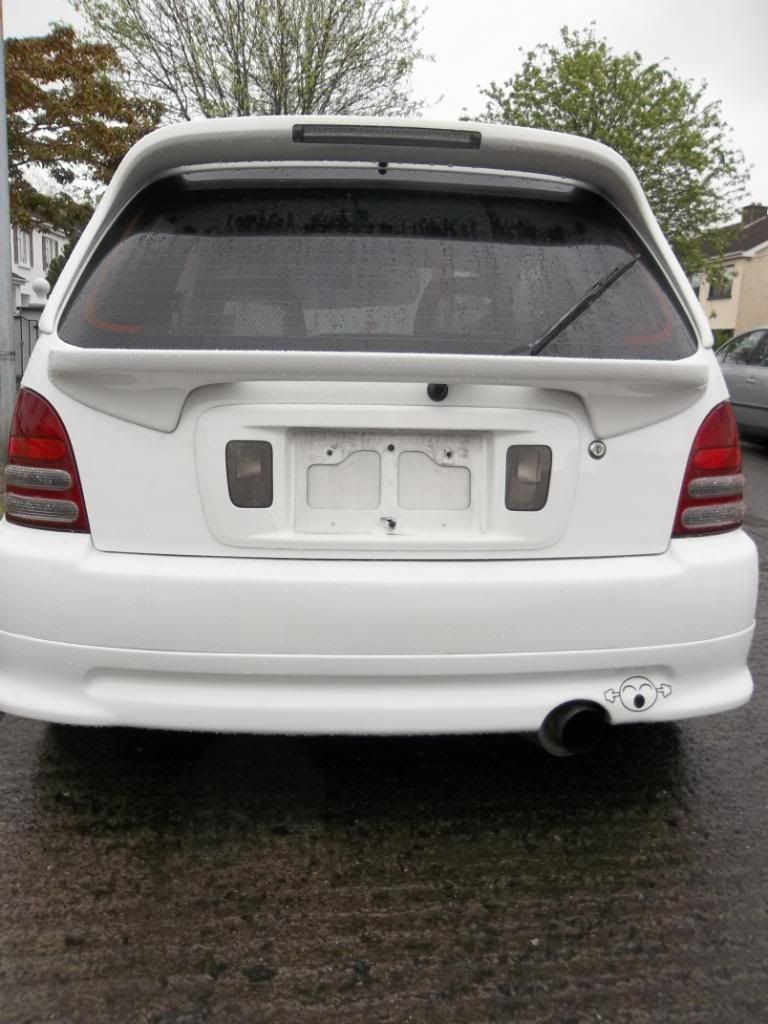
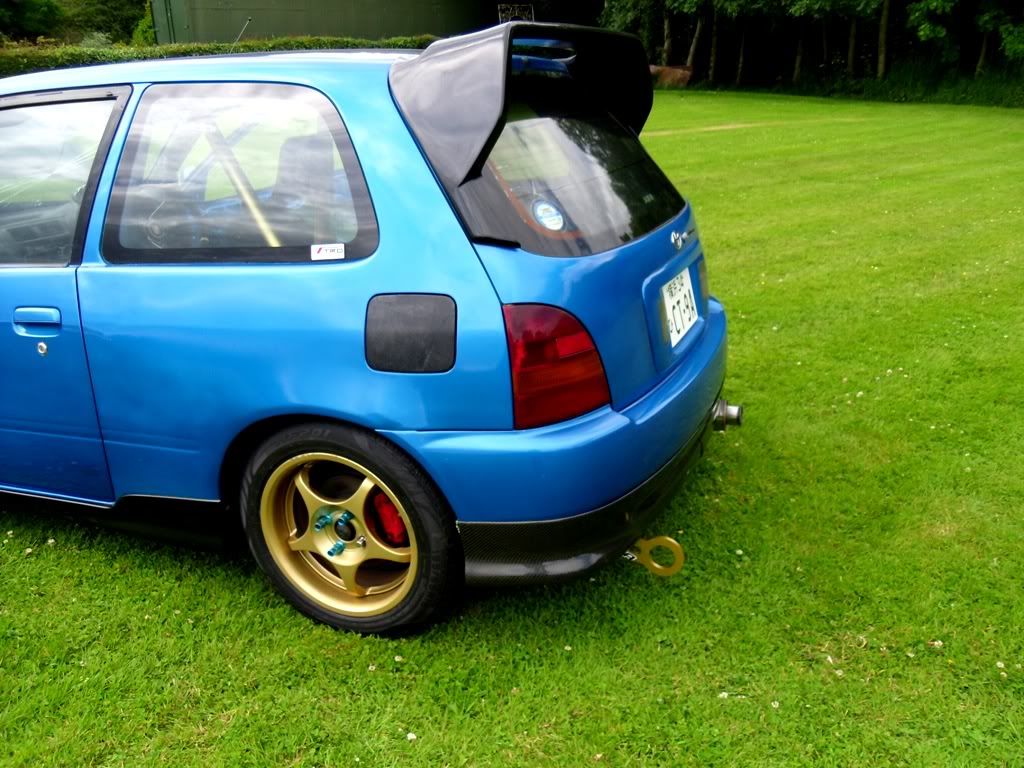
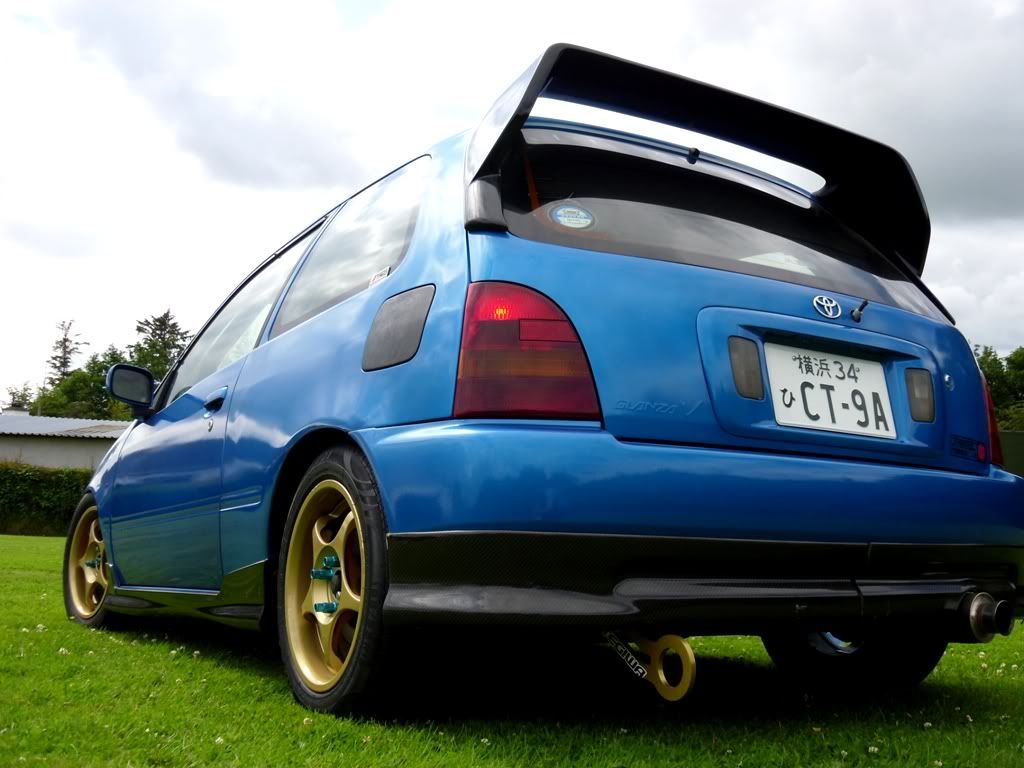
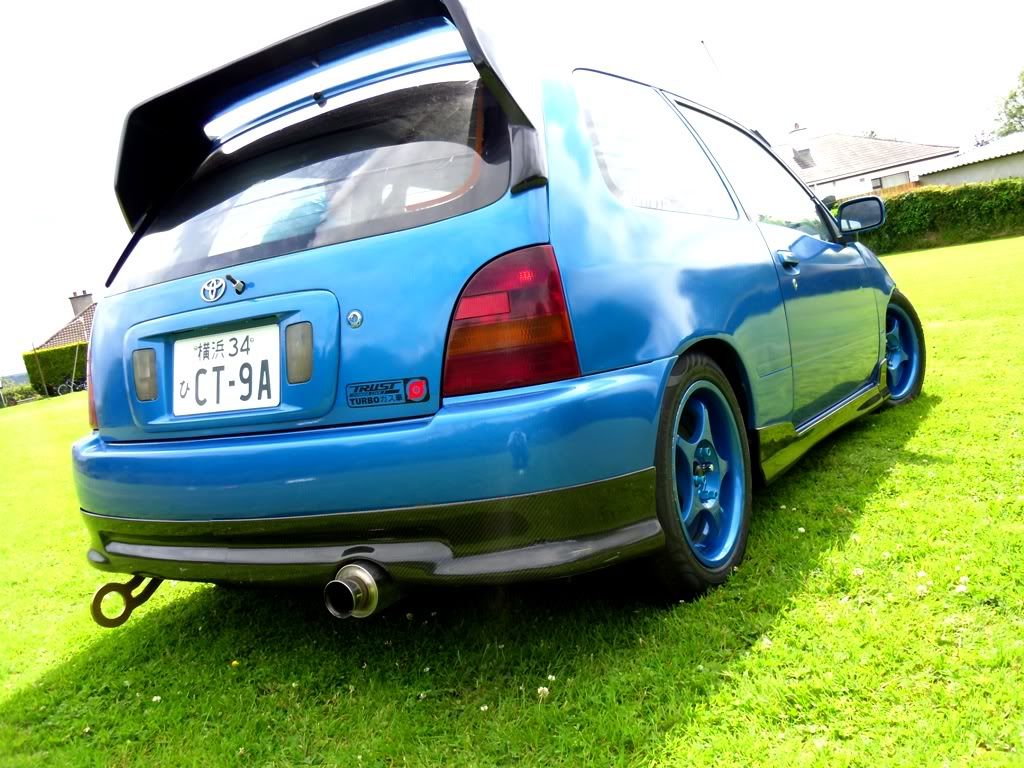
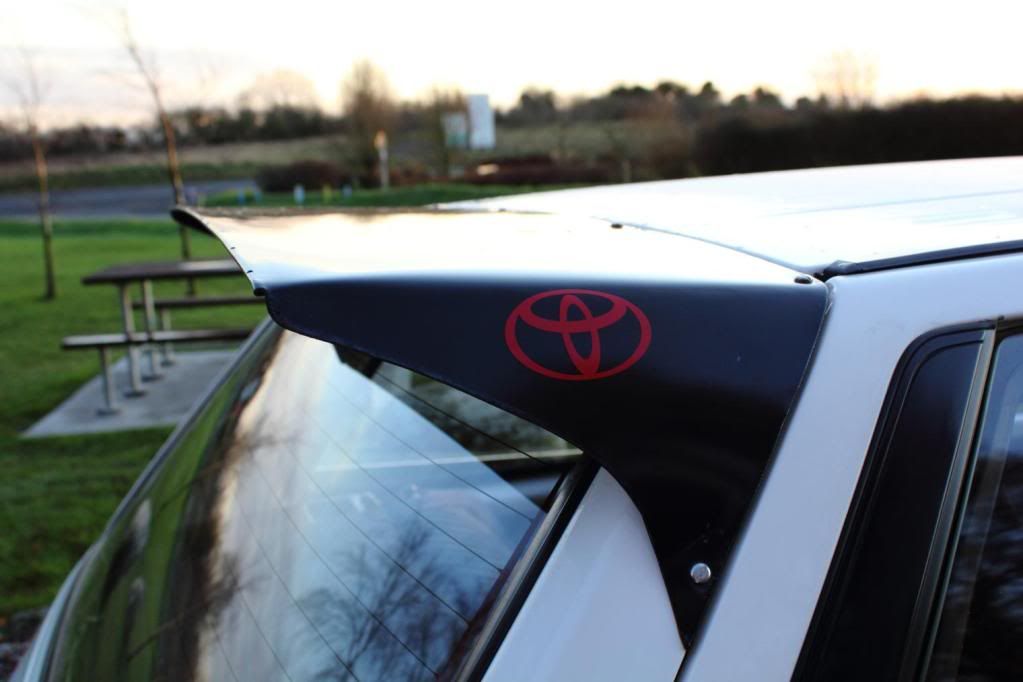
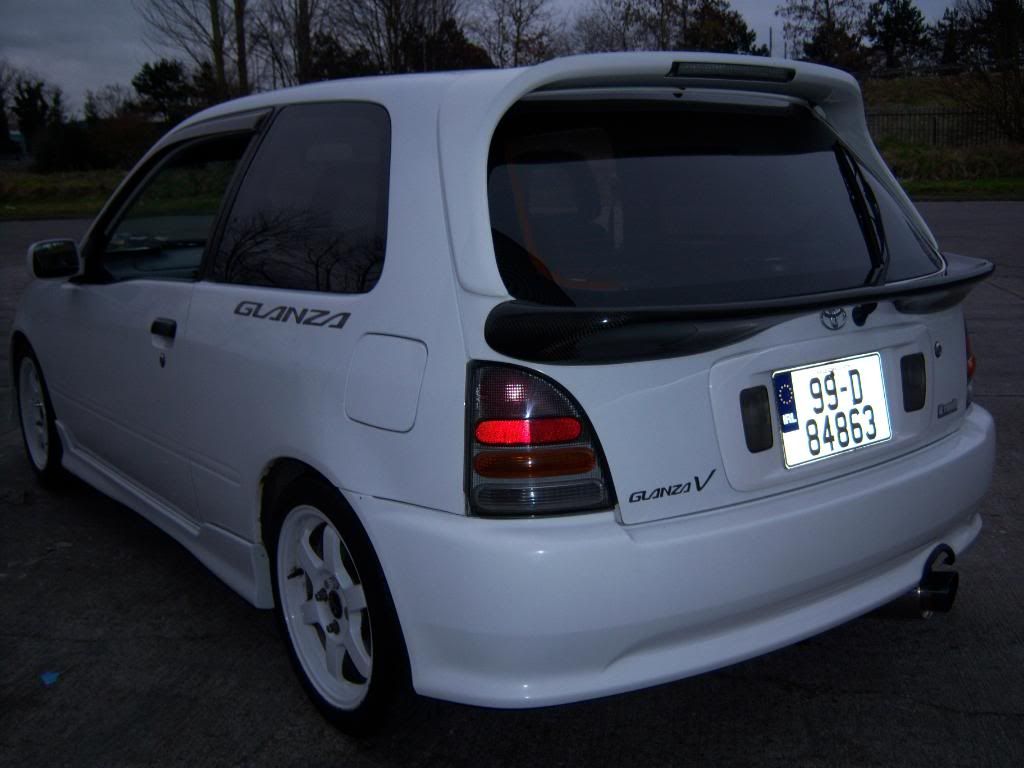
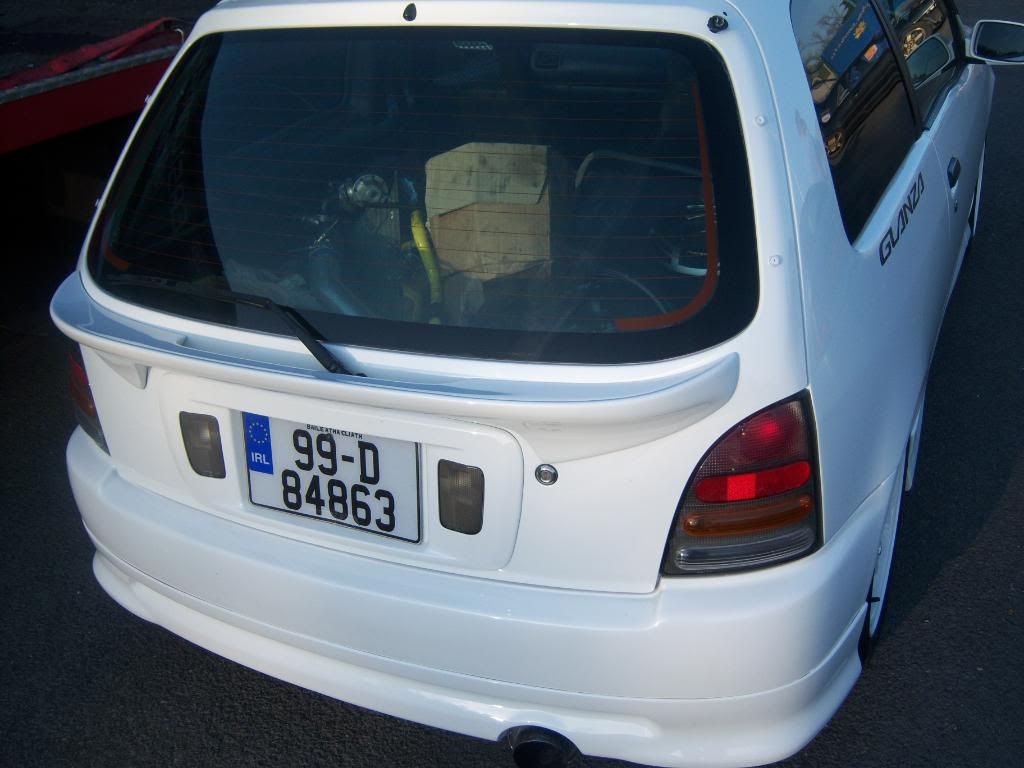
This is the back of the car now with original oem mid spoiler, original oem rear splitter andred JDM bubble lights... starting to come together!
More big updates to come!
-
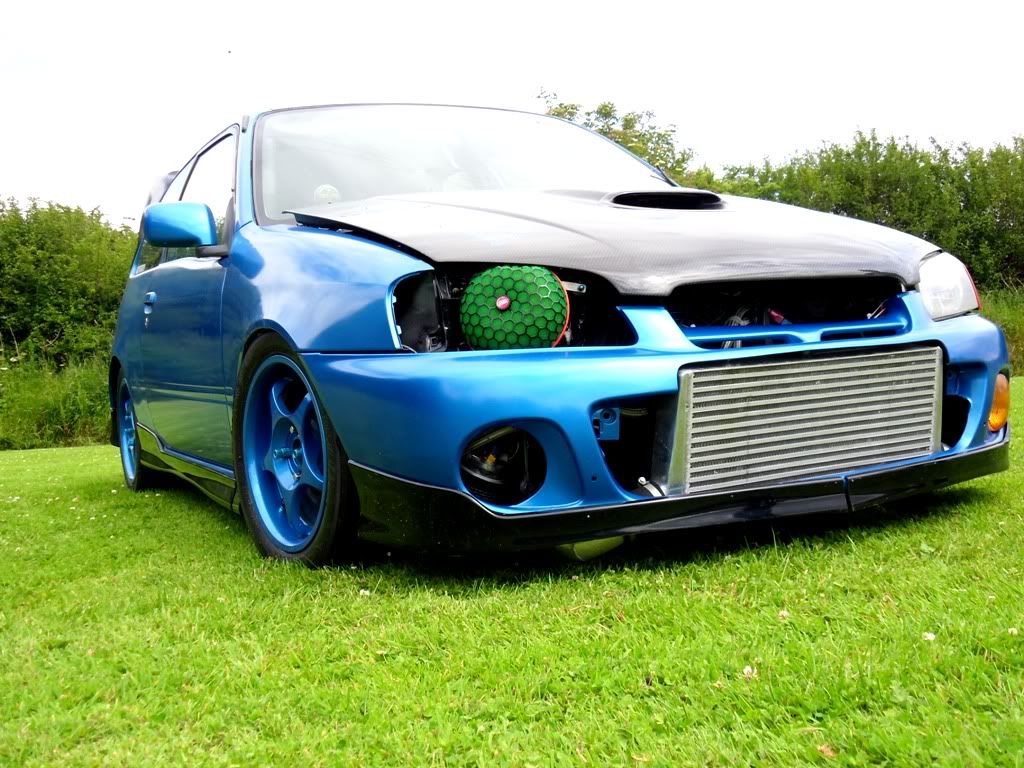
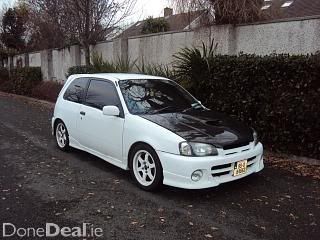
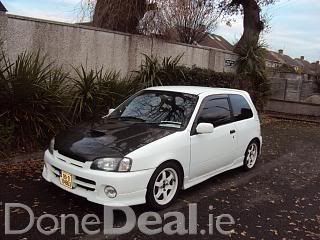
Well as a lot of you know I have this car quite a while now but never posted about it until now. Said I would throw up a spec list with a few pics. What yas think? I have the car stripped down at the minute while I decide what i want to do with it. Engine is compression tested to 168psi across all four cylinders. Car is remapped and made 190bhp and 191lbs so not a bad little motor for a standard turbo
Spec list and pics as follows:
HKS SSQV Blow Off Valve
HKS Adjustable Actuator
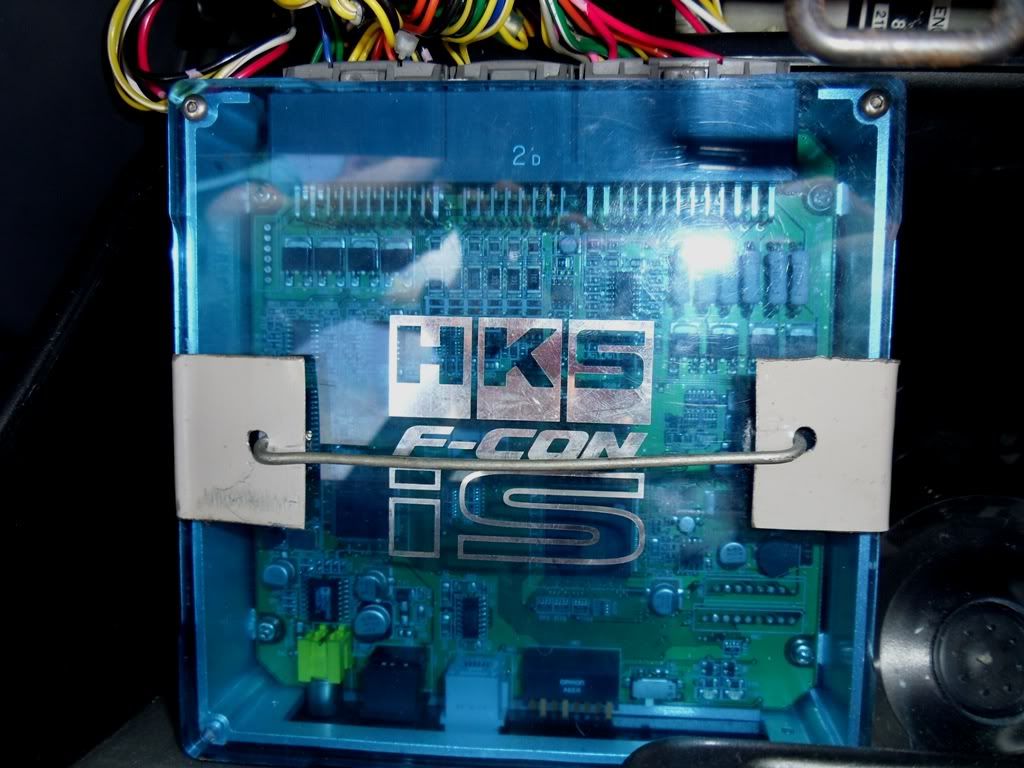
HKS F-CON PRO ECU
HKS Iridium Spark Plugs
HKS Mushroom Filter
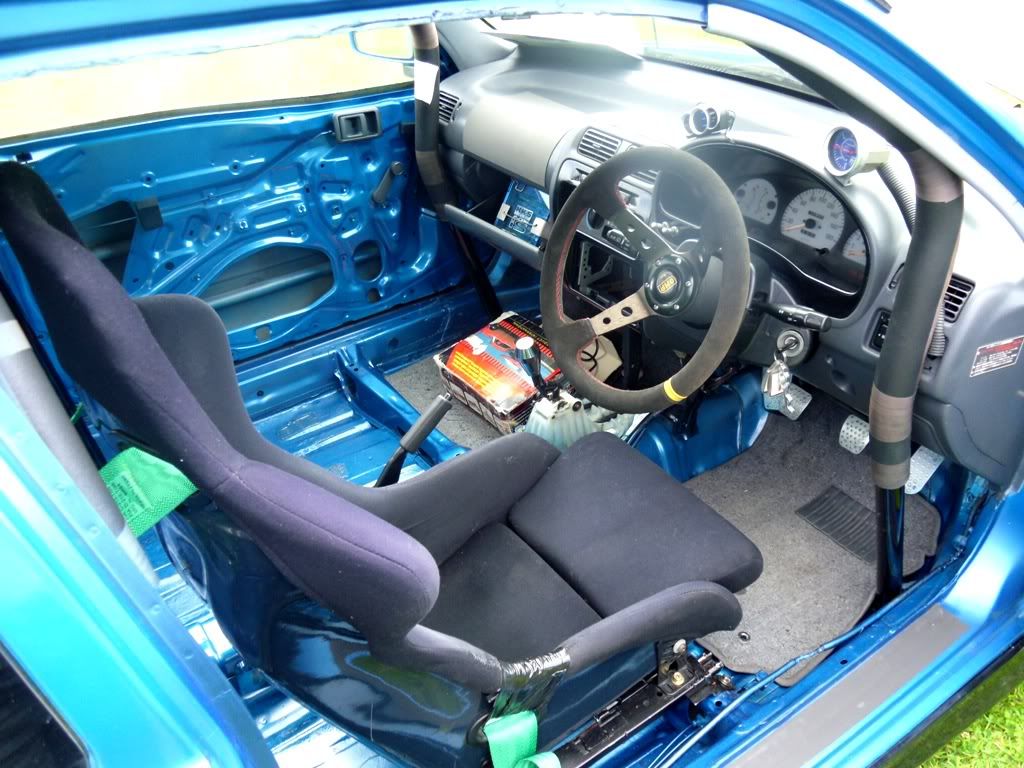
CUSCO 1.5 Way L.S.D.
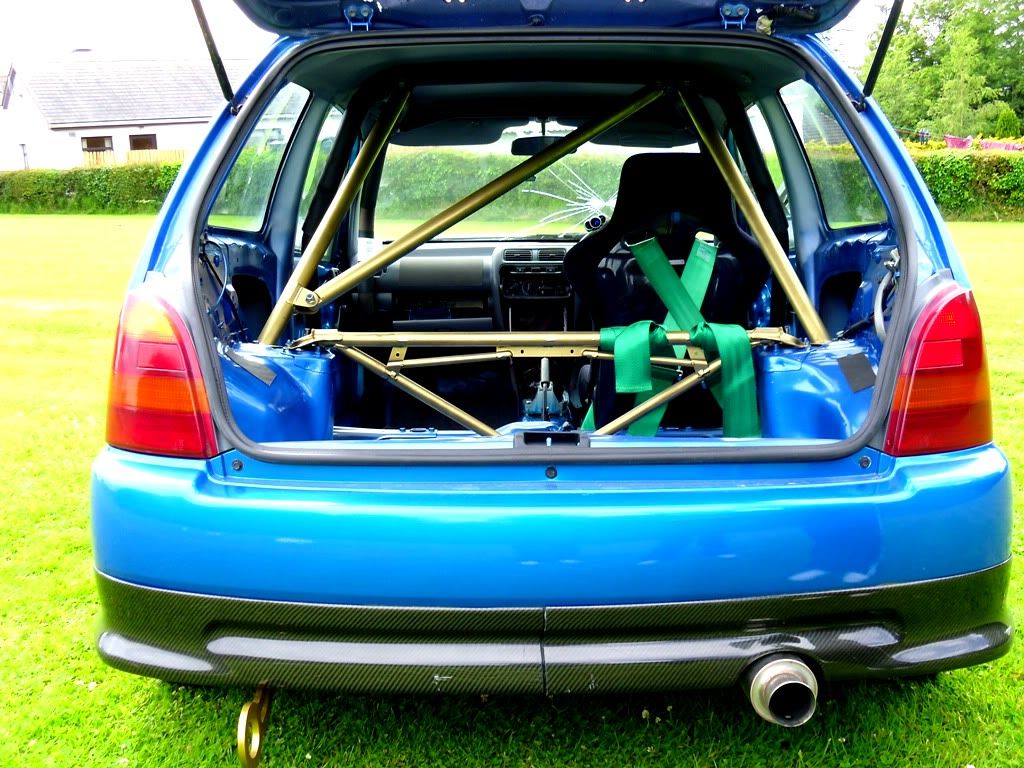
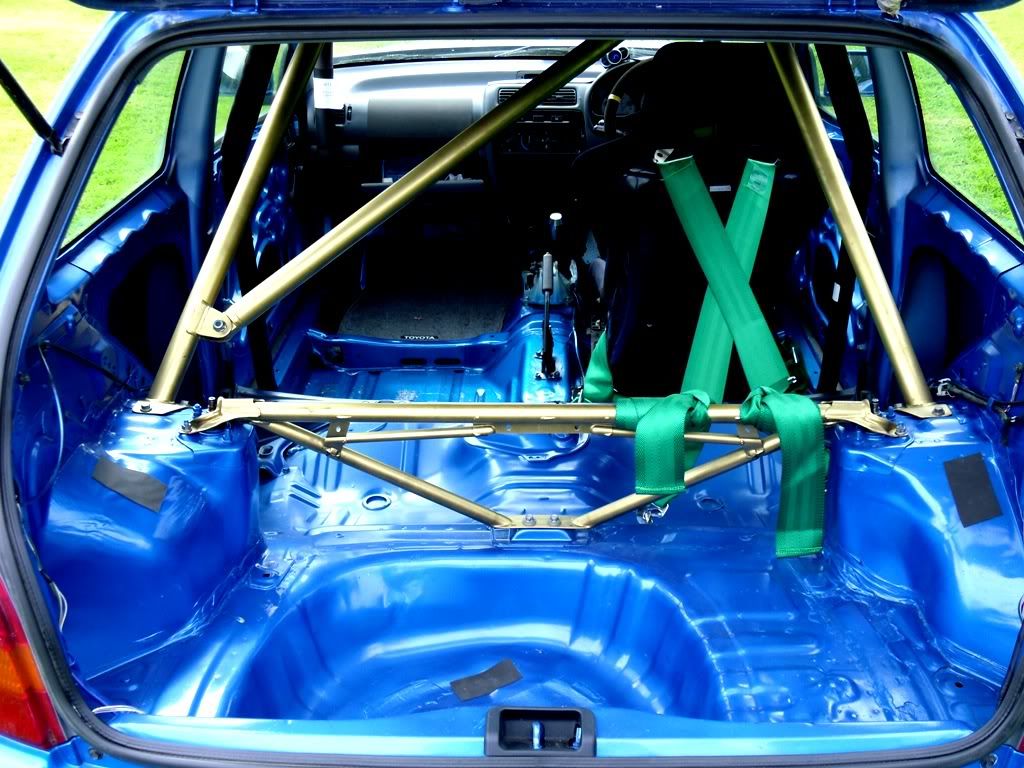
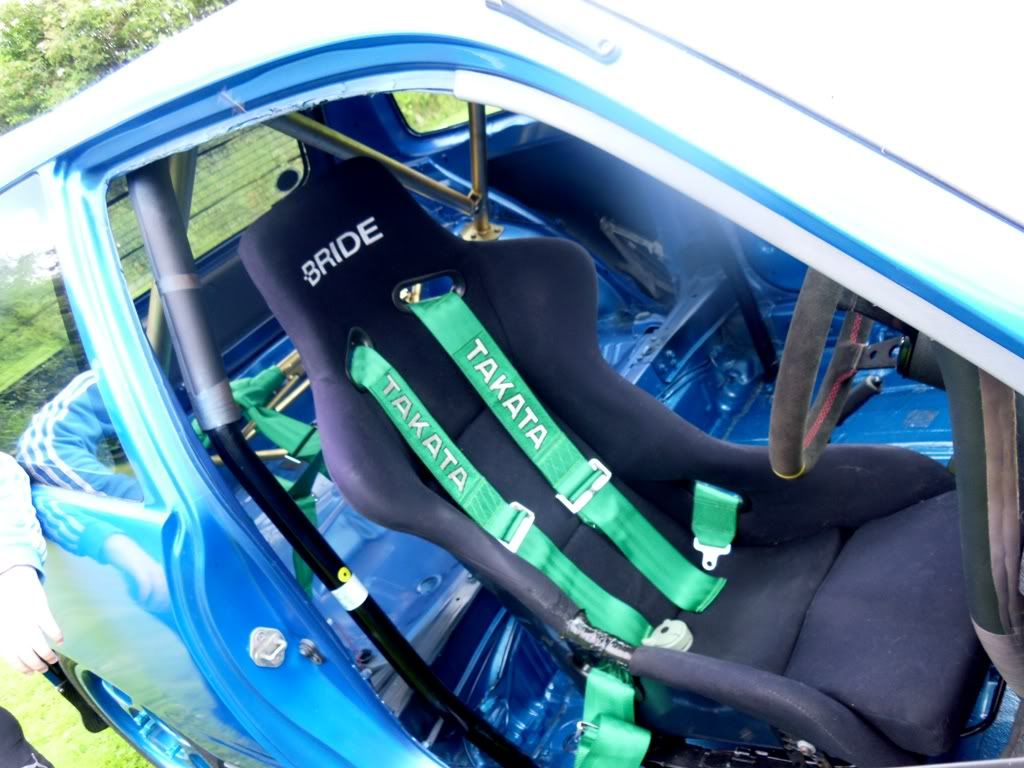
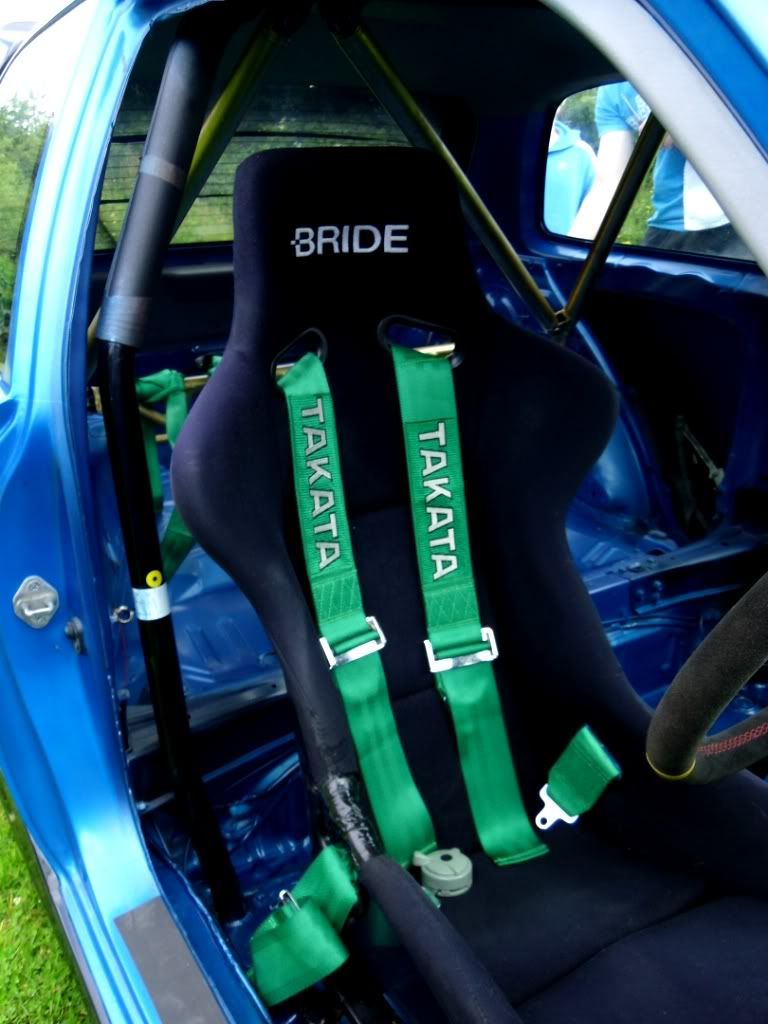
Cusco Safety 21 Full 7 Point Roll Cage
Cusco Fully Adjustable Coilovers
3 Point Rear Strut Brace
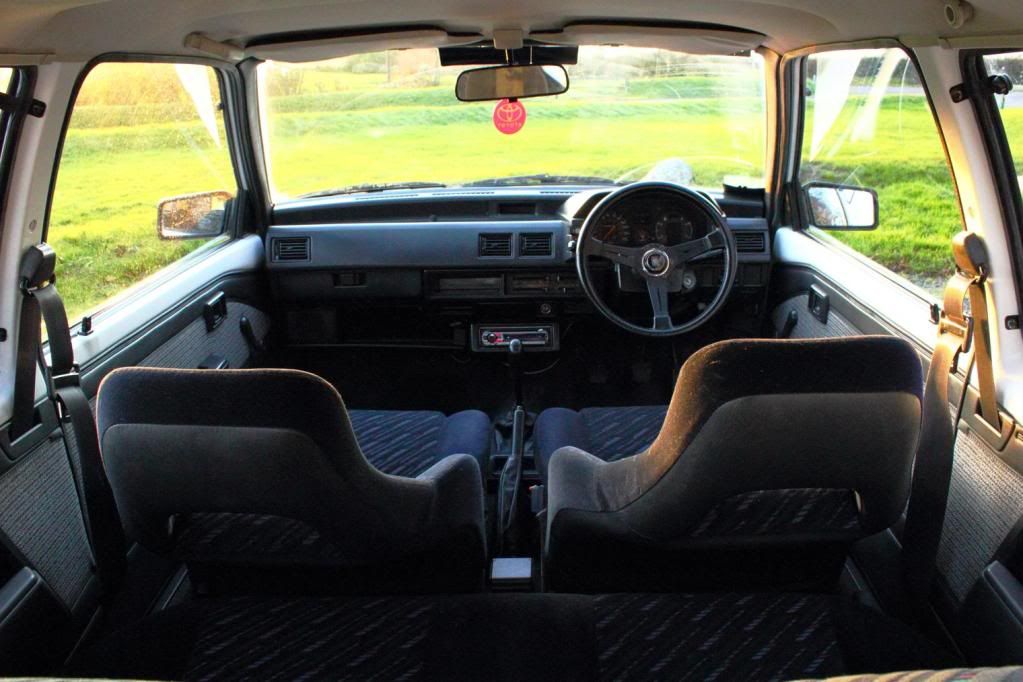
Bride Bucket Seat
Takata 4-Point Racing Harness
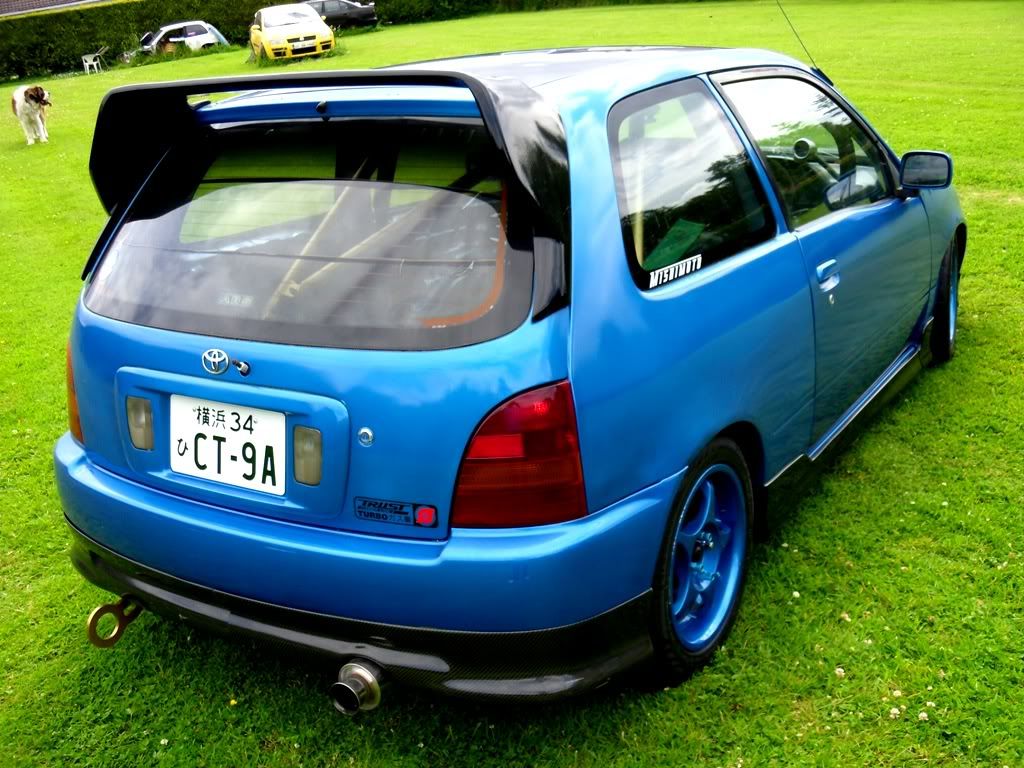
Carbon Fibre OEM Bonnet
Carbon Fibre NRG Diffusers
Carbon Fibre Rear Splitter
98 Spec Front Bumper and Custom Spiltter
H.I.D. Headlights
Golpher Front Mount Intercooler
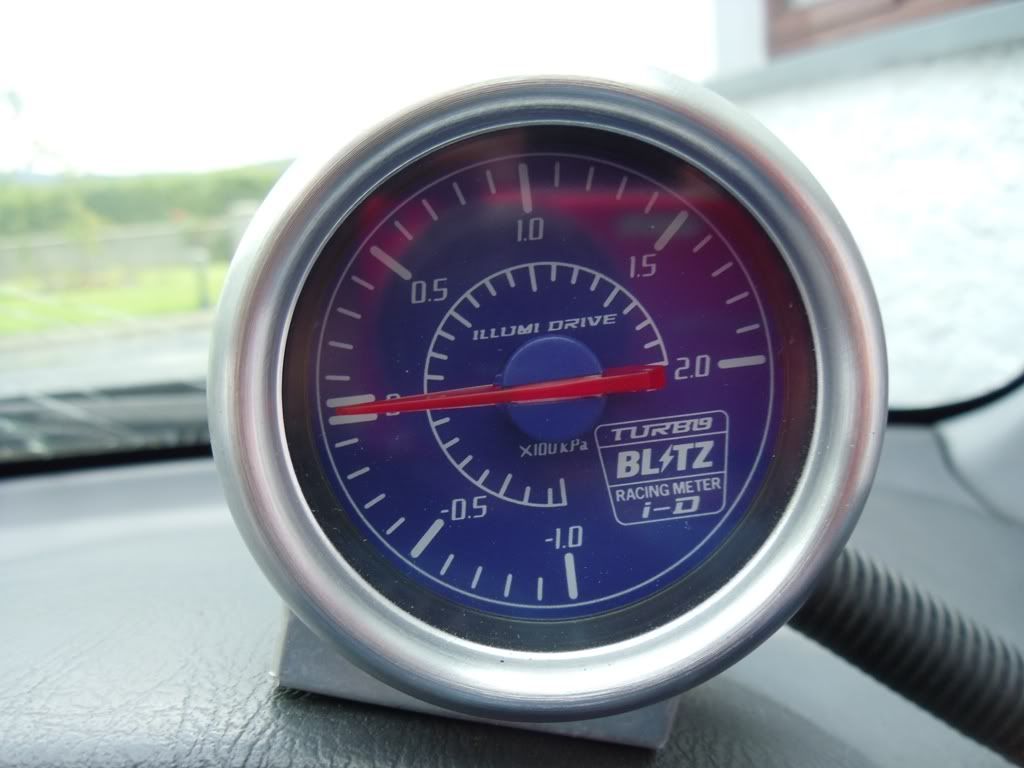
Blitz Boost Gauge
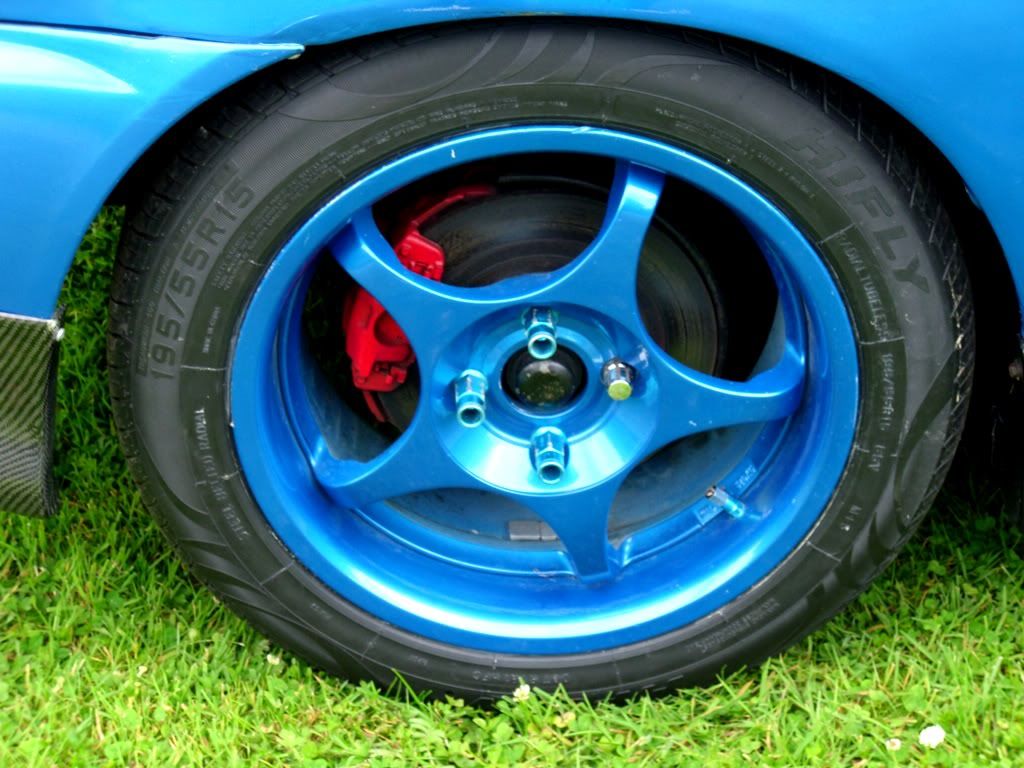
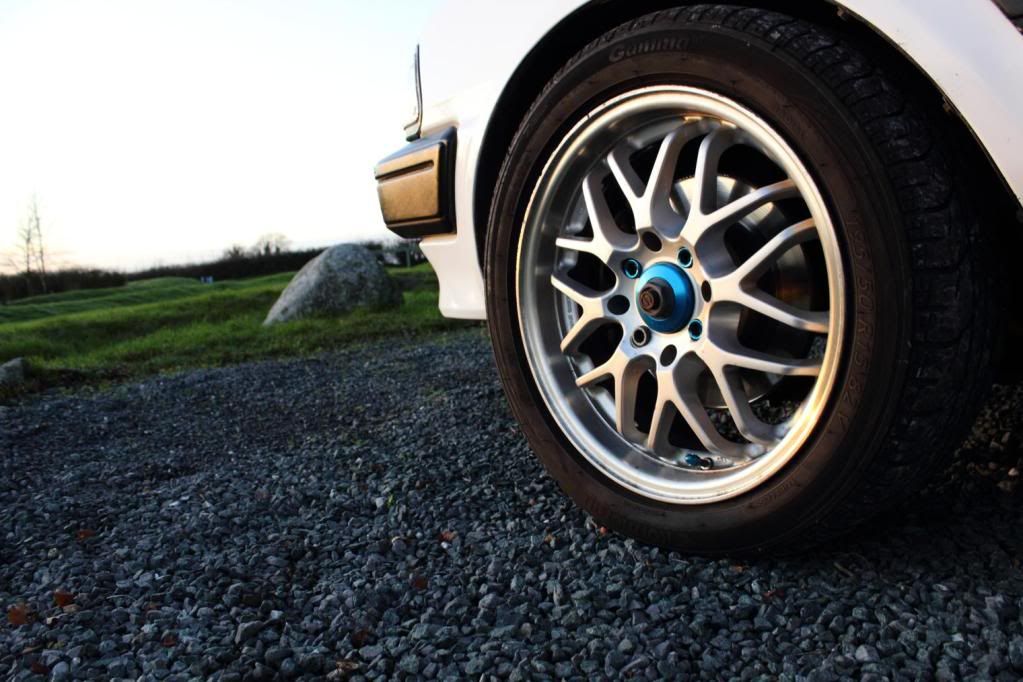
Enkei Deep Dish Rims
Advan AE038s Drag Semi Slicks on the Front
JAM Racing Rear Spoiler
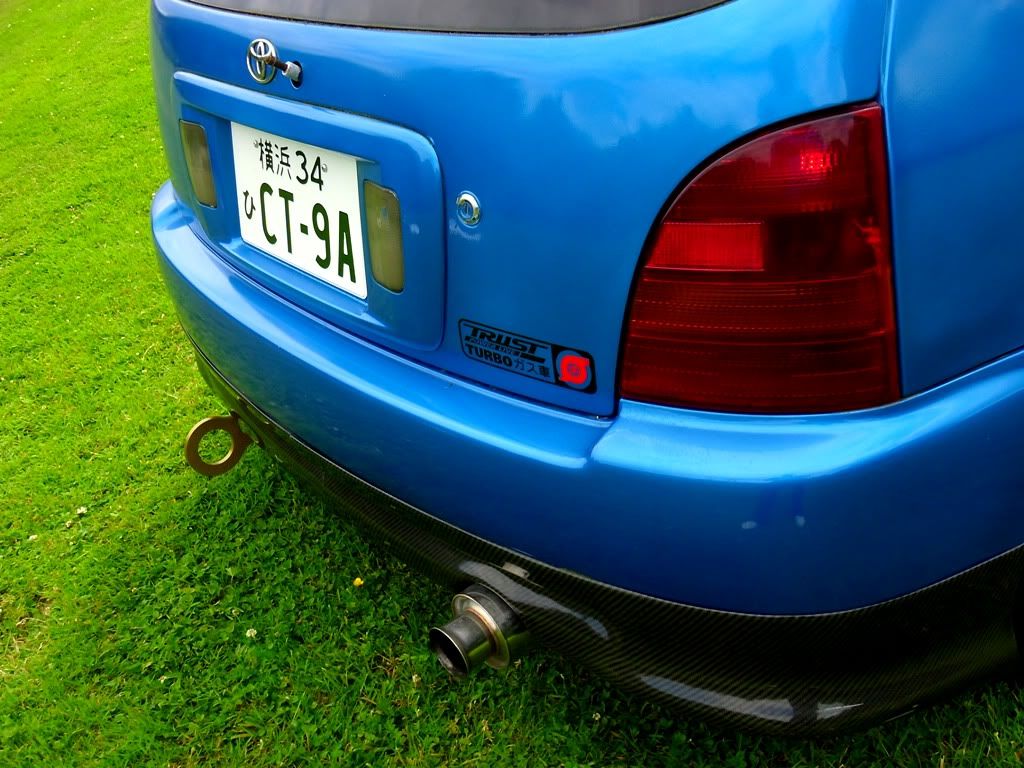
ZEP Racing Decat
Full 5zigen Cat Back Exhaust
Trust Greddy Oil Cooler and Relocation Kit
Trust Grex Shift Knob
Trust Greddy Oil Catch Tank
NGK Performance Plug Leads
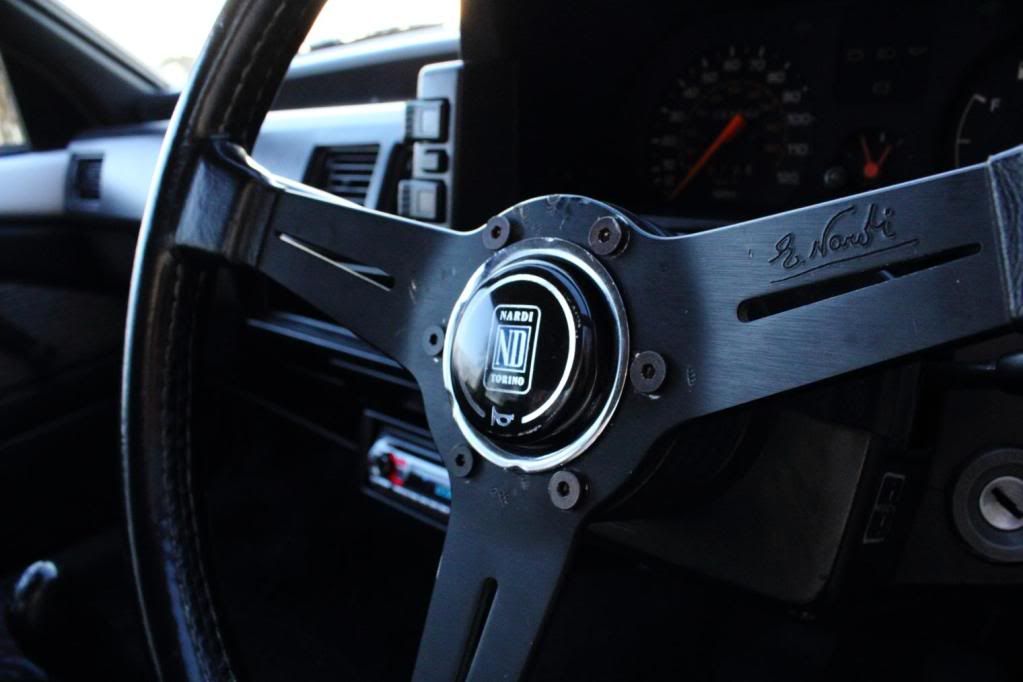
OMP Suede Deep Dish Steering Wheel
TRD Short Shifter
TRD Dust Valve Caps
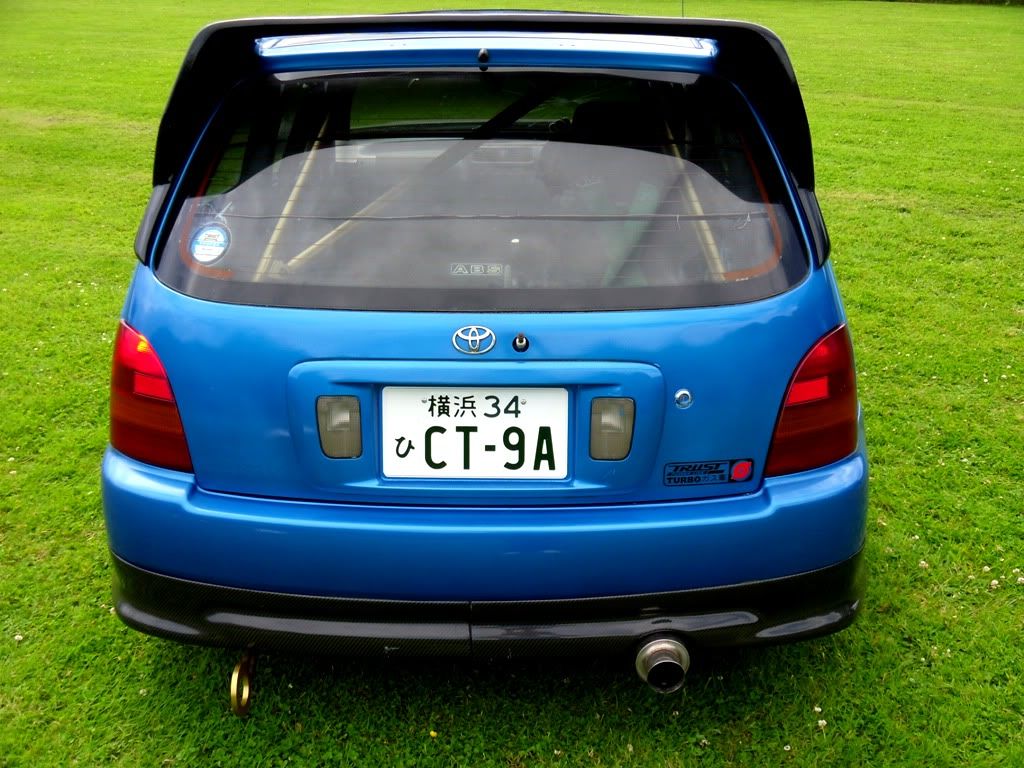
Custom CT9A Japanese Pressed License Plate
Tegiwa Gold Anodised Tow Hook
Gold Anodised Engine Bay washer and bonnet Spacer Kit.
Blue Anodised Rocker Cover Nuts
Steel Briaided Brake Lines and EBC Yellow Stuff Pads.


[img]http://i206.photobucket.com/albums/bb31/conor05_/f30.jpg[/img
-
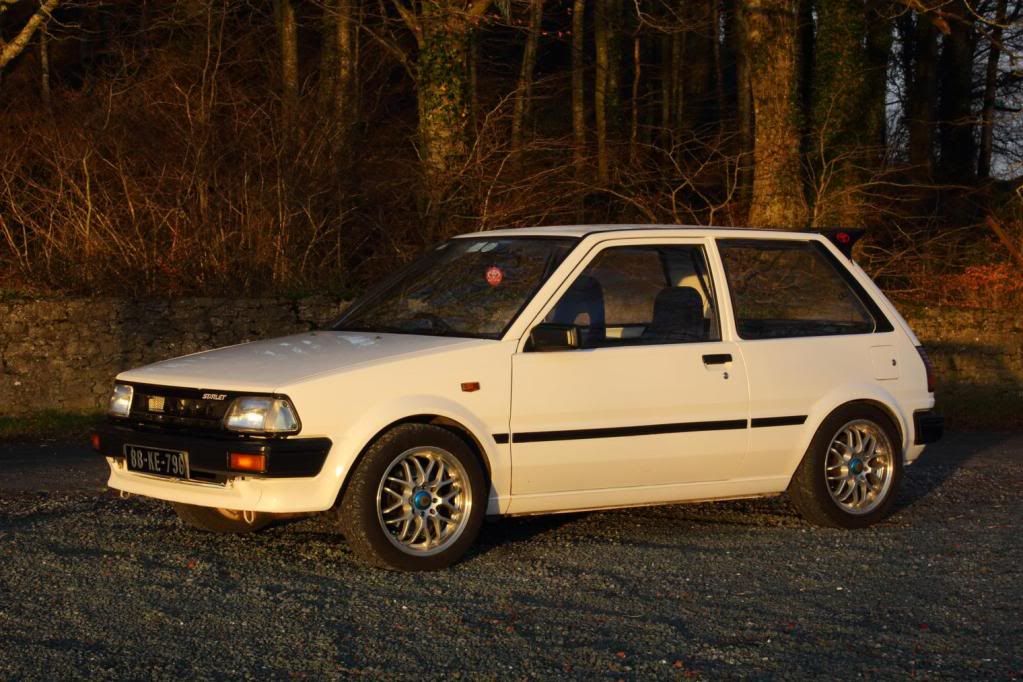
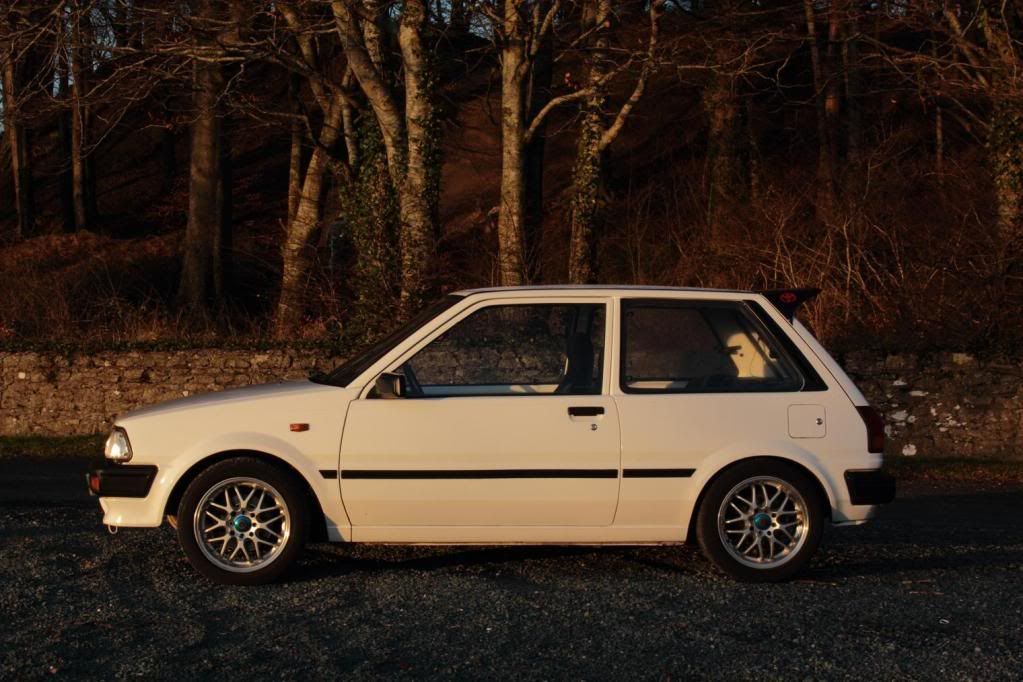
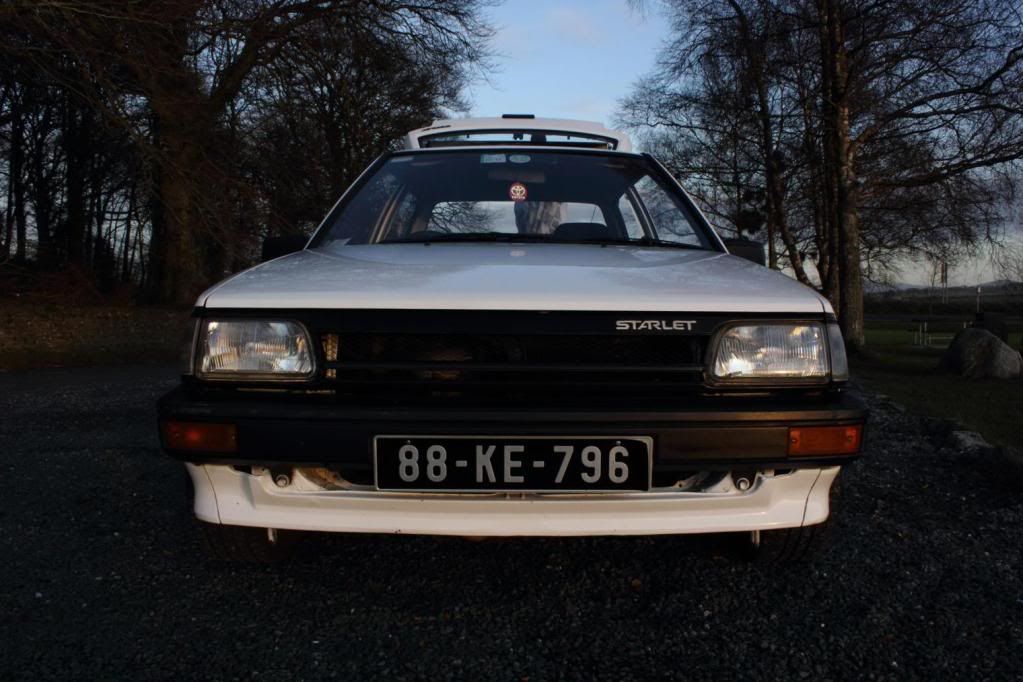
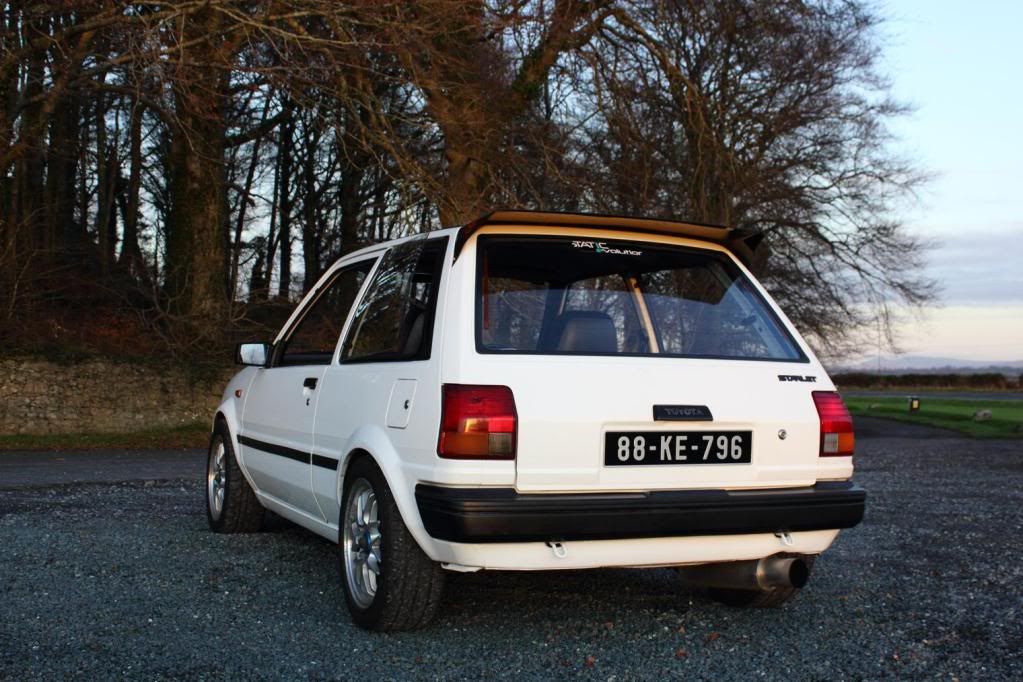
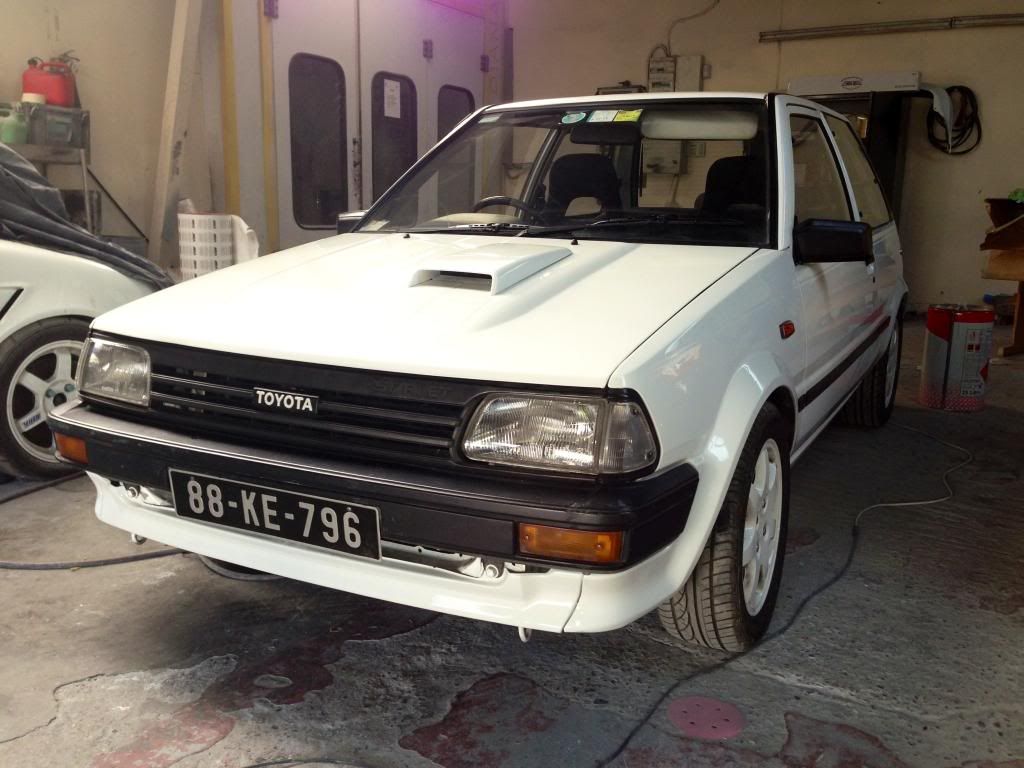
This is my mint EP70 Boxy Starlet. The car is very, very clean inside and out. The car is almost completely original and very tidy underneath. All glass is original and stamped with the cars registration number.
It has complete 1.5 5e Cynos running gear. 5efe engine with 67,000 miles on the clock. Engine and gearbox are very dry underneath and the car drives well although it's like going back in time compared to the Glanza lol
Mint Cynos 5 speed box also fitted. You can really notice the longer gears of the Cynos box as the car revs and pulls all the way out
Cynos disk brakes front and back
Mint GT turbo front and rear seats
TRD rear spoiler
Tein Coilovers
Apexi exhaust (sounds like a roaring V-tec with a Toyota badge on it lol)
Carbon fiber induction kit (Not fitted in the pics below)
Nardi Steering Wheel
Sitting on Sparco nsII's (y1r's on rear)
Just taxed the car for 3 months today and have a few bits to do for the NCT to get it through.
New brake pads have just been fitted to the front and fitted brand new rear pads today.
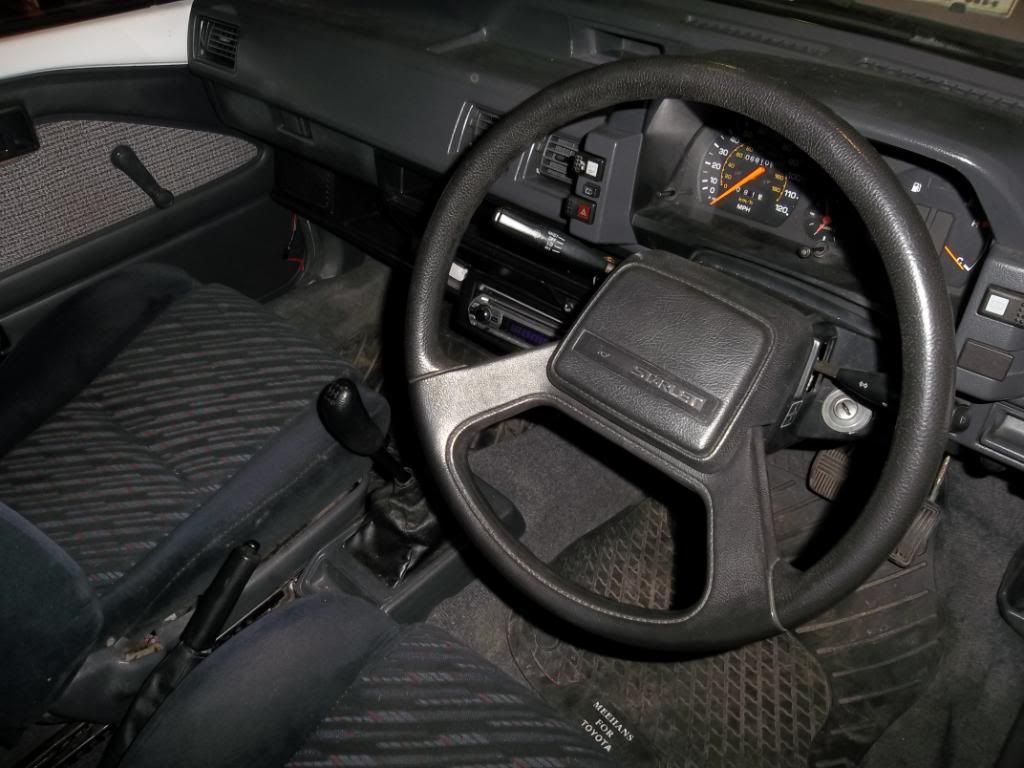
I want to keep the car as original as possible so today I replaced the Nardi steering wheel with a mint standard one as my hands kept hitting off the stalks with the Nardi steering wheel fitted.
I have a new, freshly polished rocker cover to fit and a new set of blue NGK performance leads also.
I am on the hunt for more standard parts now and gonna give it a good clean the weekend.
I am toying with the idea of a TD04 turbo conversion aswel just want to research it a bit more first.
Some pics http://www.ukstarletclub.com/forums/public/style_emoticons/#EMO_DIR#/smile.png
Okay a few more updates now folks...
My NCT is coming up this week so I've been busy doing bits and pieces with the car and tidying it up a bit...
First things first I changed the Nardi steering wheel for this mint original beauty (don't mind the state of the interior it's getting a good clean once the work is finished lol)
When I lifted up the rear parcel shelf I seen this bad tear in the back seats. I never would have noticed it tucked under the parcel shelf nor would anyone else but I just had to change it. Eventually I got a set of clean rear GT Turbo seats. I want the car minty mint and this was just annoying me. Whoever said it's an easy job to fit GT Turbo seats to a boxy Starlet is a liar too... lol
Before:
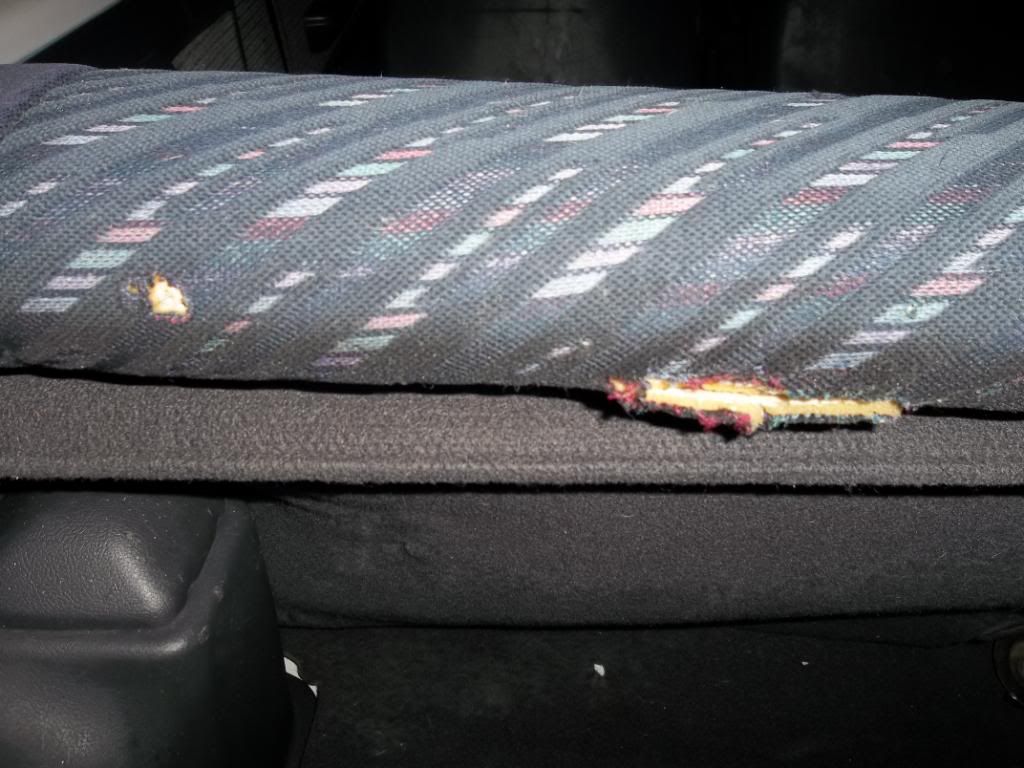
And replaced with a mint new seat:
The interior is mint but there is a tiny tear in the driver's seat and the plastic cover for the handle on the side is missing so anyone with a mint GT Turbo driver's seat please let me know...
This sticker on the window from the previous owner was also bugging me
So a with a DIY heatgun (my mam's stolen hairdryer), some petrol and a CD I got it off...
I had to change the noisy straight through Exhaust system from the manifold back and replace it with this new NCT proof beast!
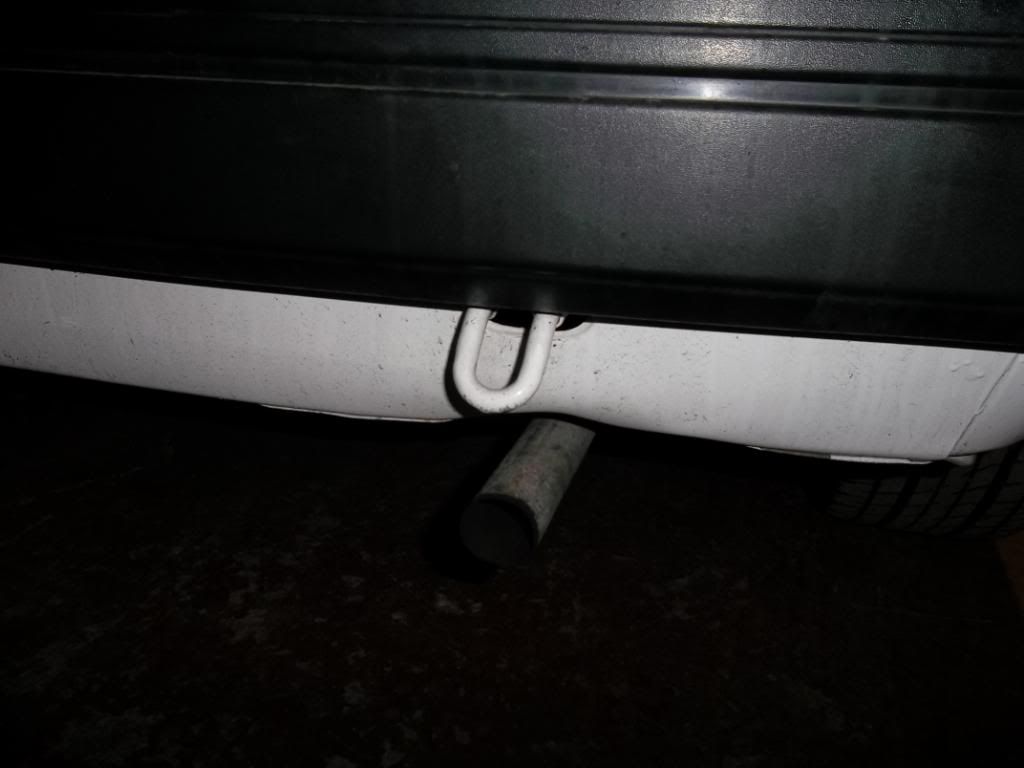
While the Apexi N1 backbox was off I gave it a thorough polish...
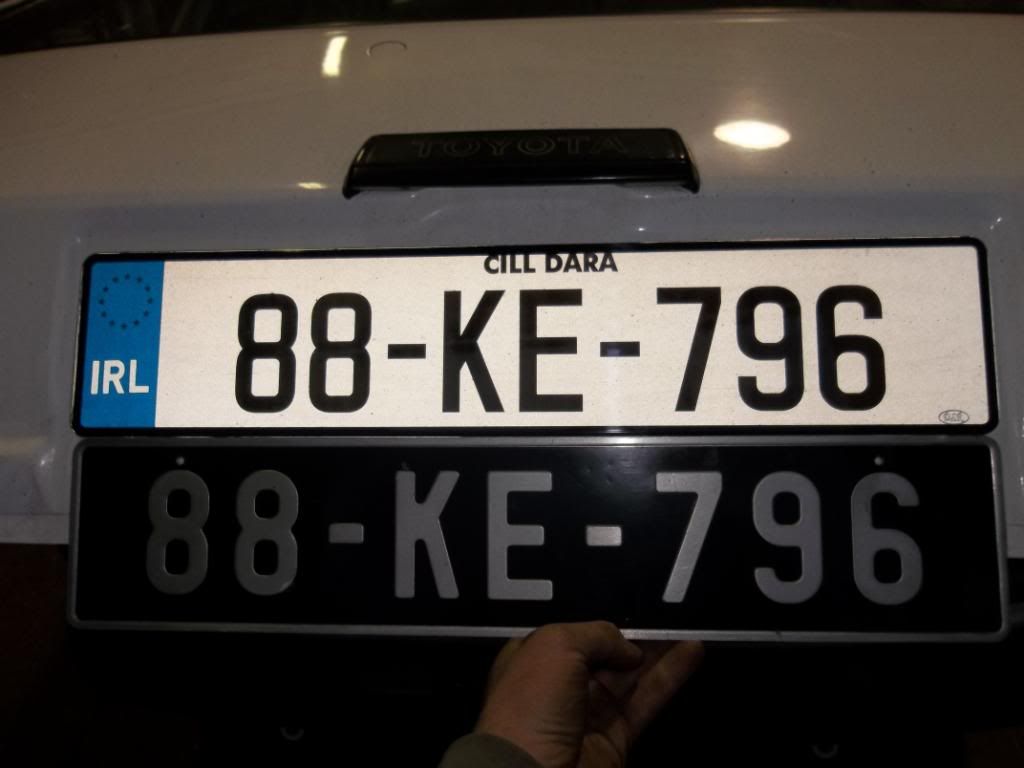
Off with the old black reg plates
I also got a mint font Grill with original Toyota badge so I removed the current grill which was resparyed and the Starlet badge had been painted with Tipp Ex by someone and the grill cut and mesh placed behind it. It sits a lot better now with the new grill.

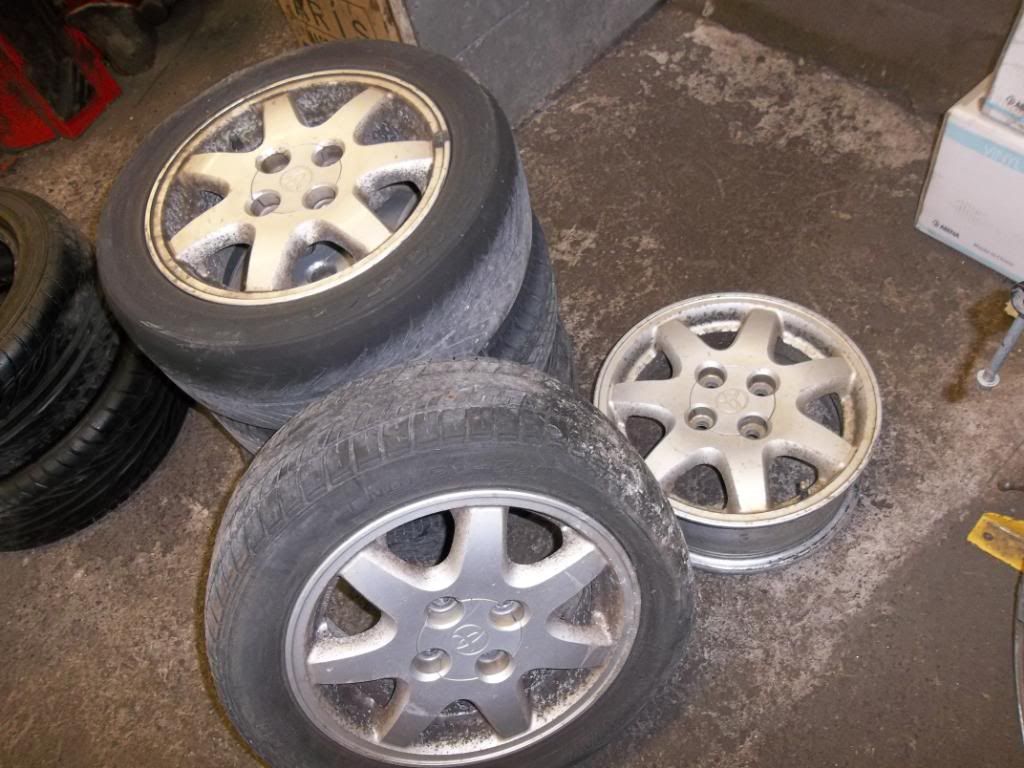
I wanted to be different from the usual Superlites etc so after weeks of searching I finally got a set of standard 14" Toyota Glanza alloys. I am going to paint them the same colour as the car. I think they will suit it nicely. I even got a fifth wheel as a spare and wrapped the front's with sticky Hankook rubber and Accellera's on the back...
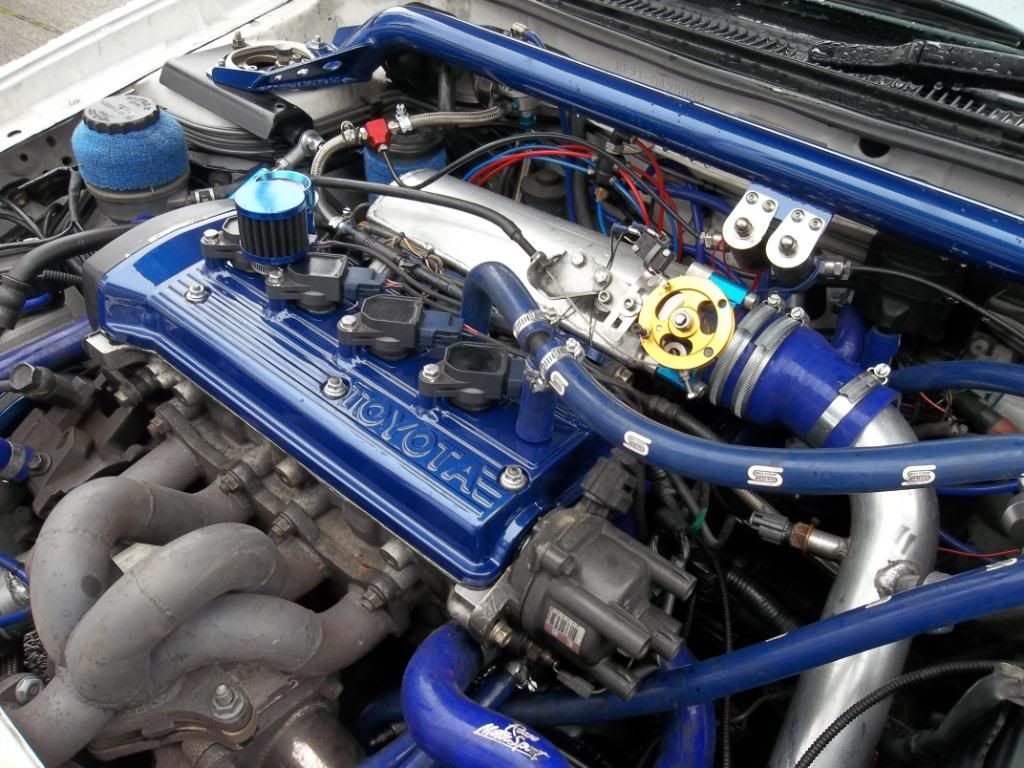
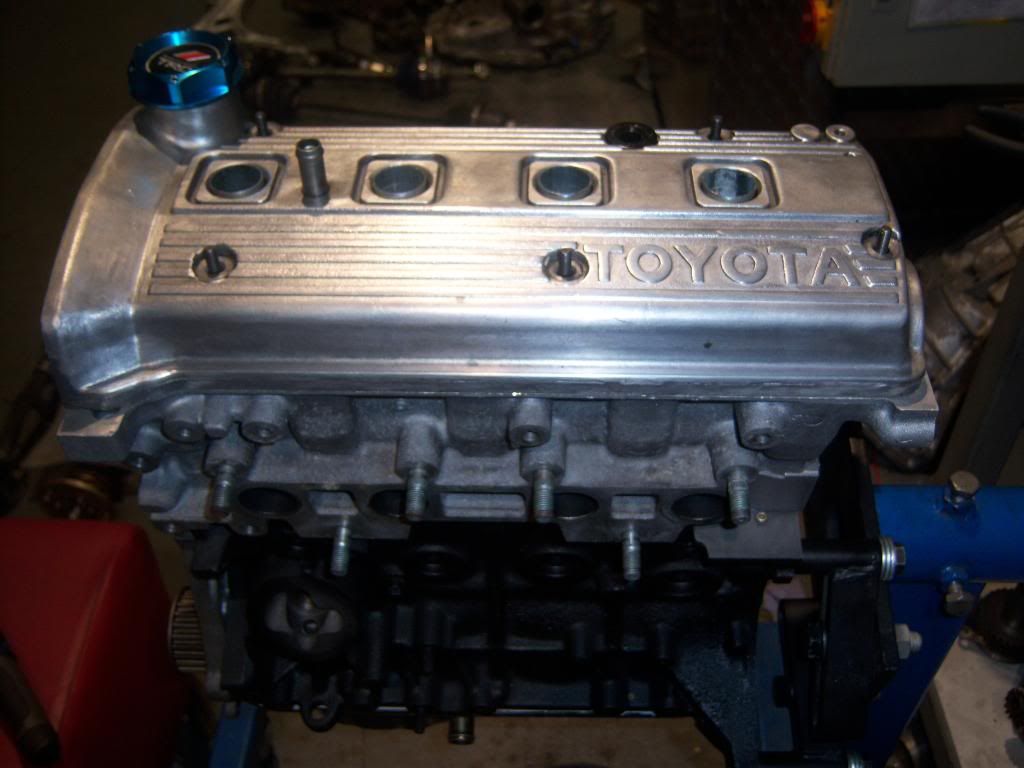
Engine wise I have replaced the old push type distributor cap with a clip-type dizzy cap from a Glanza to suit my new blue Ultra leads. These are the best leads you can get I fully recommend them. I also made up a new induction kit pipe and fitted a HKS Mushroom filter and done away with the cheap carbon look filter from before. I removed the faded old rocker cover and replaced it with a freshly polished Glanza turbo rocker cover. Along with this was a blue alloy oil cap and a blue breather filter.
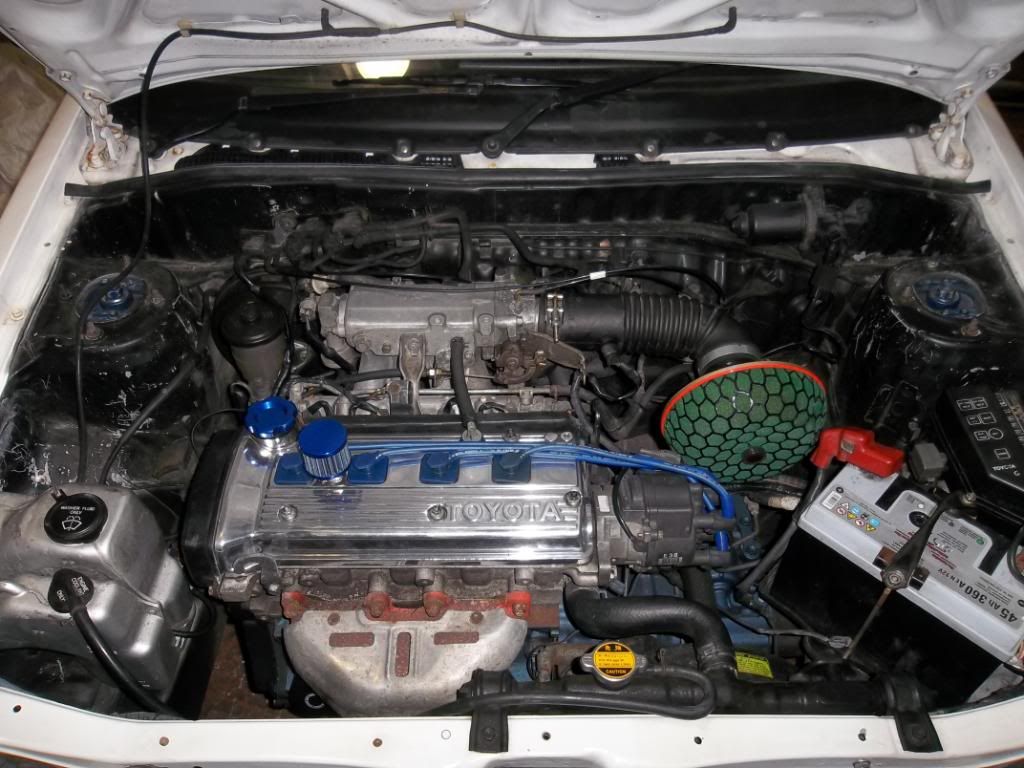
I tidied up the wiring in the engine bay, replaced the missing battery clamp, wired in a new horn which was missing and replaced the two handbrake cables to the rear disc brakes. I also cleaned the throttle body as it was sticking slightly.
I also replaced the missing cigarette lighter with a new one. All small stuff really but trying to put the car back as original as possible.
Next on the list is a set of original Toyota speakers http://www.ukstarletclub.com/forums/public/style_emoticons/#EMO_DIR#/smile.png
If anyone has an original Toyota CD player / radio I will have it along with the GT Turbo driver's seat. I am also looking for a GT Turbo washer bottle / coolant bottle, the double one. The one in the car now was painted silver and looks utterly terrible so want to replace that and keep the car as fresh looking as possible.
I done a lot of research in regards doing a turbo conversion on the car but I love the n/a raspy exhaust so I am going to leave it as it is. I will fit a thinner headgasket to higher the compression and maybe advance the timing slightly. I am also looking to order a stainless steel manifold from America for it to brighten up the engine bay a bit and help with exhaust flow.
I will put up more pics of how the car sits now soon
Well lads I changed around the intake a bit and made a custom intake pipe fitted with a HKS mushroom filter. Number one the car is now drinking petrol and number two the power of the car has dropped significantly. I think the filter is simply sucking hot air out of the engine bay which is useless.
I have bought a full standard air box kit with original cold air feed to the front panel that came out of a 98 granny starlet http://www.ukstarletclub.com/forums/public/style_emoticons/#EMO_DIR#/smile.png Along with this I got a HKS performance panel filter from Japan
I hope the new cold air feeding into the intake will improve things once again. I have decided to order a brand new polished Civic rad and a polished Stainless steel 4-2-1 exhaust manifold. These are on the way from America as we speak http://www.ukstarletclub.com/forums/public/style_emoticons/#EMO_DIR#/smile.png My glanza is getting custom cams made up for it in England so I will put my old 5efhe cams into the boxy and change the headgasket for a thinner one shortly. 5efhe cams are about .8mm-1mm higher lift than standard 5efe cams. New black vintage reg plates have also been ordered to freshen it up a bit. The car is slowly coming together http://www.ukstarletclub.com/forums/public/style_emoticons/#EMO_DIR#/smile.png
Recently I picked up an extremely rare ep71 starlet turbo bonnet. There was only ever 29 ep71 starlet turbos imported into Ireland so that will tell you just how lucky I was to find one!
The bar grill did not fit correctly with the new bonnet and sat way in underneath, so instead of getting an ep71 turbo grill I wanted to maintain the original look of the car. Custom brackets were made to push the front grill out in line with the bonnet for an excellent finish.
A lad I knew had two brand new wings and a brand new lower stonegaurd panel all in the original Toyota packaging so while I was painting the bonnet I got them painted and fitted too. A new spoiler was fitted to the rear boot as the old one was a wee bit rough and the boot de-wipered and painted.
This is the car as it sits... Ready for it's final flatten, compound and polish...
Thanks for reading,
Browner.
-
I have a lot of work planned for the car over the next few weeks so said I'd start a build thread... I want everyone's help and opinions as I go, good or bad, so let me know...

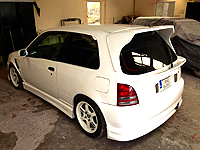
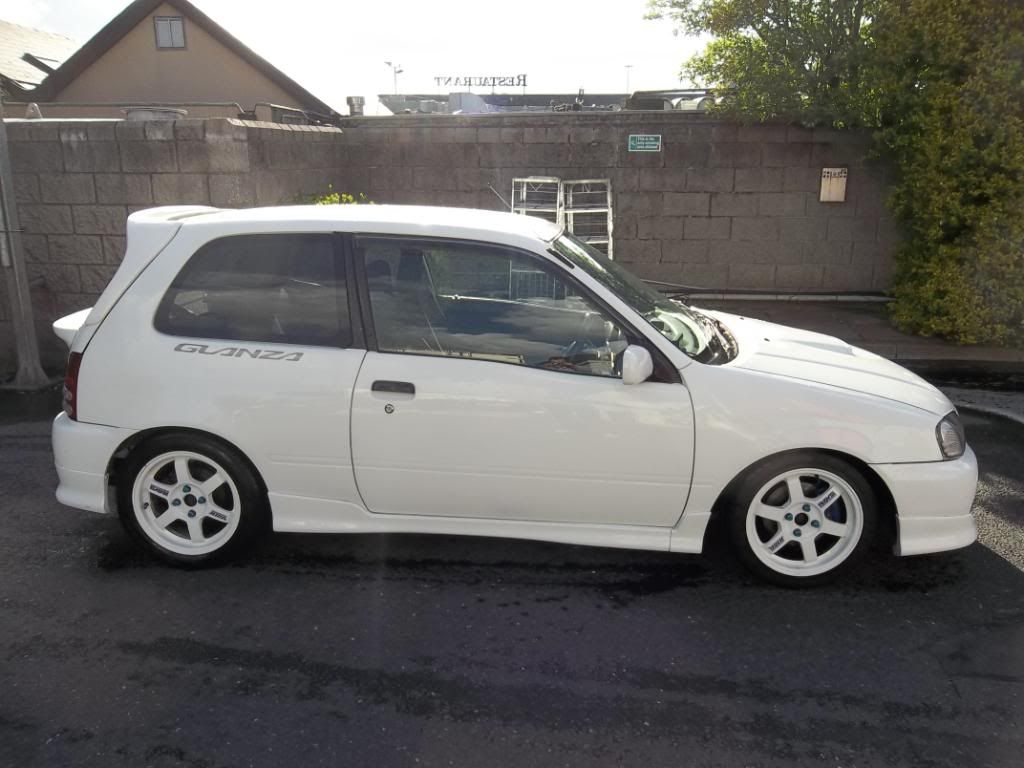
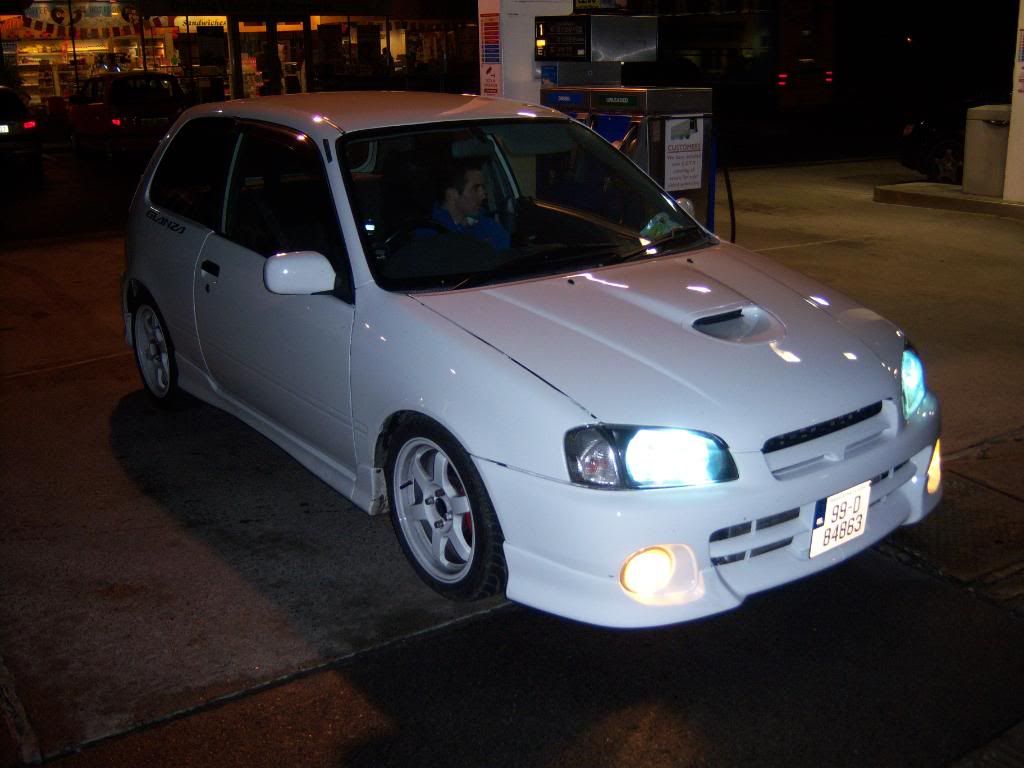
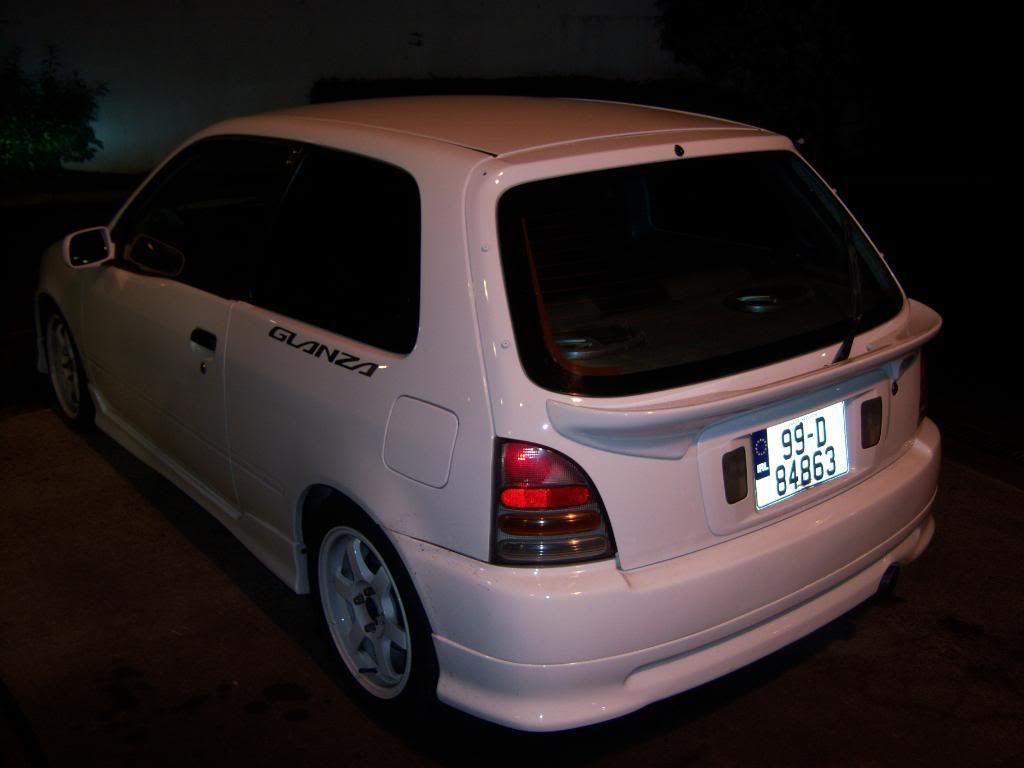
I've had a few Glanzas now but I finally found a good one that I liked... this is my 99 Glanza V when I first bought it...
The car needed quite a bit of tidying but I could see past all the bad points and most of it was an easy fix. The body was clean, the engine compression was very good when we pressure tested it, it wasn't smokey and handled better than my previous cars so decided this was the one if I wanted a big build... I'm planning a fully forged 5e build with maybe a TD05 turbo once it's run in.
I started by taking off the old Autobahn decat which had more holes than a sieve in it. Dunno why lads even bother with them on their cars. Off came the front tints (horrible job never want to do it again) and put the original cat back in, fitted new pads, made up new exhaust brackets, replaced the bald tyres with Uniroyals, fixed the indicator and got it through the NCT for 2 years
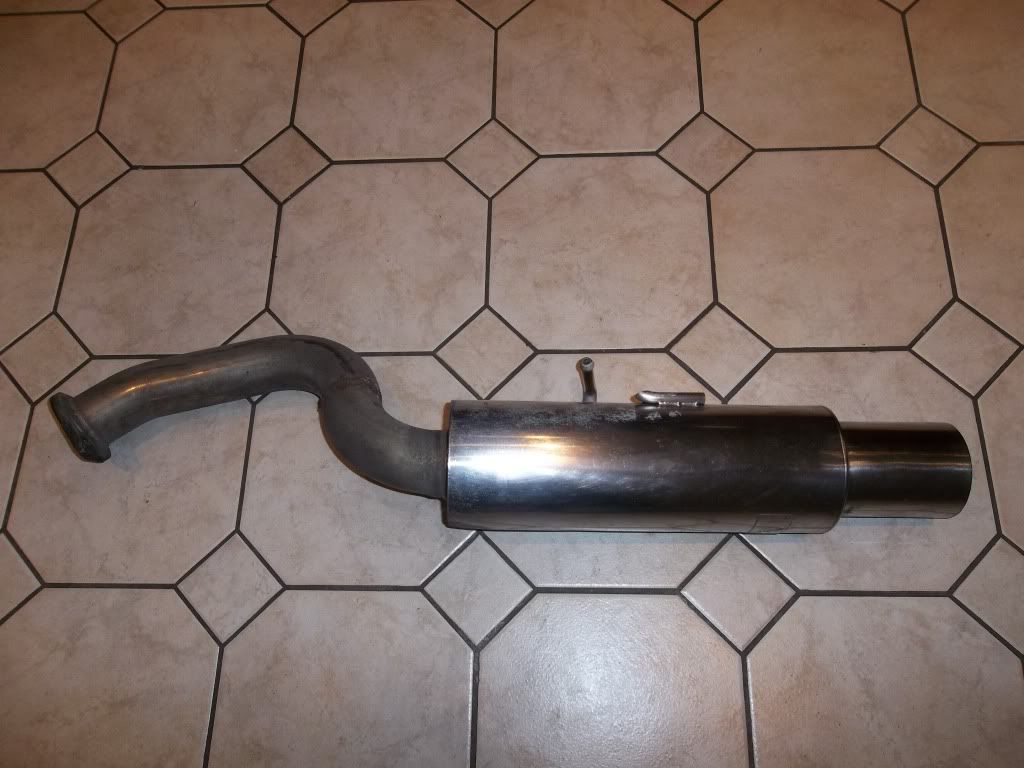
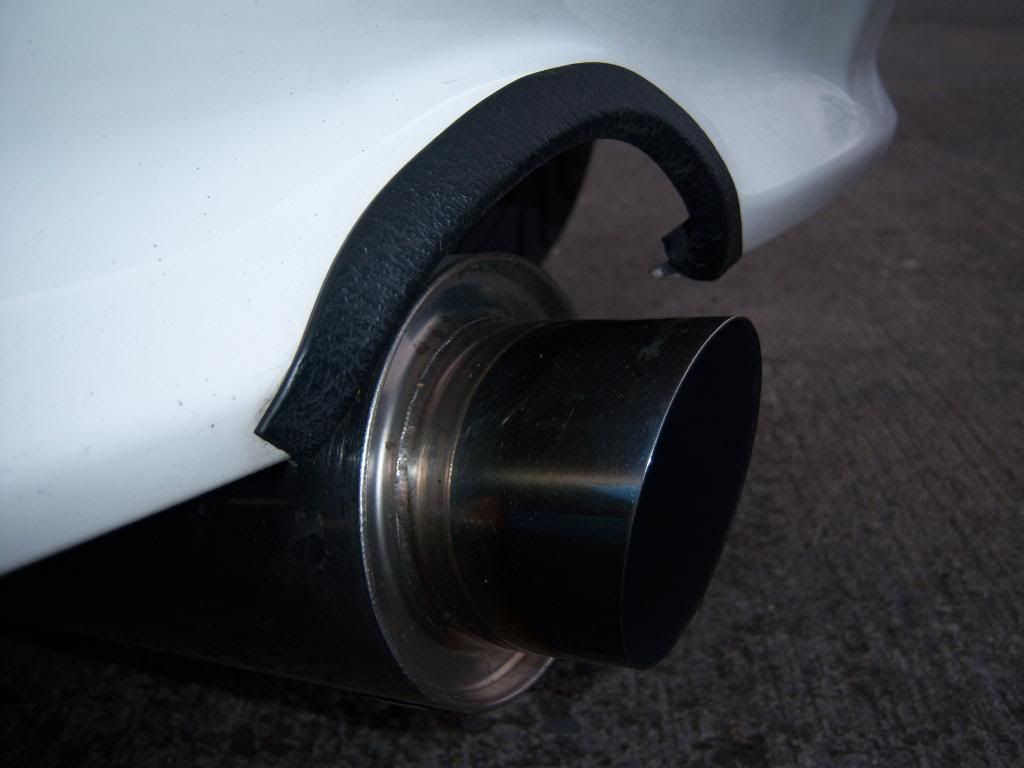
I then took off the homemade straight through exhaust and crappy backbox and fitted a full straight through 5zigen Pro Racer exhaust and Blitz decat. A small piece of the centresection was cut out as there was a slight bore in it to deaden the noise. It's been replaced with a completely hollow pipe and now sounds very loud and raspy, especially for a turbo car.
The next thing on the list was to lose the carbon. I had a carbon bonnet on my old car and didn't really like it. Although the bonnet on this was totally "may not be as advertised" I still wanted to put it back to standard. Eventually I found a clean one still in original 040 white so took that and fitted it. I bought a plain bootlid aswel as the carbon duck spoiler is drilled into my own so didn't want my boot to be full of holes! Still don't know whether to change it or not though...
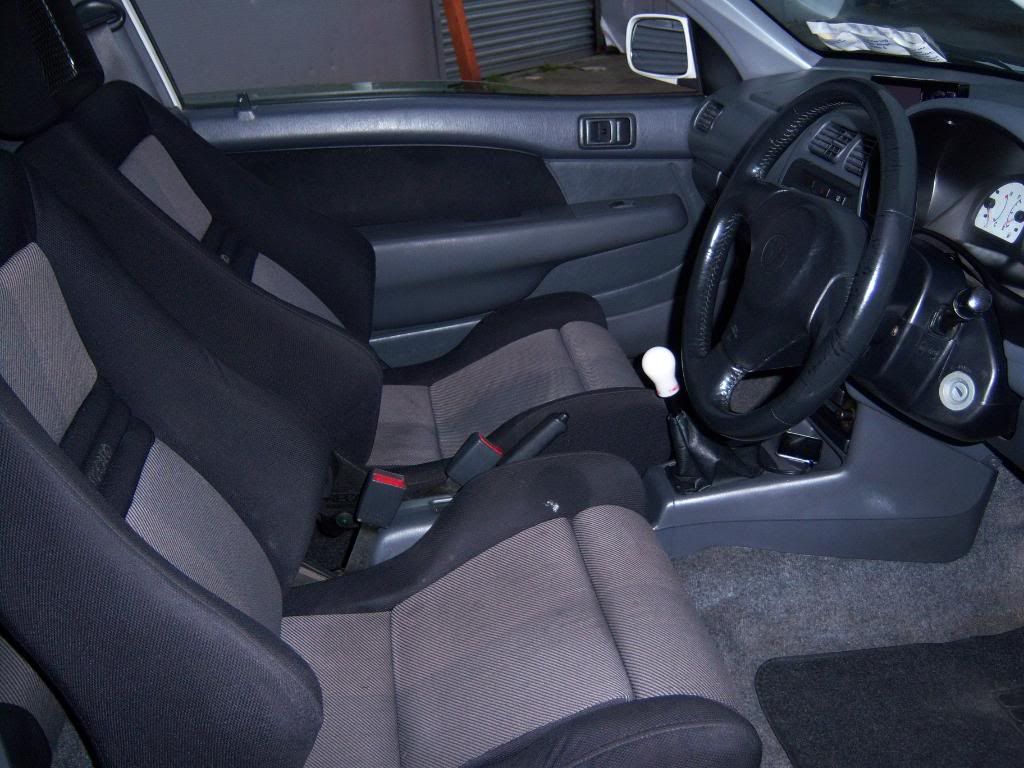
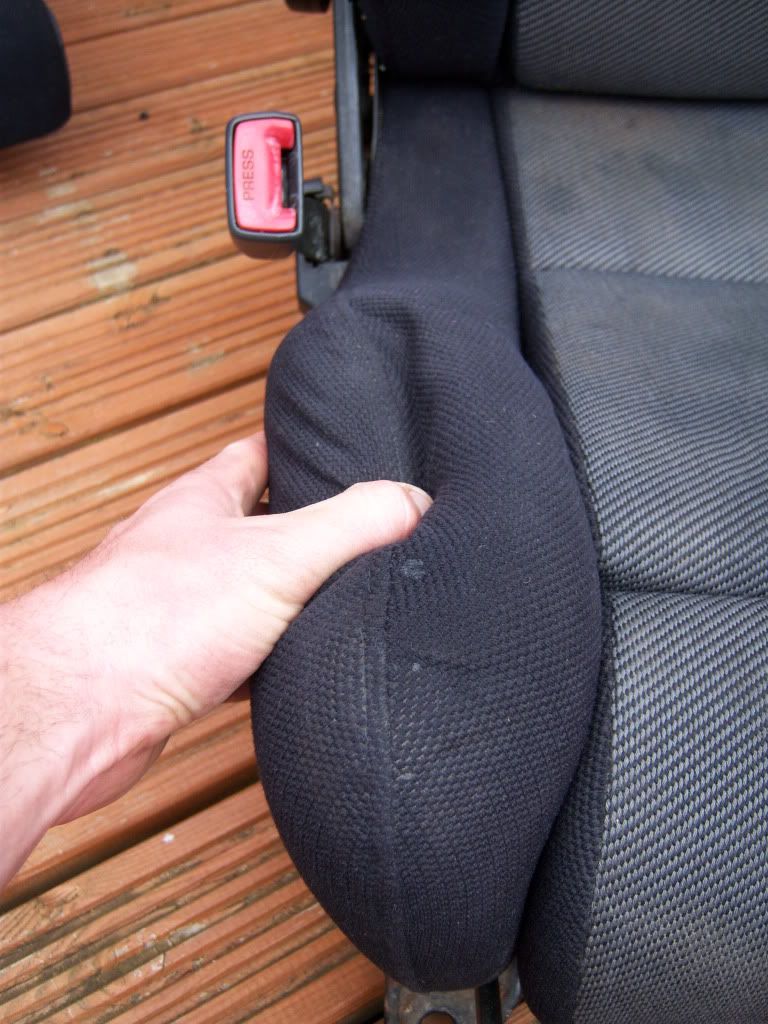
A full Recaro interior came up for sale so just had to have it aswel. It included front and back seats and door cards, which were all in excellent condition. So out came the old interior and fitted the new one. Much comfier than the standard seats.
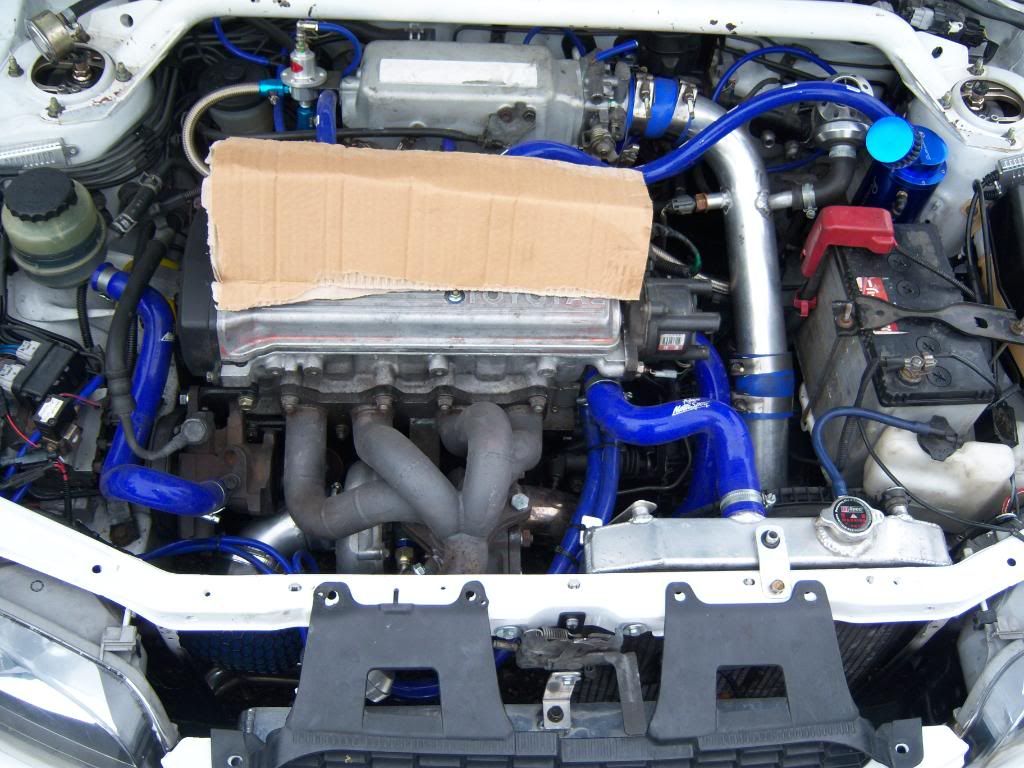
Next I stripped out the old top mount intercooler, standard rad, air con, leads, strut brace and old rocker cover.
I fitted a new front mount intercooler, frount mounted air filter, Super Sequential dump valve, aftermarket TOM's heavy duty front strut brace painted in 040 Toyota Super White and a Civic rad...

also a polished rocker cover, blue oil catch can, blue TRD oil cap and blue Magnecor leads...
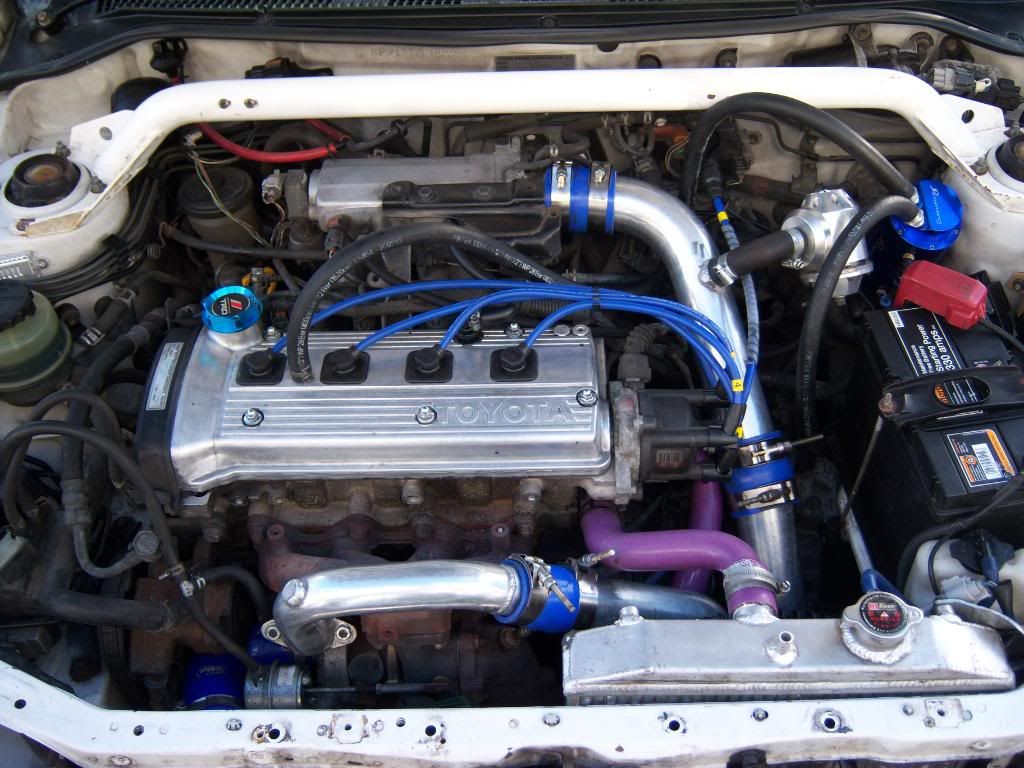
I want to keep all the hoses blue but only had purple Samco ones that came with the Civic rad so will be changing those soon.
On went an 8" TRD sunstrip, some lads will hate it but I like it so it's staying.
The speakers in the car when I bought it were f*cked and the parcel shelf was full of holes so bought brand new Pioneer 6x9's, a new parcel shelf and finally got a set of the two black clips for the parcel shelf to stop it rattling. I pulled out the old silver Greddy turbo timer and fitted a neater Apexi turbo timer to the left of the steering wheel. Also new 4" speakers for under the dash and a driver's side wind deflector that it was missing...
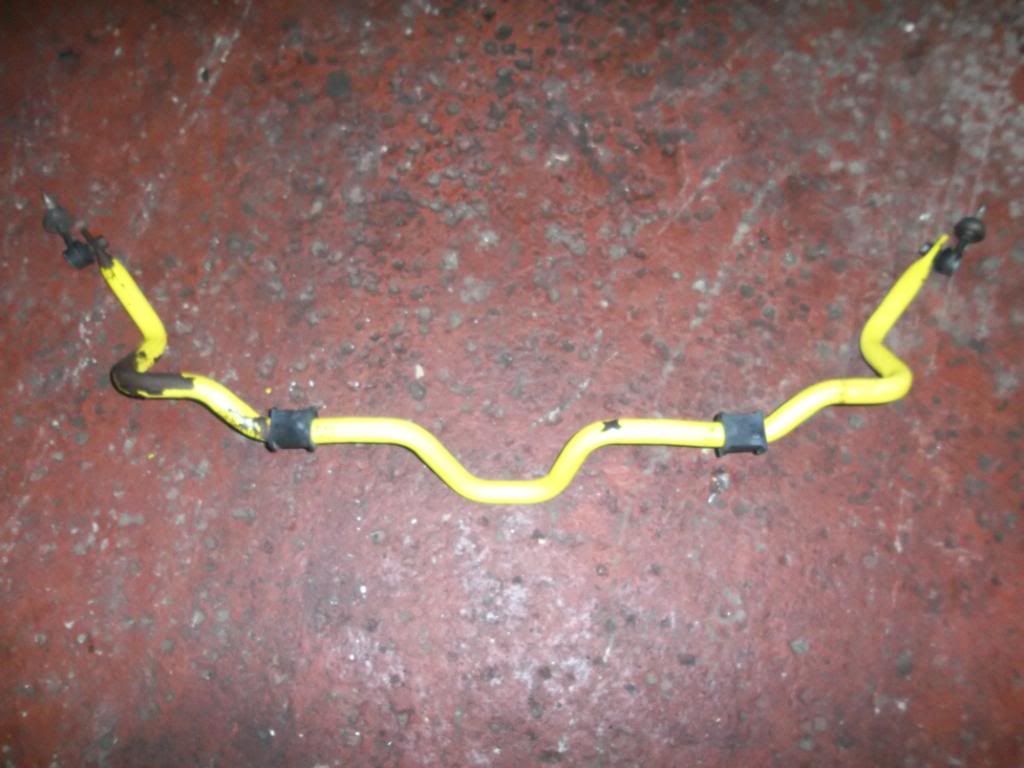
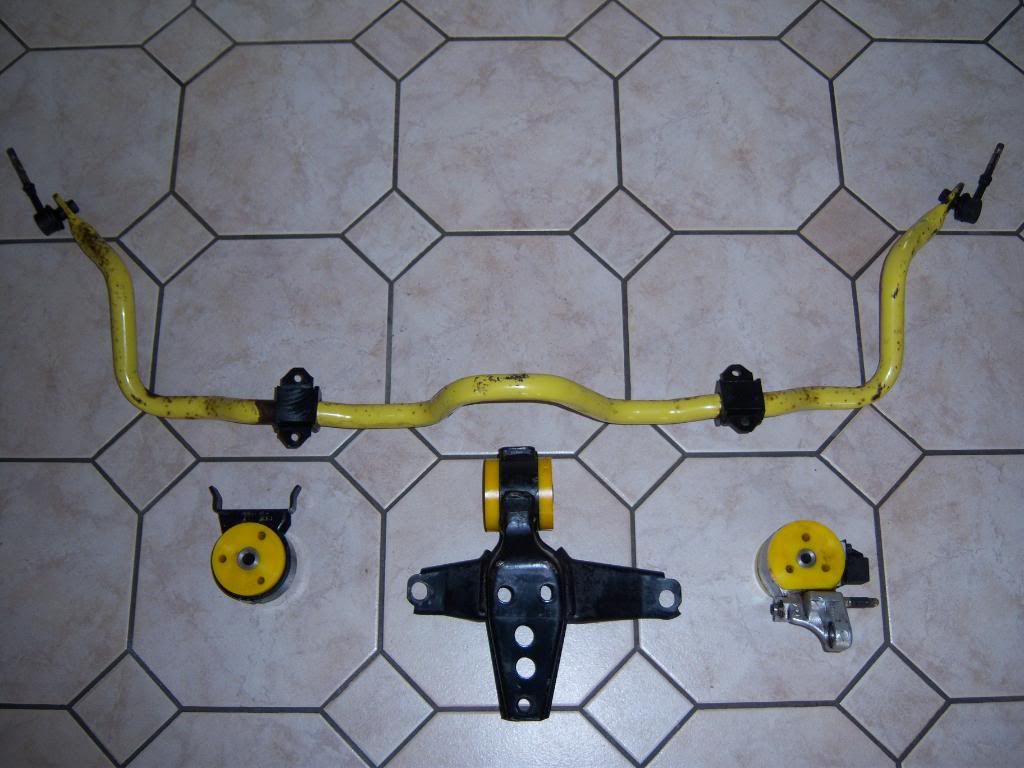
Also fitted was a genuine TRD front anti-roll bar
We also fitted 8000k HID's into the headlights and I'm looking to get the spots done too.
I went over the whole car with Autoglym tar remover, washed it, waxed it and got the interior valeted to clean it up a bit...

That's the car pretty much as it stands now with the following spec...
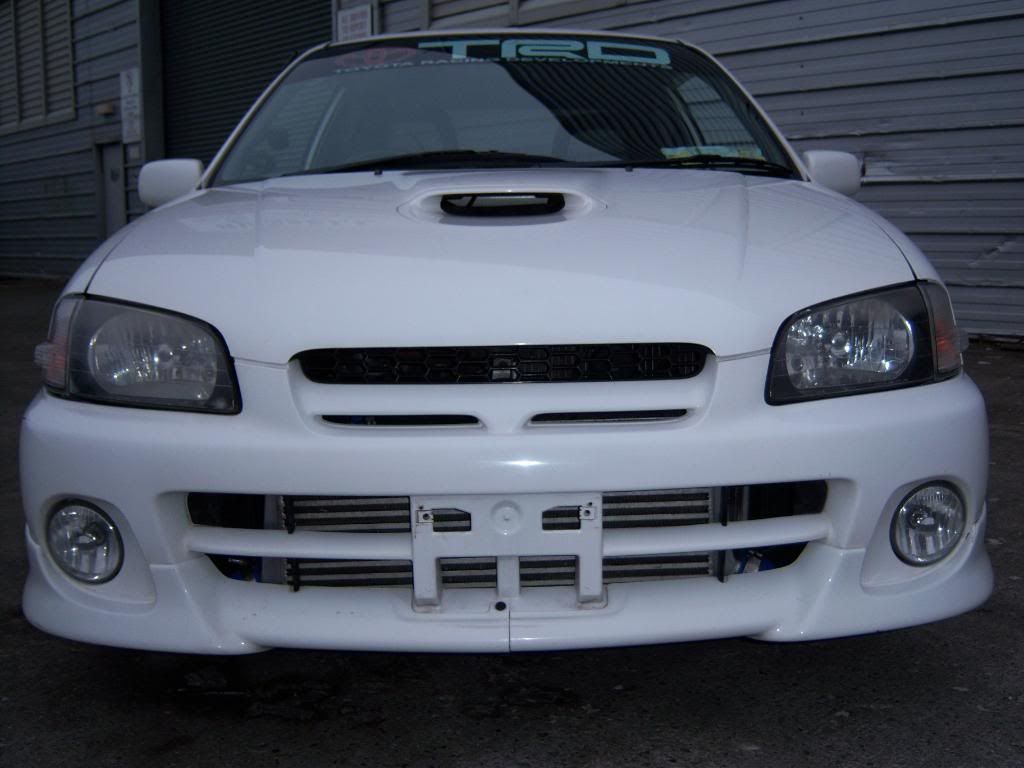
99 Glanza V, White
5zigen Pro Racer Full Exhaust System
Blitz Cast Decat
Front Mounted Intercooler
Frount Mounted Air Filter
Super Sequential Blow Off Valve
Civic Rad
Polished Rocker Cover
Blue Magnecor Leads
Blue Oil Catch Can
Blue TRD Oil Cap
KYB Shocks and Lowering Springs
Dimpled and Grooved Front Discs
Heavy Duty Front Strut Brace
15" White Rota Grids and Uniroyal Tyres
Apexi Neo
Apexi Turbo Timer
HKS Adjustable Actuator
HKS Fuel Cut Defender
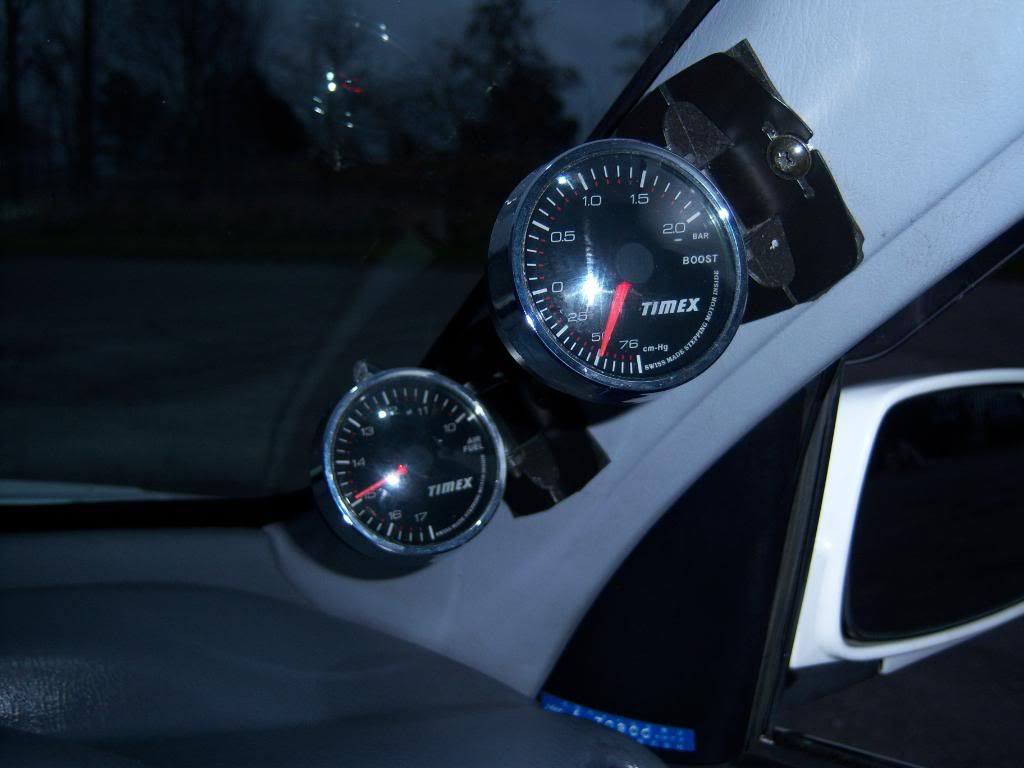
Timex Boost Gauge
Timex Air/Fuel Gauge
TRD Front Anti Roll Bar
White TRD Gear Knob (horrible... gone as soon as I find an original one!)
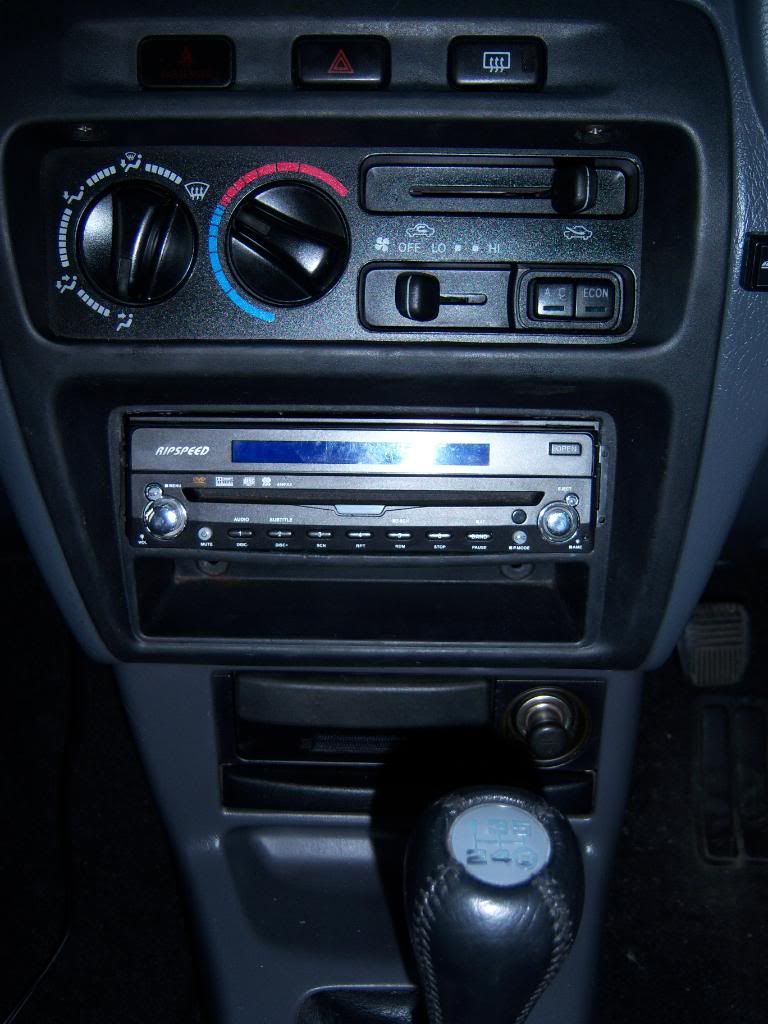
Pioneer 6x9's and Ripspeed CD/DVD Player
8000K HID Headlights
Carbon Culture Duck Spoiler
Genuine Toyota Wind Deflectors
Back 3 Windows Tinted
Alarm and Immobiliser
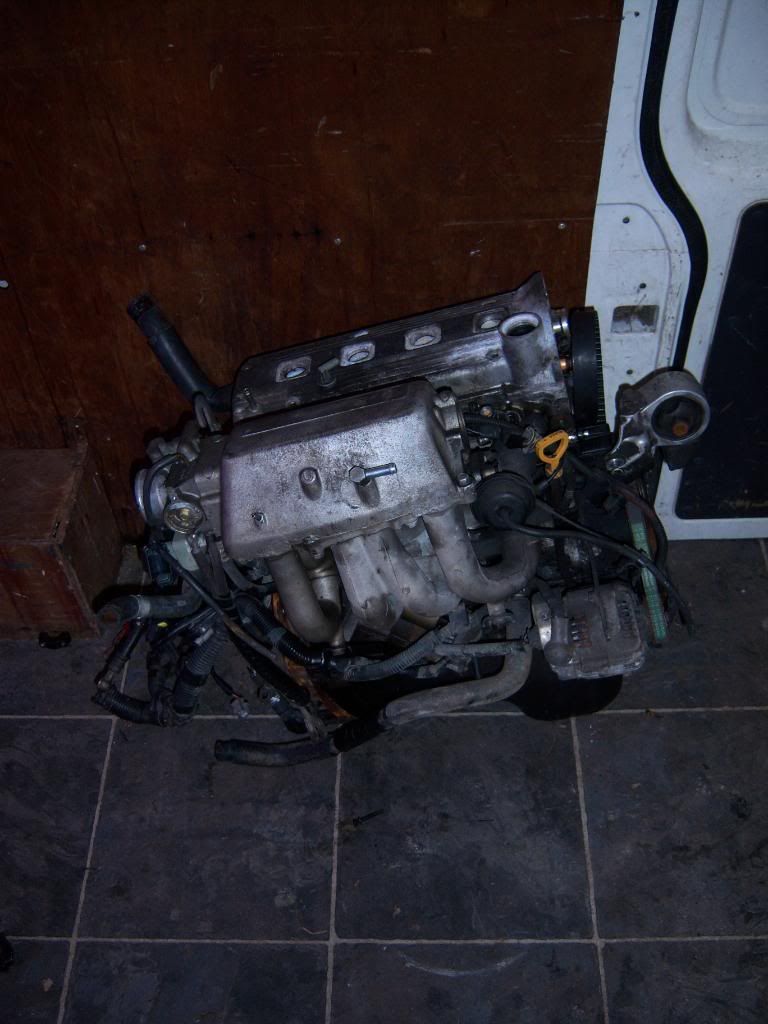
Now time to get going on the engine build...
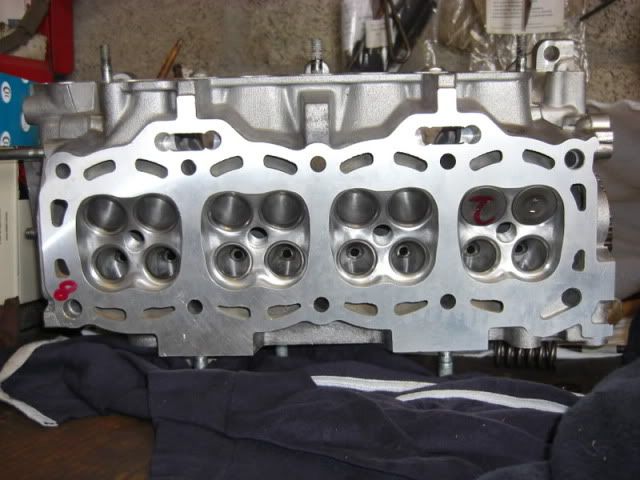
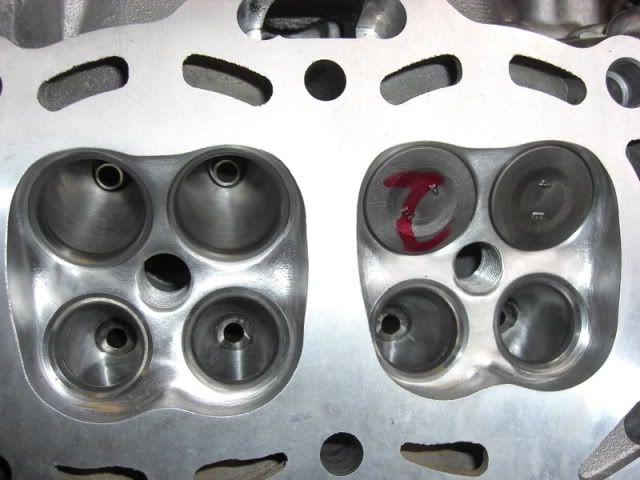
I bought Spuddy's old cylinder head who flowed nearly 440BHP through it on his Starlet last year. The head is immaculate and is heavily machined. It's a fully reworked head... ported and polished, 3 angle valve job, chambers matched in cc's, exhaust ways deburred, uprated Cruisemetal valve springs, custom shims, 5efhe cams and OEM valve stem seals. Can't wait to fit it 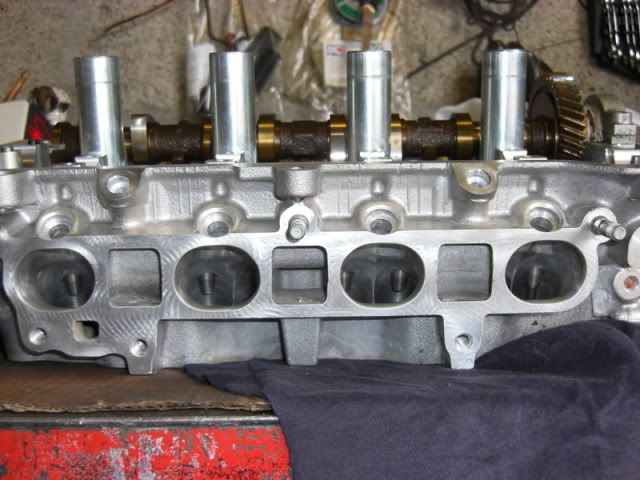

Also picked up a 5e 1.5 Cynos complete engine and gearbox for half nothing so happy days...
Picked up a few more bits now aswel...
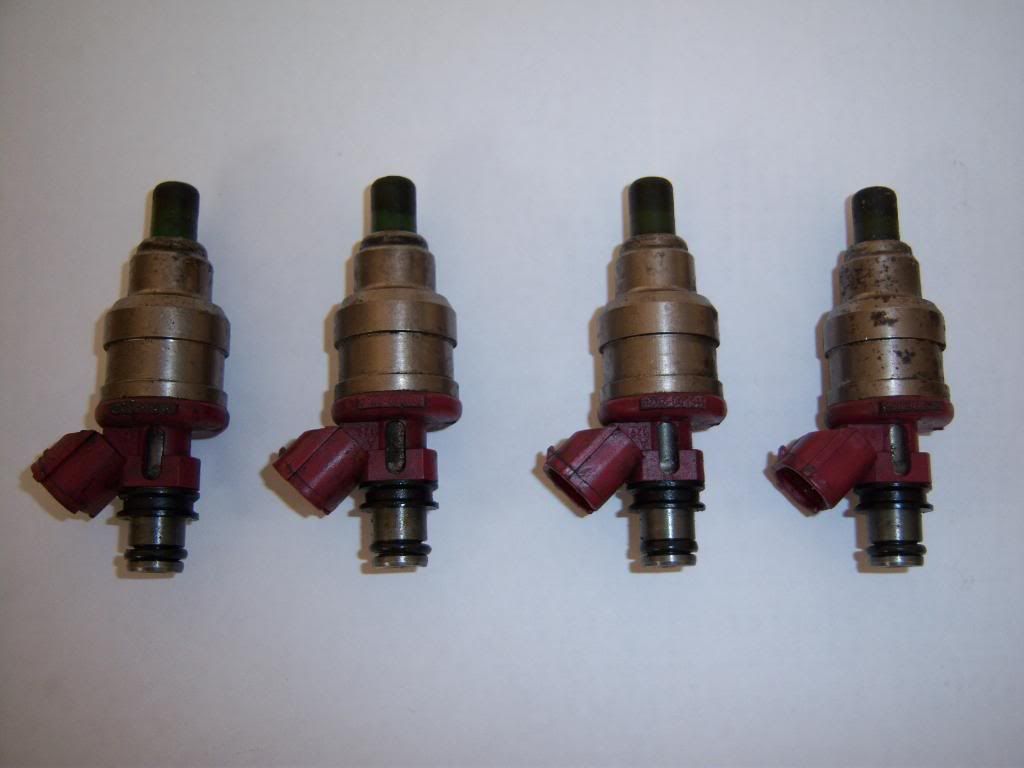
A set of 550cc injectors off a Mazda RX-7. I won't be fitting these for a while til I up the boost and maybe go for a bigger turbo but they are a direct fit to the Glanza and hard to find. Got them at good money aswel
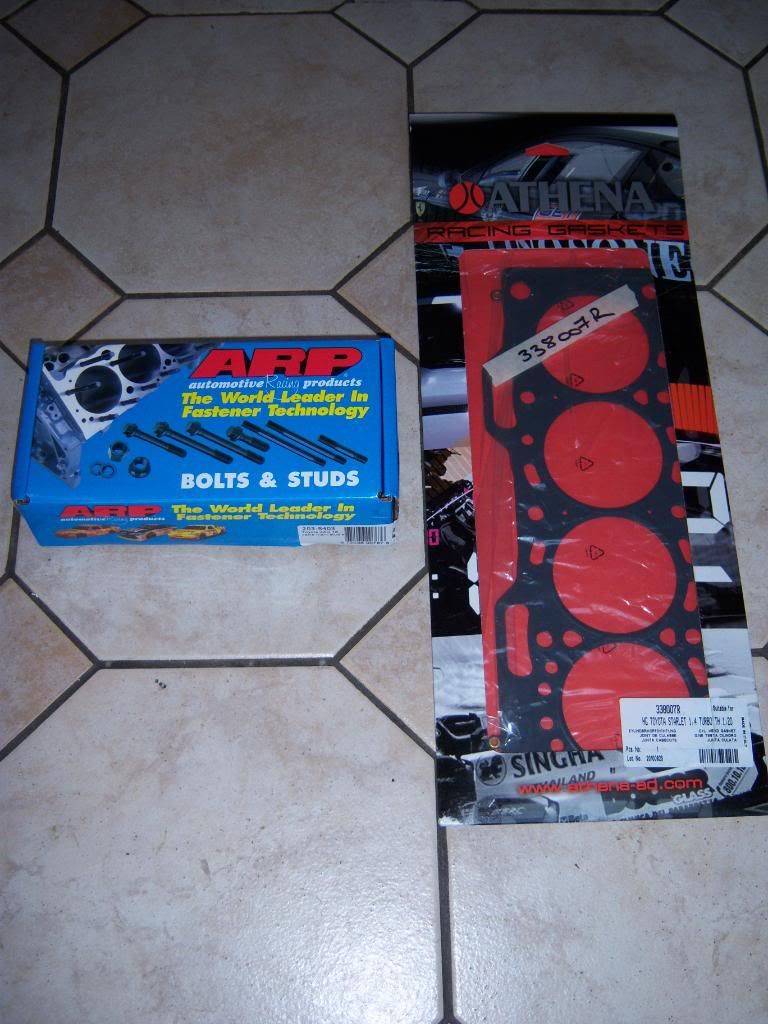
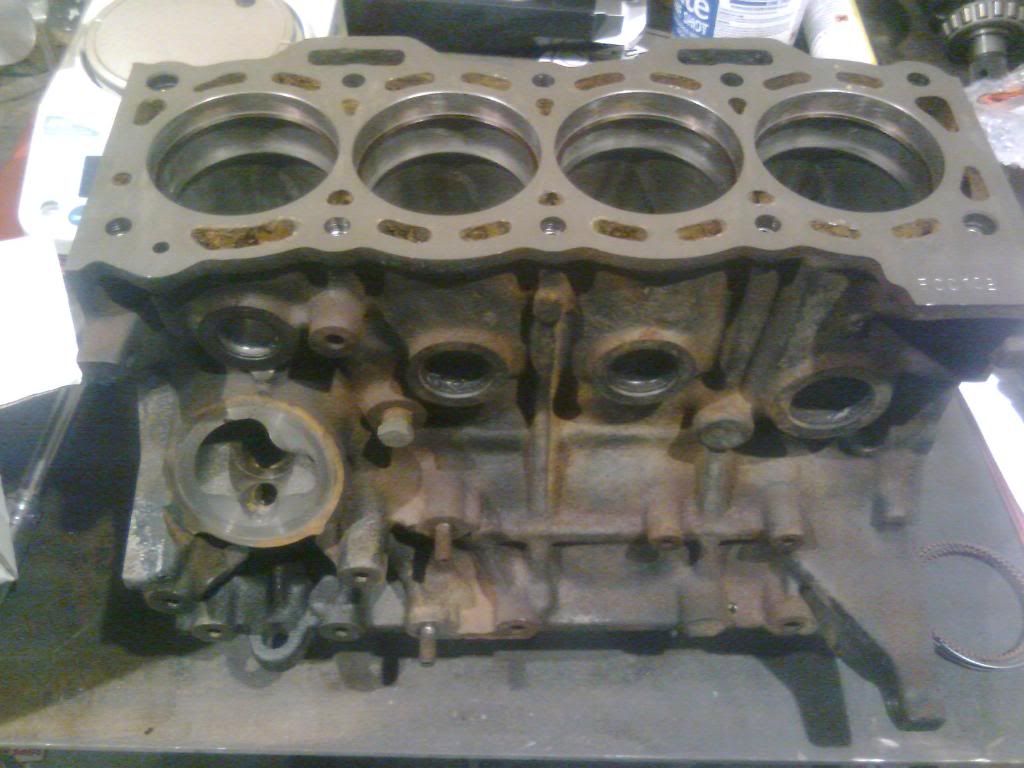
Decided to re drill the block and head and fit ARP main studs and head studs as they're stronger and hold more pressure than the bolts. Just after picking up the main studs and still waiting on the head studs. Also bought an Athena 1.2 steel head gasket. Was going to go thicker but the thicker you go the more lag I'll get so think the 1.2 should be plenty...
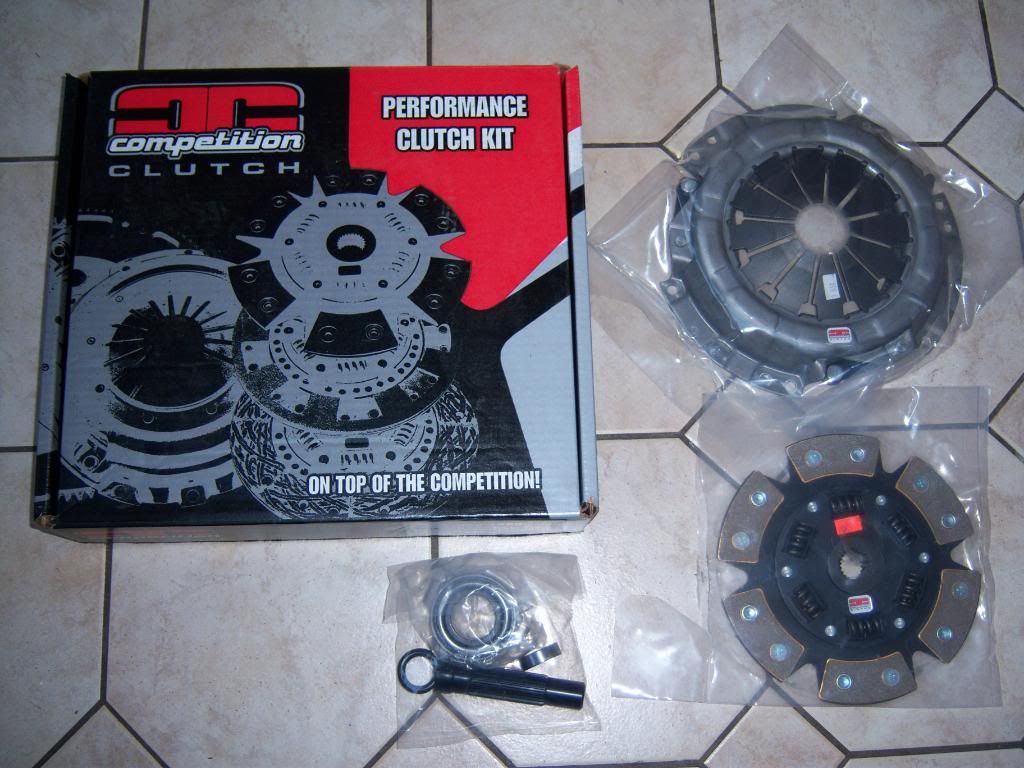
And picked up a 4e CC Competition Clutch from East Coast Customs. It's a stage 4 6 puk clutch so should be more than able to hold big power. Looking forward to getting this in as the clutch in the car when I got it was on the verge of blowing to bits. The 4e clutch plate is slightly bigger than the 5e plate so wanted to use the 4e for the better grip. I'll need a 3e flywheel to connect them as the 3e flywheel has the right pattern to fit the 4e clutch to the 5e crank. Still don't know whether to just lighten a stock 3e flywheel or buy a proper lightened one though...?
And finally sourced a set of 5efhe high lift cams. The intake cam is .8-1mm higher lift than standard and the duration is ever so slightly different. They should be a bit of a help until I decide to get custom spec cams at a later date.

Another quick update...
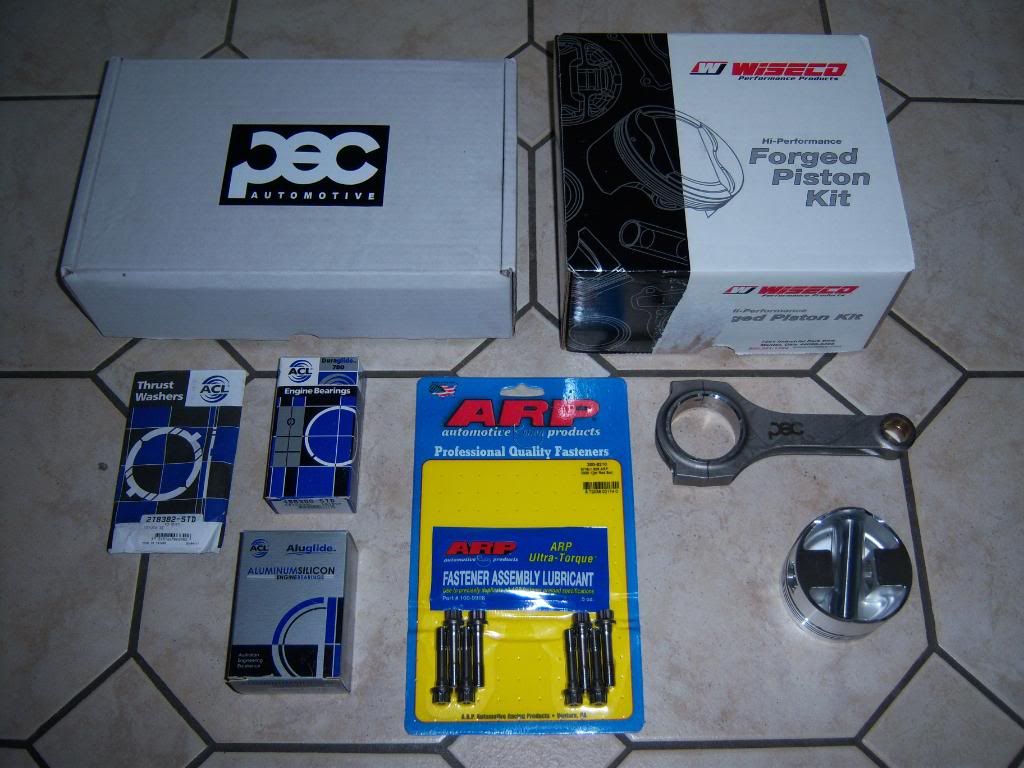
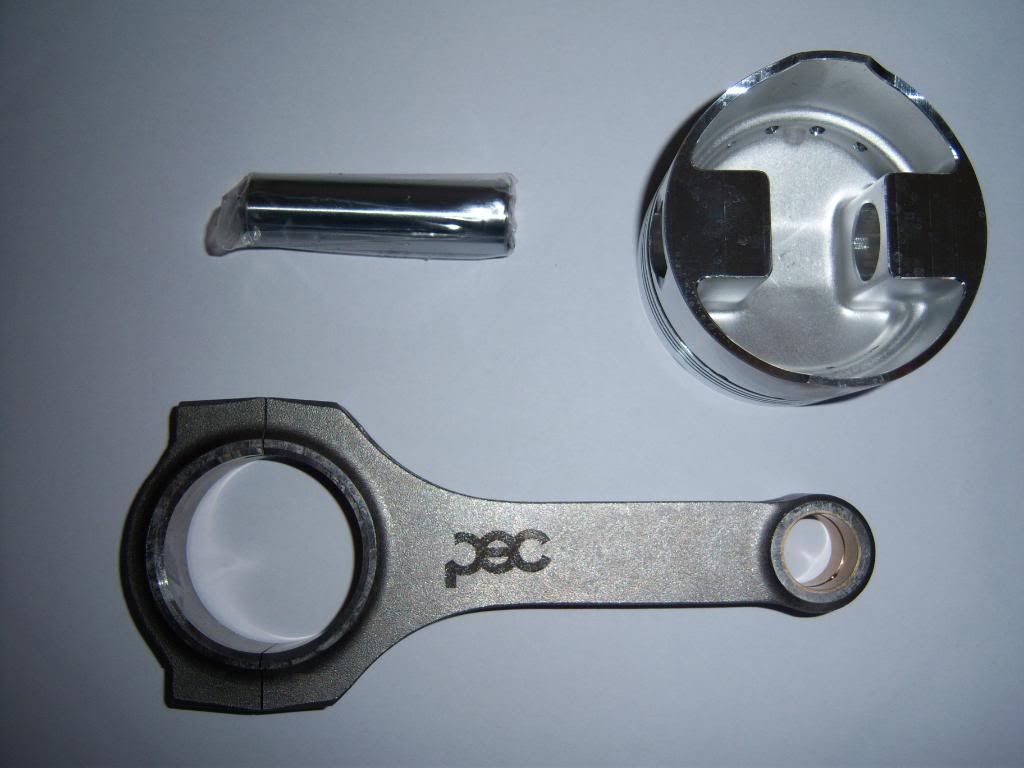
My forged internals have arrived. 74.5mm Wiseco forged pistons with a -10cc dish, PEC forged conrods, ARP rod bolts and ACL bearings (mains, rods and thrust)
We have the engine out and the block is going for machining tomorrow...
Also fitted a Whiteline adjustable panhard rod to the rear to help with the handling a bit. I fitted a new rear bumper aswel with the original factory splitter which improves the look of the back a bit and got a brand new Glanza badge for the front bumper.
Came across a "may not be as advertised" OEM gearknob aswel so finally got rid of that tacky TRD one. Got a new plastic sorround for the cd player aswel because my old one had been cut for a double din so looked crap. It tidies up the dash nicely and has a handy tray aswel. You have to love granny spec starlets!
Haven't updated in a while but the car is coming along nicely now. I sold the old bootlid and carbon duck spoiler and put it back to standard and also sold the neo as I am going for a full standalone ECU in the near future.
Today I fitted a Whiteline front anti roll bar to the front and have a set of Whiteline polybush engine mounts to go in with the new engine. These should really help keep the engine solid.
Got a few more little bits like a 1 piece boot carpet to fit to the rear Recaro's as the original 98/99 spec boot carpet has the split for the seats to open. It needed a good clean but came up good in the end.
Engine wise the block is back from the machine shop so am hoping to have the engine finished by the weekend with a bit of luck. The block was bored, decked and honed to suit the oversized pistons and the block and head drilled and re-threaded to suit the head studs and main studs. Still waiting on a lightened steel flywheel so that might hold me up a bit.
While I've been waiting on the machining I've been putting together my turbo kit. Over the last two weeks I've bought a new mild steel manifold, downpipe, large turbo, 38mm external wastegate and the new type Apexi boost controller in black (the silver ones look gank). Need to rotate and weld the turbo but I won't be fitting this until I have over 1000 miles done on the new forged engine with a CT9 so have a bit of time yet. Can't wait to get it all in though
Cleaned the engine bay and decided that while I was doing it I may aswel do it once and do it right so I'm going to re spray the entire engine bay in 040 Toyota Super White and thoroughly clean all the hoses, cables etc so the bay is "may not be as advertised".
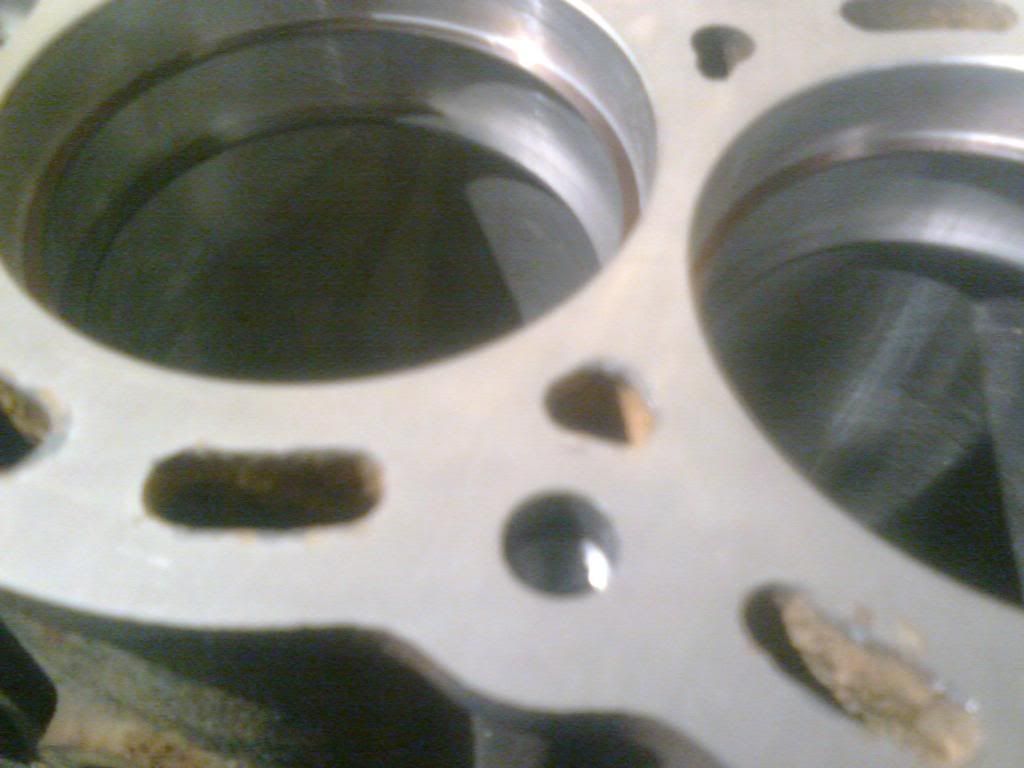
Also made a quick call to see how the block looked after the machining. The block has been bored, decked and honed...
The rods and pistons balanced...
And the block re-drilled and re-threaded to suit the new ARP head studs...
Haven't updated in a while but have been kept busy and got some nice new parts for the car. The bottom end is now fully built. Have to try a few different sets of shims to make sure all the clearance is spot on.
The car itself is off getting a bit of paint. The wheels have had a full refurb and are now sprayed the same colour as the car. I'm also getting the engine bay tidied up and have a new genuine Toyota mid spoiler for the boot which has to be painted aswel.
I got the new turbo rotated and welded today so that's ready to go too.
I recently came across another set of Starlet fishnet Recaro's. They were cleaner than my old set plus they were 98/99 spec ones with the split rear seats so swapped them with my old set. I got some bolsters replaced, swapped over some of the back pieces as the Recaro logo was well worn on some and also replaced the two headrests which were torn. I will put up before and after pics in the next few days. So between the two sets I have now made one 100% totally "may not be as advertised" set so I'm delighted
This was the bolster's before they were restored...
I will put up after pictures when I have them cleaned...
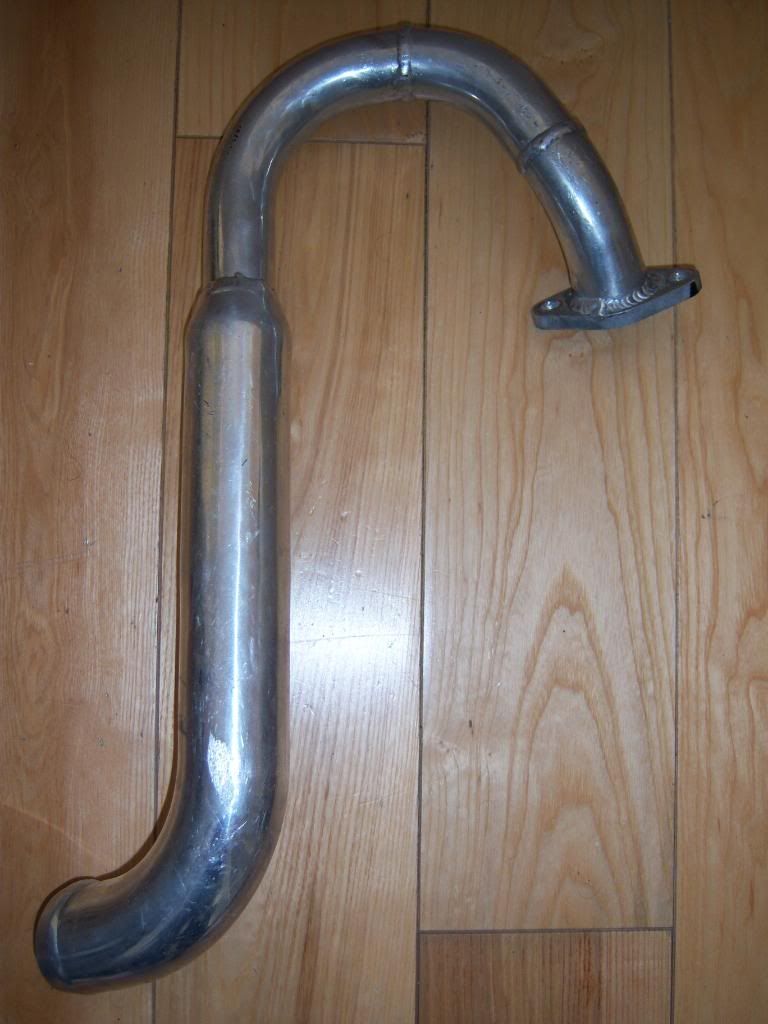
I bought a brand new short pipe for the front mount intercooler to come straight off the turbo down to the corner of the front mount. This greatly reduces the length and bends in the pipework and will help to reduce lag. I'm just waiting on a new blue silicone reducer elbow that Paul Roose is maing up especially for the car in Roose Motorsport.
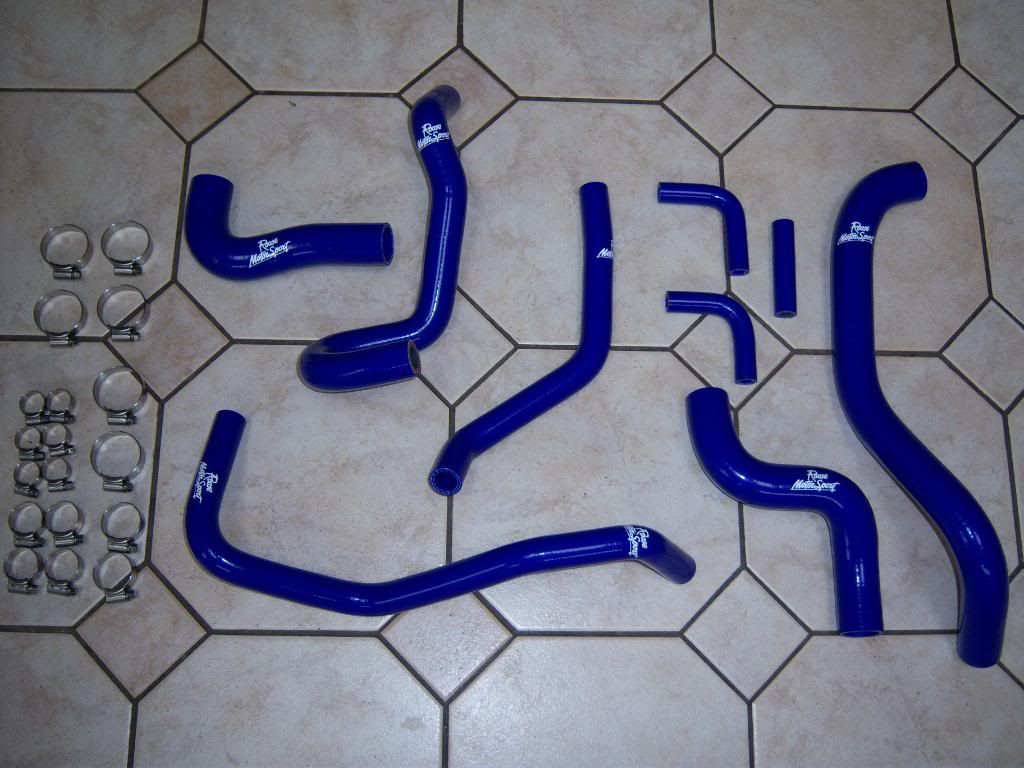
I received a full hose kit with high grip heavy duty clips this morning courtesy of Roose Motorsport. Highly recommend him he is very helpful over the phone and will do his level best to provide what you need.
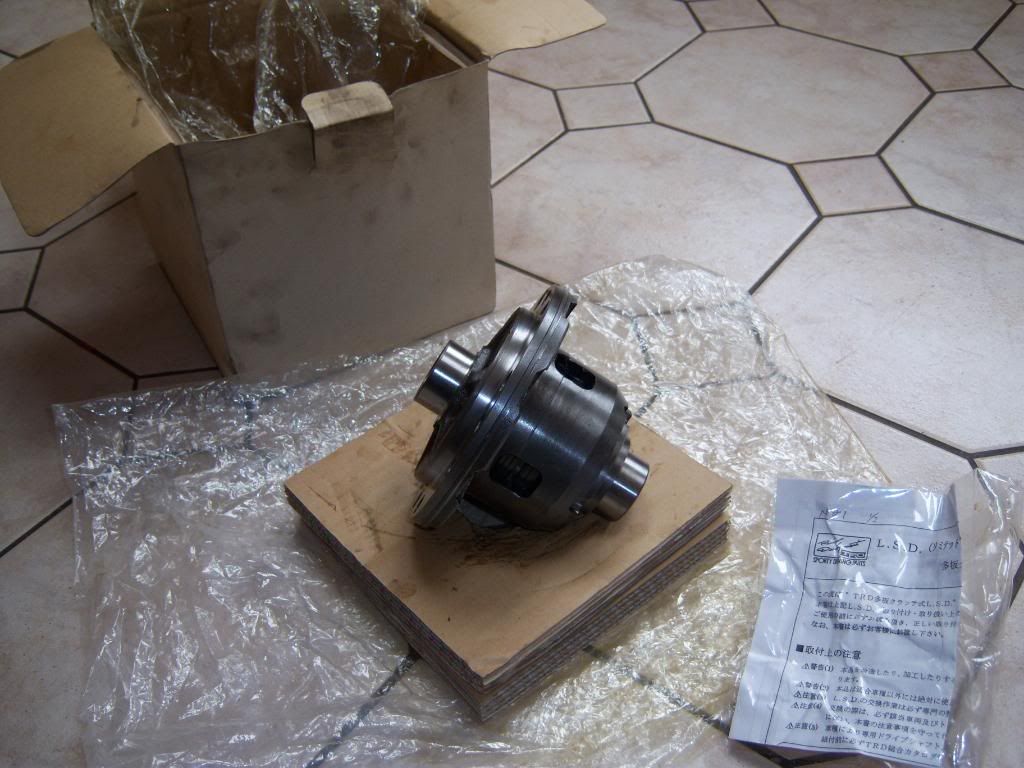
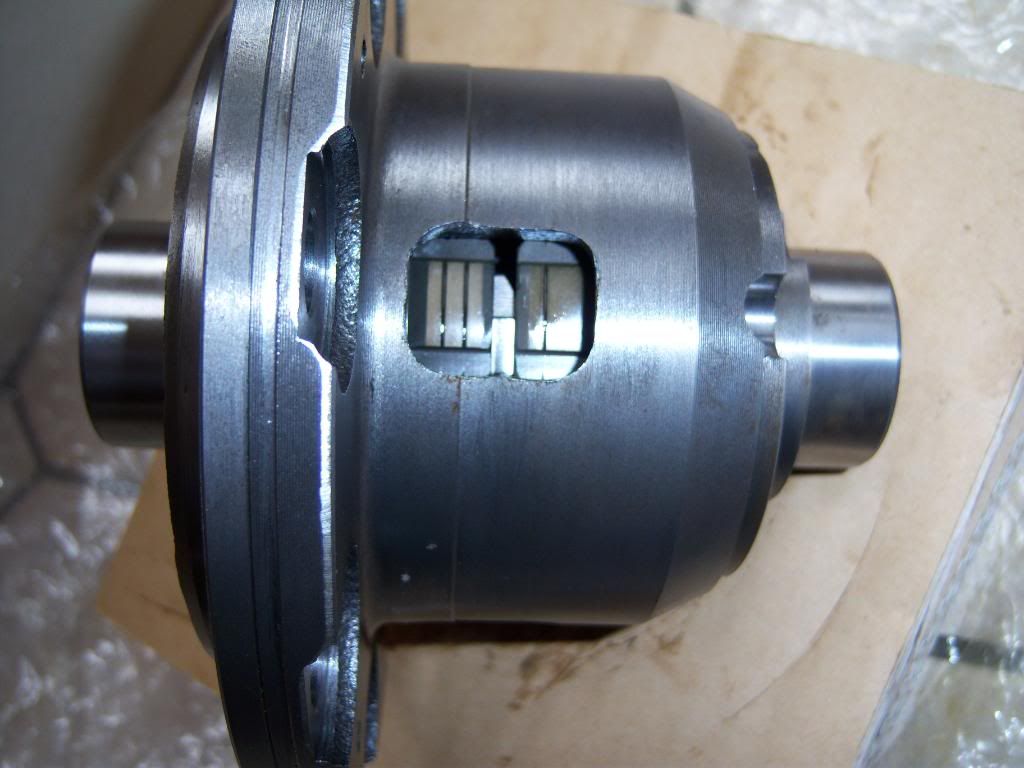
The low point... the diff lol. I was driven to drink after the money I spent on this and began to question my sanity aswel lol. Still feel like drowning my sorrows even now. Anyway picked up a brand new TRD mechanical diff. I won't say it was at handy money like most of my other stuff because it most definitely wasn't and in all honesty I don't think I can really afford it now looking back. I was going to go for the helical gear type diff as they aren't as clunky but after reading up on them I wasn't happy with the uneven power distribution to the wheels and the handling characteristics lads have described when driving with them. I wanted to do things once and do it right so wanted a brand new one. I would have had to buy a rebuild kit plus labour if I bought a 2nd hand plate diff. The TRD plate type diff will send power 50/50 to the wheels and should be spot on. They have to be rebuilt over time and can be a little clunky but I think that's a small price to pay for what should be a really good diff. Have to order New bearings from Toyota, get them machine pressed in and have the diff checked to see if it needs any preload before it goes into the box. What am i after getting myself into lol
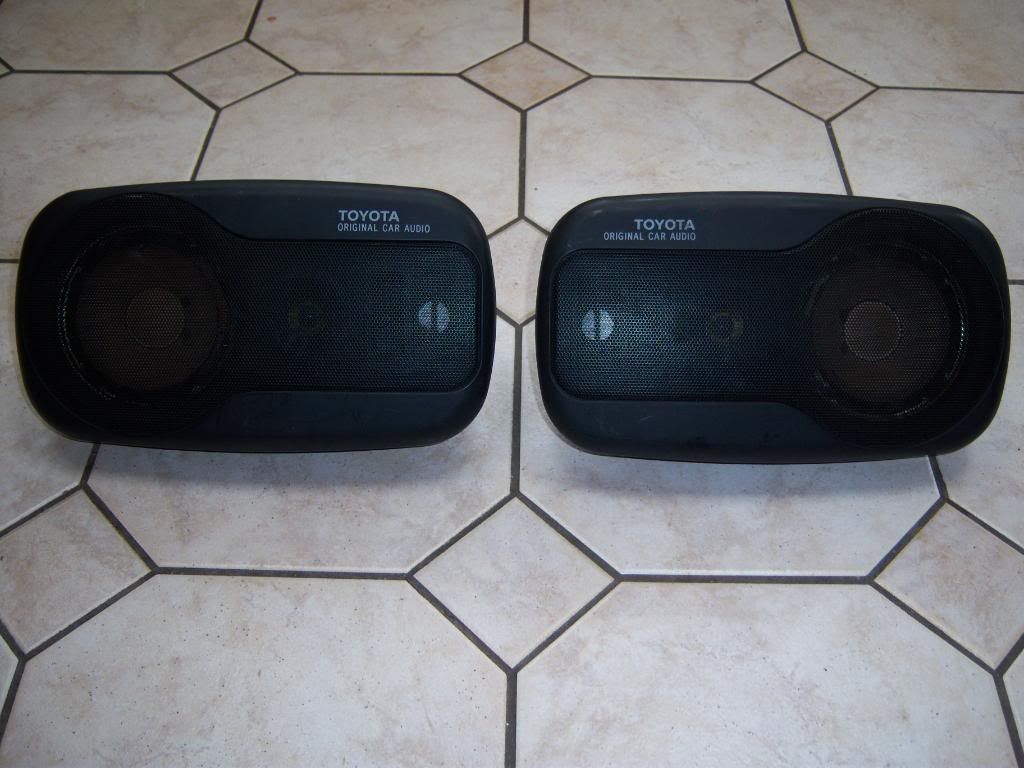
I'm looking to keep the car as original as possible so picked up a set of original Toyota Glanza speakers for the rear parcel shelf. I'll fit these when I get the car back from paint. I'm on the lookout for and original Toyota radio/cd player to match too.
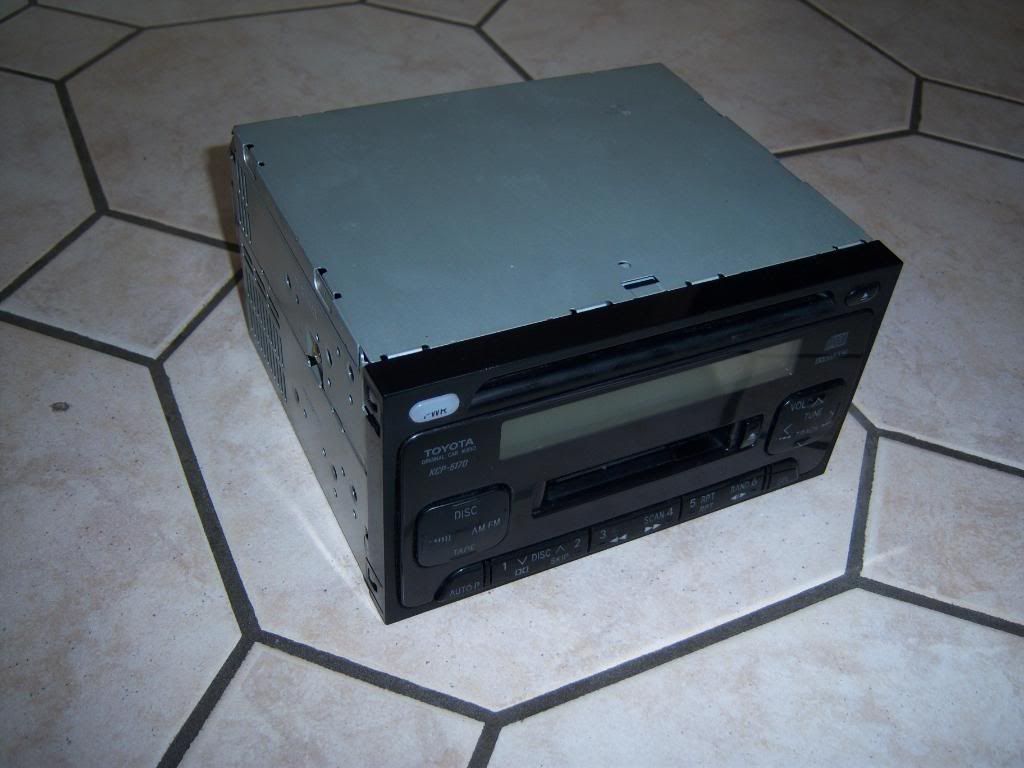
After loads off searching got my hands on an original 98/99 spec Glanza radio/cd player from a member on here... cheers mate
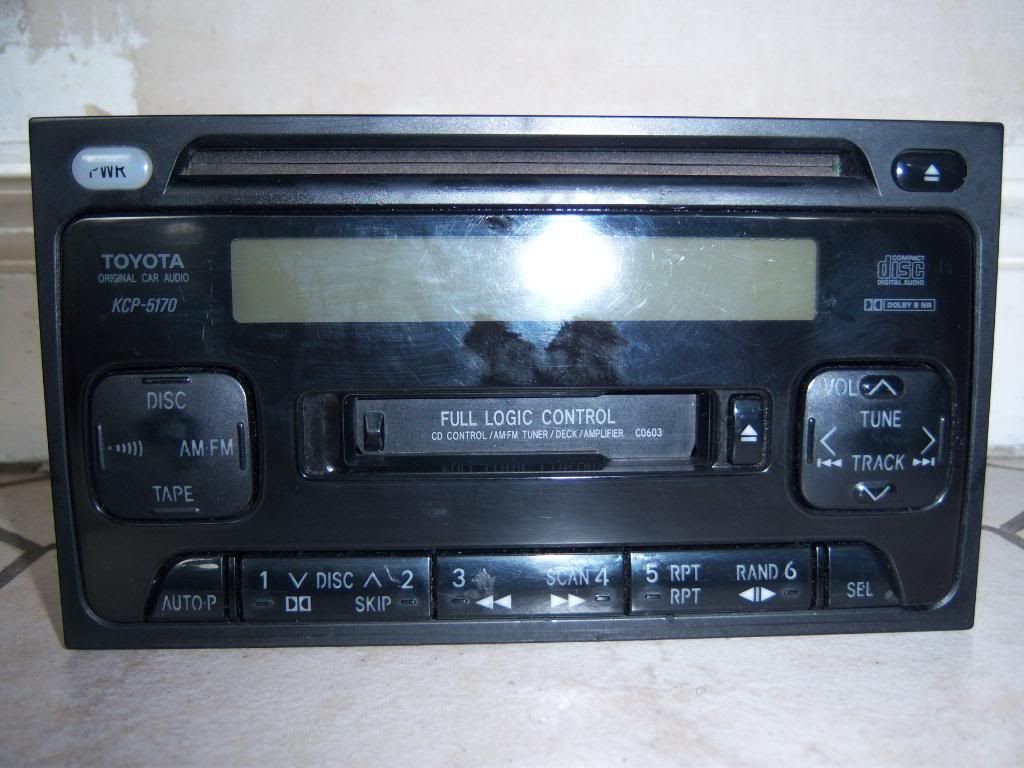
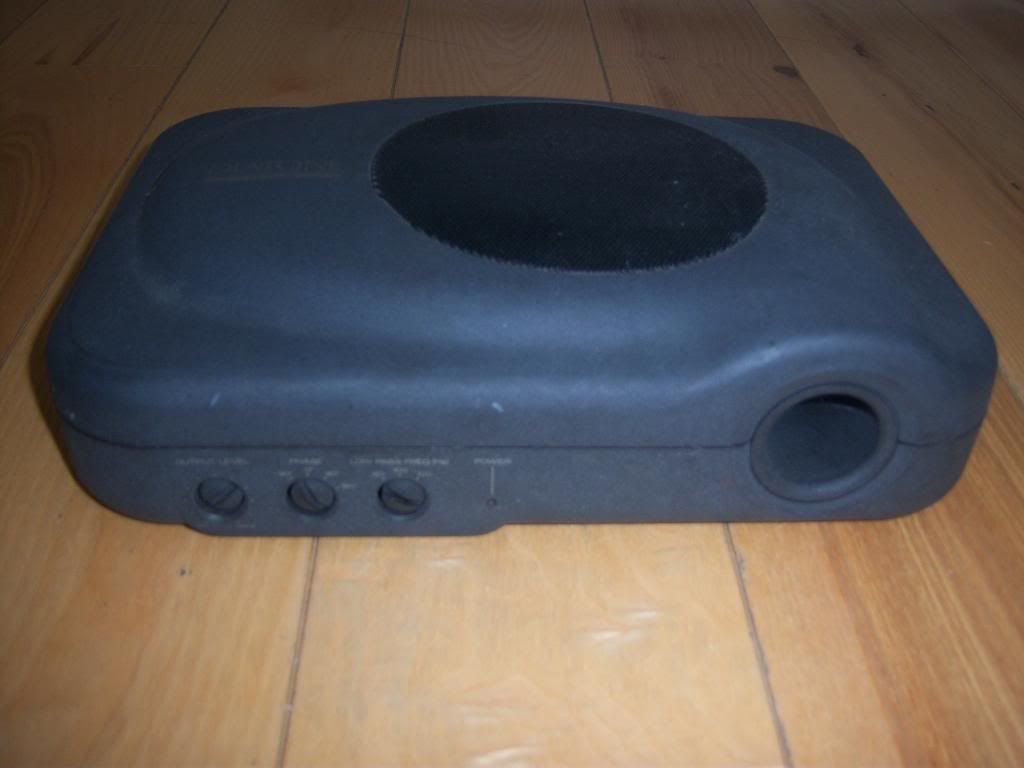
To match the CD player I also got my hands on an original factory extra amp...
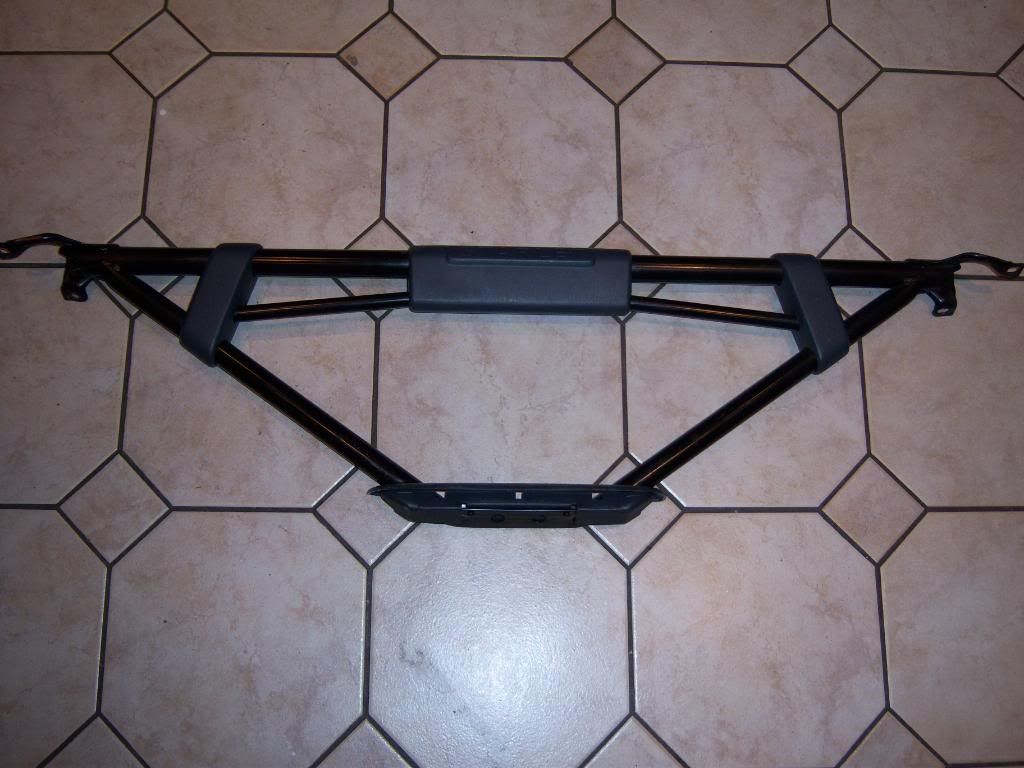
Staying with the original stuff I finally found an OEM 3 point boot strut too...
Finally got the bracket for the back seats amd the split boot carpet for the 98 spec Recaros...
Also got a few sets of original Glanza mats which I'm busy cleaning at the moment I'll post up pics tomorrow...
The engine is fully built and ready to go. Everything was fully cleaned using an oxidising kit to remove any rust and the block painted black with high temperature paint...
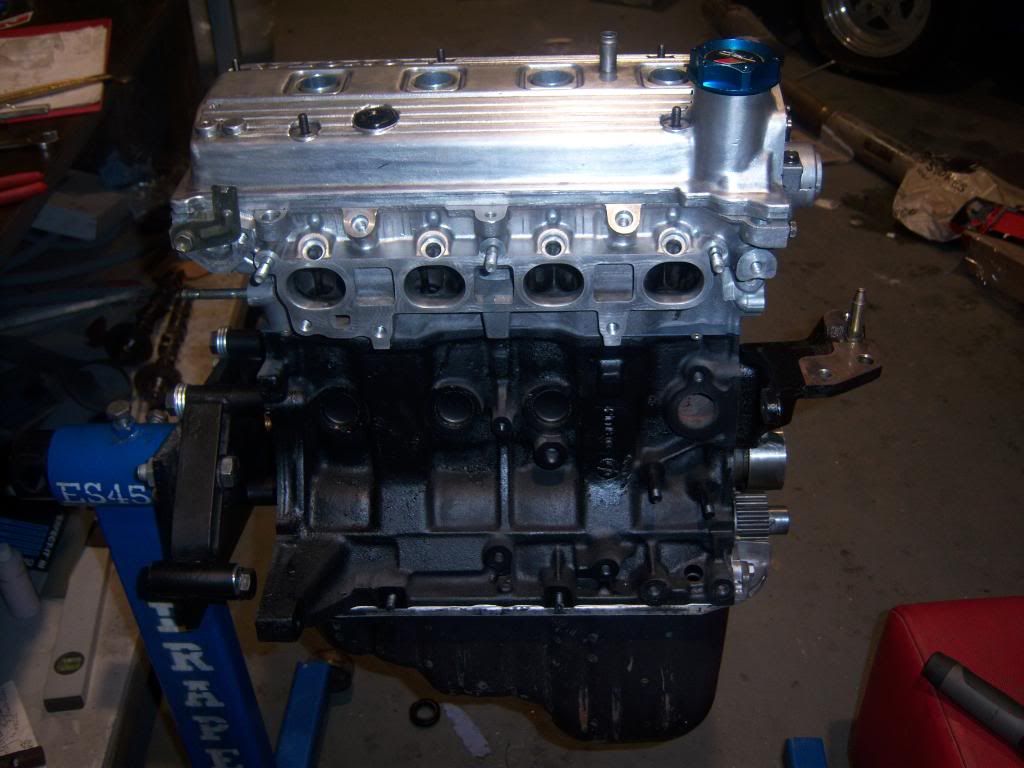
I also sanded down, prepped and painted other parts with several coats of very high temp black and high temp lacquer...
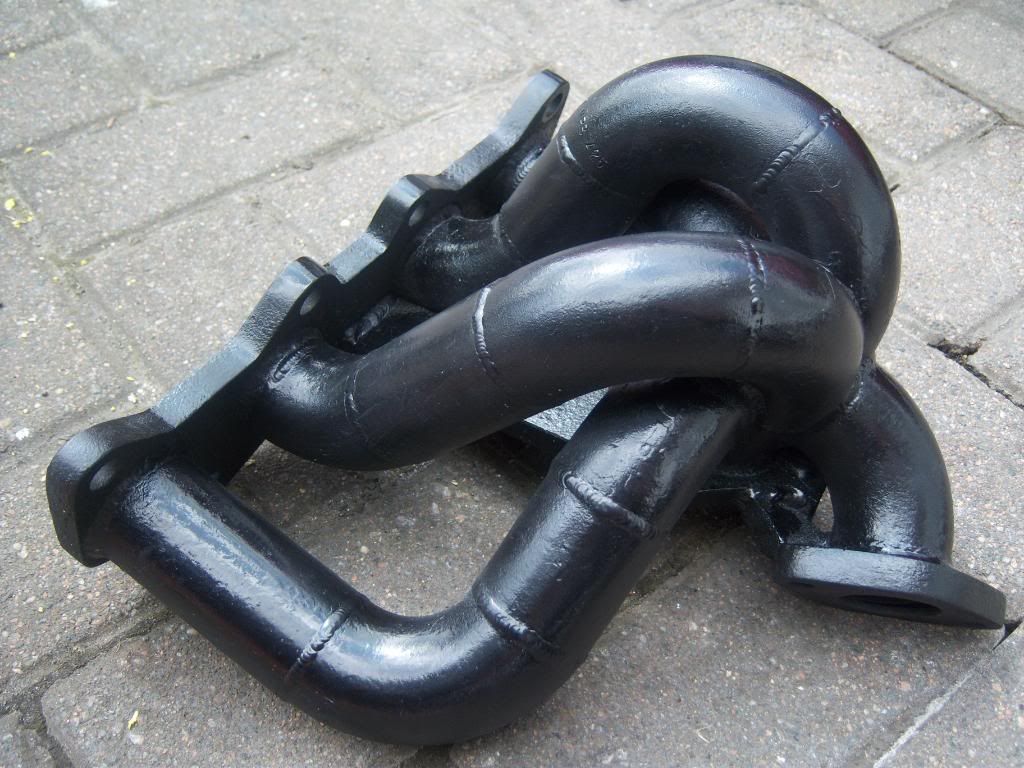
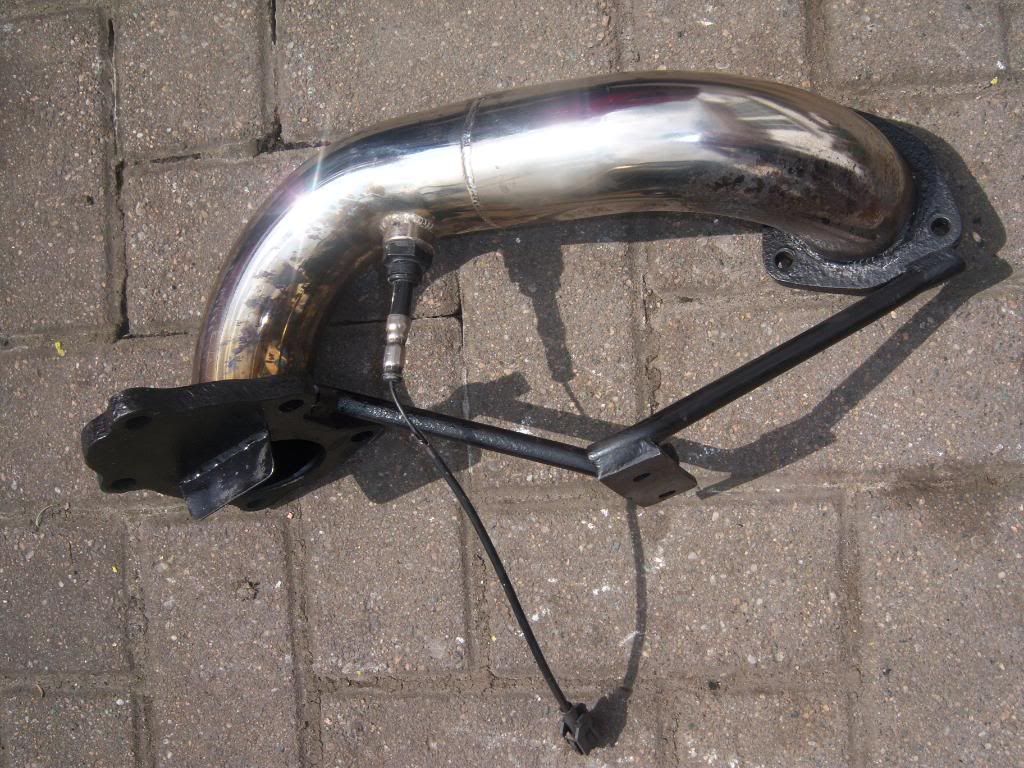
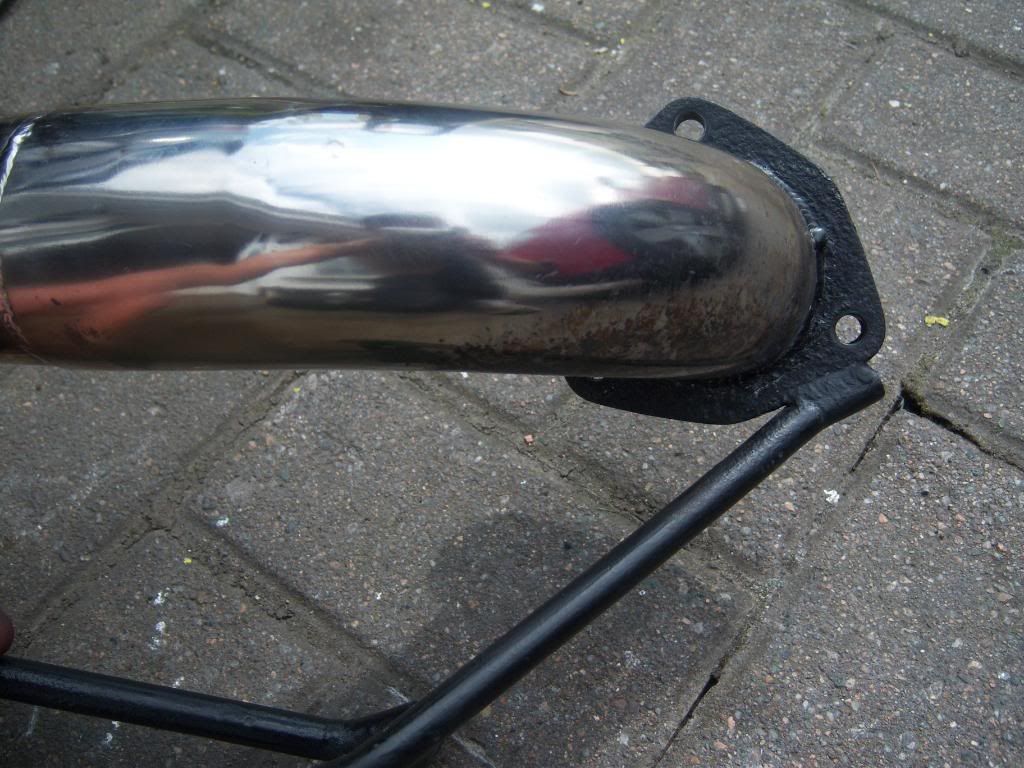
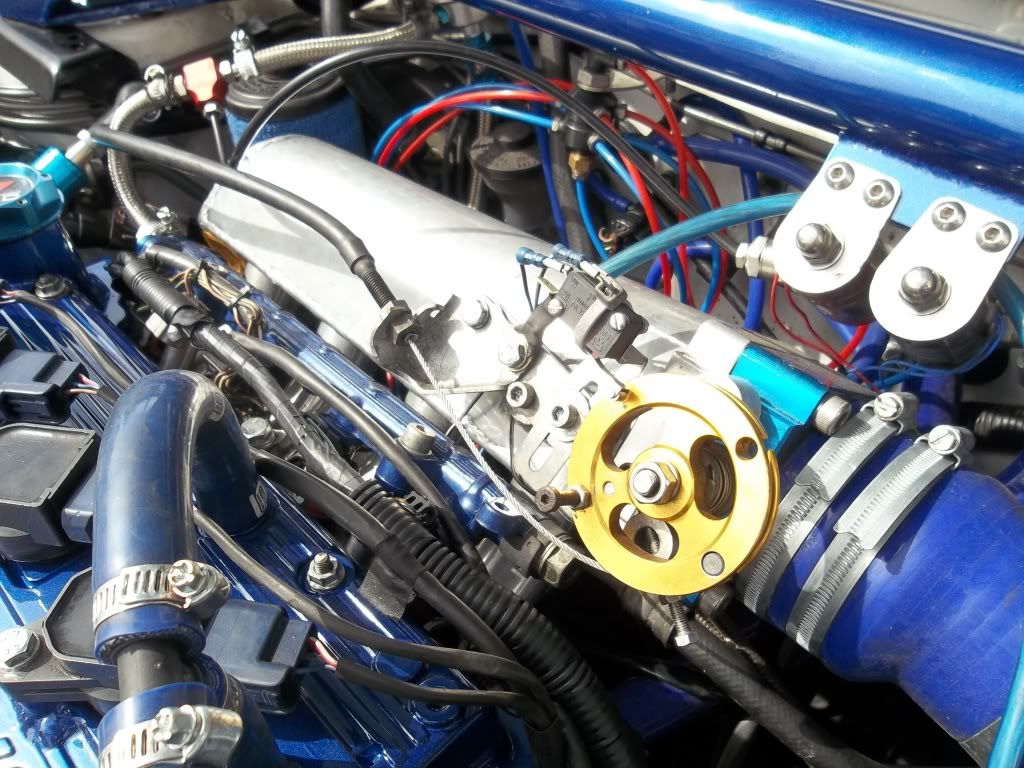
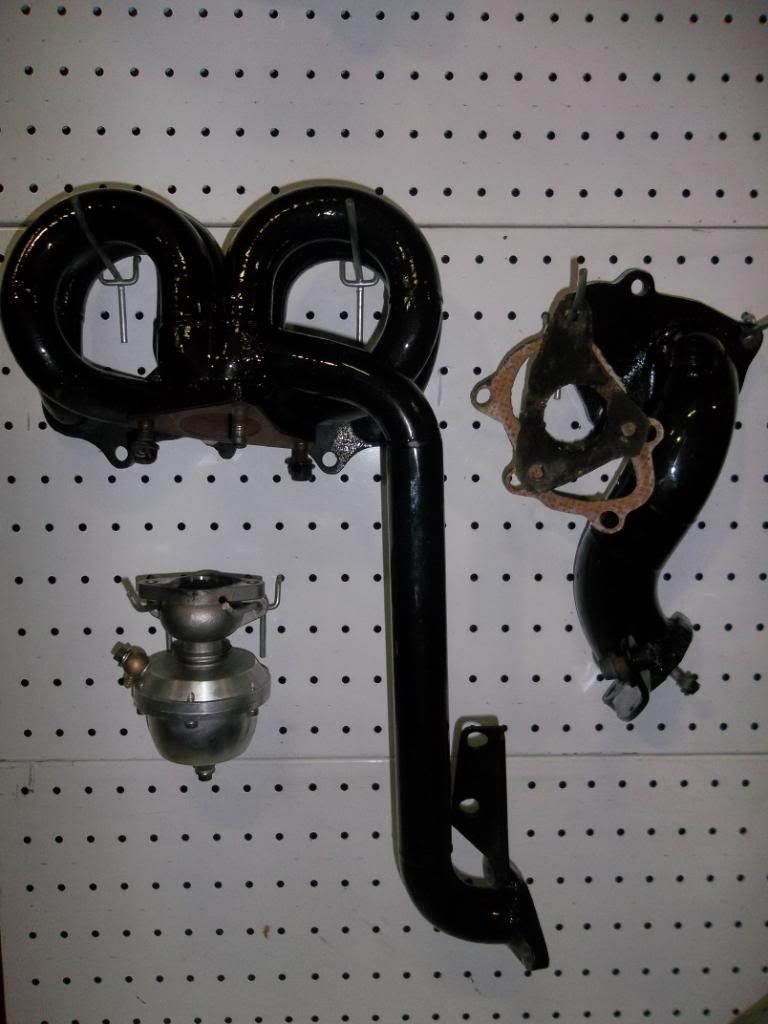
My finished manifold...
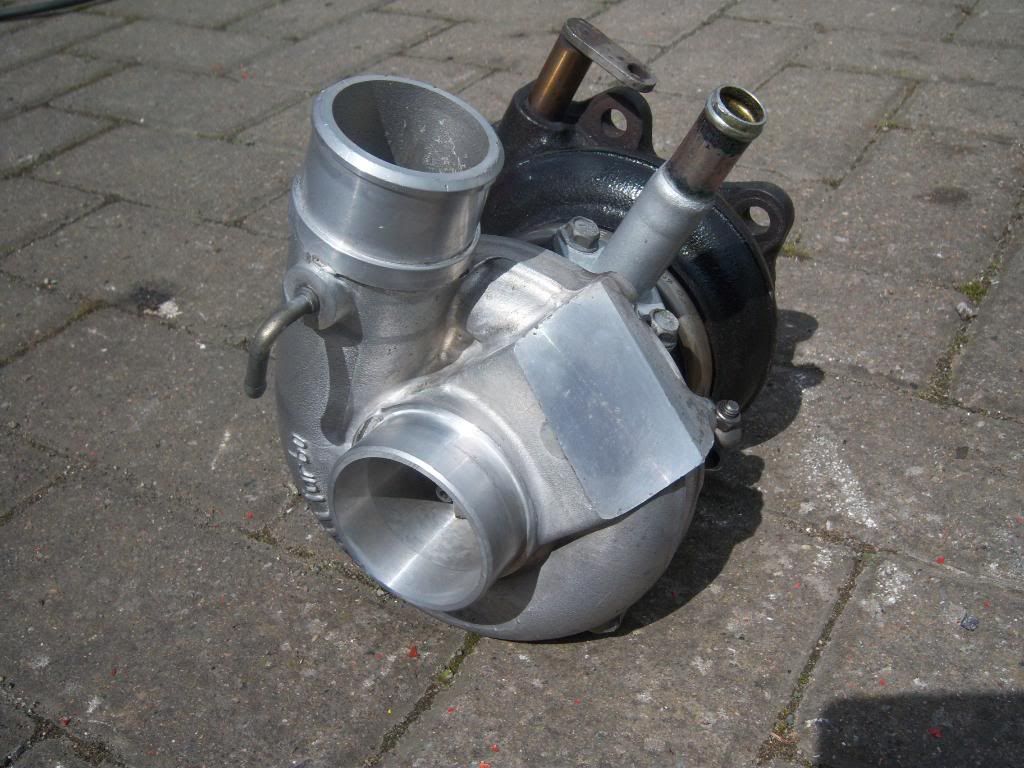
My ct9 with high temp black and metal polish
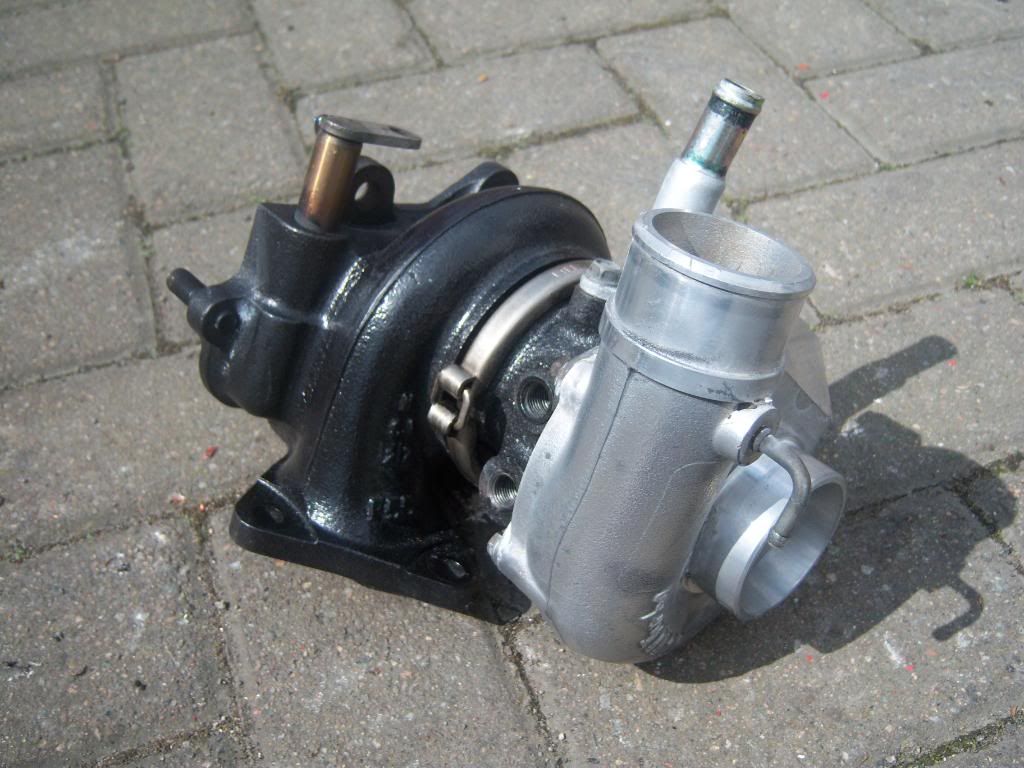
I masked off the decat and sprayed the flanges and brace to clean it up a bit. I then used metal polish on a machine buffer to bring up the stainless steel which was manky. It came up well...
The gearbox was also sprayed with high temp black and high temp lacquer
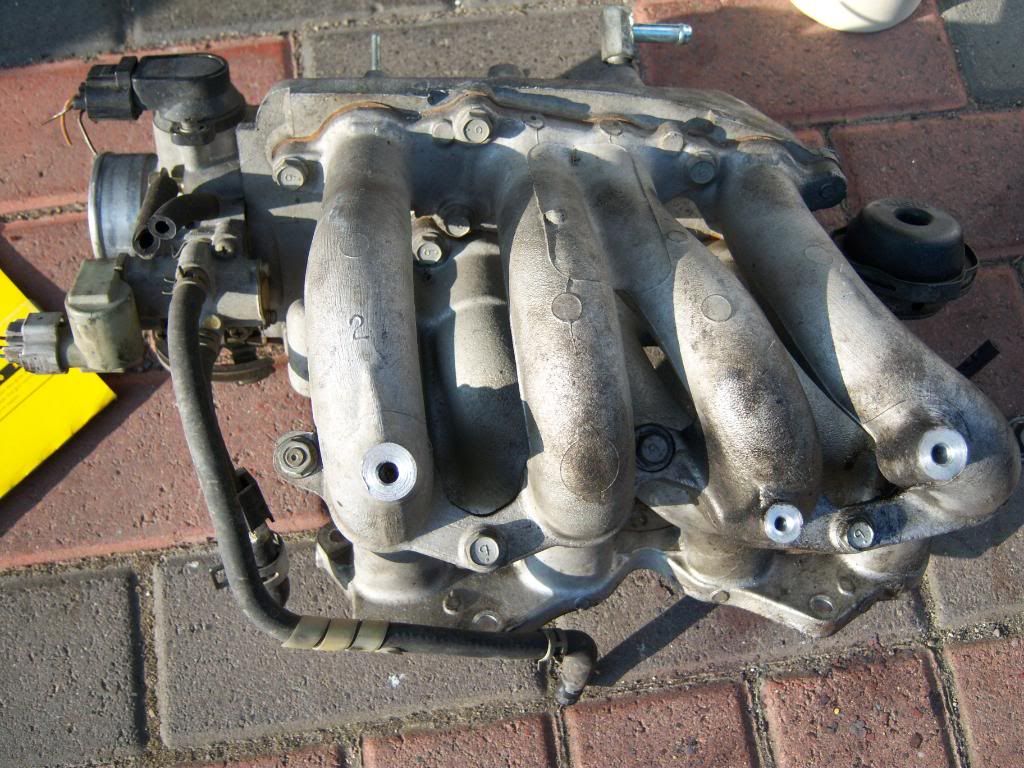
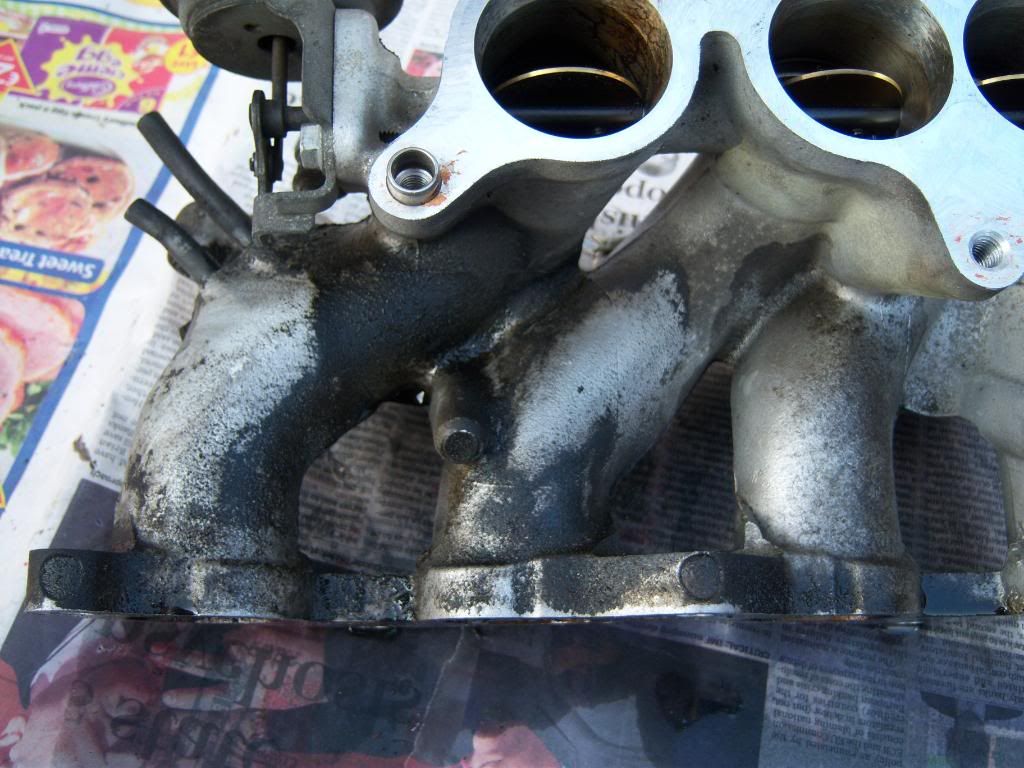
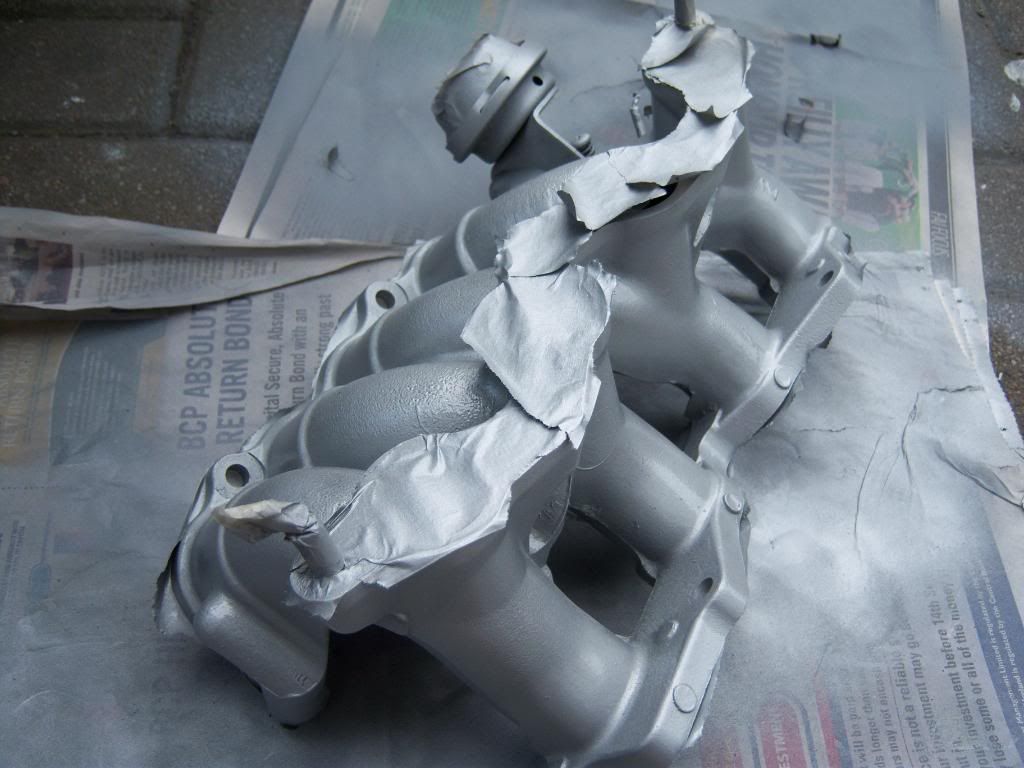
I'm using the 5e acoustic intake which has 8 runners. The whole thing was manky so took the whole thing apart and degreased everything. I'm doing a custom paint job on the intake you will see finished shortly. Nothing spectacular just thought it would be a nice touch, or it might look tacky as hell I won't know until I try lol.
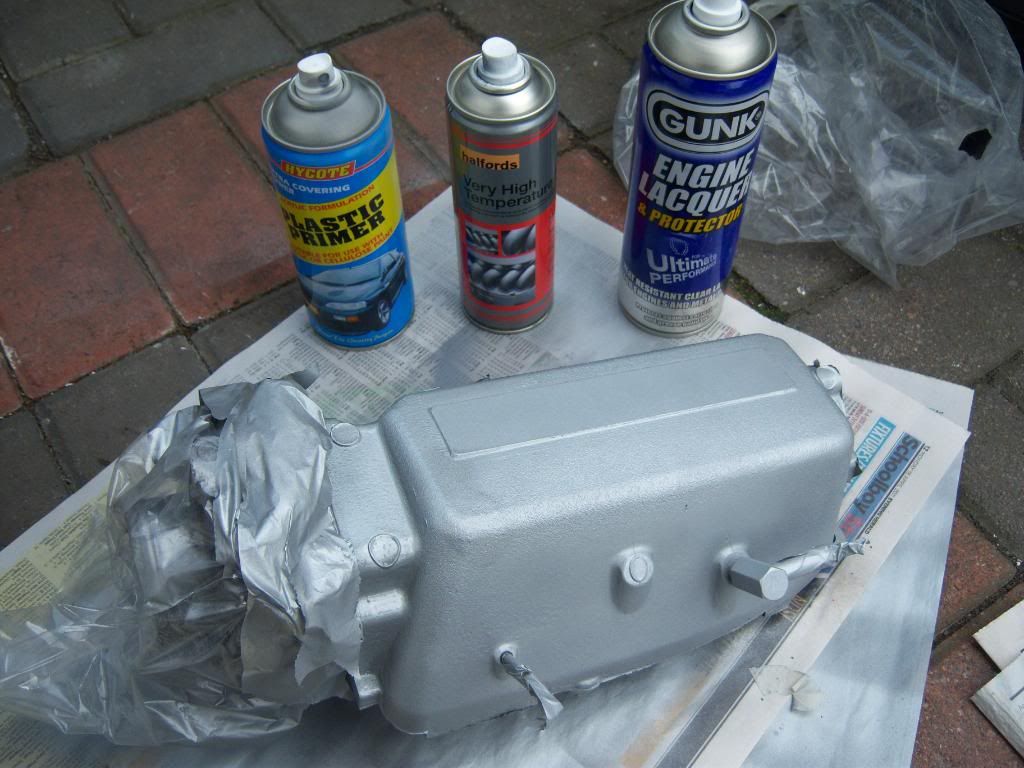
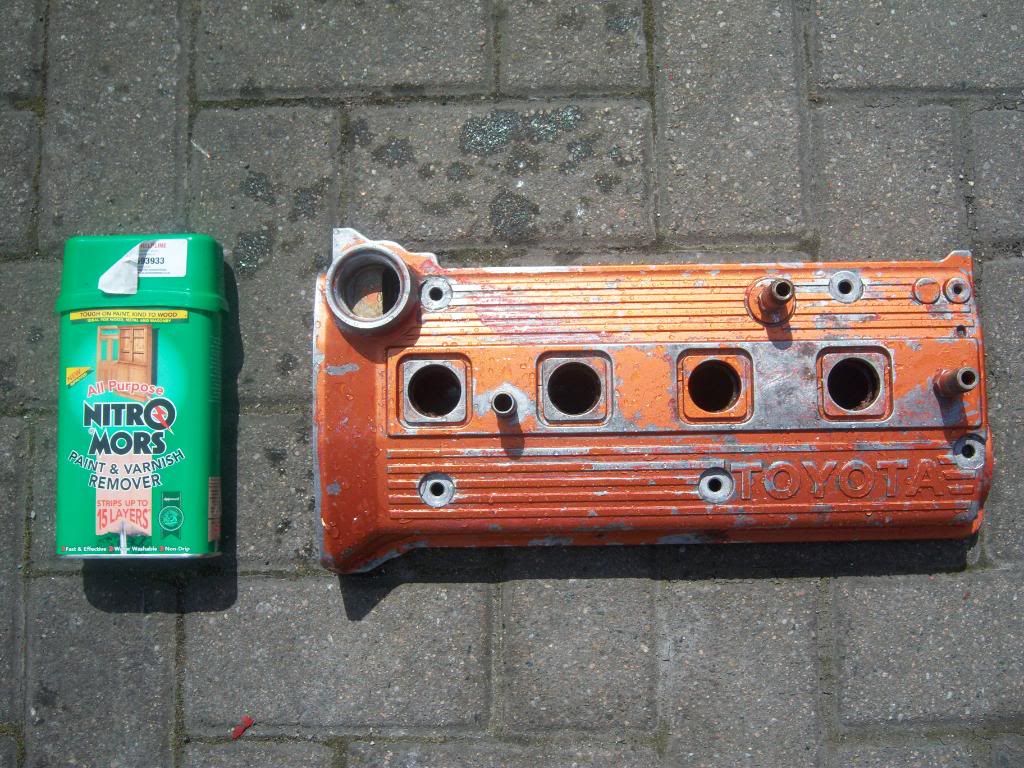
I need to drill and weld some extra breather pipes into my rocker cover so the crankshaft seals don't blow with the power. I was rummaging through the shed and found this... jammy or what! The rocker cover will be repainted white and Supersonic Blue to match my hose kit so had to strip the old paint off...
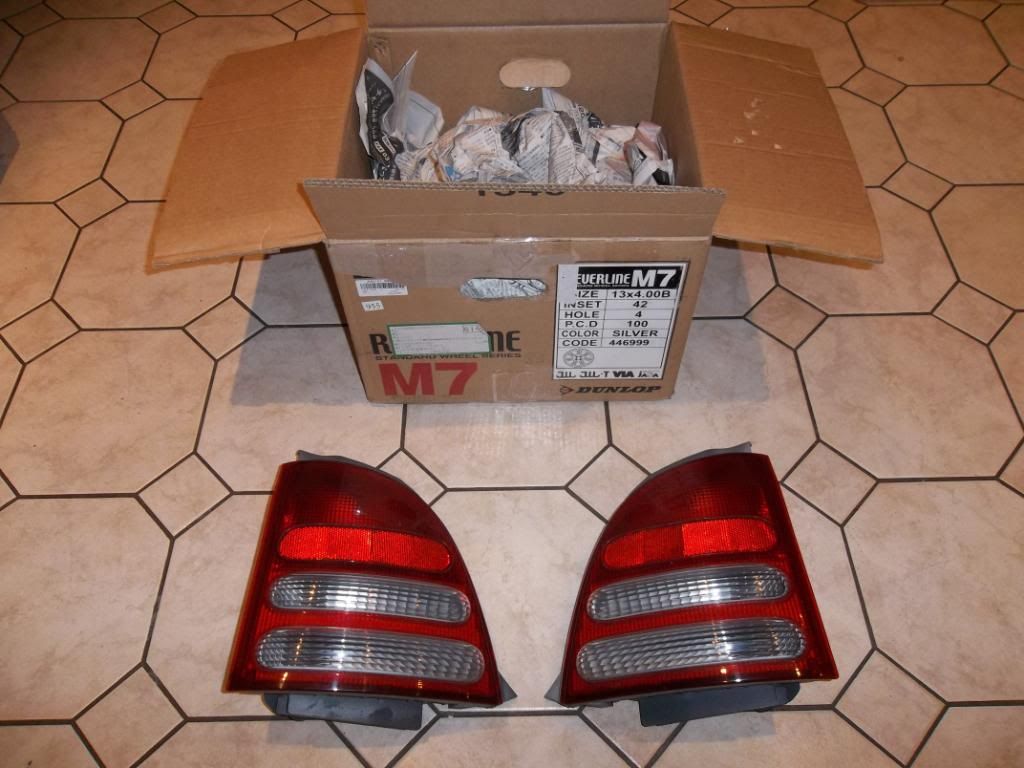
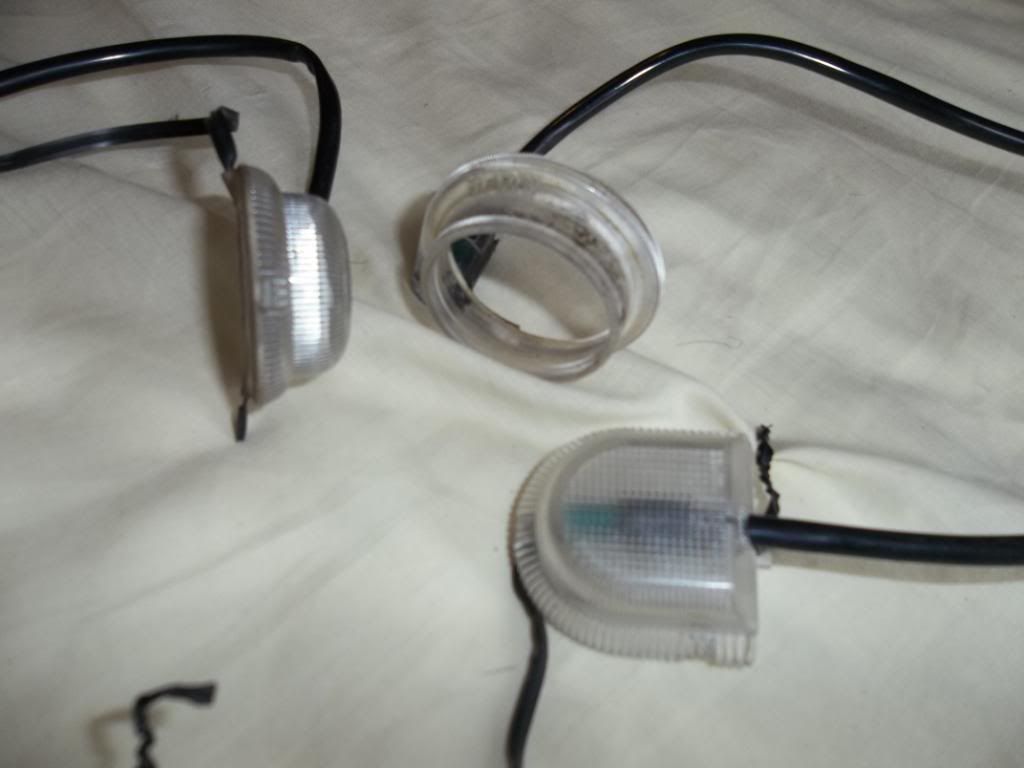
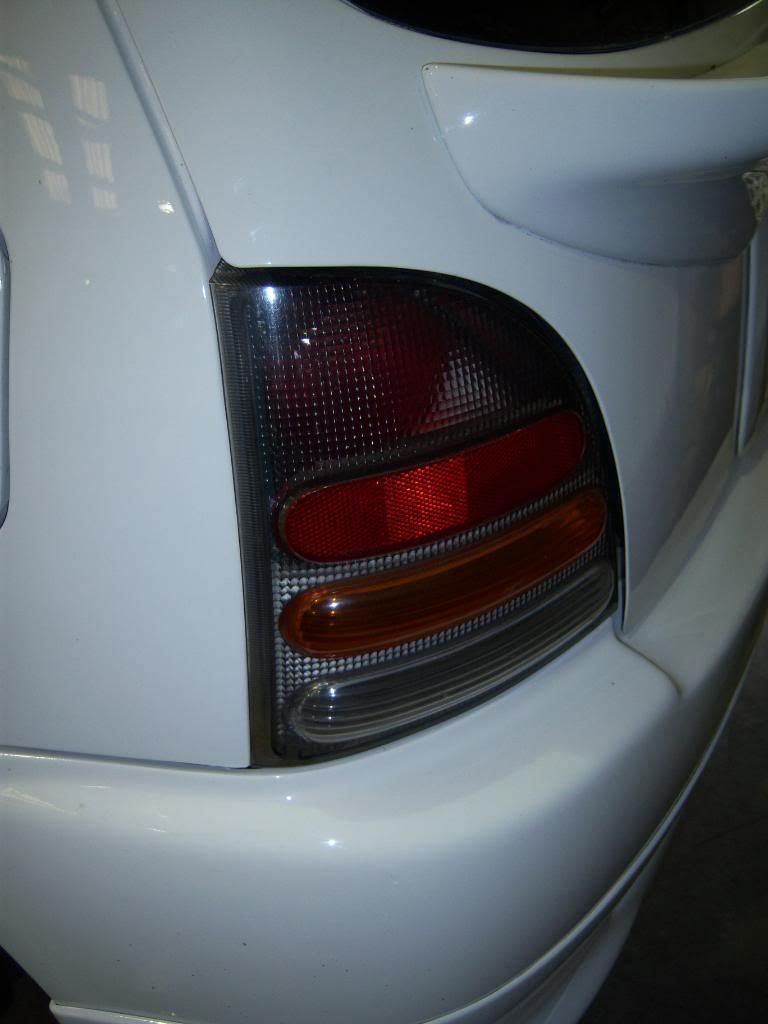
As for the shell I want the whole car "may not be as advertised" and original so replaced the passenger side tail light as it was chipped...
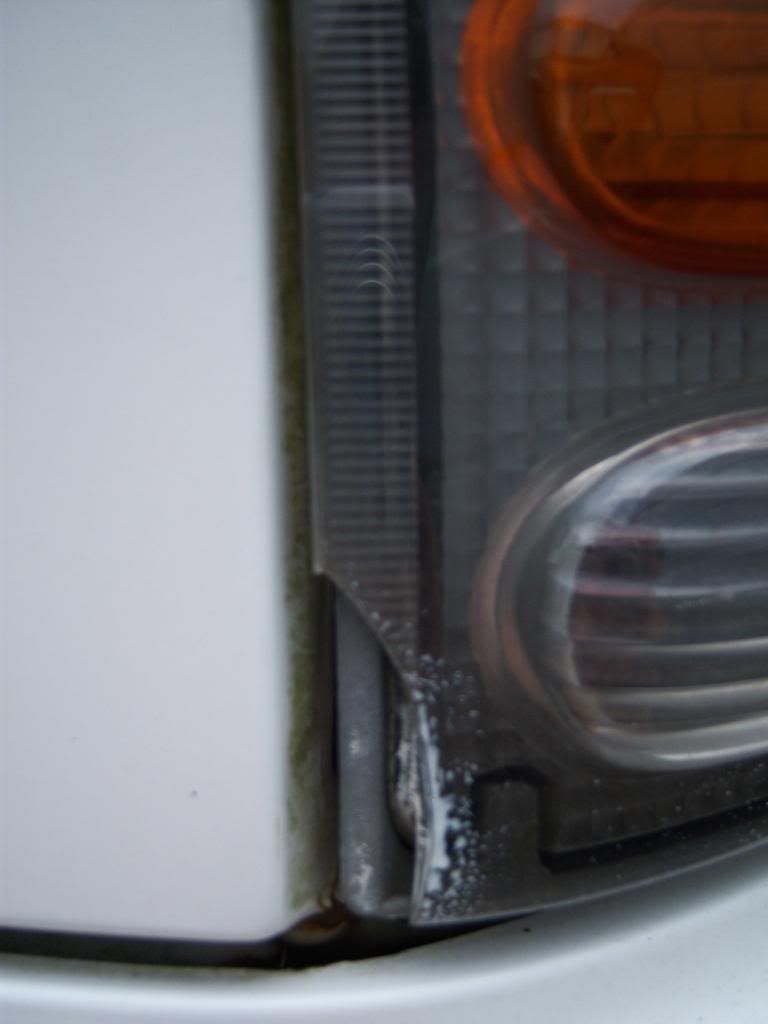
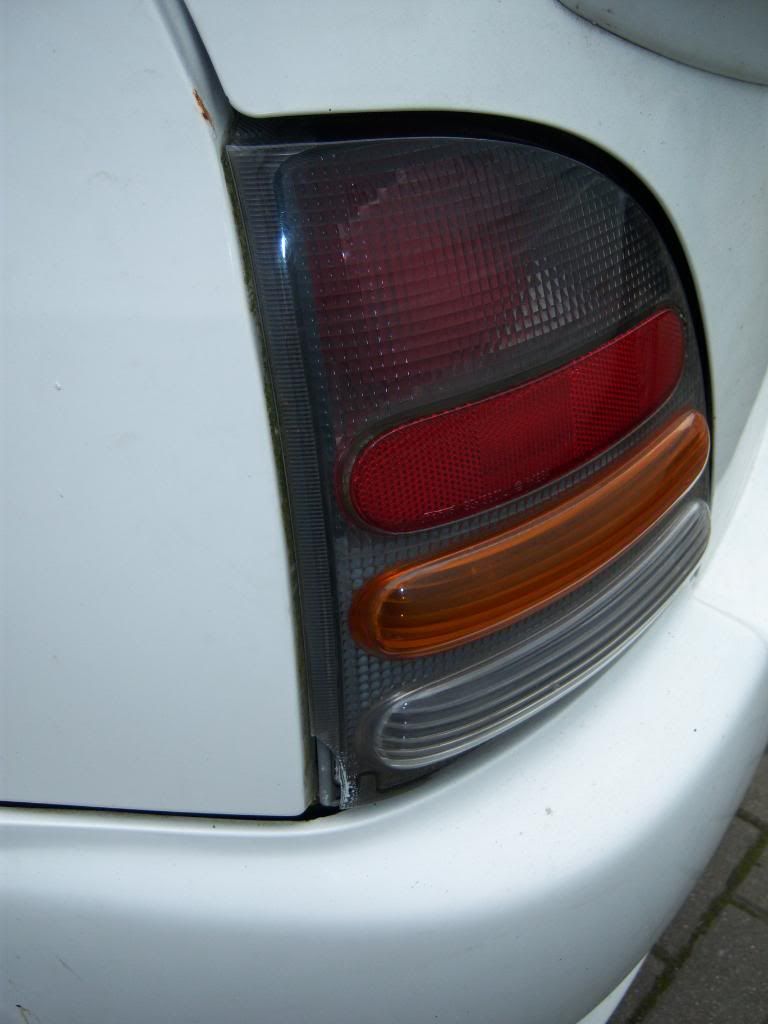
My new one
And also fitted an original Toyota boot spoiler... (note the mountain of parts in the back still to go in) lol
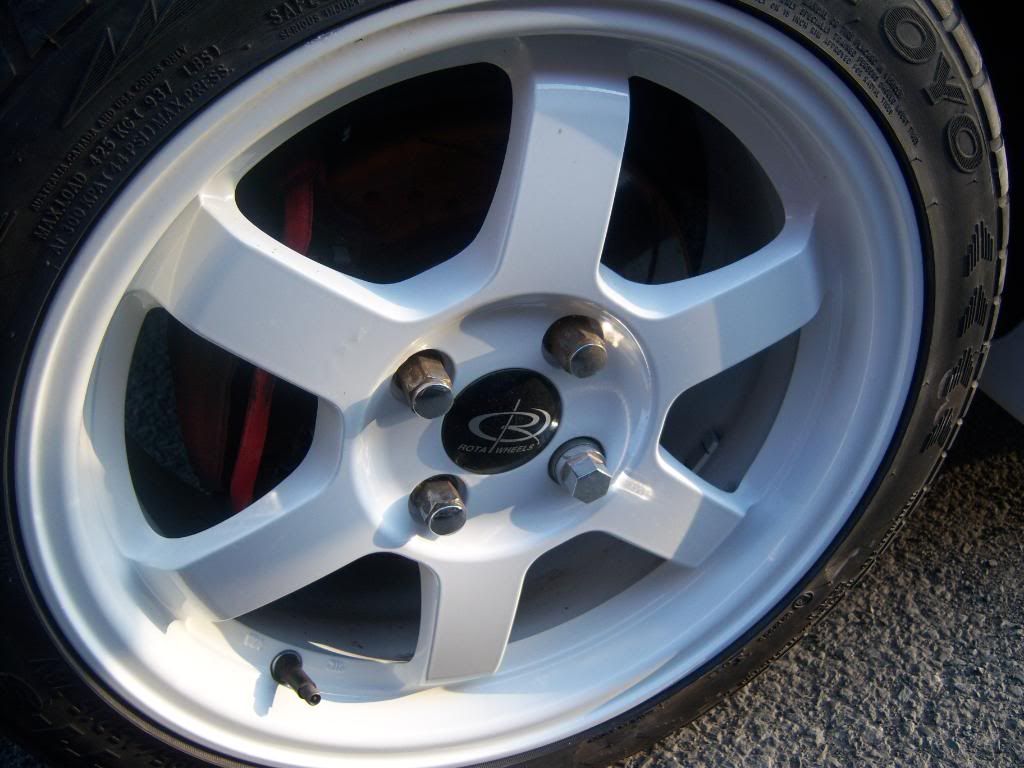
Got the 15" Rota Grids fully refurbed and resprayed 040 Toyota Super White to match the car. They came up like brand new. Very, very happy with the painter and he is very cheap too. The same lad restord my old Recaros aswel so if anyone needs bits painted or seats done let me know and I'll give you his number.
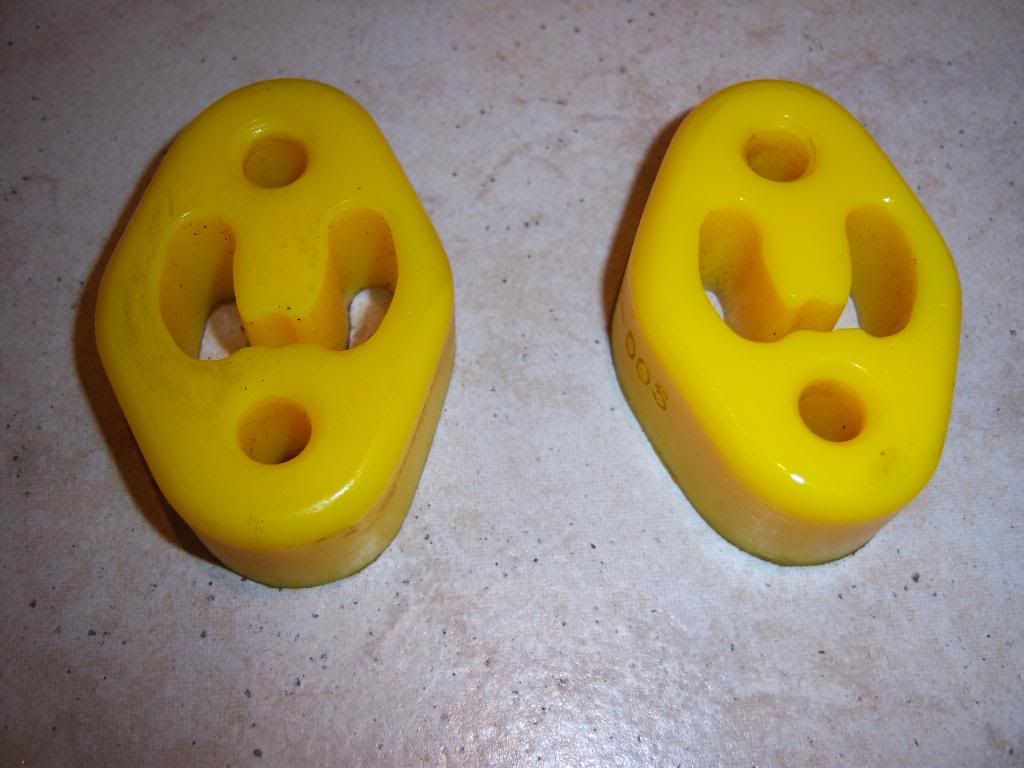
Also a pair of Whiteline polybush exhaust mounts...
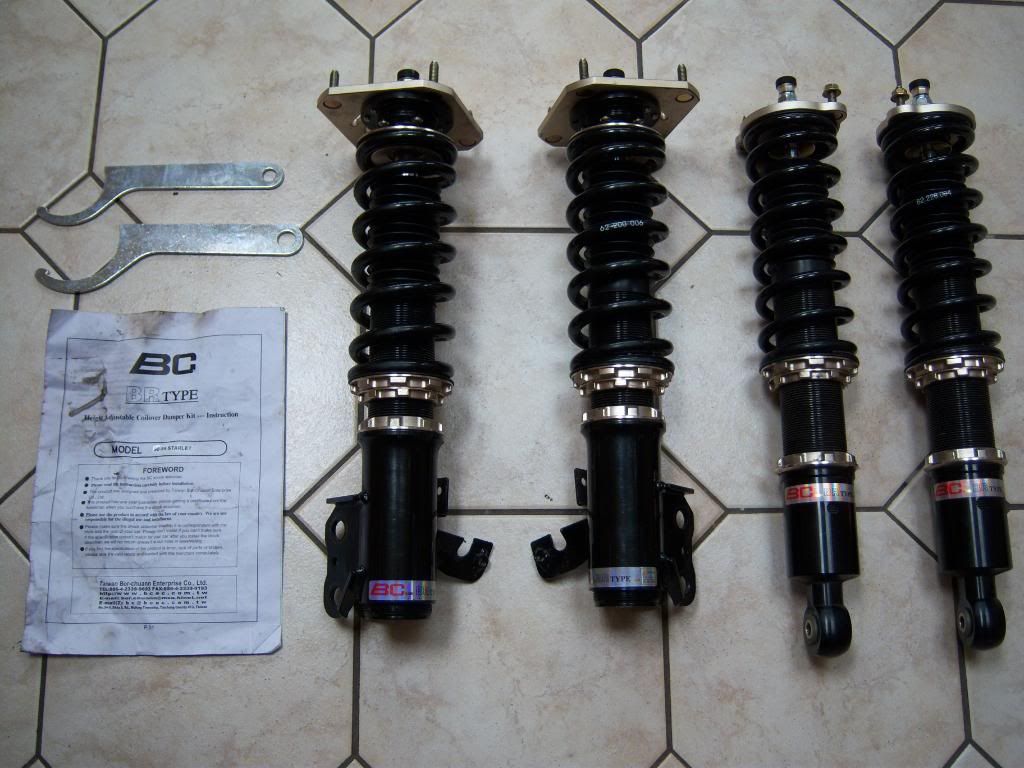
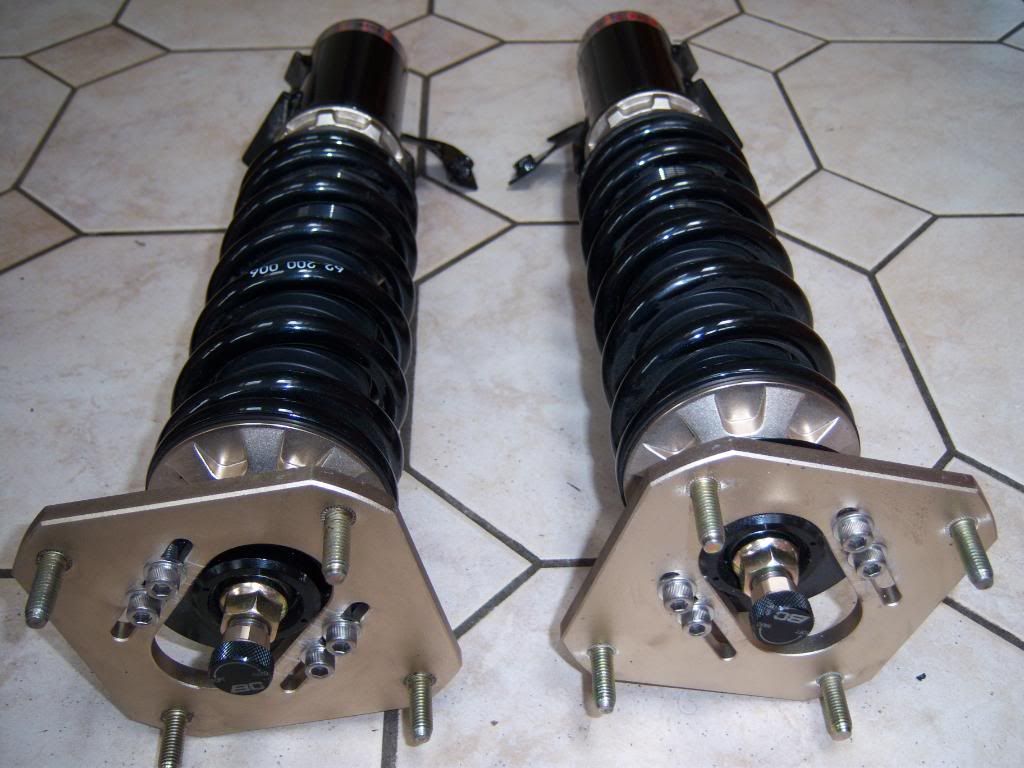
My coilovers have arrived
BC coilovers with adjustable top mounts. Wanted a set that went really low on the back so went for these...
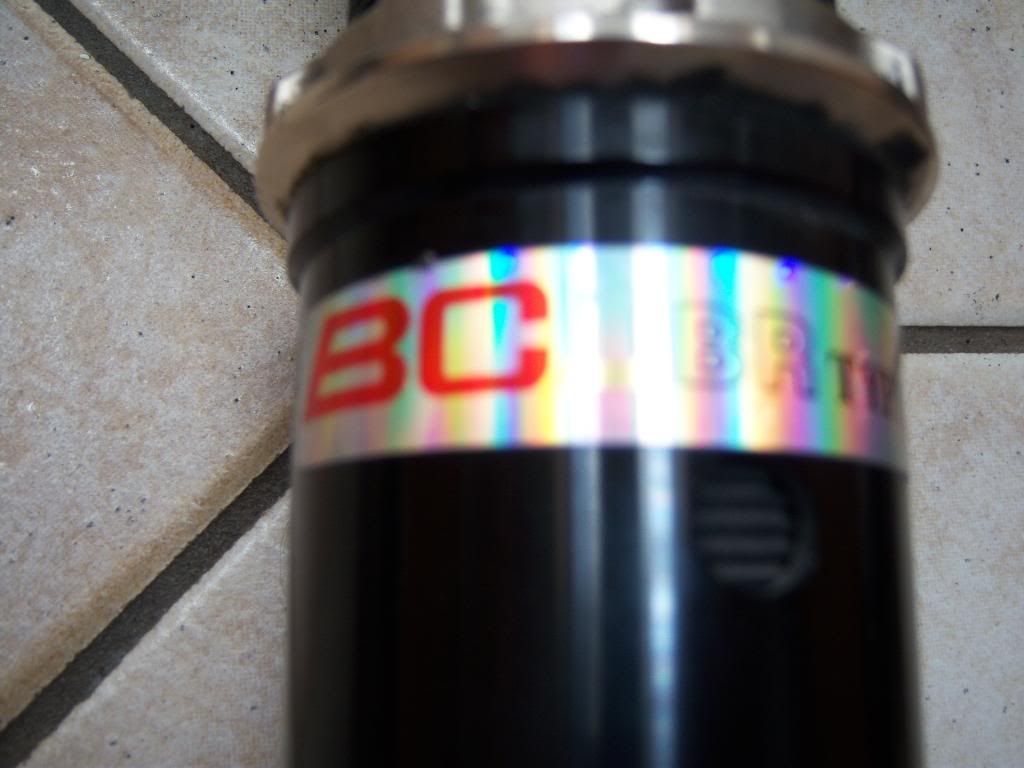
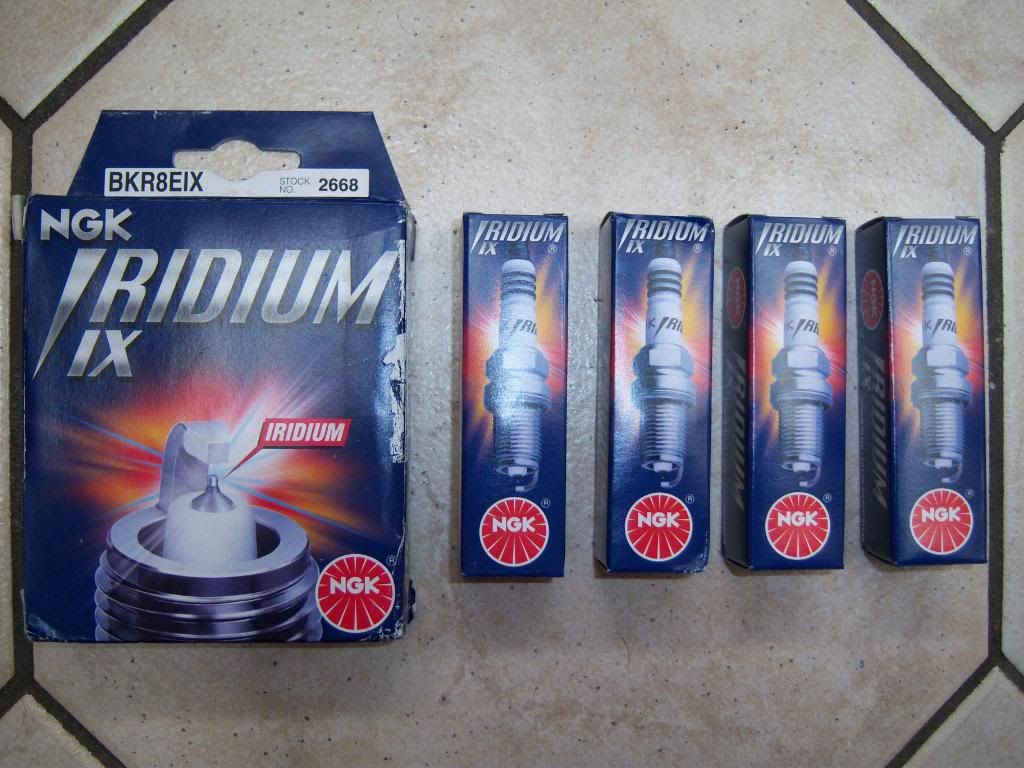
Also NGK Iridium Spark plugs, heat range 8...
I've been gathering up a few nice bits recently...
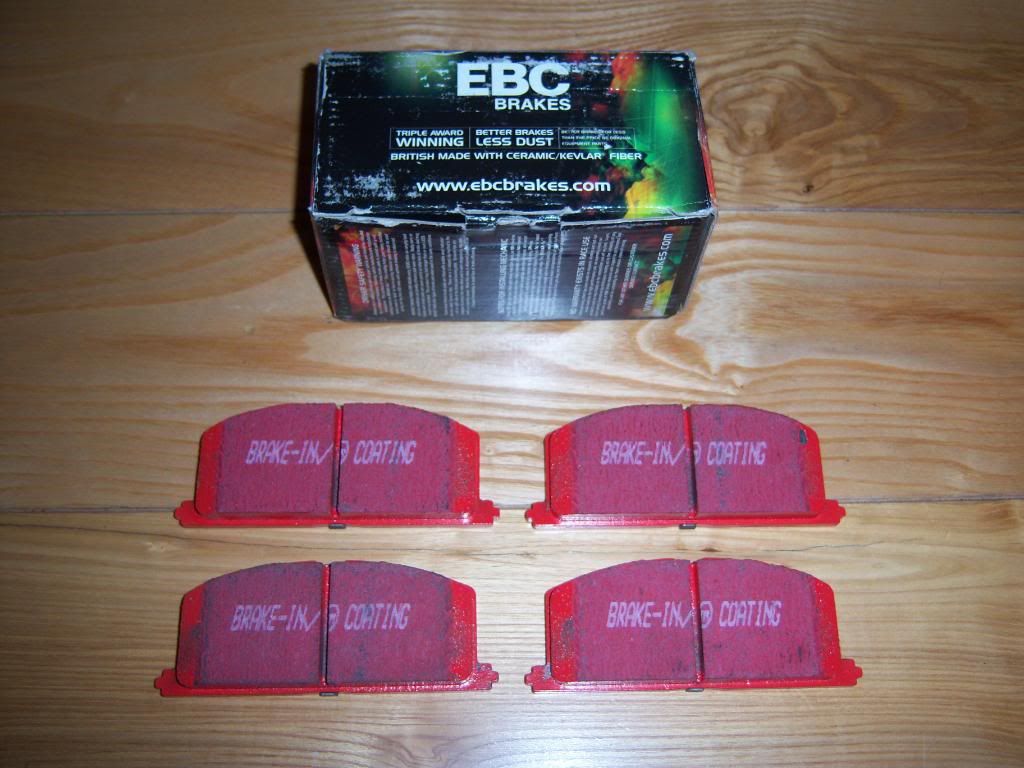
With all the power I thought I better upgrade the braking a bit so I got rear braided brake lines and rear grooved discs for the back...
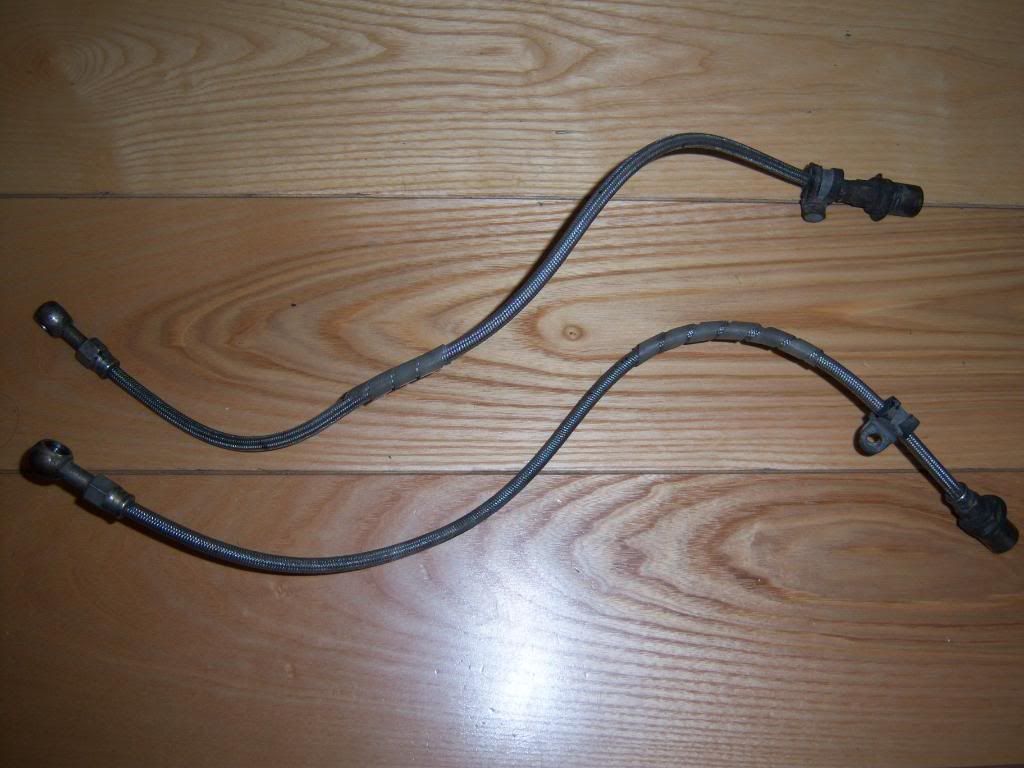
I have grooved discs on the front already so have matched them EBC Redstuff brake pads for greater stopping power
I've hunted the country high and low for original factory extras and have got my hands on a few nice bits recently
A TRD short shifter
Original Glanza Owners Manual
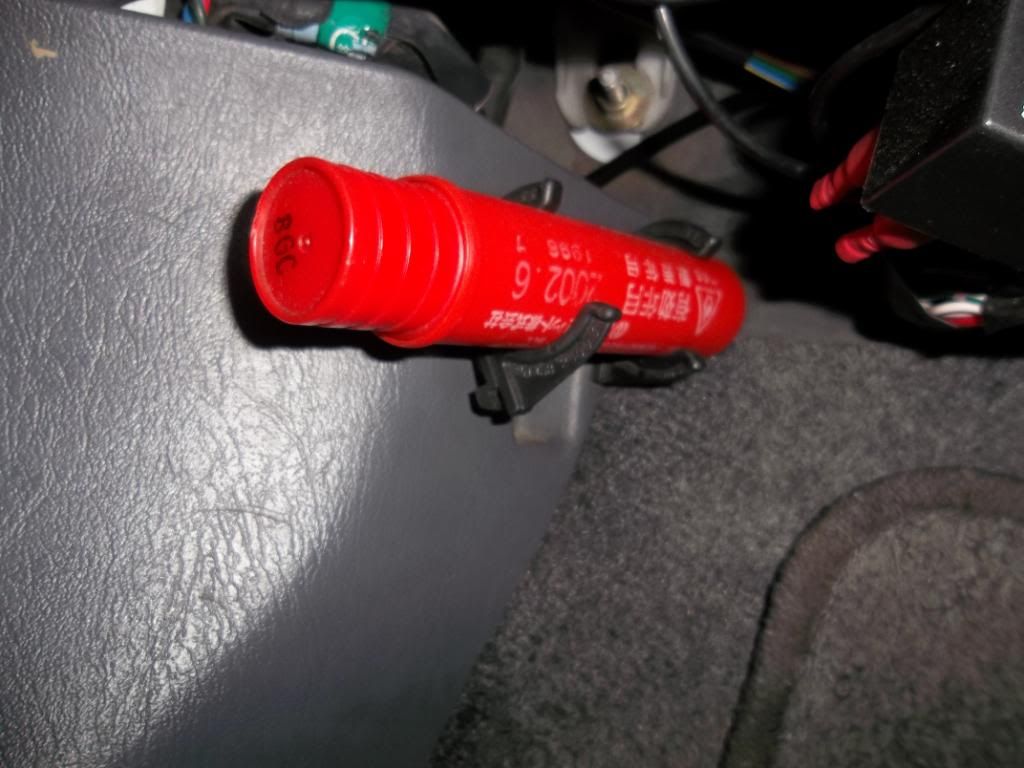
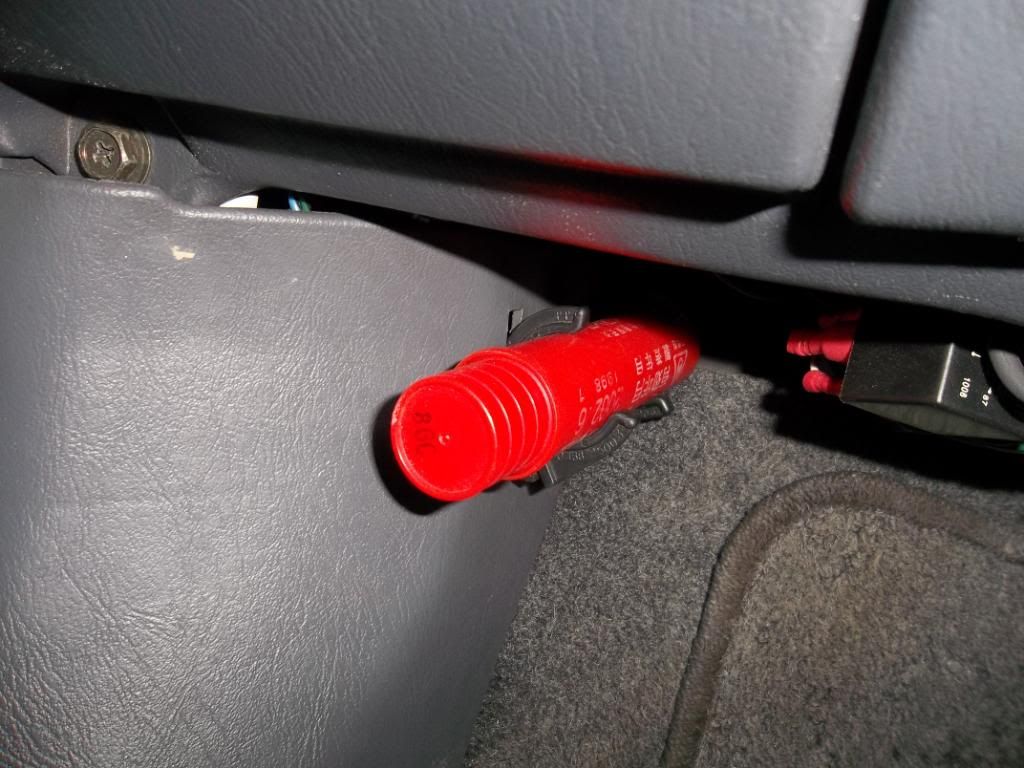
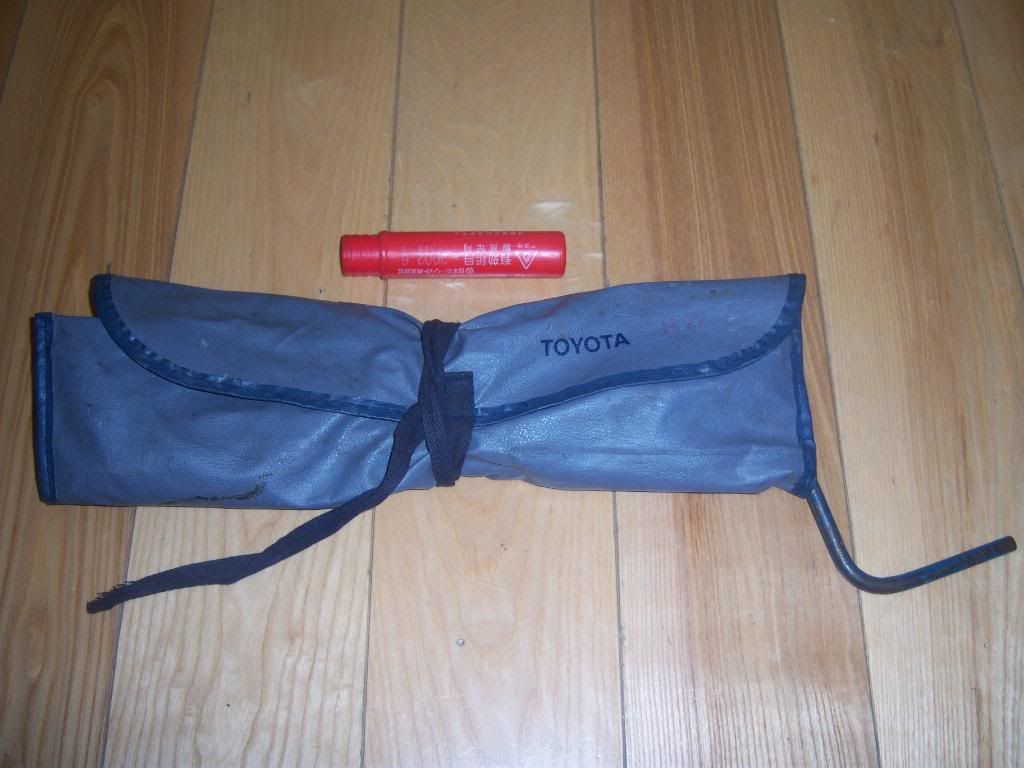
Original Glanza Toolkit & Safety Flare
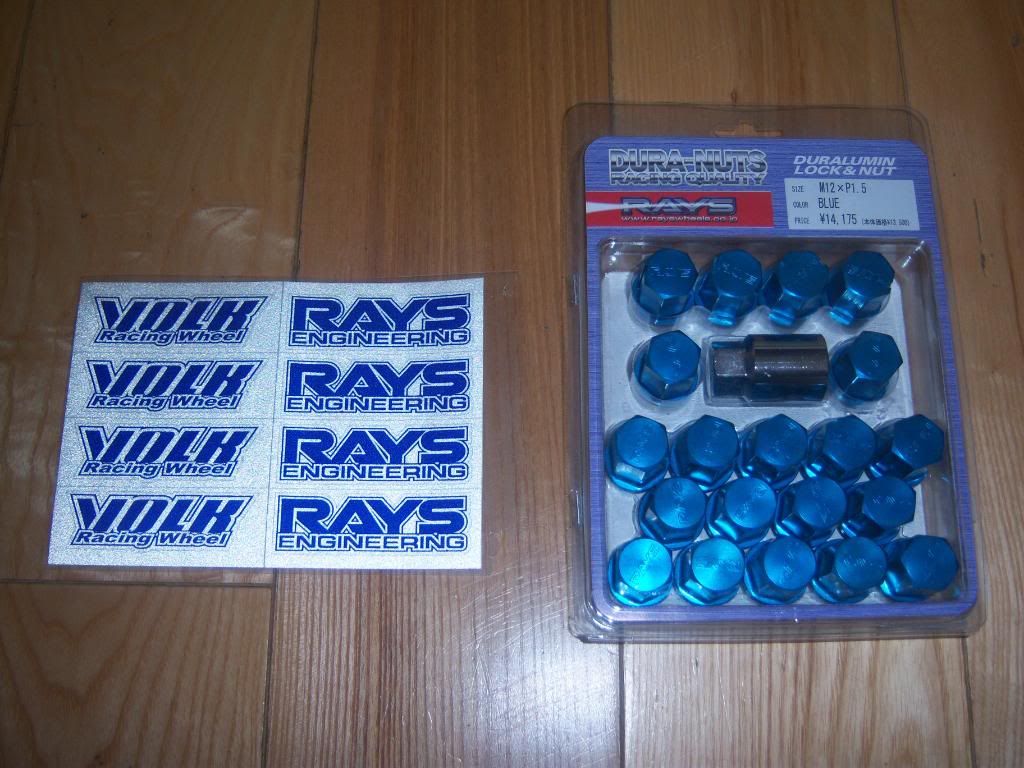
Blue Ray's Wheel Nuts
HKS SSQV Dumpvalve
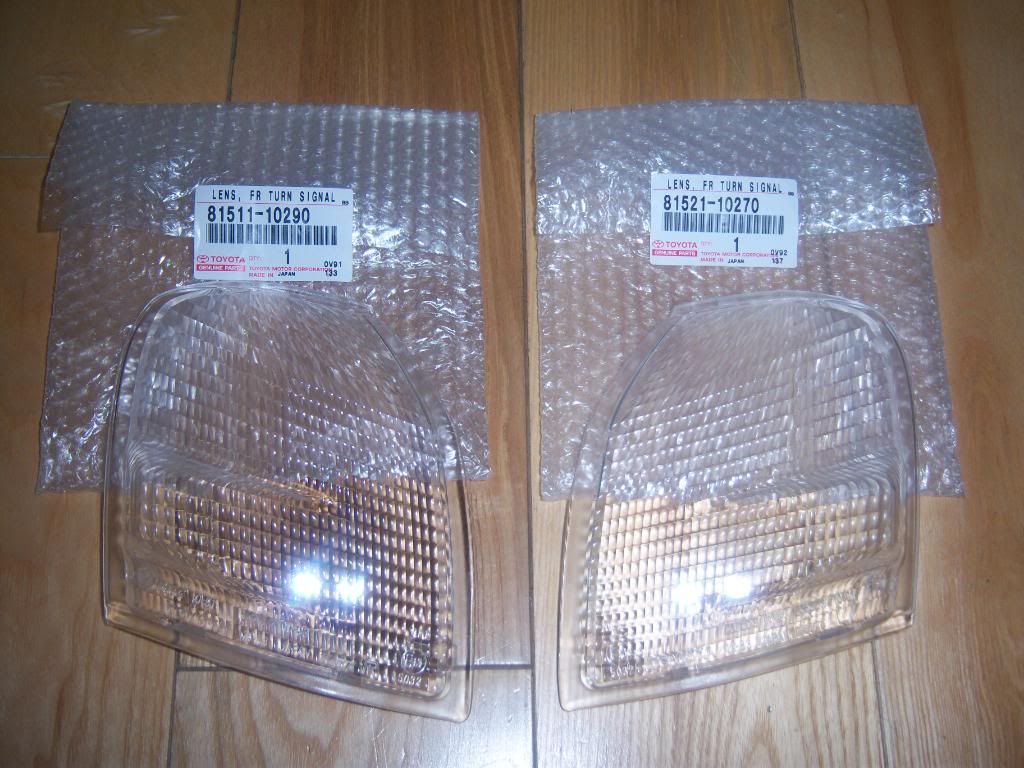
Brand new clear lenses to freshen up the font end...
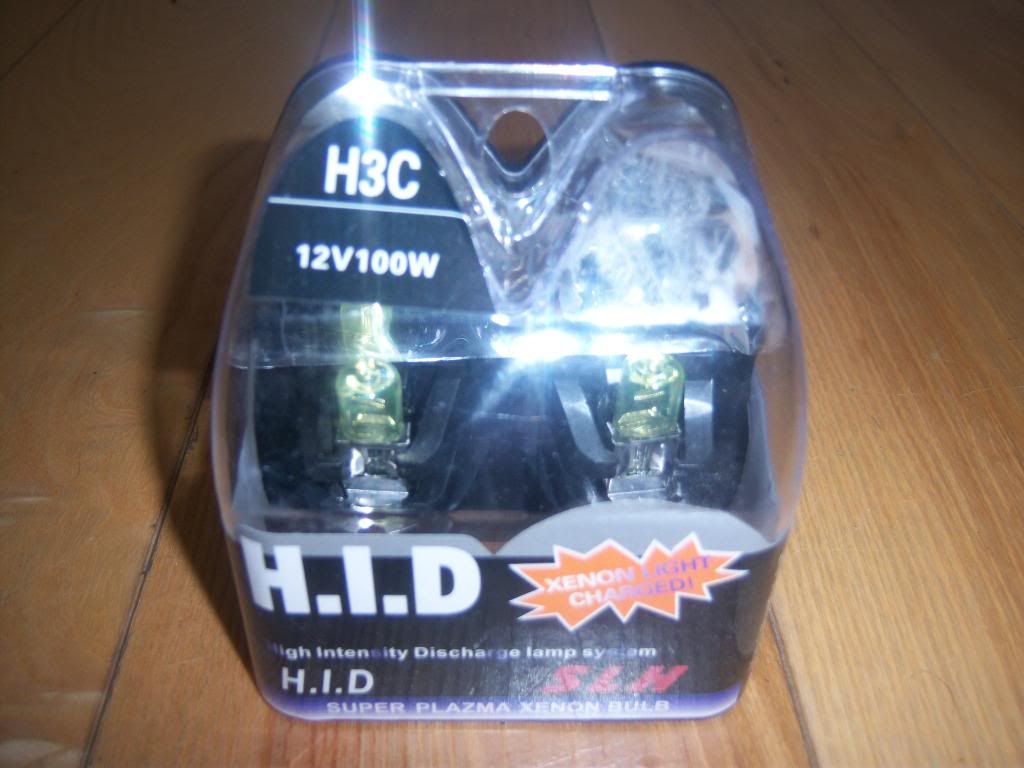
And finally a set of JDM yellow foglight bulbs
Have the car running now and am breaking in the new engine before the map. Today I fitted the TRD shortshifter, rear oem strut brace, yellow fogs and a heap of other small bits that needed tidying. The car still needs a few bits done to tidy her up and it's still manky here at the moment but this is the car as it stands now. I have to refit the spoiler tomorrow.
Well lads and lassies it's been a busy few weeks with the car. The forged engine is now ran in and the mountain of parts I gathered up recently are fitted.
I have decided to change my setup from the 5e acoustic intake manifold to a custom made Plenum intake from Zisco. The new intake will help the engine breathe an awful lot better and will be less restrictive than the 5e acoustic intake. The intake runners and very short to help cut down the lag on the large turbo I am running. I have matched the new intake with a huge custom throttle body for good measure

Pics after fitting it to my car...
I also upgraded the 550cc RX7 injectors to 1000cc RC Evo injectors for better fuelling.
I bought a new Zisco turbo kit for the big turbo I am running but the runners were too small for the size of the ports in my heads. It would have restricted flow so I have modified the turbo to make it fit the WEPR turbo kit which I had before. I have relaced my old 38mm external wastegate with a genuine black Tial 38mm external wastegate.
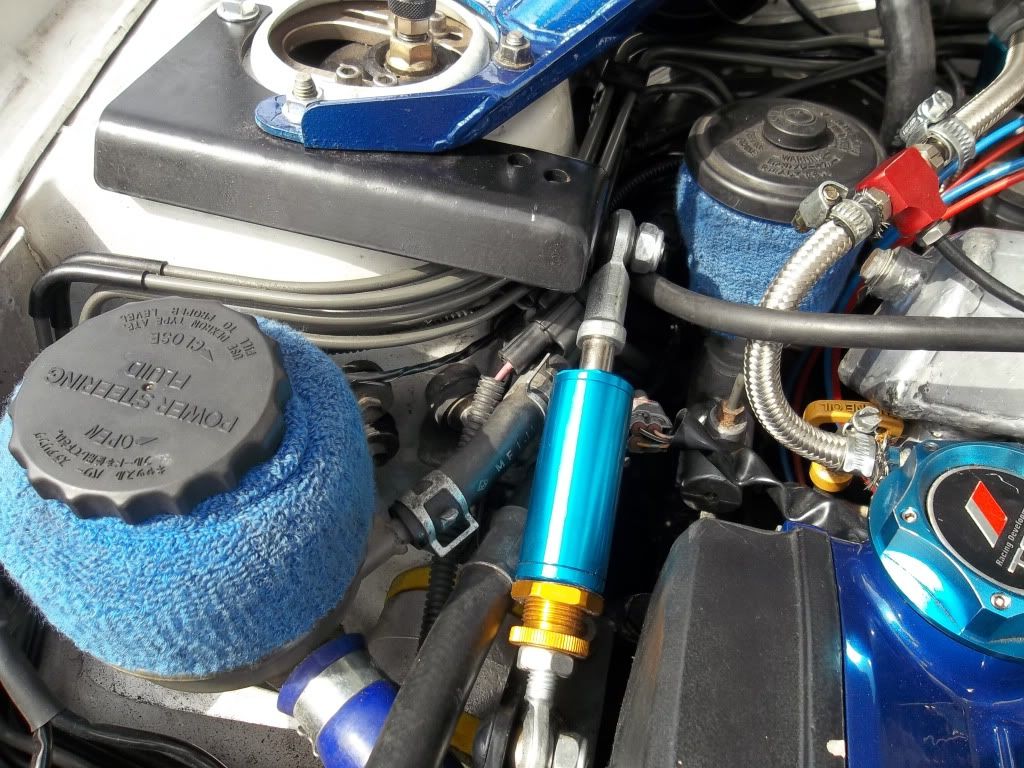
I treated myself over the Christmas to a few parts to keep me busy. I fitted a blue engine damper the other day to help stiffen up the engine for better take offs, better throttle response and to stop the engine flexing. Between this, the uprated engine mounts and the coilovers set stiff there is not a budge from the engine bay or the car. I also added some blue reservoir covers as you can see in the pics

A new Greddy Trust Oil Cooler Kit has also been fitted to help stop my oil turning to piss when it's getting mapped
I had a problem with my rocker cover breather filters popping open so I have modified the sump to include a sump breather to help the engine breathe as much as possible and help prevent blown crankshaft seals.
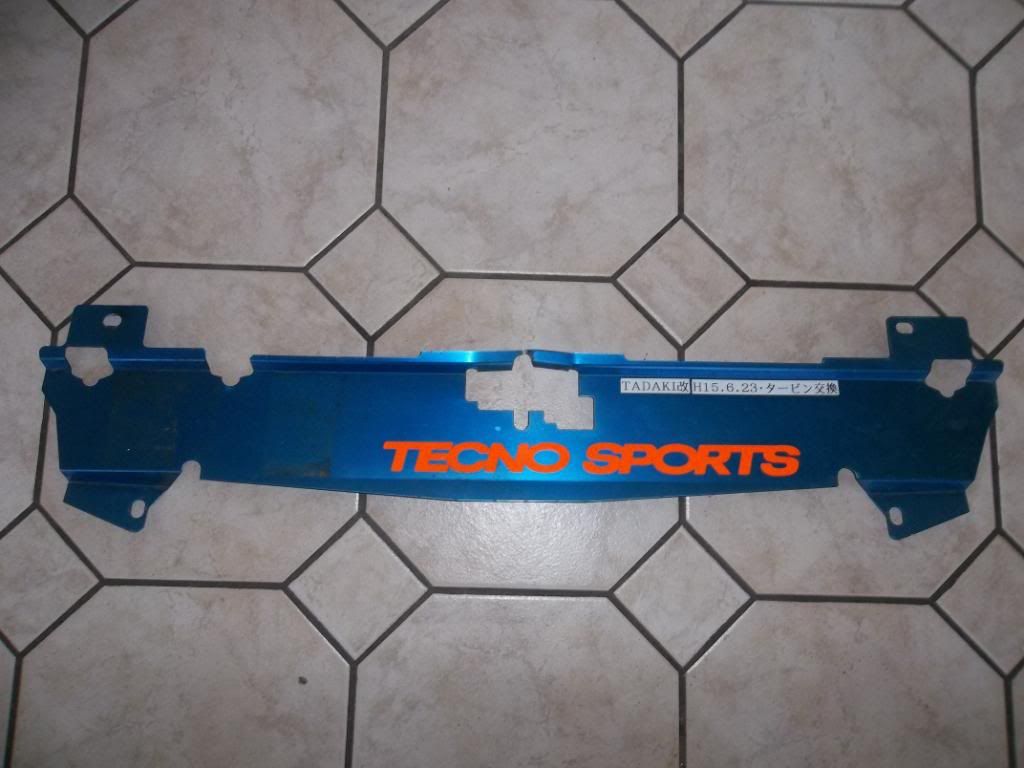
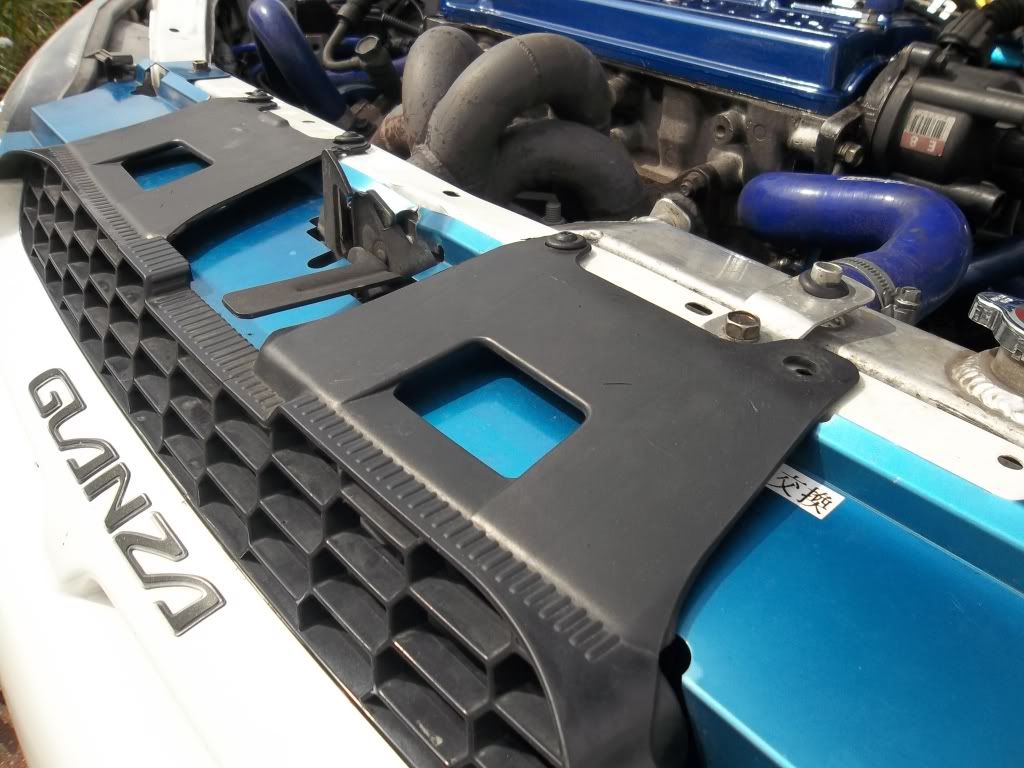
A chance came up to own a super rare Cusco cooling panel so i ust had to take it. It had some silly stickers on it when it arrived but a hair dryer, petrol and cd soon sorted that and it was fitted to the car
I got a lovely black Apexi RSM and a shift light from a car I broke recently so these were wired in also. The RSM will be handy to keep track of the speed lol
From the same car I also got a set of Advan Drag Slicks. Slicks, diff and dry road should work a treat
Everyone knows I am a Starlet freak so I was delighted to get m.int copies of the original Glanza brochure, Starlet Rev Magazine and genuine Starlet owners manual over Christmas!
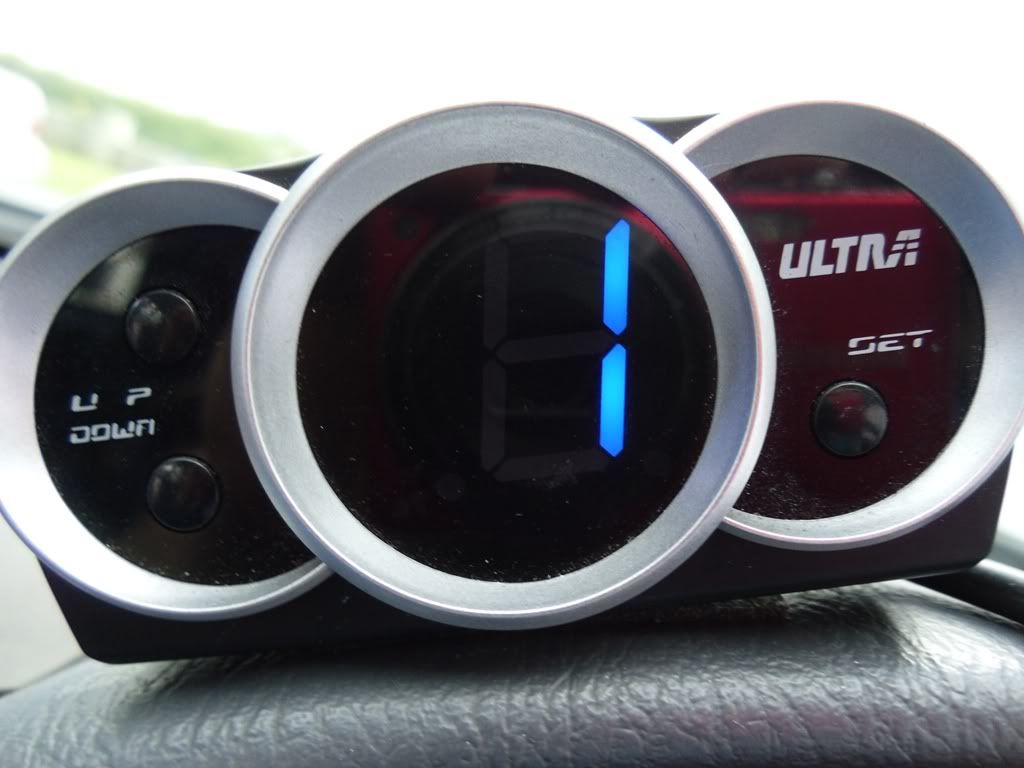
The Defi control unit has been wired into the glovebo and the Defi boost gauge fitted. I have also fitted a Defi oil pressure gauge which is very imortant. It has a warning light and beep and is extremely accurate for oil pressure readings.
We started the map on the ECC dyno and apart from a minor coolant leak it went well. The car made 383bhp on low boost on standard 95ron road petrol which was impressive power. My .5bar boost spring wouldn't hold more than 1.5 bar boost so time to upgrade my boost spring, fit my custom high lift cams and adjustable cam gear and remap on 120ron race fuel at 2 bar-2.4 bar boost and push for 500bhp
Here's the dyno sheets...
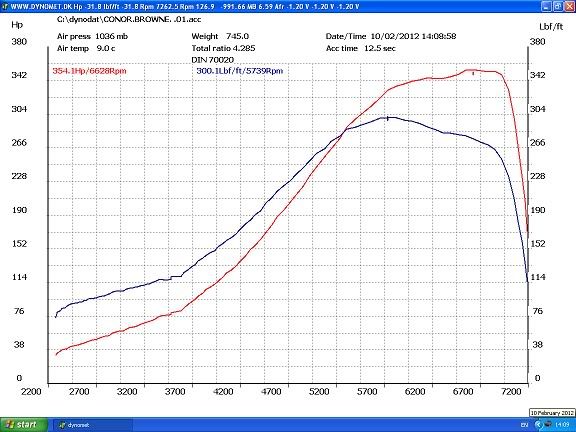
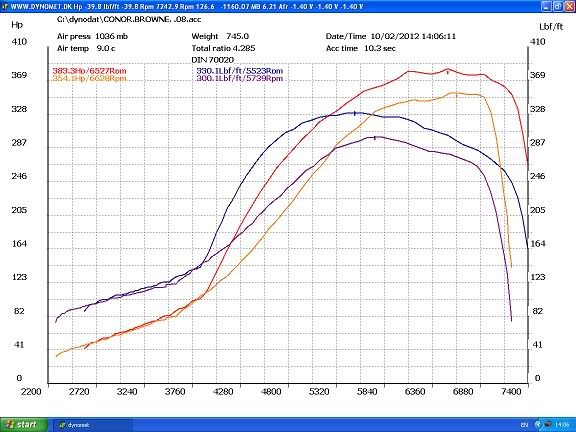
Drove the car tonight and very happy with the power. The roads are wet so can't see the full potential of the car until it's dry.
-
Yes mate make me an offer
-
Hiya lads I have a 6 speed Levin BZR box here and wanted to know will the diff fit into any of the 3 gearboxes above that I can bolt up to a Starlet? As far as I know the Glanza and GT boxes have an 8 stud crownwheel and the Cynos box has a 6 stud crownwheel. I think the Levin BZR box also has a 6 stud crownwheel. I have heard of lads doing it before but dunno if it's true. Can it be done and if so how?
Thanks,
Browner.
-
Yeah I see that. Was also looking at these what do you think?
http://www.ebay.com/itm/8x-ICHIBA-45mm-12x...#ht_4134wt_1438
-
Wasn't sure what section to ask this in so I'll keep it quick and informal. I have a huge forged 5e Glanza almost finished completion. It has a very big spec and was looking for someone to advise me on what type of custom high lift cams would best suit my setup? Can anybody recommend anyone?
Thanks,
Browner.
-
I recently fitted spacers to my Glanza but I'm worried that the standard wheel studs don't offer enough bite on the wheel nuts.
First of all, what are the length of standard Glanza wheel studs? I think the front and back studs are all the same length.
And does anyone know any good sites where I can buy extended wheel studs to cope with my spacers extra width?
Thanks a million,
Browner.
-
I have this carbon bonnet at home that I took off a Glanza. The carbon wrap looks old on it ie: very big grains etc compared to newer ones I've had. It has a Toyota stamp on the underside. Is it possible that it's a rare factory extra carbon fibre bonnet?

-
Hi guys,
sorry I'm probably posting in the wrong section but wasn't sure what one, if any, I should post in.
Basically I just want to know how I set my PM settings that all my sent items are saved rather than deleted automatically?
Can anyone help me please?
Thanks a million,
Conor.
-
Hmm might sell up so. Need money to finish my build. Don't really want to sell it though it's grown on me even though I'm not a fan of carbon lol
-
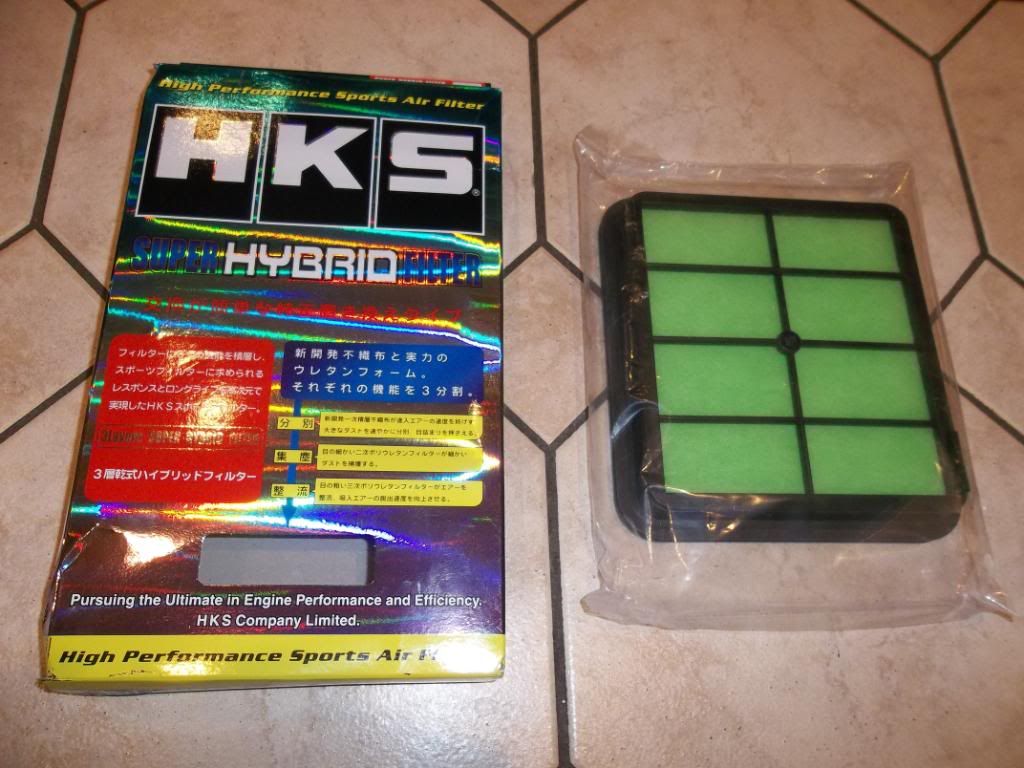
I was on ebay and saw every colour imaginable except blue lol.
You say HKS are green and yellow. On ebay it shows a range of colours made by HKS apparaently.
And what's teh main difference between the 2 layer wet and 3 layer dry filters?
-
Lads where can I buy a blue filter foam element for a 200mm HKS mushroom filter?
I've been all over the internet looking but no joy.
Also what is the difference between 2 layer wet and 3 layer dry?
![]http://i206.photobucket.com/albums/bb31/conor05_/f30.jpg](%5Dhttp%3A//i206.photobucket.com/albums/bb31/conor05_/f30.jpg)
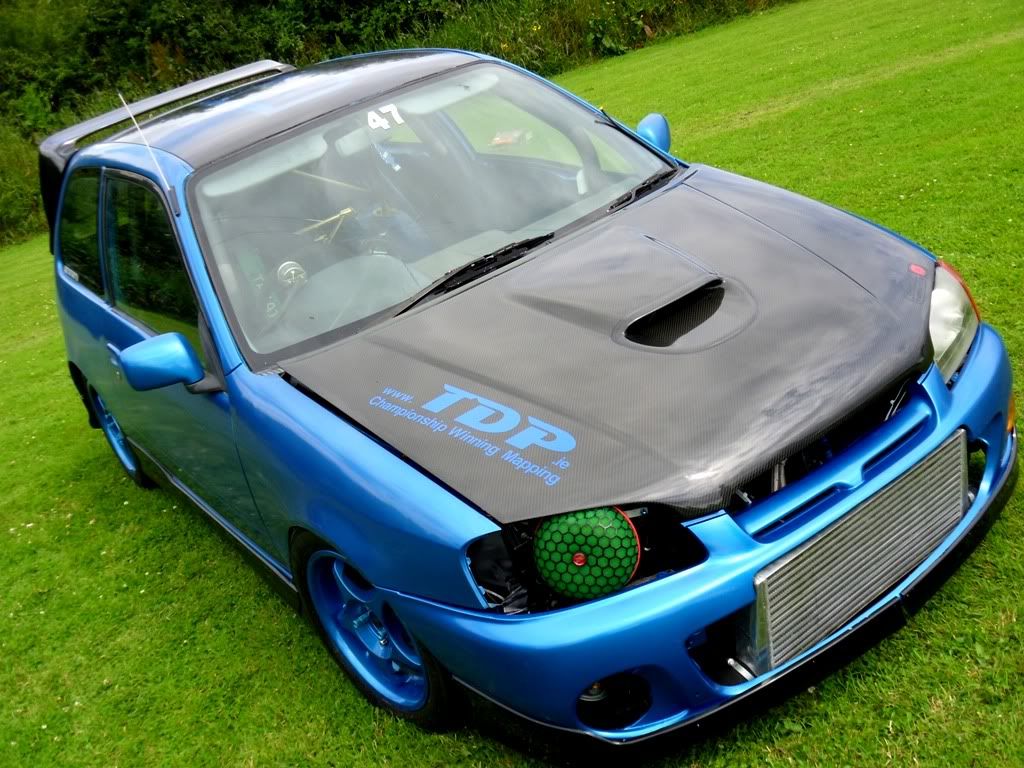
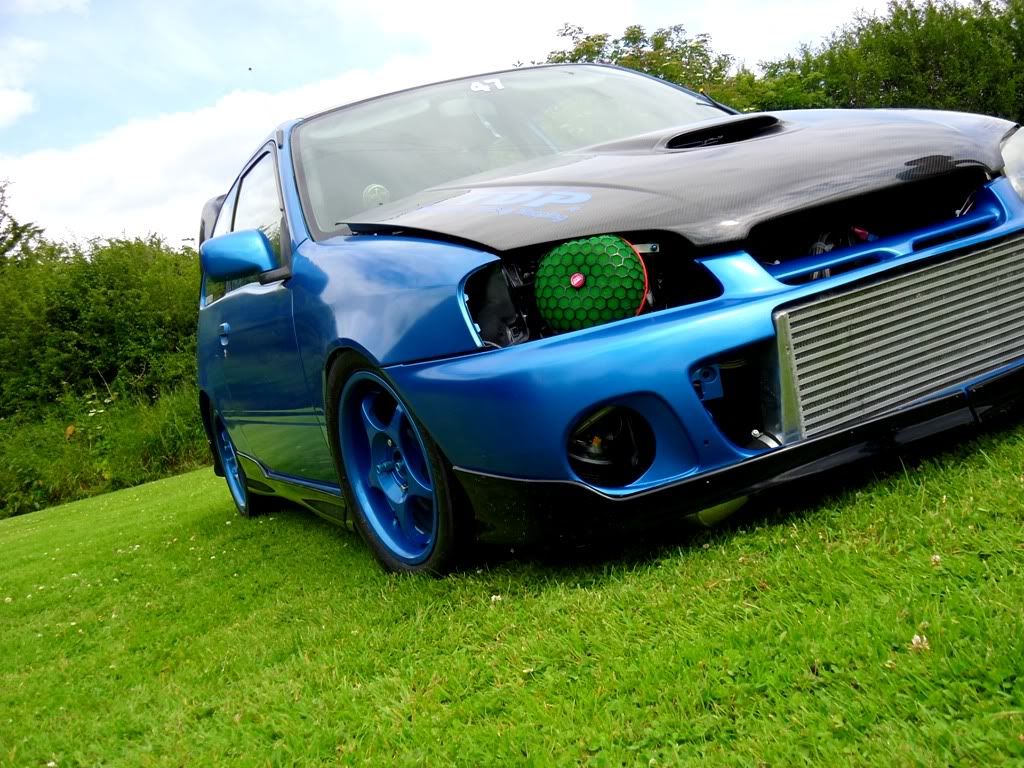
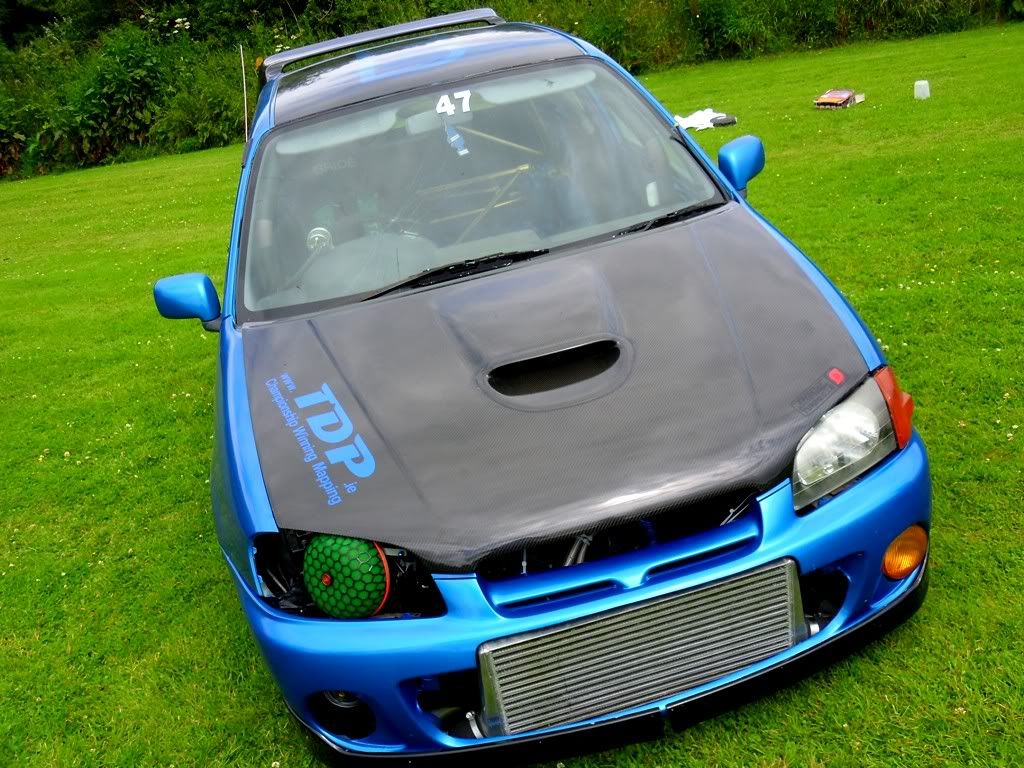
Browner's 383bhp Forged 5e Glanza V Turbo - THE BEAST IS OUT OF RETIREMENT!
in EP91 Glanza Progress Blogs
Posted · Edited by Browner
Well the sun is shining and things are looking great! =) First of all I would like to say a big thanks to QuinnyGT and Millstreet Kid on here they are two absolute gents. They bent over backwards to get me a Cusco cage up out of Cork and back to Dublin. Lads I cannot thanks you enough. I bought a full Cusco 6 point rollcage. It is a full dash dodger and rear seat dodger design.
I am modifying parts of it and getting custom bars fabricated as we speak. They are all of the highest quality seamless tube design.
This is the cage after it arrived at the house. It is blue at the minute but I am thinking of repainted the finished cage in 040 Toyota Super White. Opinions?
This is the rough design I am going for... Custom bars running by the side and rear of the seats and also maybe a custom diagonal bar in the rear to stiffen the whole lot up. I want to be careful not to add too much weight but its getting to the stage now where safety is the number one concern so I want a solid cage for peace of mind.
I ordered semi slick drag racing tyres today.
Next on the list is a clutch capable of holding 500bhp and then I am off on the England roadtrip in search of a new map for 500 ponies
We were in the middle of designing door bars for my rollcage but it was proving awkward to get in and out of the car even with them set at a low level. Also weld in door bars will not pass the NCT so a friend of mine in Carlow gave me a call with these genuine Cusco door bars for sale. These are ultra rare and I was chuffed to find such a "may not be as advertised" and original set.
They are much easier to move around than a big lump of a bar aka a tripwire lol. They are also a genuine Cusco item the same as my rollcage and still have all original Cusco paint and stickers. They will need slight modifying to fit with my rollcage as it's a dashdodger cage.
Here are some pics of them fitted to my mates Glanza:
These just arrived from England today I needed new front brake pads for my Levin twin pot calipers so decided to upgrade to heavy duty EBC Redstuf pads for greater stopping power and lower dust levels on my spanking white wheels
Just picked up this rare little beauty from a car I got in. Genuine factory extra air purifier and control switch. Very, very rare factory extra. Another one for the list
Pudgey you could do with this... get the wallet out
Well just a bit of an update. It's now Wednesday and the Big Meet is on this Sunday, still have loads to do and time for a little moan! My rocker cover cracked the day after I got it powdercoated so trying to sort that at the minute.
I delayed painting my cage and sidebars as the lads talked me into painting it the same blue as the engine bay but there was something about the Cusco Blue that I just had to have it. We went to test fit the cage today and it wont fit with my pillar pod so I have to lose that, absolutely sick because looked for one for months! So have to try and get two 60mm gauge holders by Sunday.
The sidebars are a tight fit with the door pockets and the seat bolster and will need modifying to bolt to the floor where the cage bolts to the floor. Another nice headache!
My front tyres are completely sqaured by the torque and wheelspin from the car so ordered new Yokohama Advan A048 Supersoft drag slicks from the UK. They better be here by the weekend or we might be in trouble.
At the minute the car is in about a million pieces. I just removed some parts that I want to polish up to a mirror finish including my intercooler piping, HKS dumpvalve and alloy half rad.
I ordered a new Glanza V boot sticker from Toyota which will be here tomorrow. Need a new rocker cover gasket and rocker cover washers as there is a slight weep of oil coming from there but dunno if I'll have them in time. The plan is to have the cage in by tomorrow.
The on Friday I plan on fitting 65mm extended wheel studs and spacers to the rear and finding the source of a loud vibrating rattle thats coming into the car around 4000rpm. Also going to fit my Whiteline anti lift kit and lightweight wishbones on Friday too. Then all day Saturday will be the clean of the century just to make sure its cleaner than "the twin" (Robep91)
Okay so today things have gone a bit better thank god
My drag slicks arrived so I finally have some grip!
I collected my new Glanza V sticker for the boot from Toyota...
And also got new rocker cover nuts and rubber rocker cover washers as mine were weeping a tiny bit of oil...
Although I think these polished ones will be the choice lol...
I fixed the crack in my rocker cover and resprayed it and am polishing up the raised bits as we speak...
The few bits I took off yesterday came up well after a polishing. See the earlier picture above for comparison...
My new polished HKS SSQV dumpvalve...
My intercooler pipes...
And my alloy half rad...
The rollcage was painted Cusco Blue last night and we are putting it in here this evening. Time to get the parts on and the rocker cover left to seal overnight and then tomorrow its wheel studs, spacers and anti lift kit time
OK rollcage is finally in after some gentle persuasion lol will get picks tomorrow.
Just finished polishing my rocker cover after repairing it and repainting it blue again. While it was off I cleaned all over it with cotton buds to get any tiny dirt particles off it. What do yous think?
Okay almost there now. Here is a few pics of the car the night before the Big Meet. Over 14 hours of cleaning went into getting the car looking like this including a full bodywork treatment, de tar, compound, HD wax and hours of polishing
The engine bay had a full detar and detail including all the plastics, hoses etc
Inside was filthy and the dirt just kept coming! After a good steam clean the dirt eventually started lifting and it came out well. Very happy overall just disappointed I didnt get a chance to spray the rear wiper, exhaust manifold and power steering pump black, they were a tad rusty and were the only things that let down the engine bay.
Anyway here's some pics after the clean and how the car stands now... Enjoy
This little beauty just arrived from Japan
A genuine ep91 non smoking ashtray. Very hard got and a nice touch inside the car
Got myself a full Whiteline Anti Lift Kit.
I came across ordinary Starlet wishbones and they are much lighter than the glanza wishbones. I put both sets on a scales and the ordinary Starlet wishbones weighed about 2kgs whereas the Glanza wishbones were around 3.5kg apiece. I could have done with a more accurate Salter scales but there is a definite large weight difference in them.
The Glanza wishbone (bottom in picture) has a thick rib around the edge of it, the Starlet wishbone (top in picture) does not. The fitment of both wishbones is the same.
Glanza wishbone (top) and Starlet wishbone (bottom)...
Getting off the old wishbone bushings was an absolute pig! Anyone who says it's easy is a liar lol! I had to cut most of the old black bushing off with an angle grinder and then burn the rest of the rubber off so I could fit the new yellow polybush mounts.
The rust and dirt was removed from the old wishbones and they were sprayed gloss black to tidy them up a bit. I then tested the polybushes etc to make sure they fitted okay...
Time to get it in the car now =)
Since I fitted the longer wheel studs I needed big spacers to bring the wheels out a bit in the arches, so much so that the wheel nuts were maxed out tight and were nowhere near the wheel! For the minute I had a load of slip on spacers built up behind the wheel but didn't like that and it was giving me a slight shake in the steering wheel as they weren't sitting 100% centre on the hubs.
I got these beasts now... 25mm hub centric bolt on spacers. I may have to machine them down a bit more to fit but we will try it first and see =)
Got these small slip on covers for the front bumper from Toyota today. They were missing from my car when I got it so just want to have it right
Browner