


jason_l
-
Content Count
1610 -
Joined
-
Last visited
Content Type
Profiles
Forums
Wiki
Media Demo
Store
Calendar
Posts posted by jason_l
-
-
actually will consider both climate control and non if people have either, as long as they are real cheap

-
Non climate control please
-
Hi everyone,
After a glanza and a GT (if they are different) heater control panel. I literally just need the face part not the control gubbins and ideally as cheap as possible please
Many thanks,
Jason
-
Item For Sale: Stainless Steel Dial kit for Glanza (with the standard kph dial face)
Item Condition & Description: Brand New, Stainless Steel Dials for Glanza. I have 3 of these kits available after a recent group buy i run on another forum. There are currently only about 7 of these sets out there at the moment so not loads of them about. They are designed to fit over the standard kph dial face and line up perfectly with the standard dials. They are precision etched from 0.25mm stainless steel and the quality is spot on. They are designed to fit over the needles for ease of fitting (the only needle that needs to come off is the fuel needle). This means that you don't have to faf about trying to get the needles on in the correct place.They come will full fitting instructions.
The few people that have these fitted in their cars will tell you how good they look.
Price: £55 posted to UK
Pictures: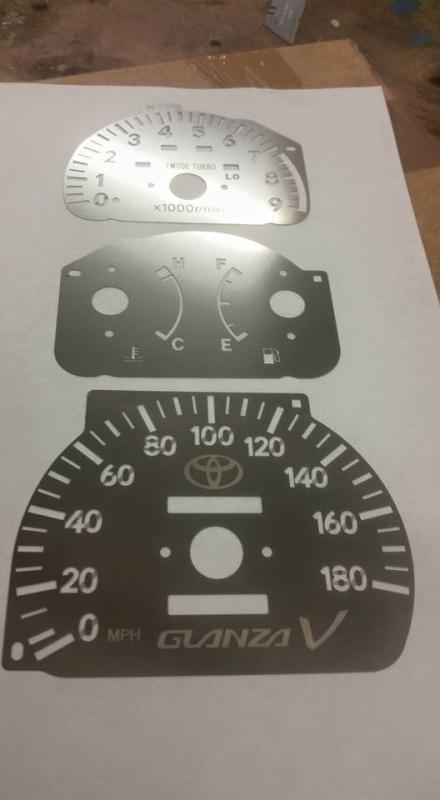
Payment & Shipping Details: Paypal or bank transfer, shipping is included in the price.Any questions just ask.
Jason
-
There are currently about 4-5 sets in existance hence why those on ebay are so much. They look very similar to stock lit up as the light is still aimed towards the driver. You just get a slight shine off the stainless. They look good though, not over the top but almost like a dealer extra.
-
-
Hi Peeps,
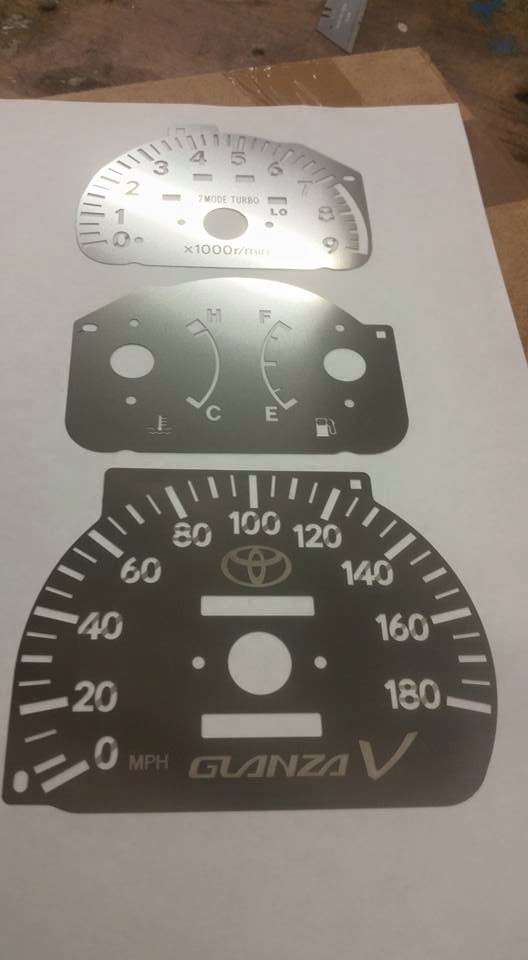
Im looking at running a GroupBuy for the Glanza V stainless steel dial conversion but need to know if its ok to run a groupbuy on the forum and if so would people be interested??? Also not really sure what section to post this in???
There are currently only a few people that have these and they are not available from anywhere else.
If the numbers are good then the price will be around the £50 mark. They come with full fitting instructions and only the fuel needle needs to be removed to fit them. The rest of the needles can stay in place as they fit over the needles while they are in place. They fit over the existing standard dial faces and will only fit the standard kph dials that are in the galnza from factory.
Here is a picture of what they look like unfitted. I will get some fitted pictures up shortly.....

Any questions then just ask peeps.
Jason
-
Mini Update. Just confirmed prices with shotblasting firm and looks like its going ahead. Will be dropping it off for its first shotblast session when im back from my holidays in a few weeks then i can finish the final welding and then its powdercoat time! Really can't wait to get rid of the shite red colour once and for all!!!!
Jason
-
Thanks Guys
Shaun, hopefully going back together will be straight forward but im sure i will forget something or need to change something. Most of the parts can be powdercoated and i can dremel off the excess but some parts will need masking up to keep the powdercoat out. Work will stop on this for 2 weeks while im on holiday but will be pushing ahead with it when im back in the uk.
Jason
-
Ha. Thanks Hou. Slow progress but progress none the less.
Heart is going good, as in im still alive so i guess it must be working. Turned out to be a titanium vlave and not a carbon one in the end.
Jason
-
So Monday and tuesday i spent the day stripping down the rest of the frame and getting the engine removed. Didn't take too long as most of the work was already done. I got the brackets welded for the frame for the oil cooler also, plan is to leave this off for the moment and add it at a later date with a side duct that brings in air to it. Its sort of behind the driver at the rear (right near the oil filter) but will be boxed in when finally added.

Continued to strip everything off the chassis and now i am just left with the frame itself. I still have some welding and cleaning up to do before it goes to powdercoat but its getting to be a bit of a mission removing the old powdercaot to sort the welding. Been thinking about getting the whole thing shotblasted and then looking at the welding but it seems quite expensive to get it all blasted. Anyway this is how it currently looks..........


As you can see it is now just down to the chassis with nothing else left on it. Really hope it goes back together easy. The plan is to do the chassis a satin black colour then all the wishbones/hubs etc will be lime green. Still in 2 minds if i should do the wheels grren or leave them silver in colour???
Im off on holiday for a few weeks but when i get back the plan is to crack on with this in between all the other jobs i have.
Jason
-
If stevie wonder had a glanza.............
-
Still working at this a little in the background. Been making a few brackets for mounting oil cooler, nosecone etc.
Im planning on being at the workshop tomorrow and most of Tuesday to get most of the welding done on the frame and hopefully get the engine out. With any luck the frame should be almost ready for powdercoating soon. After next week im taking a well earned break and flying off to warmer shores for 2 weeks but hopefully crack on with it when i return and it shouldn't be too long before the frame is finally all one colour and then i can start the final build!!!!!!
Will hopefully add a few pictures in the next few days but im pretty busy, and i also need to find time to pack the suitcase......
oh, and im just about to start the planning application for the double garage/workshop so the little beast will finally have a perminant home!
Jason
-
Great project this. Keep up the good work buddy, watching this and waiting for the swap to take place.
With regards to the clutch cable setup you should be able to use the starlet slave cylinder then something like a land rover master cylinder and a custom made clutch line. Thats what i have used on my project. Works a treat.
-
-
Haha. Amazing. Everyone says thats how im going to go but no fireball yet.
-
Ha. Thanks. Its been going so long now that people may have forgotten all about it.
-
Thanks Dude. Could never stop loving this project. Too many people start epic projects and sell them off halfway. Never going to sell this. May take me longer to build but as long as i slowly chip awat at it i will get there in the end.
Jason.
-
Flippin heck i haven't updated this in over a year!!!!
I have had to put this on hold for a while as building my own house takes up all my spare time, in between working full time and all my other projects i am working through on the side. I also had a bit of a accident while working on the house and fell 9ft onto my head and shoulder which resulted in my fracturing my spine and being signed off work for 4 weeks. Lucky i didn't kill or paralyse myself but im almost back to health, apart from a bit of pain in my left arm and neck. Just need to take it easy for a few months.
Anyway..... After having to move the buggy home as i lost the space available at work it sat at home under a tarp on my trailer for ages. Was literally just rusting away as the weather was taking its toll on it. Did give it a bit of rust treatment here and there to help slow the rust down but it was getting bad. Then one weekend i stopped in to see a mate in Basingstoke (who has been helping me build it) and he was horrified to hear that it was being kept outside. He kindly offered to store it in his workshop until i found the time to continue working on it. The Brian James trailer i had was not really being used and spent most of its time just getting in the way so the decision was taken to sell it. Sold in less than 18 hours for pretty much the full asking price.
Recently work has started up a little on the buggy. I'm only spending the odd day here and there working on it but its moving forward. After having a long talk about what should be the next area to concentrate on we decided to move on with it. There are issues with brakes, wiring, driveshafts, engine, coolant pipes etc. However these are all small issues and rather than spend the time working to resolve these issues only to have to dissmantle the thing ready for powdercoat we decided to work on these when the thing is in its final build stage. So with that in mind i have decided to concentrate on the chassis. The idea is to now finish ever little bit of welding to the frame and clean it up ready for powdercoat. There are brackets that need adding for alot of things, nosecone, engine cover, panels, oil cooler. However once all of these are done the chassis should be pretty much done and shouldn't need anything else added. If i do need to add anything i can fabricate brackets that will come off of existing mounting points.
So I moved the buggy to a corner of the workshop and started to remove parts and box them up. After 2 days hard graft and a lot of head scracthing the buggy went from this....


To this.......


Managed to get everything but the brake callipers, driveshafts and engine out. Plan is to fabricate up a load of brackets and spend a day or so welding everything onto the chassis and cleaning it all up. Then finish taking everything else off the frame and its off to powdercoat. When its back the final build can begin. I still have to work out how im doing certain things but this can all be done when i start putting it back together. The frame is going to go black, so its easy enough to touch up should i chip it. Im still unsure of the colour for the bodywork etc. Was originally thinking a bright green but some people reckon i should do everything black and keep it looking stealth. Part of my agree's with this but it ain't exactly subtle anyway so maybe bright green would be better. I also don't really think the nosecone works so i will be changing it for a more boxy version to match the frame but i can do that later when its all road legal. Good job for a winter when im not using it..........as much
Hopefully look at getting the welding done within the next few month's so there should be another update soon
As always, if anyone has any input then let me know as it all helps
Jason
-
Still sorting a few things in the background with this. Once house is watertight i can get that a bit further along and then look at building the double garage/workshop. Thats when the fun begins. At the end of the day this aint getting sold, may take me a few more years but i think you all know epic times are a coming!!!!!
@zeldoz, it was in the workshop under a cover so you may not have seen it. Paul is a great guy, work with him quite a bit. He has been helping build this also. Me and him are planning a epic europe trip in this when its built Ha.
-
Been a while now without an update and im sorry to say the updates will be few and far between. I have had to move the project out of the workshop, currently under a tarp on my drive rusting away :-( sad days. But dont worry guys and gals... THIS PROJECT WILL GO ON. I am currently building my own house and its taking up all my time. The plan is to build a double garage/workshop so i can finish the car but the house comes first. I need somewhere to live!
Yes, i work at Intech, and up until a few months ago thats where it was! Some parts are still there but not the demon itself! Any motivational comments welcome, need this built!
Jason
-
Well it’s been a few weeks without an update so I think its about that time. As usual work has been mental, it never seems to ease up to be honest but its just getting more and more crazy.
Anyway since running the buggy a few weeks back a few problems where clear. Have a oil leak which I believe is the oil pump, not a huge problem as when I take the engine out later I will sort it out then. Can be seen here….

One of the copper coolant lines also needs re soldering as there is a small leak on one of the joins and I still have to get to the bottom of why the rear brakes won’t bleed. I just need to find time to get on with a few bits.
Despite the lack of time I have been working on a few parts on and off now and then.
Firstly I have made some weld on tabs that will be added along the frame to fix the ABS side panels on. Rather than drilling into the frame I have decided to keep the frame free from holes and add brackets on that will secure the bodywork in place. Got down to homebase and bought some steel brackets that where then modified, way cheaper than going the laser cutter route.
Started off like this…

Sanded down, drilled out holes…..
Then cut up into individual brackets, nice and light as well……
Still need to order up some ABS sheet but I want to hold off until the brackets are on the buggy and I have some card templates made up also.
The other job I have been looking at is the induction pipework. I have the air filter already mounted on its own bracket but have held off on making the pipework for it as I was still unsure about what turbo I will be running. Recently decided I should just keep with the little original CT9 turbo. Its only small but am I really going to need more power? Spools up well and replacements are nice and cheap so why change it.
With this finally decided I could make the induction pipework up. The turbo inlet size is only a measly 41mm and the K&N filter I have has a 89mm size hole in it. So its clear I was going to need some reducers to get this to work. Firstly I looked at the filter side of things, got a alloy single piece reducer from ebay which was a 65-45mm reducer. Then made up a nylon ring to fix it to the filter….
And all put together and trimmed down….
Then I needed to look at the turbo side of things. The air filter is lined up perfectly with the turbo so its just a straight line to join the two together, that is of course if the oil filter wasn’t placed in the way! Now I could get a relocation kit for the oil filter and I still might do this but it doesn’t give any more room as the oil filter bracket is still in the way. So I needed to create pipework that goes up and over the filter. I could have done this with silicone joins but this gets expensive and looks a bit bodge job. So I planned on doing it with stainless mandrel bends.
Firstly got a lime green reducer 90 degree bend, this fixes directly to the turbo and bends up away from the oil filter and steps the size up to the 45mm size that is on the filter.
These pictures show the oil filter smack bang in the way and what route the pipework needs to take…

So then done a deal for 3x 45mm stainless steel tubes with nice tight radius bends….

And then a lot of cutting, sanding and fettling I was left with this…

Cut a small section of the silicone bend down to use as a joiner on the filter side and got it test fitted…..
Then the pipework was sent off to a complete legend, Steve (from Muddybuggies Forum). Wasn’t expecting a quick turn around and to be honest I wasn’t in a rush but he got it welded up and back to me very quickly indeed. When it arrived it looked like this….

Very happy with it and Steve insisted that I should polish it up. Wasn’t really too fussed as its mostly out of the way but thought I would give it a go anyway.
Got to work with a wire wheel and some scotch bright and a little after it looked like this….
More than happy with how it came out but thought I should give it a go with the bench polisher we have in the machine shop and the results speak for themselves….

And fitted in place…..


Steve’s welding is great and its nice to have some of his work on the buggy.
That’s pretty much it for now, although im already starting on the next update. Have got some stainless flat bar that im going to use to add some strength to the arch’s as they rub against the tyres when they bounce up and down when driving along and hopefully get the welder at work fixed so I can start welding the brackets and a few more bars onto the frame so I can build the bodywork.
Another update soon people.
Jason

-
Thanks Guys,
Socks, i think i owe a few people passenger rides lol
Might be the CV, problem is they are brand new outer CV joins and new wheel bearings so im thinking it probably won't be. I really hope its not a case of one of the driveshafts being a problem as i had them custom made and don't want to have to have them redone again.
-
Thanks guys for the posative feedback. Still a long way to go though but its slowly getting there.
Got the FCD fitted today and next job is to start looking at the brakes not bleeding correctly. My mate wants to come and see it on Saturday if he gets time so i may take it for a cheeky spin then, if i have a few problems sorted i might give it a bit more of a thrash!!!!!


Glanza Stainless Steel Dials
in Starlet Parts For Sale
Posted
Just to make clear peeps, these fit over the standard kph dial face and won't work with different mph dial faces.