


jason_l
-
Content Count
1610 -
Joined
-
Last visited
Content Type
Profiles
Forums
Wiki
Media Demo
Store
Calendar
Posts posted by jason_l
-
-
Well yesterday was the day we decided to crack on with the fibreglassing. Paul from work came along and gave me a hand, complete legend, couldn't have done it without him.
Was like working in a oven and i was swaeting my ass off but got it mostly sorted and plan is to now get a few more layers on it tomorrow evening and then get it moved back to the workshop at some evening next week before the new director starts work. lol
starting to add some fibreglass......


and with a even(ish) layer added all over......

Didn't really care about getting the garage all mucky as its going to be torn down and rebuilt at some point so no need to clean up lol
Then today i went back to just clean up the sharp edges and get ready for tomorrow....

After the fibreglass is removed from the front i can crack on with getting the wiring done back at the workshop and work on the nosecone at my garage seperately.
More updates coming soon

Jason
-
Thanks guys. Just so happy now i know the engine runs and everything on that side of things are good.
-
Forgot to add, thanks for the injector rings Jay and the use of about half your Glanza lol
-
Right well the last few days have been pretty manic, im shattered now and just want a couple of drinks and mong out......
Thursday the mirrors turned up, look pretty good actually and they simply just screw onto the clamps i have. Just adding a few little bits to the buggy makes it look so much more complete.
new mirrors.....

on the buggy........


Also managed to get the Acewell speed sensor modified and its all ready to go, simply just fits into the speedo cable end and converts the mechanical movemement to a electrical pulse that will show the speed the buggy is doing.

Also got a 50 Cal ammo box, i might use this in the compartment at the rear of the buggy as almost a lockable glove box, has a waterproof seal around the top, not sure yet though, its currently being used as a toolbox.

Friday i got into work early and got the car cleaned down and stuff packaged ready to go today......


Then today i have spent the day picking up the trailer, picking up buggy, driving to and from JDModified and finally dropping the trailer off and storing the buggy in my garage so i can start the fibreglassing. Its great watching peoples faces as they see the buggy on th trailer and i had quite a few people stop and stare at it as i drove past.
Im absolutely shattered but its been a very good day. I have to say a HUGE thankyou to Lee at JDModified who has been an absolute legend today. He knows his stuff when it comes to wiring Toyota engines and i couldn't have done it without him.
Got the buggy to JDModified at about 11am and about 2-3 hours later and a quick trip to the petrol station to fill up the jerry can...........
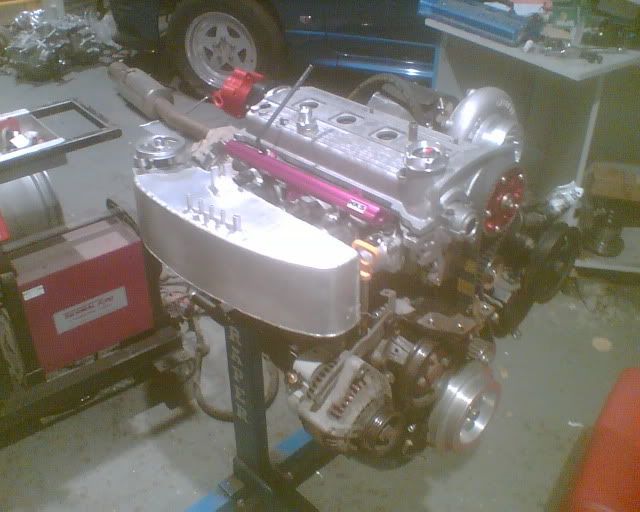
IT LIVES!!!!!
Yes thats right the engine got started up today, its actually alot louder than i thought it was going to be and i may have to get a cat fitted

First attempt..............

Had a few minor things to sort, mainly lack of fuel and a few leaks, then second attempt.....

Was running a bit poop, turned out to be air getting in around the throttle body and a port that wasn't blocked off on the inlet manifold. But then on the third attempt she started up and ran great. Now i did have a video of it running on the third attempt but i tried to upload it to Facebook and its now corupt the file on my phone!
But anyway, she runs and im over the moon.
Then there was just enough time to get it moved to my Garage ready for the fibreglass fest. Rolled it round the back with my bro, actually looks awesome when i rolled it off the trailer and just seeing it parked on the road makes it look so much more real.

and all tucked up in its new home for the next week or so.....

Well thats it for another day. With any luck it won't be long before i have the fibreglassing done and im moving it back to the workshop
Jason
-
lol thanks buddy. Yes fingers crossed. Will still be a while yet but its getting there. Another buggy went to IVA this week, same chassis as mine and it failed, but only on a few minor things which means a retest and all sorted. Made me feel a bit better about doing mine though and im not a million miles off......
-
Thanks Steve, yes got a bit of momentum to it now don't it.....
Well the F1 in spain was EPIC, had an awesome time and the race was great. Would have been nice to see Mclaren do a little better but still was great. Did pick up a little something for the buggy though........

Anyway, got back early monday morning and spent the day cleaning out my garage ready for this weekend and the possibility of getting some fibreglass work done. Its getting there, moved alot of boxes and now i think there will be just enough room to get it in there. Aim is to get it fibreglassed as quick as possible and get it back to the workshop to crack on with other parts of it.
Well back to work on Tuesday and the 'drunken' ordering i did last week on ebay was shown to its extent, luckily i didn't have much money in paypoo so it wasn't too bad really.
Started with some nut covers and green bolt/screw caps.........

next package contained a K&N oil filter, this is huge compaired to the standard filter and even has a nut attched on the end for easy fitting/removal.....
Standard size filter on the oil filter bracket.....

and compared to the new FAT filter.......

might need to tweak a small bit of the frame but will fit in the end.
Also had some Harley davidson Fork clamps. These are used to relocate the indicators to the front forks. Im planning on using these as mirror mounts, they said they where for 39mm forks and the frame is made from 38mm steel but im happy to report they fit perfectly. They have a great radius on all edges so should be IVA prrof but i may need to just cover the bolts slightly.
Fresh out of the pack........

threaded the ends M10 x 1.25........

and fitted to the frame roughly in place.....


I then roughly added the mirrors i have, would love to keep these mirrors but im going for slightly larger mirrors that are on order and should be here tomorrow. Will simply screw into place and should be IVA friendly....


Got a few more things to sort tomorrow and friday and then fingers crossed a large update this weekend.........
Jason
-
Thanks for the comments guys
Don't worry Socks i will happily take people for a spin in it. I went in a MGF 1.8 engined version on the weekend, exactly same buggy as mine although looks alot different but same chassis underneath, slightly different wheel base and mines wider at the rear. His has 125bhp and it went like a rocket!!!!! Felt more like a rollercoaster than a car if im honest so i can only image how mental mine will be. Really want this built so bad now.............
-
Think its that time again

Well after the Stoneleigh kit car show and having a spin in Steves MGF engined buggy i was blown away. That thing goes like a rocket and it has really got me wanting mine done now. I think Steve said his was about 125bhp and that was more than enough power! However i am still keen to eventually aim for about the 200 mark. Obviously i just need to get it done first!
Well Monday was raining which meant i couldn't work on the house so decided to go into work and get some done, shame that. lol Aiming to have this built for next year in May so i can get to the show. I probably won't make it but going to try my hardest and really try to get it done.
Anyway, pictures are what people want.......
Back to sanding down, filling, sanding the nosecone.....


I think thats probably about as smooth as im going to get it before i add the fibreglass as there is no point getting it uber smooth just to have to spend ages on the fibreglass doing the same thing. Got a little primer on it just to see it a bit better and have to say i really do like the nosecone. I think im just going to go up the sides to where the primer stops as i think the extra bit doesn't really add much to the design.


Then started looking at mounting the headlights, only made one bracket so far but i now have the template for the second one so won't take long. Still not sure if the headlight location will pass IVA as it states they need to be max of 400mm from the edge of the car but the rear is wider than the front so unsure but if it fails i will extend them out on stalks for the retest and then put them back after the test.....
one bracket......

clamped in place, going to grind the original bracket down slightly and weld it on.

Makes the front look a little more complete now.....


and just a random shot off the deep dish wheels with the slicks.....

Also been working on adapting the acewell speed sensor to fit to the toyota speedo cable and im almost there with it. This means i will have a better more reliable solution for the speedo. Will get pictures next time im working on it.
Would love to get on with it some more this weekend but in a few hours im flying out to Barcelona
Me and Sarah are going to watch the spanish F1, got a full weekend pass so should be awesome. Sarah is nuts about F1 so its more for her than me lolAnd then the following weekend is when it starts to pick up some more. Have the buggy booked in with JDModified to have the engine wiring finally finished off. Hopefully this means when the key is turned the thing will actually start up. Really looking forward to this and fingers crossed it all goes smoothly. Then the plan is to shortly after this get it moved to my garage to quickly get the fibreglassing underway for the nosecone. Watch this space for more updates soon......
Jason
-
Small update.
I found about 20 minutes free this week so got a few more parts ordered and managed to make a new spoiler
Got these flick switches in green, not sure what i will use them for yet but will match with the rest of the green theme.

Then i managed to find a little free time and some 10mm acrylic we had lying about. Decided to make a clear acrylic spoiler for the buggy, looks pretty good if you ask me and not too bad for a quick job. I haven't taken the backing off of most of it yet (just one end piece). Might sticker it up or do something with it??? not too sure, just need to router the edges so they have a nice radius and its all good.
Luckily we have a huge laser cutter at work so spent my lunch break sorting this out.....
being cut on the laser..........


Pieces cut out......

and then all bolted together in place......


Would love to know what you guys think?
My big work deadline is this week and next week i can finally start taking holiday again (now have 7 weeks in total to use this year) so next week im off to find some sun but then when i return i can crack back on with the buggy finally
Jason
-
lol thanks buddy.
Not really much of an update to be honest but it all counts
-
Well, with it being my birthday last week i managed to get a 'Hall Pass' from the girlfriend and for my birthday i was allowed to spend some cash on the buggy. Go figure, its my birthday and that means i can spend my own money on me for a change lol
Anyway, managed to get a few things bought before the pass expired........
Mikalor clamps for the intercooler pipework.......

green alloy valve caps......

and some small headlights, only 105mm across the lens and they are very light, but are built really well and even have sidelights, dipped and main beam all in one unit. They will look awesome when i finally get them fitted..........


Not many more parts i actually need now. However money or parts are not the problem, the ONLY problem is finding time to actually finish the thing and just put the parts together. Hopefully work will ease off soon and with the house ticking over i can get a few days in on the buggy
As always the comments are greatly recieved.........
Jason
-
Cheeky git. At least i can keep a car for longer than a year lol
-
Thanks guys. Starting to get there but earliest it will be done is next year if im lucky. just too busy building the house.
-
Right then..................
Think its that time, finally.
*** Update Time ***
Well with all my time being spent on sorting the house i have had very little free time, and with work being really busy as well i just haven't had the chance to get the buggy out and get any work done on it. The workshop is rammed and there is currently no room to get to the buggy to do any work so its just been sat under the dust sheet for the last 5-6 months.
Well today Sarah was dragged into work for the day and its too cold here (-
 to do any brickwork today so i had the day to myself. Rather than just loaf out for the day i decided to go into work with Sarah and get some work done on the buggy. Really glad i did as i managed to geta few bits done and had a good day of just cracking on with it.
First thing to do was get the workshop cleared and get the buggy out and see what was what......
how it started off the day...............


A few weeks back i managed to find 5 minutes to cover the steering wheel centre in foam and then suede so now hopefully its a bit more IVA friendly.

First thing to do today was get everything sorted out as i have loads of bits just everywhere in the workshop, under my desk, in box's on the buggy etc.....

also picked these rather nice zip on coilover covers from Autosport International a few weeks back, will keep the rear coilovers all clean and scum free....

now im all organised and everything is easy to find when i need it.
Then i started by getting the new rear painted calipers fitted.....

Then got the lime green gear gaiter glued to the surround and on the car.............

Started making up the compensator for the handbrake and i think i have now sorted it. Will find out hopefully soon when i find time to fit it and trial it out.....

Got the front nosecone filled with a bit more filler and then gave it a quick sand with the orbital and just sprayed a quick coat of primer to see the rough finish. Obviously it needs a lot more work but its getting there slowly.....


While sorting out the parts under my desk i found the clear cam cover that i bought a while back. Had a little think about this as it doesn't fit on the engine with my non stop tunning adjustable cam. Decided to try and cut the standard cover up to create a spacer piece and it worked a treat. Was a bit fiddly cutting it up and sanding it smooth but im glad i spent the time. It looks spot on and you wouldn't think it was the old cover cut down. It also now means that the new cam cover has retained the rubber gasket around the edge so its sealed properly around it....
before.....

cut up, this is the remains of the old cover......

and the finished article, looks so good in the flesh.....


Really happy with the finish and its another part fitted that i had lying about.
Then got the rear plate brackets welded to the rear bar.....


and while i had the welder out i knocked up a quick bracket for the rear tow eye and got that welded to the rear bar as well. This will be fitted after the dreaded IVA test of course.....


Well that was today
Sort of worked on a bit of everything really but was good to get some work done on the buggy and get a few parts out of their box's and fitted. Doubt i will get any time to do much work on it now till after march when work is back to normal and im not working stupid hours.Comments welcome as always people
Jason
-
Hiya buddy.
Long time no speak. hope your well dude.
Yes i would like to see this finished also. lol
Jason
-
Thanks for the comments guys
really makes me want to get it done even more.@Taggy, this aint for show's mate, of course i will take it to every show i can but it aint going to win any show and shine prizes. Its purely built to be driven hard and try and shut down some supercars. and oh yes track use!
-
Don't worry i haven't forgotten about you guys. I actually need very few parts to complete the project. The main expensive parts i need are some road legal tyres, probably be R888's and a hybrid CT9. Everything else i need is just little things here and there. I just need time more than enything to complete it. and thats something i have none of at the moment. However having said that there is nothing i can do on the house this weekend so i have saturday and sunday to crack on with it.
Jason
-
Looks good dude!
I have one as well and i love it to bits, awesome fun and like you say got to have the roof down even when its freezing cold. I car share with the misses though and she aint usually too happy when its cold out, she knows if its not raining i will want the roof down. lol
Mines on springs but more than lower enough for me as like you say just gets impractical. Mine has hit on a few speed bumps, mainly because of the front mud gaurds though. Whats the next plans?
Jason
-
Just a little update.
The buggy is still here and i haven't really had any time to do anything on it recently with work being so busy and also trying to sort out the house. The buggy is still under a cover and gathering dust. However i did manage to go to Autosport International at the NEC on sunday and i really am wanting this thing built. Seing all the awesome cars has made me just want this thing built. I did manage to buy a few little parts for the car that i have had trouble finding and i have loads to get on with now.
My current workload is crazy but will ease up around mid march time so the plan is when there is more room in the workshop i can roll the beast forward and get cracking. Don't worry guys and gals.............one day she will see the light of day.
Thats it for now,
Jason
-
glad to hear you arnt guna sell as this will be full on win when its done!
even if it takes a week or 10 years im looking forward to seeing it complete

Yes more like 10 years than a week i think..........
-
Yes the car is getting very dusty indeed, even with the dustsheet thrown over it
I haven't touched the thing now for months, and its just been sat there and left. I have added a little bit of body filler here and there as we use it at work and i make a point of always mixing up too much so that when i have some left i just lift the cover and add a little more to the nosecone.
The house we bought still needs a lot of work and i have been spending all my time and money on that. Plus my Roadster died in a big way a month or so back and i have been busting my balls trying to earn more money to pay for that. Im now going to be on my third engine in 4 weeks
Anyway, the Demon will not be getting sold as i just love it to bits and WILL have it done at some point. I know many kitcars get left and then people loose interest and then just sell it down the line but i promise that won't happen as i really do want it done. Just give me time, lots of time but i will have it finished
Jason
-
Gold badge will look epic on your car Steve
Forgot to say i saw your car at JAE and it looked just complete win!!!!!
Jason
-
This build is just awesome!
 The amount of work you have put in is just epic. well done dude, must be so epic to drive.
This picture made me laugh my head off.............
It pretty much sums up the car right there on the engine stand................RAPER!!!!!!
-
LOL love the cookie monster 1
I die a little inside every time i see that mx5 on fire though
Project 'Deathwish'
in Other Motors Progress Blogs
Posted
Well its been a busy old week really. Work has been hectic but still found some time to sort out a few little bits
Friday i got back to the garage and got the next coat of fibreglass on the nosecone. Again a big thanks to Paul for working in the heat to help layer up the bumper and it was looking great.
Didn't get any time over the weekend to get any done as i was working on the house both days and i was shattered come monday. However monday i needed to look at moving the buggy back to the workshop so after work i rushed home just to load up the trailer and get back to work. Thanks to my bro for giving me a hand loading and unloading the trailer. Got the buggy back to work and the trailer back to JDModified.
Then Sarah ended up working late on tuesday and wednesday which meant i was forced to stay on and get on with the buggy, such a shame
started off like this.......
sort of bearded bumper, so trimmed the whiskers off........
Then after a lot of pulling, some wooden wedges and a rubber mallet this happened.......
I did manage to crack the bumper at the sides as it really didn't want to come off but its easy enough to repair and re-enforce from the back.
Then removed all the stuck on foam/ply and filler.......
still got a little more to remove but its almost there. Got it on the scales and its currently 8kg for the whole thing. Pretty happy with that but it will go up slightly more with the gel coat layer.
Then started cleaning up the front and trimming to fit the buggy better.......
Still need to trim it down to fit perfectly but its slowly getting there. Have taken some measurements and its all looking true and square, just a little bit of fetling on the top part. Then i can clean it up and start getting the gel coat layer on. Im still going to make a splitter that fixes to the bottom edge to make it look a little more meaner.
Then i thought i would test fit the front rad and i must say its PERFECT. looks so good and fitment is spot on, can't see any of the edge parts. Then added some mesh i have, to be honest i think it looks better without the mesh but i may leave it in for the extra protection it gives to the rad.
with rad and no mesh..........
and then with the mesh roughly in place....
Think its starting to come along quite a bit now and looking a bit more complete.
Next plans are to continue with the bumper work and begin looking at the cooling pipes and the brake lines. Still in 2 minds if i should use copper pipes or braided lines throughout the buggy?!?!?
More to come soon,
Jason