


Monkey
-
Content Count
89 -
Joined
-
Last visited
Content Type
Profiles
Forums
Wiki
Media Demo
Store
Calendar
Posts posted by Monkey
-
-
I know it isn't as good looking as some of the other manufacturers but i was never one for style over substance.
Its got a massive spec for the £8k price tag
Alloys, air con, remote central locking, electric windows front and rear, electric mirrors, front fogs, ABS, adjustable height drivers seat, adjustable steering wheel, 6 air bags, 6 speakers, mp3 CD player with aux-in, 5 doors, plenty of storage, a decent boot, a 5 year warranty, £35/yr tax. I've driven one and it's a great little car.
-
No sorry mate, they went ages ago
-
I'm afraid my starlet is going off to the big scrapheap in the sky

I've been seduced by teh government scrappage scheme and pick one of these up in 3 weeks.
I'll miss my super Starlet but it's just too good an opportunity to miss.

-
Jacked it up at my Dad's and found the problem immediately. I must have been pretty central on what I hit as all front suspension is fine. It has taken a chunk off the gearbox but just a fin thankfully (1/4" to the right and I'd have been screwed). It has scraped the cat (but still ok) and dented the middle section. It scraped the underside of my 'half-full' petrol tank (if it had gone through, metal on metal, sparks plus petrol, doesn't bear thinking about
 ). So far, not so bad. And finally... The back axle/anti-roll bar/wheel hub assembly was a lovely banana shape
  The back wheels were 'toeing in' badly. I found a garage that has heated it up and beat the f*ck3r straight to get me through christmas. Gonna source a second hand replacement and get it replaced in the new year. Not a small job though so labour costs are gonna be biiiig I love my car though and cant afford a new one. Anyone got a rear axle?
-
Driving to a party last night in the dark and the rain and I drove over something that went BUMP...Scraaaaaape underneath the car.
It now feels like I'm driving on a skidpan and I'm constantly having to correct the steering to stay straight.
Also my passenger seat no longer slides violently forward when I lift the lever, it's gone stiff.
I must have really messed something up underneath for it to affect the seat rail alignment in the car right?
I now have to find a garage on the Sunday before christmas that can have a look and tell me what I've done and then try to get it fixed for christmas, it's just not going to happen is it
I have no alternative transport as I dropped my motorbike on ice and mud a few weeks back.
Gutted isnt the word
Anyone on here got any ideas what I could have done?
Chris
-
did he get your number too? :angry:
I made sure i got his...so he can do my service again next time
 doesnt need his number...
hes outside his house now. wanking over his side strips...
How do you know, are you watching him?
 Bet that made you happy
It certainly did mate
-
Went to pick up my car after its service today and it took me half an hour to get out of there. The mechanic insisted on putting the car back up on the lift to show me all the things underneath that he can't believe are so clean :angry:
I'm not normally smiling 2 minutes after parting with cash but I was this time. He just kept going, "Look at this, it's not even got any rust on it!" and "These normally have splits in them!" and "You can still see the sticker on that!" and "That still looks brand new and they normally rust for fun!"
I suppose it's to be expected on a car that's done less than 30k and was owned by an old lady from new before me.
I'm buzzing
-
once i saw the most amazin sight. An orange lamborghini murcielago fly past my work doing well over 100 mph an then about 20 seconds later 2 volvo t5s blue lights flashing fly past theres no way they would have caught that lambo

you need police bikes against something like that, the only thing that could match (and exceed) the acceration of the car. At least until they could get a chopper in on the action, you cant outrun them fookers ha ha
-
You are a star mate, thanks for those, might be a while now before I get it all sorted but I can drill the door and have the wiring in place for when i source the glass.
Muchos Gracias Amigo
Monkey
-
I will have to drill a hole in the door and car for the wiring to pass through as I convert my Sportif to Central locking and electric windows from the SR. I would like to get an idea where the wiring exits the door at the hinge and travels across inside the rubber gaitor to the car. If someone could take me some piccies, I would really appreciate it
Cheers
Chris
-
Sorry I snaffled the crystals from Idrees, it does help only being a 30 minute drive away. Will hopefully have them on for the Huddersfield meet on Sunday.
I think those protectors look pretty sweet actually, I have headlight protectors on my motorbike headlight and it they have been a godsend when my mates Ninja flicks up stones at 150!!! I have bodywork protectors on the front fairing for the same reason.
-
I should be there mate
5) Monkey
-
Looking fantastic mate
-
Thanks mate, would apprciate it. Can you also find out what condition it is in etc.. Please?
I saw it today mate, looks like brand new!
-
Could be interested in that TTE spoiler, can you get a price for me please?
No problem mate, I'll ring him tomorrow.
-
Oh if anyone knows how to remove the bump strips on the side in photoshop, I'd like to see that too.
Ta
Chris
-
Having just picked up uber bargain of the century I would now a little sneak preview of how the speedlines will look on my car
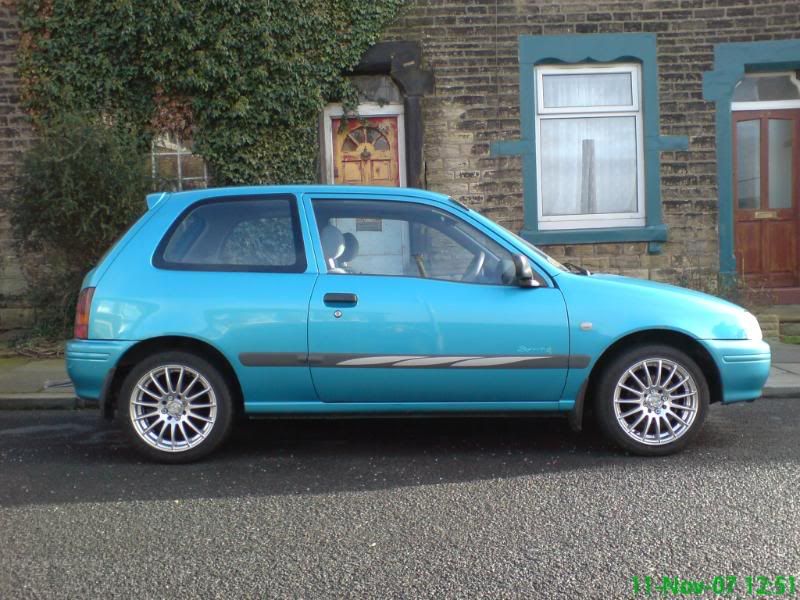
Borrowed the pic above from Bourkey's NA Build thread, cheers mate

-
Im not jealous of your paseo clocks
If you fancy doing the clocks yourself, I did a really detailed how2 with loads of pics and I'm happy to give anyone any additional help or advice, it's a really worthwhile mod I reckon.
Thats what we call a cracker deal Chris mate.I've already told Joz but I feel the need to gloat, the door cards, switches, speedlines and the alloy gear knob that he threw in to 'sweeten the deal' cost me only £130.....for the lot
Joz said I've had a 200% bargain they shudv been, ru gna recover the door cards?I'd like to, can you just lay something over the top of what is already there? How would you fasten it down, glue, staples etc.? Has anyone on her done a how2 that I've missed? I don't want it to look like a tacky job
-
Picked up my SR door cards from the breakers this morning
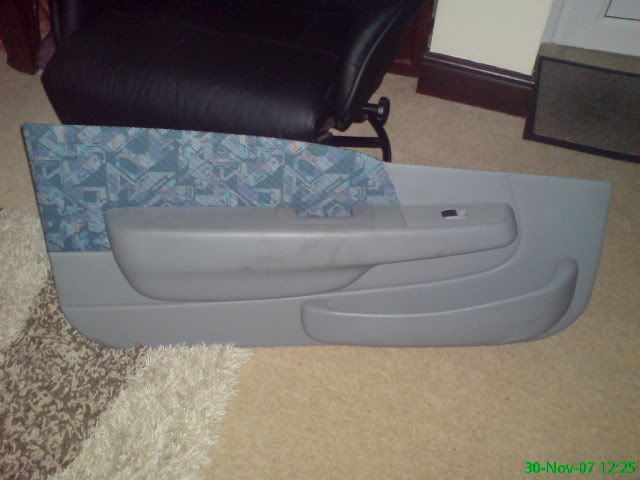
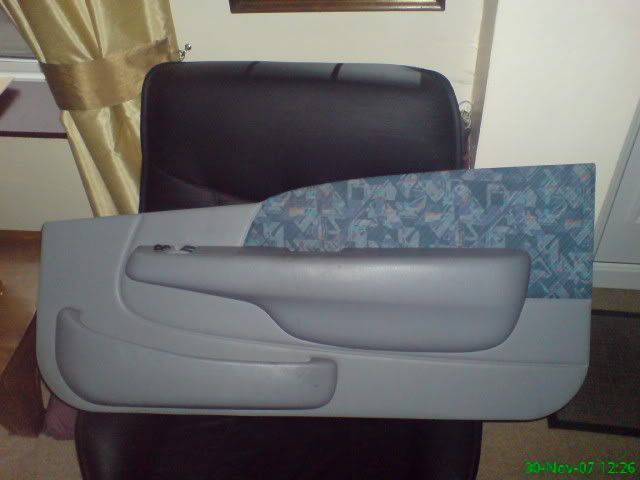
As soon as i pick up the door internals from Bourkey, I'll be rockin' and rollin'!
My breaker had a little surprise for me when I got there
He's just got another SR in this morning so I grabbed these:

They have virtually brand new Pirellis on them and very few marks so I won't need to refurb.
They were at a price that i really couldn't refuse and i assume they give me a bit more 'Starlet Kudos' than my current rims?
If anyone is after any SR clocks or a mint TTE spoiler let me know and I'll get a price for you.
Chris
-
Paseo clocks 'How 2' now complete, click here
-
OK guys and girls, having finally sorted the Paseo clocks, here is the definitive 'How 2' for fitting them into your Starlet.
White dials baby!!
I recommend that you disconnect the battery before starting, to ensure that you do not short anything or set off the airbag once wires are exposed.
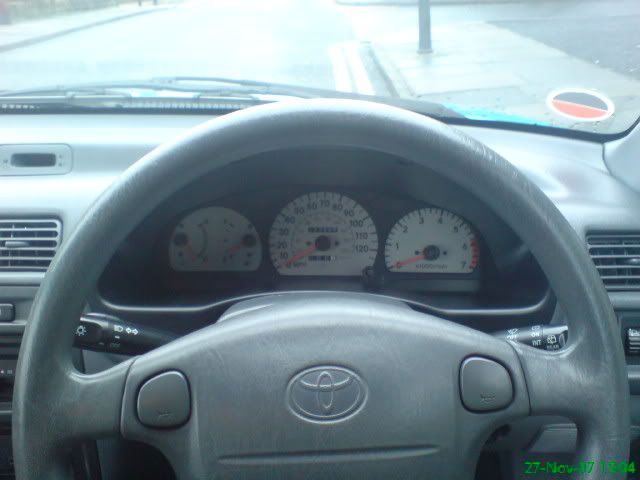
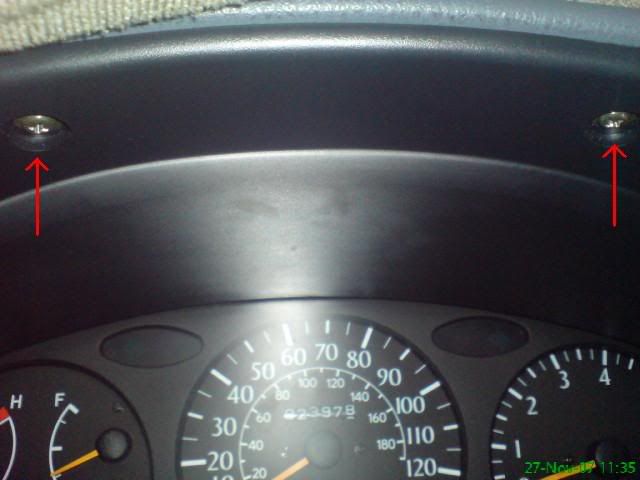
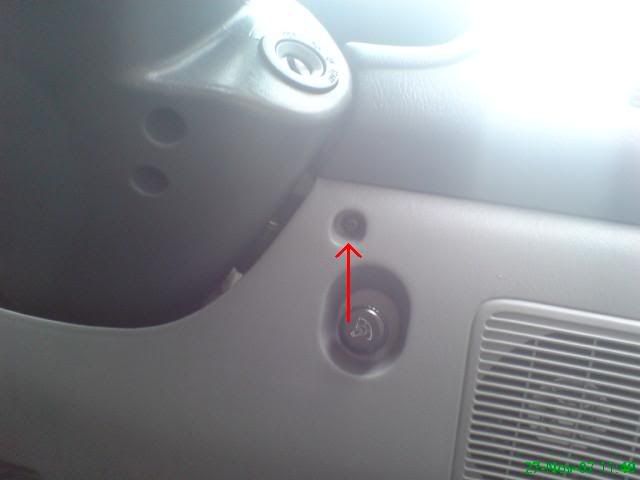
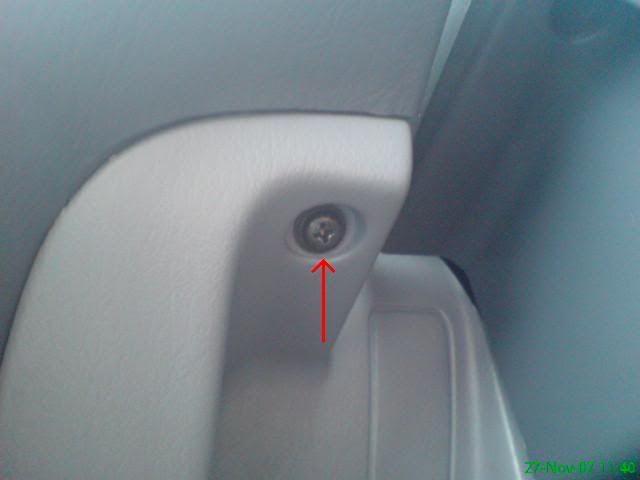
1. Remove the 2 srews that hold on the clock surround
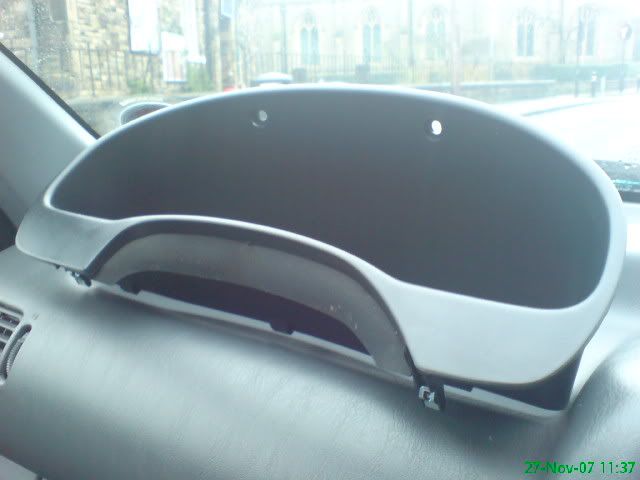
2. Remove the clock surround
3. Remove the 3 screws that hold the clocks in place
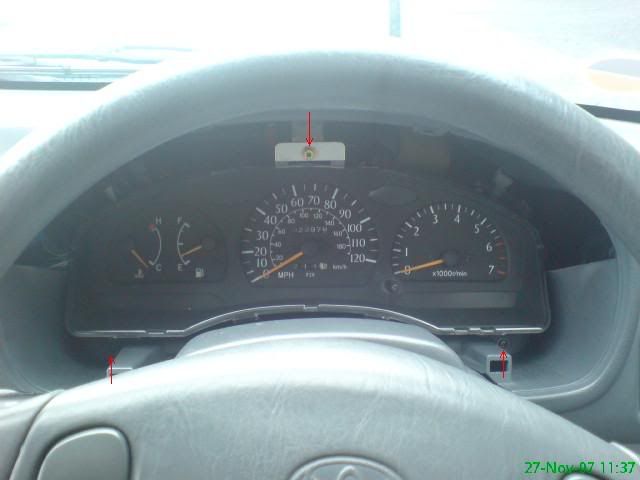
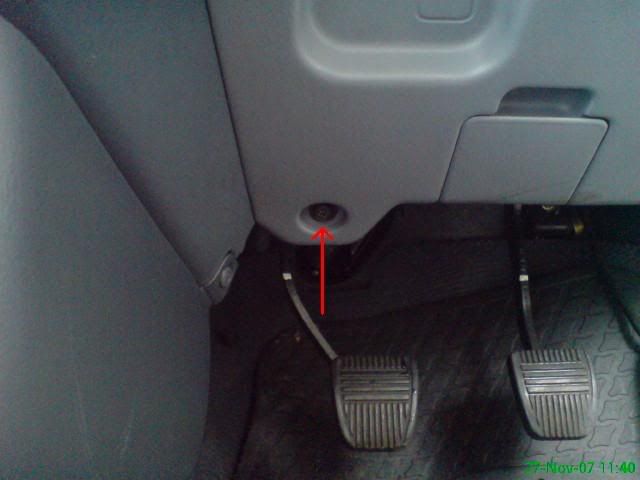
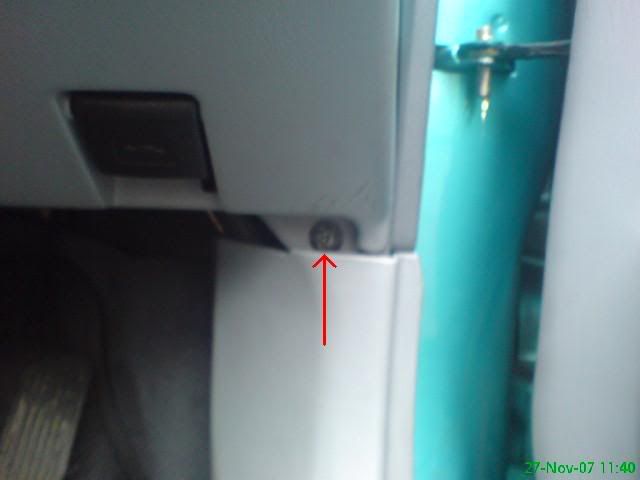
4. Remove the 4 screws that hold the dash panel in place
5. Press in the tab to remove the fuse holder
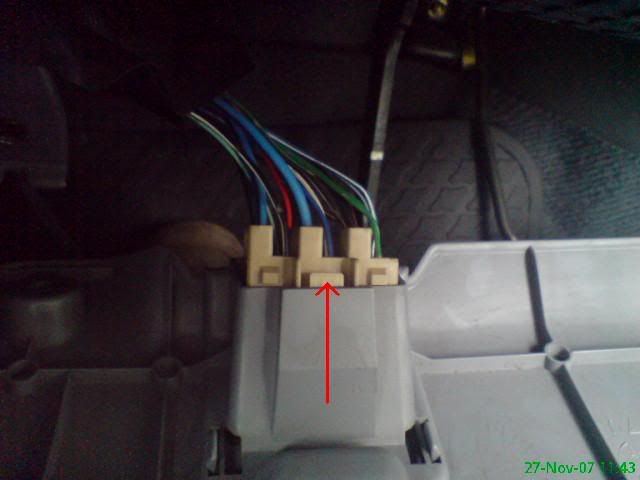
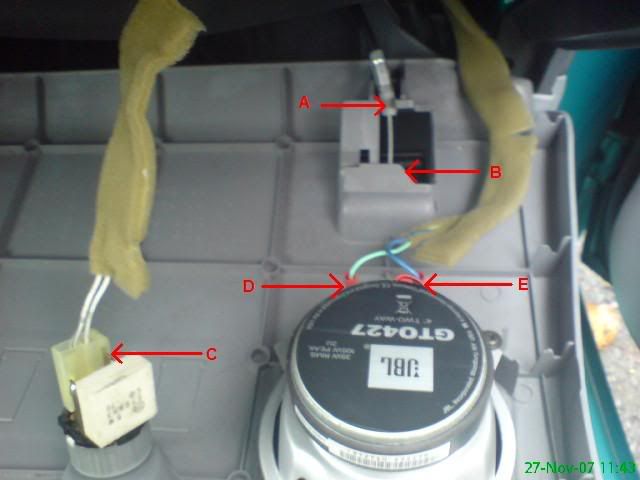
6. Unclip the bonnet release cable A and pull out the tang B. Push in the tab C to unclip the dimmer connector. Remove the terminals D & E from the right speaker.
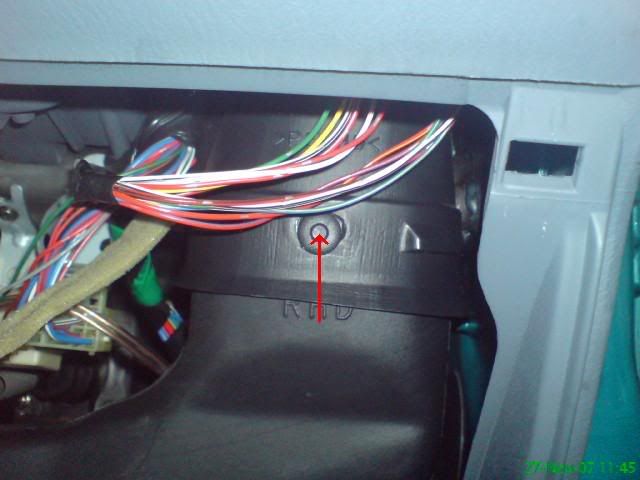
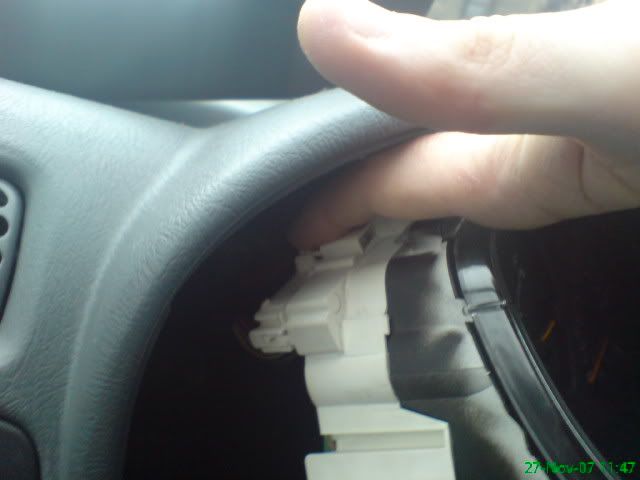
7. Push in the centre pin of the black clip that holds the heater duct and remove the clip.
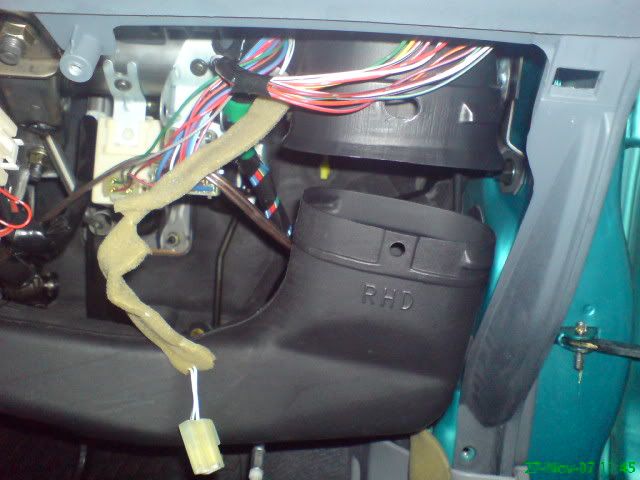
8. Pull down and slide out to the right to remove the duct
9. You can now reach underneath and easily release the speedo cable from the back of the clocks by squeezing the tabs on the outside.
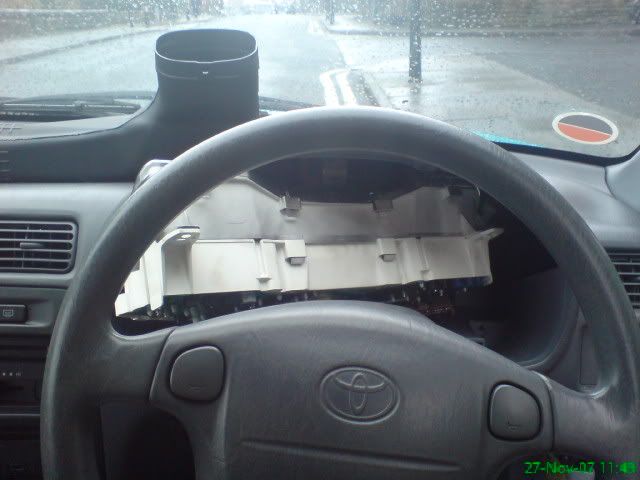
10. The clocks will now be loose enough to get your hand in and unclip the 3 connectors from the back pressing down the tab on the tab of each one and pulling them back.
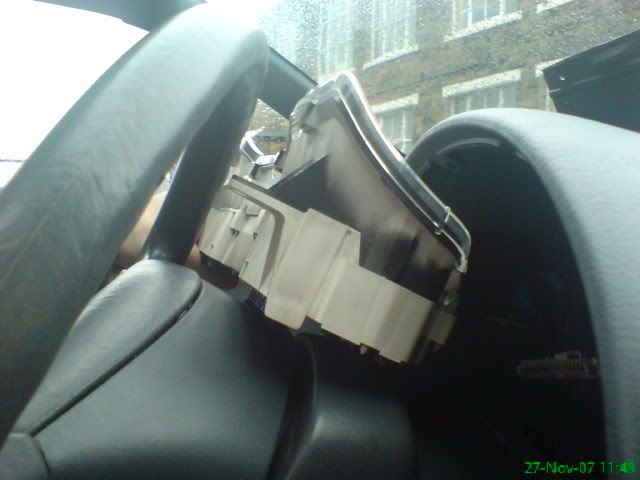
11. Manouevre the clocks out of the dash, this can be really awkward.
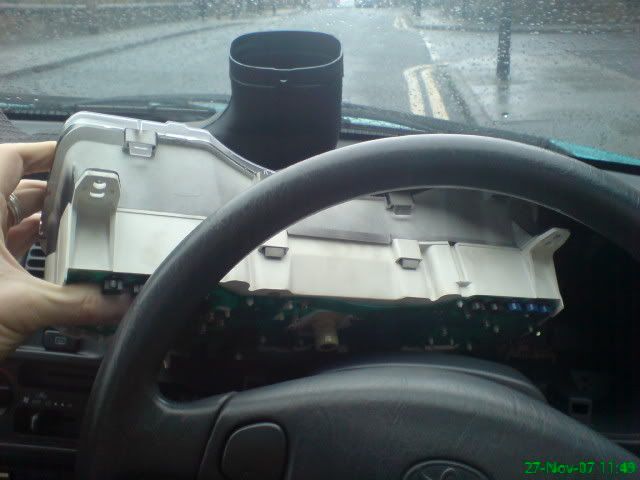
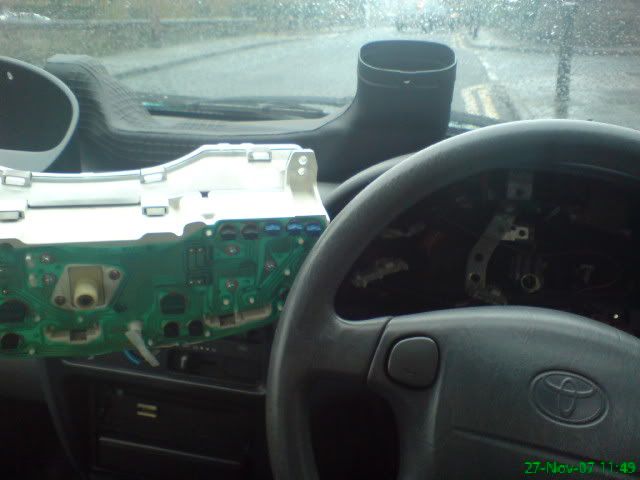
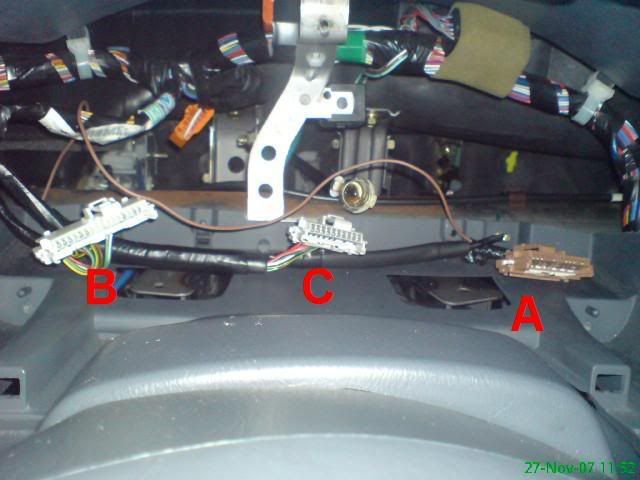
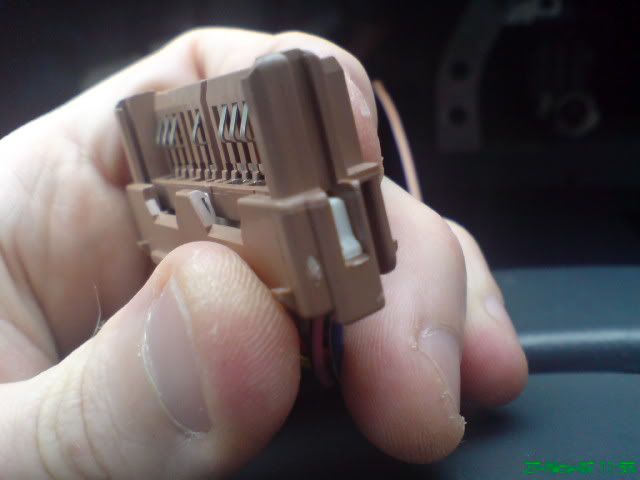
12. You can now see the 3 connectors. 16 pin white connector B, 10 pin grey connector C and 13 pin brown connector A (Ignore the loose brown wire, that's my tacho wire, you already have a working one in your loom...hopefully!)
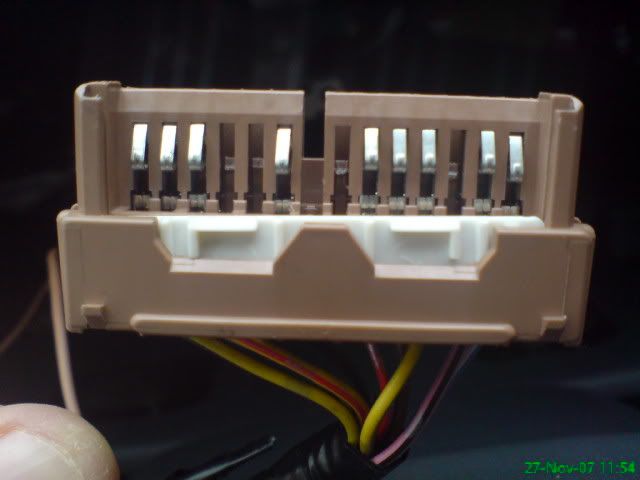
13. Before you can swap wires you need to know how to remove the pins, here is a close up of the brown 13 pin connector. The white sections of all three connectors must be removed before the pins can be pulled out.
14. Slide the front plate down and remove it.
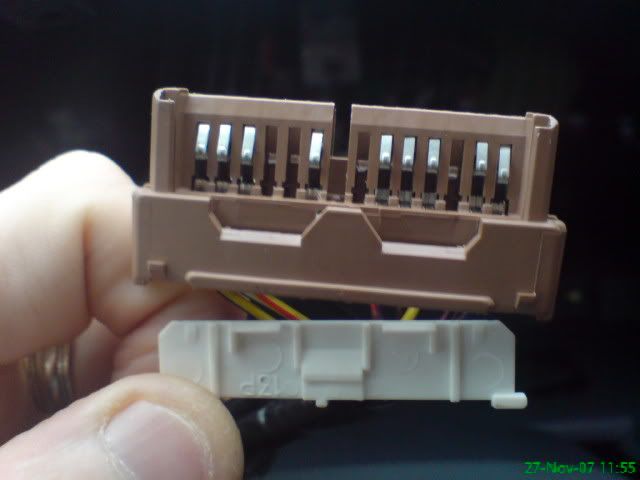
15. Press the tabs in on each side and one in the centre to remove the other white plate, this also slides down and out.

16. By sliding a pin down the back of each pin in turn and pushing back the little locking tab you can slide out the wire. (Sorry couldn't take a decent pic of this with my phone)
17. Now for the pin swaps
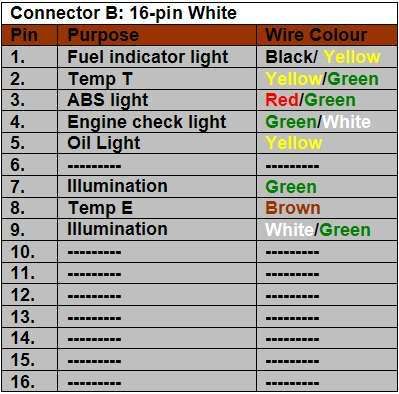
Here are the wire colours and the positions that they need to be in. Pin 1 is on the left as you look at the connector above.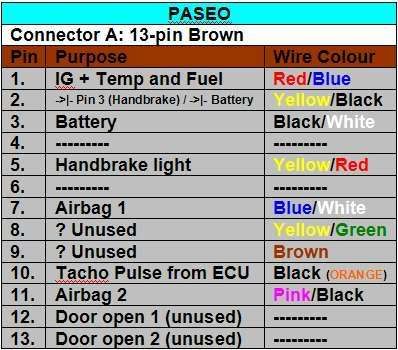

The awkward swaps are as follows:
A: The Yellow wire (Oil indicator light) that is found at pin 8 of the 13-pin brown connector A on your Sportif must be moved to pin 5 of the 16-pin white connector B. I removed all the electrical insulation tape and cut a section out of the wire for neatness.
B: The Yellow/Black wire (Fuel F) that is found at pin 12 of the 16-pin White connector B on your Sportif must be moved to pin 4 of the 10-pin grey connector C. I used some of the yellow wire I cut out of the oil wire in a) to extend this one.
All other wires are simply moved around within the same connector.
18. Replace the white plates into each connector that holds the pins in place.
19. Slide in your Paseo clocks with the correct mileage already set using my mileage adjustment guide How 2.
20. Plug in the three connectors and reach around underneath to push on the speedo cable.
21. Replace the 3 screws that hold the cluster in place. (You may find it easier to push the speedo cable on once the cluster is held by the screws, otherwise you will have to hold the cluster with your left hand as you reach under with your right)
22. Replace the heater vent. Push the centre pin of the black plastic clip back up so it is proud of the rest of the clip. Push it into the hole and then push the centre in gently until it locks flush with the rest of the clip.
23. Re-connect the speaker, dimmer and bonnet release cable and clip the fuse holder back into place on the dash panel.
24. Replace the 4 screws that hold the dash panel in place.
25. Replace the clock surround the 2 screws that hold it in place.
26. Reconnect the battery and check everything is working.
27. Revel in your sexy white dials, point and laugh at anybody with boring black dials. (Optional)
I'll add to this if I remember anything else.
Chris
-
-
I'm the IT helpdesk (posh title - Desktop Support Analyst) for a pharmaceutical company with about 300 staff. Only on secondment in the job at the mo but should be made permanent before Christmas (been with the company 7 years). They are looking at pushing me into loads of training almost straight away to become the site Applications Management Analyst looking after all the Oracle databases and stuff. If all goes well should be earning just short of £30k this time next year

Shizzle my nizzle! (what does that actually mean?
) -
Getting my SR springs off Bourkey once his Tein's arrive for Christmas
Happy days!Also gonna do a swap to SR door internals / cards / switches as the lack of central locking and keep-fit windows are pissing me off. Door cards and switches look like coming from a breakers, internals from Bourkey again (cheers dude
)Decided to go the lazy route on the sub front, it looked like a royal pain in the arse to try to build an enclosure for the sub I got off my mate so I bought a brand new, ready made enclosure and sub off ebay. Only cost me £35 plus p&p so probably worked out not much different than it would have been to put together a decent enclosure myself. The enclosure is supposed to be 'tuned' for the sub too apparently? I assume that's a benefit (<-- warning...warning...newbie alert!)

It's a bit chavvy but not on show and sounds great, it's quite small too so doesn't take up too much boot space, which is nice. Just need to stop it sliding around in the boot now, will probably just velcro it so it can be removed without too much fuss if necessary. I put on "On Her Majesty's Secret Service" by the Propellerheads and ffwd to the bit where the huge bass comes in at around 6m15secs. It sounded so cool, I just sat there laughing my head off in my car, pathetic I know
I'm running a 2nd set of RCAs down to the boot 2moro so i can control the sub level from the headunit, some tracks really don't need massive thumping bass ha ha.
Paseo clocks are going in tomorrow too followed by a really detailed how2 with lots of nice pics (specially for Joz)
I can get the SR ones over to you then Junaid
Has anyone ever used a Fli 10 Active enclosure, the ones that have a built in amp and come in a kind of rounded toblerone shape? Any good?
Monkey NA Project
in EP91 Progress Blogs
Posted
Yeah I never got around to fitting them. I have the door cards / glass / window regulators / central locking mechanism / Denso door & window control module.
I think that's everything you need.
Send me a PM and we'll discuss a price ok.
Cheers
Chris