

Sefton-EP91
-
Content Count
1696 -
Joined
-
Last visited
Content Type
Profiles
Forums
Wiki
Media Demo
Store
Calendar
Posts posted by Sefton-EP91
-
-
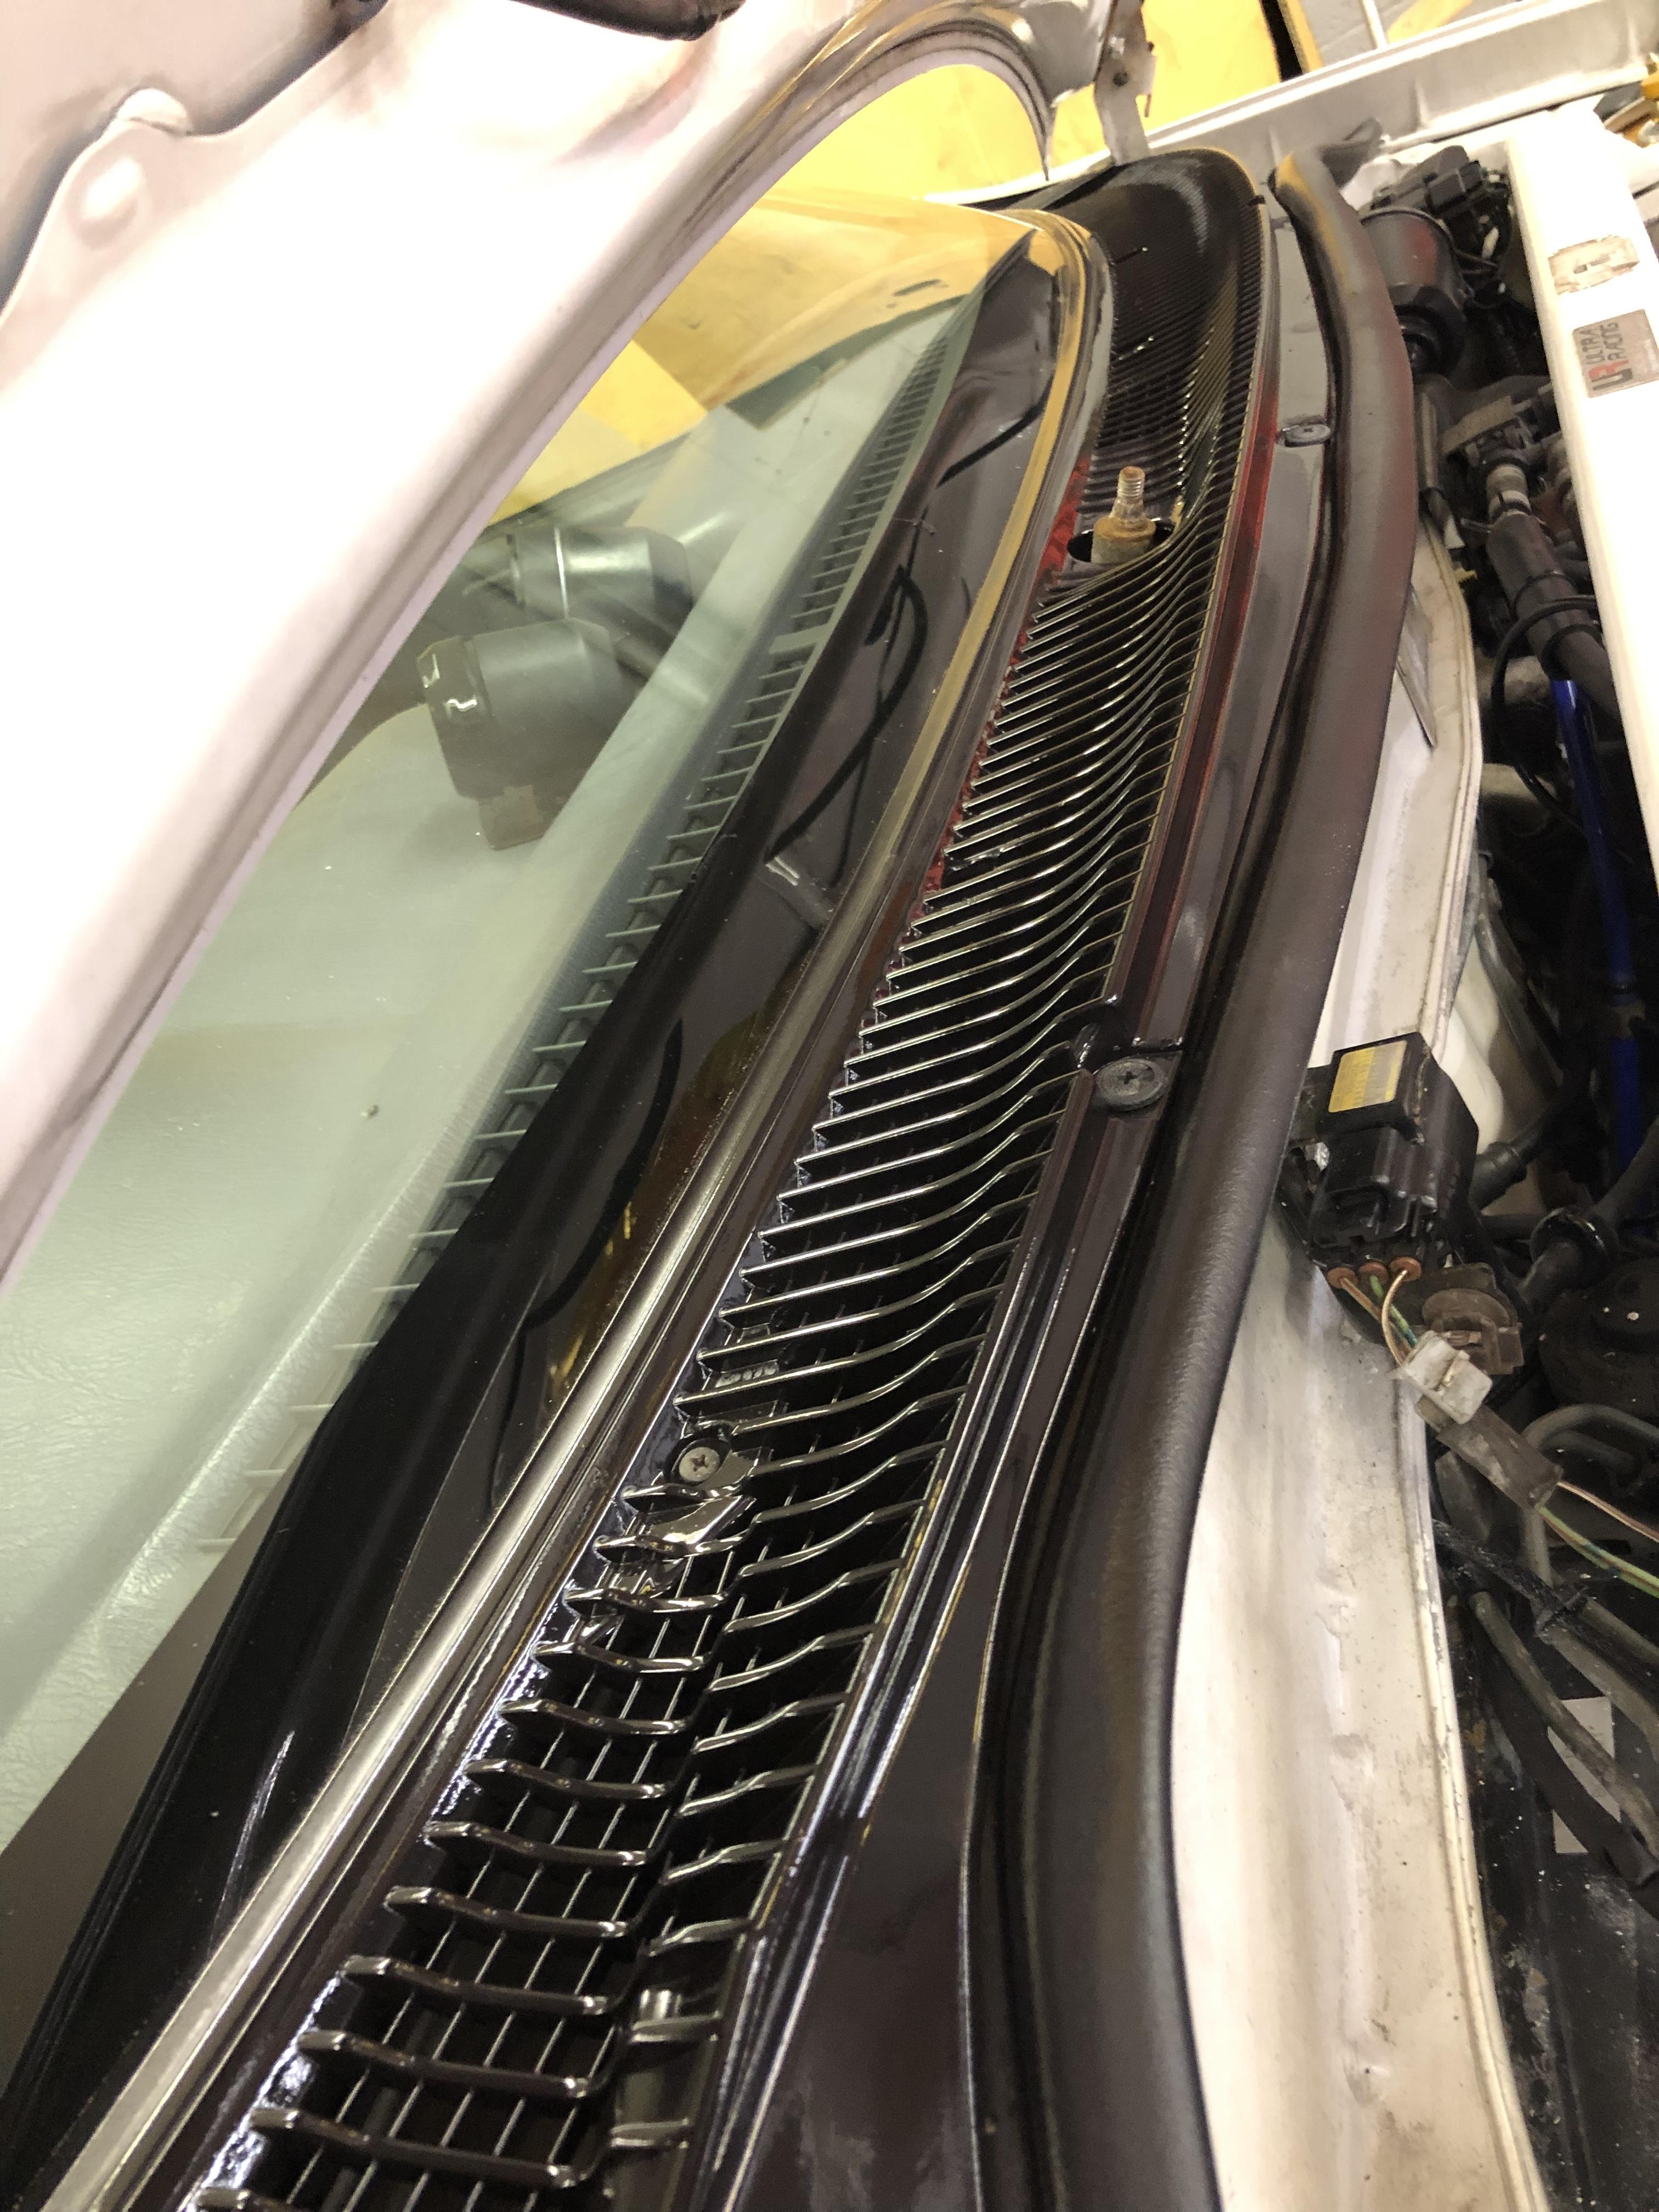
Gave the wiper arms and scuttle panel a refresh as they were looking faded!
Now good as new..


-
Gave her a little wipe over to get the dust off! God I miss this thing!
On another note, the Clifford alarm I had on the car decided to pack up so I’ve got her booked in for a new Sterling CAT1 alarm and immobiliser on the 14th Feb. So that should keep her protected!
Small photo of how she sits.
-
6 hours ago, jellybaby said:
We’ll if I ever get mine sorted maybe sort a road trip out to the ring or something I no neversimple would tag along if we go via Holland
I’d be up for a road trip mate, I’ve been wanting to sort a ring trip in the future. I’ll post something up once it’s arrnaged and maybe a few other will be up for it aswell!
-
22 minutes ago, jellybaby said:
Whoop glad all sorted feller it nice to see ya sticking at it us older vets still want to keep them going and push
You know it! I haven’t put a lot of my hard earned money into this for someone else to enjoy!

I’m just doing my upmost best to keep her going and enjoyable!
-
Sounds like you have it all figured out mate, hope it all goes well! I just used normal sump sealant. It’s only to fill the gaps

-
22 hours ago, RobSR said:
Awesome news
")
Thanks rob!
-
Awesome build mate!
Looks like you have put your heart and soul into it! Keep it up! She will put a smile on your face when you drive her for the first time after finishing it!
-
Shims are fitted and the tapping is gone
 to say I’m happy would be an understatement, it’s been a struggle this time round with this build but I can finally see the light!
The car was suppose to go for a new 3” custom decat back exhaust on the 7th jan but due to all the issues I’ve been having I had to delay it. It’s now ready for the exhaust but unfortunately speedfab is fully booked until March now, I’ve booked it in for the 1st March but that does mean the mapping will be delayed until the end of March.
On the plus side she is running a treat and ready for a slow drive tomorrow to ensure everything is ok!
-
They will be fine, mine arrived today and are identical to the ones I bought from work. Just half the price and arrived ALOT faster!
-
18 minutes ago, jellybaby said:
What the link for the shims
 as I going to need some
https://rover.ebay.com/rover/0/0/0?mpre=https%3A%2F%2Fwww.ebay.co.uk%2Fulk%2Fitm%2F332630831194
-
So,
I got the car back together again although she was running I noticed another pronounced tap which was really annoying me, so I stripped it down again to have the clearances re-checked and to my surprise, ALL of the intake valve clearances were too tight again. So I checked what shims I needed again and got them ordered. This time I’ve left the cambelt on, using a special tool from work I was able to push down the cam follower and pop the shim out!
Thankfully a couple could be swapped about so only need 5 in total! Also a massive thanks to Shaun finnigan for the link to the shims, saved me so much money and time! A lot of the shims are on back order through work (Toyota) so thankfully the ones Shaun linked me to are the ones I need and are available.
Fingers crossed this cures my tapping!
-
11 hours ago, jellybaby said:
Cheers dude
-
On 1/20/2019 at 3:32 PM, jellybaby said:
DID ya manage to get a pic of the conversion chart as I have identified some shims that neee to be adjusted
I’ve set a reminder in my phone so I’ll get it tomorrow for you
-
9 hours ago, LeonL said:
What brand catch tank is that? Looking for similar one myself, that mounts nicely to the strut
It’s an RW Developments catch tank! Mounts up perfectly on the strut, the only thing with mine is it touches my BOV so I’ve had to bend it up slightly although hardly noticeable!
-
14 hours ago, H_D said:
Looks real good buddy. Keep us updated on how the new turbo setup works.
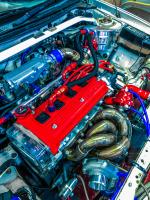
13 hours ago, glanzadude said:Thats one sexy engine bay, best off luck with her
Thank you so much for the kind words guys, appreciate it very much. I’m hoping to keep this updated as much as I can now so keep your eyes peeled!
-
On 1/15/2019 at 9:28 PM, jellybaby said:
I have this task to do my self how easy did u find doing it ? Any guide u used ?
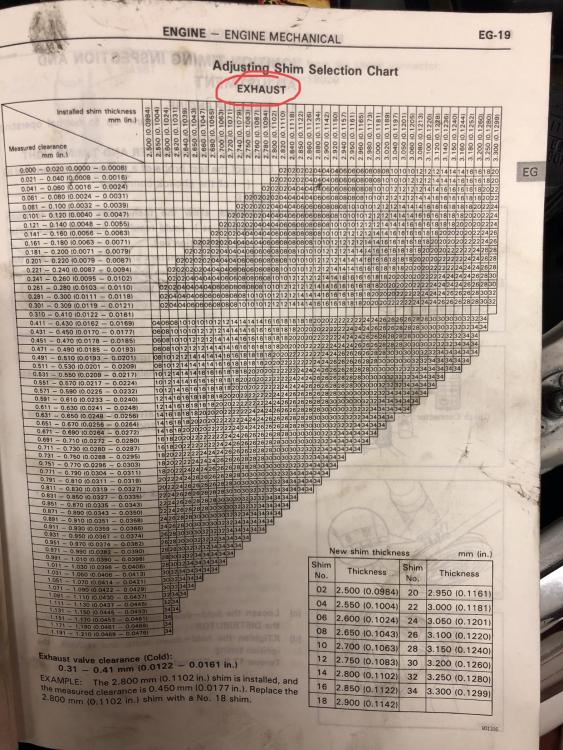
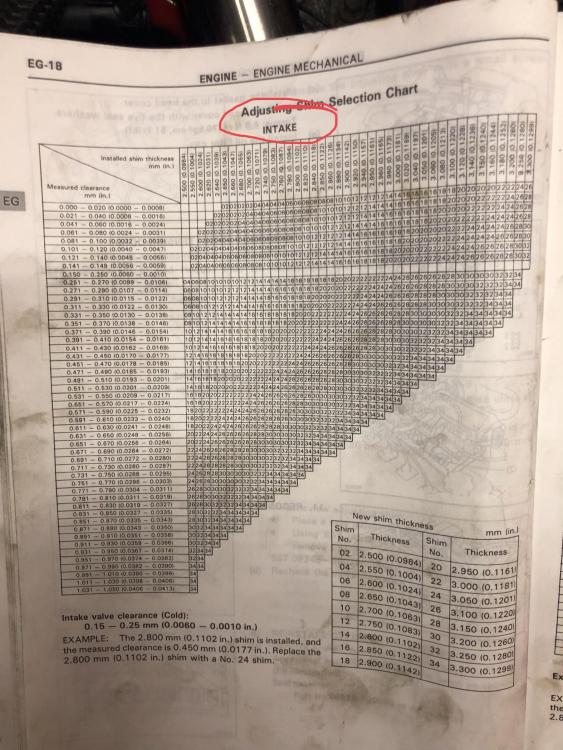
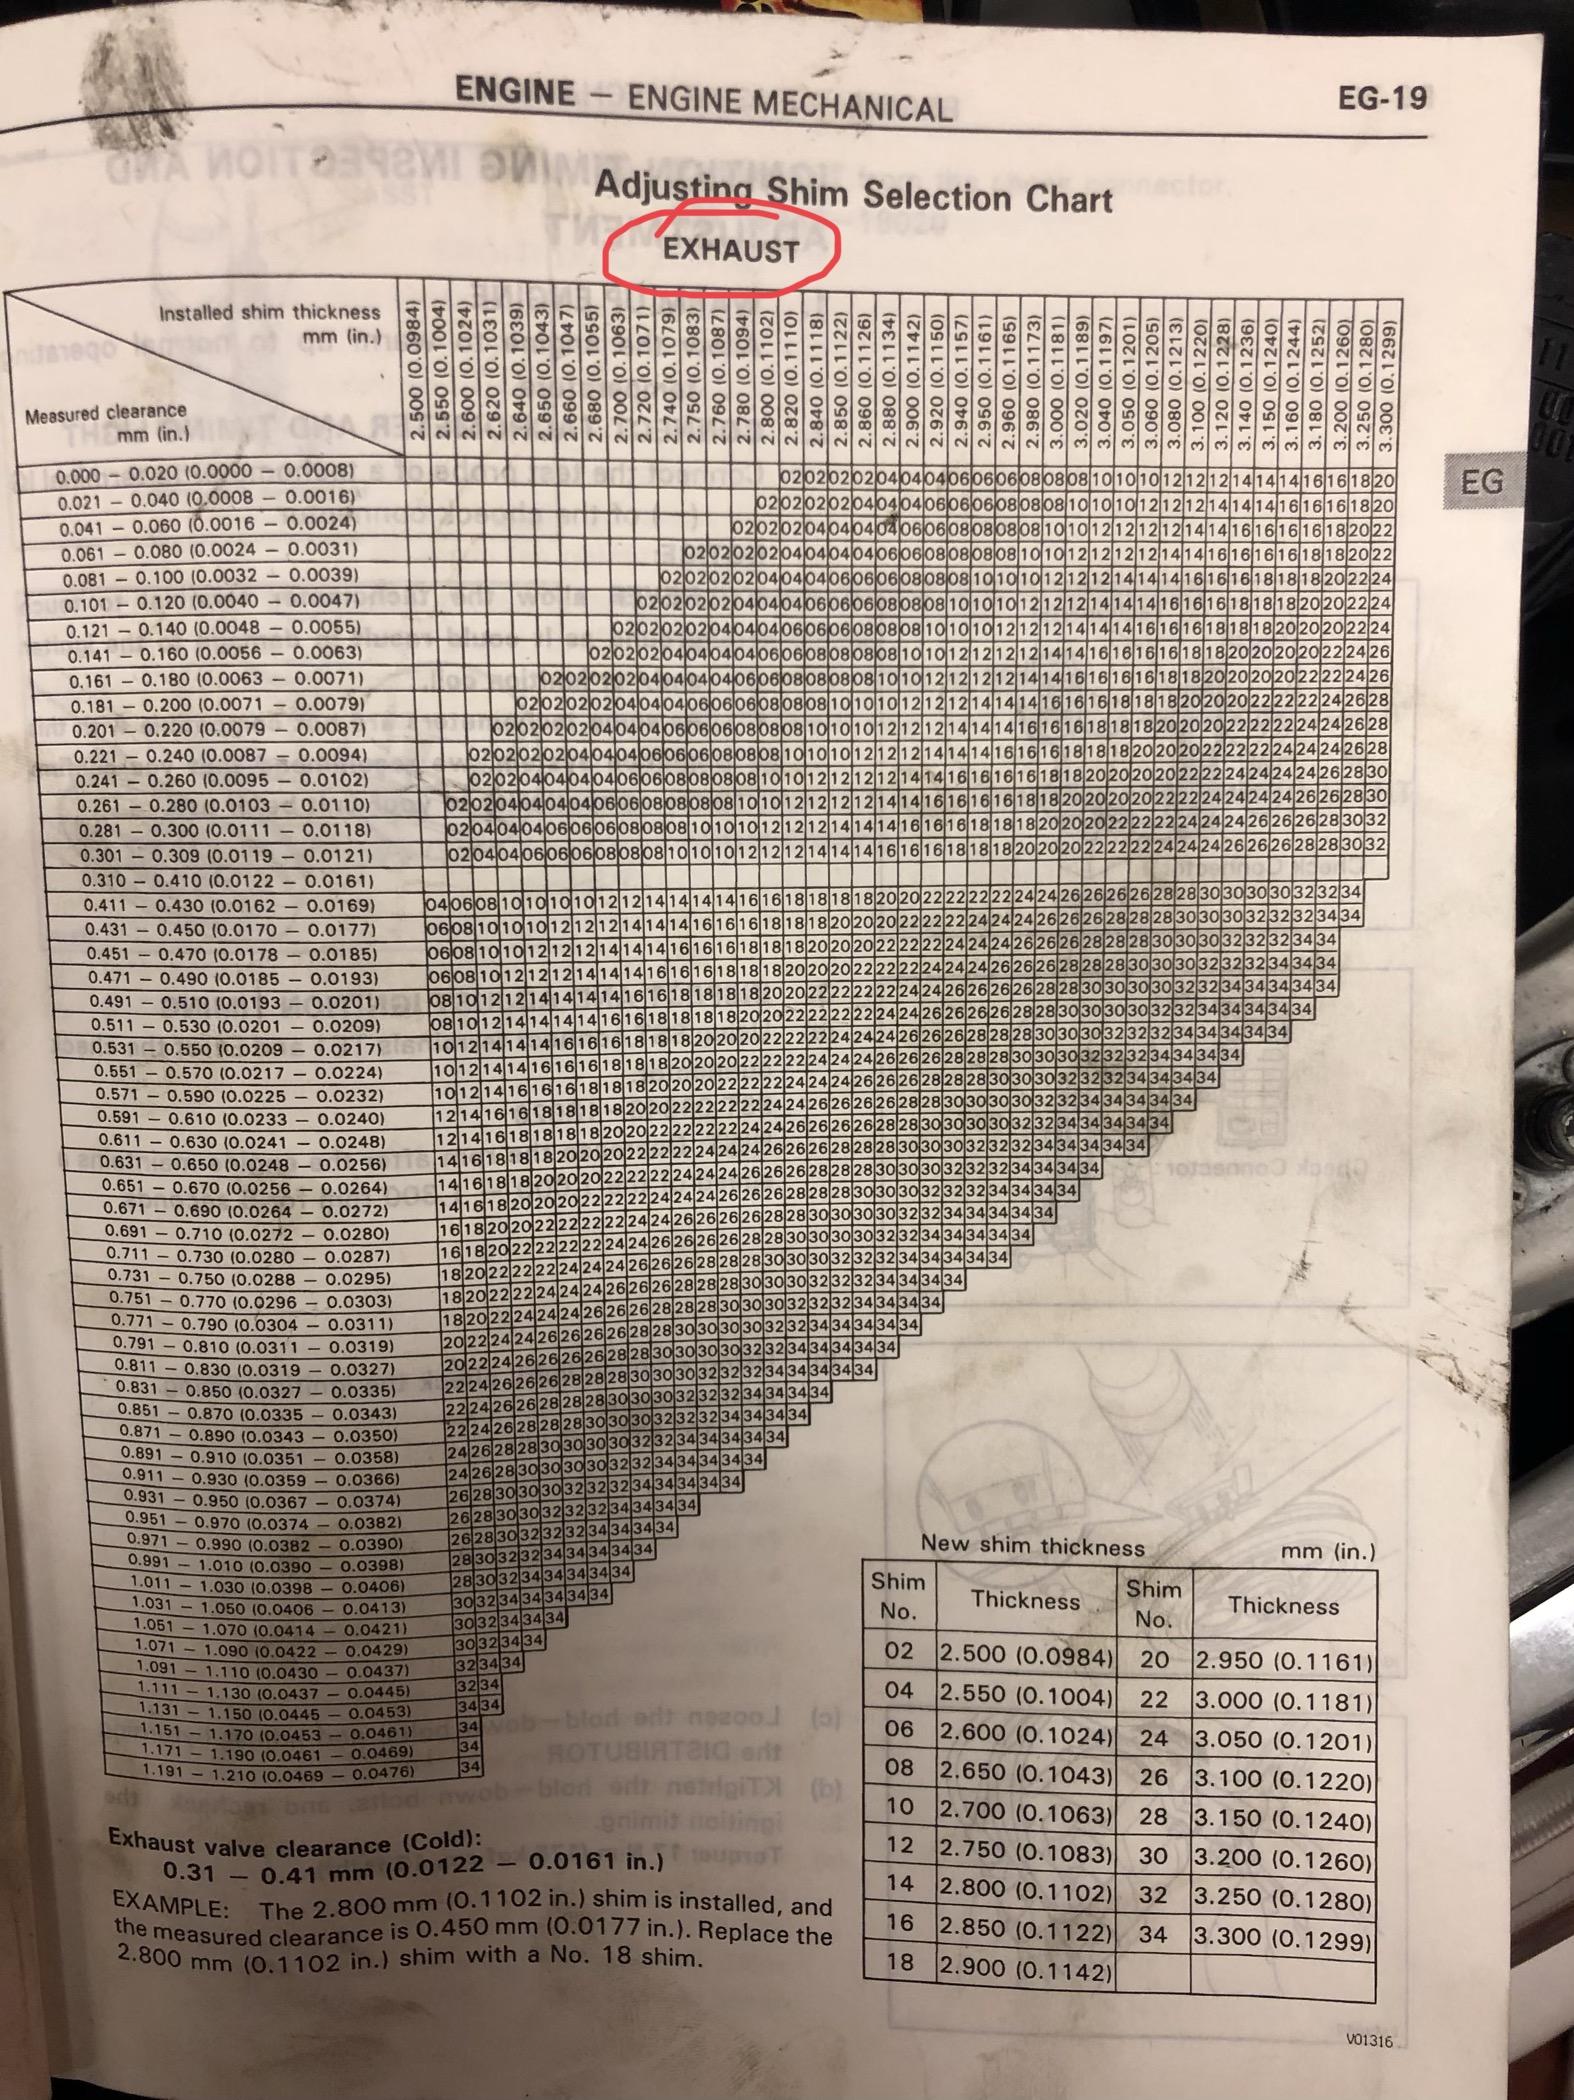
It’s surprisingly easy, I have a conversion chart at work to work out what shim you need.
You just use a feeler gauge with the cam lobe facing upwards and measure your gap between the camshaft follower and lower part of the cam lobe, then you measure the shim that’s already in place, Then use the conversion chart to work out what shim you need. Ill get pics tomorrow and drop them in here for you! With the conversion chart your life will be a lot more simple
-
The shim has arrived
 it’s fitted and going back together, the cambelt is on, cams are in and rocker cover is in along with new genuine camshaft oil seal, distributor is in along with new dust seal and oil seal, also new genuine dizzy cap and arm fitted. Hopefully I can have it running tomorrow!!
-
On 1/14/2019 at 2:45 PM, BMX-RIG said:
What an annoying set back! All good progress though.
Still got a few months until the weather picks up!
9 hours ago, akyakapotter said:Turbo kit looks sexual. Only a small set back pain in the bum though. Keep plugging away at it.
Thanks for the kind words guys, yes it was a small setback and nothing that can’t be sorted!
-
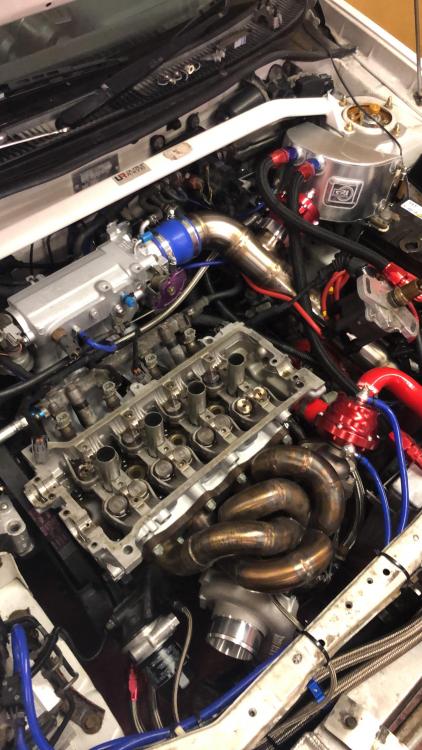
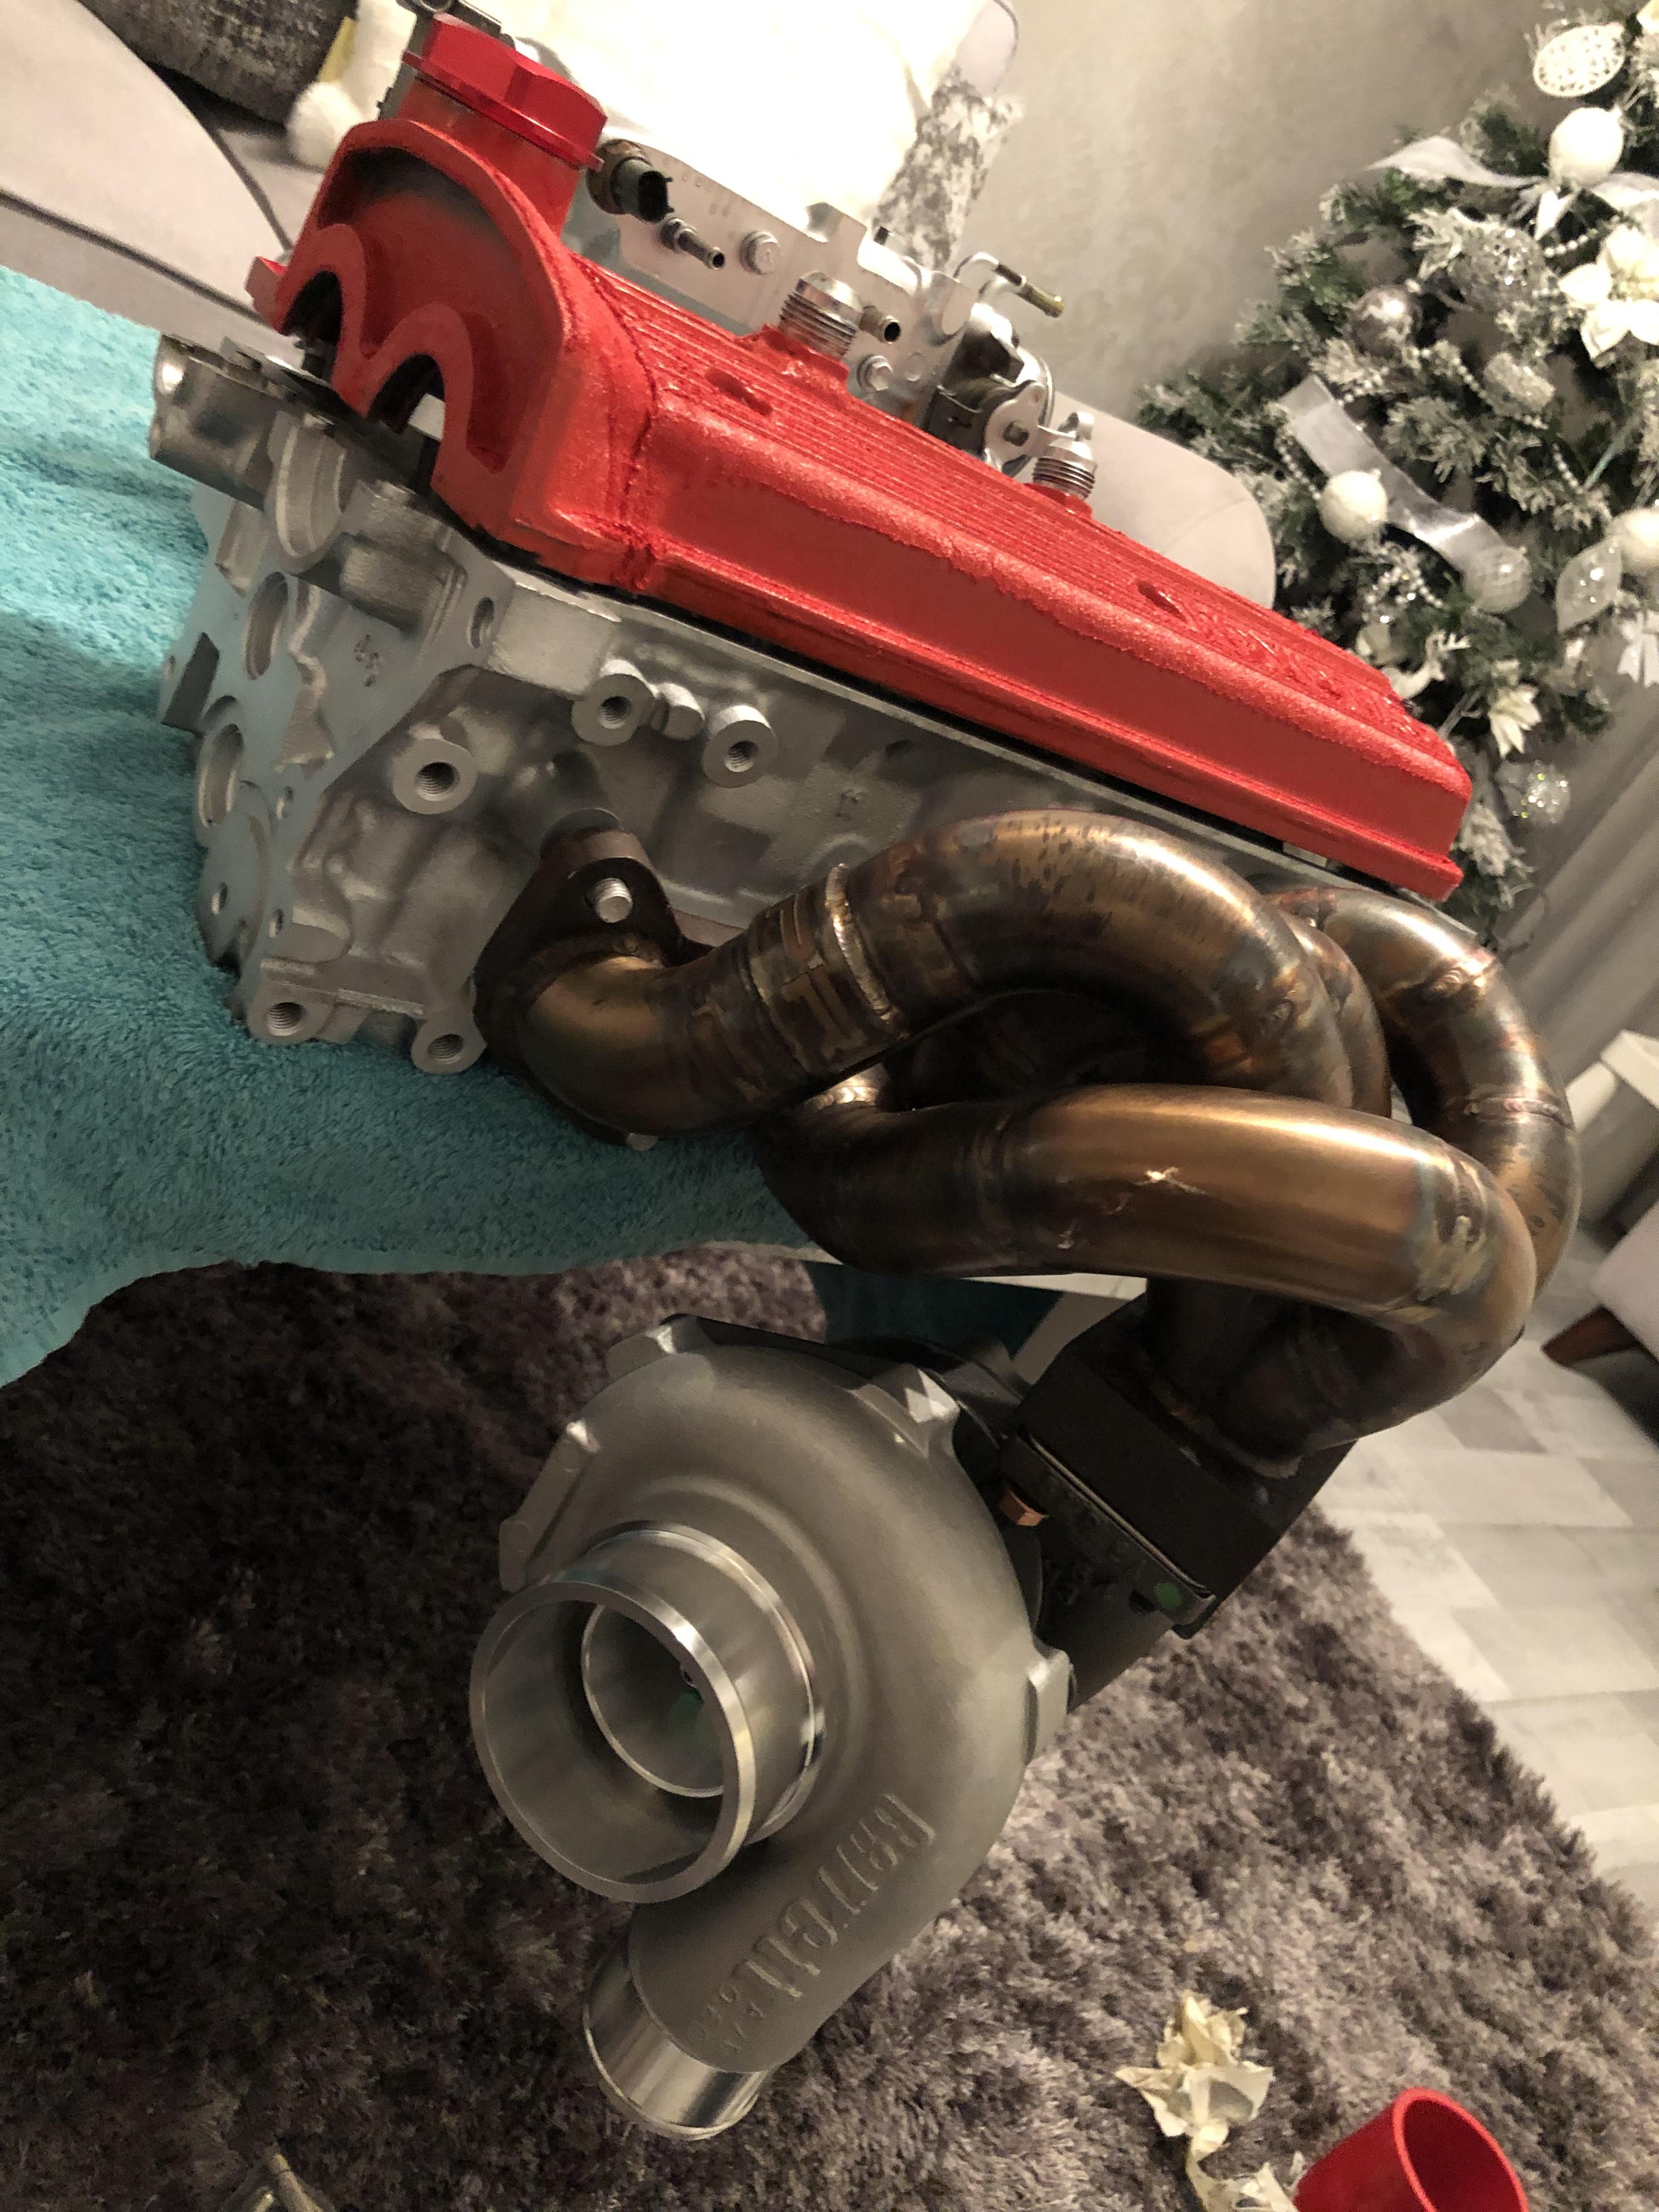
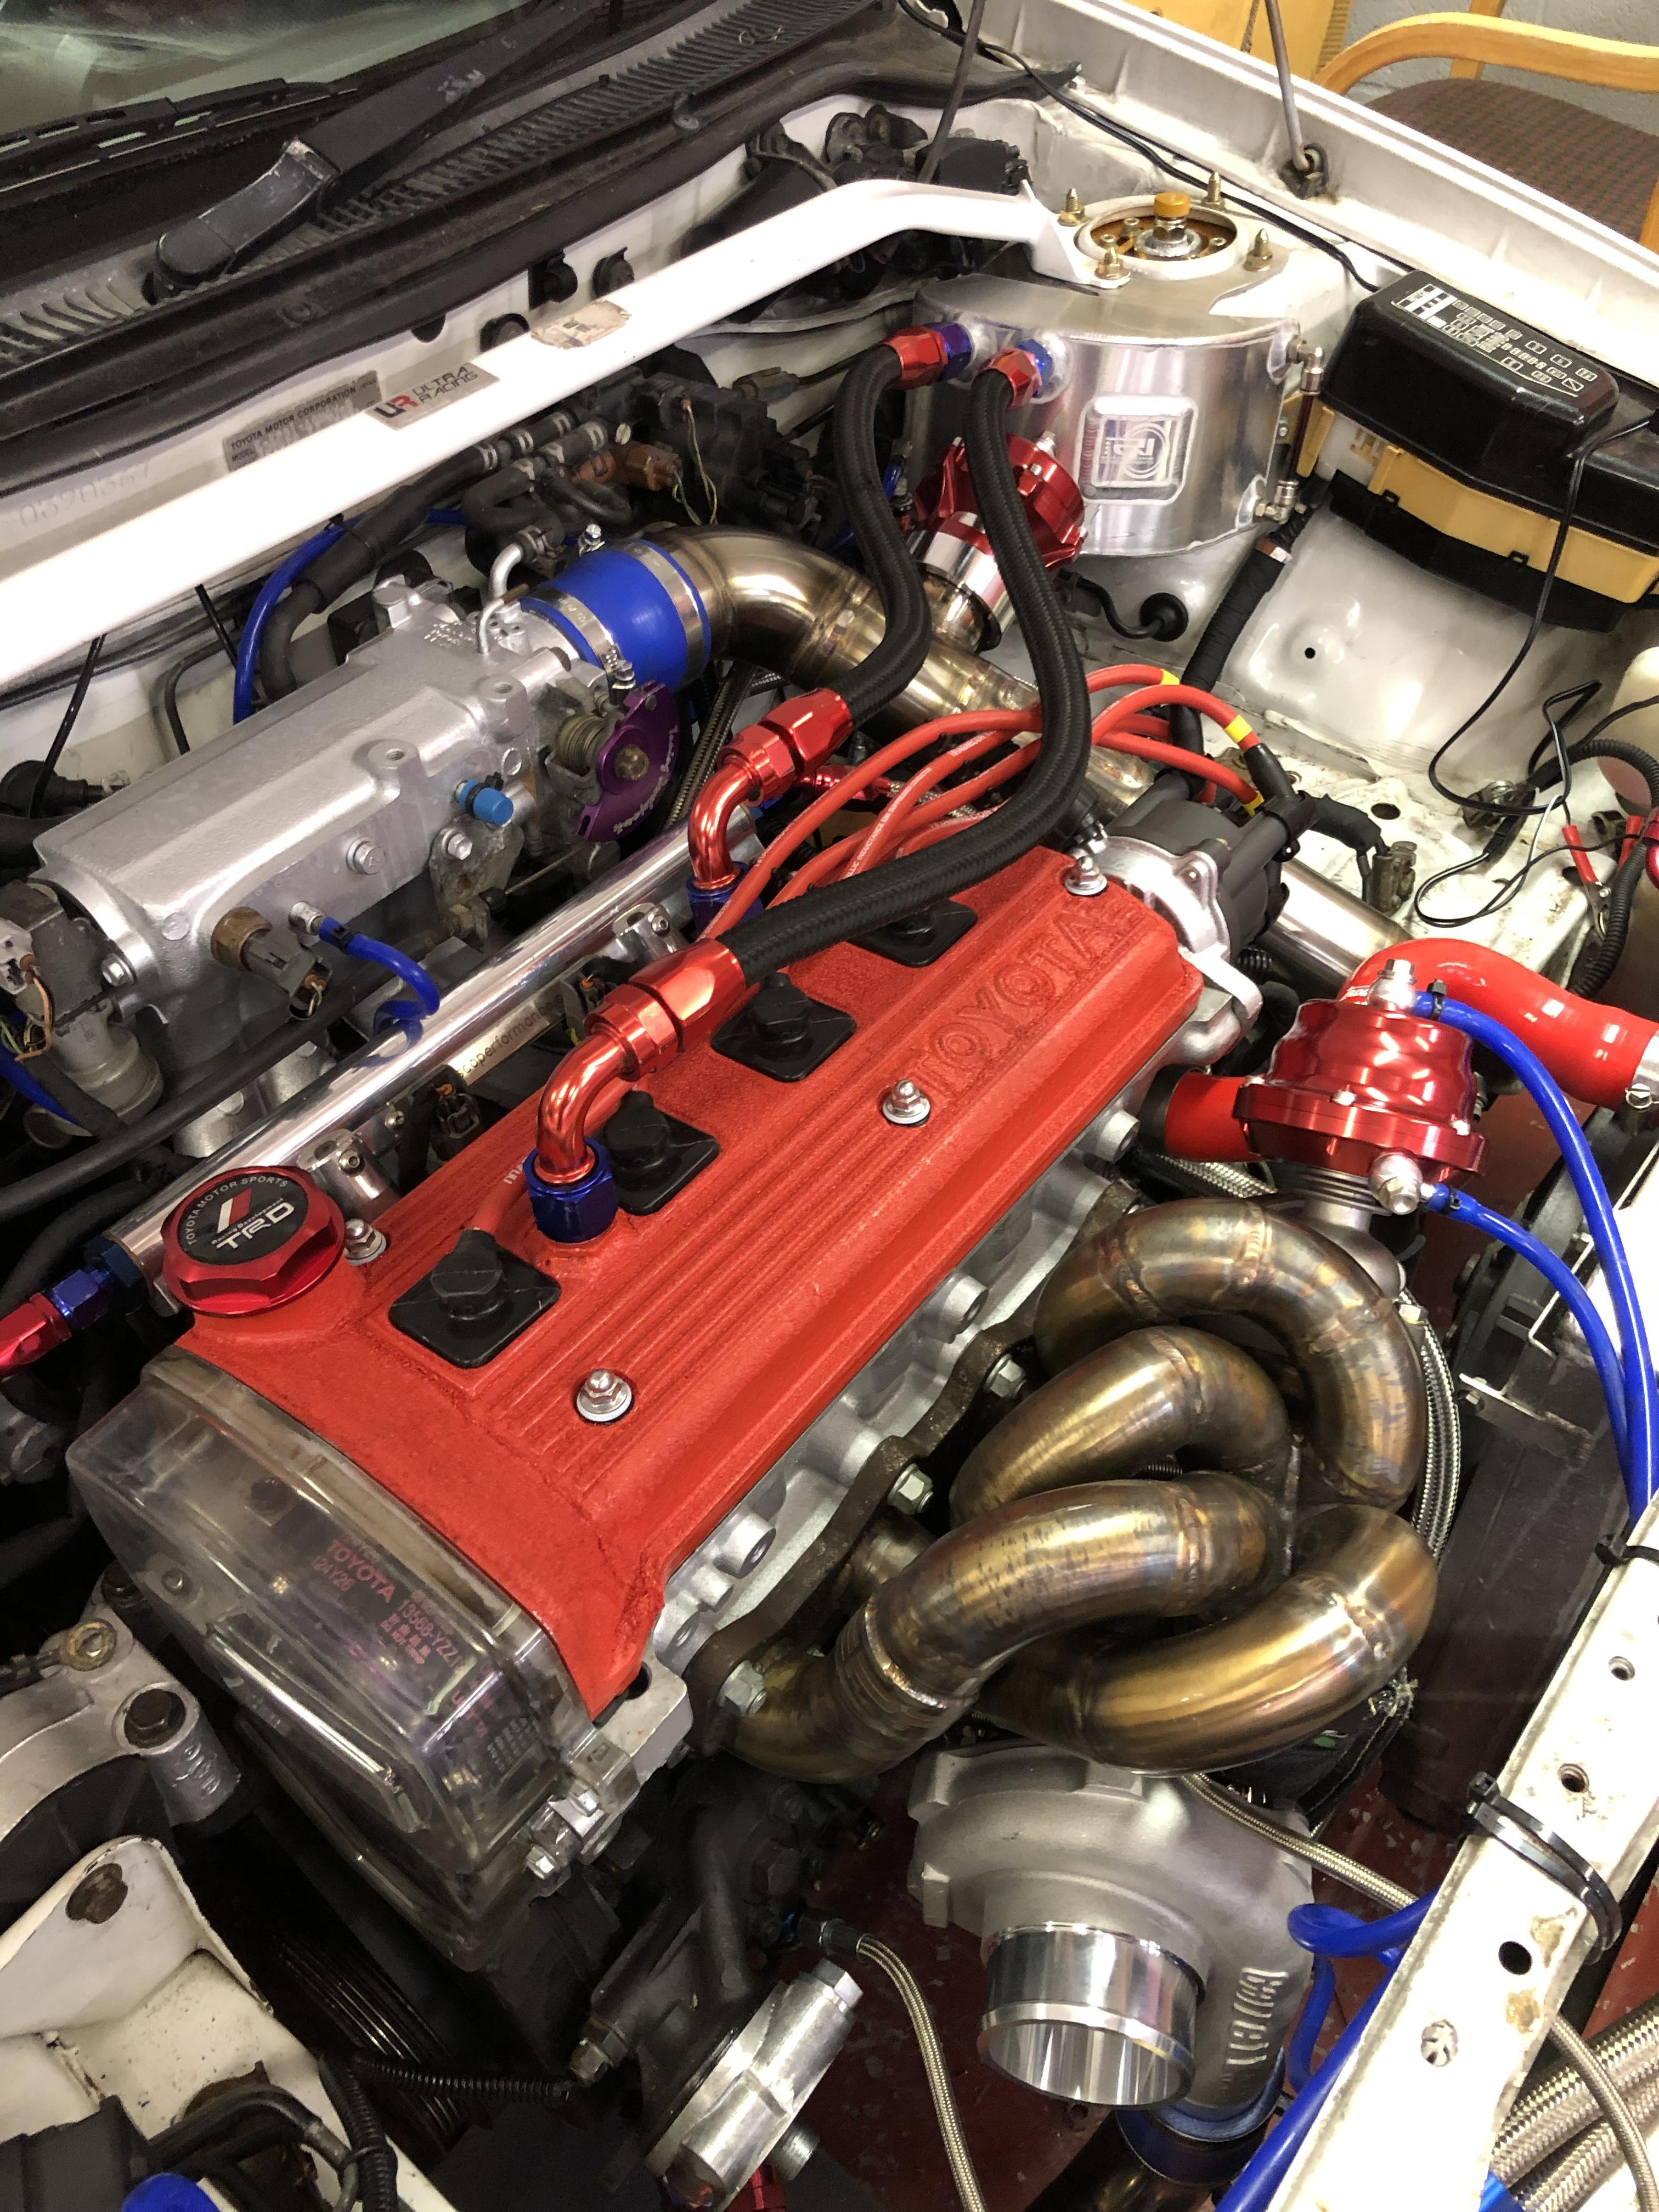
So, I’ve fell behind with this again so it’s time to update it. Ive sold my billet hybrid td04 kit to way for bigger things over winter.
I thought over winter I would like to change my turbo setup and change some cosmetic things.
i thought long and hard about the new turbo choice and soon came to the conclusion that it would be a Garrett despite some really good turbo kits coming up for sale and in production.
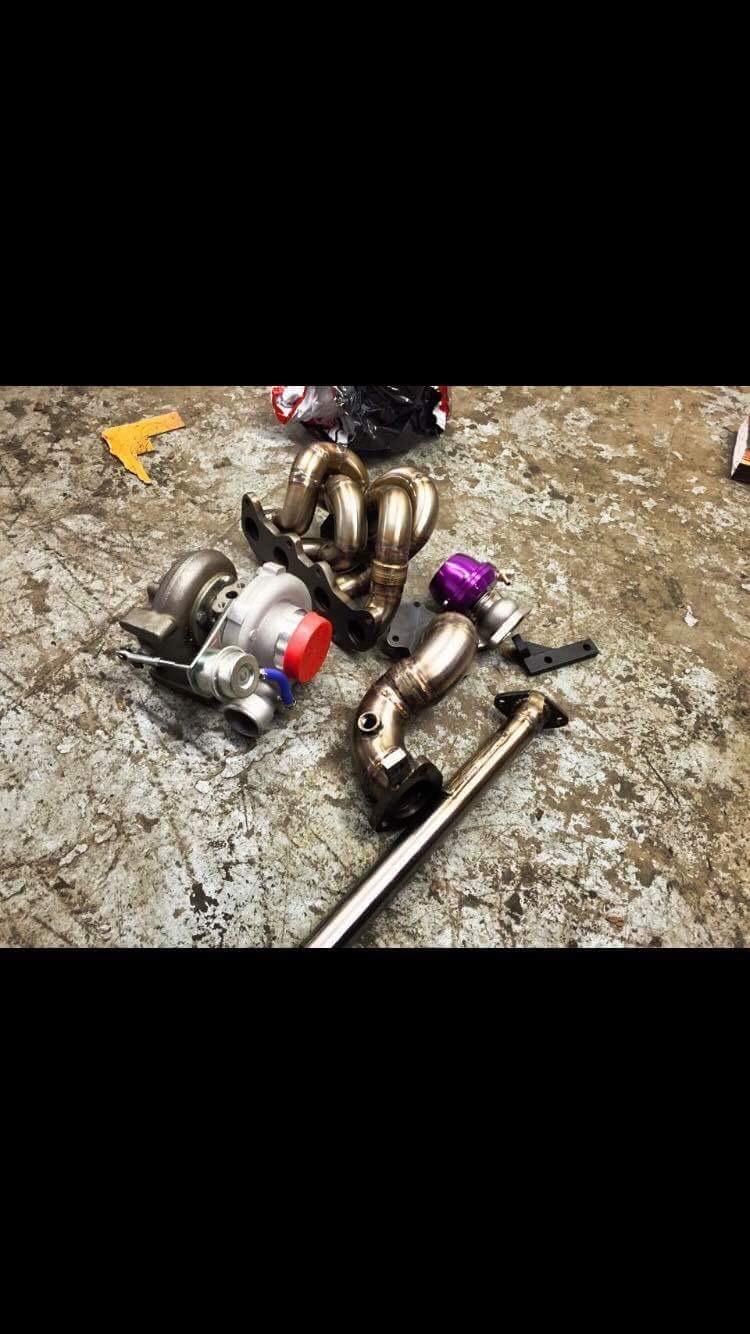
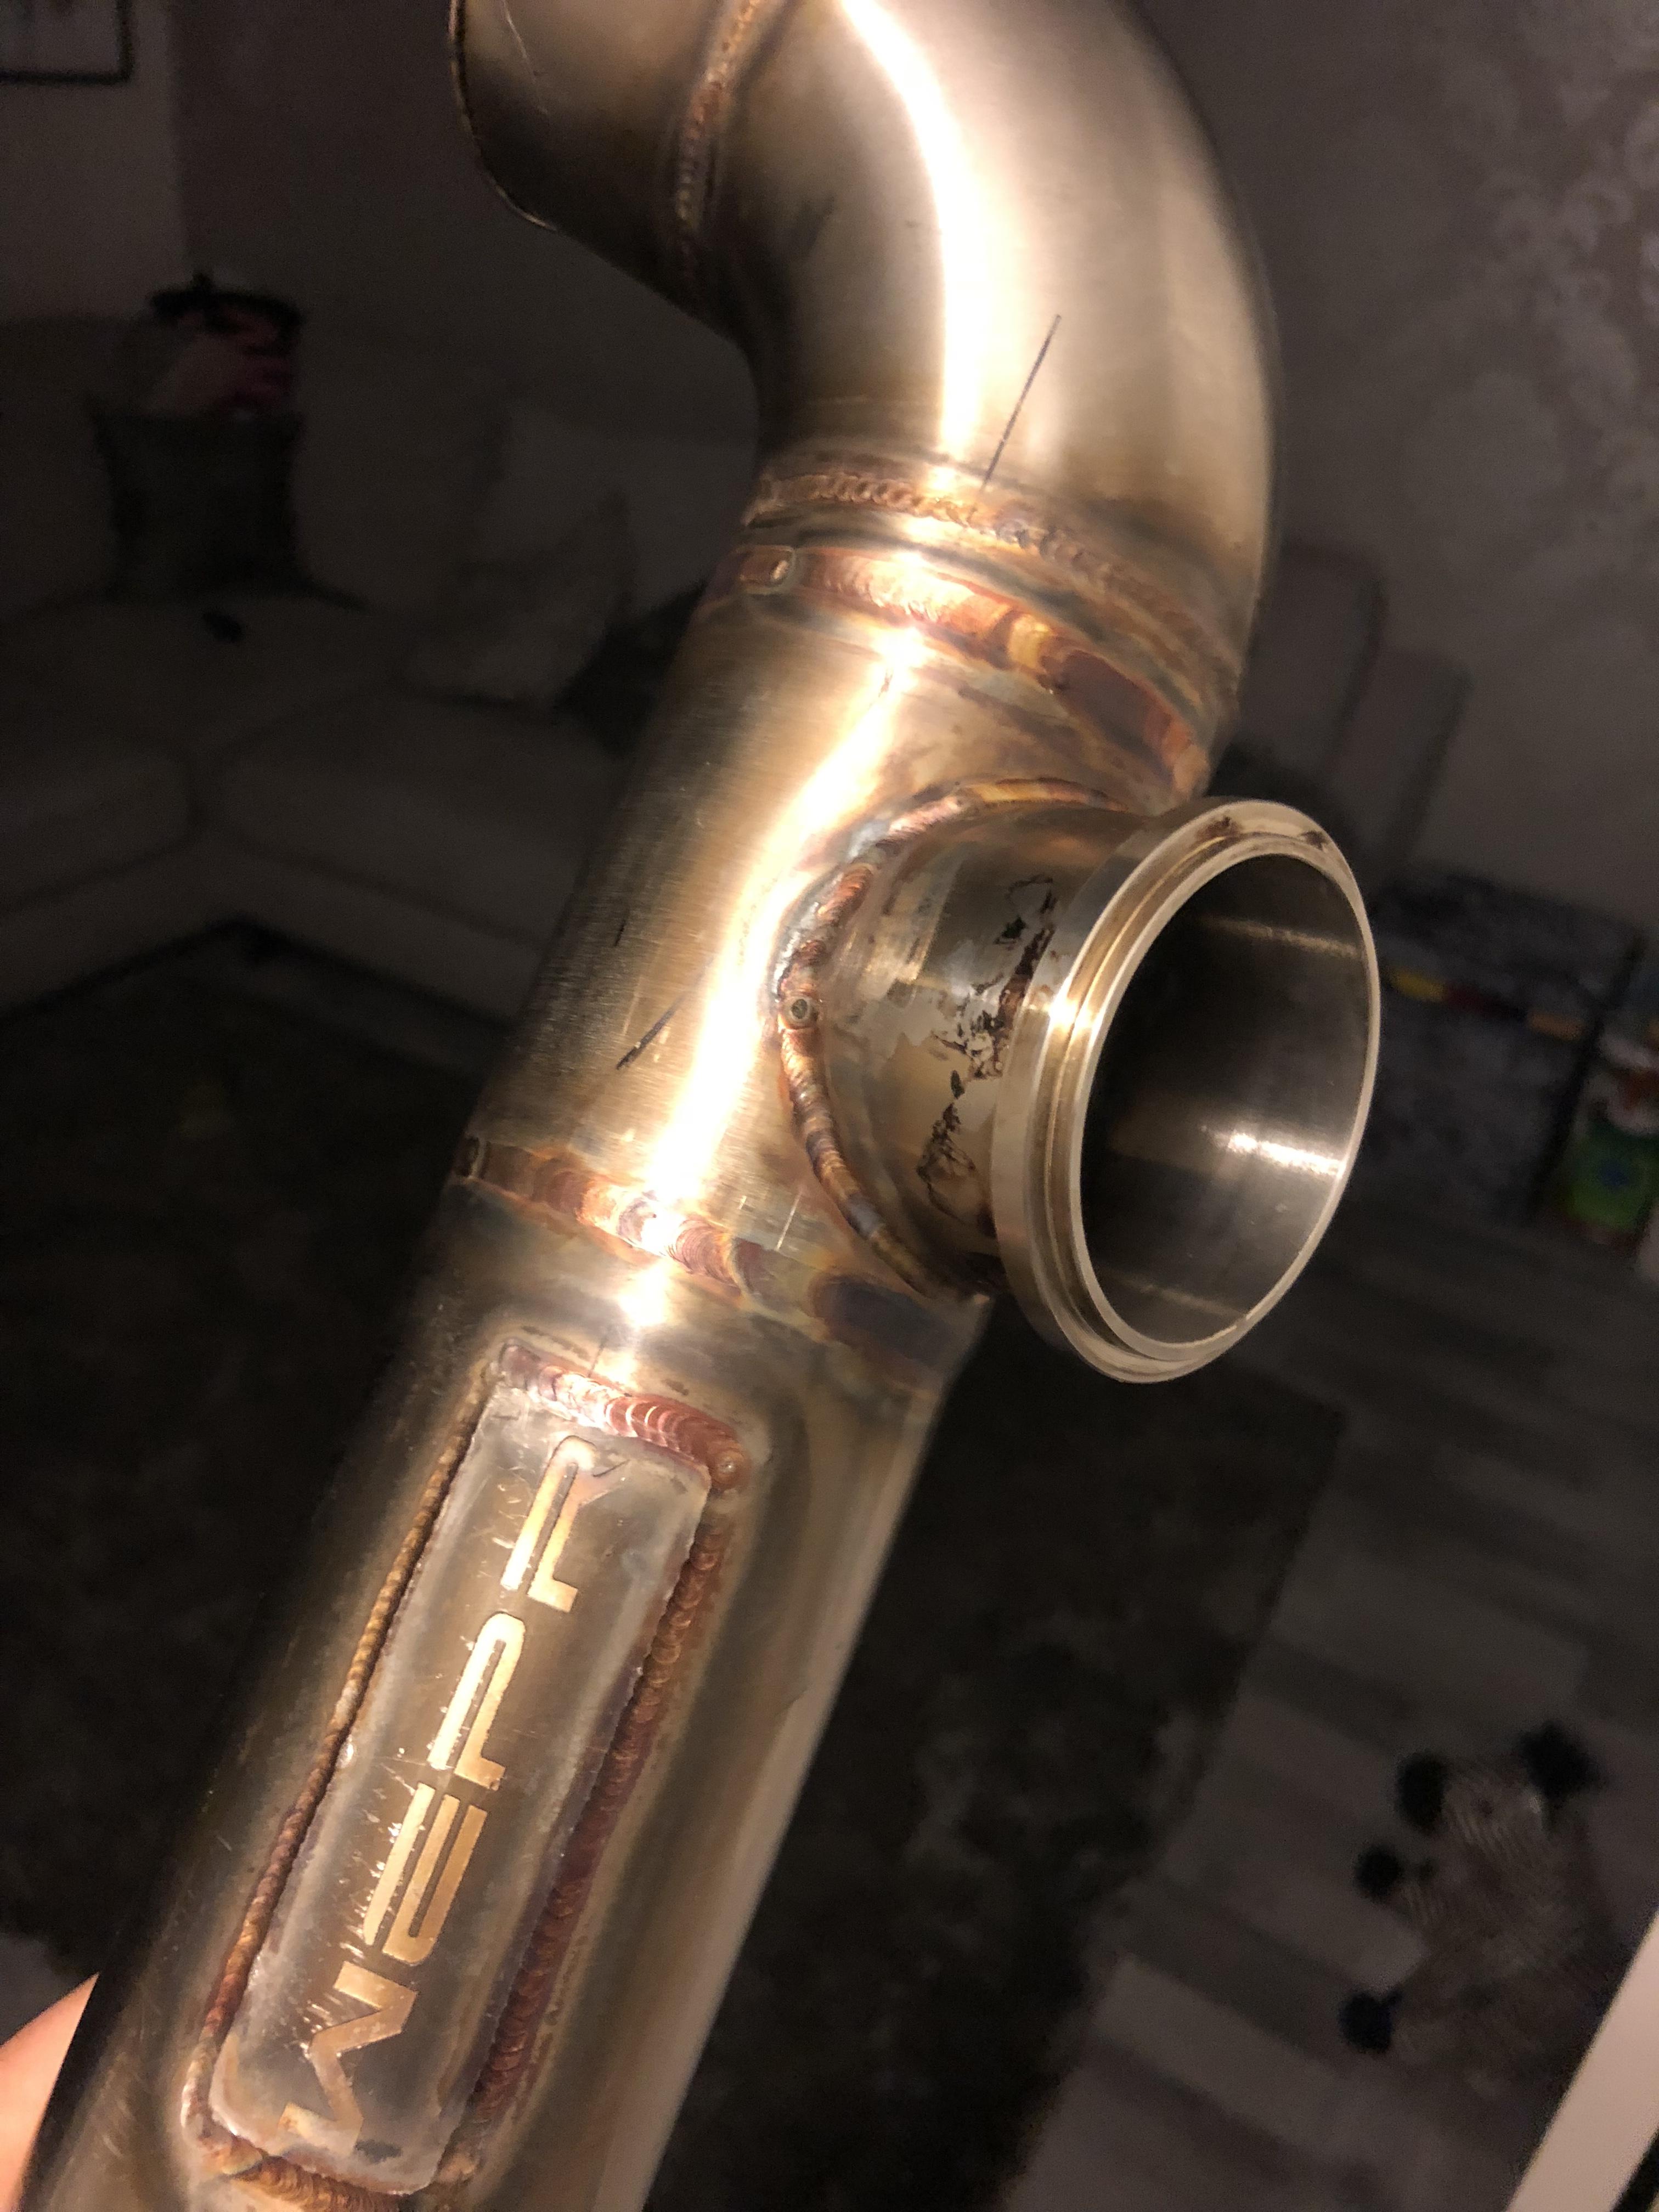
This WEPR kit came up for sale and decided I had too have it.

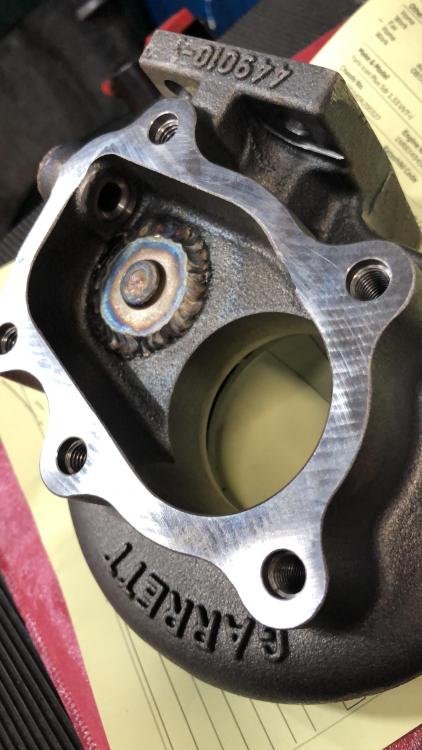
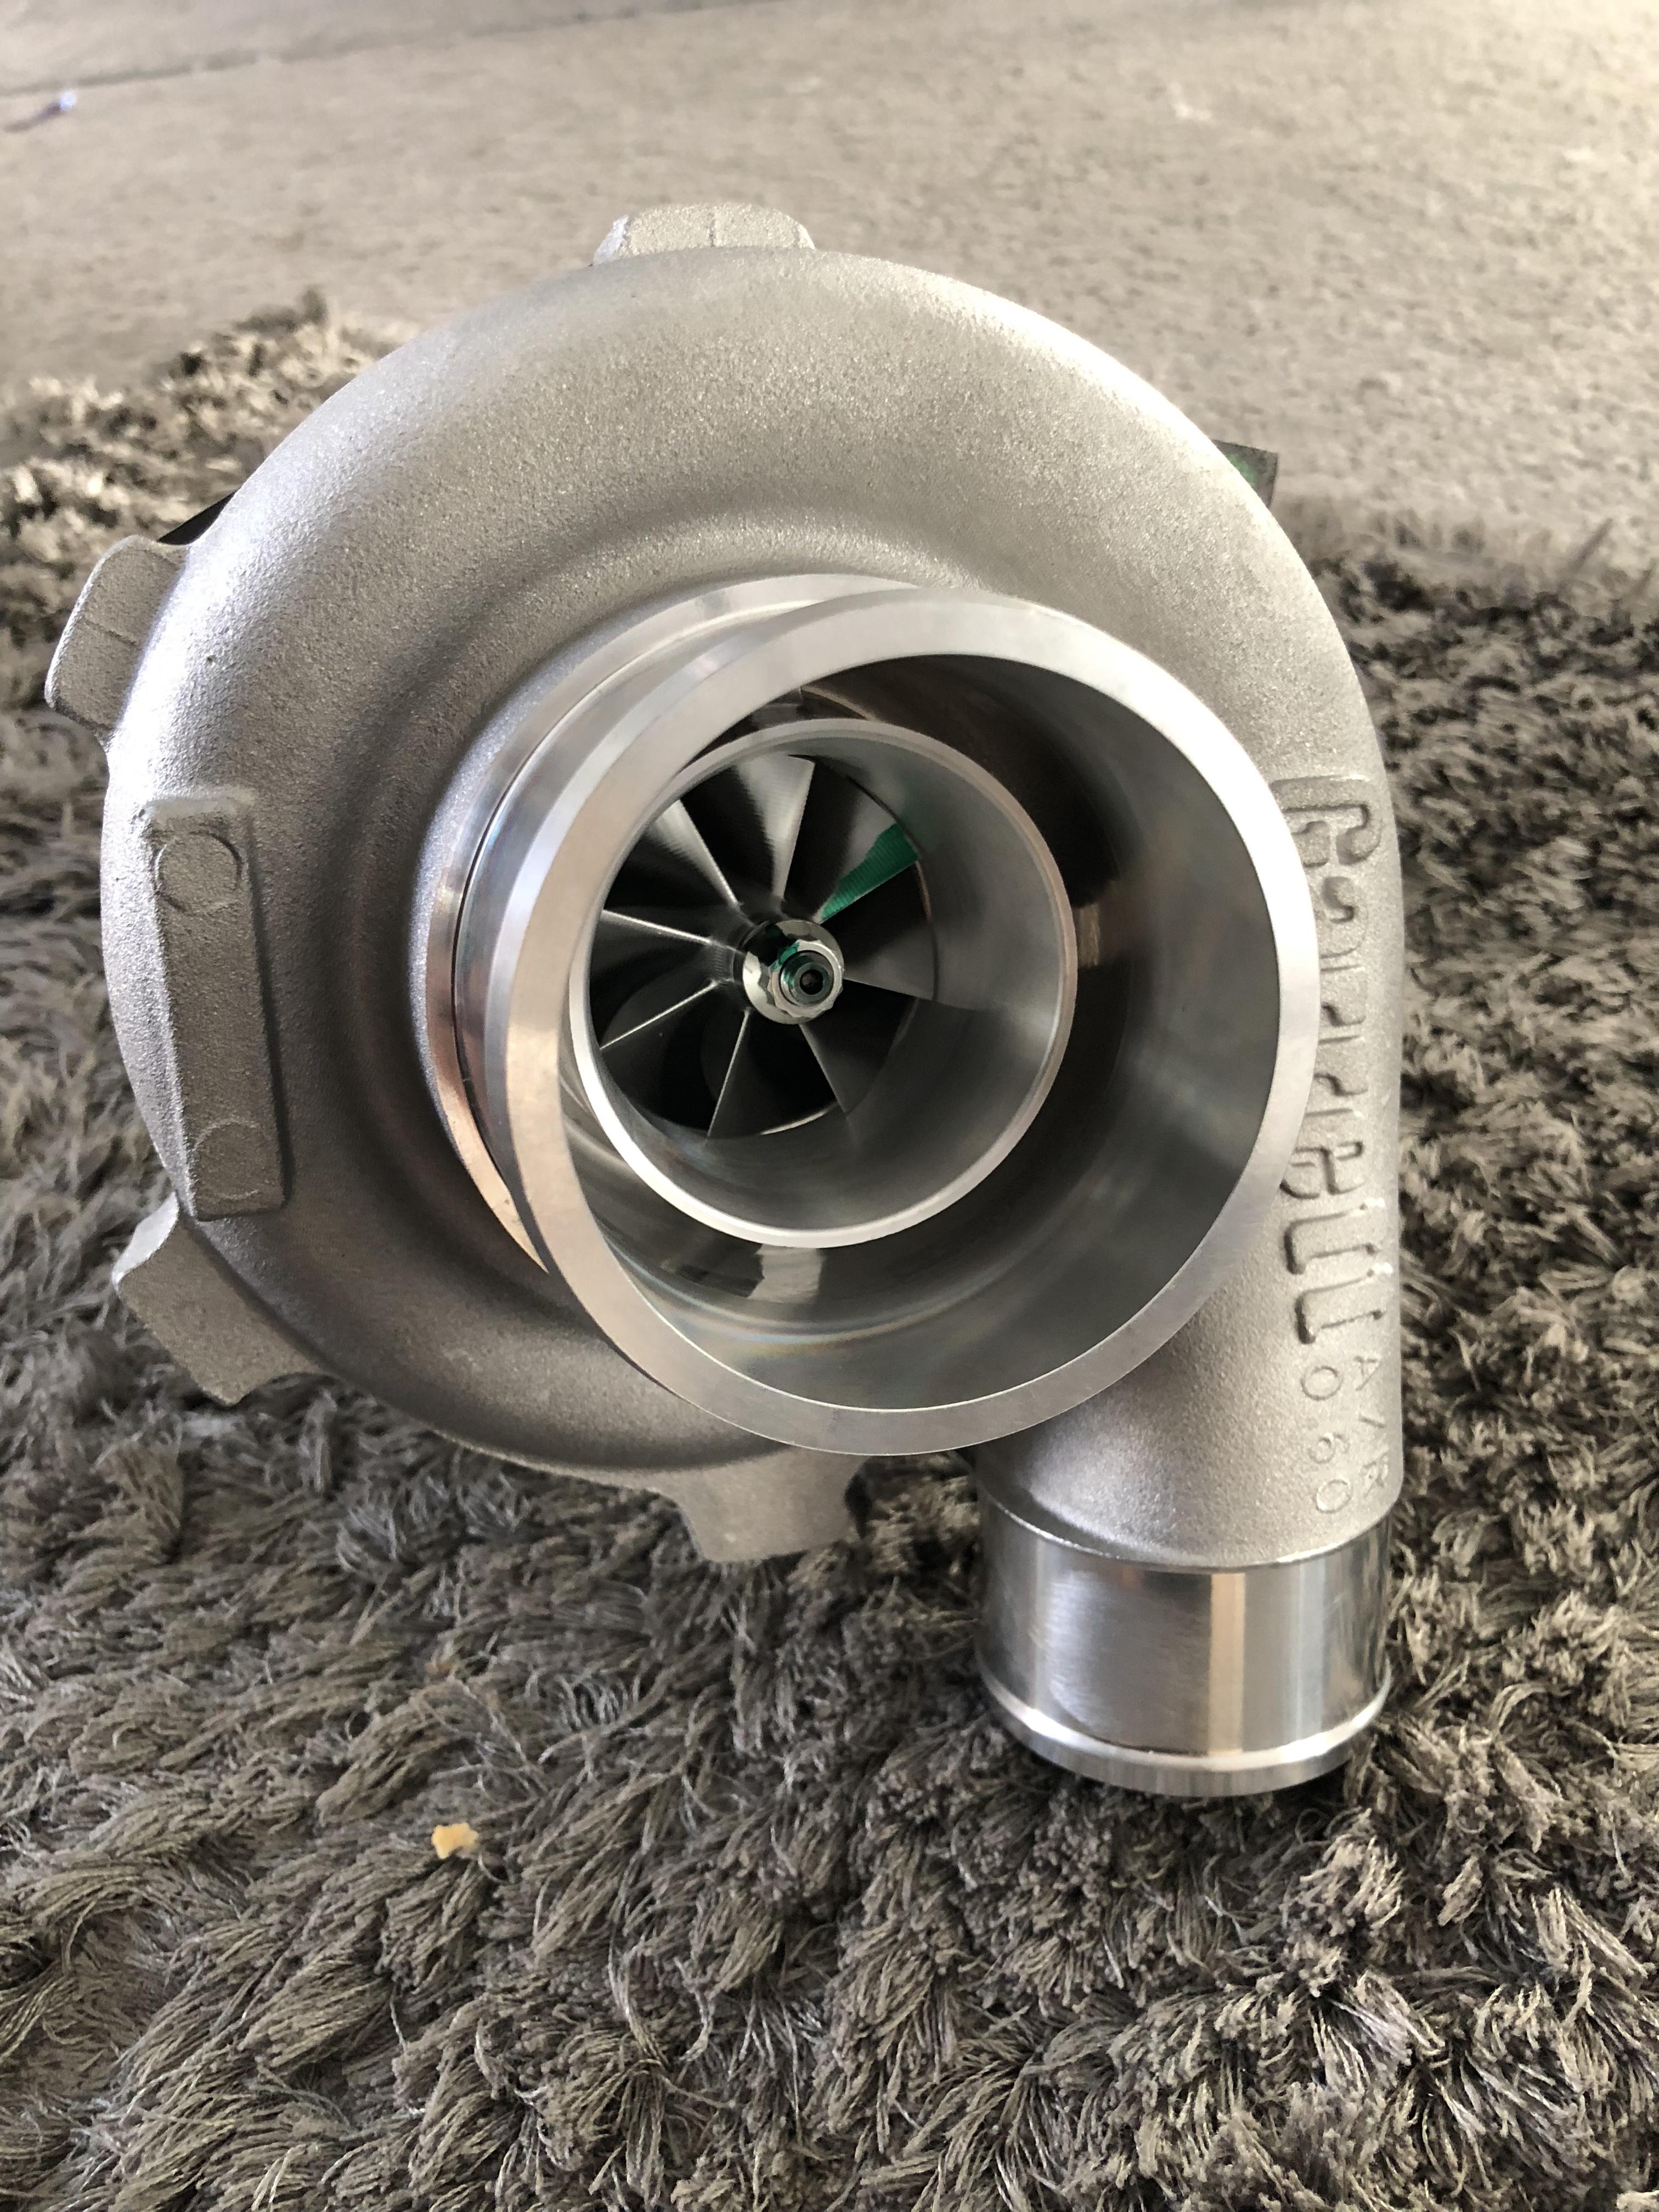
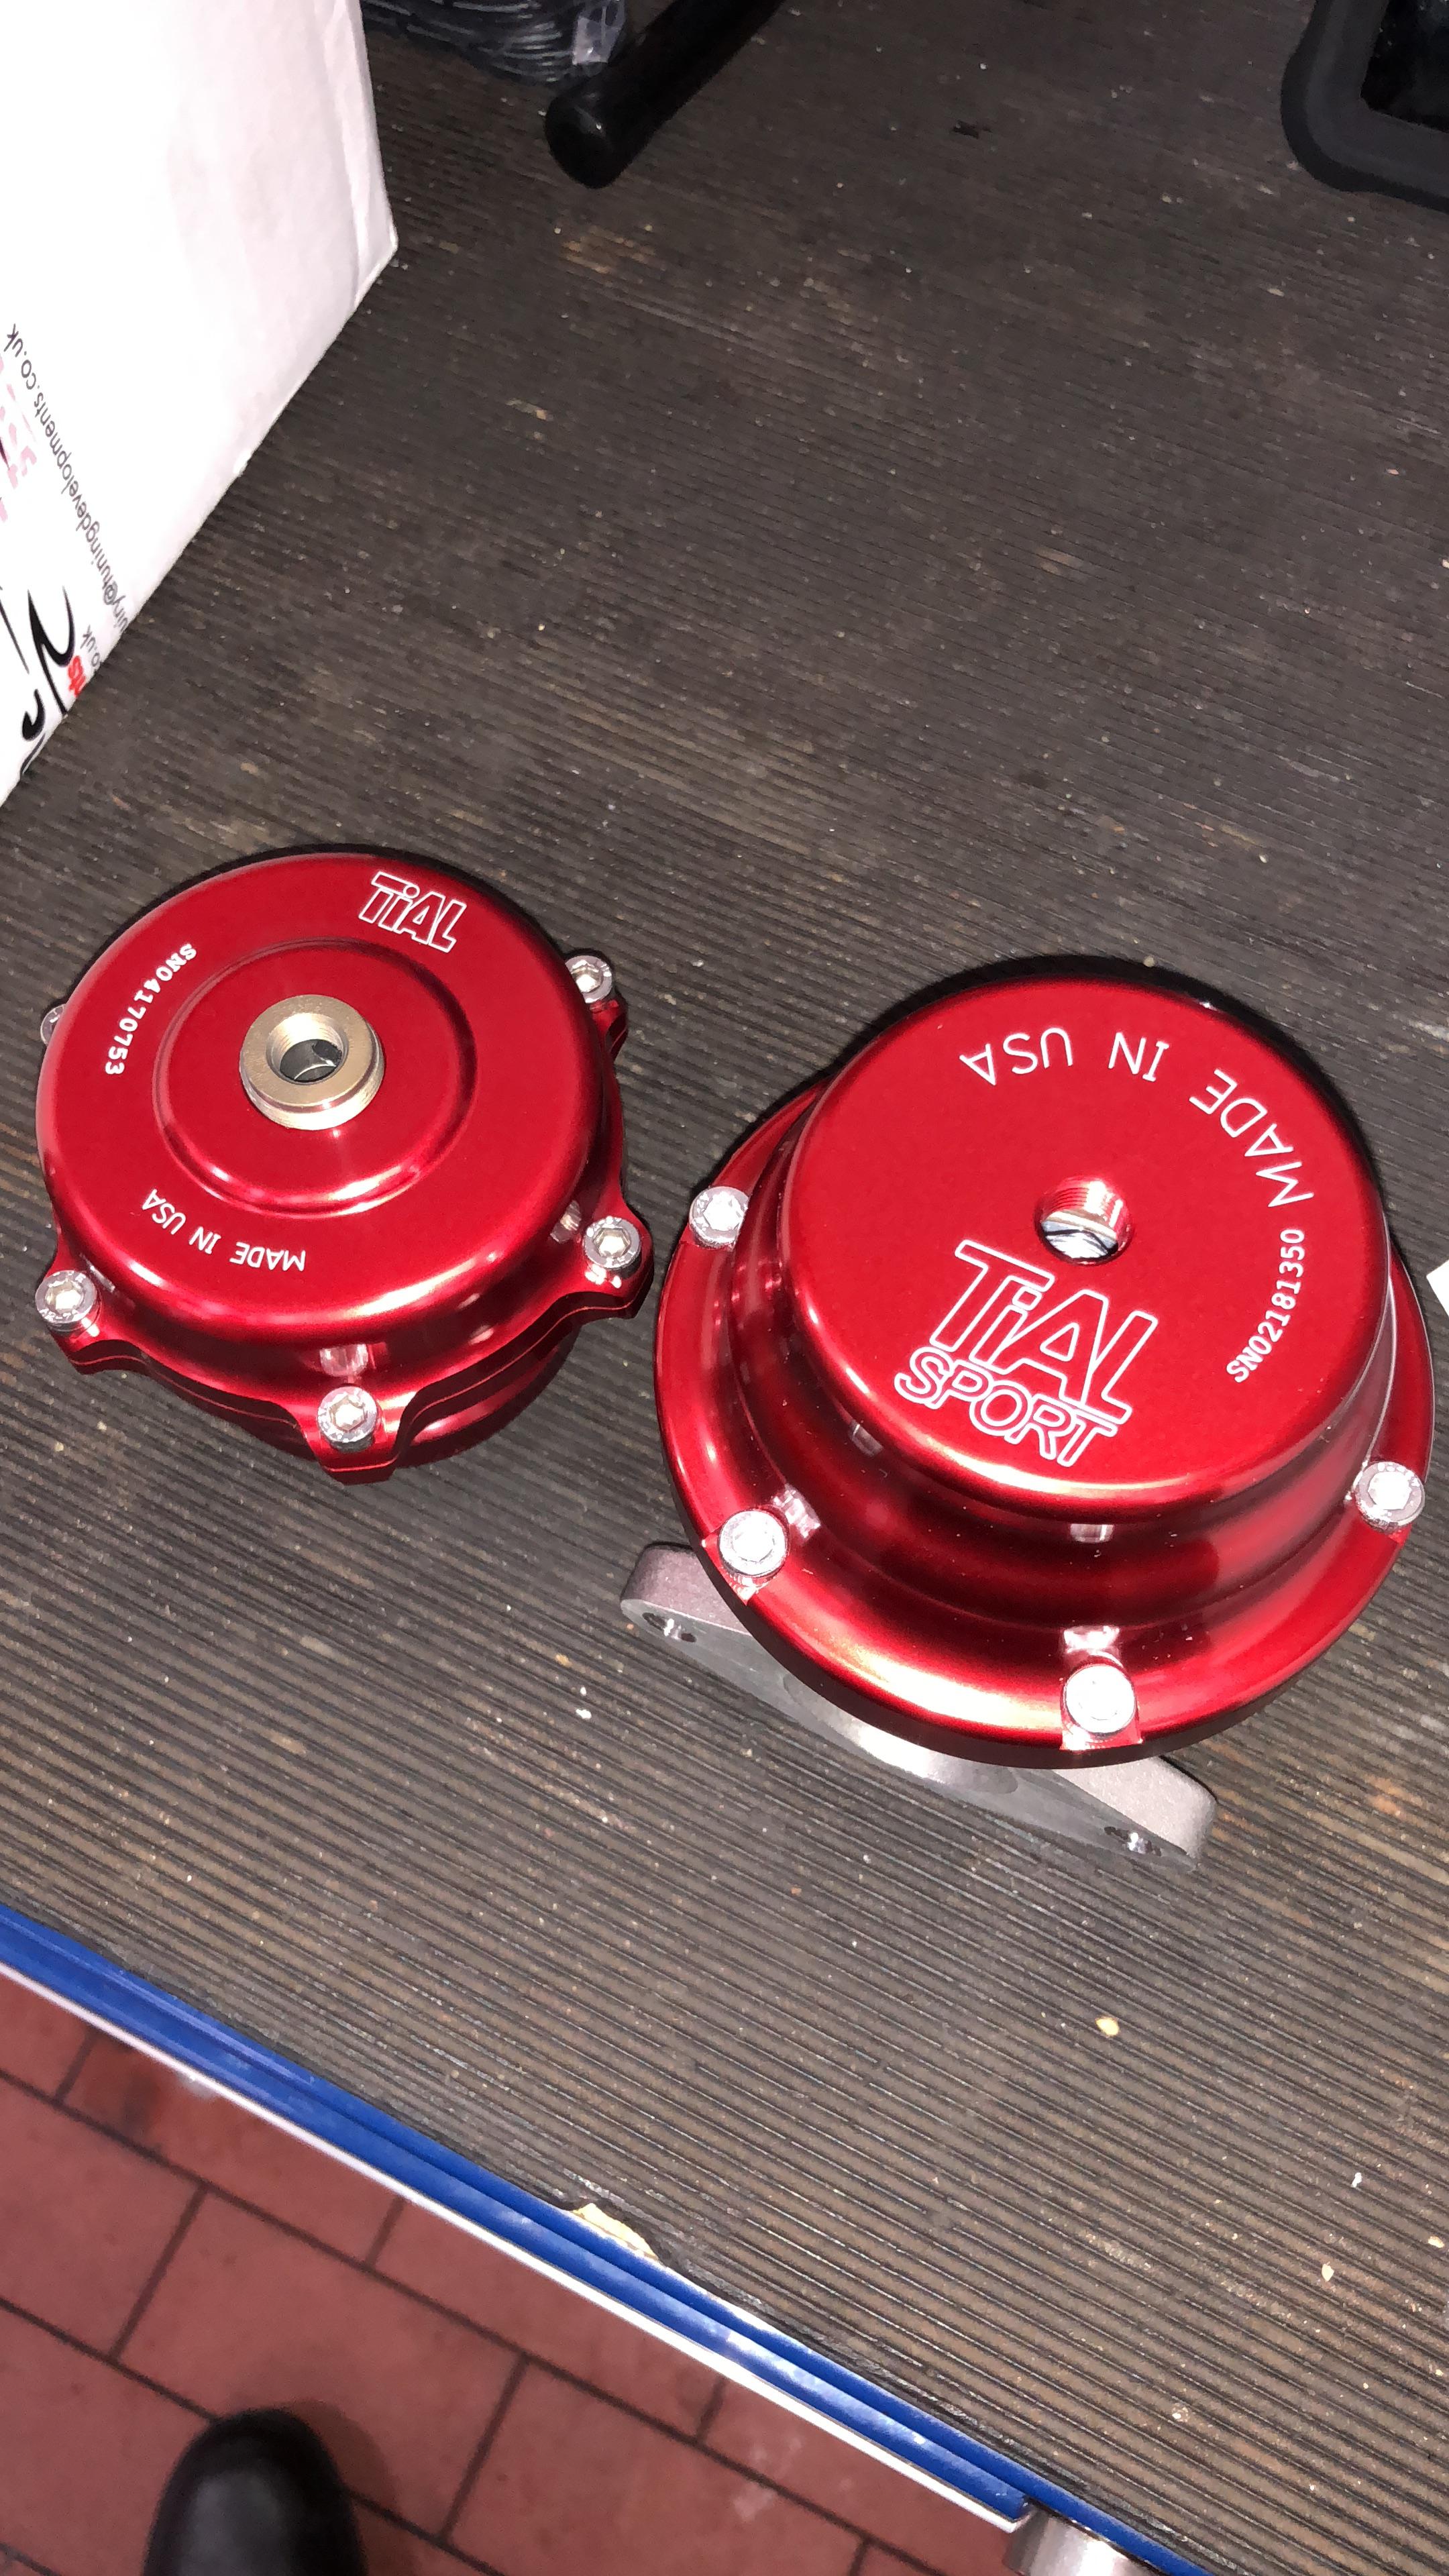
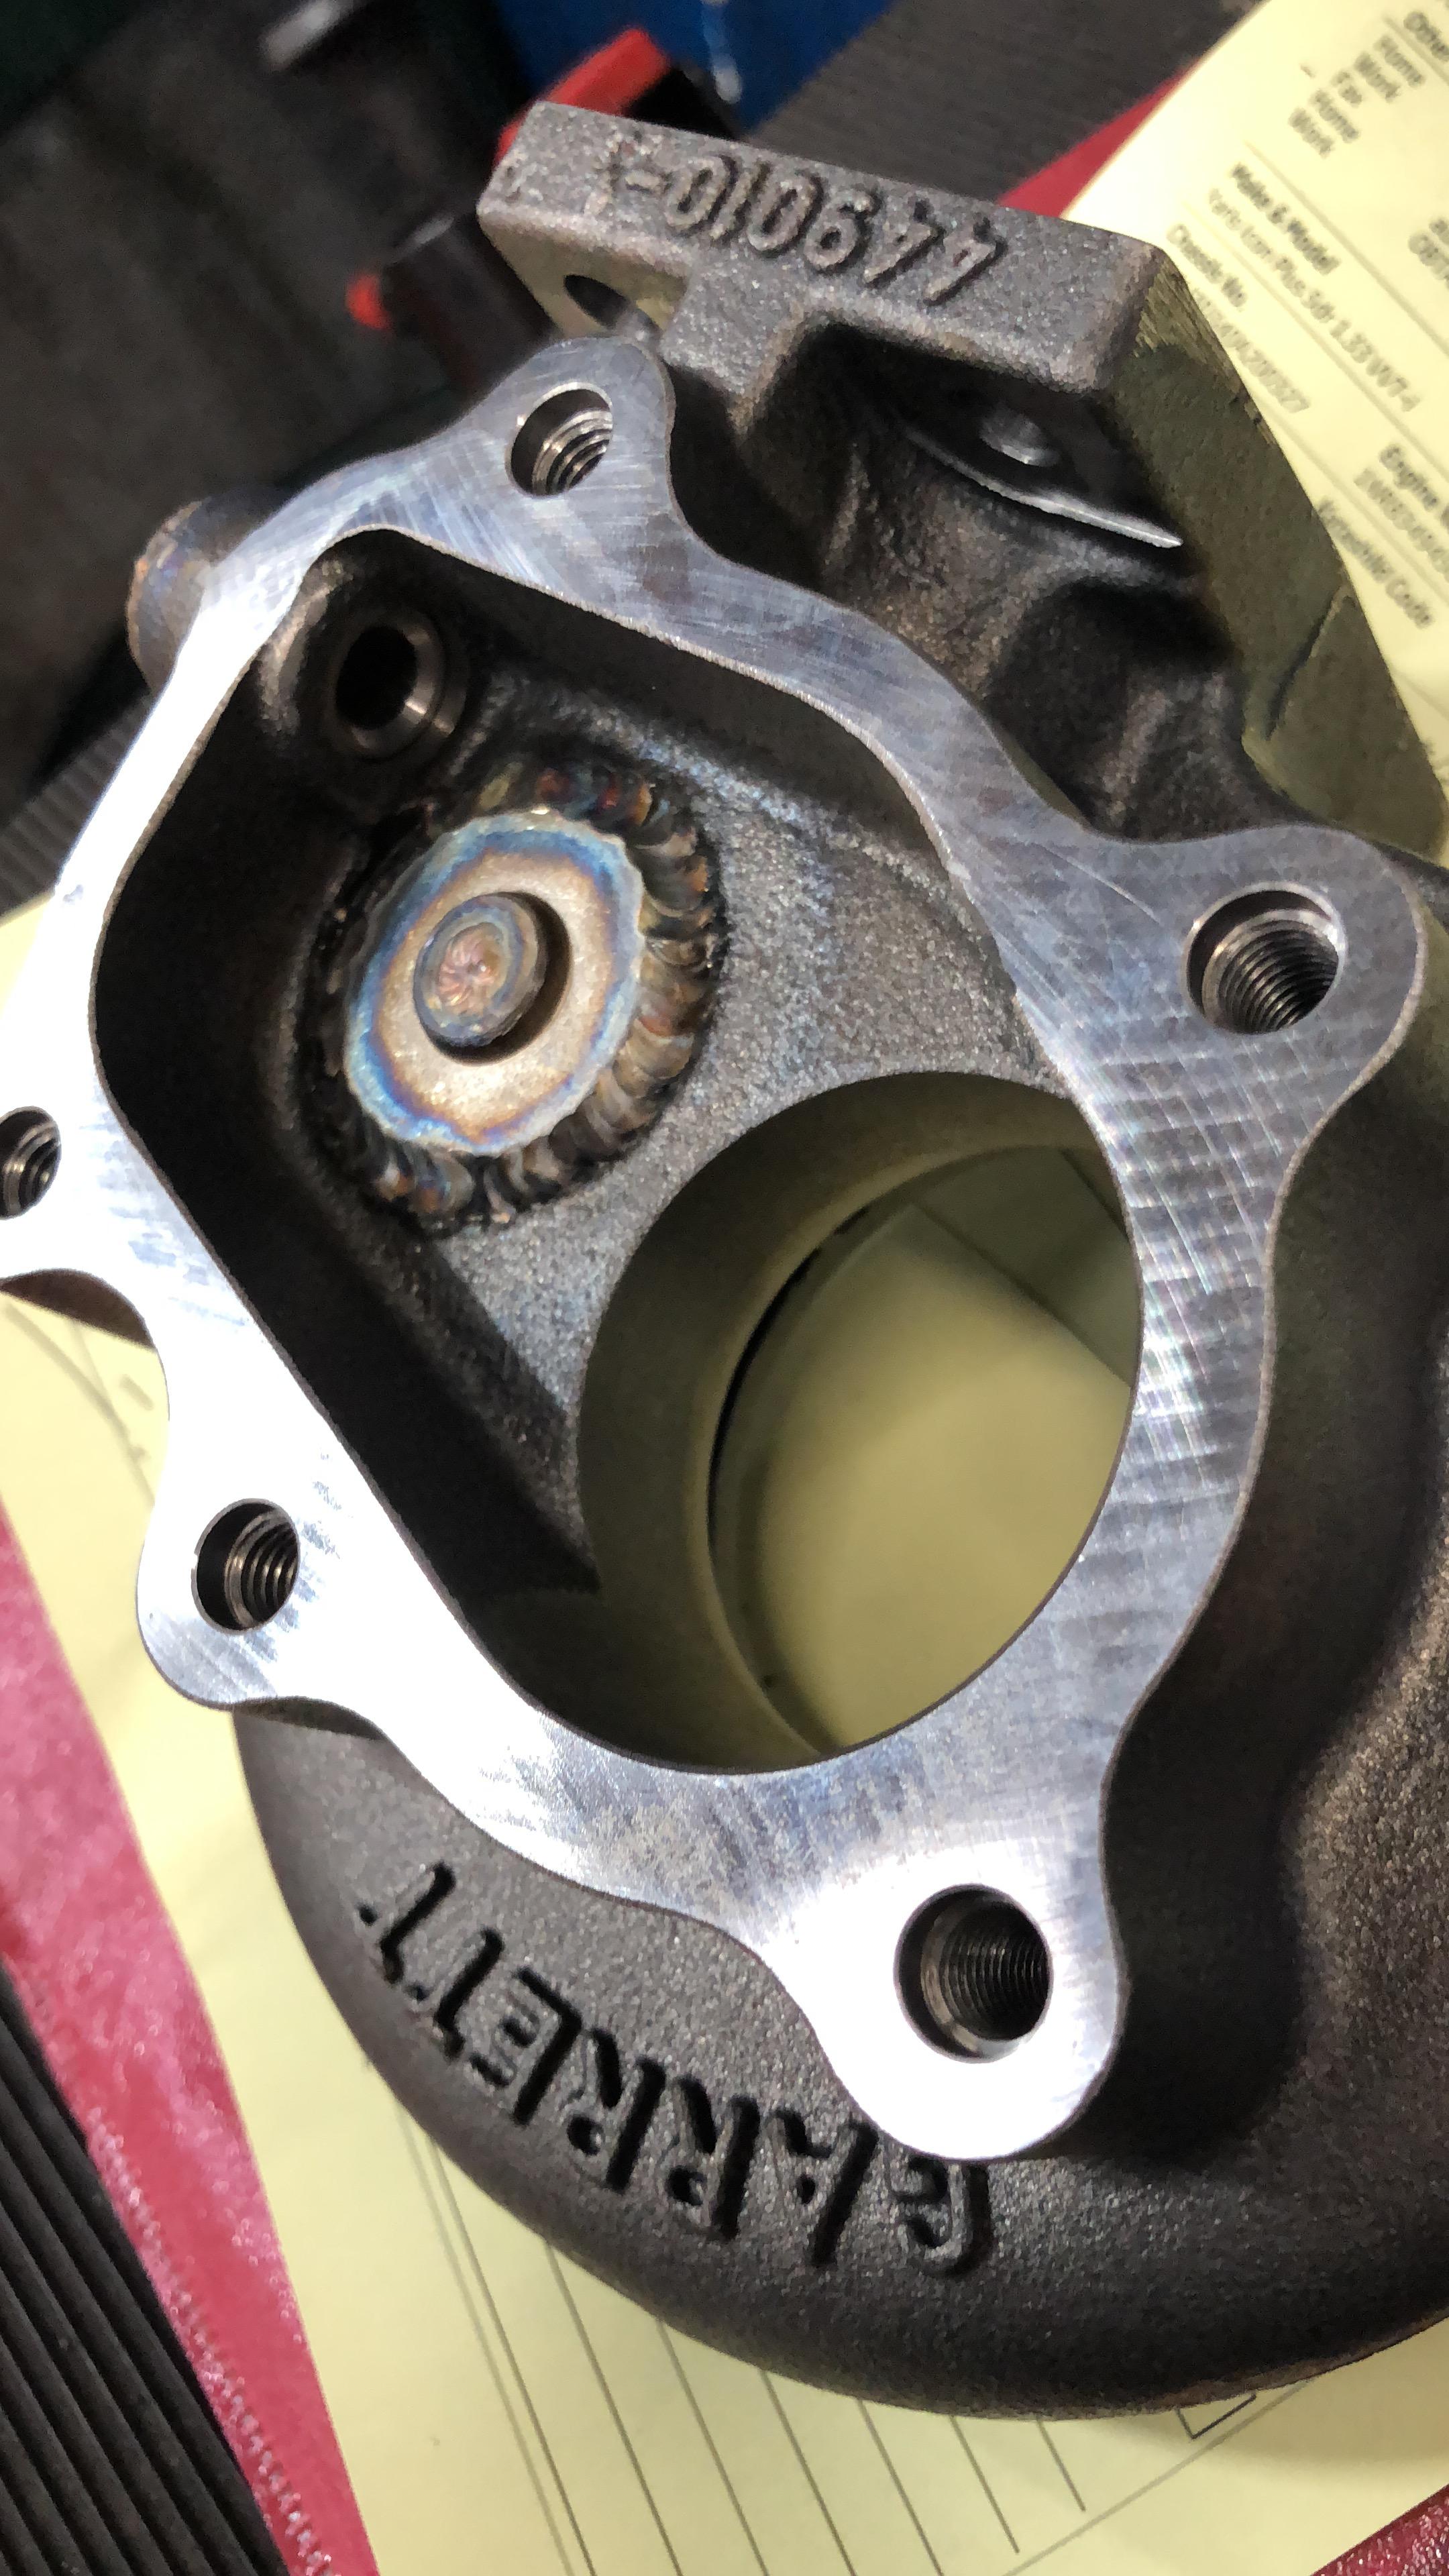
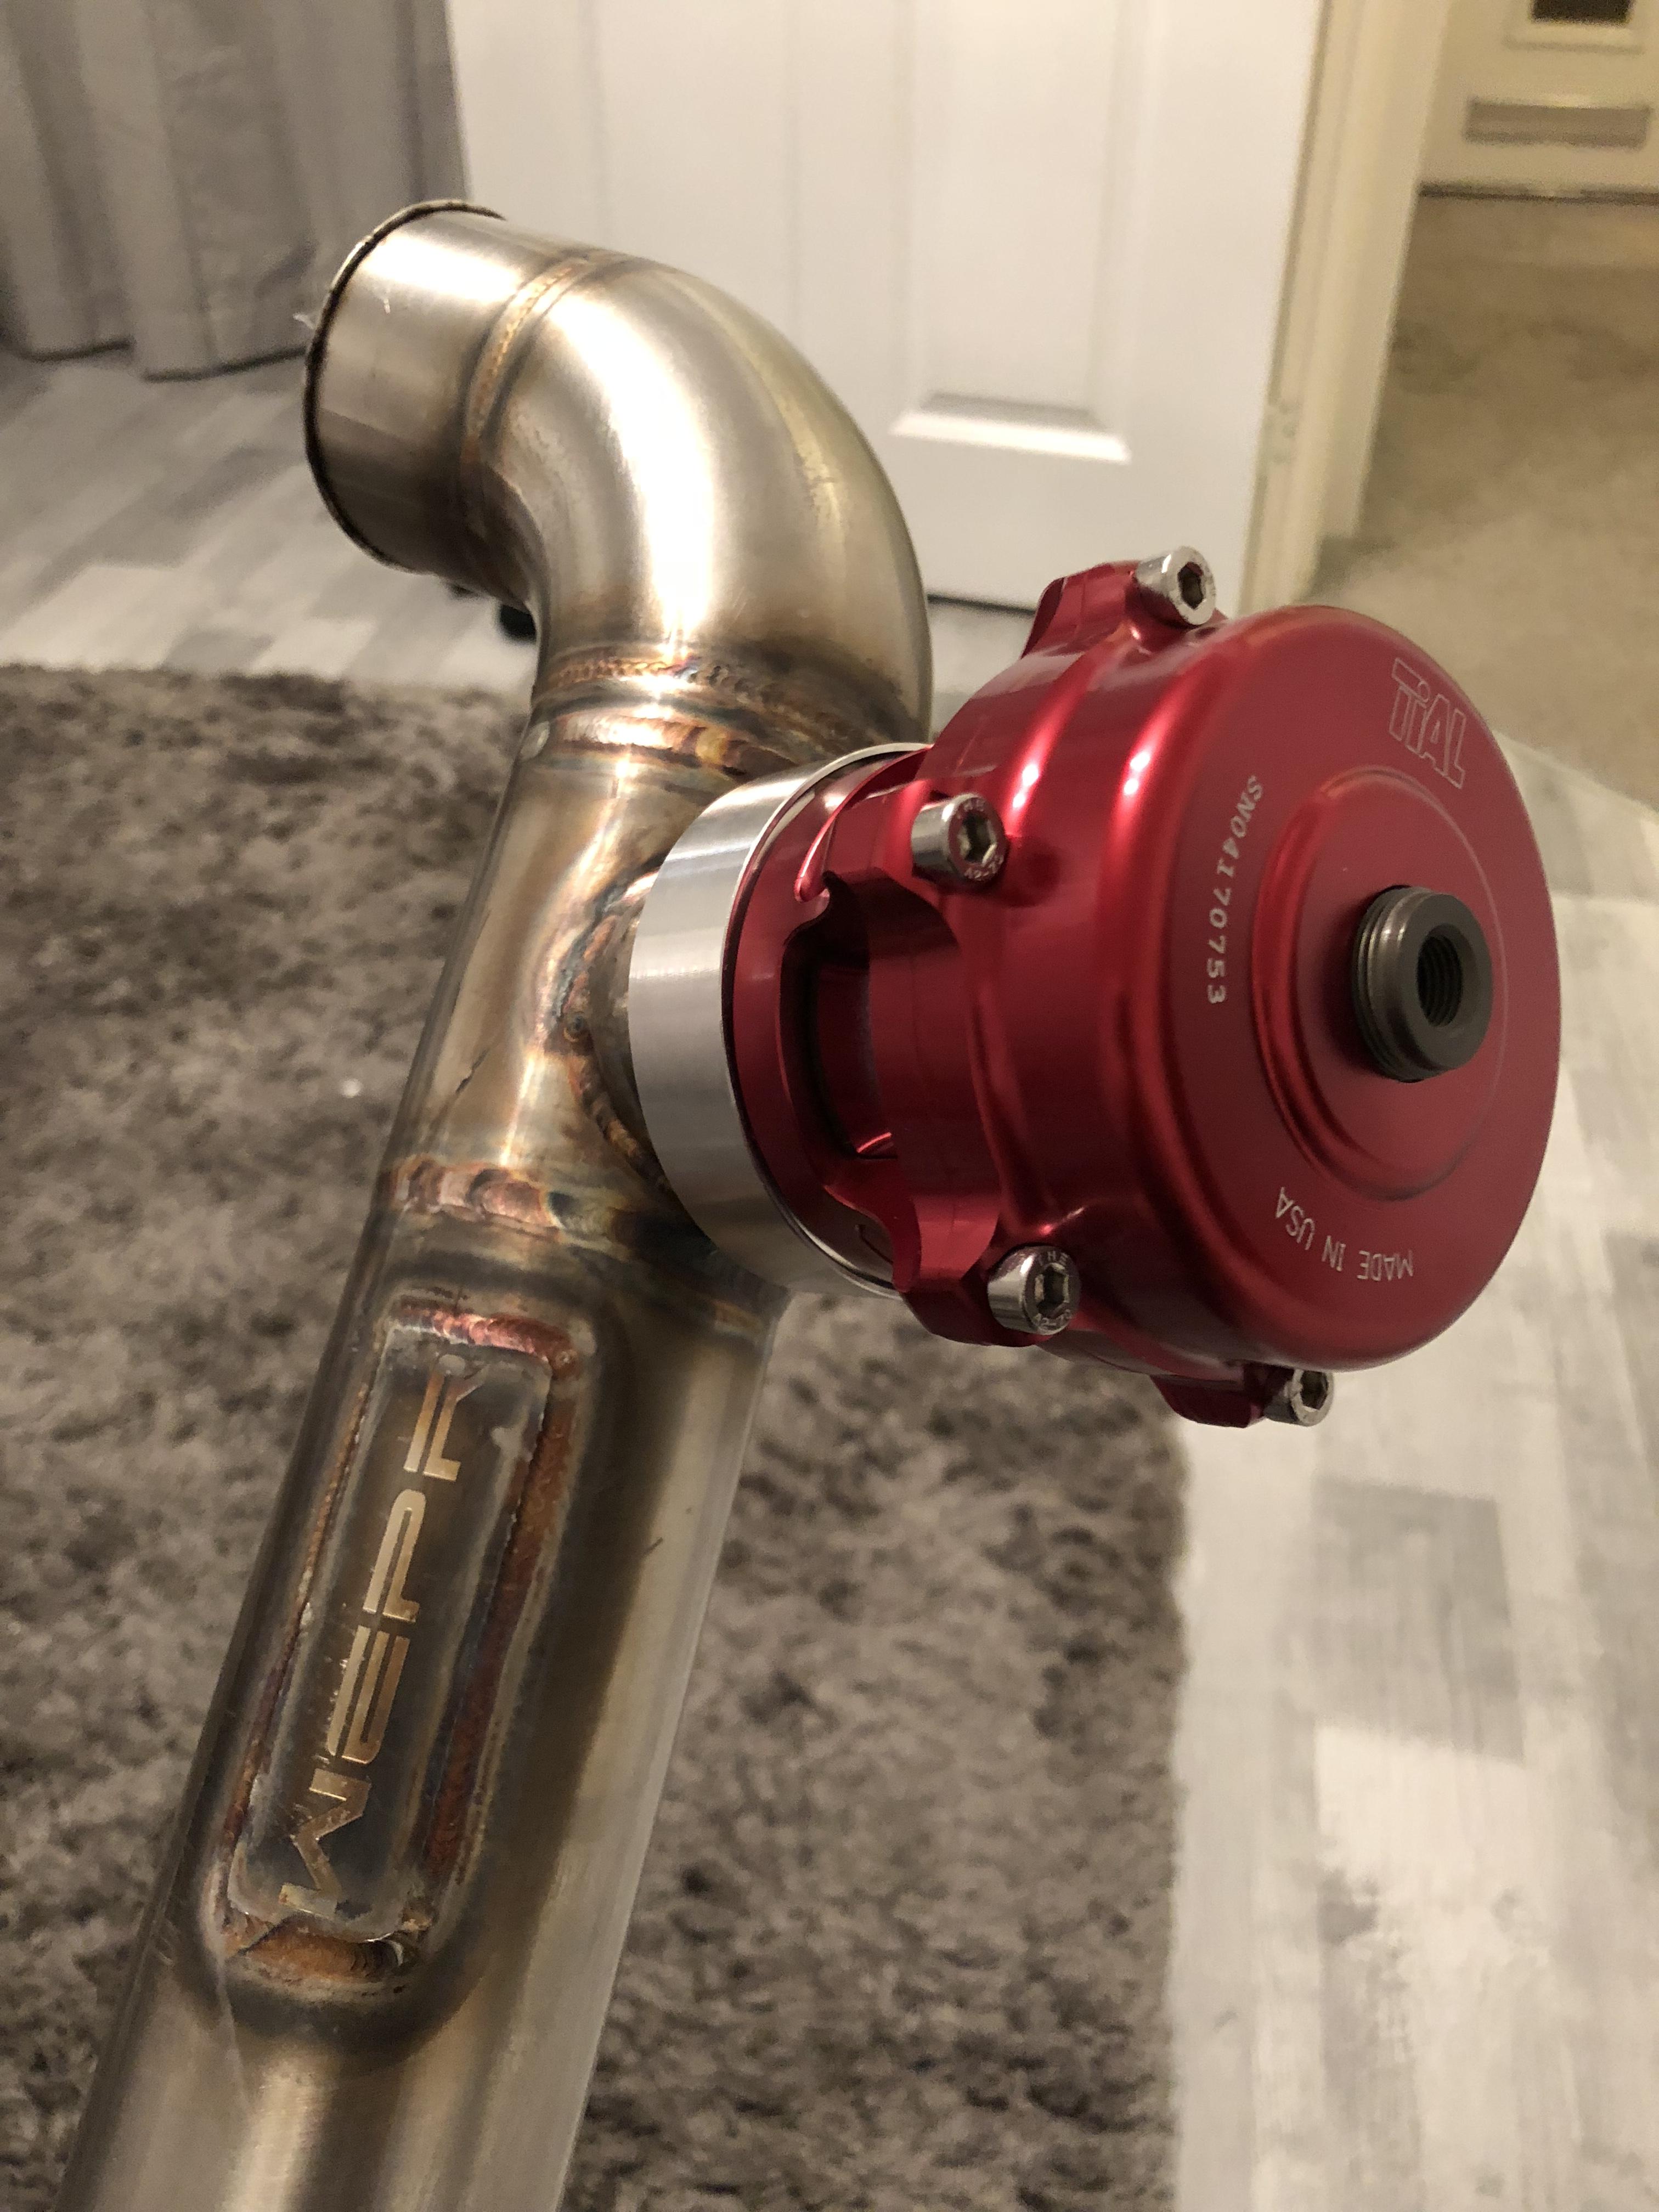
So I made a decision on a turbo and went for the Garrett GTX2860rs gen2 turbo so I got it ordered from BTN Performance and couple days later it had arrived

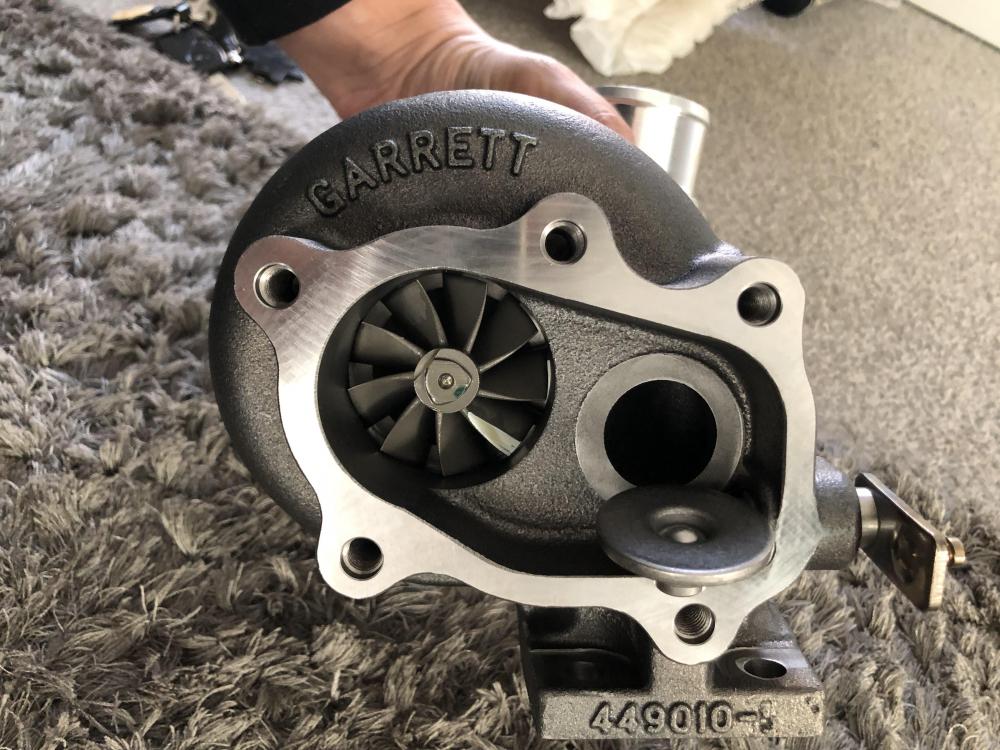
I wanted to run external gate again and as id sold my complete turbo setup I no longer had an external gate so I set at buying a new external gate and getting the internal gate welded up on the new turbo, I also wanted the matching BOV so I bought that aswell, both genuine TiAL.

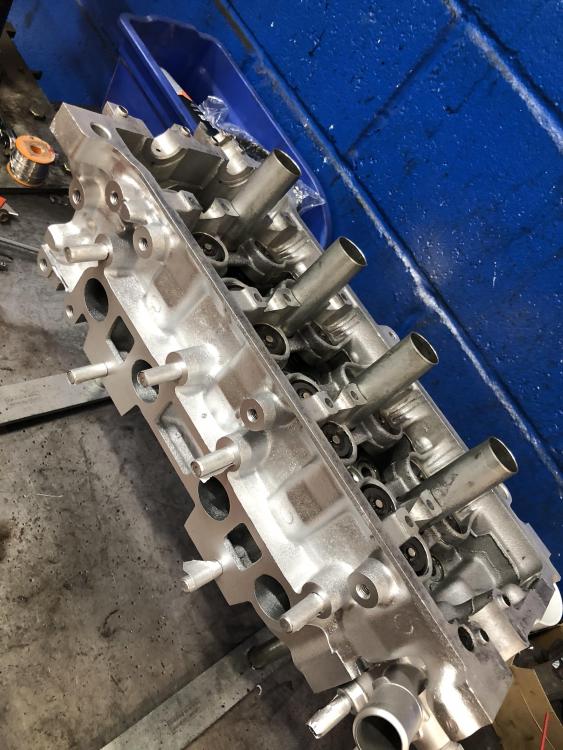
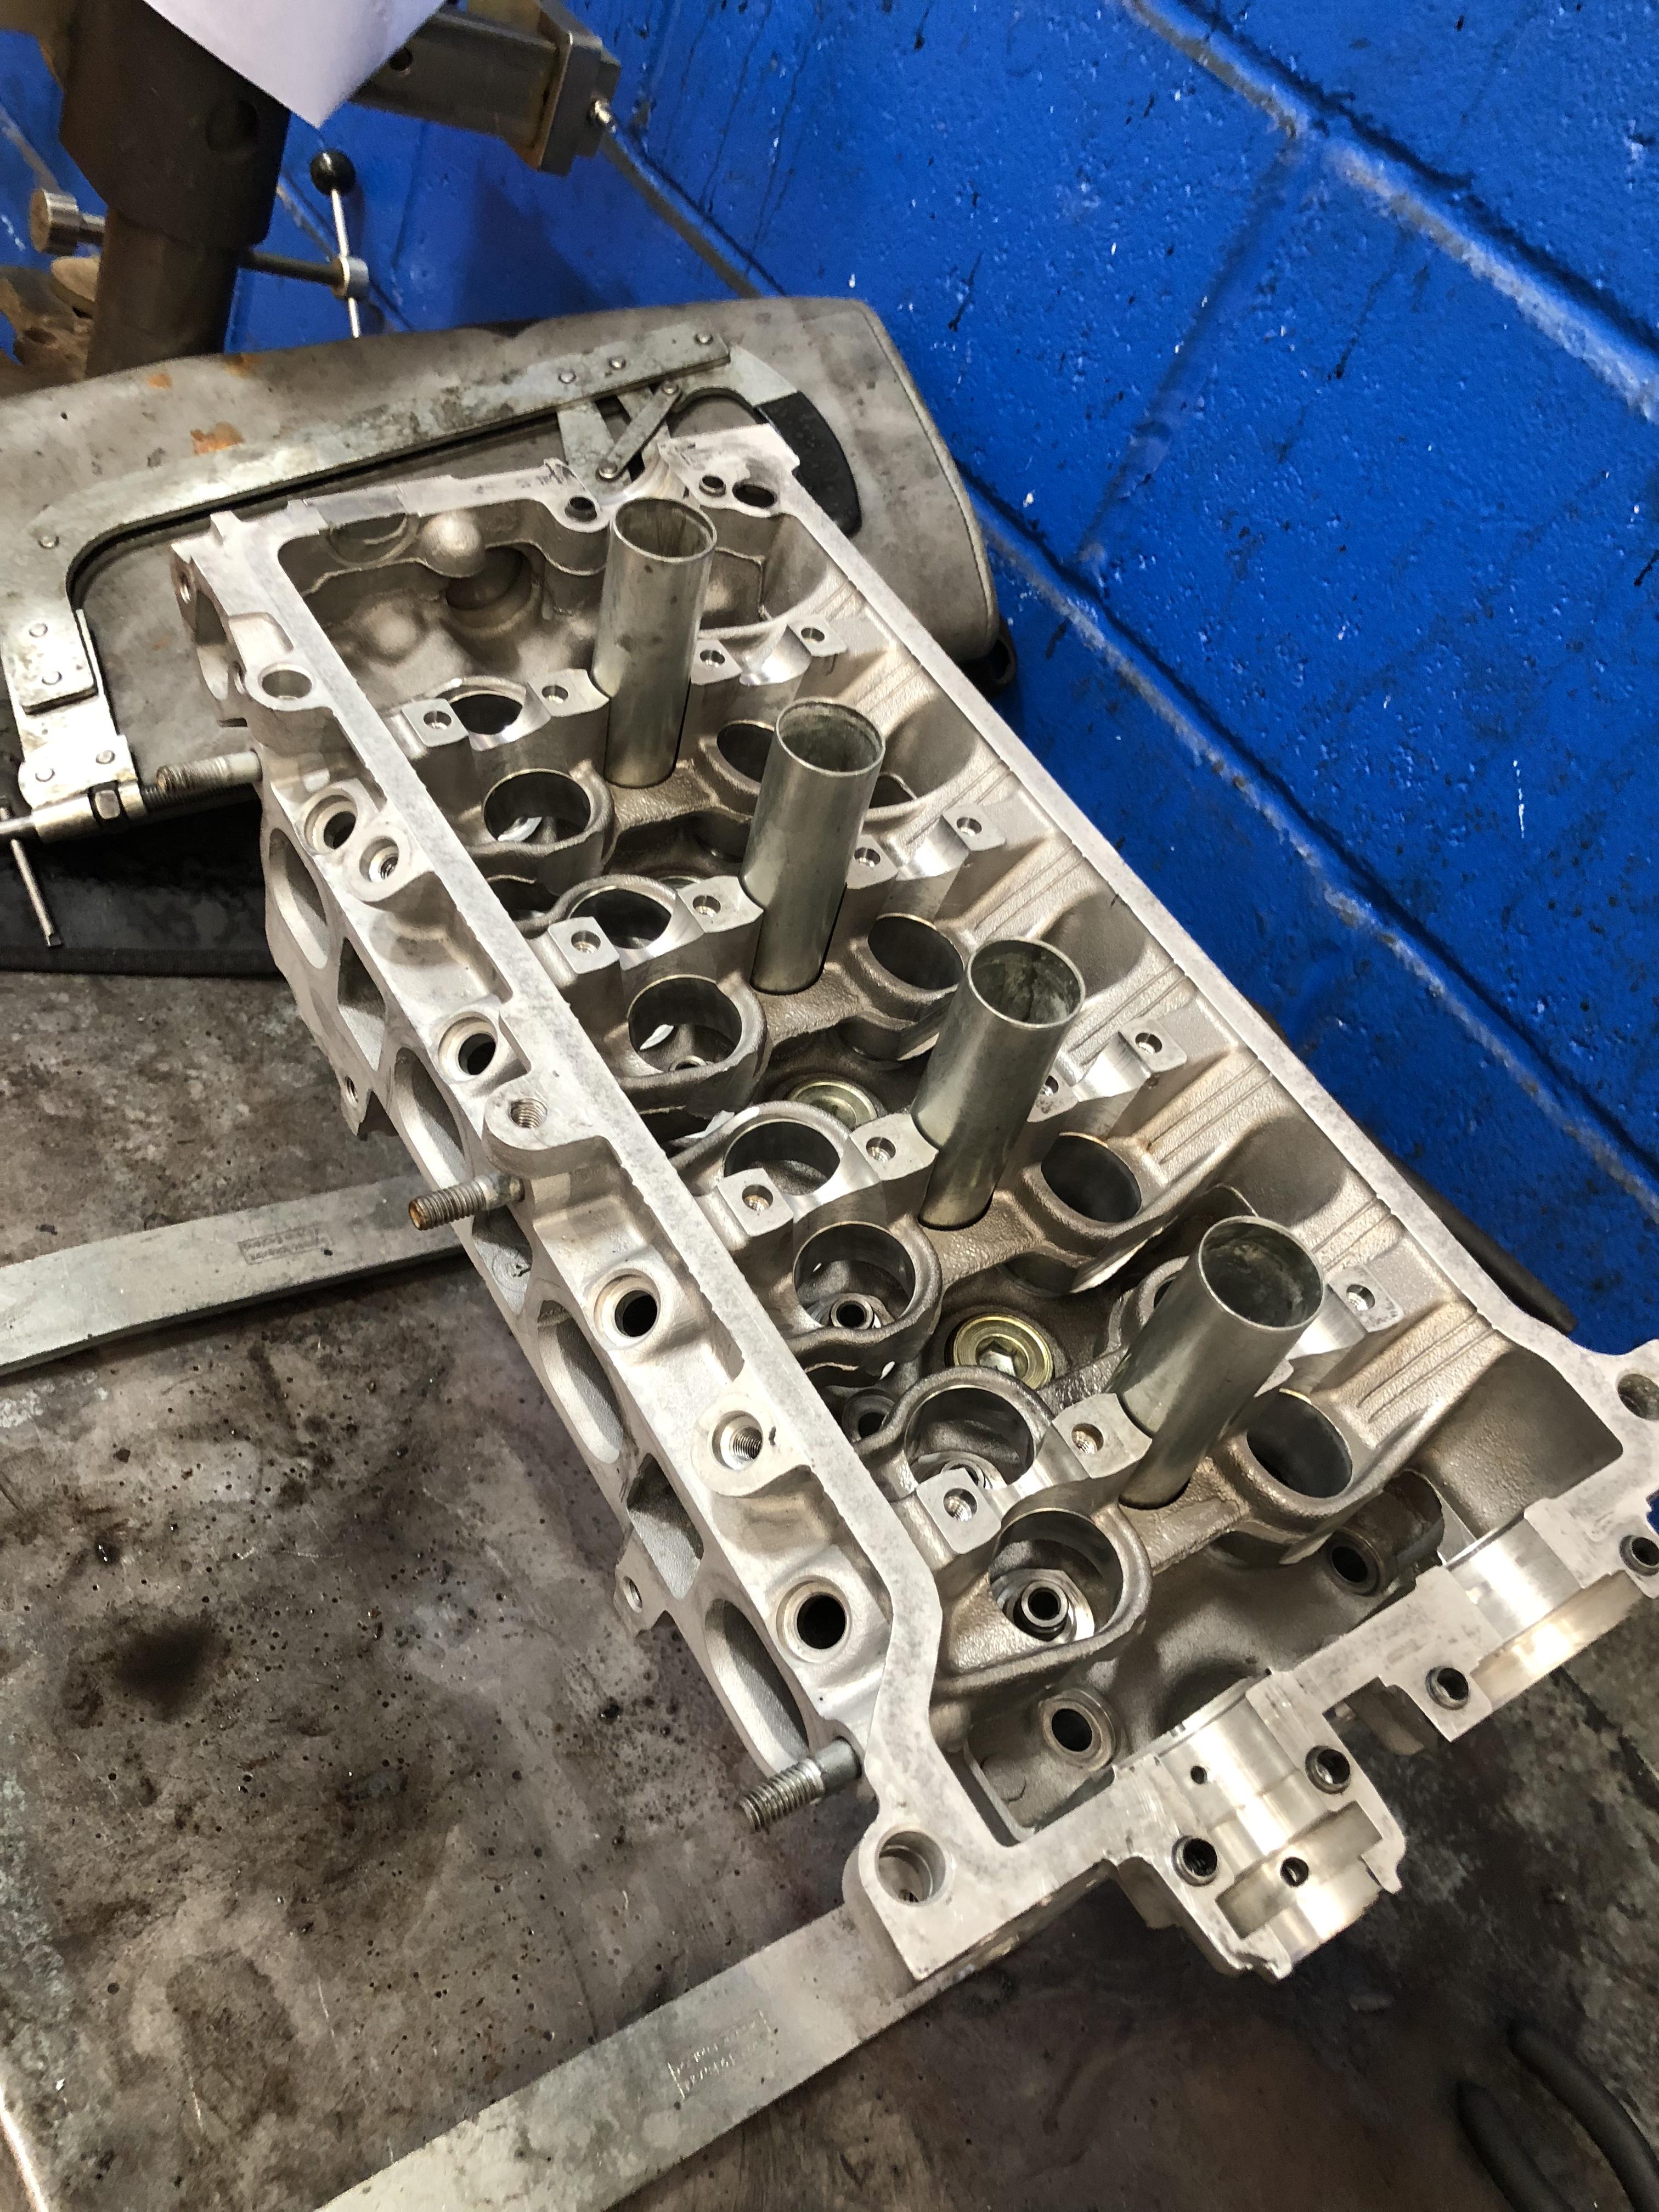
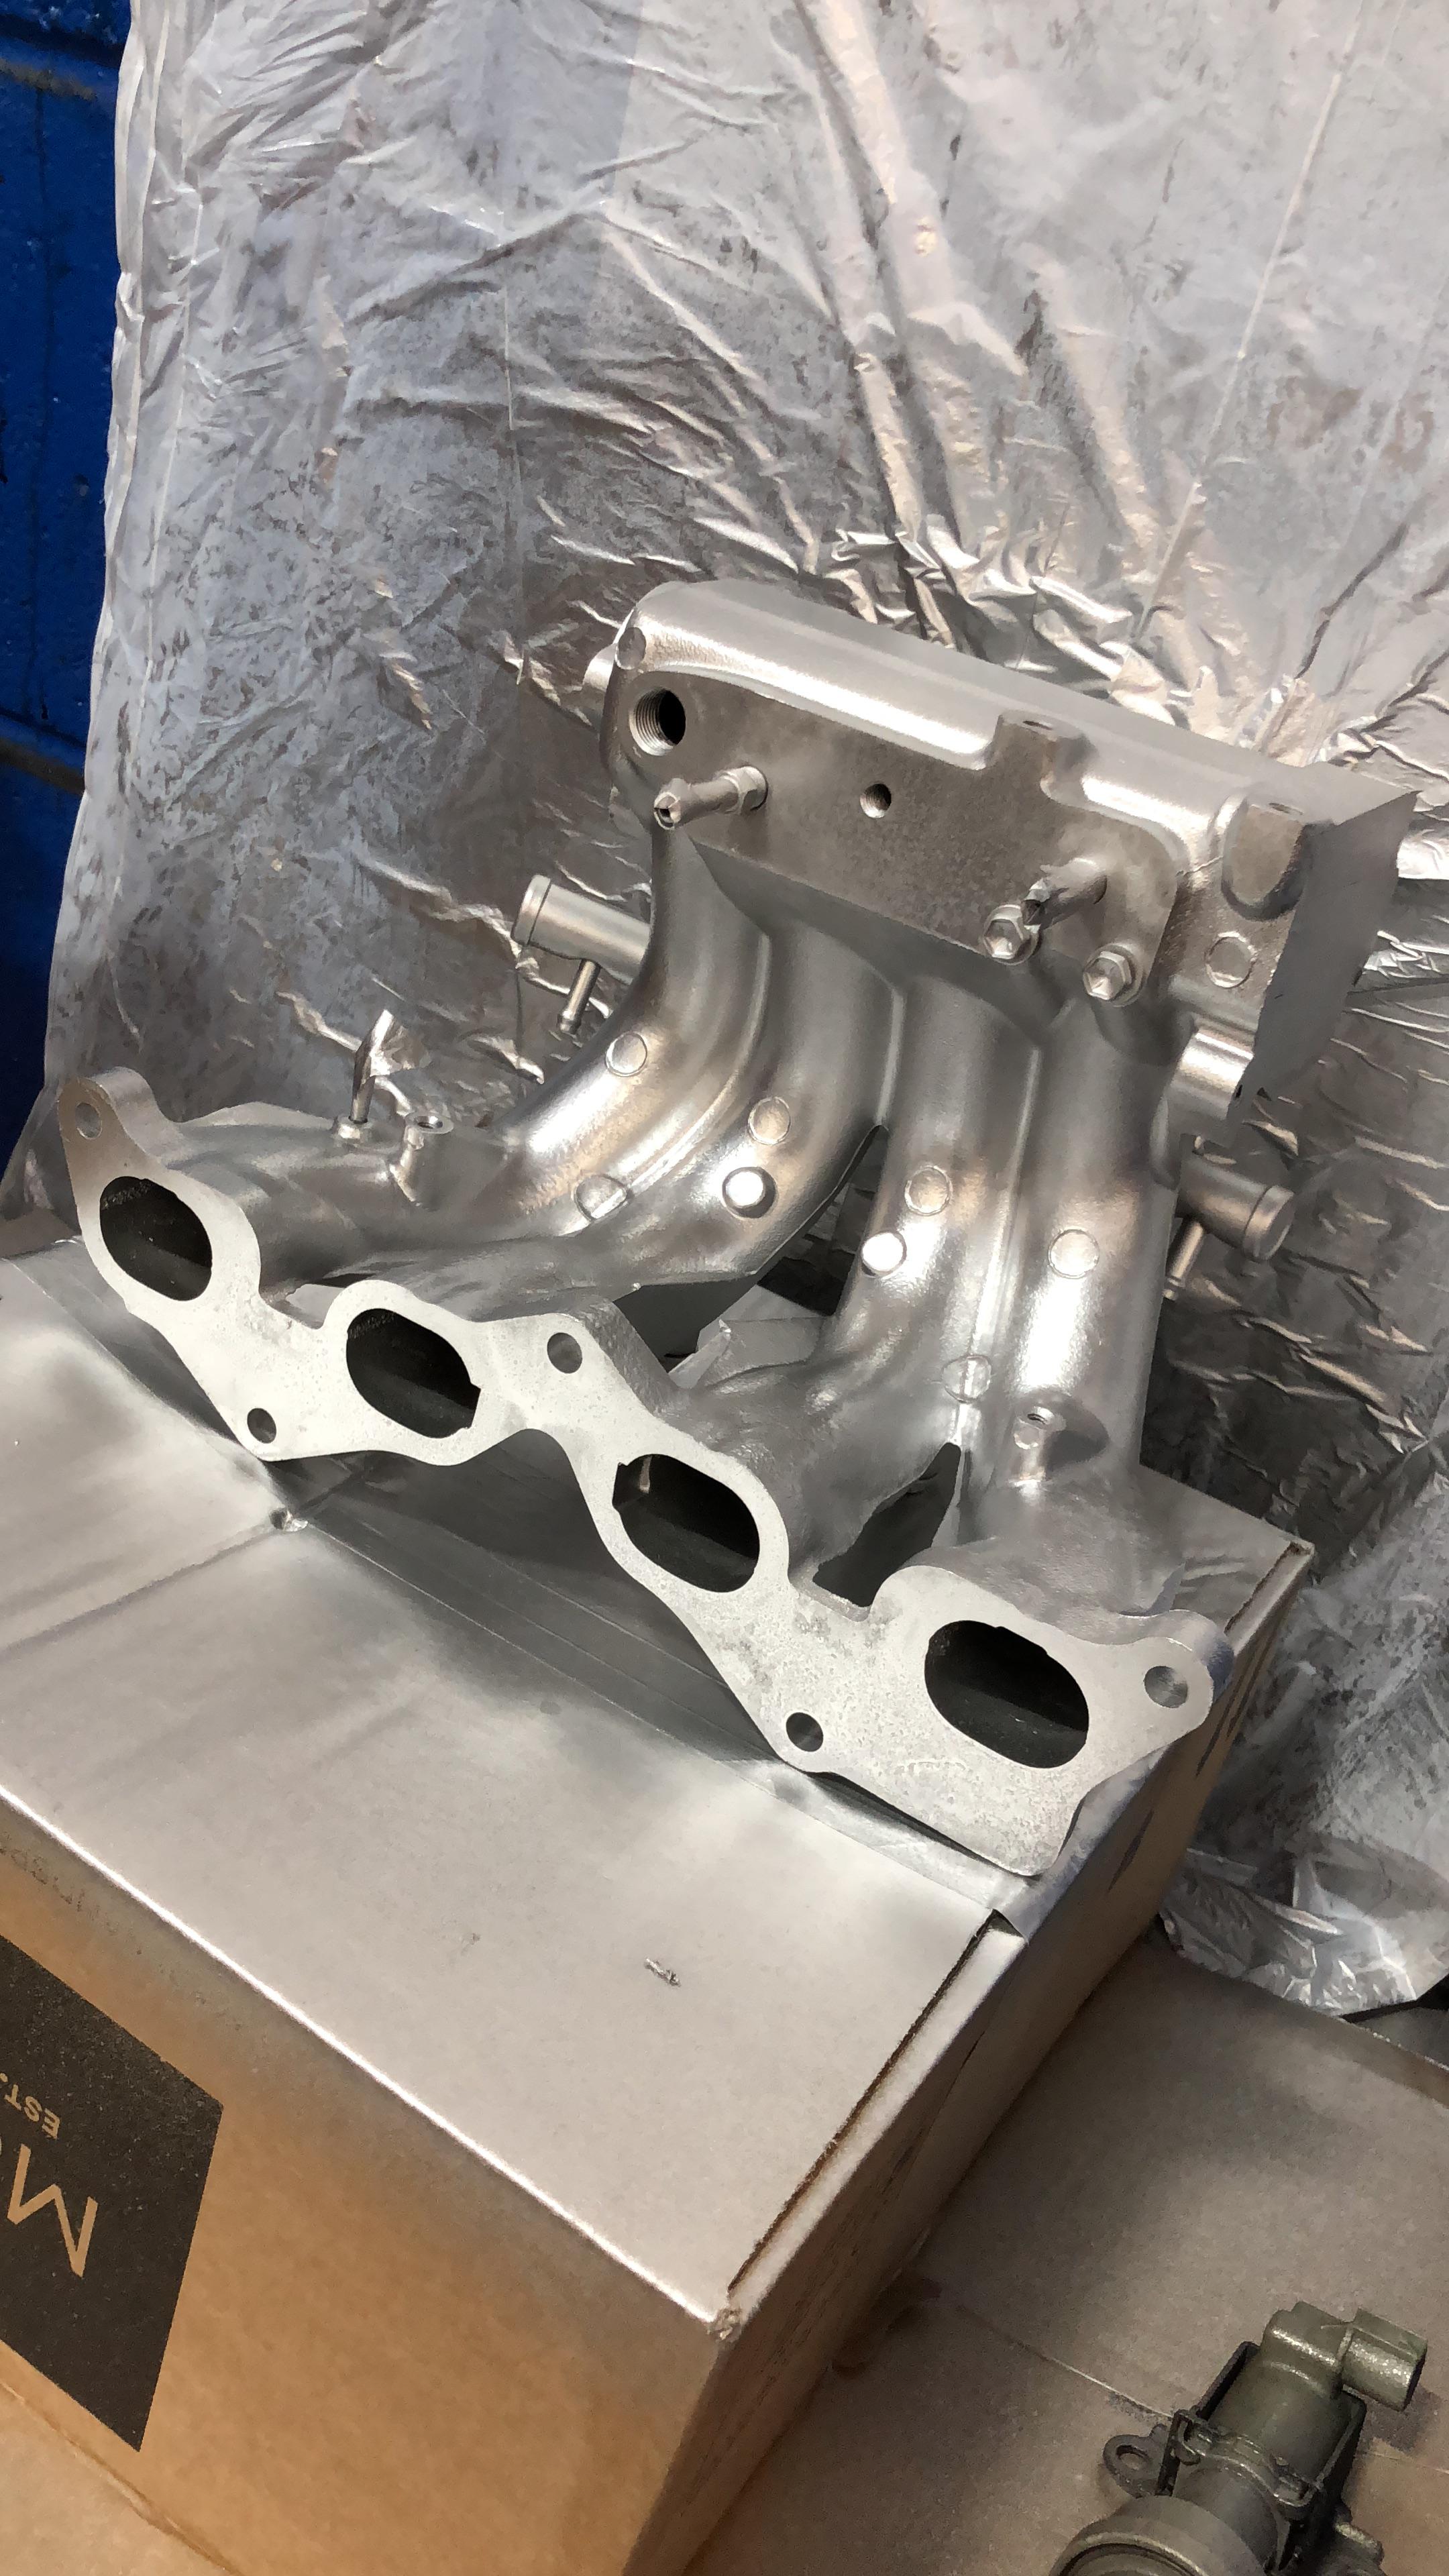
The plan was to make the engine bay as clean as I could with the facilities I had so I bought another cylinder head from Tyler devonport and soon realised I’d bagged myself a bargain as it was mint!

Photo was just after I had stripped it, so i could set at replacing the stem seals, re lapped the valves and painted it.
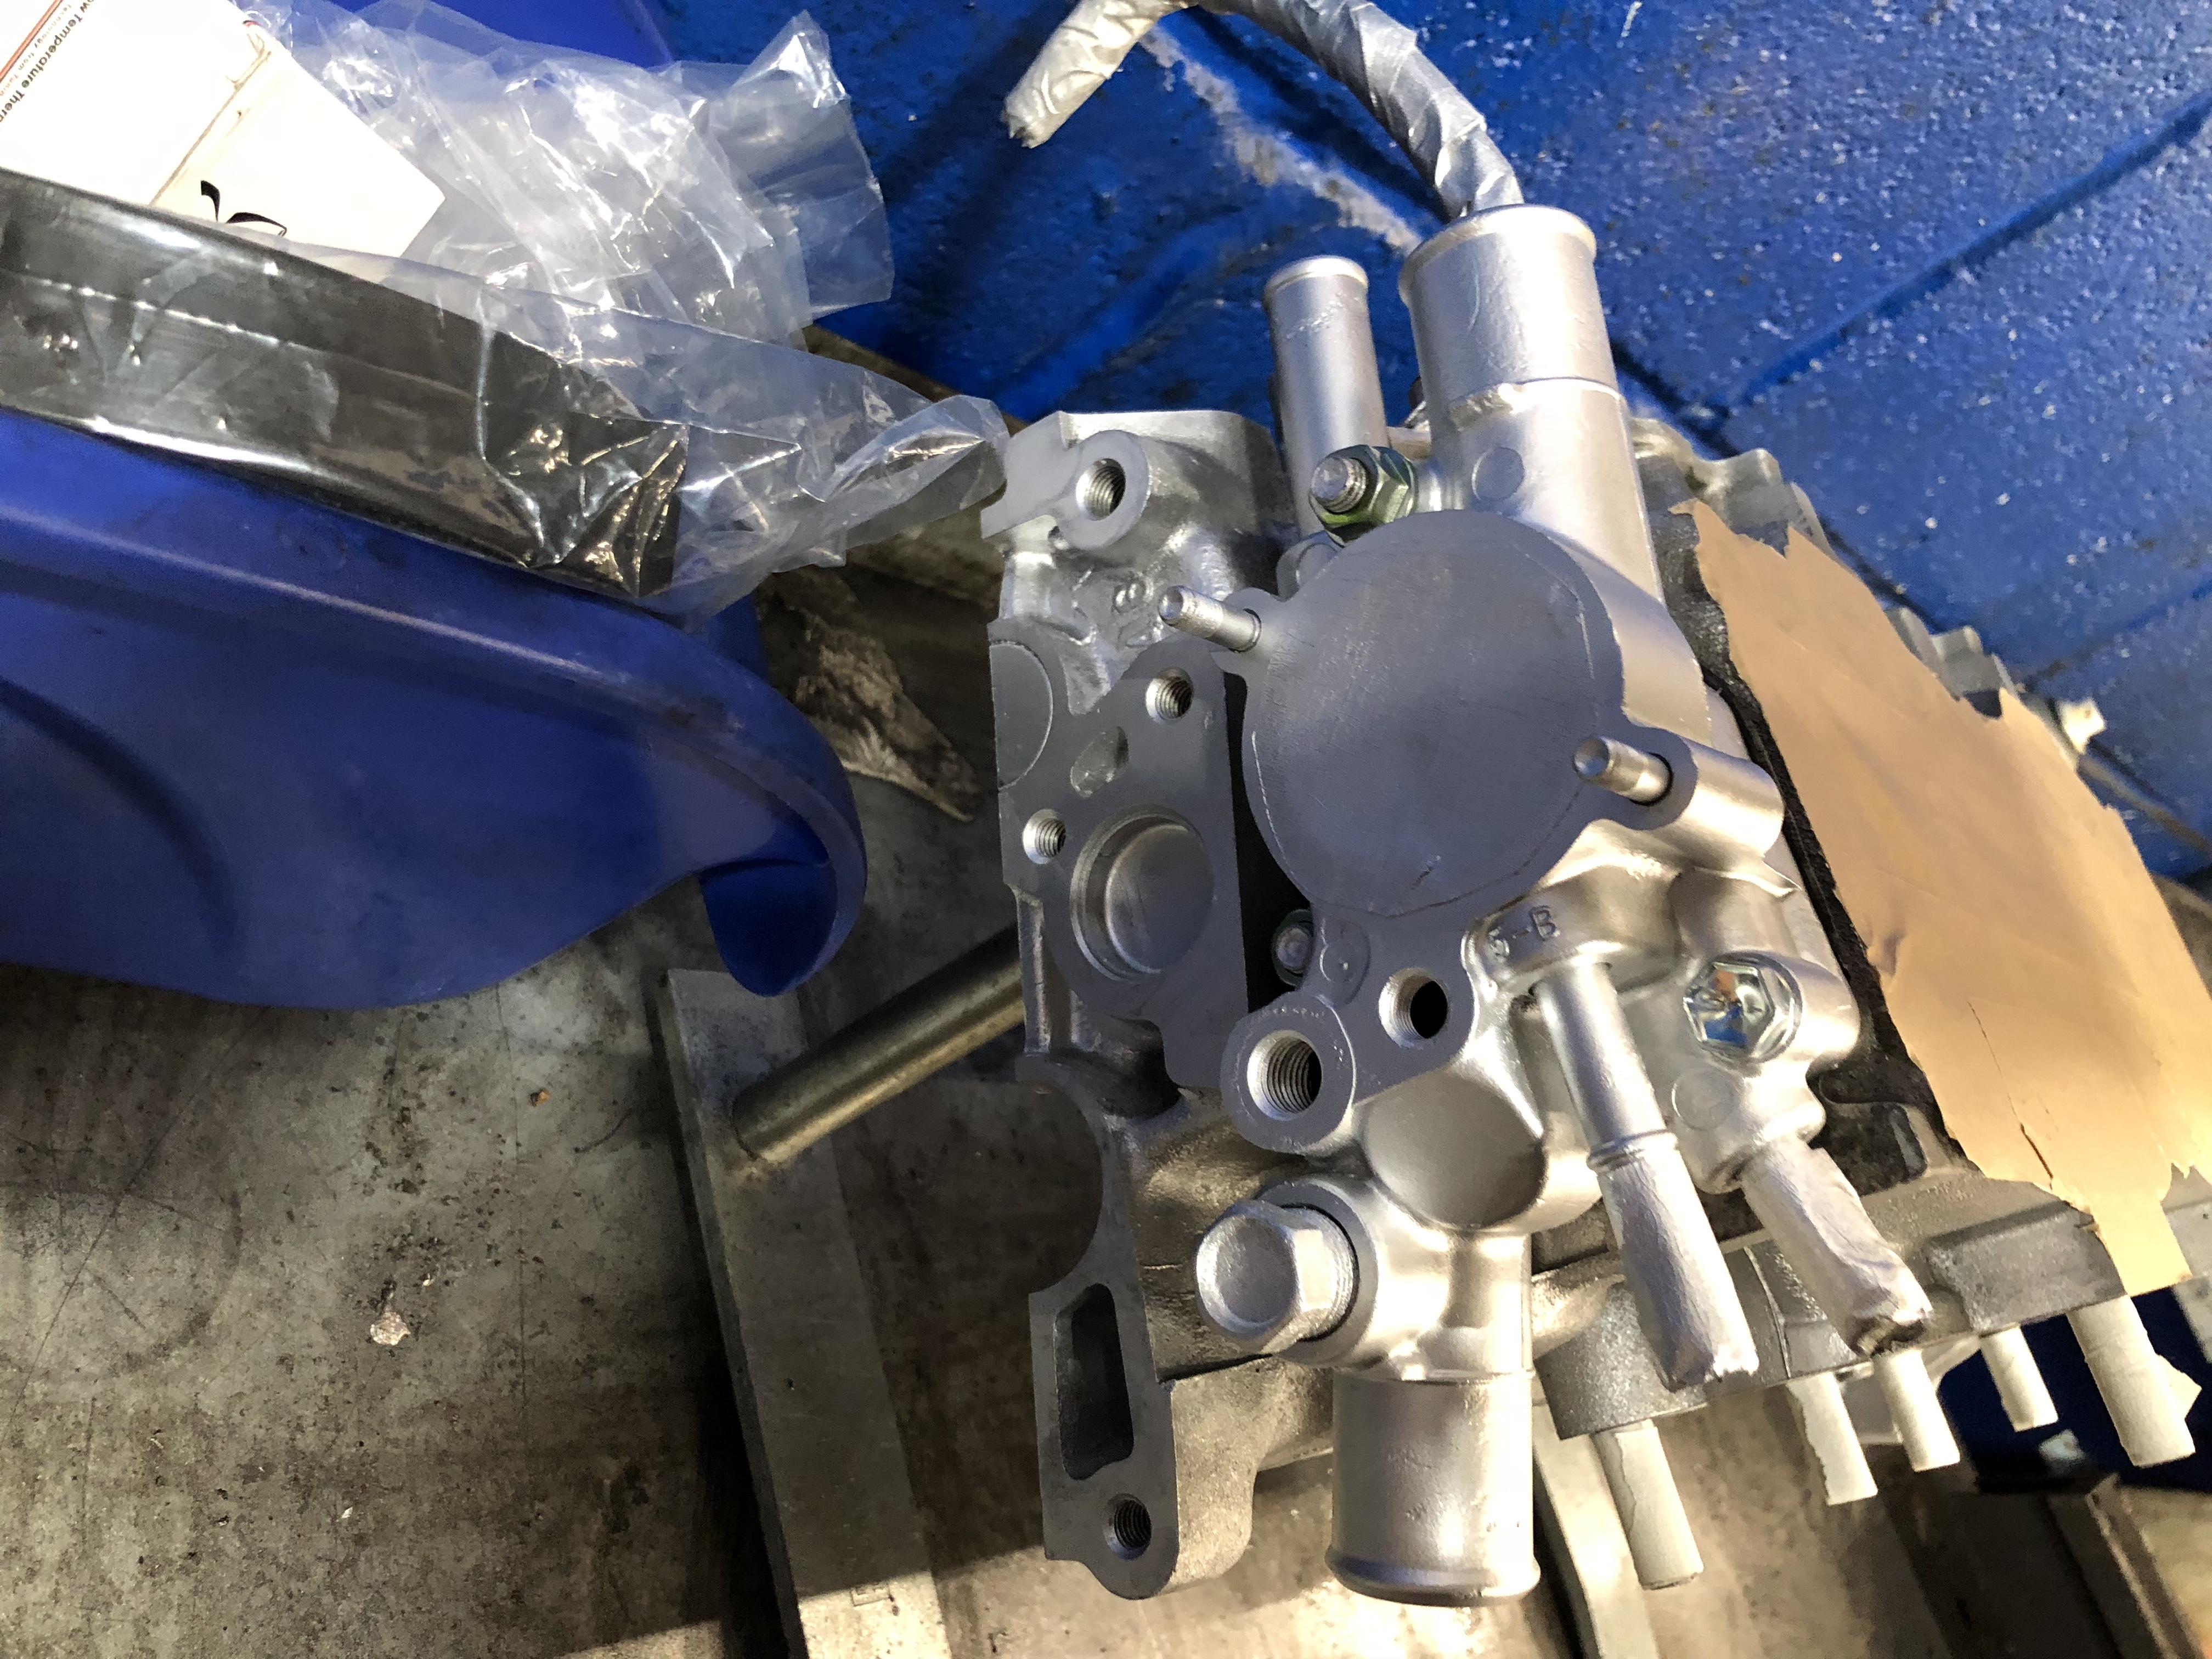
I also bought i new Thermostat housing to save all the hassle of swapping it all over once my car was stripped. While i was there I replaced the thermostat with a TD low temp stat.

No photos of the stat fitted unfortunately.
I soon realised that with the new BOV I would need to get my WEPR intercooler pipeing modified to accomodate the new BOV. So thanks to my good from Luke Gittins for sorting this for me!!


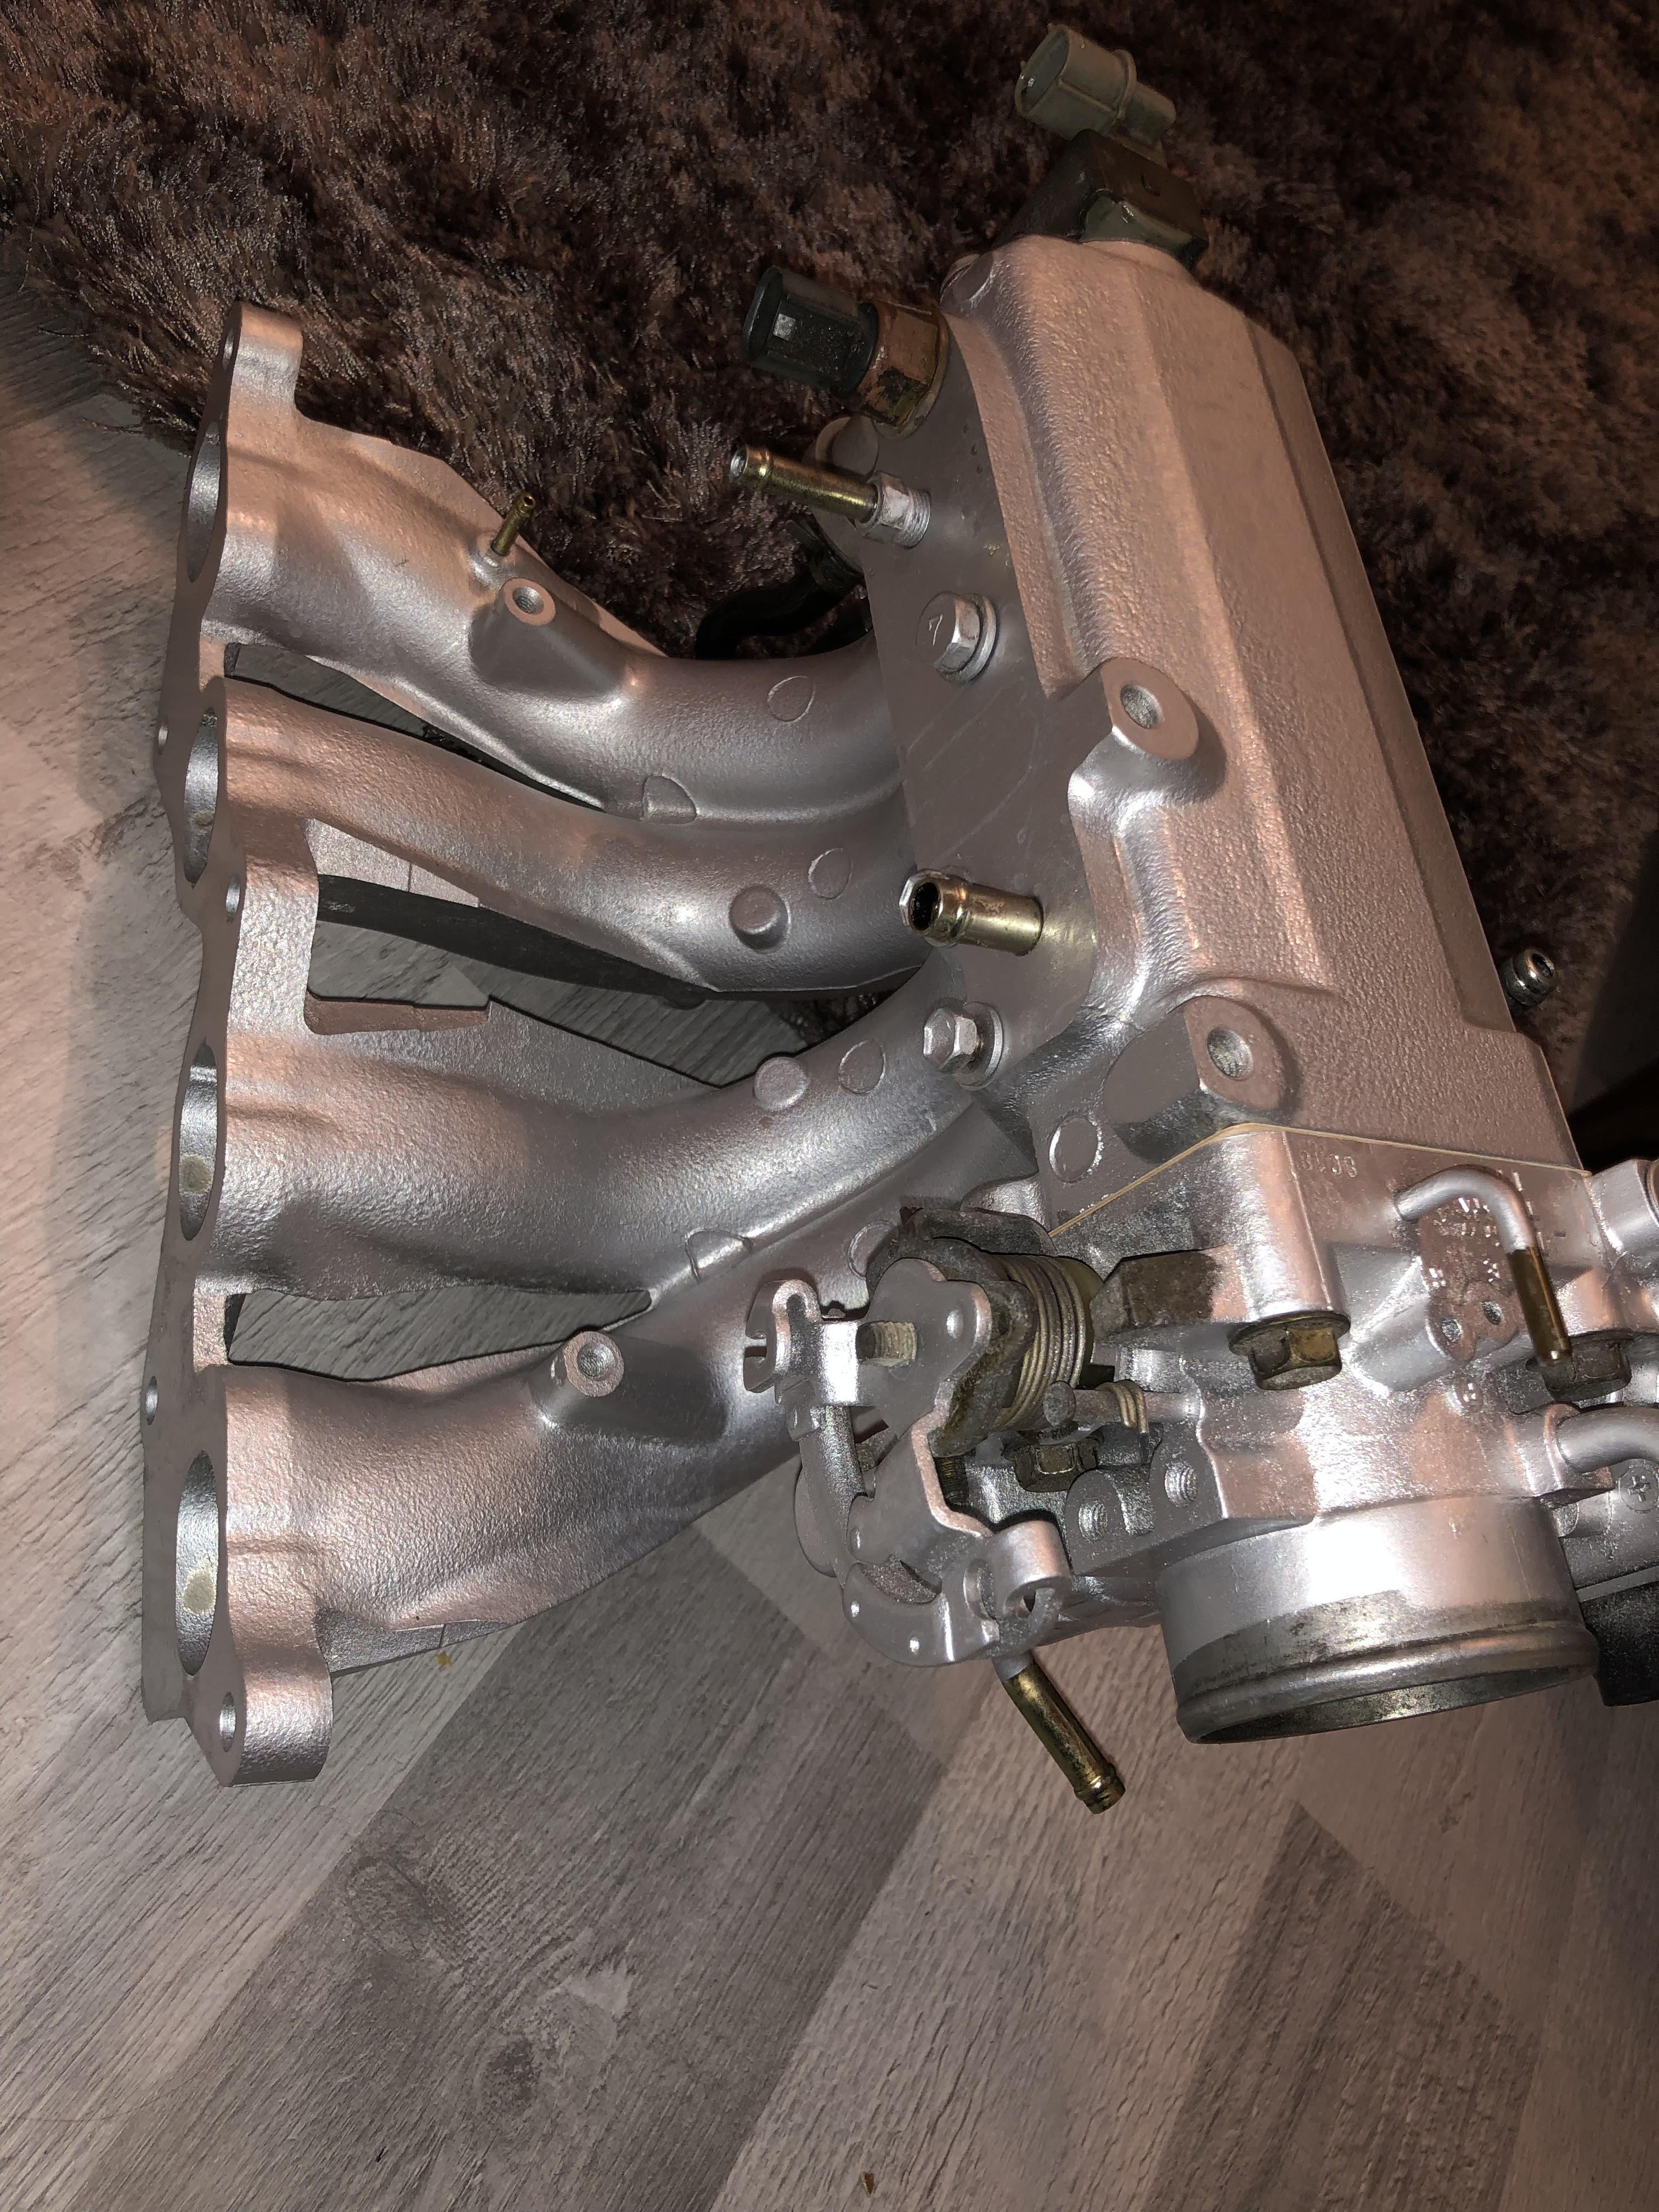
i decided I wanted to clean up the inlet aswell but instead of cleaning mine I bought another from Luke Gittins and painted it up!

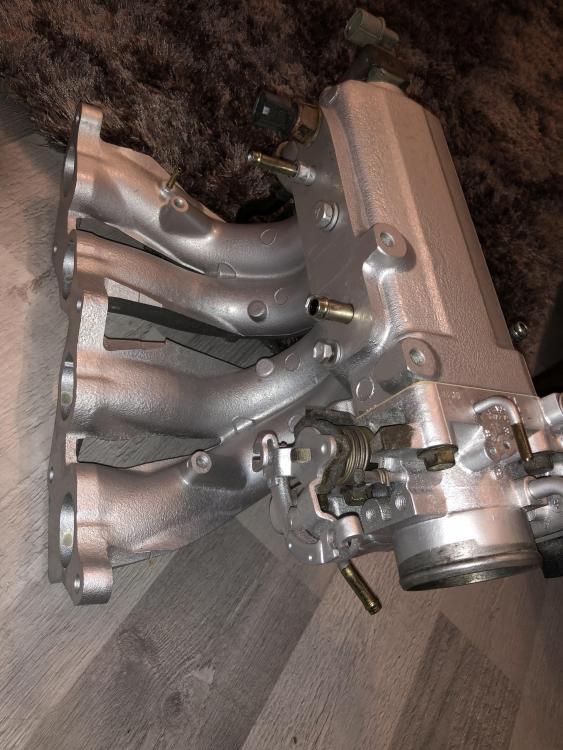
2nd photo I had fitted the throttle body along with genuine Toyota seals.
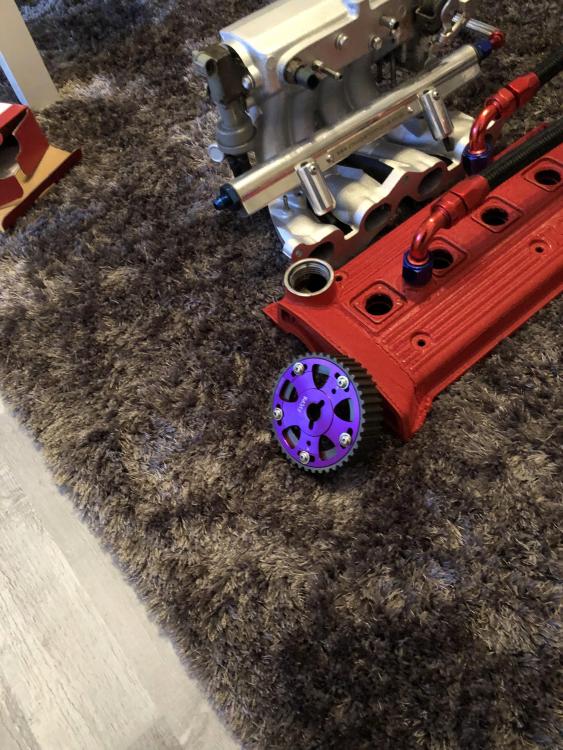
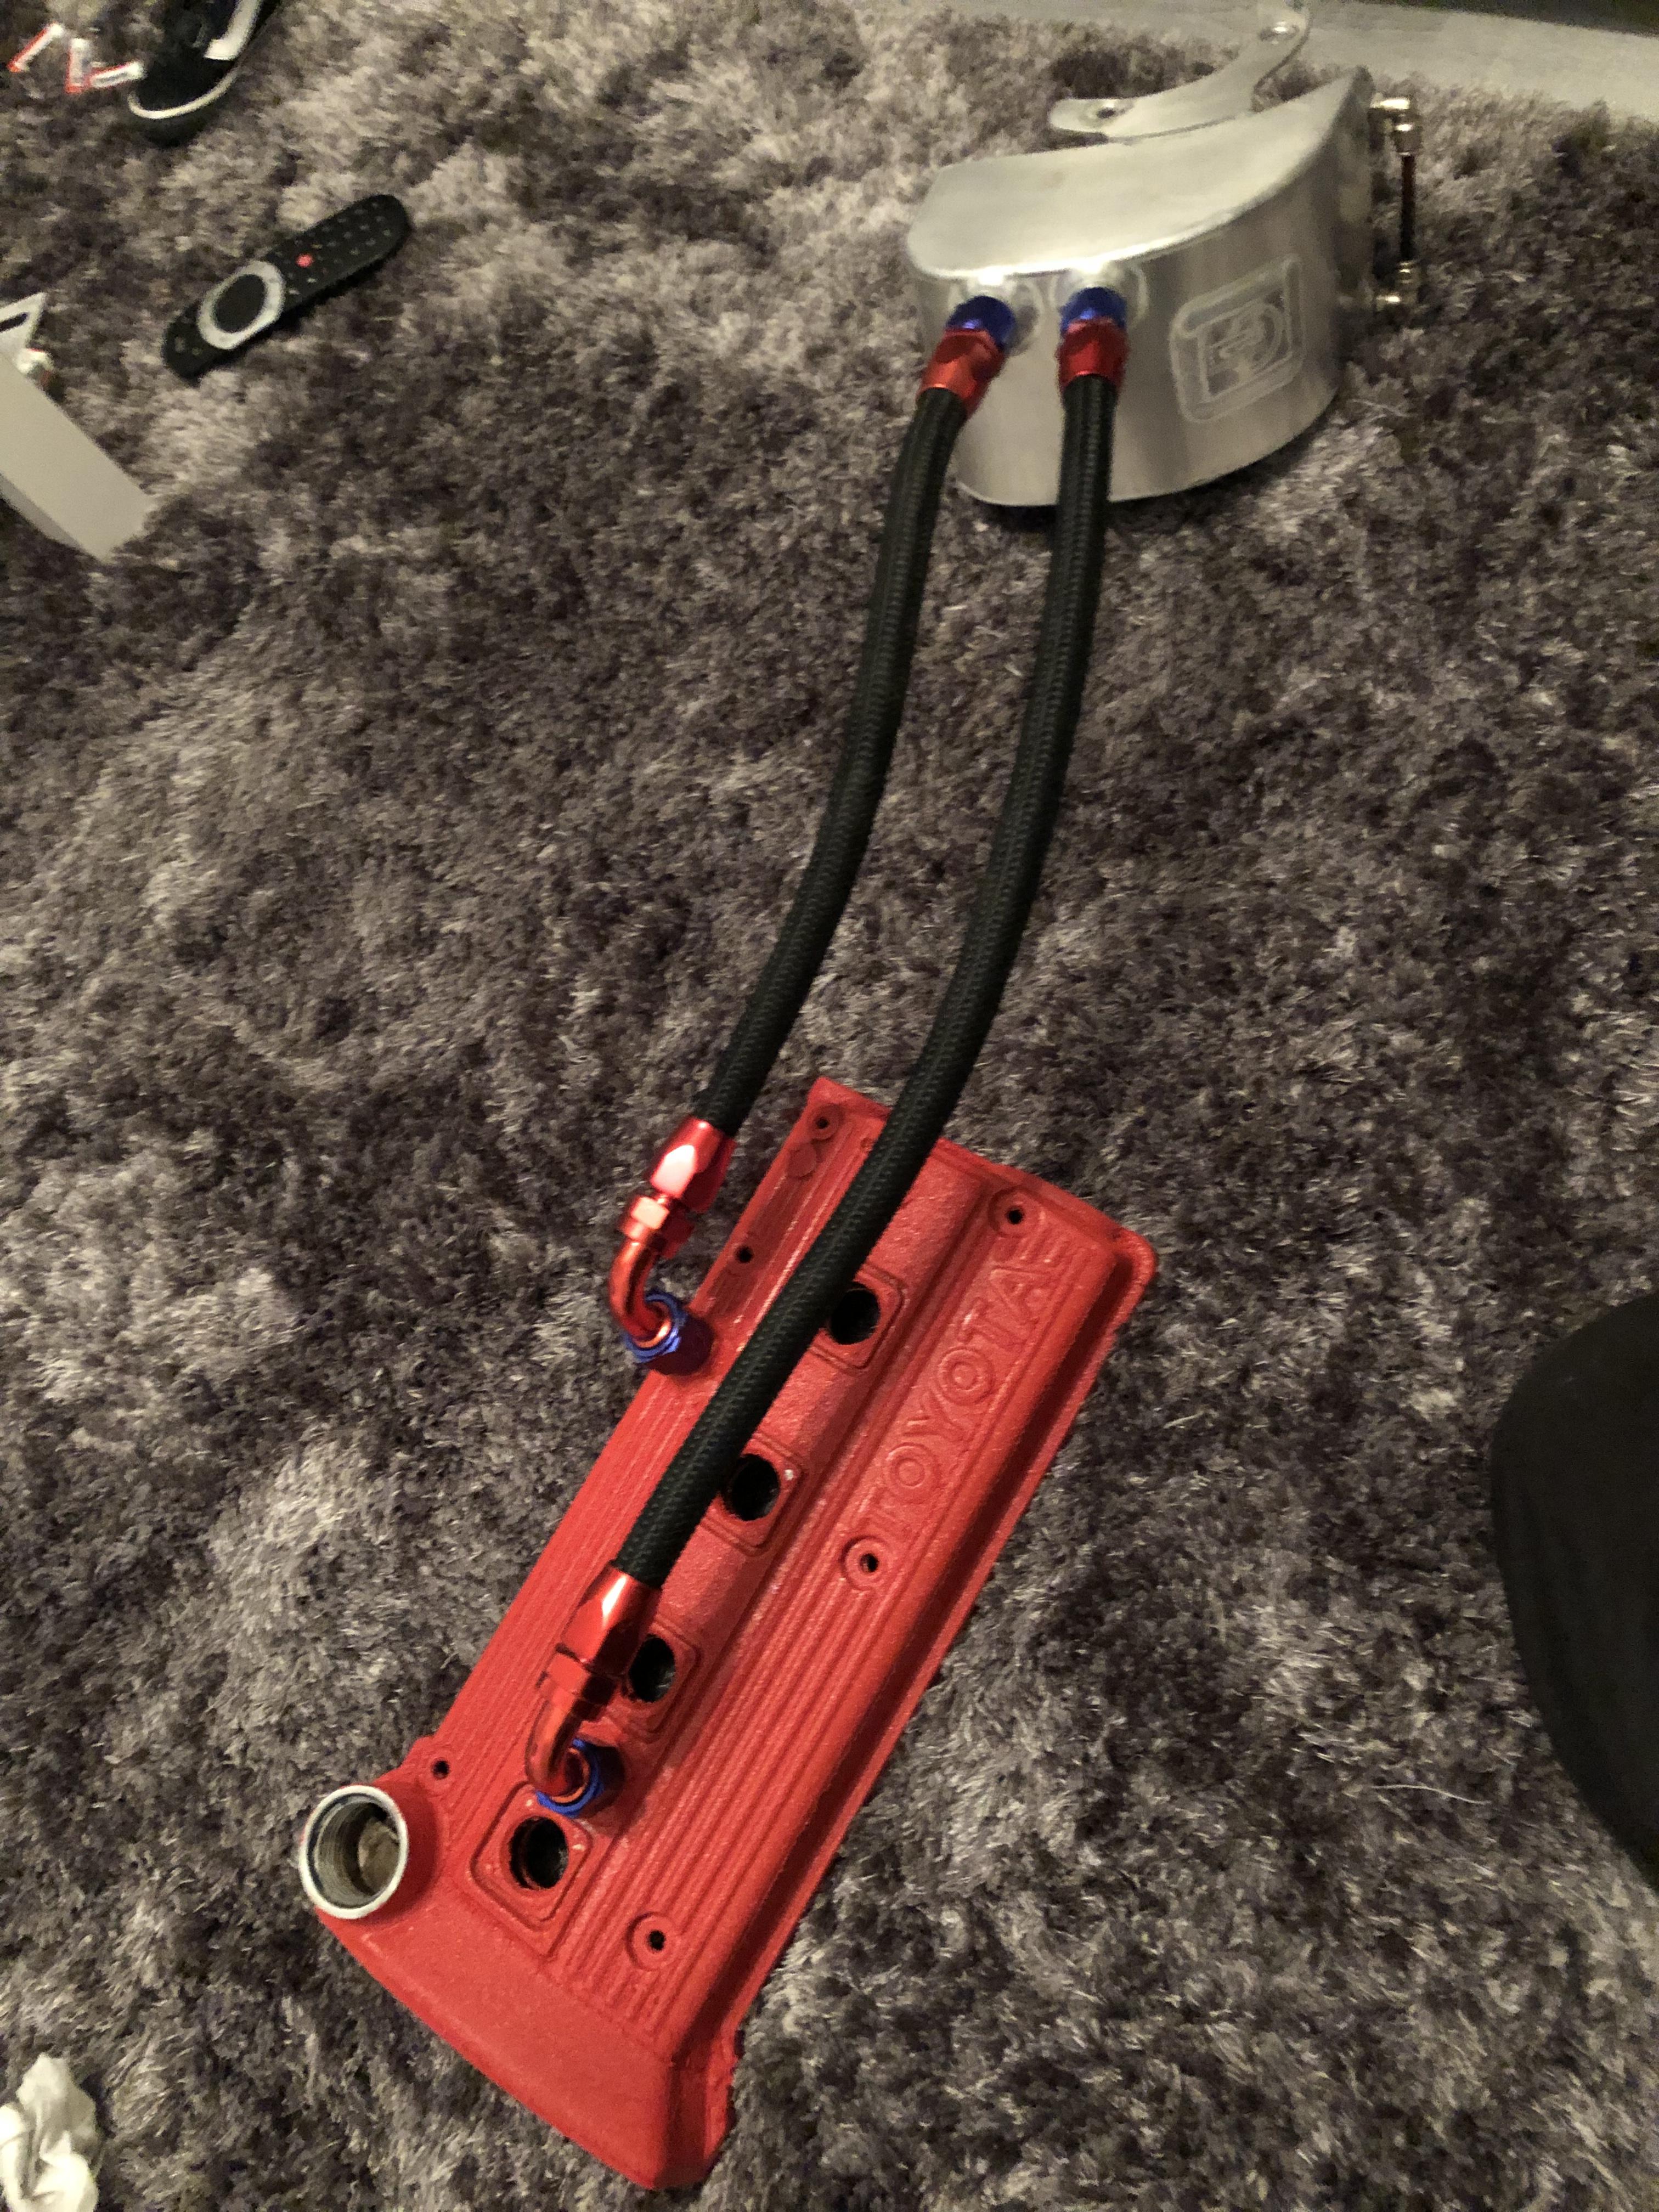
So my current rocker cover was looking abit tatty so I decided to sell it along with my zisco oil catch tank and bought another from luke Gittins along with a RW Developments catch tank. Although when the rocker cover arrived I had already made plans to paint it but unfortunately I don’t have any before photos. So this the finished product.

Painted wrinkle red!
I decided to test fit all the bits and see how they looked, I can honestly say I’m excited.
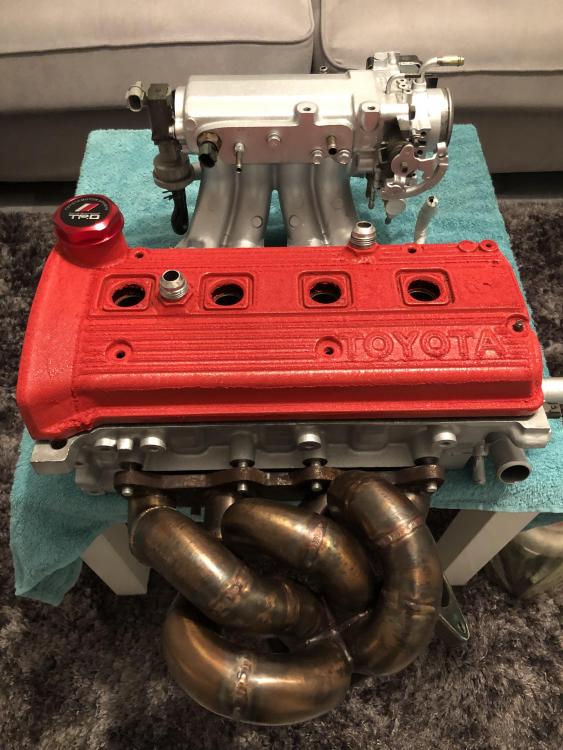

New fuel rail aswell.
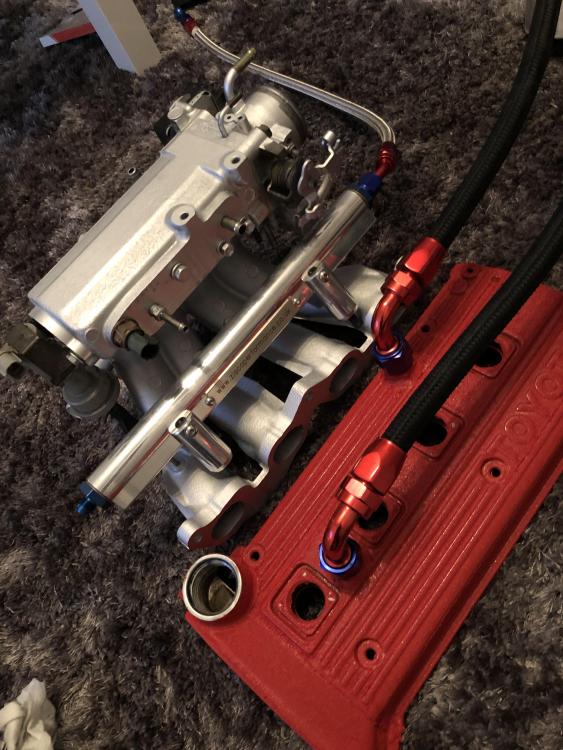
Made up Some new AN6 fuel lines from the fuel filter and al the way round the engine bay.
new adjustable cam pulley
so I got my car stripped and set and getting it back together with all the following.
New ARP Headbolts
New Athena 1.2mm head gasket
New Genuine Toyota gaskets where applicable.
New inlet and exhaust manifold studs and nuts
New Thermostat housing bolts and nuts
New distributor bolts
New genuine Toyota distributor cap and rotor arm
New Rocker cover seals and nuts
New magnecore 8.5mm HT leads
New spark plugs
New cambelt cover bolts
New Genuine Toyota cambelt kit
I bought a clear cambelt cover from Luke Gittins.
I waned to remove the power steering aswell so I bought a loop pipe and got it fitted.

There is so much happening I’m losing track what order it all goes in so I’m just going to throw it all in here. So now there is no particular order.
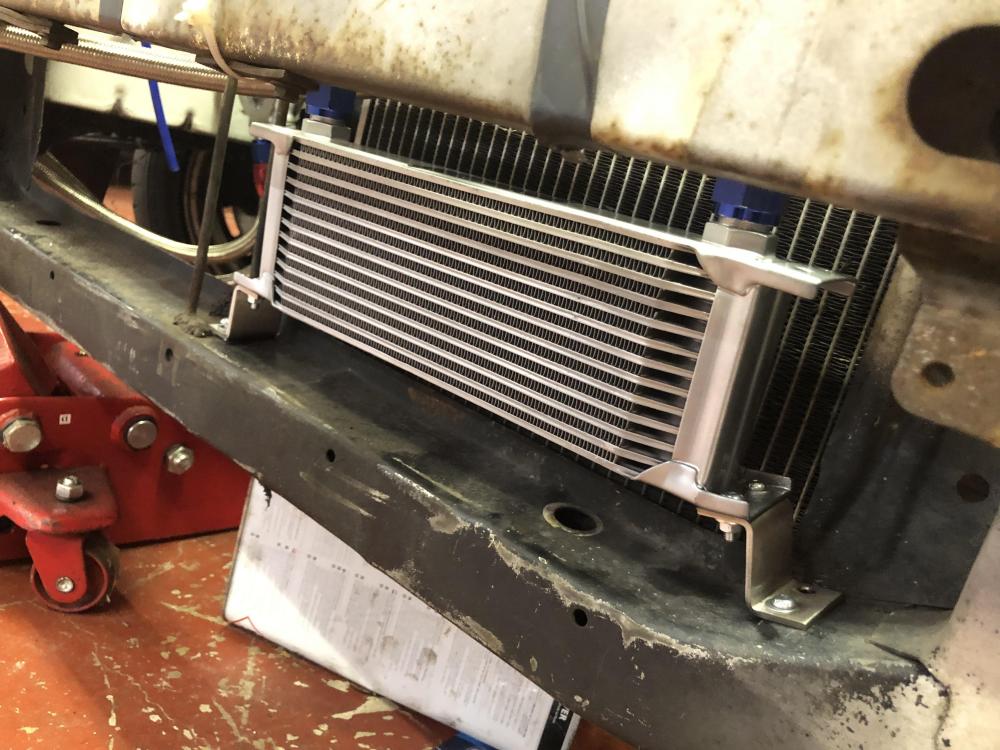
Managed to also get my oil cooler setup fitted along with my mocal thermostatic sandwich plate.
got hold of a rear bumper with optional lip so i got that fitted aswell.
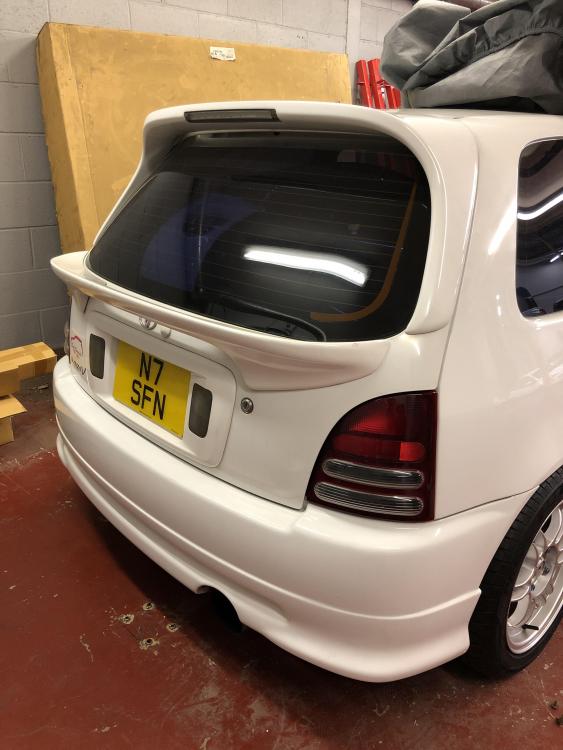
also got hold of a Glanza S Bonnet.

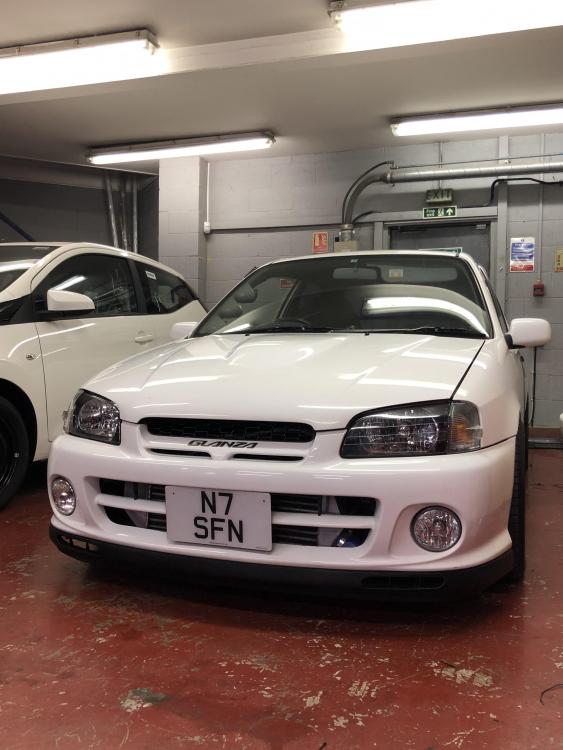
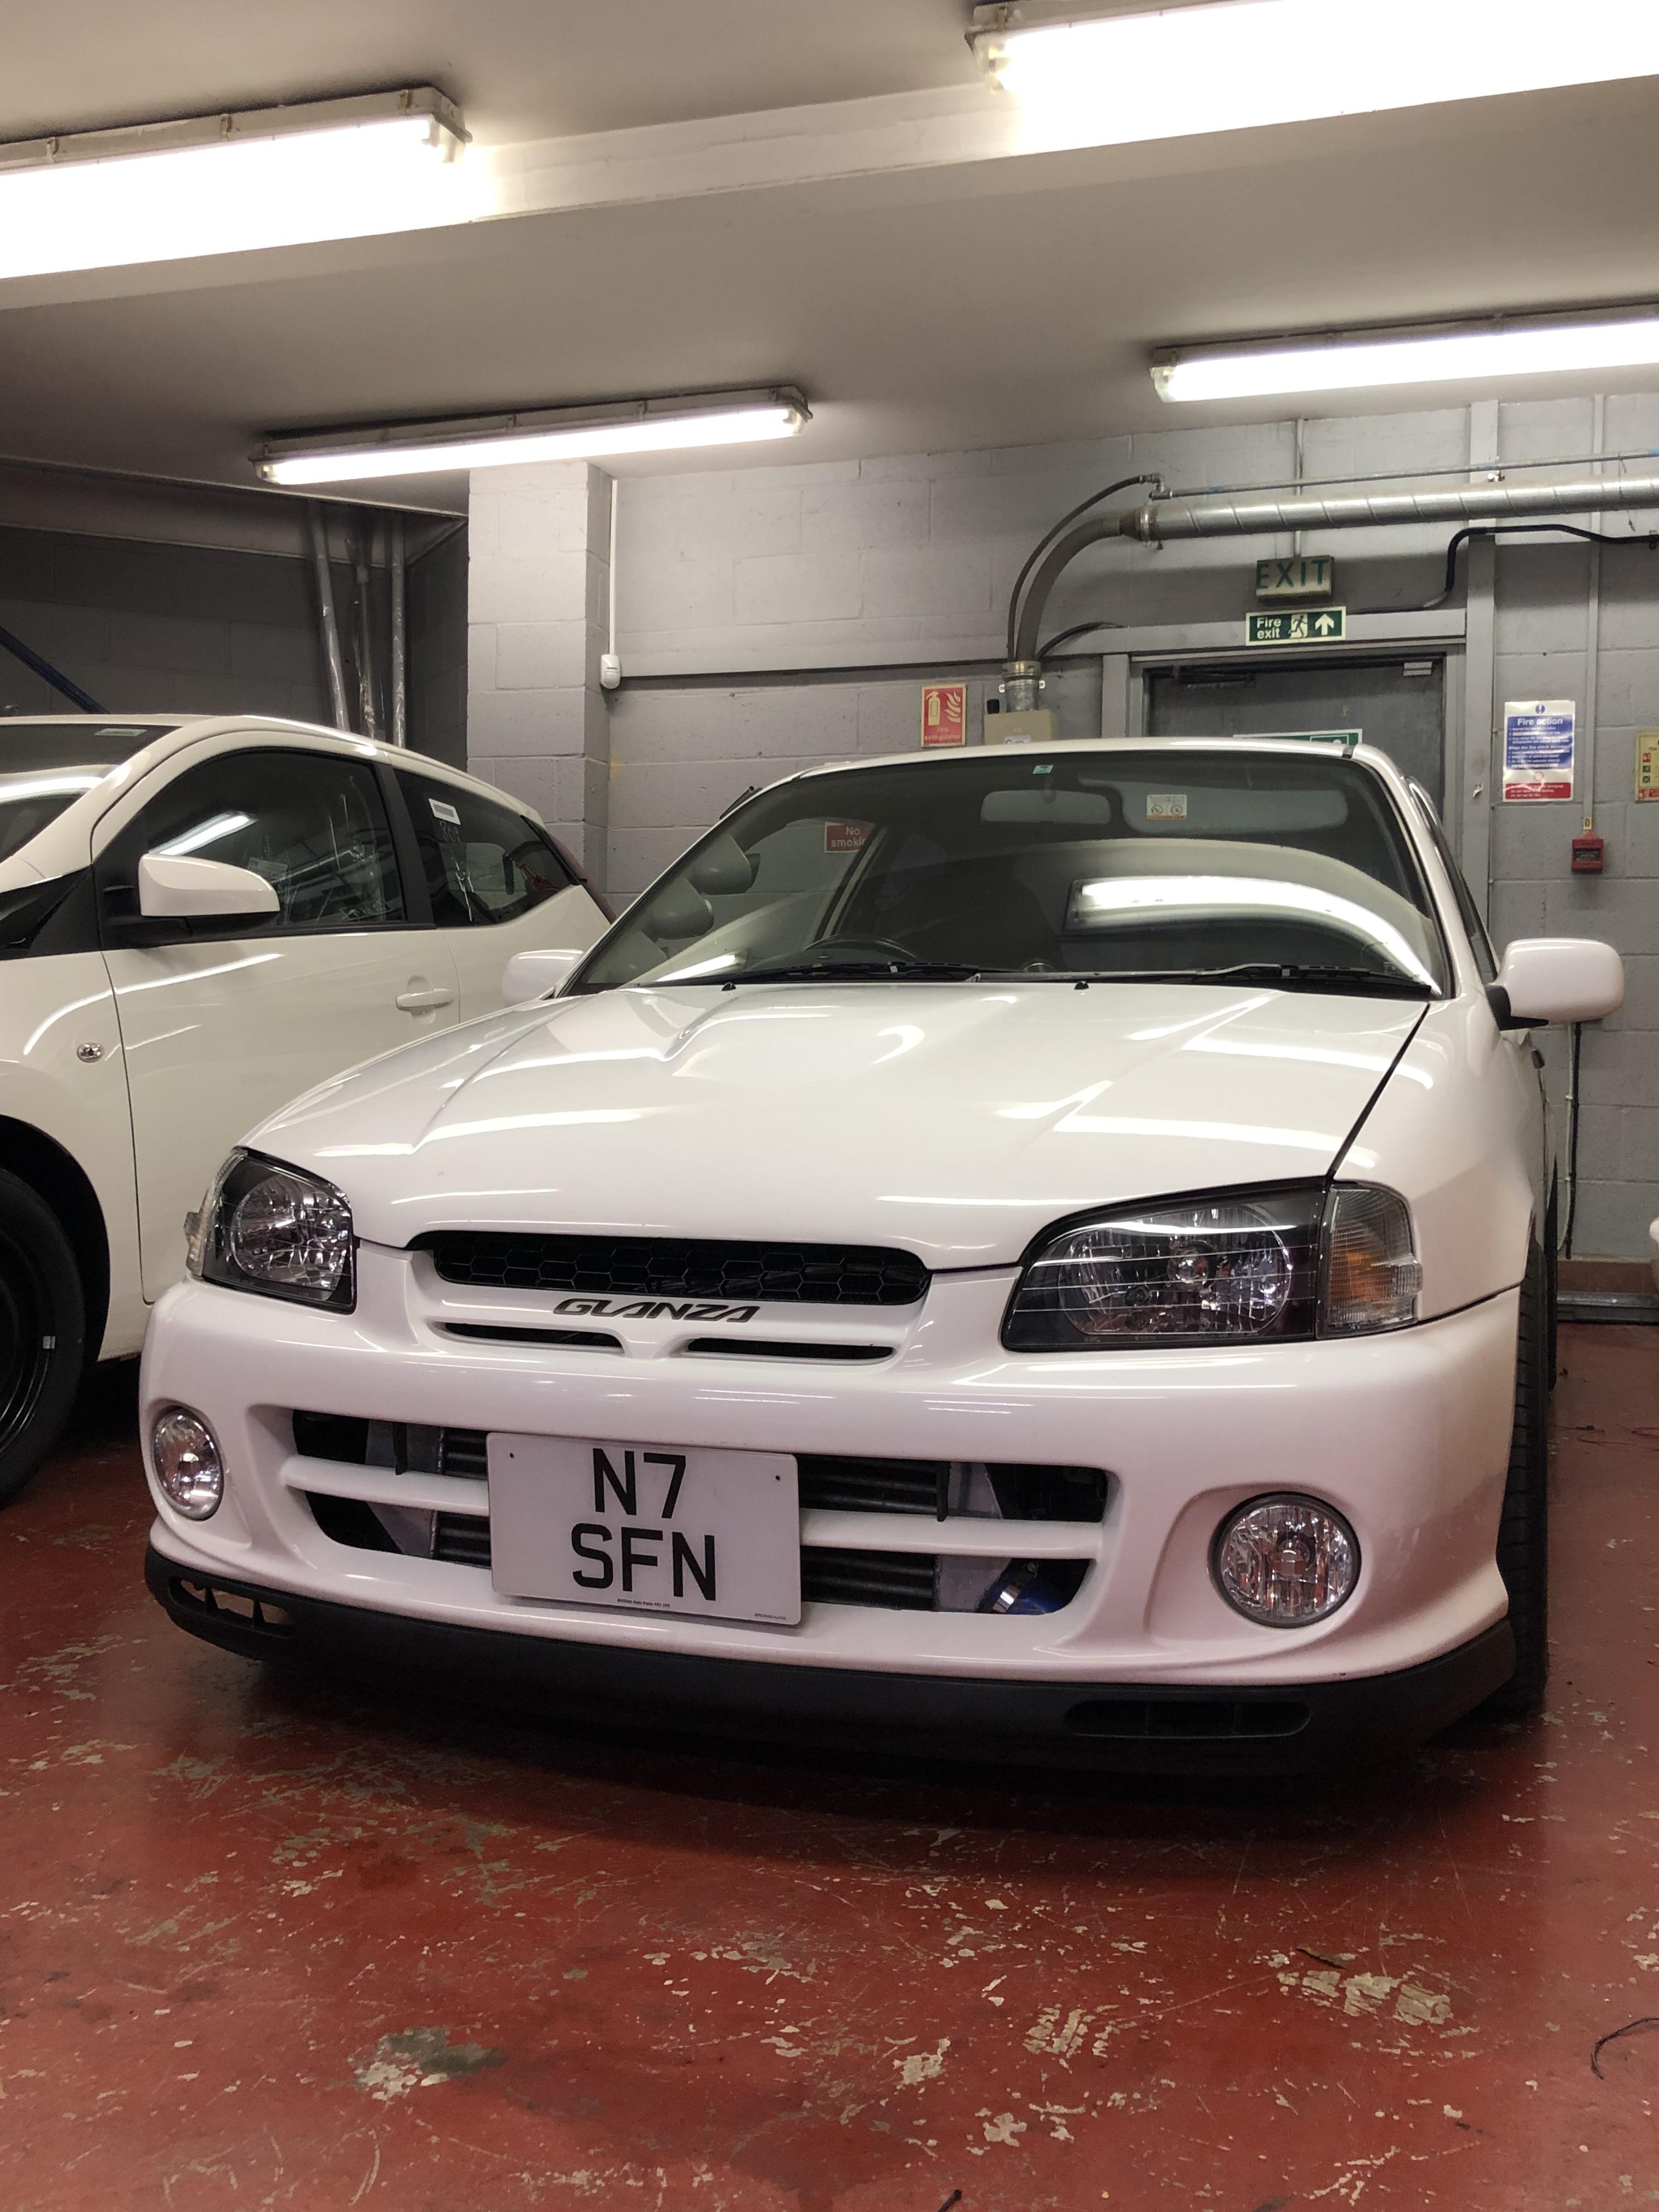
So too some things up, she was sitting happy looking like this..

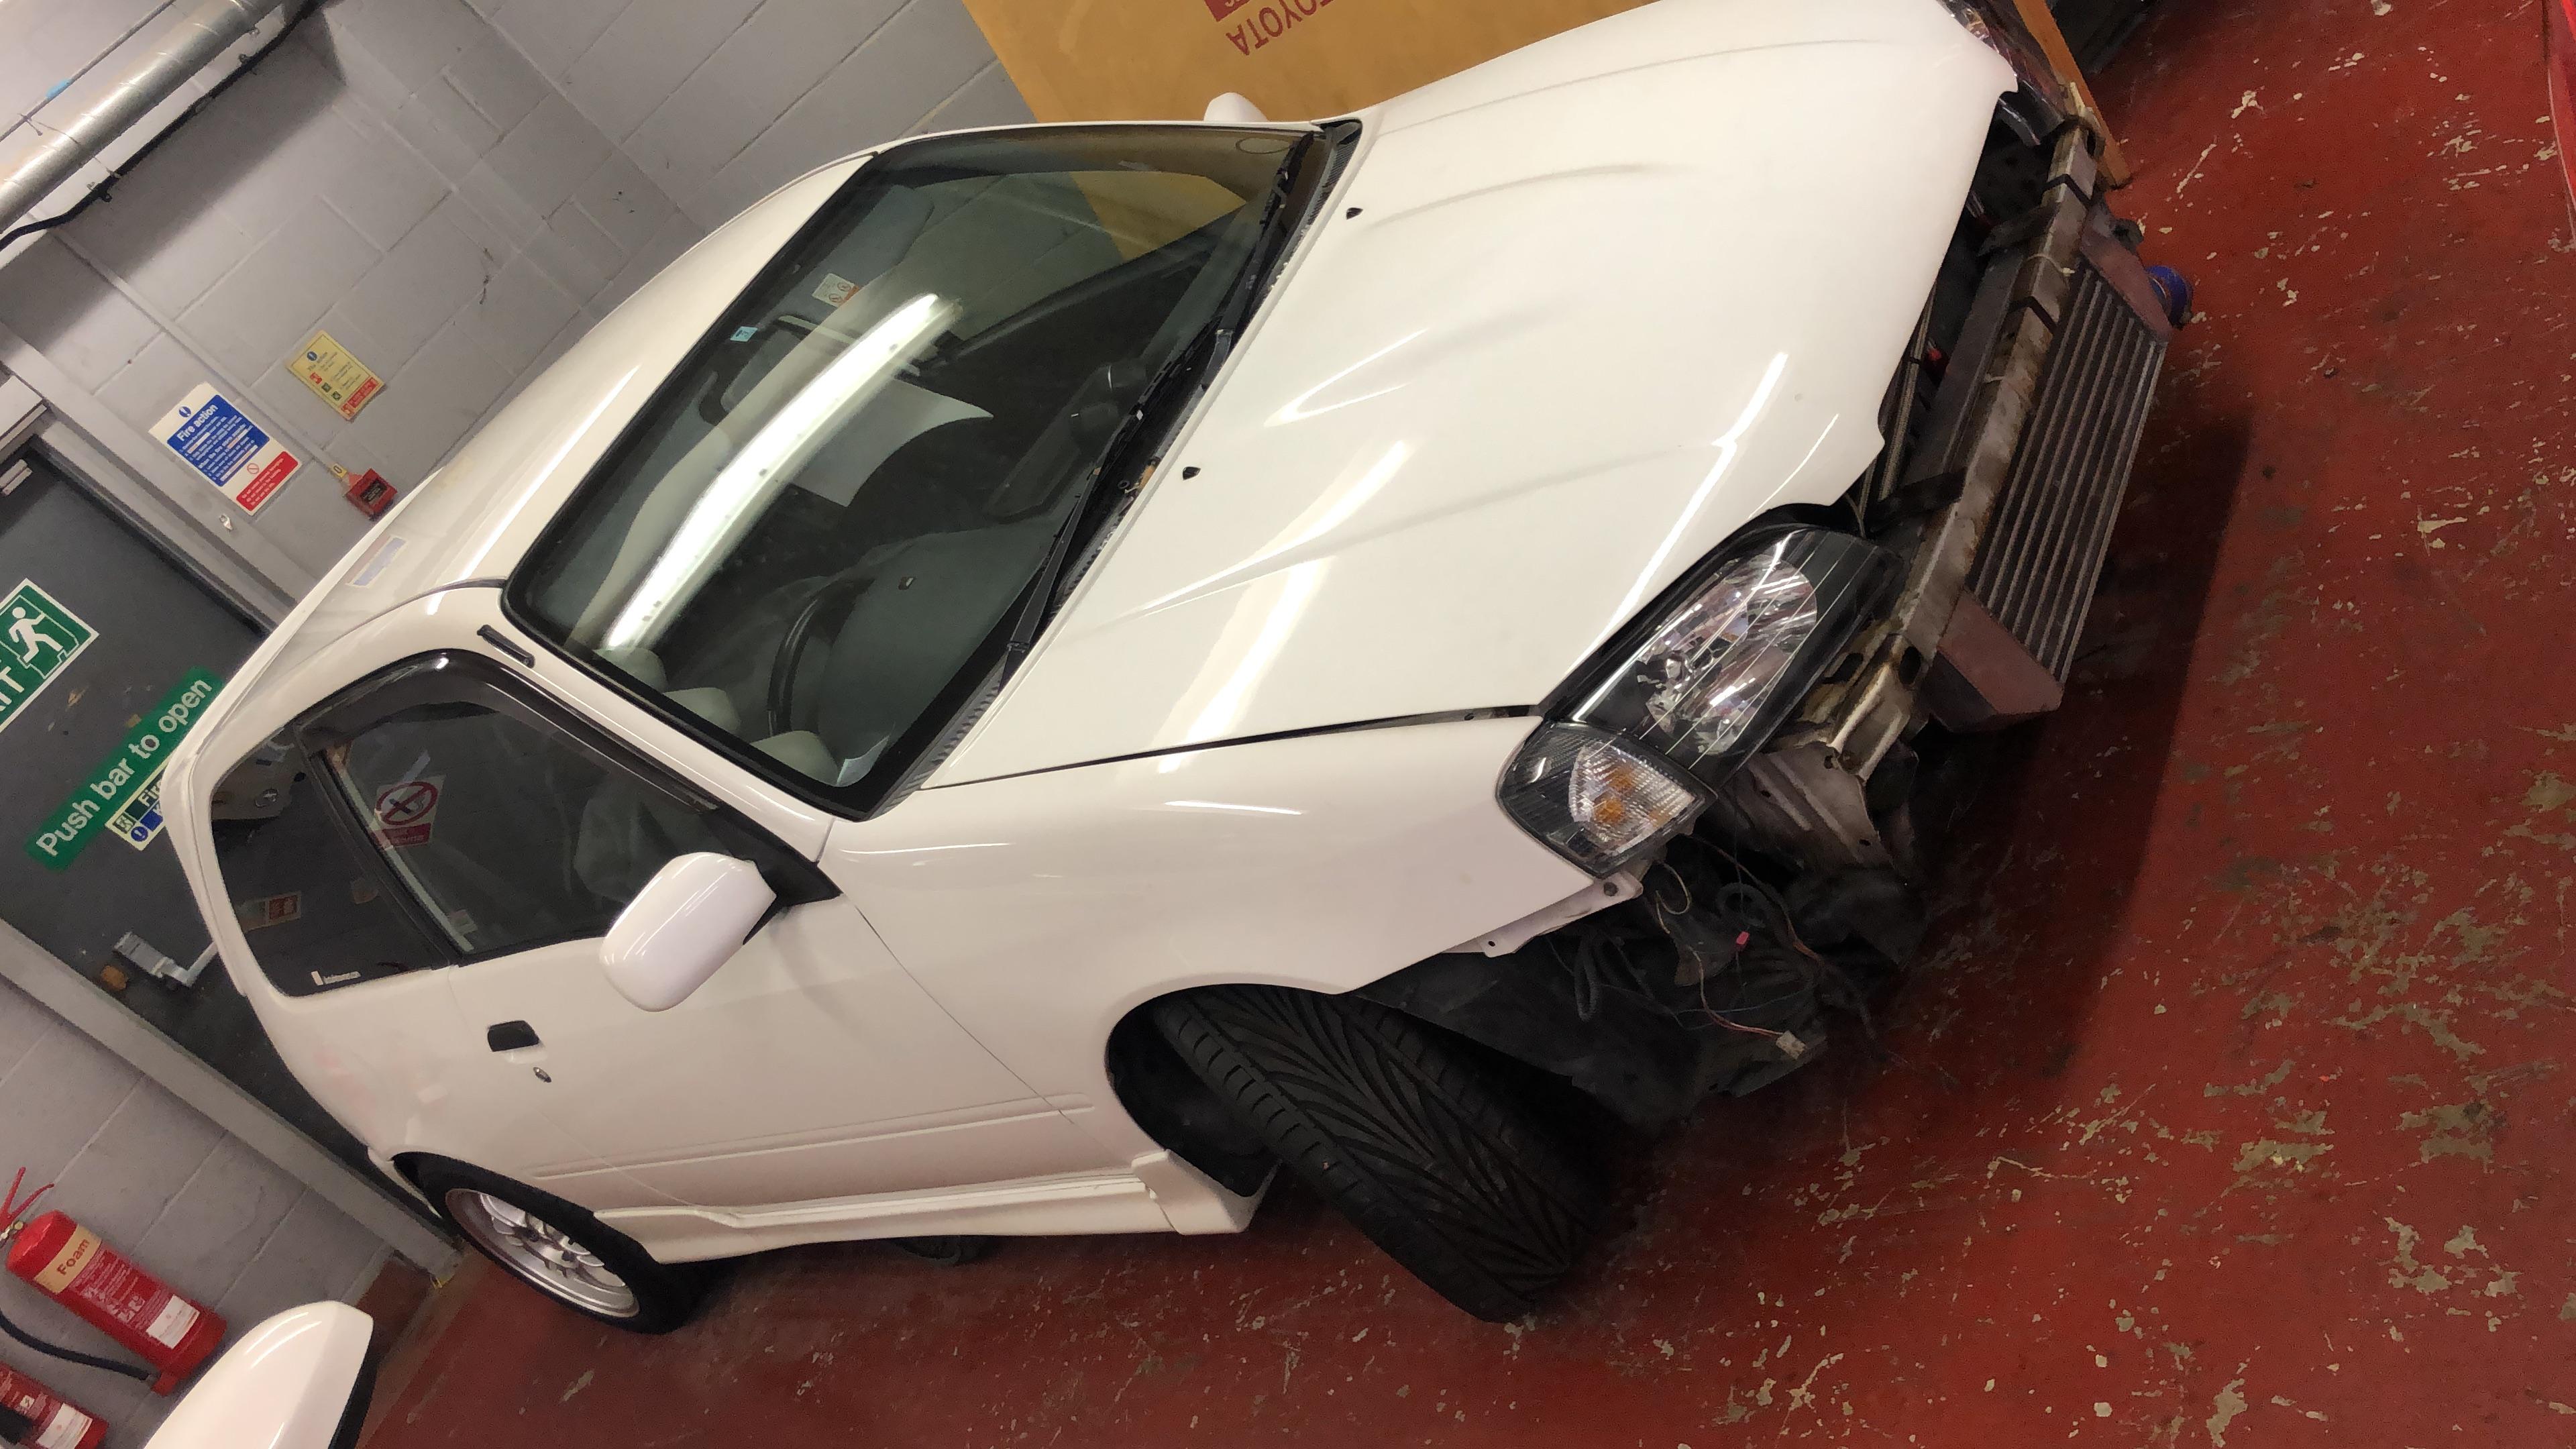
So too cut a long story short, she was suppose to go and have a new exhaust made up at speedfab on the 7th Jan but it was soon brought to my attention that there was an issue after starting her up.
She had a major misfire, 2 cylinders were down on compression. So I set at investigating and soon found the valve clearances on cylinder 1+4 were too tight so I spent the good part of a day setting all the clearances. Unfortunately I didn’t have enough shims to make a good cylinder head out of the two heads I had so I’ve had too order 3 shims from work and 1 of them soon went too back order. So now it’s a waiting game..
she now sits like this..
more updates as things happen now!

-
I will bare that in mind in future, thank you! It’s a snap on 4 wheel alignment machine, unsure of the model but it’s pretty good!
-
On 27/06/2018, 08:52:37, jellybaby said:
What’s ya camber at also did u losen the strut bolts in the hub when adjusting
I haven’t got the readings but I set everything to 0. I didn’t undo the hub bolts but was going to do that if necessary!
-
I would say so.. I didnt think you could get them wrong! As the bolts are spaced apart differently!?
-
So I managed to get the steering overhaul complete and the tracking done, it’s safe to say it was out by a lot!
Pic on the ramp!
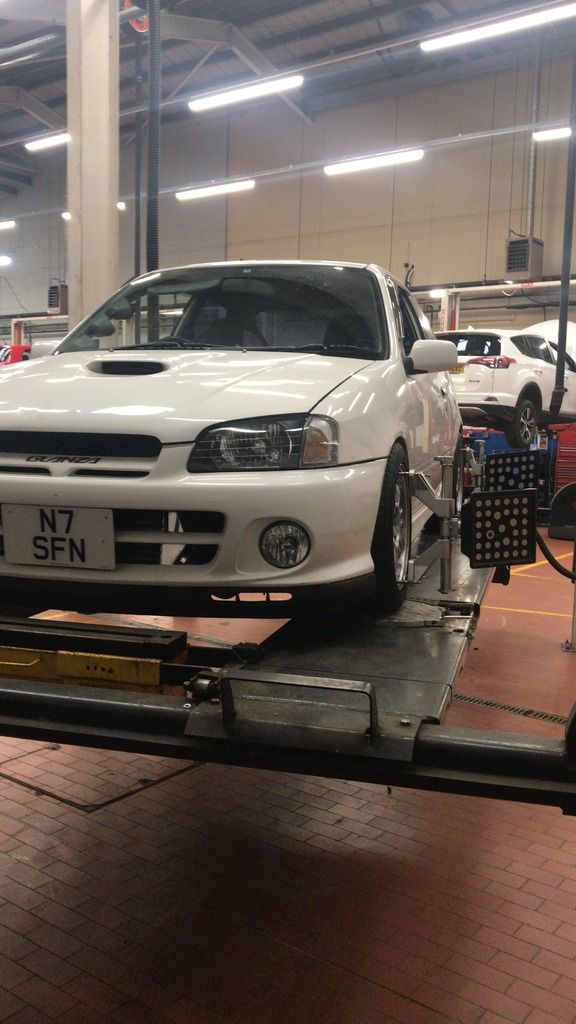
Im not 100% happy with the alignment so I will be redoing it at some point, the adjustable top mounts are pushed all the way over which is concerning as I’m sure they shouldn’t be like this. Any advice would be greatly appreciated!
-
If I don’t have a tried and tested answer before Thursday I may just go for a neutral setup and see how I get on, if I have to re-adjust in the future then so be it!
i just don’t want to feel I’ve put all this money into it and not feel any great benefit!


Sefton-EP91’s 98 Spec Forged Glanza
in EP91 Glanza Progress Blogs
Posted
They have been painted mate