nest Posted February 16, 2012 Share Posted February 16, 2012 soooo.. been meaning to get a build thread up for this for a while now, just never got round to it.Bough a Glanza v about year and a half ago, compeletly standard apart from exhaust, boost gauge and crappy old steering wheel.. looked like this when i got her:Driving it home felt alot off wobble in the steering so investigated to find one the studs was loose, and the rest wobbly which basically ate the alloy, then i replaced the studs and got new alloys..they are Team Dynamic pro 1.2s 15x7 wrapped in yoko's parada spec 2then the standard mani cracked so got new s/s mani, s/s decat, air filter relocation kit and front mount intercooler,fitted all that in the rainLOL!car stayed pretty much like that for a while, got new steering wheelrep OMP deep dish wheel..bought a 4 point cusco rollcage, bumper exit exhaust and new front bumper with oem splitter from a member on uksccage fitted, nice and stiff, didnt get round to fitting the bumper and new exhaust untill my s/s mani cracked, so bought a cast iron sps mani off a member over at tgtt. fitted all thatonly pic i got as it was dark..got a bucket of a mate of mine, super cheap, ta mate car looked like this..couple weeks after fitting all that, the turbo water line split dumping all my coolant and blowing the headgasket, pretty crap, so stripped the head downrebuild with athene racing headgasket, arp head bolts, pretty solid now.while everything was apart i bough some lightwiegh pulleys and adjustable cam pully in a group buy on ukscalso fitted a nismo 255lph fuel pump, half size ally rad with slimline fan, no pics unfortunately.couple pics of the head stripped etceverything was lovely jovely for a few weeks then the bottom end decided to let go. pretty ****ed at this point, though about what to do, thought about selling up but ended up on taking it completely off the road, stripping everything, cleaning and replacing every single part. Going to buy another engine to throw in it, then on the side rebuild the broken one with forged internals and maybe cams... but that wont be for a while yet. So far most the engine bay stripped out..inlet mani cleanedinlet mani with throttle body cleaned and rebuiltfuel raildizzy and HT leadsturbopower steering brackets sprayed upcouple pics..Started this week off by getting the car on axle stands and taking front bumper offgot rid of the heat wrap round the intercooler pipes then put it all in a box to put it away for now...intercooler offthen took the lights offmost the bits i took off togetherthen i got the machine polisher out, started polishing some the bits, done the exhaustgave the lights a quick going overbeforeafterpictures dont do it justice, alot better in person cleaned up air filter and pipeworkcrash bar had alot off surface rust so started sanding it getting it ready for paintingcouple rusty brackets didnt get round to sanding them down as it went dark car looked like this at this pointalso removed the windscreen container as im moving it to the boot and replacing it with an oil coolerthen moved inside and gave my intercooler a quick polishhot water + deepiothen quick polish, looking better thats pretty much it for now, more to come Quote Link to post Share on other sites
Starbuck Posted February 16, 2012 Share Posted February 16, 2012 Nice build. Quote Link to post Share on other sites
Asad Posted February 16, 2012 Share Posted February 16, 2012 sweet build mate, best colour imo.....how did the bottom end go? Quote Link to post Share on other sites
LeeroyV Posted February 16, 2012 Share Posted February 16, 2012 coming along nicely even with the set backs Quote Link to post Share on other sites
shorty Posted February 16, 2012 Share Posted February 16, 2012 Haha bout time jake! time to build a proper track car ;) Quote Link to post Share on other sites
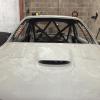
Idrees Posted February 16, 2012 Share Posted February 16, 2012 I like where you're going with this, I love how the OEM splitter makes the whole look so many miles better. Quote Link to post Share on other sites
nest Posted February 16, 2012 Author Share Posted February 16, 2012 Cheers lads! Bottom end went when I was on the motorway to my mums, oil light came on as I went round a roundabout as I was coming off the motorway then as I slowed down noticed a clunking sound then couple minutes after she went - yeah shorty gonna be proper build ;) Quote Link to post Share on other sites
shorty Posted February 16, 2012 Share Posted February 16, 2012 You know it ;) Quote Link to post Share on other sites
templar2007 Posted February 16, 2012 Share Posted February 16, 2012 Lookin good so far mate bad luck on the bottom end tho Quote Link to post Share on other sites
nest Posted February 19, 2012 Author Share Posted February 19, 2012 thanks mate..got abit more done today, started the day off with removing all the old air con pipework and crapbeforeafteralso removed the charcoal filter but only got a pic of it before i removed itgot a mocal 13 row oil cooler off a mate for a bargain, cleaned it up heres a picdegreased and cleaned up front off the chassis getting it ready for paintingremoved the alternator and gave it a quick clean, gota polish it nowdirty as foooookabit cleaneralso removed my front wheels as they covered in crap and need to come off anyway, had one wheel nut round off one me so had to mess around hammering a smaller socket onto it to get it out, looked like this after, lolwheels are so filthy on the insidewill be cleaning and polishing them throughout the week.last thing i did was spray my crash bar with some hammerite, will be doing the other side and finishing off the front sometime this week, heres couple pics Quote Link to post Share on other sites
200bhp starlet Posted February 19, 2012 Share Posted February 19, 2012 nice build matelewis Quote Link to post Share on other sites
nest Posted February 20, 2012 Author Share Posted February 20, 2012 thanks mate, small update today got off work early so had an hour to crack ongot the rear off the car on "stands"..BARRY!!!!just waiting for more axle stands to arrive lol..found out i had KYB shocks...finished spraying the crash bar upgave both rear wheels a quick wash and degrease, insides where greasy as fook so hot water and depio and some scrubbing did the trickdirtybettercar now stands like this, hopefully get alot more done at the weekend, hoping to be picking up some coilovers saturday. Quote Link to post Share on other sites
nest Posted March 4, 2012 Author Share Posted March 4, 2012 so the glanza is coming along slowly need more day light and less rain!my breaks are completely shagged so they came straight off, they wont be going back on as ill be going for a big break setup off some kind in the near future, couple pics of the breaksdisks are rotten!i was then left with this, which will be coming apart and cleaned up.then took out my old shocks, they wont be going back on as i will be getting coilovers at some point.this what was leftremoved the wishbones, completely covered in grease and general road crap.clean them up, will be sanded down and painted with hammeritei had an oil leak in the oil line to the turbo, so alot off the underside and most the suspension is covered in oil and grease, everything will be getting cleaned and painted throughout the buildremoved front arb, again covered in pure crapdirtycleani will prob be going with a thicker item, but though id clean it anyway got some Tein coilovers off shorty for pretty much nothing, however one the shocks is blown and one needs a new topmont so not sure whether these will be going on or not. they need a good clean and paint.got some new wheels they are SSR, 15x7 very light, not sure if they will stay white, well see, heres a quick picki then moved onto the loom as its always been something I've not been happy with, just generally always looked dirty and scraggly i started by stripping all the old conduit and tape off,cleaned all the gunk and crap of the wires and started retaping itgot this far with it, looking alot better but will order some new conduit to go around it at some point.sprayed these two brackets with hammerite aswell since they have been laying around for agesthats pretty much it for now, more to come soon though ;) Quote Link to post Share on other sites
ryan lang Posted March 4, 2012 Share Posted March 4, 2012 loving this build mate wish i could go into as much detail with my car looks like your crash bar has taking a bump though Quote Link to post Share on other sites
nest Posted March 4, 2012 Author Share Posted March 4, 2012 loving this build mate wish i could go into as much detail with my car looks like your crash bar has taking a bump thoughHa thanks bud, yeah I though that too, something the owner before me must have "forgot" to mention luckly it's only the crash bar that has a bump in it everything else is 100% straight Quote Link to post Share on other sites

Recommended Posts
Join the conversation
You can post now and register later. If you have an account, sign in now to post with your account.