


Westley
-
Content Count
387 -
Joined
-
Last visited
Content Type
Profiles
Forums
Wiki
Media Demo
Store
Calendar
Posts posted by Westley
-
-
I got a cusco rear strut last month for £50- havnt fitted it yet as I want to keep the rear plastics so need to remove and trim them
Yeah I was impatient and badly trimmed mine, only a little bit just to fit the brace, but I need to get the dremel out and tidy them up at some point
-
You can get them pretty cheap if you keep your eye out!
I managed to pick up a white line rear strut brace for £60 a fair few weeks back from this forum, it's nice and solid too!
And yes handling is definitely the best aspect to focus on with the starlets as that's what they're best at
-
Little update:
Managed to get hold of a front brace. I believe its a factory option one? Cost £20 and should be here this week.
Now looking for a rear one. Ideally I want the one that braces the seat belt mounts and the strut mounts.
I have both the front and rear strut brace for the strut mounts, the front was on when I bought it so I never noticed the difference but after fitting the rear strut brace it made a massive difference in my opinion, it's much tighter and less jelly like
-
Arb is hammerite smooth gold.
Rest are a different gold.
Trick is to use zinc primer with a decent light base coat.
Cheers though fella its taking time to make everything clean.
Thanks for that!
 I'll try find a colour that is a close match, and again thinks for the advice with the zinc primer! I need to get my underside freshened up as its been an advisory to get it undersealed and the rear is starting to look a bit worn out!
 Look forward to seeing the final product bud
-
The wheels suit it so much! Can't wait for this to be all up and running!
-
I one day plan to have the parts on my car as clean as yours! It's beautiful!
Quick question are all the gold parts the same gold? If so what gold is it as the arb looks almost perfect to the gold I'm looking for
-
This is going to be an awesome project
-
The Toyota wheel is spot on! I've a deep dish fitted to mine atm, but I was tempted to go for the same wheel, only problem I had with the stock wheel is to have my arms comfy and not stretched out I had to have the seat at a certain point, but then my legs would bash the cowl every now and then xD so mine is for a purpose otherwise I'd have the same wheel
-
I think I'm in love with this! I don't know why but rally specd cars just look amazing no matter what and the new design on this just looks absolutely perfect!
-
I've just ordered some wheels for it actually, they're not JDM... nut maybe in the future i'll keep my eye out for some tasty 14's... as much as i'd love 13's (i love tiny wheels haha) they won't go over the turbo brakes :/
The wheels are being delivered today, so i'll get some pics on here tonight hopefully

True! I didn't think about upgraded brakes! But 14's will look good too
-
This is going to look spot on! The colour suits the shape of the car so well! What's the plans for wheels? Some 13" wide jdm alloys would be awesome
-
Little but crucial update!
Car now has a brand new Toad Ai606 alarm fitted! It feels good to have remote central again and a super secure car! Oh and it beeps when locking/unlocking. What more could you want?!
Now I can get saving up again and get the to do list further completed!
-
Just think i wont send anything again.. lol...
I wish i took more pictures.. will do it in future...
On the case to the companies now....
Well at least my bumper came in one piece I can vouch for you being a great seller to deal with!
-
Import tax

Yes that one! Aha
-
I ordered a boss kit from RHD and it came in less than 2 weeks, are you aware of the extra charge you have to pay when the item is delivered? I wasn't as I assumed all the costs were in the final price but I had to pay £15 once the item arrived too. Just so you know
-
This is the one! I did an earth from the button to the boss then a long wire connected to the yellow one for the power, just make sure the plugged in to the button the right way round. The plug itself plugs into the black round piece with yellow stickers on it that u remove when fitting the boss. Just to be clear this is a 98 glanza
Yeah mine had the round black piece, it has a wire coiled around inside it which obviously allows it to spin when you turn the wheel, so basically just got to take power from the existing plug?
-
Brilliant! Hopefully I'll be able to seethe images and maybe even sort my issue out too
-
I can't see the picture anyway :/
-
See mine didn't have the little stick part, either that or I just didn't notice it! Either way let us know if you get it sorted! I'll probably give mine a try when the quick release group buy arrives!Yea it's a 98 glanza, where the boss is u can see a little stick poking up which when pressed activates the horn. I'm gonna look into maybe glueing something on top of the stick so I can press that. Shouting out the window only does so much lol I've looked into wiring up the button before with no joy
That actually isn't a terrible idea xD surely if you have the wire so it is brushing along the ring it should work whichever direction the steering wheel is pointing at? I may have to try this idea out.I used a little bit of wire that touches the metal on the back of the boss only works when the wheel is straight lol
-
As above has anyone managed to do this? I've only ran mine without the horn connected but I'm coming across more and more idiots each day that shouldn't be on the road and it's frustrating not having a horn! Or can I put a button for it somewhere? Doesn't have to be on the steering wheel
I too have started to notice more idiots too! I have the same issue atm, do you have the airbag model starlet? If so there's more difficulty to get the horn button working.
I think you have to somehow get power to the brass ring on the back of your boss kit in order to get the power for your horn button! Some people have managed it and have left a few suggestions on my thread as regards the same issue
-
Look forward to receiving this little gem.
-
Looking good there mate! Big fan of the colour did the inlet manifold make any noticeable difference?
Thank you! Personally I noticed a little difference, nothing mind blowing and it does sound beast when you put your foot down, definitely a worth while purchase
-
Panard rod will help you out a bit then
I'll get that sorted at some point then.
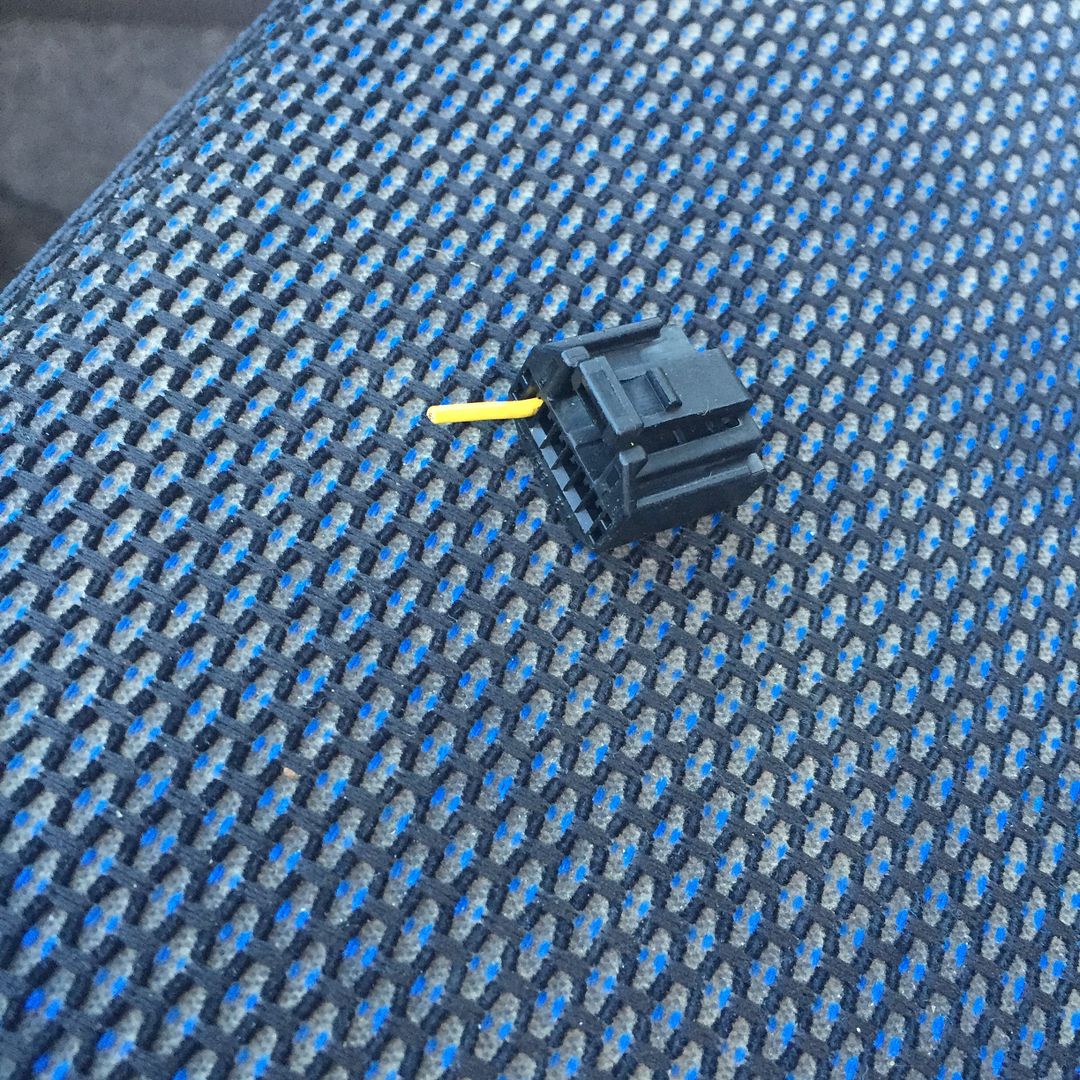
Today I managed to get the parcel shelf fitted and wired in properly! So happy about it tbh. I popped to maplin picked up some female spade connectors the first pack I picked up were spot on and fit into the prongs in the plug perfectly. Also picked up speaker wire and a soldering iron, the last time I did any soldering was back in school... But I grew up with a computer technician and I've done a fair bit of of building in the past so I'm not completely useless with wiring etc...
So pulled all the old wiring out, it was twisted and taped together, but it's survived so it wasn't all that bad

got all my wiring ready and soldered up the wires to the loom in the back of the stereo, trailed them down the passenger side all hidden away (passenger side because that's where the side the plug for the parcel shelf speakers was)
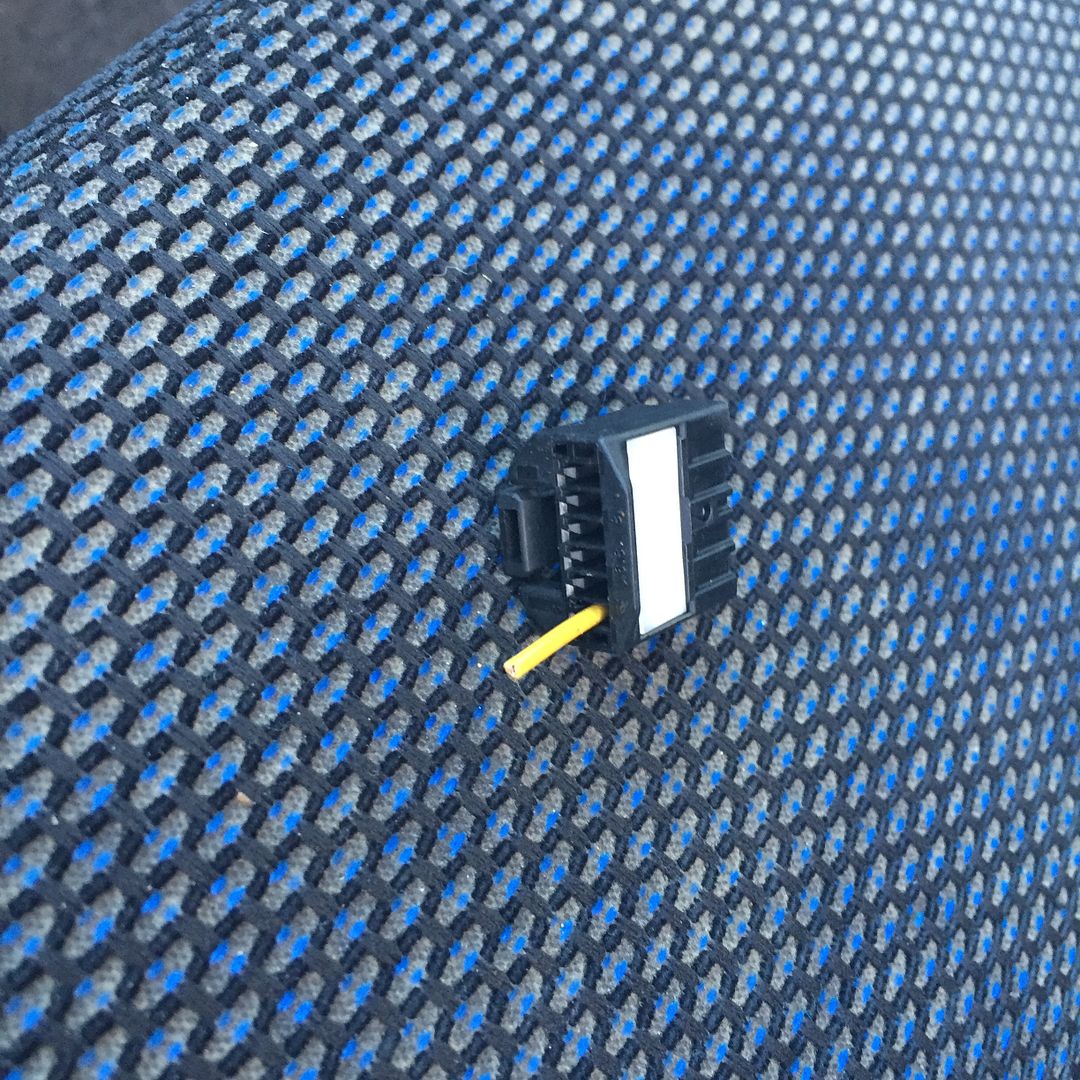
Put true spade connectors on the wires with a bit of solder and tape, plugged them into the four prongs as they were colou coded for each side and of course positive and negative.
This was the plug outcome
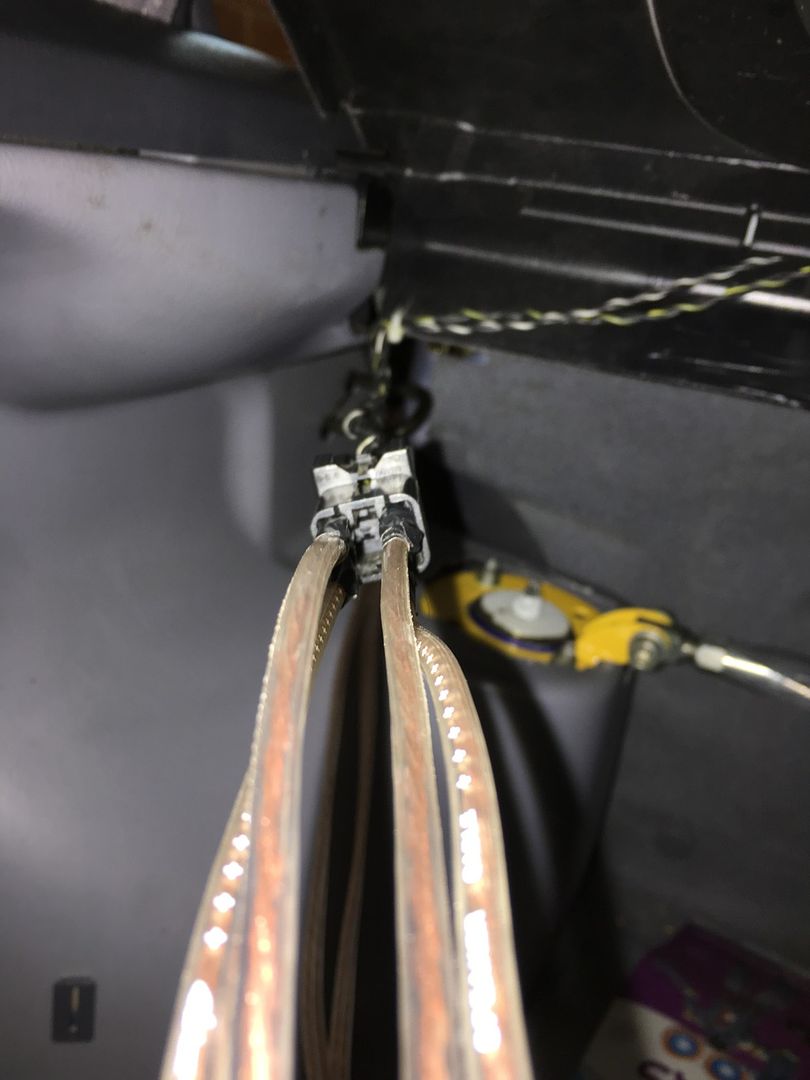
And tadah! They all work perfectly! Everything's tucked away and I'm happy knowing all the wires are properly attached to one another.
-
It sold! John on this forum was looking to buy it but the seller already had someone viewing it the same night it sold


4EFEJay's EP91 Sprint Project
in EP91 Progress Blogs
Posted · Edited by Westley
The rolla mani is definitely a good mod to do to the NA so hopefully you get it and yeah I'm impatient when it comes to fitting parts unfortunately xD