

whitestar
-
Content Count
628 -
Joined
-
Last visited
Content Type
Profiles
Forums
Wiki
Media Demo
Store
Calendar
Posts posted by whitestar
-
-
Cool build, I like the colour
Is the ep91 brakes a direct fit on the standard ep70 hubs?
And what size discs are you running?
Thanks mate!

Yeah EP91 brakes bolt right on. You just have to space the discs out 1-2 mm with big washers or a spacer plate for them to clear the calipers. That's the only thing that has to be done for them to fit. I'll add pics in a minute. I use standard EP91 discs, don't know the size.
Love this thing, top work!
Thanks fella!
Very nice project, i had seen some pics on instagram
Cheers! Nice to hear it caught your attention.
Lovely little project.
Looking forward to the updates
Thank you! More coming in a minute.

-
185/50/14 on 8.85" banded steel rims


-
Ok, some more pics and stories.

So as said earlier, I painted the B pillar satin black with rattle can paint. I also made some wing mirror delete plates out of plexi glass and glued them on. Came out pretty nice.

Looks clean and sweet now. Also put on TEQ-stickers to rear windows on both sides.

Interior is almost ready, just need to sort out the door cards and attach the tacho meter!

Also got the fenders painted and got my galant front lip finally.
Need to be trimmed though, as it's too wide.
The painted wings on!
 So happy. My spare set of mitsuba alpha horns found their place too.
The new fender mirrors are trimmed and screwed on and the front lip mocked in its place. Starting to look super nice now, can't wait!

Fitted the glanza front strut brace.
Straight fit otherwise but it touches the bonnet from the center. Bonnet closes anyway so it's fine as for now...
Started to refurb the EP91 front brakes as the current ones are shot.

Cleaned up from rust and crap, much better already.

Painted the calipers black with hammerite. Now just have to wait for the new banjo bolts to arrive and I can start to put some parts on.
Also MR-2 helped me with the carburetor one day, he got the engine running much better than it did previously! Huge thanks for that.
Few things more and I can start to arrange the inspection....To be continued.
-
Seen that quite abit on instagram! It's a pretty sweet colour. Poor EP70's catch the rust bug very easily. Turning into a cool little car and makes me think I should finish my own at some stage
Thanks! Nice to hear it's caught attention on instagram.
You totally should finish yours!Nice work! Looking great
Cheers mate! Your P7 is totally on another level. I'd love to turbo this at some point, but we'll see how this goes on.
-
Yo can buy those rings. They can also change colours and you can buy a set with strobe function too.
http://www.oraclelights.com/automotive-lighting-products/ORACLE-Halo-Kits
-
I had a bride brix seat like those. The most comfy seats I've ever sat in! Looks great man
Thanks man!
Yeah these really are good seats. I've always thought that bucket seats are not good to sit long times but I've driven hundreds of kilometers with these and they feel awesome.
-
Nice to see some progress, looking so good, not so "rusty" anymore. You have to give new name, maybe "Mint" or something, because of the color
Those fender mirrors are too much, not so big fan of them. Good stance, I have to dig those camberbolts for You also and few other parts Thanks!
Yeah not so rusty anymore. Noticed I'm not able to edit the first post anymore so can't edit the title. The new name could be Mintlet. Drop by some day when you have time, we should check the engine a bit. Probably going to get the front body panels painted this week so it's a big step in finishing this.Looks very smart
Thanks! A lot of progress achieved if compared to the first pic.
This is cool, been considering chopping in the charade for one of these
Thanks man! Yeah these are cool cars and I love the simplicity. Your Charade is a cool little thing too, wanted one at some point of my life but then came the Starlet fever and here I go.

-
Got a set of pics for my self from the same photoshoot from last spring.
Loads of pics, sorry for spamming. All photos by Joni Paaso.


-
Thanks guys, glad you like it!
Got my fenders sanded down ant they're ready for paint. Also painted the B-pillars yesterday and some other stuff.
I'll update more soon when I get more done.
-
Okay, let's break the silence.
Alot has been happening during the last few weeks, so let's put in some pictures.
So, here we go.

The exhaust was just horrible. You can see how the back box sat before. This pic above shows how the exhaust was hanging like 5cm off the bottom of the car, and was held together only with 11 clips in total.
Had to sort this piece of shit out.
Here are the most of the pieces of the former exhaust. It was totally crap I must say, but with some help from two of my friends we reused almost all this stuff. Not all the clips though.

I also serviced the rear coilovers, put in serious amount of copper paste to prevent it from seizing again.

Right one is yet to be serviced. Left one is as low as it goes.

Comparison between stock and the lowest a D2 coilie can go.

This is with the stock suspension still in.

And here's what the D2s did. Notice the painted bandeds!

After fitting all the coilies me and my friends made the new exhaust from the old parts. Just bought one flex part and a reducer, was the cheapest 3 part exhaust system ever.
Turned out really good and goes not hang low anywhere. And it's welded this time!
Back box sits perfect now! Also angled a bit to right side and slightly up.

Also bought some Momo seats from a friend and modified the stock rails to fit them. Looks pretty good I must admit.

Also fitted the replica OMP deep dish steering wheel.

Seats look serious. Lovin' it! Also painted the front satin black at some point.

Interior almost ready. Just have to try to find new door cards or re trim the old ones black. Put in some cheap black mats to finish it all.

The fenders were quite bad, so they've had some work done on them too. Car's starting to sit pretty nicely at this point.

Bought some 4WD Tercel dust caps for 5€ to finish the wheels. Painted them satin black too.

All the plastic parts of exterior have been painted satin black and the spoiler has been glued on at some point too.


Ordered some oldskool fender mirrors too a while back. Looks pretty sweet but have to adjust the fitment a bit before fitting them properly. Anyway, drilled the holes for them already.

Grille and front bumper freshly painted.

And the last one from this night. Took off the plastidip from B-pillars. Going to paint it black with real paint this weekend. Sits pretty nice, can't wait to get it ready! :S
More to come!
-
That's awesome dude!
Looks really good!
-
Haha intrested are u? Pm me mate easy to make..;)
-
Nice! What did you use for the side skirt extensions?
-
Awesome!
Thanks!
nice1 another boxy saved best of luck with her
the welded patch plate on the sill was truly a patch plate ha ha
Yeah you don't see these too much anywhere I guess. Usually they are actually in better condition than this, but the harsh condition on this one makes it easy for me to do almost anything to this one as I don't feel like I'm ruining anything.
Yay looks like it's going to be an awesome project! They are very fun cars. Keep the updates coming!
Thanks! Update coming up right now. ;)
So, the car got taped up for painting on friday and my friend painted the car during the weekend. The interior was painted on saturday and the rest of the body on sunday. I let the paint dry for a few days and got to work on her next time yesterday. Took off the masking material and riveted the aerocatches on. Also bolted the gear stick back to floor with the new dildo gear knob.
Painted the B-pillars black and reassembled the rear almost entirely. Just spoiler, bumper and starlet badge are missing at the moment.Later Mr MR-2 popped up with his brother, as he needed my original front struts for his P7. I finished cleaning my D2 coilovers, and MR-2 took the old struts off at the same time with his brother. Now the front is lowered almost as much as it goes on these. I can maybe squeeze a few millimeters more, but have to check the fitment first with the bandeds with rubbers on. Got the bandeds from sand blasting this morning, going to try to get them painted this weekend.
Also planning to do the exhaust so that I can start lowering the rear too.Time for pics I guess!


-
I bought one for 40€ and it was an expensive place. One corner has a small piece missing though, but it doesn't matter too much.
-
Yeah I just want to try to get it on road so I can drive it before the winter. Also painting it with Temalac, which is some industrial paint. Chose that as it's durable and you can get that in RAL colours.
This is going to be "zero fucks given" type of car.

-
Nice, lot of pictures also
Rusty is good name for this, like the idea when peoole are naming their cars, specially old personal cars. Little job to get this rustfree, but I got Your idea to live with that and do only bigger lines first.You find pervert steelies, changing car totally with coilovers and painting also, that is fast way to do miracles to exterior
Now five of my friend have EP70 very close capital of Finland (Helsinki), Starlet clan have taken very first steps I think, next summer maybe small gathering...
Yeah if I was more serious with this project and didn't have my Glanza and had the time and space to strip this completely to sandblast and weld this properly, I would. But now I just want to get it look neater and slam the hell out of it.
Yeah we need a Starlet meet for sure!
In need of some tlc thats for sure. Plus how far out does that backbox sit haha.
Look forward to seeing the progress with it
Yeah it's a bit rough example.
I don't even want to try to make it look like new again. It's been through life and it can show. We all have our scars! The exhaust on that is a true diy job.
It doesn't sit well from anywhere, it blows and it's held in one piece only with clips. I have to sort the exhaust after the paint so it doesn't hang so I can get on with the slamming business. -
As some people who follow me at instagram might have seen, I finally bought an EP70.
I've been wanting one for a long time already, but after seeing Jonny Moberg's stanced silver EP70 I knew I just had to have one at some point.So this july I found a really cheap one for sale. It was probably one of the ugliest cars I have ever seen and It wasn't in really good shape either.
Price tag had been 400€ at first, the seller then lowered it to 200€ and I drove it home for 140€.It had been "built" to be a car navigation car, so it had stickers, loud exhaust pipe, mk1 MR2 seats and a set of fugly red rally mud flaps. It had failed MOT as it had some rust spots and the suspension was wrecked, so the owner left it standing over winter. Next spring the engine didn't run well anymore (sounds like running on three most of the time), so he decided to sell it. Also the sills were welded, but not really well. More like a temporary fix.
My plans are to fix the worst rust spots (actually I have done them already), paint the car inside and outside, put in a deep dish steering wheel, banded steelies, bucket seats and some other mods. The most important mod for me is to put on the used set of D2 coilovers I bought off from JayJ last year and stance the hell out of it (or at least try to go as low as possible). I'm not going to give this thing any mercy as it's really not in best shape anymore, but I'm not going to trash it either.
The basic idea is to make it a funny stanced Starlet for as little amount of money as possible.I guess it's time for a random set of photos. I'll update this thread as the build goes on.


-
I'll do it when I get some more things done so that I have more to tell.
Thanks for that, I didn't know what was the difference between EP70 and EP71.
-
Very oldie, but oh so goldie.

-
Thought I'd share a few videos from American Car Show / Tuning Car Show 2016 in Helsinki that have clips of my car too.
Appears around 6 minutes: https://www.youtube.com/watch?v=A2m_7xdzxXw
Appears around 5:30: https://www.youtube.com/watch?v=l_rEYTtfcck
Appears on 1:55: https://www.youtube.com/watch?v=juCvnPzGcWY
And final one at 2:50: https://www.youtube.com/watch?v=ncZDCqlfpNY
-
Thanks mate!
That tsurikawa ring was taken off right after those pics.
It's not for towing, it's just a JDM thing that cool guys in japan stole from the subway trains to show off.Spoiler is mocked up out of cardboard now. Just have to make it some day.
I bought an EP71 and it's been taking all my time at the garage for two weeks now. I'll post a build thread of it later too. ;P
-
Latest issue of Finnish tuning magazine Tuning.fi featured my Glanza.
Pretty excited about it!
-
I received my brand new Speedvision Gen 3 CT9 hybrid last week. Going to put it on asap, maybe next week. I'll tell you how it feels then.
I had a hybrid before but it spitted the oils out, so had to swap back to stock ct9b. The old hybrid might have been a cheap ebay one, not sure as got it second hand.
Whitestar's budget EP70 project, Rusty is her name
in EP70 & EP71 Progress Blogs
Posted · Edited by whitestar
Ok, some more progress.
Brakes assembled and ready to go in!
Old manky brakes.
No brakes.
Newer not so manky brakes.
Work in progress.
So I thought the new pads were too thick as the car was really hard to move. Turned out that the offset on new discs was different to the old ones and that's why the discs caught on the calipers.
Put in some thick washers under the discs to clear the caliper, should be only a temporary fix to get the car inspected. But now it works!
Assembled the front. Alpha horns show quite nice behind the grille
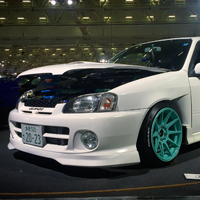
Drove to a near by gas station to get some fresh fuel and took a few pics.
Turned out pretty nice I must say! <3 Front lip still to go on!
Covered the shitty and ruined door cards with black fabric. A bit better now. Also put in the seat belts. Only thing missing now is the new tacho meter I ordered.
This one's from today. Got the emissions test done and booked the car for inspection on saturday, YAY!
So, more news after the weekend I guess. I hope they're good!