

enzo_e492901
-
Content Count
219 -
Joined
-
Last visited
Content Type
Profiles
Forums
Wiki
Media Demo
Store
Calendar
Posts posted by enzo_e492901
-
-
Cool. Just wanna say you should never vent to atmosphere because if you run both rocker cover lines to a can that is vented there is nothing pulling the gases out or if you run one line to a vented can and leave the other in place you have basically drilled a hole in your manifold.
You should place the can in line with one of the rocker cover lines, which one is under debate.
Even when the PCV valve is closed and that's most of the time the other line is still drawing the gases out without fresh air being let in like it would when the PCV valve is open.
Gavin
-
That's if it's going back into the inlet manifold were talking about hosing it into the catch tank with the rocker cover breather then venting to atmosphere
Oh. LOL. I would suggest you read up on how engine breathing systems work!
Gavin
-
just did a sex wee??.
lok at the fc 2000 analog with a c4 coil will be much easyer to fit and is cap discharge and also multi spark duration (MSD) the 3000 is digital and is worth that did more the msd 6a is analog but thr coil packs are duck all on the c4 (wen running this coil open up your spark gap and make sure your ingnition timing is bang on it realy does kick anus. (had a head gasket go on a track nova once and the ignition system was that good that the water squirting into the cylinder caused a super charging effect and it never missed a beat, u could watch the exspantion tank empty and expand like a baloon on aceleration lov um)
jacobs electronics mate is wer i shop.
chris
Yeah it should be good when I get it done.
I'll do some more research but I think the Fire Control 2000 and 3000 is out of my price range.
Cheers Chris
Gavin
-
Don't forget lads that the PCV valve is also there to stop manifold backfires igniting oil vapour, so it's not a good idea to gut it!
Gavin
-
Do you have the part number and price for the rear quater panel?
I'll try and dig it out for you, I'm sure I still have the paperwork somewhere. They aint cheap!
Gavin
This is the drivers side (RH) quarter panel part number for a 1997 sportif: 61601-1C370. (I have seen different numbers for different cars!) Price is £201.01 plus V.A.T. That price may very well have 10% off it too, I can't remember!
amazing attention to detail on this bad boy. sooo wish i had a garage and a runaround to put this kind of attention into my n/a
Cheers Ryan. I know what ya mean, it was a nightmare when mine was off the road.
its down to personal preference but the pcv for me is to tight, the valve is very restrictive so i cant see much oil /carbon getting thw into inlet + most inlets i have seen are not very oily, in my opinion fella its the TB that suffers with fouling and this then collects all the dirt that the filter misses out, causing all kinds of throttle respons problems (flat spots), and it is this 1 that is running most of the time and at high chat which is wen crank case gasses are at thr peak.wat are u thinking of for your ignition side, wat mods u got at present??
a little lube in the inlet runners will act as a aid to help flow as air also suffers from friction on the outer edges wer it contacts the runner walls, known as the boundry layer, the thing to watch out for is if your valve heads are showing signs of carbon build up on the back face this can indeed cause the valve not to flow as it should (but i have never seen this on this engine apart from the exhaust valve, or wen valve stem seals have failed due to high cylinder temps = bad tuning).
chris
I will think about swapping the catch can over!
I am probably gonna run an MSD 6A for ignition, it's the only thing I can find that's not too expensive. I too have looked into modifying the distributor cap for an external coil.
It's hard to say what mods are on it at the minute as I really can't remember. lol Some mods are fitted and some aren't. But below is a list of mods that have been or will be fitted by the time i'm done this year. In about 4 months, I hope!
Engine...
EP82 JDM Gi 4E-FE (Gen 1) (Different Inlet Manifold, Camshafts, Valve Springs, Crankshaft and Connecting Rods. Pink Injectors and a Baffled Sump) Fully Rebuilt with ALL NEW Genuine Toyota Sensors, Gaskets and Seals, Bearings/Shells, Piston Rings, Water and Oil Pumps, Timing Belt Kit, Distributor Cap and Rotor Arm, Flywheel, Engine Mounts, Headbolts, Locating Pins, Pegs and Dowels.
TRD 0.6MM Metal Head Gasket
Magnetic Sump Plug
C J Performance Lightweight Alternator, Water Pump and Power Steering Pump Pulleys
C J Performance Lightweight Adjustable Cam Gear
All Stainless Steel Nuts and Bolts Except Critical Locations
Intake System...
Carina E 50mm Throttle Body
Custom Fibreglass Induction System with Cold Air Feed
Custom Fibreglass Catch Tank
-6 Earls Hose and Fittings
ITG Maxogen Air Filter
Custom Teflon Throttle Body Insulator
Custom Teflon Inlet Manifold Insulator
Exhaust System...
Corolla 4-2-1 Exhaust Manifold
Glanza S Back Box
Heat Wrapped Downpipe
Oil System...
Mocal Oil Filter Relocator
Mocal 10 Row Oil-to-Air Cooler
Mocal Oil Thermostat
Laminova Oil-to-Water Cooler
TRD Oil Filter
-10 Speedflow Hose and Fittings
Cooling System...
Half Size Civic Radiator
Slimline Radiator Fan
Custom Fibreglass Fan Shroud
Custom Water Swirl Pot incorporating a Constant Bleed System
TRD Rad Cap
TRD Low Temp Thermostat
Samco Hoses
Fuel System...
Custom Fuel Rail
Fuelab Rising Rate Fuel Pressure Regulator
Fuelab Fuel Filter
-6 Earls Hose and Fittings
Ignition System...
MSD Digital 6A Ignition System
Ultra Blue Point Silicone Ignition Leads
TRD Grade 7 Spark Plugs
Drivetrain...
Custom Quick Change Gear Shifter
Polyurethane Gear Linkage Bushes
Electronics
Gen 1 88HP Corolla ECU
Custom Starter, Alternator and Power Cables
Custom Earthing Cables
AEM Wideband Air/Fuel Ratio Gauge
Stack Pro Exhaust Gas Temperature, Fuel Pressure, Oil Temperature, Water Temperature and Oil Pressure Gauges
Some time in the future, I hope...
Nitrous Oxide
There is probably some things missing from the lists.
Gavin
-
its just under around 2.7k it hits peak but its not just a on off switch so u will find that it starts to regulate presure right away, slowly opening the valve as it forces the spring back so any adjustment of the presure relif valve will affect oil presure as low as idle, but different on cold start on this engine, oil has tobe up to temp to check.
chris
i would have put the catch can on the other pipe as it is this 1 that fouls the TB with oil. but a very tidy job u have done.
I did think about using the other one because that's the one that gets used when there is no vacuum (most of the time) but I used the other one because the inside of the manifold seemed to have more oil on it than the inside of the throttle body/butterfly. I guess the ideal solution would be to run 2 catch cans but thats not practical. Any thoughts about how to catch the oil/blow by gases from both lines without using 2 cans while still retaining total functionality?
Cheers Chris
Gavin
-
Absolutely love the attention to detail mate and the neatness of the bay!! colour scheme is mint. Keep it up dude
Thank you bud and I will do!
it regulates constantly at peak presure but normaly around 3k rpm mark which is wer the presure needs to be at low down rpm starting to build up ready for mid to high end rpms. so yes it regulates full presure but u hit that very quick on most engines. how old are u mate just out of interest.chris.
Thought so, I guessed peak pressure would be at about 3k. That all makes sense now! I'm 28 mate.
Do you have the part number and price for the rear quater panel?I'll try and dig it out for you, I'm sure I still have the paperwork somewhere. They aint cheap!
Gavin
-
just shim up the presure relif valve its located on the under side of the block with sump off, to bring back any lost presure mate.
chris.
check out redz11 build + old build i tuned that 1, raffa engine i am in the process of modding, rayan langs will be the pinical of 4e tunning keep an eye on that, as for me i have a corrola i am getting track ready, thinking of going 5e thw and a black v that will just be for shows but will be running around 160-80hp no more. i'm struggling for time to get on my own motors.
I thought the oil pressure relief valve only controlled the maximum pressure the system is allowed to reach? Therefore shimming it would only change the maximum pressure.
or
Does it start to open at a lower pressure and constantly bleed a little pressure/oil off?
I guess i'll have to find out, somehow!
Gavin
-
That is some amazing skills dude, i wish i had the know how on how to make that fibreglass parts. Your attention is cracking dude!
As Sparky says it is inspiring!
Thank you very much.
If you or anyone else wants to know anything about the things in this thread or anything else for that matter, just ask! I will try my very best to help and advise you. I can do wood work and basic electronics as well! People can PM me if they would prefer.
Gavin
-
all the turbo engine i am pulling apart are suffering with oil starvation on the outer edge, almost showing signs of radius ride. its caused by the main and big end pins being drilled thn machined, i have found big benafits to tapering the oil drilling that feed the shells also remove the sharp edges, a ported head gives great gains to this motor.
chris
i hear u on the money.
If that's true I had better think again about running an oil-to-water cooler and an oil-to-air cooler because of the pressure drop(s). What do you think Chris?
good work man!!! wish i had somewhere to have a go at stuff like that we got lathes etc @ work but theyy a bit funny bout peope using them lol where does it attach to breather pipes on mainfold and rocker cover??mmmmmmmmm
i may be tempted by this haha ste
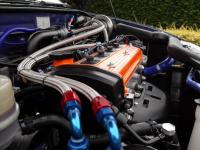
Yeah mate one line runs from the valve cover to the can and the other runs from the can to the intake manifold. Like this manifold vacuum pulls the oil and water vapour/blow by gases from the valve cover to the manifold but the can catches it before it gets there.
One word, amazing!Cheers Bud
Gavin
-
very true mate ive been thinkin about it as like u say every little helps and they look cool as fook too haha
and true dude where did u get catch can from??
thanks dude ste
I made the catch can, pics are somewhere in here. I'm working on a new lightweight one made from chemical and heat resistant fibreglass, so this one might be for sale in a month or two!
Gavin
-
wow makes me wanna really get my ass into gear and paint my engine been thinking about it for ages
great build thread flying the flag for n/a dude.....
much benefit from having oil catch can and those insulators on manifold and throttle body? as ive thought about these options too...
but overall one of the better build threads mate nice work!!!
steve.
Thanks mate that's really nice of you!
As for the carch can and insulators, every little helps. lol The catch can works but it's never gonna collect the same ammount as one fitted to a turbo because n/a's don't blow as much by the rings. The manifold does stay cooler on short drives but still does become heat soaked on long blasts.
Gavin
-
lov it fella, would have done a few things different if i had engine apart. respect to you
chris.
wat cc are the pink injectors. N/A tunning is proper tuning. did you notice the problem with the crank pins on these engines relating to the main and bigend shells, bad oil starvation in certain areas.
Thanks Chris! You need to get a build thread up! I would have done a few things different as well but I was running out of funds at the time and wanted to concentrate on making a good solid base engine.
From the research I have done I believe they are 200cc. That's not much of a differance to UK ones which I think are 195cc.
I did not notice any markings, discolouration, or anything that would indicate oil starvation problems.
This build is great dude!Engine looks awesome
that quality work there ,love itCheers Guys!
Gavin
-
I don't know u gavin but I can say chris Is a genius.! His knowledge is amazing and he genuinly wants to push the n/a. Not for money but so he can prove what no1 has done and getting big bhp. He's currently doing my and matt (drongo) an inlet mani and has been amaingly helpful. I can say alot of others will defo agree.! Top man
P.s nothin for the scoopless n/a chris.? Lol airfilter wise.
What he is telling people is nothing new, Mr Toyota did it years and years ago with the gen1 engines. I see someone copying Toyota not working things out for himself. And that's all you can do! It's what i'm doing but I am NOT claiming I came up with the idea becauise I didn't, Toyota did!
I'm not denying he was the first to inform people and spread the word!
Gavin
-
lov it wen tuners colide.
All in good spirits, mate! No offence/harm ment!
It's debates that start like this that get results!
Gavin
-
is this gavin that was at japfest. fixxing amjads car.
NO, not me.
Gavin
-
i am putting together a ram air kit for the glanza rep guys that have the scoop in the bonnet. it will mount on the intercooler brackets and give predicted gains of 3-4% at 100mph. going to fit this to a lads car at the mm day. now that 1 will be mine.
Yeah it will! but... I am working on something for the intake also, Check my build thread!
Gavin
-
ok its a toyota parts granted lol. but as far as i can see im the first to sus this out and promote it. as my phone is full of people wanting more info and thy cant find anything on the net about it. i know of a better manifold that will fit but need to try it and sus out the gains ie pros and cons. and hope i do not push up the power band to high. and it is very easy to say now, that you was running this after the event. no 1 knew about this mod a short time ago. and has tuk me ages to get people to trust in my tuneing.
p.s by the way i have never seen or had my hands on a gen 1 jdm starlet. and the corrola is only 88hp and has a tiny throttle body so that dont count. im sure thr is a few lads on here that will back me up. even the corrola lads on the ae101 site did not know about the turbo TB.
I've never run a Corolla throttle body! but... True, I was using a smaller throttle body, I had an idea I should be using a bigger one but it's taken me about two years to get around to finding one I liked and I still have not got it fitted yet. Thats's why I said "almost" in my last post.
Yes it is very easy to say things after the fact but my "New Members" thread, although only about 2 years old (before you even joined UKSC) kinda shows how long i've been running this manifold for, it also says why I tried the tubular Corolla manifold and why I had to use a smaller throttle body (it's all I had on hand at the time that would work with the UK ECU without hacking things left, right and center.) My New Members Thread So my point... I'm not saying it after the fact!
The JDM GI/ gen1 engine aint all that, not running on standard ECU's anyway.
Anyway we only have the same goal in mind, Faster Starlets!
Maybe we should share thoughts about n/a tuning sometime.
Gavin
-
lee, (red11) is the man 2 speak 2 about the fueling he ran this system for a year or so and a student wen he did, he was the first with my 90+hp mod for the N/A.
It's not really your mod, your just copying the gen1 engines.(The best thing to do!) I've been running almost like this for 5 years untill I tried the tubular Corolla manifold and then went back to the gen1 manifold!
Fuel consumption does suffer!
Gavin
-
Like you say if it's a groove the easy fix is to try and get the seal to sit about 1-1.5mm further out. Other than that I think you can get shaft repair sleeves but I think they change the size of the seal needed. You could get a sleeve that has the same o/d as the crank seal face and machine the crank down so that the sleeve is a tight interference fit onto it. But I would not want to do that to the flywheel end!
Gavin
-
As other people have said somewhere above, it will more than likely be the grooves that have been worn into the crank.


Gavin
-
If it will help below are photos of the 3 plugs from a sportif that I fitted SR clocks into? I can't remember if the photos are before or after the conversion though.


The photos might be able to help you but I'm sorry if there no help at all!
Gavin
-
Diy is the way to go. Post #6. You can make it as short as you want! Plus you can shorten the side to side movement aswell!
Gavin
-
I thought most people would be signed up, it's EP91.com.
I'll see what I can do.
Gavin
Show me your Catch Cans!
in Photography Gallery
Posted
Well back in the day when manufacturers did vent to atmosphere they used a tube that went somewhere under the car and was positioned as to create a vacuum via the venturi effect to draw the gases out.
But that's no good for emissions and it left a trail of oil down the center of the road.
Gavin