steed
-
Posts
328 -
Joined
-
Last visited
Content Type
Profiles
Forums
Wiki
Media Demo
Events
Everything posted by steed
-
hmm, that is very much the case, i have tapered the original inner diameter but it's a little stepped. i mah have to look into a better arrangement. and probably some kind of aftermarket ECU (everything is standard except the inlet manifold!
-
lol! there's a layer of PTFE tape under the silicone, the gunk was for extra assurance
-
so here is it running properly: and here's a few pics of just what was involved in converting the 5E to ITB's today: firstly had to get some itb's and build it up (build thread to follow at later date) here is a couple of pics of the number of air lines involved, its quite a few: here is where i relocated the inlet air temperature sensor: here was one of the harder bits: i had to fabricate and ICV utilising the old one so that i could keep it plug in and play. the icv filters seperately and is now located far away hidden just inside the passenger wing between the fuse box: here is the finished article complete with jap spec air filters whilst i wait from some mini cones to arrive: here is the finished set up, you can just about see every part of the conversion:
-
cured! problem was a mixture of things. i have a small reservoir to smooth out the pulsing vacuum but it has a filter or valve in it screwing up the MAP sensor, removed it and then it ran better. also the FPR was plumbed into where it goes normally however i realised that with itb it's only reading pressure from number 1 cylinder (big mistake). plumbed it in and smoothed it out some more. i still need a proper reservoir to flatten out the idle but it's sounds a lot healther now. looking forward to getting it going when it's stopped raining. on a run up to scotland this evening. pics to follow
-
not able to use as down draught, they are just throttle bodies, no injector or carbs. i'f using standard in head injectors (smells pretty rich too, a little sooty)
-
been hard at work and forgotten to update me thread: panhrad rod: front ARB bushes: drop links: engine bay ITBs: oh yeah! (when they work properly i'll be happier)
-
yeah, it ran well before i fitted them all throttle bodies are operating correctly
-
well here's what i've been working on this morning, it has a few teetching problems, namely it sound like one cylinder isn't firing, any one any ideas, and don't say air leak, i've chased my miles of piping already.
-
rossi you going to give the place a heads up if and when we do choose to go there? also we have regular meets in hampshire with the HJC and the police don't seem to mind us too much, but we do warn them when we are gathering 'on masse' so to speak.
-
you'll need the Ecu and the injectors, as long as you get the ecu from the engine WITHOUT ACIS otherwise it won't work properly.
-
i'm up for this, i'm southampton, as long as you don't mind a Paseo crashing the party?
-
yeah it's 8 little round ones and 2 arb ones for the paseo and most ep91, however some of the very late ep91 had a differet drop link which bolted to the bar and had only 4 little round ones actually on the wishbone, worth a check. Also worth nothing is because of the age of the links i've damaged the top nuts/thread bar and had to order new ones, the cheapest place for them is fensport, to brand new ones (blue print) for £20 delivered. They come with fresh rubber bushes so i guess it never hurts to have spares. i which check balance motorsprt, cheers
-
i agree, the 5E-FHE cams are designed to work with the higher revving 5E-FHE variant. they don't start to come one until way past the 5E-FE's rev limiter. if you fit those cams you'll need to get some sort of ECU, piggyback or otherwise.
-
okay so, i had no idea that little bit of plastic could make such a difference. i cannot recommend enough poly bushing the ARB it's ridiculous how much flatter it handles now, it shouldn't make that much difference but it did. as to the panhard rod, it's stopped the 'seo from being a bit skittish over motorway bumps, however i need my tracking done to take into account the new wheel alignment. definately going to save up for a rear ARB.
-
the mk1 mr2 ones will fit but they are a different impedance, you'll need to add an extra resistor to deal with the load.
-
well i spent yesterday trying to correst the suspension geometry problem i created when i'd lowered my 'Seo 57mm at the front and 50mm at the rear onto the tein spreings. to do it i needed this: then started on removing this thing old thing: greased and lubed this bearing after placing the whiteline official washer on it: and then, with some light persuasion from a hammer, attached the whiteline rod: also swapped the old ARB bushes for some poly ones: the drop link bush (the wishbone part of the drop link has also been poly bushed): and ARB bush: i'#m off to see what difference this makes to the handling, will let you know my findings later. on a side note i have recently come into possesion of a standard EL54 Panhard Rod if anyone is looking for one
-
apparently, and i don't know if this has been dyno proven or not but, you gain about 10 bhp by utilising the corolla manifold. in conjunction with an after-market exhaust and air filter. for what it's worth when i swapped my mani for the corolla one it felt the difference in the lower end of the rev range, much more pull (this is measured with my highly accurate bum dyno). probably fitting ITB's to my 'seo by the end of the week so if you want a corolla manifold you are more than welcome to mine.
-
damn, that's fugly
-
i'd go with an MR2 conversion too
-
ST was the base model, you could put all the extras on the ST that are found as standard on the SI
-
this is the back of the kind of corolla you are looking for over in the US:
-
Right so this is a two fold thread: the results of dropping my paseo on teins and a basic step by step guide to fitting lowering springs. Firstly you'll need some of these: and one of these: (other vehicles are available) You may also need some tools, here's a rough list of the ones i used: metric sockets: 10mm, 12mm, 14mm, 19mm socket ratchet adjustable spanner breaker bar (i used 24" 1/2 size one after breaking two 12" 3/8) hammer metric spanners: 14mm, 19mm axle stands spring compressors jack WD-40 (or other penetrating fluid) you'll need lots. I started with the front (because if you only manage to do one half of the car a low front doesn't look as bad as a high front). jack the car up, hand brake on firmly, and remove the wheel (i recommend loosening the wheel nuts while the car is on the floor). WD-40 the lower strut bolts ans any bolts attaching brake hoses or drop links to the strut. Important: remove brake hoses first, ensuring the stay clear and don't present a snagging hazard later on (they are very important). Whilst the strut is still bolted the on loosen the top mount bolts but don't completely undo them. Now you can undo the lower strut bolts (they will be very hard to free so use lots of WD-40 and the large breaker bar). Once removed roll the hub forward to allow the strut to come away more easily. Now you can remove the top mount bolts and lower the whole spring and strut assembly out of the turret. Pictured here with spring compressor attached. I recommend loosening shock absorber top nut at this point. Tighten the spring compressors until there is slight play in the spring between the top mount and the lower dish of the strut. Now fully undo the shock absorber top nut and remove the top mount. With the top mount removed take off the top strut dish followed by the spring, the rubber/plastic boot will probably come off with it, this isnâ??t a problem. Clean the gunk that has built up at the top on the shock and marvel at the difference between you old rusty shock and the shiny new one. Remove the spring compressor and fit the to the new spring, I put a rag down whilst tighten the compressor to avoid damaging the Teins too much. When you have tighten them sufficiently youâ??ll be able to slide the spring on followed by the rubber/plastic boot, then the strut top dish finally followed by the top mount. If you have tighten the spring enough youâ??ll but able to do up the shock top nut with any too much difficulty, do not tighten the shock top nut completely. Before releasing the spring compressors line up the springs with the indentâ??s in the top and bottom strut dishes. Now you can remove the springs compressors and put the strut and spring assembly back in, being careful to ensure the top mount goes in the correct way round. Itâ??s easy to rotate providing you left the shock top nut loose. Tighten the top mount bolts then refit the hub to the base of the strut. It is advisable to clean the bolts and nuts if you are re-using the old one as there may be damage to the threads otherwise. Donâ??t forget to re-attach any drop links or brake hoses you may have removed. Now repeat for the other side. Next is the rear suspension, this can differ greatly from car to car, in this instance (the paseo) me have trailing arms with a panhard rod and spring over shock arrangement (this is exactly the same as the starlet). Remove the interior trim as necessary to access the rear strut top mounts. Loosen the top mount nuts whilst itâ??s still fitted and WD-40 the shock top nut Now WD-40 the lower shock bolt and remove it, using the hammer gently tap out the strut and spring assembly (donâ??t get to aggressive as it may damaged the shock). Now fully undo the top mount bolts and remove the strut spring assembly. Spring compressors on again and squash the spring until there is play between the top and bottom strut dishes. Using the adjustable spanner and a regular spanner (or another adjustable) undo and remove the shock top nut. Remove washer, top mount and rubber/plastic boot along with the spring, then compare. This is the rear strut assembly broken down into its components. Using the spring compressors squash the new spring until you can fit the rubber/plastic boot, top mount, washer and nut. Not forgetting to position the spring correctly in the lower dish (the top is not so important on this rear strut, others may require correct positioning though). Do not fully tighten the shock top nut just yet, refit the strut and spring assembly. With the strut back in bolt the bottom onto the trailing arms, I recommend using a spanner or similar the lever the bottom of the strut into position. Tighten the top mount bolts and now fully tighten the strut top bolt. Now repeat on the other side. Once finished lower return you car to the road, have a cup of tea/beer/something stronger. Oh and enjoy you lowered ride!
-
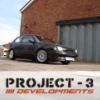
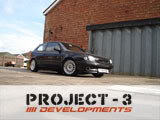
well this is how she looked when i bought her, note i swapped on some rover 15's i had lying around because it had decent tyres. Note the ridiculous ride height added some of these (dropping the front by 57mm and the back by 50mm) originally meant for the EP91. did the old corolla manifold swap: the much improved ride hieght on a little shoot: notice the saggy bum, it took me a little while to realise but the shocks were shot so i've swapped them over now, and put on some 16's i had lying around. admittedly the tyres are too big so the next mods include adjustable panhard rod and lower profile tyres. oh i've also replaced the radiator with the thicker cored civic rad and fitted a cold air induction kit i made up: latest shoot pics:
-
best way of getting uprated shocks is buying a set for the EP91 starlet (they are the same manufacturers part number). i just got a set for my paseo from camskill i also get a set of EP91 tein street springs they are as low as you can go without getting coliovers.
-
oooooh, this is going to be used and abued by me very much