

montanajr
-
Posts
972 -
Joined
-
Last visited
Content Type
Profiles
Forums
Wiki
Media Demo
Events
Everything posted by montanajr
-
You will need: Flathead screwdriver(s) 10mm socket Torque wrench Needle nose pliers Spray paint of your choice, I chose matte black VHT spray Drill and abrasive brush (from Halfrauds ) White spirit, de-greaser & cloths New Toyota rocker cover gasket â?? Part No 11213-11041 New Toyota washers and nuts (not necessary, but might as well!) About: Removing and spraying your rocker cover is very straight forward and requires very little technical know-how or tools! Easily attemptable for almost anybody! I was bored so I thought Iâ??d take my camera out with me lol. Doesnâ??t take very long either! 15mins to take cover off, then prep and paint leave to try and re-fit! Guide: - As it was, looking very sorry for its self! - Remove HT leads (remember their order for re-fitting!) and keep to one side. - Disconnect hose from PCV valve to inlet mani (circled red) and any other bits that might be in the way. - Unbolt EFI pipe from bracket and rotate EFI pipe slightly forward to give you some more room. - Locate the five nuts that hold the rocker cover in place (circled red). - Remove nuts with 10mm socket - Once the nuts have been removed you will see the five rubber washers that sit beneath them. - I did not buy new nuts/washers so use a combination of pliers and flat head screwdriver and gently remove the washers without damaging them. - Once the washers are away the rocker cover needs to come out, however the injector loom behind the rocker cover gets in the way and stop its from lifting up. - Undo the 10mm bolt that holds the plastic box to the support bracket and cable tie it to the throttle cable protector (circled red). Keeps it well out of the way for removing the cover. - Now this is out of the way make sure everything else is clear, and use a flat head screw driver for each of the four corners of the cover and gently prise the cover up. Once all four corners are free wiggle the cover off, be very gentle if youâ??re not going to be replacing the gasket as I was a bit brutish and tore the gasket. - TIP: The bracket the EFI pipe bolts to gets in the way so itâ??s best to try and get the cover out from the back. It should come out fairly easily. - Once the covers off you should see the following: - Itâ??s off and bloody filthy! lol. - TIP: You canâ??t see it that well, but there were bits of gasket that stuck to the head. Use needle nose pliers and gently remove these as they may prevent the new gasket from seating properly. - Prep time! First of all I used some de-greaser and cloth to get most of the muck off, then a wire brush and some wire wool. Once I was relatively happy I started to use a drill and abrasive brush drill bit, cleaned it up a treat! - Took about 30mins of cleaning to get it shiny. At one point I thought it looked so good Iâ??d keep it shiny, but I couldnâ??t say no to matte black! lol. - It was now ready for paint so I used some white spirit and a cloth to clean the surface up as best I could and masked up the areas I didnâ??t want to be sprayed (PCV valve, oil breather, oil filler and spark plug holes). - You can now begin painting! I built it up with a number of thin light coats. Leave to dry. I only left it about 1.5hrs as the VHT stuff dries incredibly quick and will properly cure once on the engine and it gets hot. - Rocker cover painted! Now to refit it! - Itâ??s simply a matter of doing the above steps in reverse, making sure to properly fit your new gasket of course! Simply pull the old one out of the rocker cover and push in the new one. - Now gently put the rocker cover back onto the head so it lines up and the lugs show through. A bit of wiggling is required - It may not be necessary to properly torque the nuts but I did, better to be safe than sorry! You want to torque them to 7Nm (thanks dan_ep82!) using a torque wrench like the above one. - Re-fit the rubber washers (give them a clean ofcourse! ) - Lightly hand tighten the nuts in criss-cross order; so starting with top left, then bottom right, then bottom left, then top right etc. Begin to torque them in the same order (it helps to pull the cover flush against the head, so it seats properly and no leaks!). - Remove all the masking, put the HT leads back in, put the injector wiring back in place, bolt the EFI pipe back in place, re-connect PCV hose and anything else you undid! - Job done! (Just as it starts to pour thank god!) Took hardly any time at all and was very easy, and I think it looks really good!
-
Awesome project mate! What does it go like, the blacktops are 165hp standard aren't they?? Get some vids up pwease!
-
Cheers bud! Yeah well worth it, goes like the clappers now! We just got to lag the IC pipes and done for now! Will clock the turbo at a later date, and now we gotta get shi DV working!! It works as normal, on idle it holds open and when you give it some throttle it closes like it should, just doesn't dump! Any ideas!
-
Brake bias is mad, its all about the fronts mate! And if you wanted to put the front disks on the back and bigger discs on the front you'd have to make up some custom caliper brackets :S Just get a GT or V rear axle and whack that on, and get better discs/uprated pads/braided lines for the front. Stop like a pro then!
-
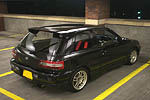
So my brother suggests we fit a FMIC to his car, that'll be fairly straightforward riiight?? On a Starlet, what 1.5hrs to fit one? On his, 2 days, 3 people (me, bro, dad) and a lot of swearing and frustration lol. Had to buy a universal kit and cut the shite outta it and use an evo8 core, take charge cooler, pump and rad out, bridge 2 charge cooler sensors, make brackets to hold the IC and just loads of little bits! Took an age! Didn't manage to clock the turbo as the huge circlip holding on the snail was impossible to get off, plus the actuator was round the back behind the mani - how the hell would one get a e-clip on that?! Anyway, few pics, quite chuffed as it works well and pulls like a feckin' train! One problem; his dump valve no longer works even though its plumbed in properly?? Doesn't look too bad eh? I'm welll pleased!
-
-
-
Yup, was an rb10 indeed! Was alright lol
-
Hi I'm Chris. Had to go to uni for a meeting this morning, then came home and did an oil change on my brothers GT4 and watched some TV. And now I'm on the internet and my mums made prawn curry which I'm going to eat. Oh and I watched a documentary about a group of people restoring a crane from the 1950s, was wierd. Bye! x
-
sorry, but this is so good it has to be seen
montanajr replied to ste91's topic in Lifestyle General
I'd slap her ass... -
"Lock me!" says this thread.
-
If it is the correct part, shotgun!!!
-
http://www.toytuning.com/onlineshop/drivet...tscvshubs500bhp
-
Doesn't look like them bud! :*( Very gay, stupid Toyota! lol
-
Oooh I'm sure you can find a sneaky way around it! lol
-
Cheers bud
-
Build me a forged 5e Gaz - I'll give you a tenner! Deal ?! ;)
-
D2's are just generic coilovers, I'm sure the "G4s" will be rebranded D2's basically...
-
It does depend on what you want; bone stock, mildly tuned or a monster. Prices will ofcourse vary and as Cal said some good examples go up and surpass £3k. All depends on what you want/can afford!
-
£3400 for the GT. Tein Lowering Springs £137.50 KYB Front and Rear Shock Absorbers £140 + £70 HKS Actuator £75 NGK Plugs £28 Ultra HT Leads £30 WEPR FMIC £300 Autobahn Manifold £135 CAP Clutch £130 Speedline 15" Wheels £50 J3 Boost Gauge £20 Front Exit Exhaust £120 5Zigen Horn Button £1 Sabelt harness £70 Forge BOV £35 HKS BOV £Free - swapped with bro! New rear discs and pads £100 Oils/oil filters/tyres/brake fluid/spray paints/polish/shampoo/hours of my life £??? A fair bit! Heat wrap/heat lagging tape £30 SARD FPR/Apexi SAFC/JAM FCC/FSE FPR/HKS FCD/ - bought and then selling/sold on to make some money back I think thats about it. You can add it up, I'm too scared ;)
-
Lucky for you the prices of both GT's and Glanza's have plumeted! I reckon you could get a good, lower mileage, near stock GT for max around 2.5k nowadays! Shame as I paid £3400 for mine this time last year! Just make sure you get a goodun, ensure the owner actually knows a thing or two about maintaining / taking care of the car and you should be fine!
-
They'll be with you soon bud!
-
You not got the CF Wedsports yet?! Sent them 1st Class!
-
That looks beautiful matey!
-
Why are the three green dash lights always lit up on my glanza?
montanajr replied to Marc's topic in Lifestyle General
I can vouch for the fact that if the FCC is causing problems with the MAP sensor signals it will run like complete and utter shit off boost! So you'd know about it! lol