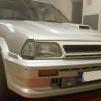
Ep71T Posted November 11, 2018 Posted November 11, 2018 So this is how it begins . It's an unknown mileage chassis and engine project. The chassis is a ep70 2 door 1.0 which at some time in its life was converted to a starlet turbo with an 2e-fte telu? I don't know.. i call it 2e-t I bought boua couple of months ago and it has been great fun. It has been running ok with a little hunt at idle.. and one coolant leak after another . The brakes where a mess.. so the decision was taken to stop driving it and restore it . Quote
Ep71T Posted November 11, 2018 Author Posted November 11, 2018 I started with the interior to check the condition of the floor etc.. So as I take parts out of the car I discover more things to repair . It's ok it's all part of this game. Found a decent rust hole at the driver's footwell and a smaller one at the passengers . I will repair the rust spots and I also plan the strengthen the unibody if I can. I cleaned the area with the rust and used an air saw to trim it. Now off to find some 1mm sheetmetal to make a patch for it . Quote
Ep71T Posted November 12, 2018 Author Posted November 12, 2018 So I managed to find a fender instead of a piece of sheet metal and went all out forging on it This is the piece that came out after a lot of hammering . And this is the floor with a couple of rivets . Quote
Ep71T Posted November 12, 2018 Author Posted November 12, 2018 I will weld everything up when I am done with the interior and unibody mods Next in order is to remove the wire harnesses out to repair and put them in order. Quote
Ep71T Posted November 17, 2018 Author Posted November 17, 2018 So this is how it is right now The rear sheetmetal needs some sorting out.. Quote
Ep71T Posted November 17, 2018 Author Posted November 17, 2018 Now I need to tear down and inspect the little Godzilla . I was surprised how fast it came out Quote
Ep71T Posted November 18, 2018 Author Posted November 18, 2018 The tear down and inspection began. Looks good so far. Nothing major . I have to measure bores and inspect the cylinder head. Quote
Ep71T Posted November 18, 2018 Author Posted November 18, 2018 First crack lol.. ct9 2nd third fourth .... All four have cracks between intake and exhaust valve seats And after soda blasting it for a better view of the crack lol... Quote
Ep71T Posted November 28, 2018 Author Posted November 28, 2018 So I took of the valve seats for a better view of the crack. It didn't look any better... so I was tempted to send it of for weld repair but I found a N/A cylinder head in very good shape. So who can spot the differences with the turbo head? Quote
Stu Posted November 30, 2018 Posted November 30, 2018 Might pay to cc those chambers and work out the difference in compression. The stock turbo is quite low compression anyway so alittle bump up would be good, just not too much. Quote
Ep71T Posted November 30, 2018 Author Posted November 30, 2018 (edited) Thats what i though too.. I will use the N/A cam as it has more lift on the big intake valve whereas the Turbo cam does that on the small intake valve. .. Now I have to find out what to do with the brand new ct12b I stumbled on.. It looks enormous compared to the ct9 I have.. Edited November 30, 2018 by Ep71T Quote
Stu Posted December 3, 2018 Posted December 3, 2018 Is that from a 2jz? Some of those variants have a larger AR exhaust housing so will be very laggy, might pay to compare against the stock unit. Quote
Stu Posted December 5, 2018 Posted December 5, 2018 Ah right, I forgot about those ones. I'd just check out that exhaust housing size compared to the old unit. Quote
Ep71T Posted December 5, 2018 Author Posted December 5, 2018 It's big.. don't know if it's worth any effort. I did notice the cartridge is the same.. Quote
Ep71T Posted March 24, 2019 Author Posted March 24, 2019 Back to action. Valve cover went for a bath on my old dishwasher along with some motor mounts and other parts for a cleanup. if you have an old dishwasher try it out.! I decided to do away with the red turbo logo.. Black on black is my theme. Quote
Ep71T Posted March 31, 2019 Author Posted March 31, 2019 Anyone knows where to find the valve cover gasket ? It has a stop production from Toyota and no aftermarket luck so far. I made one up for now from a 1zr engine and crazy glue Quote
Ep71T Posted May 5, 2019 Author Posted May 5, 2019 So what do you think about stitch welding ? Now the car is stripped down I could stitch it a bit. Which areas do you recommend? Strut towers? Frame rails ? Quote
Calum122 Posted May 5, 2019 Posted May 5, 2019 Cam cover looks great! I always use the home parts washer Quote
Ep71T Posted November 3, 2019 Author Posted November 3, 2019 So its time for an Update. Fast forward 6 months I have not lost faith yet !!! The engine is temporarily fitted to figure out turbo location . The radiator support was cut and made removable ! The engine bay was cleaned and sprayed where needed . The radiator was nicely tucked in on the radiator support and as far left as possible. I used the recipe for bigger brakes found on Epic TMC's channel So In my version I Used the Opel Astra 256 rotors but machined the hub instead of the rotor and got some single pot Celica TS calipers. Fit is awesome .. will see in the future how they perform. With white you see the part that hat to go . Quote
Ep71T Posted October 21, 2020 Author Posted October 21, 2020 Sorry for the delayed posts guys.. I left off Nov before Covid19 and now I have already 5k km on the car and some track testing done. So from the picture mind the ugly blue coolant hoses , I made a chargecooler and used a hybrid coolant recirculation pump and a radiator from Auris Hybrid. Quote
Claymore Posted October 21, 2020 Posted October 21, 2020 1 hour ago, Ep71T said: Sorry for the delayed posts guys.. I left off Nov before Covid19 and now I have already 5k km on the car and some track testing done. So from the picture mind the ugly blue coolant hoses , I made a chargecooler and used a hybrid coolant recirculation pump and a radiator from Auris Hybrid. Brilliant build On 12/5/2018 at 5:50 PM, Ep71T said: It's big.. don't know if it's worth any effort. I did notice the cartridge is the same.. How did you fit the turbo? Was it a straight fit or did it need changes? Quote
Sam44 Posted October 21, 2020 Posted October 21, 2020 (edited) Dish washer for the win haha. A man after my own hart. Loving this, really quality work very tidy. My Hats off to you. Edited October 21, 2020 by Sam44 Quote

Recommended Posts
Join the conversation
You can post now and register later. If you have an account, sign in now to post with your account.