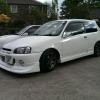
Matt ep91 glanza Posted May 28, 2014 Posted May 28, 2014 About time I started a build thread for my new project that's been on going since last winter. I started off with a black forged glanza with panel damage to the rear quarter with the intentions of repairing it and getting it back on the road. However plans changed and I decided to re shell the engine and running gear into a white 98 spec glanza, ive always liked the white 98 specs previously owning one a year before this and regretting selling it. my old 98 spec I purchased a very clean solid base off of e bay late last year. The car ran well as it was, hadn't been modified which Is what I wanted. the day the car arrived. So the work began. Removed the old engine and gearbox out of the black glanza, then taking the engine and gearbox out of the white one.While the engine was out, that got a very good clean also a fresh coat of vht paint. Then came the cleaning and painting of the actual bay, degreasing all the old grime,dirt and grease it was a task but well worth it. That took 3 days to get the engine painted and cleaned with a fresh coat of polish and wax to keep the shine. unfortunately I cant find many photos of this stage I will upload them if and when i find them. I also ordered a td04 turbo kit from wepr externally gated evolution style manifold, looks great, running the tial wastegate with .8 bar spring. the engine all finished and cleanedNext was to drop the engine and gearbox in, very carefully. The car then got jacked up! Me and my Dad pushed the engine and gearbox in using a pallet truck, we then slowly let the car down to the new height of the engine. Then got the mounts lined up & bolted up. (not as easy as it sounds) After that, connected all the electrics up and water lines etc. All new roose motorsport hoses were installed with fresh jubilee clips as the old ones were looking a little tired, as well as replacing all the bolts in the engine bay for new ones with spring washers etc, just to freshen everything up. Whilst fitting the turbo kit, we realised the screamer pipe didn't fit with the radiator pipe in its current position so I went to see dean at rw developments and had him re weld my radiator port and also had him make me a race spec rocker cover with fittings and I also purchased one of his catch tanks After hours of cleaning the bay & engine it was time to take a step back and look what we'd achieved. Great results! Also a very fresh looking bay. Next was to upgrade the brakes, I dropped lucky and found a set of wms brakes brand new never been fitted with all brackets etc for a great price. They are a great fit we had the trim the dust cover surrounding the disc to stop any catching and fit 5mm spacers on the wheels to allow some clearance. I bought some brand new ebc yellow stuff pads for them as well. Braided lines all round were also fitted,rebuilt the rear brakes and greased all the cables, piston etc to make sure they worked well after being stood for a while. Whilst the wheels were off the inner arches got a deep clean to bring them back up like new and a fresh coat of paint as well as removing all the dirt and muck that builds up over the years. The wheels got a very good clean inside and out. Along with a polish/ wax to protect them and keeping that shine. So far I am running 195/55/15 purely because they are the tyres that came with the car, which are like new. I am looking to purchase some new tyres with a slightly lower profile and perhaps slightly wider as I am going on track at japfest 2! Anyway the car stood for a little while with the engine in but was not set up or anything as other projects had unfortunately taken priority. so with some spare time I wired in the e manage blue harness and getting it ready so that it could be mapped and set up properly. with the car looking a mess on the outside we decided that it would be better to get everything running right before doing anything with the exterior, so with everything ready we sent the car off for mapping on a low loader. The day came where the car was going to get mapped but during the pre dyno inspection we encountered a problem with one of the injectors, unfortunately the injector had failed so that put the mapping back another couple of weeks as new injectors had to be ordered in from America. I went for the 410cc Honda race series injectors on advice from the tuner and intended to run the fpr at a pressure that would be around the same as the 460cc injectors that were installed previously. Fortunately the next time I went for mapping there were no more teething problems and everything went smoothly with the car, it produced 200 wheel horse power which I was relatively happy with. the deadline of getting the car back from mapping and japfest left us with 3 days to sort out the bodywork, I bought a brand new bodykit that ive rarely seen on a glanza to make it stand out a bit and have something different, so the first thing was to get that all fitted and lined up properly. next was to prepare the rear quarters for paint as both sides have seen better days and also the door shuts where the old sideskirts in the past had been tiger sealed, needed repairing and painting. one day to go til japfest was a mad rush to get everything fitted up and cleaned and ready to go japfest photos: The next updates will be fitting a pair of driveshafts as the current ones have had it. it also needs a new rad fan as that's stopped working aswell, but other than that its going to be staying as it is.I have booked some track time at japfest 2 so I will be changing the front and rear bumpers for standard ones for track use as I don't want to spoil the fresh paint or risk damaging them.I'll also post up a spec list of what its running so farI will also be removing the rocker cover to polish it up to a mirror shine very soon. I'm also looking to buy some new aftermarket wings for the car aswell I think progress has gone well so farFrom thisTo this Quote
yaristurbo Posted May 28, 2014 Posted May 28, 2014 Great car, such good work from you and your dad Quote
Sefton-EP91 Posted June 1, 2014 Posted June 1, 2014 Lovely looking car mate. I knew the guy that owned this before you.. Jamie? What did you do with the engine and box that were originally in this? Quote
richdog Posted July 7, 2014 Posted July 7, 2014 The run down to jf one highlighted a few niggles with Matts car tgere was a funny knocking noise ioon taking up the drive.bearing in mind tge works tgats been carried out, all suspension removed cleaned painted and poly busged not sure where niuse was from, some xareful listening and testing revealed no play anywhere !Just replaced outer cv joint on passenger side.so much better, now ordered full joint kit from iddy, just waiting arrival hopeful in time to be fitted to make clumber park thus Sunday. All silcon hoses finally replaced under the bonnet. Hopefully have a nice change of wheels coming soon. Quote
glanzadude Posted July 8, 2014 Posted July 8, 2014 (edited) Do I like the front lip Mmm? Fine car I have to say giving it a full respray really tidys it up well done to you Edited July 8, 2014 by glanzadude Quote
M.B-glanza Posted July 8, 2014 Posted July 8, 2014 Very nice matt pleased theres a build thread for this looked so clean in the flesh and that engine bay was simply stunning.. hard work pays off Quote

Recommended Posts
Join the conversation
You can post now and register later. If you have an account, sign in now to post with your account.