Westley Posted January 26, 2016 Posted January 26, 2016 (edited) Should be there Ive had 3 now with it in different models and different years. It is folded back on its self usally dont see why yours doesn't have it as the wiring looms should be same. Only difference is from 96-97 to 98-99 they changed how it came through the firewall Oh right, well I did have a good look and had the rear quarter plastic all unclipped and I couldn't find any wire :/ tbh though the parcel shelf I got had the plug on the passenger side anyway, and the existing wiring from a previous owner had been run down the passenger side so I just improved on that Edited January 26, 2016 by Westley Quote
*Pete* Posted January 27, 2016 Author Posted January 27, 2016 Oh right, well I did have a good look and had the rear quarter plastic all unclipped and I couldn't find any wire :/ tbh though the parcel shelf I got had the plug on the passenger side anyway, and the existing wiring from a previous owner had been run down the passenger side so I just improved on that Not just the rear one you have take off to get you also got to pull the front rear quarter one too Quote
Westley Posted January 27, 2016 Posted January 27, 2016 I think I took off up to the drivers door card and never found it :/ ah well my speakers are wired in and it looks tidy enough Quote
*Pete* Posted January 29, 2016 Author Posted January 29, 2016 So got my old starlet back today and I also did a 5 hour round trip picked up a manual steering rack Quote
PPSR05 Posted January 29, 2016 Posted January 29, 2016 So got my old starlet back today and I also did a 5 hour round trip picked up a manual steering rack Glad you finally got it back at least you can sort it out now. Quote
Walker96 Posted January 30, 2016 Posted January 30, 2016 Are the paseo dials same to wire in as the SR ones dude? Cheers Quote
*Pete* Posted January 30, 2016 Author Posted January 30, 2016 Are the paseo dials same to wire in as the SR ones dude? Cheers No, if you look in the how to/tutorial section theres a how to which I found easy to follow, have to swap the wire around and some wires move plug as well Quote
Walker96 Posted January 30, 2016 Posted January 30, 2016 No, if you look in the how to/tutorial section theres a how to which I found easy to follow, have to swap the wire around and some wires move plug as well Got a link mate only find the SR one dude Quote
*Pete* Posted January 31, 2016 Author Posted January 31, 2016 Got a link mate only find the SR one dudeHere you are:http://www.ukstarletowners.com/topic/8006-how-2-fit-paseo-clocks-into-a-starlet/#entry104834 Quote
Walker96 Posted January 31, 2016 Posted January 31, 2016 Here you are:http://www.ukstarletowners.com/topic/8006-how-2-fit-paseo-clocks-into-a-starlet/#entry104834Cheers mate! Quote
*Pete* Posted January 31, 2016 Author Posted January 31, 2016 Yesterday done the cambelt and waterpumpThen today went to get my wheels off my old starlet and this happened Quote
5T4R7ET N/A Posted February 1, 2016 Posted February 1, 2016 (edited) Cant beat standard steel wheel nutsI just got some black ones.Thats going to be a bit of a headache Edited February 2, 2016 by 5T4R7ET N/A Quote
Westley Posted February 1, 2016 Posted February 1, 2016 Ahh what a ball ache! I had the same happen, only one though haha! I've got plain black steel wheel nuts now too just to save me from having the same issue! Quote
*Pete* Posted February 6, 2016 Author Posted February 6, 2016 So picked up some rays mazdaspeed alloys with maxxis maz1 tyres on fridaySeeing as I had the wheels in the car while i was out decided to give them a test fit first pic is with three people sitting in the bootFitted them today properly had to buy some 5mm spacers as the fronts didn't clear the cailpers Quote
*Pete* Posted March 10, 2016 Author Posted March 10, 2016 (edited) Been awhile since I've updated this so here goes.Rolled the arches:And then put my suspension on off the old one:Also brought and put on a adjustable panhard rod:I have also started to take off the bump strips only done one side so far just need to take the glue off the passenger side.Also re did my custom rear light wiring on my lights with diodes all the wires to stop an earthing problem I was getting when braking in reverse it would turn the side lights on. and finally got them on the car.Added clear indicators as well Edited March 10, 2016 by *Pete* Quote
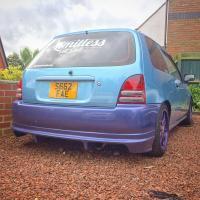
*Pete* Posted March 10, 2016 Author Posted March 10, 2016 (edited) Some of you know I and a few of my friends run a local car club called Limitless, which we had our first monthly meet last weekend so had the car relatively clean. Here are the photos I took of my car, first two are at the meet and the other after the meet. Edited March 10, 2016 by *Pete* Quote
*Pete* Posted March 10, 2016 Author Posted March 10, 2016 That looks sweet man love it Cheers, hopefully going to get stuff done on it alot quicker now Quote
*Pete* Posted March 15, 2016 Author Posted March 15, 2016 So took the rest off the glue off at the weekend and clay bar around the area to make it all the the same colour and spent two hours polishing the lips of my wheels, took most of the corrosion off and got a bit of a reflection. As you can see from the picture above the universal wheel spacers stick out over the hub and wheel where it bolts the hub and look ugly so I had these made. Quote

Recommended Posts
Join the conversation
You can post now and register later. If you have an account, sign in now to post with your account.