Dansstarlet1996 Posted May 1, 2016 Posted May 1, 2016 That's awesome dude! Be good to see how this one does Quote
*Pete* Posted May 3, 2016 Author Posted May 3, 2016 Right better do a proper update! Finally have time to do this now I this now after doing my club stuff with our monthly meet being Sunday!Before Japfest (prep basically):So no picture but adjusted the rear wheeling bearings as one had a little play but now there all good!So my strut brace I had sand blasted and I had primered it, I wanted it on for Japfest so I finished spraying it.Started on the lacquer the next day:did run out so had my dad go out and buy another few cans of paint and stuff while I was at work the next day and let him put a few things of his own on my card to says thanks.Multi tasking while waiting in between coats I did a oil changeLetting it dry and hoped for the best Had to move the fuel filter but got it fittedAt Japfest:On track with Nick (akayapotter):Made a little purchase while there Even though I took it abit easy on braking I still pushed it in the corners Then this weekend I had a spare motorized headlight adjuster which I fitted to adjust the headlight properly as mine was broken. Thing I have worked out is that there are two adjustments you can make the to the headlight the one on the top (white bit top left of picture below) adjusts the horizontal pattern of the light and the motorized adjuster (the bit with the rust bolt head, the one that adjusts) has a bolt on the back of it to adjust the height of the beam When ever I looked people always just said the screw on the back of the headlight so may look into making a proper guide to tell people.And also cleaned my engine bay and fitted my magncor ht leads I have.Did have a slight issue later on as I discovered that water had got into the second spark plug hole and was causing a horrible miss fire. so at first I thought the dizzy was wet took it off no water inside but cleaned the contacts and rotor arm put it back on. Ended up with a micro fibre being pushed in with a screw driver got the water out than ran like a dream and even felt a bit better pulling while driving around! Quote
*Pete* Posted May 3, 2016 Author Posted May 3, 2016 Also should have some replace plate arriving tomorrow some 12x6 inch plates Quote
*Pete* Posted May 3, 2016 Author Posted May 3, 2016 Also forgot to say the old turquoise shell I gave to my mate whos a scrap man he did me a favour of getting rid of it and I had a load scrap inside it which made it worth him taking it. Quote
*Pete* Posted May 11, 2016 Author Posted May 11, 2016 So little update:Random photo I took at my clubs monthly meet before the start of itAlso got myself so new number plates 12x6 ANPR camera at work for the gate don't like them but oh well I'll deal with that. Handy the plates came with a packaged with a film that I useed to mock the holes for the mounting to which I measured the front on to fit on my na/glanza mix bumper to which the bolt holes are the same on the na bumper ftw!I also noticed on of my welds on the rear box wasn't as good weld as I thought and had snapped off caused it to be able to move around alot. So re welded strengthened and tided it up. used the bits I cut off to strengthen the mounts. Not the best welding I have done but we had run out of normal wire for the welder so had a crappy stainless steel wire which I found not to weld as well :/Rain stopped play so had to wait for it to stop. I threw everything under the car or in the garage but I left my hoodie out in the rain so that got soaked!But I got it bolted back on and now it barely moves and wobbles the car the car without banging on anything Also the little starlet came to the rescue the other night, managed to tow it enough to bump start it as it had a flat battery! Quote
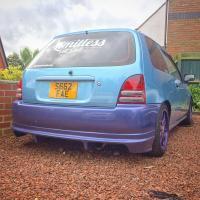
*Pete* Posted June 2, 2016 Author Posted June 2, 2016 Update:Got the three spoke wheels back on for Japday.Then had a few photos:Removed the rear wiper:Modified Nationals with my own club Limitless: Clean the car:And Willow got this amazing photo of my wheels Quote
JDMfreak Posted June 3, 2016 Posted June 3, 2016 them 3 spokes are serious looking paint work is mint on the car aswell Quote
*Pete* Posted June 3, 2016 Author Posted June 3, 2016 Looking Sweet! them 3 spokes are serious looking paint work is mint on the car aswell Cheers! I want to refurb the wheels abit due the curbing and paint is cracked on them but thats on hold as I'm getting a few bits on the car sprayed soon. Quote
*Pete* Posted July 13, 2016 Author Posted July 13, 2016 (edited) Update! Yay! Been awhile!So things have been picking up with mods.First I wanted something different for the horn and my brother had these laying around so got them off him (by the way its been modded so all ports fire at once so its single tone) also you may wonder three horns, four ports? two of the ports have a joiner that then lead to the biggest horn.Didn't have to make any brackets just used holes already there. pump mounted the chassis leg where was already threaded holes but had to do the trick of puting to nuts together so I could tighten it to the body properly.Fitting my boss, snap off boss and steering wheel. I took out the late spec unit and put in my early spec unit from my second starlet as its way better (First starlet was late spec and the unit broke when I fitted a boss).Horn wiring just swap it from plug with one wire into the other plug on the top left.So you can see how I made the horn work still with the standard wiring loom. All fitted:Painting a few bits:So you can see the difference Best Part!! Coilovers BC Racing BR Series Coilovers: Type RAHad to get my tracking done as it was majorly out! Wasn't even on the gauges when they started. Took it to a garage my brother use to work at and only cost £10 for half an hour to do the tracking. Car sits 300mm from centre of the wheel to the top of the arch all round Edited July 13, 2016 by *Pete* Quote
*Pete* Posted July 13, 2016 Author Posted July 13, 2016 Also got a Tsurikawa fitted because JDM yo! More and better pictures I took of the car.When positioning my car there some noticed when the car was on un even ground the wheel went high in the arch still and inch for the wheel to go into the arch. Quote
Walker96 Posted July 13, 2016 Posted July 13, 2016 Looks great mate! Do really like them wheels can't wait to see it in person now. Quote
*Pete* Posted July 13, 2016 Author Posted July 13, 2016 Looks great mate! Do really like them wheels can't wait to see it in person now. Cheers man! I have always loved 3 spoke wheels! Quote
Westley Posted July 13, 2016 Posted July 13, 2016 Looks so nice! Like how it's looking rather jdm too Sent from my iPhone using Tapatalk Quote
akyakapotter Posted July 13, 2016 Posted July 13, 2016 How does that work for the horn? My glanza I have a bit poking out that makes contact with the metal of the boss kit well annoying lol Quote
*Pete* Posted July 13, 2016 Author Posted July 13, 2016 How does that work for the horn? My glanza I have a bit poking out that makes contact with the metal of the boss kit well annoying lol Should have a metal ring on the back of the boss thats isolated from the rest of the boss with a wire leading off to put on the horn button. should look similar to that Quote
*Pete* Posted July 13, 2016 Author Posted July 13, 2016 Looks so nice! Like how it's looking rather jdm tooSent from my iPhone using TapatalkCheers dude, I love the little addition bits to make it JDM Quote
Pete_A Posted July 14, 2016 Posted July 14, 2016 Love it! 3 spokes rock. i fukin lol'd when i saw those horns, a quick parp from them should have pedestrians doing a little malteser, worth gettin a dash cam and a youtube account! Quote
*Pete* Posted July 14, 2016 Author Posted July 14, 2016 I wouldnt do it to anyone i dont know unless there in the road or doing something stupid. Do it to my mates all the time they know I have them but still makes them jump. Ever since i put them on I haven't been in the position to use them Quote
*Pete* Posted July 14, 2016 Author Posted July 14, 2016 How does the horns sound? Pretty good, I'll have to get a video at some point Quote
Dansstarlet1996 Posted July 27, 2016 Posted July 27, 2016 Looks awesome mate! Liking the Volvo in the background of some of the pics too ;) Quote
*Pete* Posted July 27, 2016 Author Posted July 27, 2016 Looks awesome mate! Liking the Volvo in the background of some of the pics too ;) Cheers, the blue 240 is my brothers which is quite a machine and the green 850 t5r is my dads I almost got a 340 instead pf another starlet but starlet won Quote

Recommended Posts
Join the conversation
You can post now and register later. If you have an account, sign in now to post with your account.