

Sefton-EP91
-
Content Count
1696 -
Joined
-
Last visited
Recent Profile Visitors


-
Sefton-EP91’s 98 Spec Forged Glanza
Sefton-EP91 replied to Sefton-EP91's topic in EP91 Glanza Progress Blogs
She’s done! Runs absolutely perfectly, I’ll admit I haven’t driven the car yet so I plan on taking it for a drive tomorrow. Gave it a quick once over aswell as the oil was thrown all up the back of the car when the oil line split. -
Thank you nick, i didn’t realise my membership had run out if I’m honest, I’ll get it paid!
-
For some reason it doesn’t allow me to edit my first post
-
Thanks morgey. That’s the link. I just want it to say: Sefton-EP91’s 98 Spec Forged Glanza Thanks.
-
I’m unable to edit the title of my build thread and was wondering if an admin could do it for me or point me in the right direction. I use to do it via the first post but I don’t seem to have that option anymore. Thanks!
-
Sefton-EP91’s 98 Spec Forged Glanza
Sefton-EP91 replied to Sefton-EP91's topic in EP91 Glanza Progress Blogs
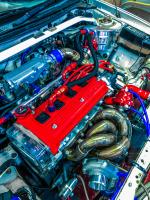
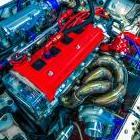
So after a long battle, I have finally got the car to a point where it can be started and flushed out, I’ll be using a cheap alternative oil for flushing then switching to Fuchs 5-40 fully with a fresh filter. So just to go over what’s been done: New ACL Big end shells New ARP Big end bolts New ARP Main cap bolts Cleaned out oil strainer Stripped and cleaned oil pressure relief valve Cleaned and painted sump New genuine sump bolts Heat wrapped down pipe Fitted new Racing lines remote oil line Fitted new Heatshield Products heat proo -
Sefton-EP91’s 98 Spec Forged Glanza
Sefton-EP91 replied to Sefton-EP91's topic in EP91 Glanza Progress Blogs
I took the circlip out of mine, stripped it, cleaned it all and made sure it was free moving, it’s just a a spring loaded plunger that opens when the pressure exceeds a specified amount! For £48 I think I’ll stick with the one I have! -
Sefton-EP91’s 98 Spec Forged Glanza
Sefton-EP91 replied to Sefton-EP91's topic in EP91 Glanza Progress Blogs
Shit news I know guys but nothing that can’t be sorted, will be going back together tomorrow hopefully so I’ll update again once it’s back together, the pressure relief valve works perfectly, I’ve stripped it all down completely and cleaned it all out and ensured it works. -
Sefton-EP91’s 98 Spec Forged Glanza
Sefton-EP91 replied to Sefton-EP91's topic in EP91 Glanza Progress Blogs
Big update.. as mentioned in my previous post the car was booked in for mapping on the 28th March. Before the mapping I decided that the screamer pipe had to go, so literally on the day before mapping, thanks to rob fisher for the recommendation, I got the car over to alpha performance fabrication to have the screamer plumbed back into the exhaust, the work carried out is absolutely perfect. Again thanks to rob fisher for putting me forward to those guys! So on the 28th I set off bright and early for mapping, car drive faultlessly all the way to M-TECH Automotive. Car wa -
Sefton-EP91’s 98 Spec Forged Glanza
Sefton-EP91 replied to Sefton-EP91's topic in EP91 Glanza Progress Blogs
So today I planned on getting the car finished underneath but if I’m honest it didn’t really do to plan, painting underneath was turning out to be a much bigger task than originally anticipated so I decided to ditch that idea and just under seal it, i left the arches white as I quite like them as it looks much cleaner. I also managed to get some photos of the exhaust. I also got my AD08R’s fitted so all in all a pretty productive day although not exactly how I planned. -
Sefton-EP91’s 98 Spec Forged Glanza
Sefton-EP91 replied to Sefton-EP91's topic in EP91 Glanza Progress Blogs
So at the moment this is the best photo I have of the exhaust, I’m still in the process of doing the hammerite underneath the car but this is where is have left it until Saturday morning. It’s has a few coats now, I’ve even started on the black bits and I must say when it dries it looks far better than it did, as said before, it’s pretty clean underneath but in the long run this will only protect it more -
Sefton-EP91’s 98 Spec Forged Glanza
Sefton-EP91 replied to Sefton-EP91's topic in EP91 Glanza Progress Blogs
Made a start on the cleaning and hammerite underneath! Anyone planning on doing this, take my advice! Don’t do it! It’s an extremely messy job and requires lots of prep, if I’m honest I wish I never started! As you will see from the photos, the whole under side (body) will go smooth white, the rear axle, fuel tank, wishbones and all the other bits will go Satin black. I plan to get the car up on the ramp to do all the final bits to make it easier and I also plan on dropping the suspension after mapping to get round the back of the coilovers and also over the top of the exhaus -
Sefton-EP91’s 98 Spec Forged Glanza
Sefton-EP91 replied to Sefton-EP91's topic in EP91 Glanza Progress Blogs
Mine are in fact 15” 7J ET35, although I do run 20mm spacers all round so I get that “stanced” look. My plan when I get the chance is to bring the camber in for a fast road/track setup so I have the added bonus of good handling once all the engine work is complete. Well the mapping is booked and is due to happen on the 28th March @ Mtech-automotive so I’ll voice my opinion once Im done, Like i said I’m having a few extras aswell so keep your eyes on this space. Did you have to do the distributor mod? I had trouble getting mine to start? Awesome, yeh mine has taken a while to -
Sefton-EP91’s 98 Spec Forged Glanza
Sefton-EP91 replied to Sefton-EP91's topic in EP91 Glanza Progress Blogs
So today I managed to start the process rolling with the mapping. I’ve got it booked now for the 28th March @ M-Tech Automotive, which is a sister company of ME (motorsport electronics). I’m extremely excited this time round. So at the same time she will be having the new fuel rail fitted along with my 430cc injectors, the launch control will be wired into the handbrake switch and various other bits which are in the pipeline so watch this space! I also finished off the polishing today, tomorrow I’ll get the hammerite out and start with the underside of the car, which will be -
Sefton-EP91’s 98 Spec Forged Glanza
Sefton-EP91 replied to Sefton-EP91's topic in EP91 Glanza Progress Blogs
Just a small update, heres a small teaser of the exhaust! I apologise for the dirt, the one day I actually have to drive my car and it’s raining! So because of the rain I decided to give her another once over. She’s shining now