Patches
-
Posts
688 -
Joined
-
Last visited


Patches's Achievements
Boosting a Starlet (5/8)
-
Well done finding all those syncros! I wanted to find a new set for mine but couldn't get all of them, think 3rd gear one was the one I couldn't get in the end
-

Drive by wire advise + throttle body replacement
Patches replied to Faiyaz.123's topic in Electronics
EP Wiring now offer parts for fitting DBW -
What year of car do you have? I might have the wiring diagram for it.
-
.
-
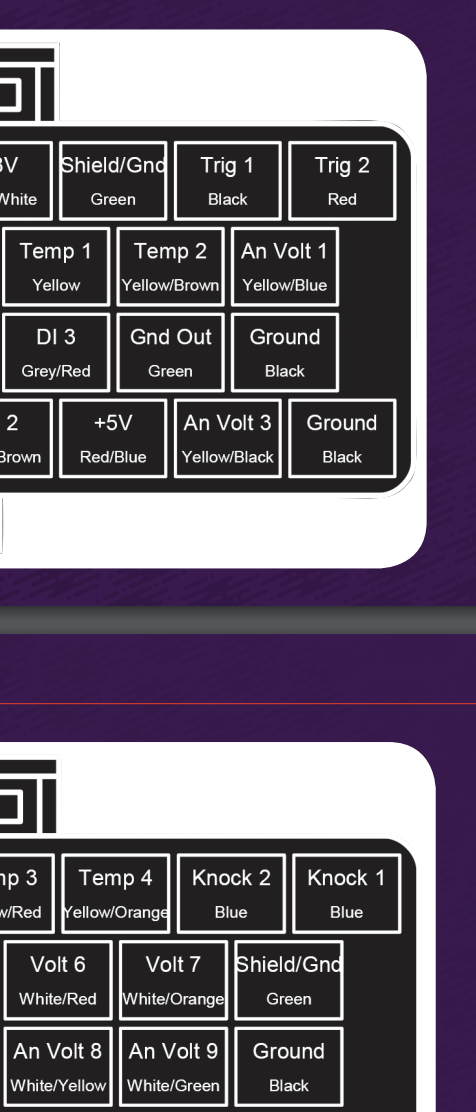
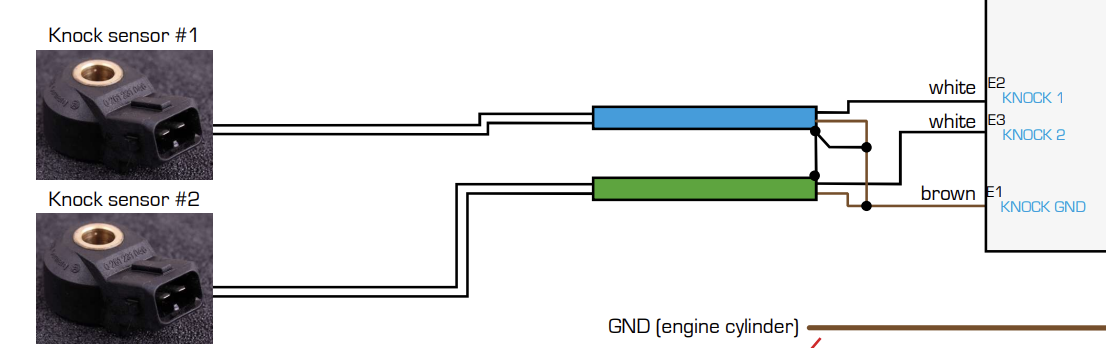
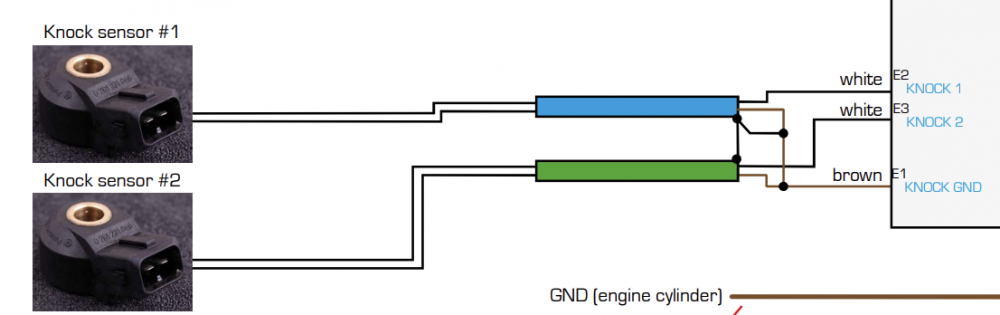
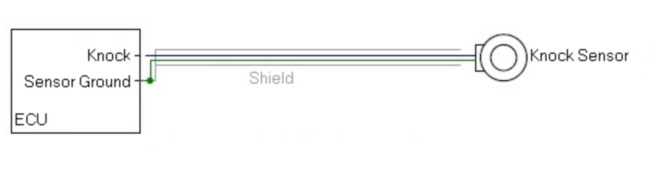
Adam from Link ECU has addressed this question on the HP Academy forum https://www.hpacademy.com/forum/efi-wiring-fundamentals/show/knock-sensor-shield-grounding I will continue to wire the way the ECU manufacturers documentation recommends
-
Nah man I definitely appreciate it. Always open to hearing other ideas and suggestions but equally if several ECU manufacturers are suggesting it as a solution it surely can't pose too many issues? I'll definitely watch that video when I get some time.
-
Well sort of, technically it has its own pin. All my sensor grounds (apart from the knock sensor and trigger grounds) are in the A connector Gnd Out and the ground and shield for the knock will go to Sheild/Gnd on the B connector. Either way it can't present too many issues as MaxxECU also recommend this method

-
That's interesting Rob, according to Link in their documentation that's exactly what I should do 😆 Haltech also recommend doing the same as I've just checked their documentation too
-
I made a mockup of my engine loom using rope Found this hidden gem in the oem harness, not sure what it was originally for but the wires could have been touching each other so I've cut them at staggered lengths, covered with heatshrink and taped it up so at least its safe now Here is the alternator, starter, windscreen wiper, reverse light switch and brake level sensor wiring fed into the AC blanking grommet, still need to terminate fan relay and a few other things on a dtm connector in the car Repaired washer wiring, new terminals, heat shrink and cleaned the connector body as couldn't source a replacement Remade my horn wiring, it will do the job. Ideally I would seal the terminals onto the horn and use new connectors but this should be fine. New ground for the horn wiring Knock sensor wiring, terminating the shield and one of the wires to a new wire for the sensor ground
-
Ha nice one dude!
-
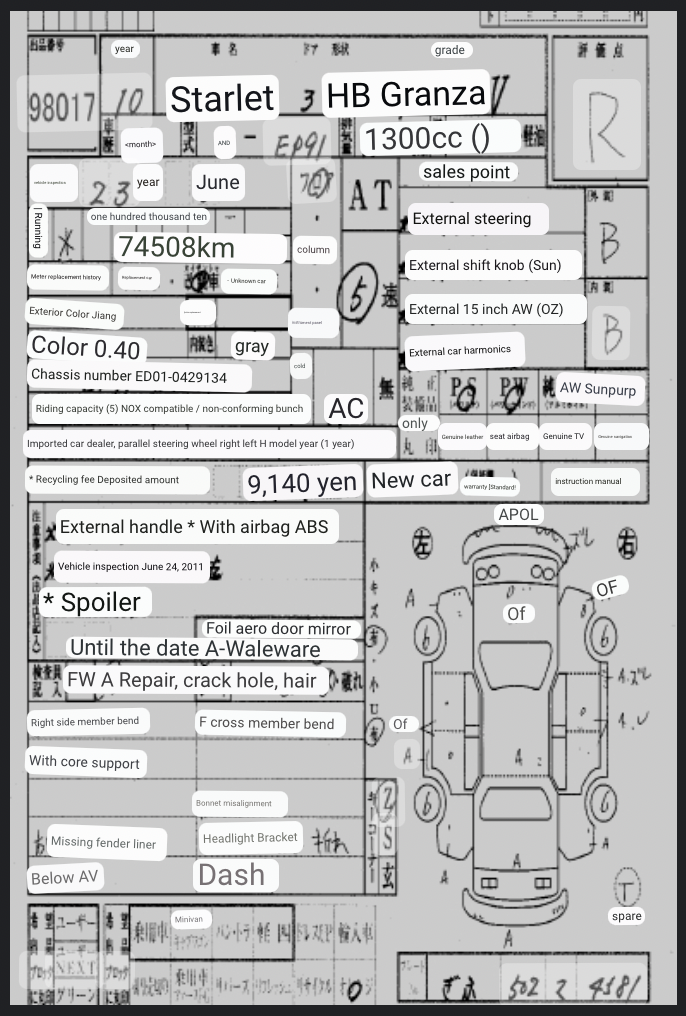
Still working away on the wiring loom. I've completed repairing and tidying up the chassis so that's ready to go back in now. As a side note I have been trying to import a Alphard or Vellfire as a family car and found this site myauctionsheet.com where I was able to verify the auction sheets for cars already imported. Costs about £7 per search so I decided to have a look to see if I could find my original starlet I bought in 2012 from DCY Europe (the shady cunts they are) It was a grade R and using google translate it says all over it "cross member bend" etc. At the time I paid £5k for it which was a lot and it was really clean aside from the smash but they made me sign sheets of paper saying it had no accident history in Japan etc 🤣 absolute wankers

-
Freshly built forged engine leaking oil
Patches replied to peter.ep80's topic in 4E-FTE Engine Discussions
Hi Peter, I'm not that clued up with this sort of issue but wanted to mention 2 things in case you weren't aware already. The 4e-fte had 2 different oil pumps, one with a seal on the pump and the other with the seal on the block so you might want to double check you have the correct oil pump. The parts diagram on the left shows what looks like a 5e oil pump as it has a crank sensor on it which (I don't think) was present on the 4e engine. If you can get a video of the engine running with the timing cover off then that might help people see where the oil is coming from. -
https://www.toyotagtturbo.com/community/index.php?threads/how-to-set-timing.41744/
-
While the gearbox was off I got the flywheel skimmed by the gearbox rebuilder, can't recommend Craig at D. Gilmour Engineering in Glasgow enough, he's been great for all the gearbox work and machining I've had done so far. I've got the gearbox back on which was also a nightmare as I really struggled to get my drivers side front wheel off as it had corroded onto the hub. Ended up loosening off the bolts a tiny bit and kicking it while under the car, once I got the wheel off it wasn't too bad. Took the loom off the car to give it a proper inspection as I knew there was some bodged bits the first time I wired the car, I also want to split the chassis loom, charge harness and the engine loom so I can easily remove one at a time. Found some right dodgy crimps! This is what happens when you rush a job, have to do it twice haha! I've got decent RS Pro uninsulated ring terminals and a pressmaster crimp tool to do my own grounds so no more red plastic insulated terminals. Having a problem with washer pumps failing, found the issue... corroded terminals so ordered a new connector with terminals and seals from auto-click but cancelled the order as after a full week they still hadn't posted it. In the end just cleaned the connector and seals up and used new Sumitomo terminals which I could source from automotiveconnectors.com Also found the reason why my car struggles to start when the engine is hot, this cable has seen better days This is the starter terminal so ordered a new custom made 25mm2 cable of 800mm with M-8 terminals at each end to replace this section from the battery positive to the starter. While the loom is out I bought some rope to mock up a loom so I can make it in the house which is 100X easier than hunched over in the car. Also made a start on the K20 coil harness, this it the mocked up version made using the leftover twin core shielded wire from the Link ECU Loom A
-
Removed my current gearbox and it was the clutch release bearing which was totally destroyed! Didn't get any photos of it. Taking the gearbox off was a total nightmare, would have been easier removing the whole engine and box then splitting but I sold my crane ages ago. The gearbox builder got some pictures of my diff which I had never seen before so it's a plate diff, think it's a TRD but no markings on it. At least I know I need the friction modifier LSD oil so got 2 litres of Millers Nanodrive CRX LS 75w90 NT+ In the meantime I've been remaking parts of my loom and doing it properly by measuring correctly and making it in the house rather than on the car which is much much easier. Starting with and injector subloom as I swapped from RX8 injectors to Bosch EV14 550cc (0280158117), I was using clip on adapters but the loom was a mess and needed redone anyway. I accidentally wrecked on of the terminals on the denso connectors I had and instead of waiting a few days for a replacement I just reused a pigtails from the original loom! Looks awful! i also used 14AWG wire for the power feed which was overkill. New injector loom is 20AWG Spec55 wire, DR-25 heat shrink, Raychem SCL for the splices and booting with DTM 6 way connector using 2 terminals for the power which I will splice into a single 18AWG power supply wire. I also picked up a set of K20 coils for £48 delivered as I need to reseal my rocker cover anyway so might as well get bosses welded on at the same time. I've struggled to find good quality K20 coil connectors so in the end had to buy genuine Sumitomo ones from KVS Looms in America which wasn't cheap but at least they should last. Here are the cheap shite K20 coil connectors which broke on the first test fit.