

Claymore
-
Content Count
660 -
Joined
-
Last visited
Content Type
Profiles
Forums
Wiki
Media Demo
Store
Calendar
Posts posted by Claymore
-
-
9 hours ago, Simon said:
You could get a 4efte without PAS and with AC very weird option but it was available as its shown on the EPC and they are factory parts.
Nice one,
Found this in the EPC :
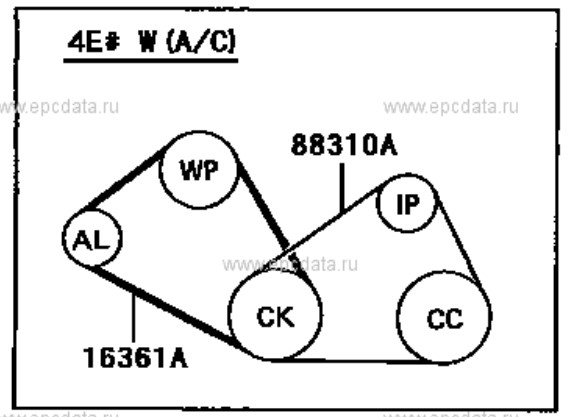
Can't find the parts page for the idler setup though, do you have a link?
Looks like a 'mare to adjust, do you just pull to tension or is it sprung loaded or eccentric bolt?
-
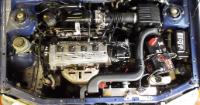
Continuing the theme of Weird ass 4efte / not a 4efte bitsa engines!?
https://www.ebay.co.uk/itm/374042202483?epid=652485202&hash=item5716a71173:g:JjEAAOSw2ypiZ6DI
Doesn't look too bad until you get to the PAS bracket "mod" to keep A/C and delete the pas pump, 4efe dizzy, coil, 2 plug 4efe ECU (other 2 ECU loom plugs appear to have been cut off and replaced with piggy back plug connections), forward facing thermostat cap from an auto?!
Think I'll pass on that

-
As far as I understand the emissions test a high lambda reading usually indicates an exhaust leak letting in air (oxygen) and it then shows up on the MOT testers O2 sensor in the exhaust pipe tip where they take the reading.
I'd check the exhaust for leaks at all the joints, (especially the new back box) and also for holes in the pipes.
Could be the engine genuinely running lean, but the other readings should show that.
-
Nice work! Love the injector sub loom, the labels really make it look awesome.

-
N/A clocks or Glanza clocks also which year are they from?
-
10 hours ago, Frankieflowers said:
i opened the distributor to stop the oil leak and discovered the teflon seal inside. It needs to be replaced but there is no information about it and no OEM on the parts website. Why?
I changed both gaskets but obviously the oil gets through the dented arm all the way in the rotor box. Please help.
Do you have photographs of the teflon seal? Any measurements? You might be able to find a similar seal or have a custom one made.
-
15 hours ago, JamesG said:
Recieved my aluminium power steering pot from RW developments last week.
Got it all fitted up with my roose silicone hoses and fresh power steering fluid.
Very happy with it, looks great in the bay compared to the standard one.
Also picked up some 98 spec glanza wing mirrors to replace my originals as one has been badly cracked since I got the car. They are a slightly different shape to the 96 ones and the glass is a little larger, but the plug is the same so they bolt straight on.
Pleased with them, they've also been repainted in 040 white so look well on the car.
Awesome
-
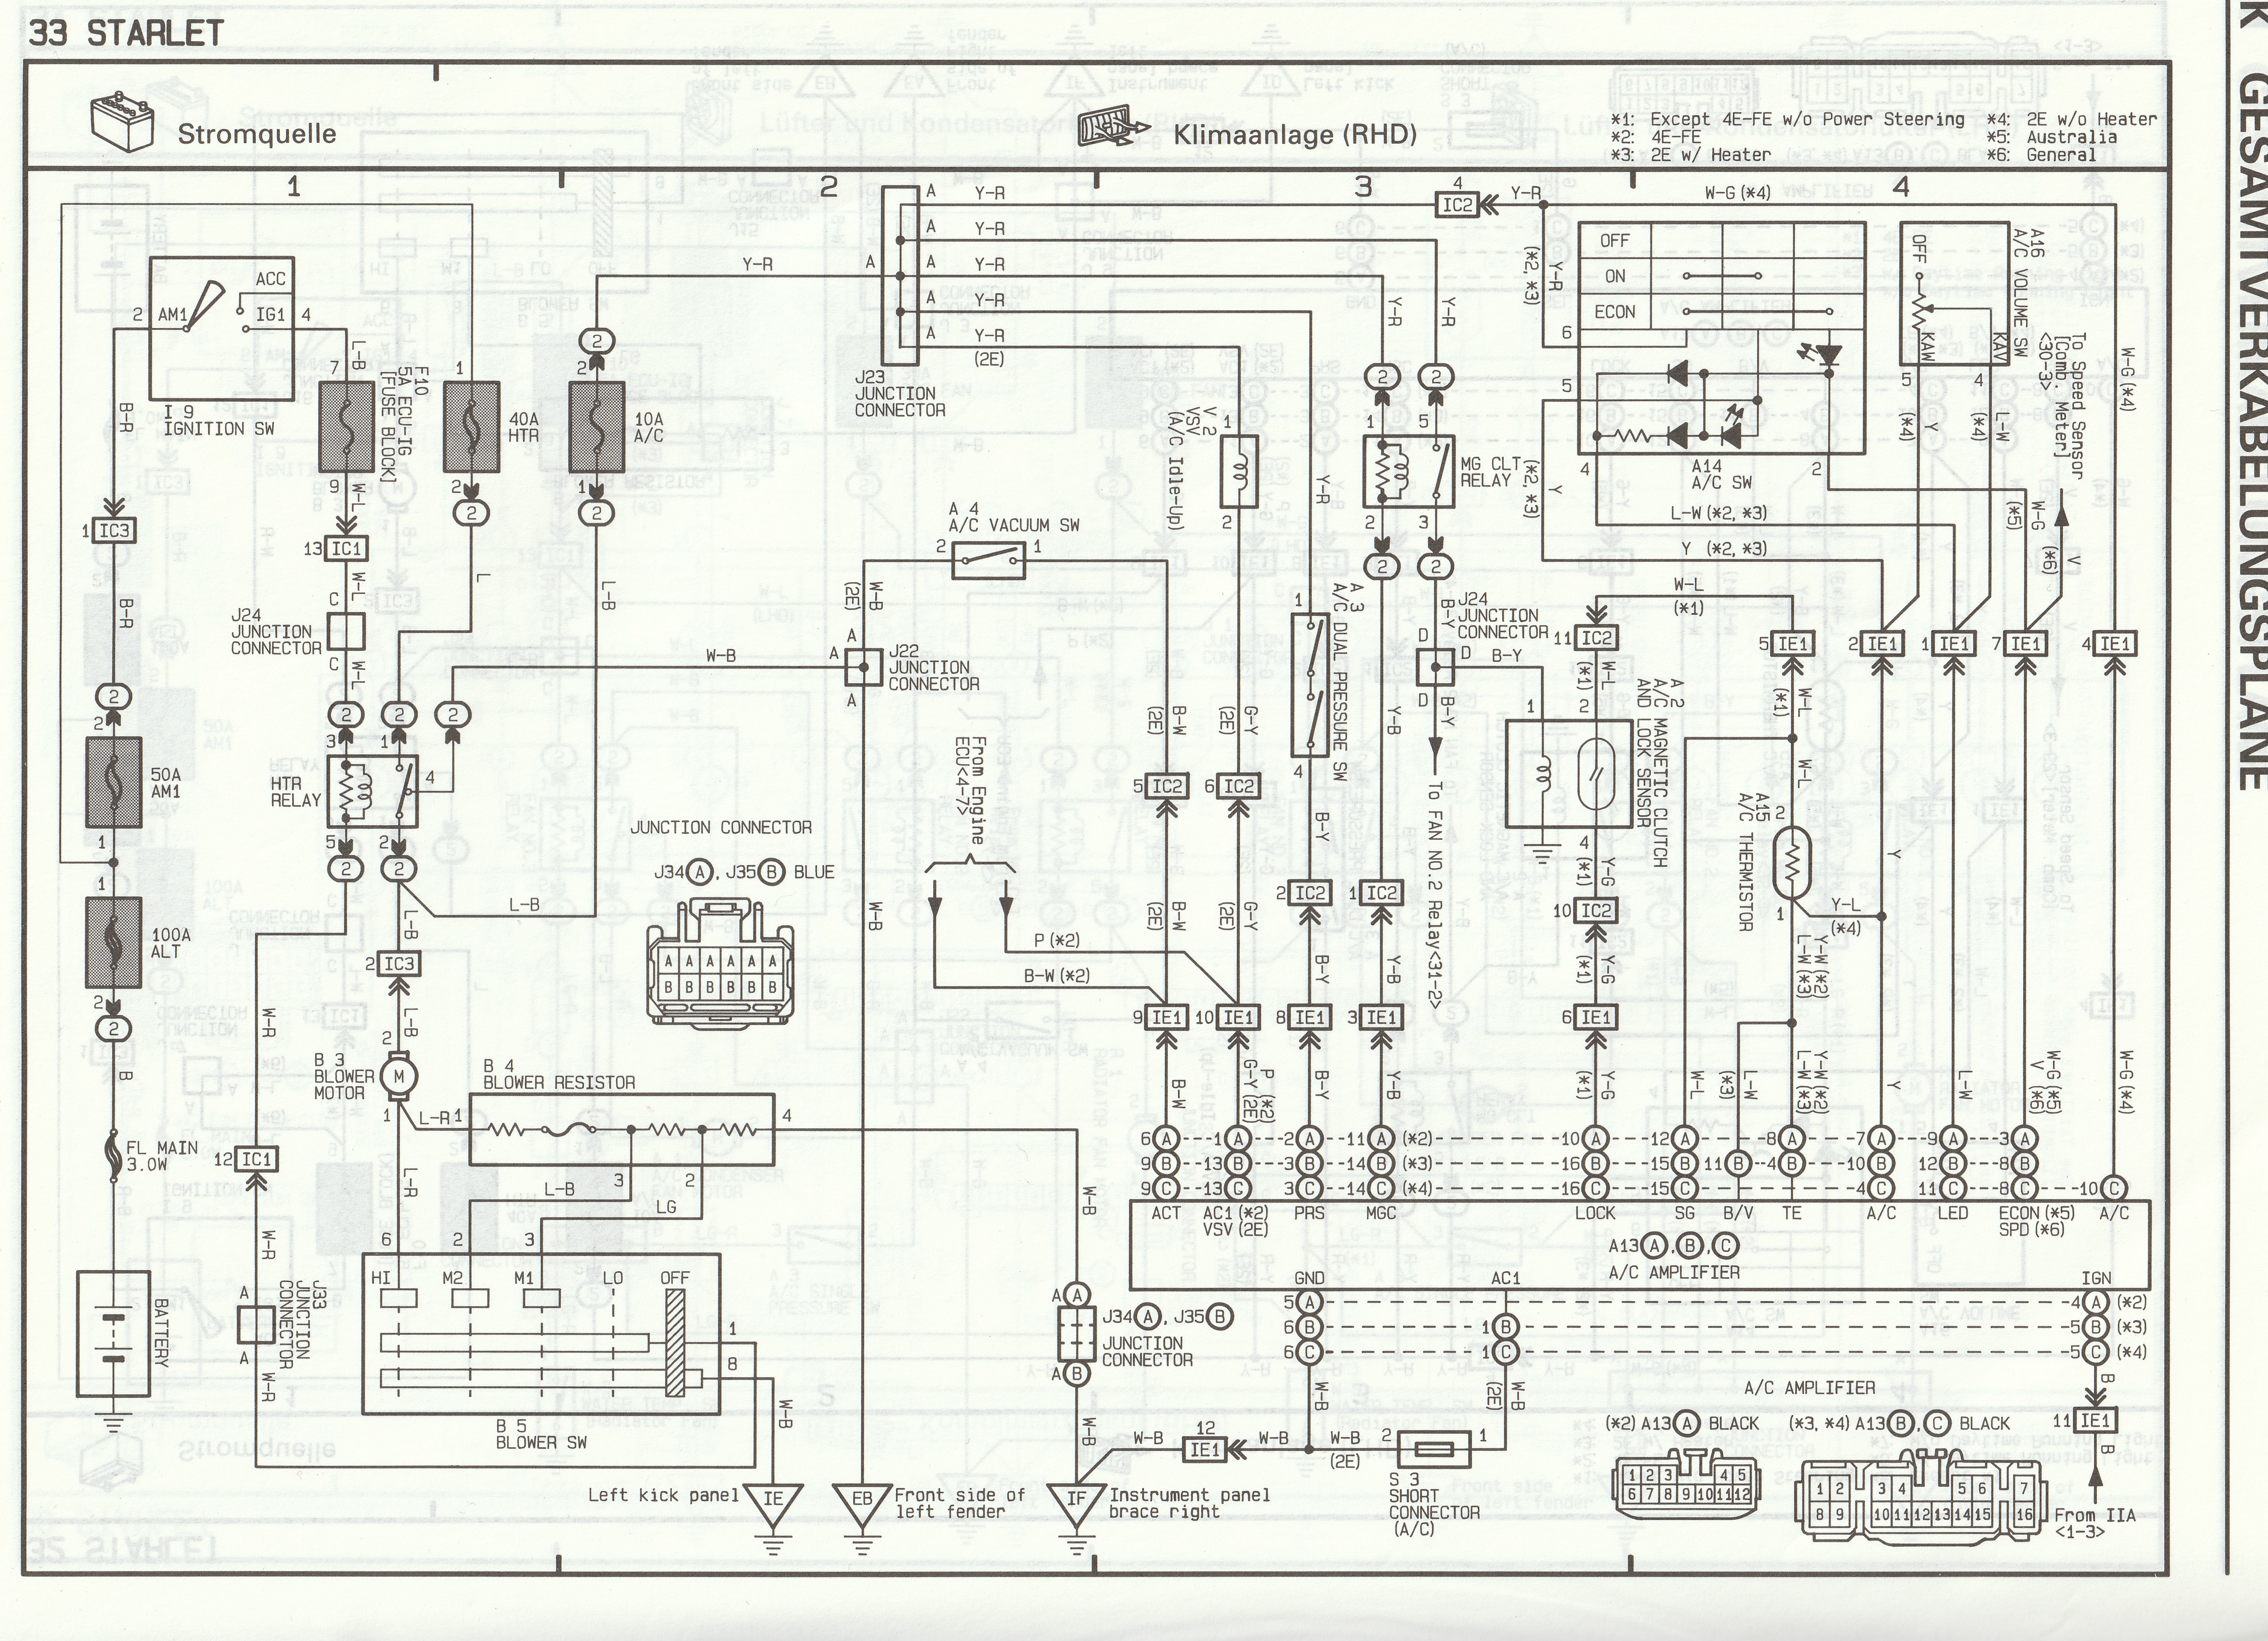
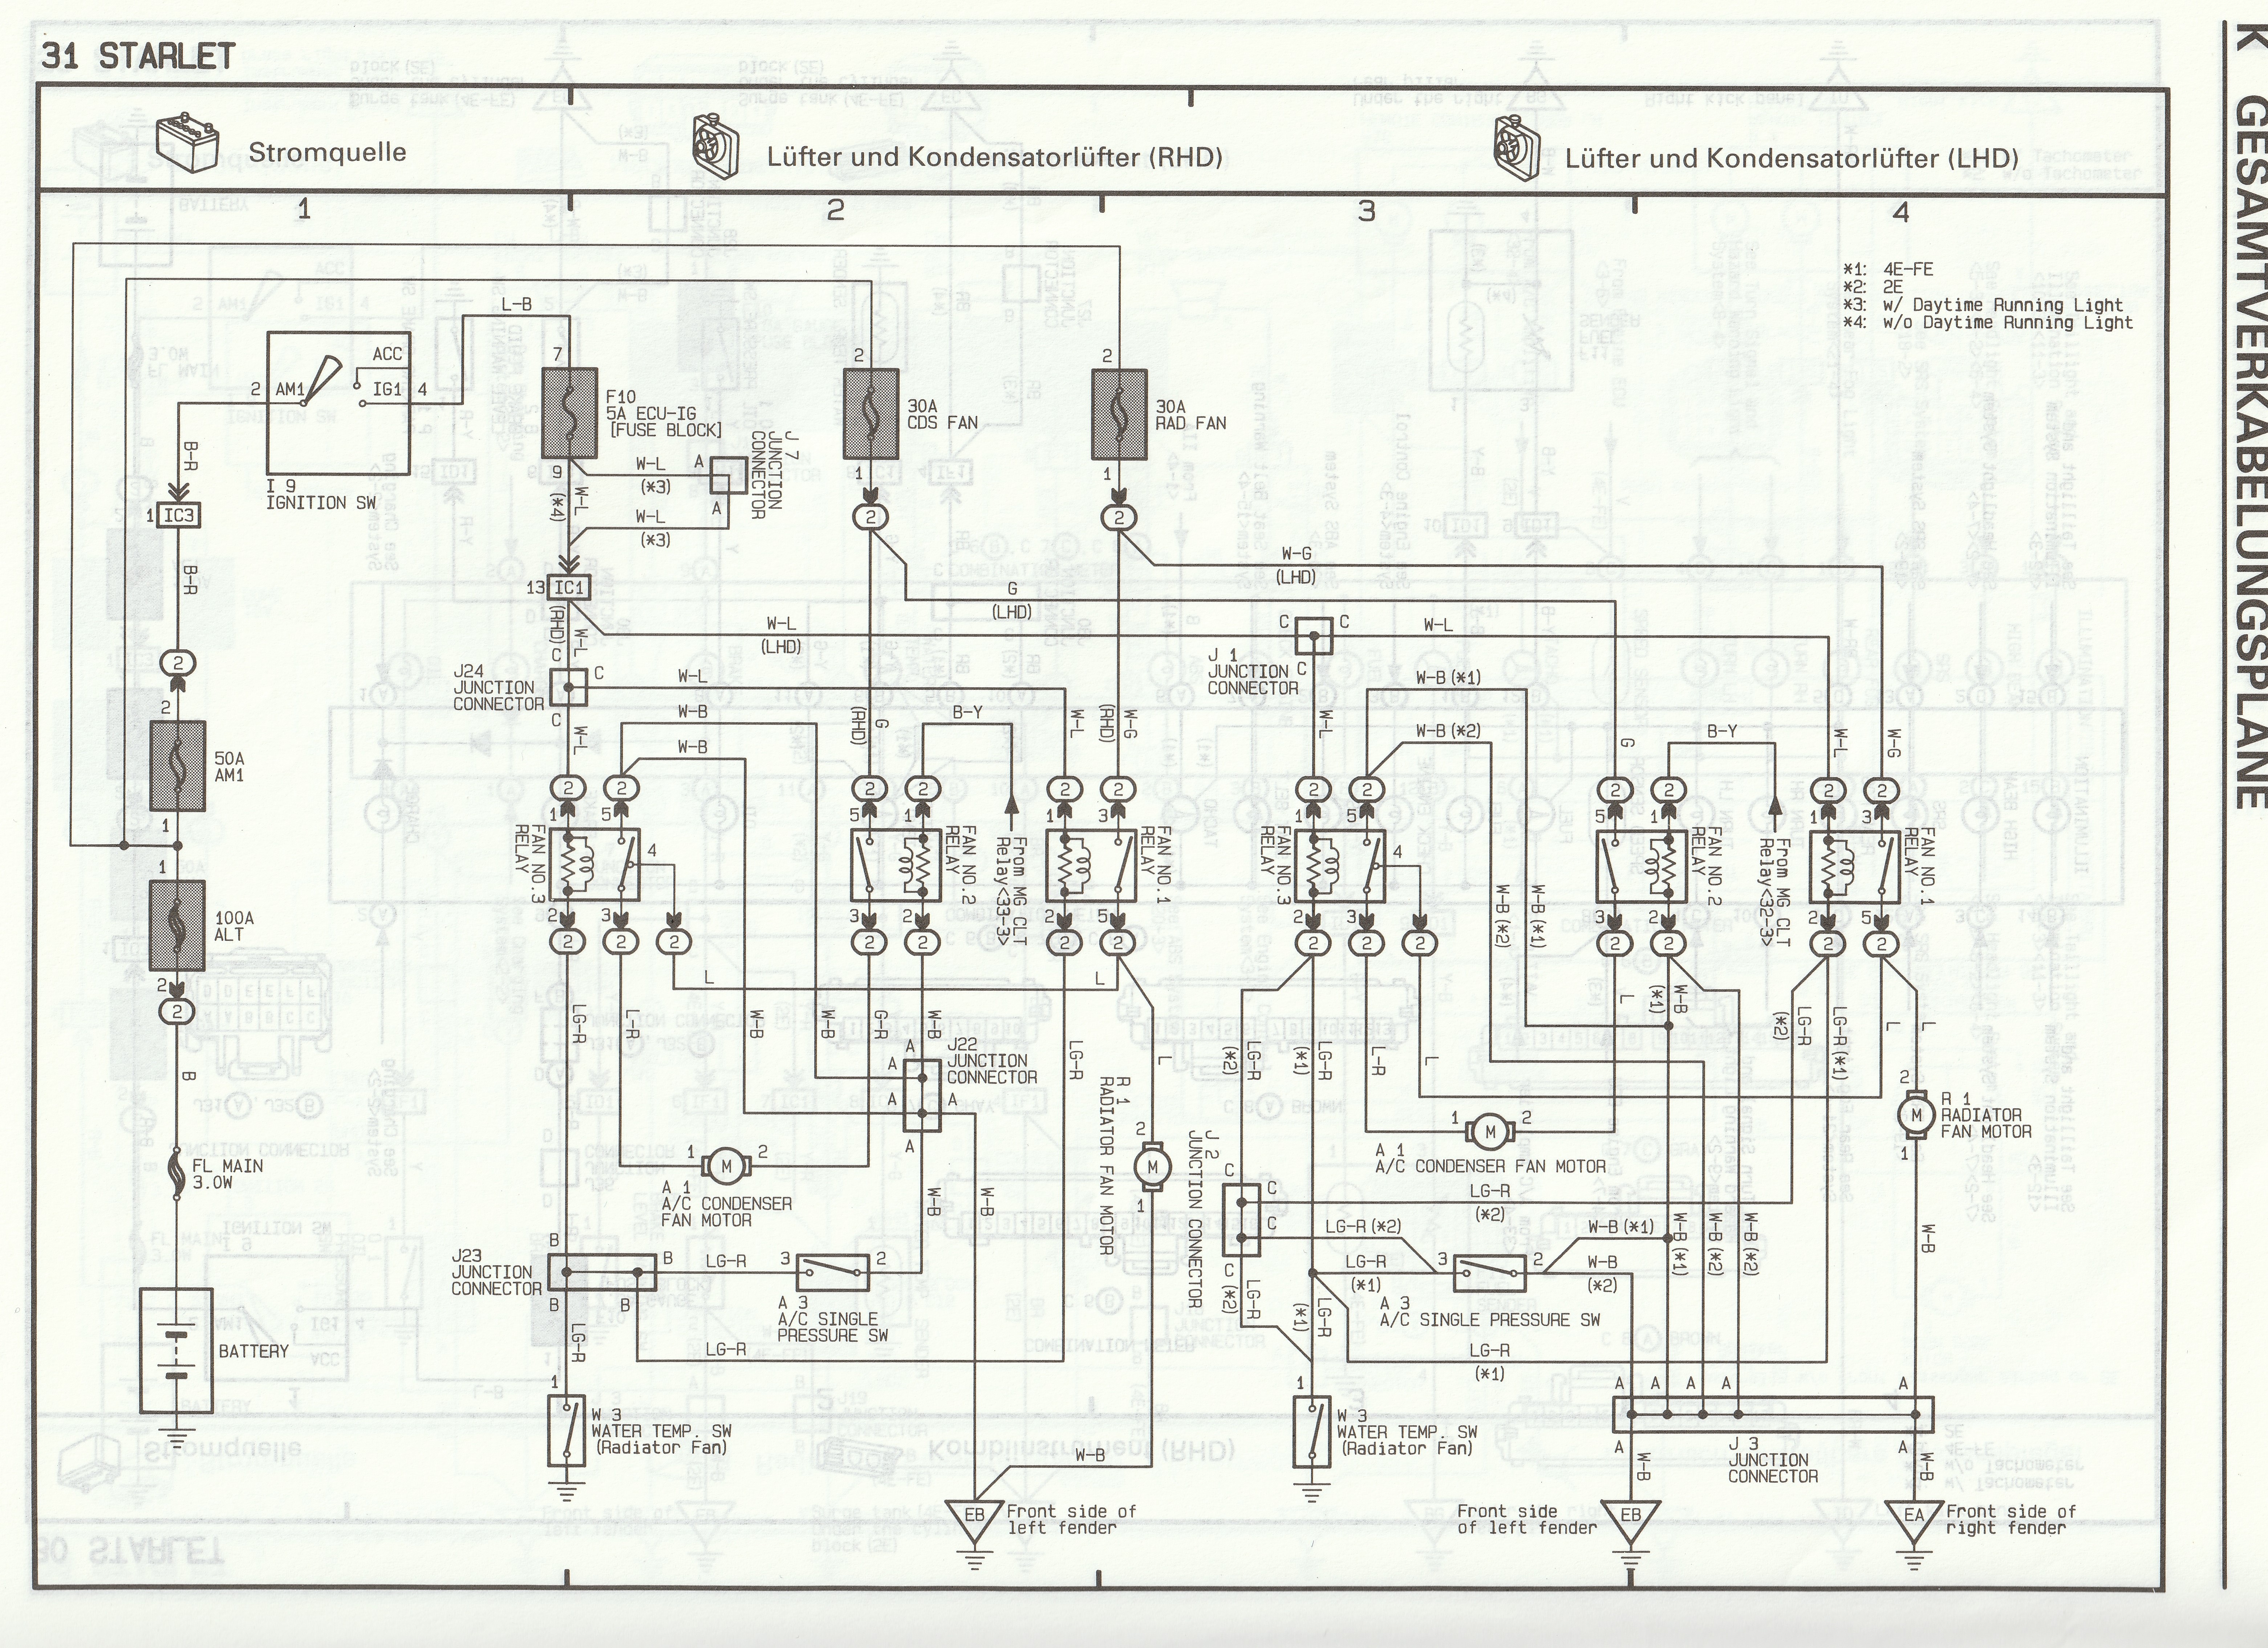
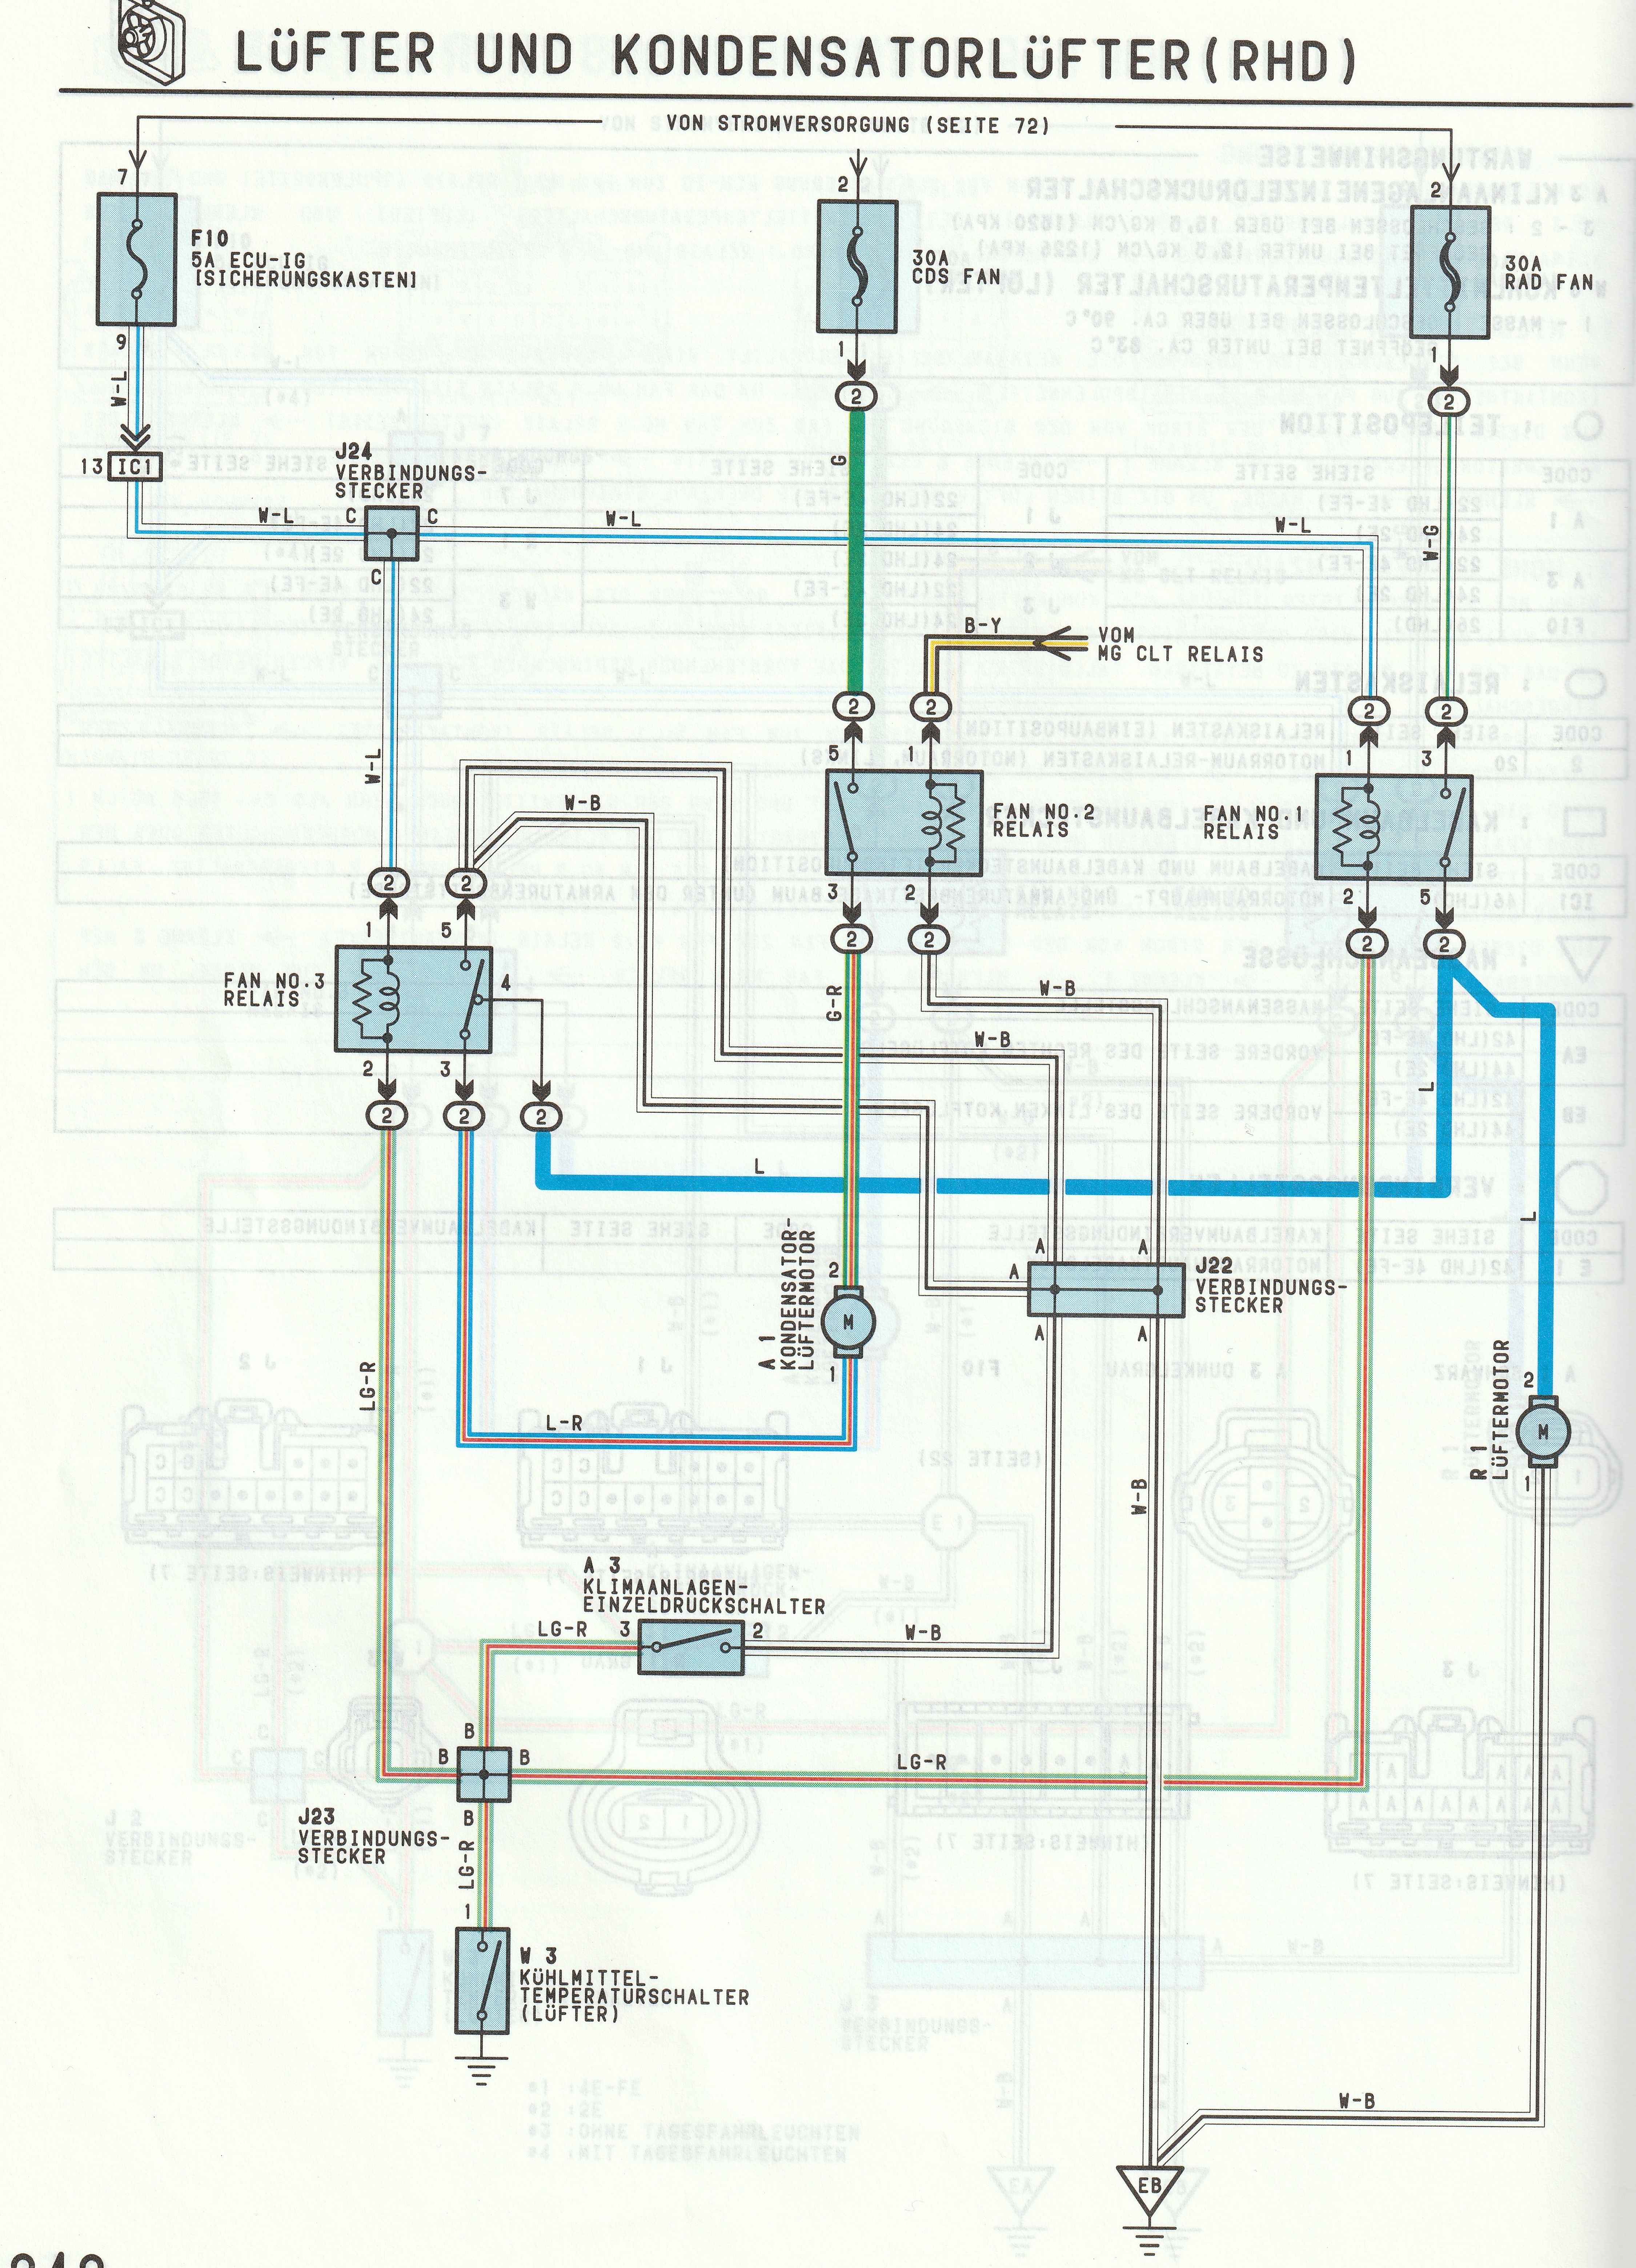
Hey Frankie all I can really offer is a copy of the European 96/97 Starlet 4efe wiring diagrams from the official Toyota workshop manual. It may be different to the 98/99 models and also the wiring may be different to the Jap models (glanza)! Also the auto climate controls found in the Glanza will probably be different aswell!
For what use it is:
Heater controls
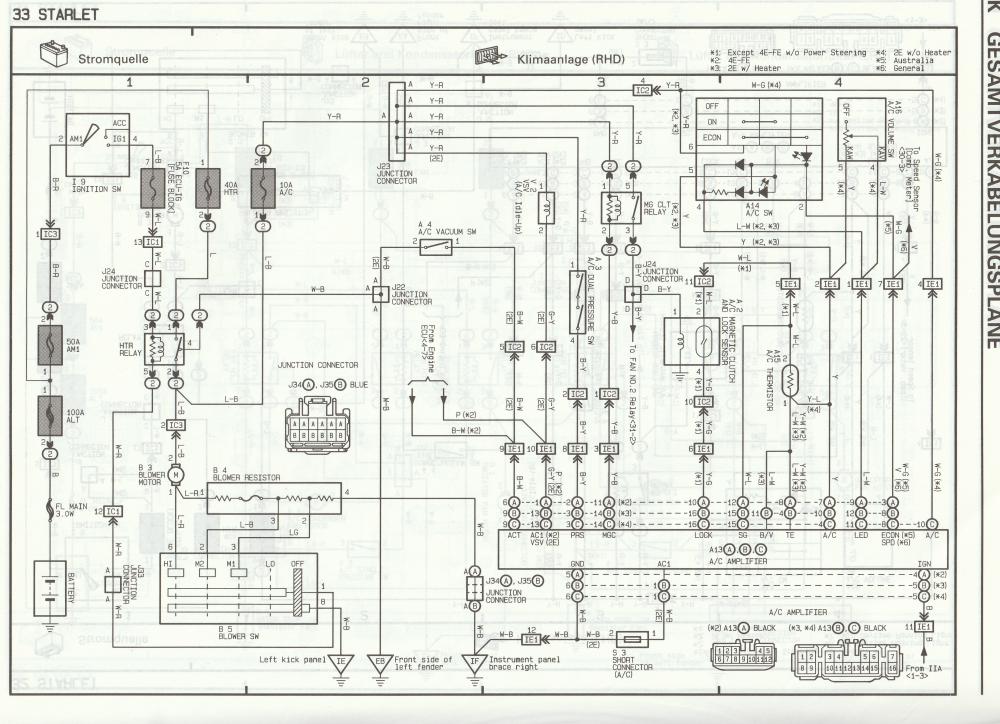
Fan / motor / relay wiring:
(Use RHD side of diagram only)
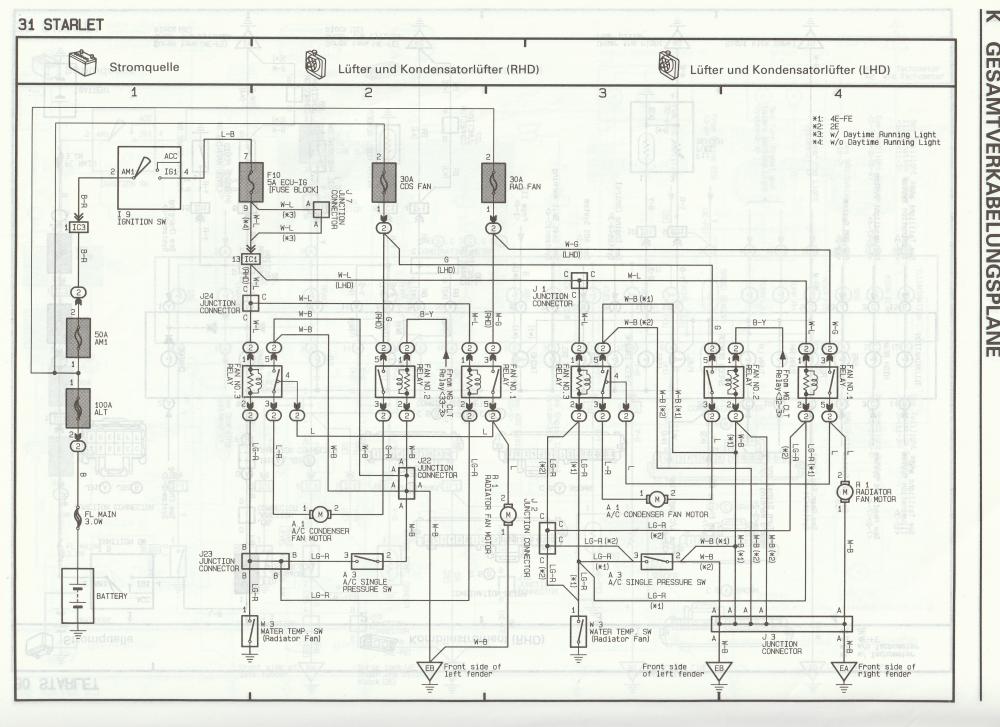
German version:
RHD only
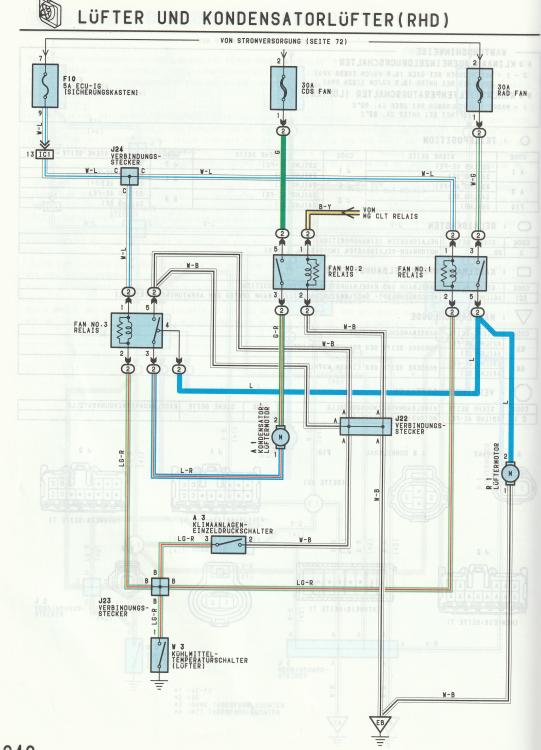
Check if any of the wire colours match and then start tracing the wires to relays and see if they follow the same path. Compare to wires / purpose from corolla loom.
Hope it's of some use, just be careful and don't cause a fire!
-
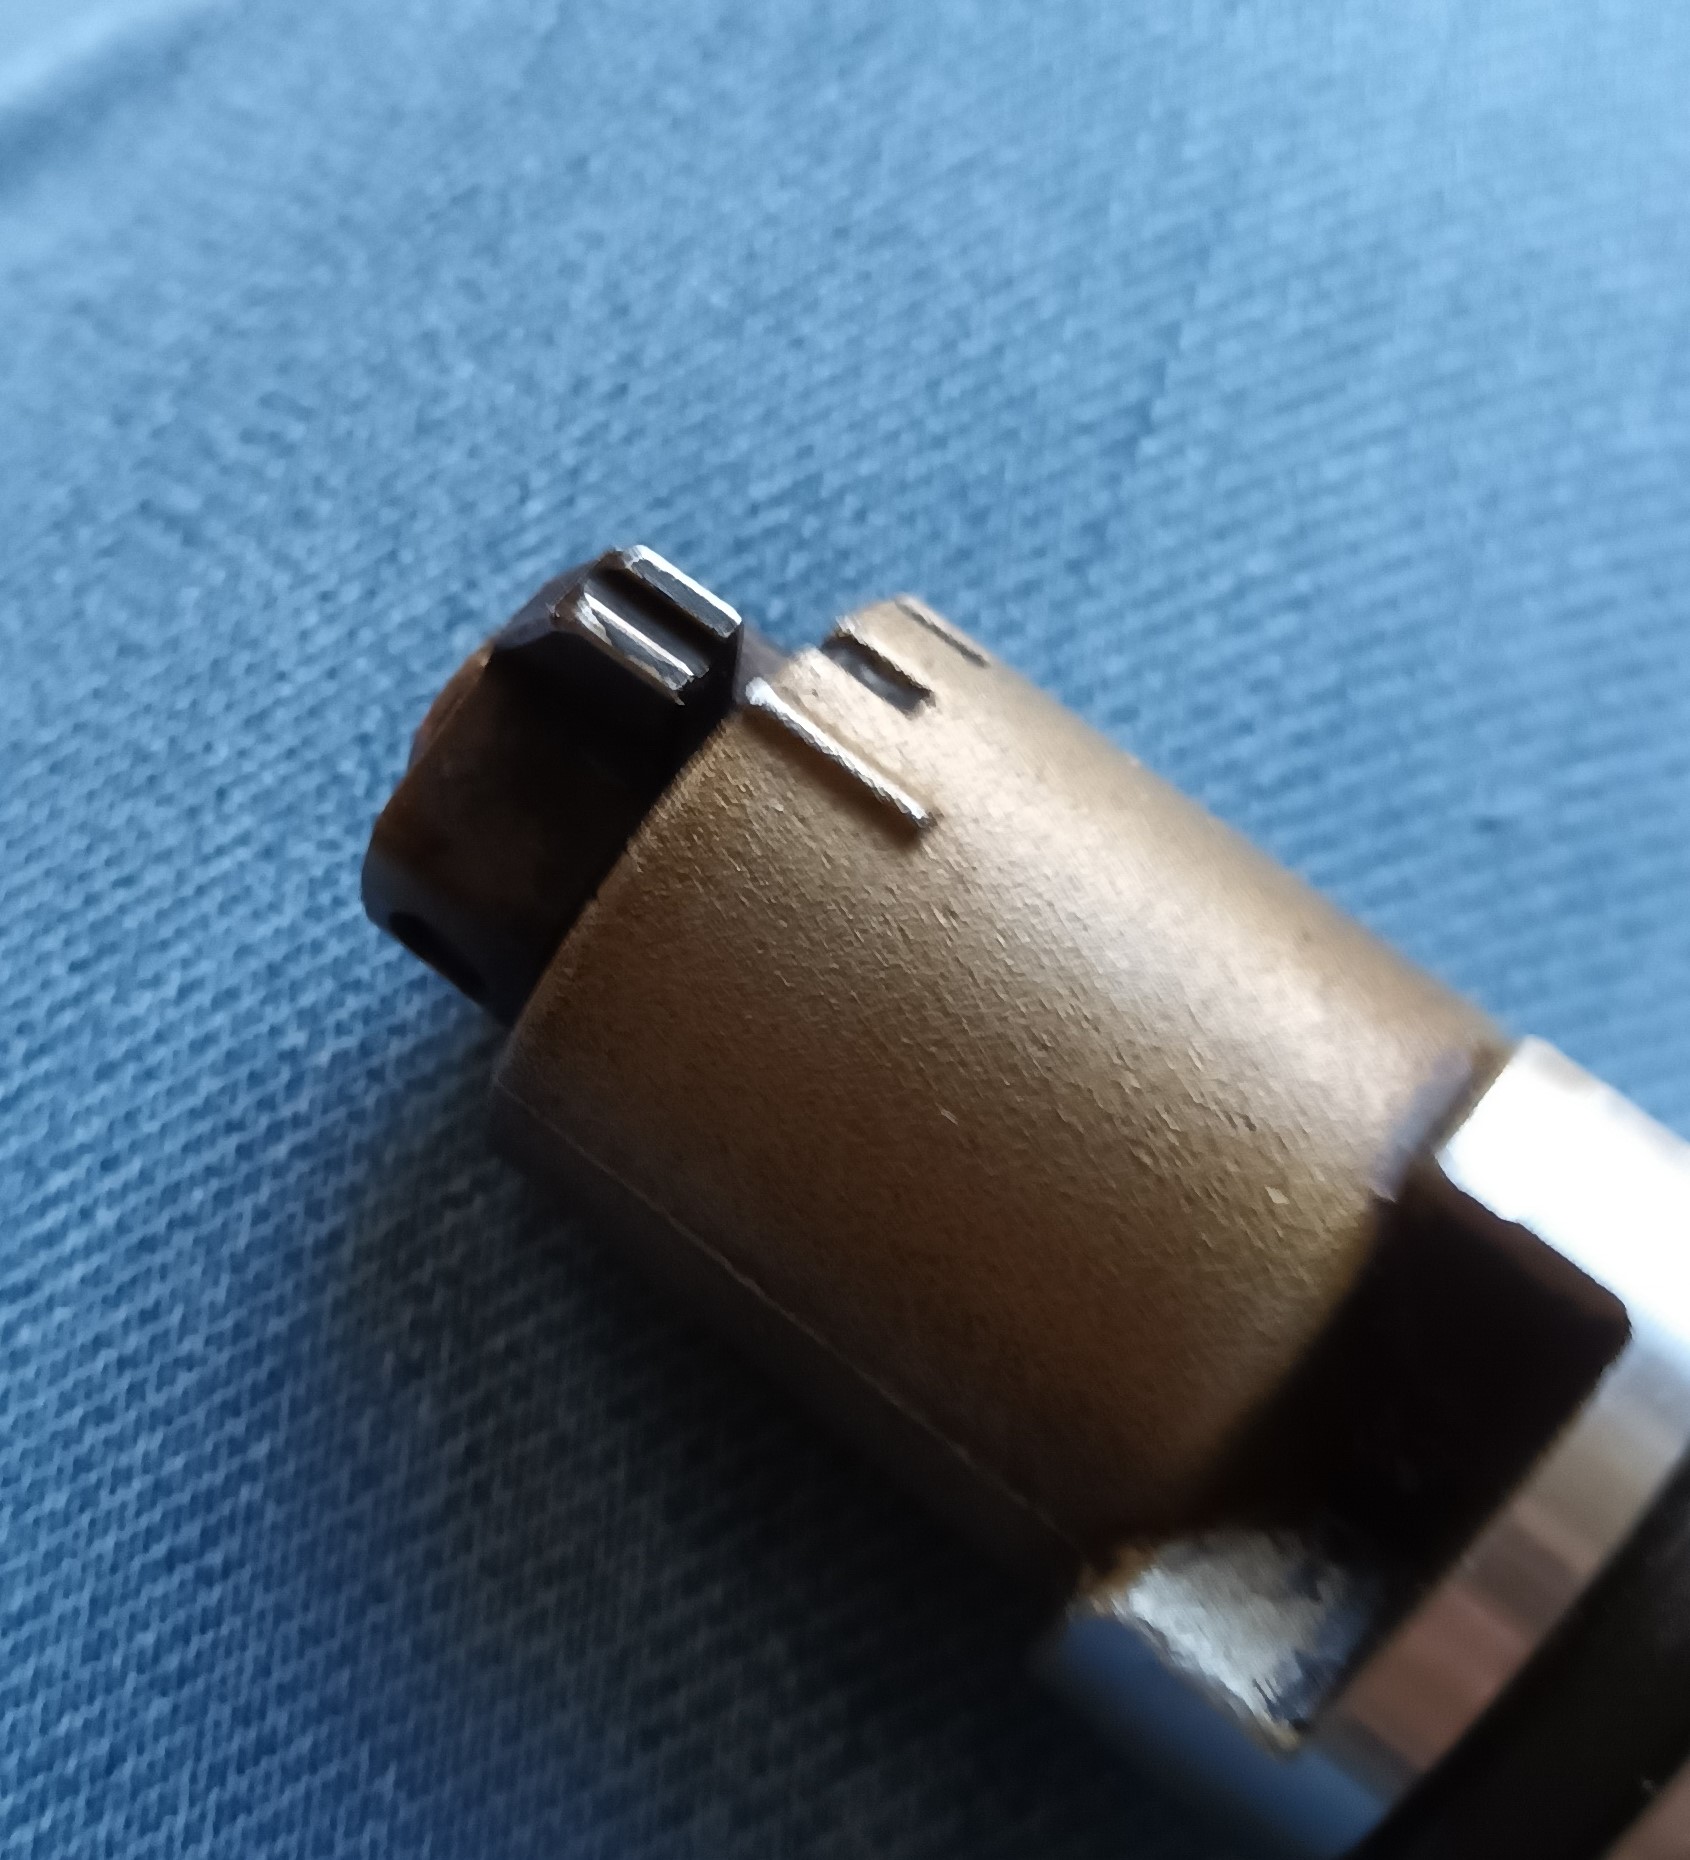
1 hour ago, Frankieflowers said:
Hey guys. I received the new distributor cap, rotor, NGK wires and dust cat seal from Japan. I already change the small gasket on the cam when we opened the engine. Although there is still a small leak in the distributor cap. I read around that it might be the bearing or the bearing ceiling gasket. It could be leaking around the shaft. we did take care of putting ceiling paste in the proper position to avoid it but it still leaks. This is why I also bought a new bearing. I haven’t found information about a distributor regeneration on this model. Do you guys have experience of putting one apart and replacing these parts for regeneration?
I also received the new TPS. I would like a piece of advice to change it. I understand the procedure about the position and electric check that has been done and I would like to know if the throttle has to be unbolted to do the job.
if I am correct, the four pin TPS reads from 0 to 100 with its fader. There is no switch. The three pin TPS works differently but that is not my case.
I'm sure the 4 pin tps does have an idle contact (see diagram a few post up) then it is a variable resistance sensor when it's off idle. It needs to be set up with feeler gauges.
Ask Jay if he will look in the official Toyota manual for the 4efte auto procedure.
The access to the TPS screws is limited (might be easier in the corolla). You can try to loosen them as it is on the car. From my experience the screws will have corroded into the throttle body and you will have difficulty turning them. Try it and see mate, but don't round them off.
-
5 hours ago, Frankieflowers said:
It's best practice to disconnect the battery before working on the electronics to prevent shorts / sparking problems.
There must also be a procedure for calibrating the new tps compared to throttle opening angle so the idle contact only connects at idle, as soon as the throttle is open a fraction the idle contact must open. Loosen screws, turn tps, check for continuity, feeler gauges etc..?
-
2 hours ago, RoyalDutchie said:
https://coolerworx.com/products/coolerworx-short-throw-shifter-toyota-starlet-glanza
One dutchie is now running one aswell
Here too...
-
The things people get up to when they have their own dyno
-
There may be a genuine reason for the delay, but it sounds like you've been more than reasonable anyway.
If you bought on eBay your covered as they guarantee your item or a refund.
If you want to start the process go to the item in your account, click "I didn't receive my item" and check the I want a refund box. eBay will then contact the supplier to respond. After a few days, if its not sorted then you can ask eBay to step in (there's a button to click) and they force the refund for you.
Hope you get sorted.
-
Great stuff mate, nice and tidy.
-
Found this on another forum....
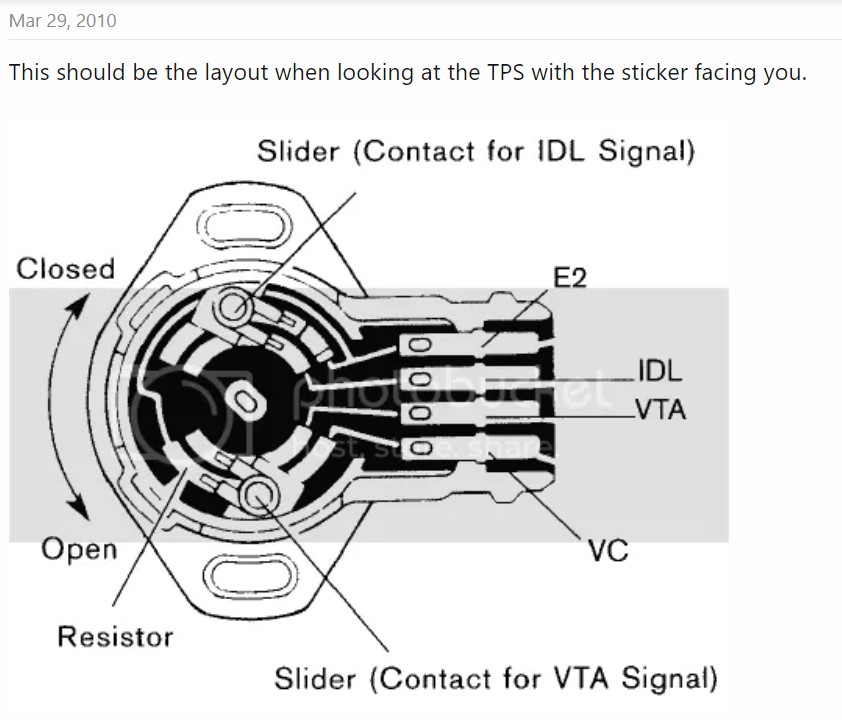
From the diagram looks like the idle contact is a switch.
Test between E2-IDL with continuity setting (beeeeeeeep when at idle, open circuit off idle position)
Test between VTA-VC with resistance setting (resistance should change smoothly as the throttle is turned.)
That's how I would test it.
The EP82 4efte use 89452-14020 for 89-92
The EP82 / EP91 4efte use 89452-22090 for 92-99
-
15 hours ago, Frankieflowers said:
I checked the voltage output of the TPS. It jumps out of scale when opening the throttle slowly. This should mean that it doesn’t work smoothly.
I tried to find a new one but I cannot find it. Could you help?
The new reference n. Of Denso 198500-3011 isToyota89452-22090
FYI never inspected an actual 4efte TPS. This info is from ECU pinouts and forum posts and my experience with the EP91 4efe TPS.
As far as I know the Automatic 4efte uses a potentiometer (variable resistance) style throttle position sensor. But the ECU pinouts also mention an idle sensor (switch?). So it may have a switch to show closed throttle and variable resistance for throttle angle.
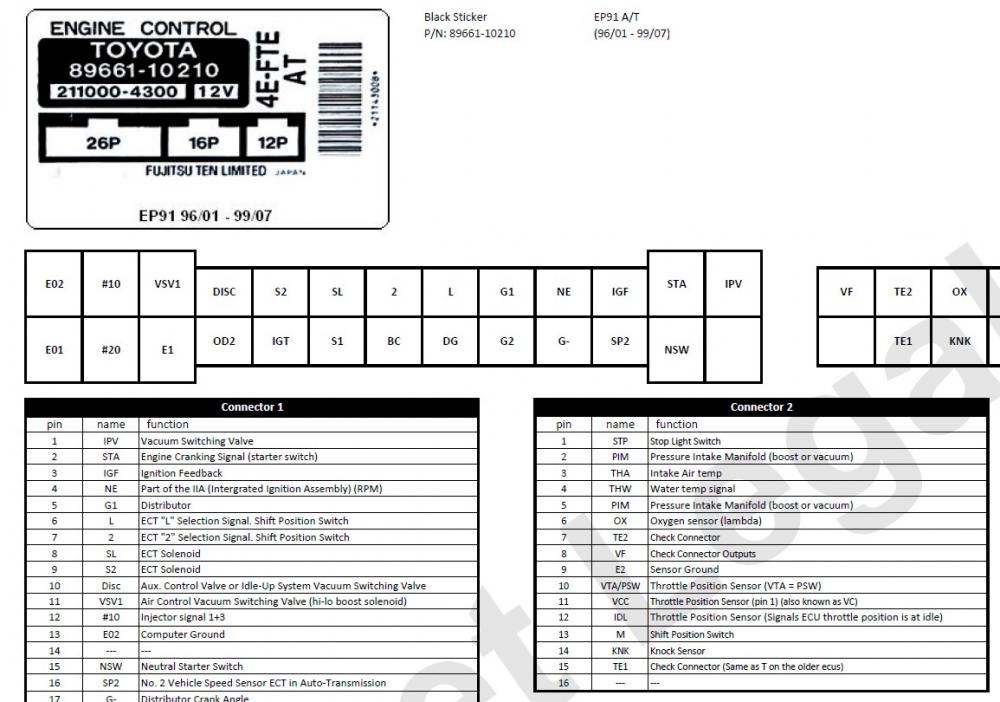
9 E2 = Sensor earth
10 VTA / PSW = Throttle angle (fte Auto) / Full throttle (switch, fte manual)
11 VCC = 5v power
12 IDL = Idle position (throttle closed)
How many contact pins does the sensor have?
Does the ECU show any error codes?
How are you measuring the sensor? Which pins are you checking?
-----------------------------------------------------------------------------------------------------
Starlet 4efe EP91 which I have checked with a multi meter=
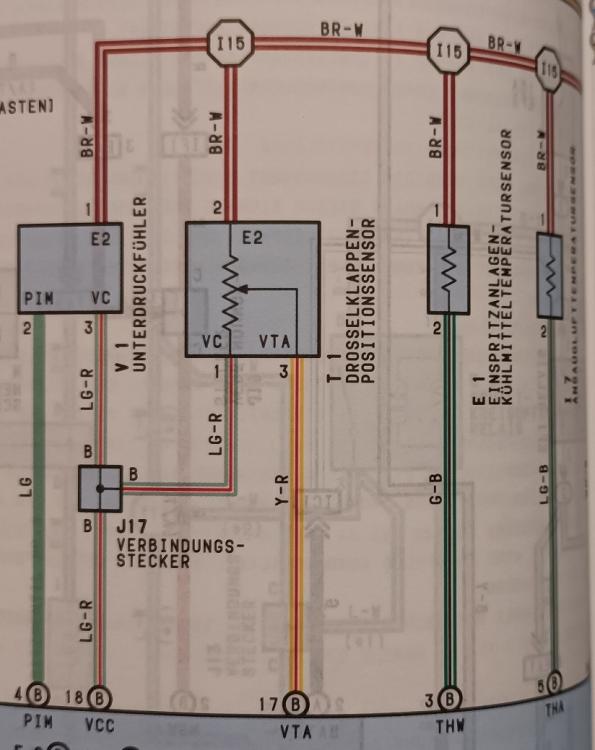
18 VCC = 5v (power)
16 E2 = Sensor Earth (earth)
17 VTA = Throttle angle (signal)

I've checked the TPS on my EP91 4efe starlet and it shows variable resistance between pins (3) VTA and (1) VCC when the throttle is turned.
Hope this helps!
-
12 hours ago, Pikey009 said:
I tried to buy the second one but he’s either sold it to the original owner from new or has kept it. Exceptionally rare those nowadays
Yeah, it was cheap too. Shame Toyota didn't think to put the 20v blacktop in it at the factory though.
-
Looks like a G6 breaker, maybe worth fragging to get the engine and g'box or fix up:
https://www.ebay.co.uk/itm/255384752523?hash=item3b761e118b:g:YIEAAOSwbU9iCTW7
Not sure what to make of this one but thought I'd post it up:
https://www.ebay.co.uk/itm/275139724642?hash=item400f9b0562:g:9W0AAOSw6WZh8Ybi
-
2 hours ago, burty said:
So it's been I while since I updated this few bits worth a mention is I've managed to source some inner arches that are solid from a good friend on here this will save so much time rather than fabricating some the donor car clearly had been garaged most of its life one of the cleanest shells I've ever seen it was great fun cutting them out seeing how thin they are was an eye opener though
Also bought some parts I absolutely do not need but couldn't say no to some mint OEM wind deflectors with clips and not at over inflated prices
Thanks to both of you for helping out
Great to see progress

-
23 minutes ago, Frankieflowers said:
Thank you very much. I sent a message to @JamesG I hope he’s going to be able to email me the workshop manual so at least I don’t have to translate from Japanese 😂
question. What if I need extra shims to do the job? Is it possible to pick them out without removing the camshaft? I saw a video of a guy in Thailand doing it with a few accessories. What do you think?
Toyota have special tools something like this:
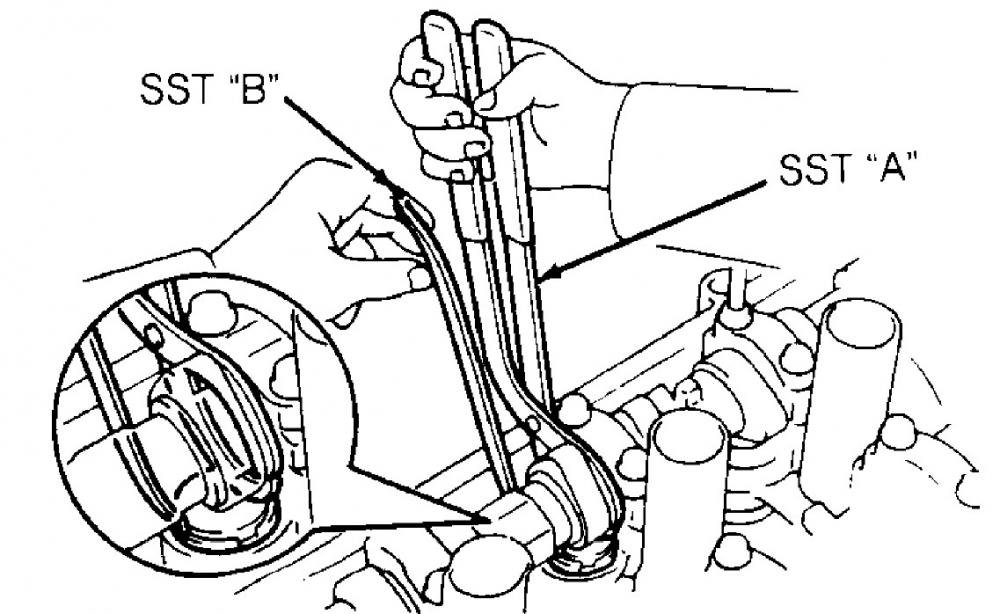
They push down on the bucket pushing the valve down and then you can change the shim.
I have seen it done with the cams in place but its not easy without the special tools and you could damage parts.
Get the clearances measured first. Then we will think about fixing things!
-
8 hours ago, Frankieflowers said:
I guess the issue is that the valve clearance hasn’t been checked because the shop doesn’t have the camshaft and I didn’t know I had to do it. Never done this before and I don’t have the specification from Toyota to check clearance between camshaft and cup plates. I am so mad at myself because I didn’t know this and the shop didn’t tell me at all that I had to do it. They said that it’s normal that a mechanic is it gonna check the clearance after ratification but I am not a mechanic and my partner doesn’t have experience with this type of valve movement system without registration.
Hey Frankie, don't blame yourself.

Depending on what machining work was done to the head and if the workshop put the same valves, buckets and shims back in the same positions will determine if and how bad the clearances are now.
Whatever happened in the past, I would now check the clearances to be safe.
Measuring the clearance is easy all you need are feeler gauges, pen and paper. Once you know the clearances you have, you can then check them against Toyota specification. If any clearances are out of specification you then need to swap / replace shims to make the clearances correct.
@JamesG has the 4efte workshop manual in english, PM him your email and I'm sure he will send you it. It shows how to check the clearances.
-
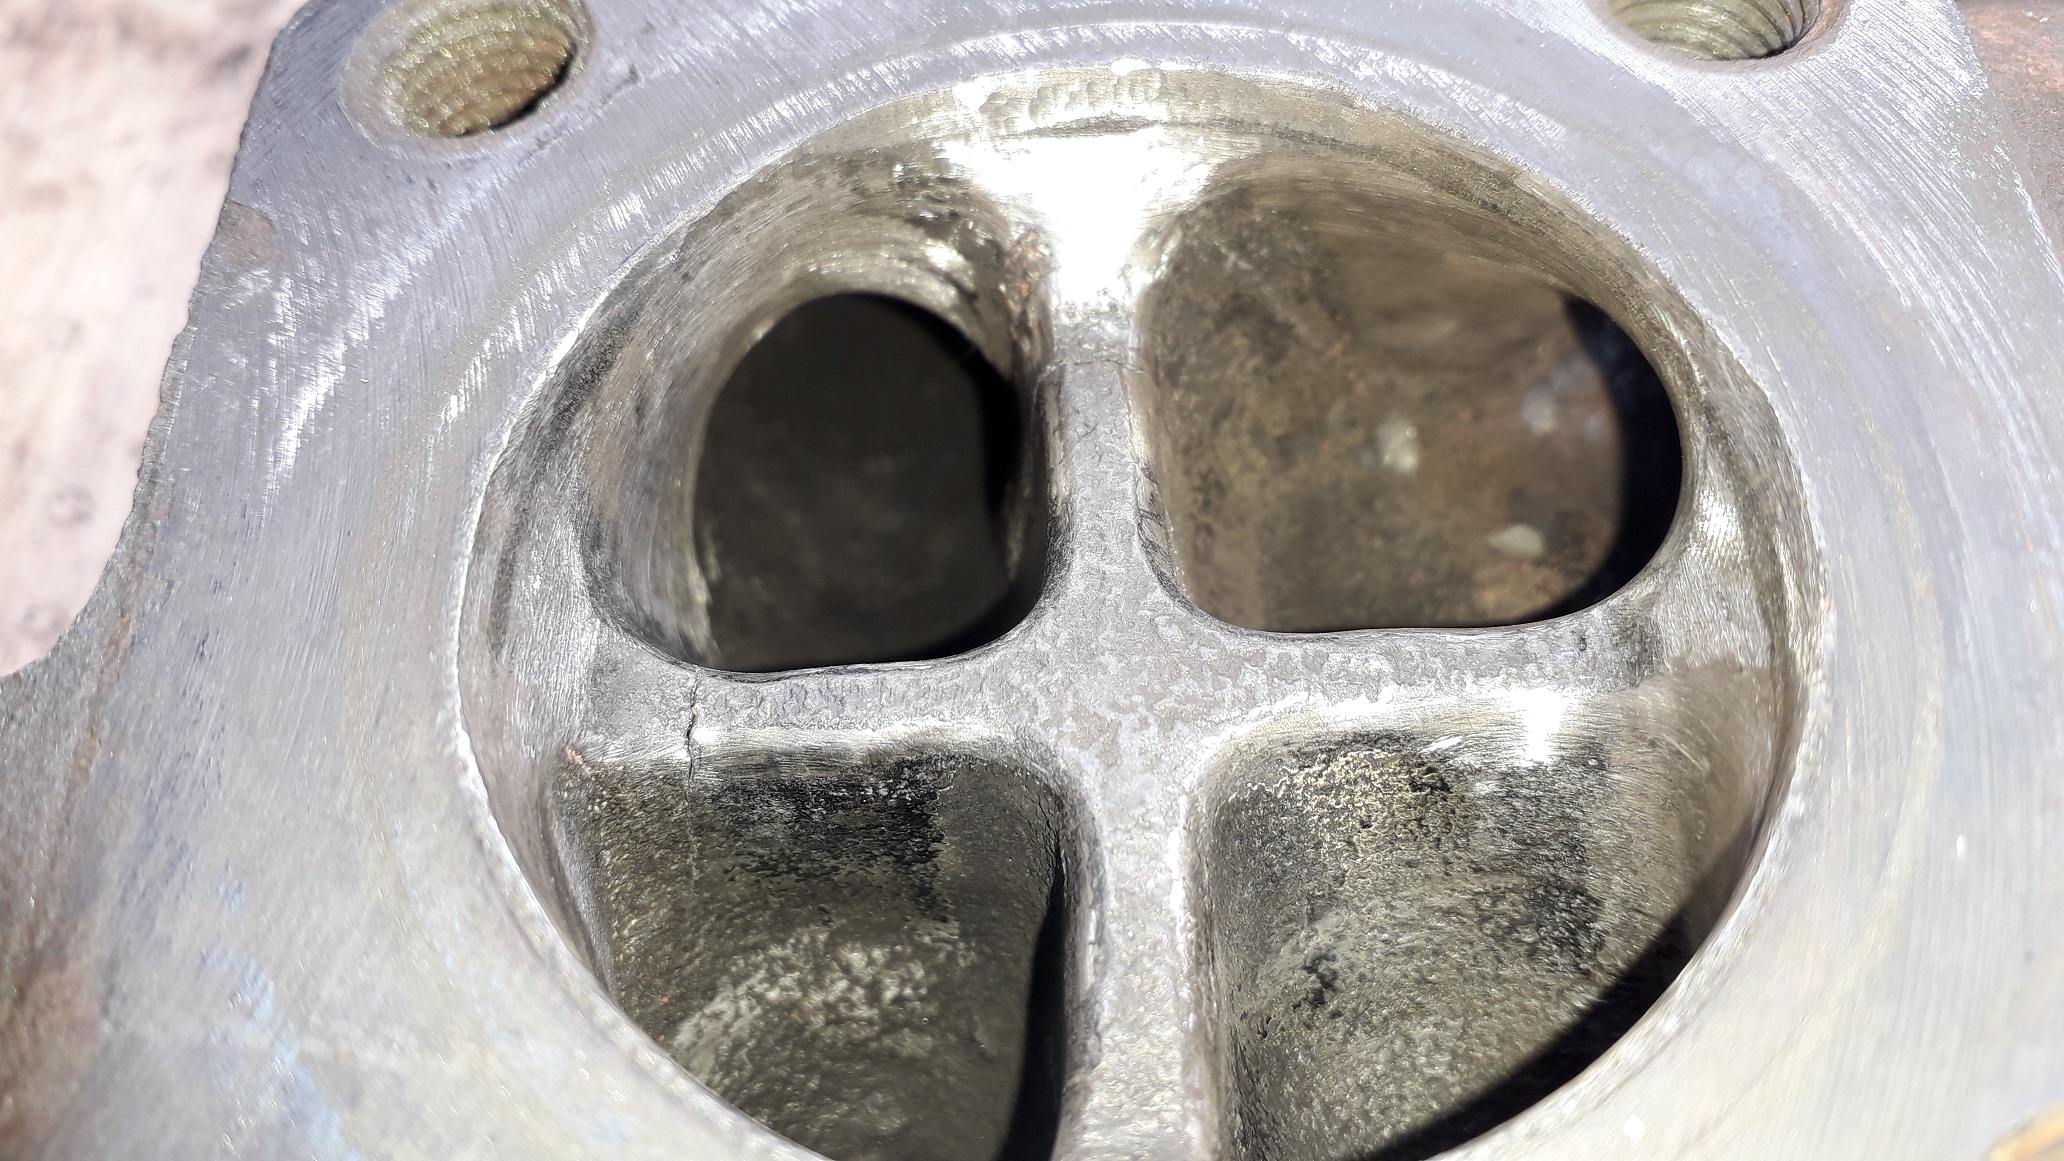
6 hours ago, Frankieflowers said:
is it possible that trimming the turbo side of the exhaust manifold would create a noise or change how the turbo CT9 works? Ever since we put the engine back together it is not behaving like before. It’s banging while changing gears and there are holes in the acceleration between 3000 and 3500 RPM. Mechanical timing has been set precise and electric timing has been set as default. What could’ve happened?
I doubt that it would cause a problem Frankie. I didn't remove the + from my manifold, I only smoothed the edges.
If you look at all the cheap tubular manifolds and the one from Tuning developments they don't have a + in the turbo side. They seem to work fine (until the cheap ones crack).
There are a lot of things that it could be Frankie. I'll just throw them up here.
If the turbo was making funny noises that's where I would start. Might be worth removing the turbo to inspect it. Are the blades on the wheels ok? Does the turbine shaft have a lot of movement? Does it spin free / smooth? Are either of the wheels rubbing on the housings? A turbo won't just break sitting on a bench, but oil starvation can damage them.
As I said last time, check everything that has been moved, removed, changed and refitted. Sensor electrical plugs, hoses, hose clamps. Is the O2 sensor tight and not leaking? Did you remove all the cloths and rags from hoses to stop parts falling in?
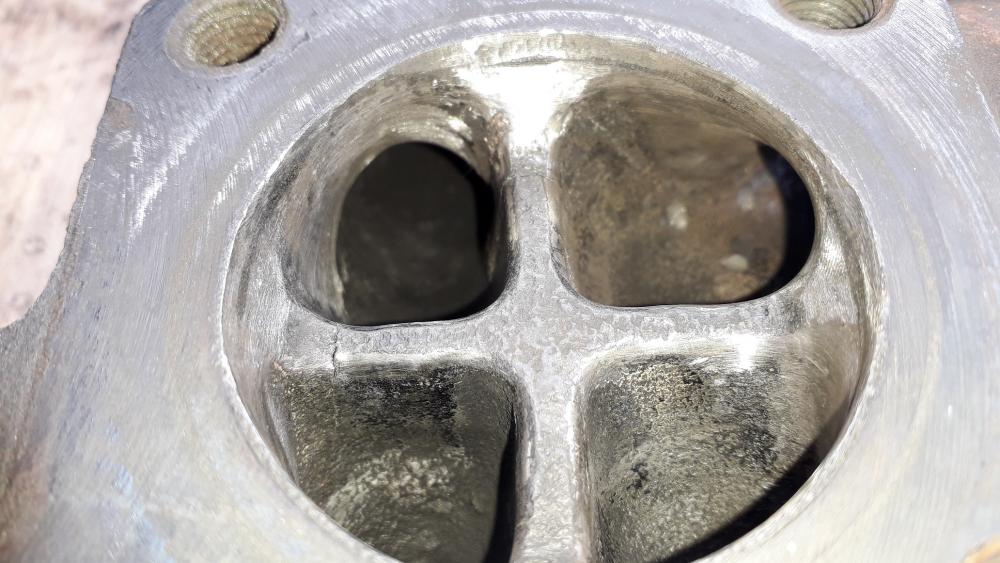
When the cams were installed did you line up the marks on the back of the cam gears correctly (cam to cam)? Is the Timing from the crank to cam still correct? Looks like the distributor was put back in correctly at tdc from your photo.

Did the valve shims and buckets get removed from the head? If so are the valve clearances correct still?
Set the distributor timing to factory: 10 degrees btdc in diagnostic mode.
We're all certain that we build things correctly, but have you gone back and actually double checked these things?
-
Nope, I posted up some info about 4efe corolla cams but it didn't really add anything to the topic so I changed my mind and deleted the text but you can't delete the post so I posted a dot. Lol.
Still need to change one of the spark plug tube seals in my cam cover so I'll measure my cams then.
-


Beware: Not a 4efte?
in eBay, BidJDM, Yahoo Auction Finds
Posted · Edited by Claymore
I did find that diagram in the EP91 4efte EPC https://toyota.epc-data.com/starlet/ep91/61052/electric/8719/88444/ but when you click on it the site said it was not compatible with the vehicle.
Checked the EP82 and it is listed but as you say NLA from the dealer.
However, when you look at the engine for sale in the eBay ad it doesn't look like the bracket above. It looks to me like an EP82 PAS lower adjuster bracket with an idler pulley bolted through. Not a vertical sliding pulley bracket with separate tensioner bolt.
I can't seem to find this setup in the Toyota EPC. Doesn't really matter I guess.