

ryan lang
-
Posts
8959 -
Joined
-
Last visited
Content Type
Profiles
Forums
Wiki
Media Demo
Events
Everything posted by ryan lang
-
i know i dont plan on selling it. just takin it off the road fora because ive got a holiday to save for and i cant afford to pay the insurance. i dunno wether to let the tax run out on it and stick it in my gdads garage or pay it and keep it outside my house. but im thinkin unless i get a job within the next 2 weeks im nakered. i cant even put petrol in im that skint.
-
i think its bad news time for tommy seriously thinkin of takin him off the road and putting him in the garage fora while because i can afford to keep runnin him at the moment. im gettin desparate on the money front now. ive applied for everything and anything, just to keep him on the road. but no luck anywhere
-
i know, im not ina rush to get them atm tho. gta get a job 1st
-
hmmm mite av a go on there now dude, and thanks guys
-
yeh citizens advice were helpful. luckily i was able to lend the money off my mum to cover bein overdrawn. but it getting a bit beyond now
-
ive just been and he said ill either have to go to small claims court or national insurance
-
there not goin bust tho. just makin a few cuts. ive rang them a couple of times. they made me redundant without any notice aswell tho and theyre not allowed to
-
cheers guys. i went to citizens advice and they said i can claim with national insurance thingy or take them to a small claims court. i know its family and all but every1 else in the fam has said to do it
-
i was laid off without any notice and i was supposed to be paid on the 31st of march and they still havent paid me. they sent out a cheque which was short so i rang them and asked for the rest. the 1st cheque i cashed has bounced twice now. any advice on what to do because i am now overdrawn and will receive charges for everyday i am overdrawn. any 1 with any previous experiences or knows how to handle it please help
-
cheers dude much prefer to get some fogs on the front atm. ive just put a new erar light the 1 side and cheers guys havent given him a bath in a long time, used some proper old school stuff to polish it with, its called 'mer'
-
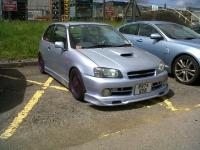
just given the monster a bath and a nice shine with some old school mer super duper pleased with how hes turned out. cant wait to get back into work and be able to get sum dollar for the work too continue, know a boy who turbo'd 1 of his starlets from cwmbran so its a possibility when im back on the payroll
-
dont get a civic. my brothers got 1 and there a bitch too do anything too
-
my dads had hundreds of bike and ive had a few crossers. but my dads into his harleys got a nice 1 ill try get a pic and hes currently rebuilding his yamaha 1100 and hes made the whole frame by himself, he smashed it through a farm fence pole like a foot thick 1 and ripped it outta the grounsd and shattered his pelvis, collar bone and broke his ribs and punctured a lung. bad time but he finally got the bike back and is rebuilding it from scratch. its an animal, ill try and get lots of pics of all the different bikes hes had, hes like us with our starlets but only with bikes
-
i know theymust of stood it up on them and it must of fallen for the vent to crack like that
-
only thing is i think the gaskets that come with it are pants because they didnt use the ones that came with mine, they took them outta the wrapper and put them back
-
i think mine was like 185. and then 60 for them to fit it and 260 for the rest of the sytem. so only roughly what you'd pay for an uprated turbo exhaust. and if you get a mani custom made its like another 300 quid on top of that
-
Getting 60 In Second On Uk Spec Starlet Na
ryan lang replied to a topic in N/A E-Series Engine Discussions
i get 60 in 2nd -
ahhh dont worry bout the fogs just get it on there lol. i was lucky with my headlights £40 bargain lmao. small update got the brakes sorted finally
-
haha i know, hows it going anyway? havent seen it for ages because i dont work up ebbwvale any more so dont see it.
-
fudging brakes!!! holding me back literally, have to accelerate to get down hills, goin to get it sorted now ina moment tho. got me a nice spanking new piston from toyota. should do the trick. if it works im gunna wash the car outta joy and happyness and just because its a little bit stinking. jus a quick question is there meant to be some sort of cover for the engine behind the vent?
-
yo i got a 2 inch pipe with a 3.5 inch tailpipe, but i also bought an obx manifold aswell. still sounds awsome tho listen: ingnore the lil brother tho
-
alrite cheers fellas. my dad used to make brakes for a living but just wanted to double check because he used to do the for lorries and im guessin theyre quite a bit bigger than mine lol. ill let you know how i get on
-
cheers. will i have to bleed the brakes after?
-
yeh thats because you can see the corners that are bent and the paint that flaked when i tried to get them straight and the vent scoop is cracked. but all in good time will be sorted
-
recently my brake has been sticking so badly that i have to accelerate to get down hills. my dad hada look and found that my piston was corroded so ive bought a new 1 but would like a bit of guidance on how to replace it any help i much appreciated cheers