


Patches
-
Content Count
688 -
Joined
-
Last visited
Content Type
Profiles
Forums
Wiki
Media Demo
Store
Calendar
Posts posted by Patches
-
-
EP Wiring now offer parts for fitting DBW
-
On 9/5/2022 at 11:37 PM, owenroche2@hotmail.co.uk said:
I’ve stripped all the abs parts out of the car and removed the looms ready to paint the bay the plan is to removal all un needed wires from the loom.
question is I remember the cable coming from the rear of the car (for the tail lights?) plugging into this ecu do I need to keep this or is there another place for this loom to plug in?
What year of car do you have? I might have the wiring diagram for it.
-
-
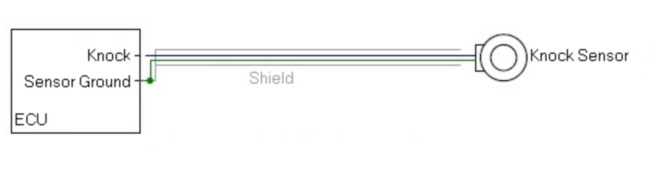
On 8/25/2022 at 1:00 PM, RobSR said:
Agreed that you can use the shield ground pin for that, but IMO you shouldn't be connecting any sensor grounds there. Hopefully Link have tied it into the PCB away from sensitive IC grounds and closer to power grounds but who knows. I probably over analyse but its good to have an understanding if you're really interested in it and reviewing/making your own decisions. Just because a couple of ECU manufactures do it a certain way, doesn't necessarily mean its correct.
If you're interested and have spare time, i can recommend watching this: https://www.youtube.com/watch?v=ySuUZEjARPY
Ricks whole career has been EMI problem solving and discusses exactly what we were talking about above. In short, his recommendation is don't connect your shield to your sensor ground lol.
Adam from Link ECU has addressed this question on the HP Academy forum
https://www.hpacademy.com/forum/efi-wiring-fundamentals/show/knock-sensor-shield-grounding
I will continue to wire the way the ECU manufacturers documentation recommends
-
On 8/25/2022 at 1:00 PM, RobSR said:
Agreed that you can use the shield ground pin for that, but IMO you shouldn't be connecting any sensor grounds there. Hopefully Link have tied it into the PCB away from sensitive IC grounds and closer to power grounds but who knows. I probably over analyse but its good to have an understanding if you're really interested in it and reviewing/making your own decisions. Just because a couple of ECU manufactures do it a certain way, doesn't necessarily mean its correct.
If you're interested and have spare time, i can recommend watching this: https://www.youtube.com/watch?v=ySuUZEjARPY
Ricks whole career has been EMI problem solving and discusses exactly what we were talking about above. In short, his recommendation is don't connect your shield to your sensor ground lol.
Nah man I definitely appreciate it. Always open to hearing other ideas and suggestions but equally if several ECU manufacturers are suggesting it as a solution it surely can't pose too many issues?
I'll definitely watch that video when I get some time.
-
20 hours ago, RobSR said:
Yes I’m really not sure why they recommend doing it this way, as you’re putting shield noise onto a pin all the other sensors are connected too.
All the big professional harness builders I’ve worked with who do stuff upto F1 level, put them to ECU/Power ground so I’ve always done it this way as I’ve had more consistent results.
Just my experience so thought I’d point it out
")
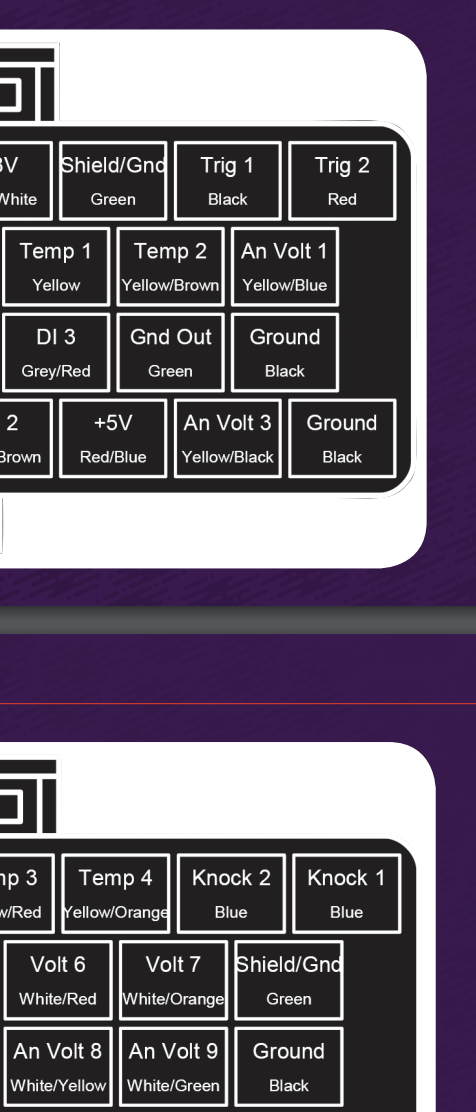
Well sort of, technically it has its own pin. All my sensor grounds (apart from the knock sensor and trigger grounds) are in the A connector Gnd Out and the ground and shield for the knock will go to Sheild/Gnd on the B connector.

Either way it can't present too many issues as MaxxECU also recommend this method
-
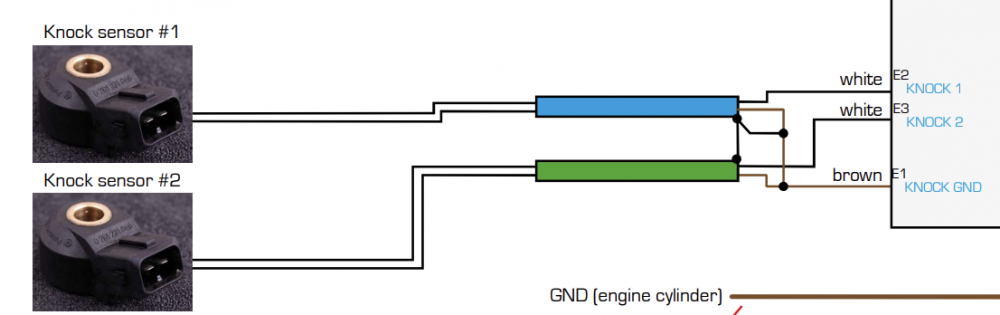
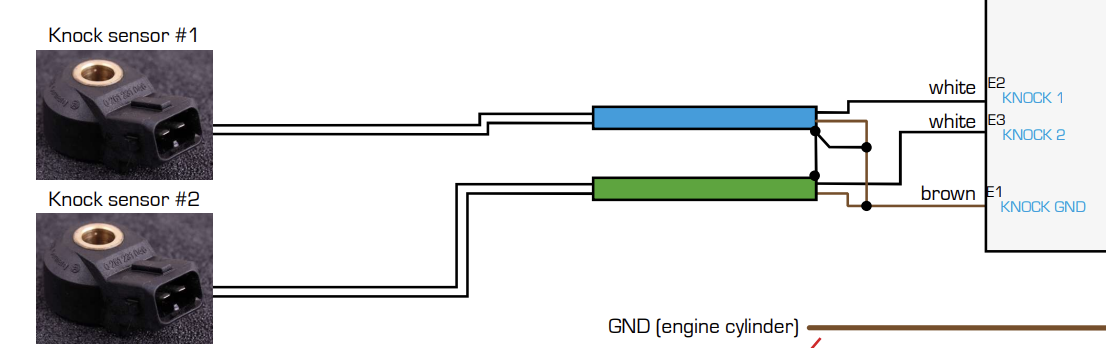
On 8/16/2022 at 11:22 PM, RobSR said:
Just an FYI, on the knock you do not want to connect the shield and sensor ground together and then to the sensor ground pin.
conductors to Knock input and sensor ground, the shield should then be terminated on its own one end only to a chassis/power ground
That's interesting Rob, according to Link in their documentation that's exactly what I should do 😆
Haltech also recommend doing the same as I've just checked their documentation too
-
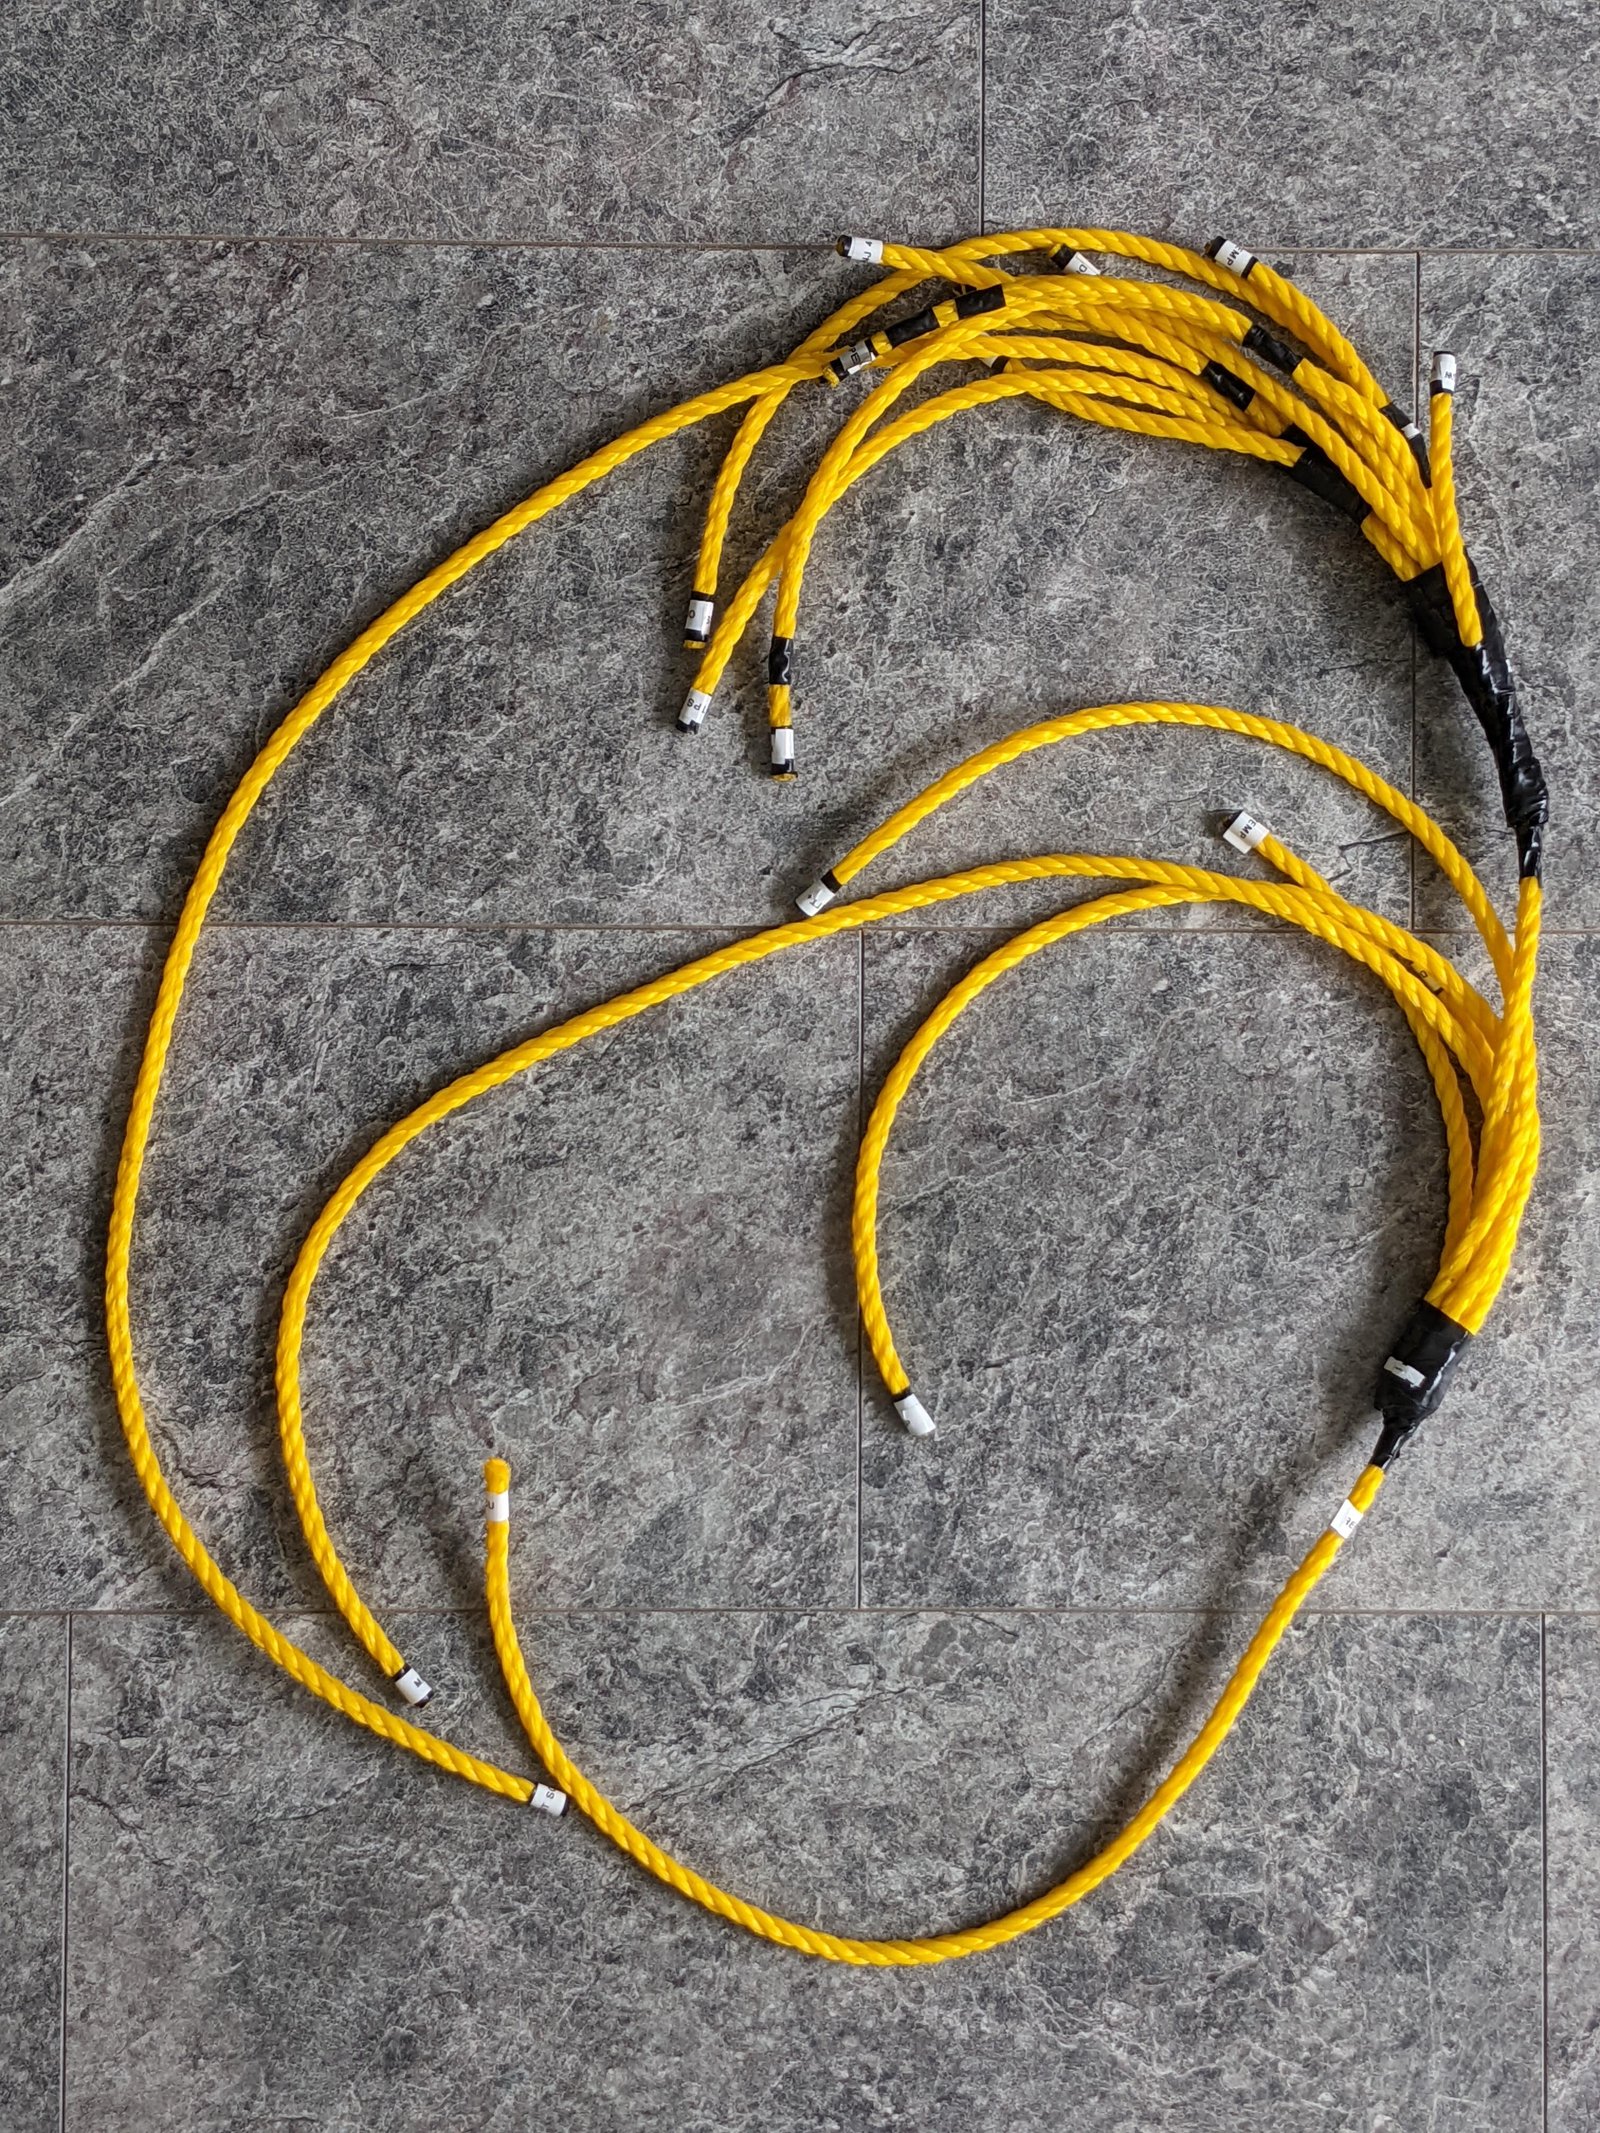
I made a mockup of my engine loom using rope
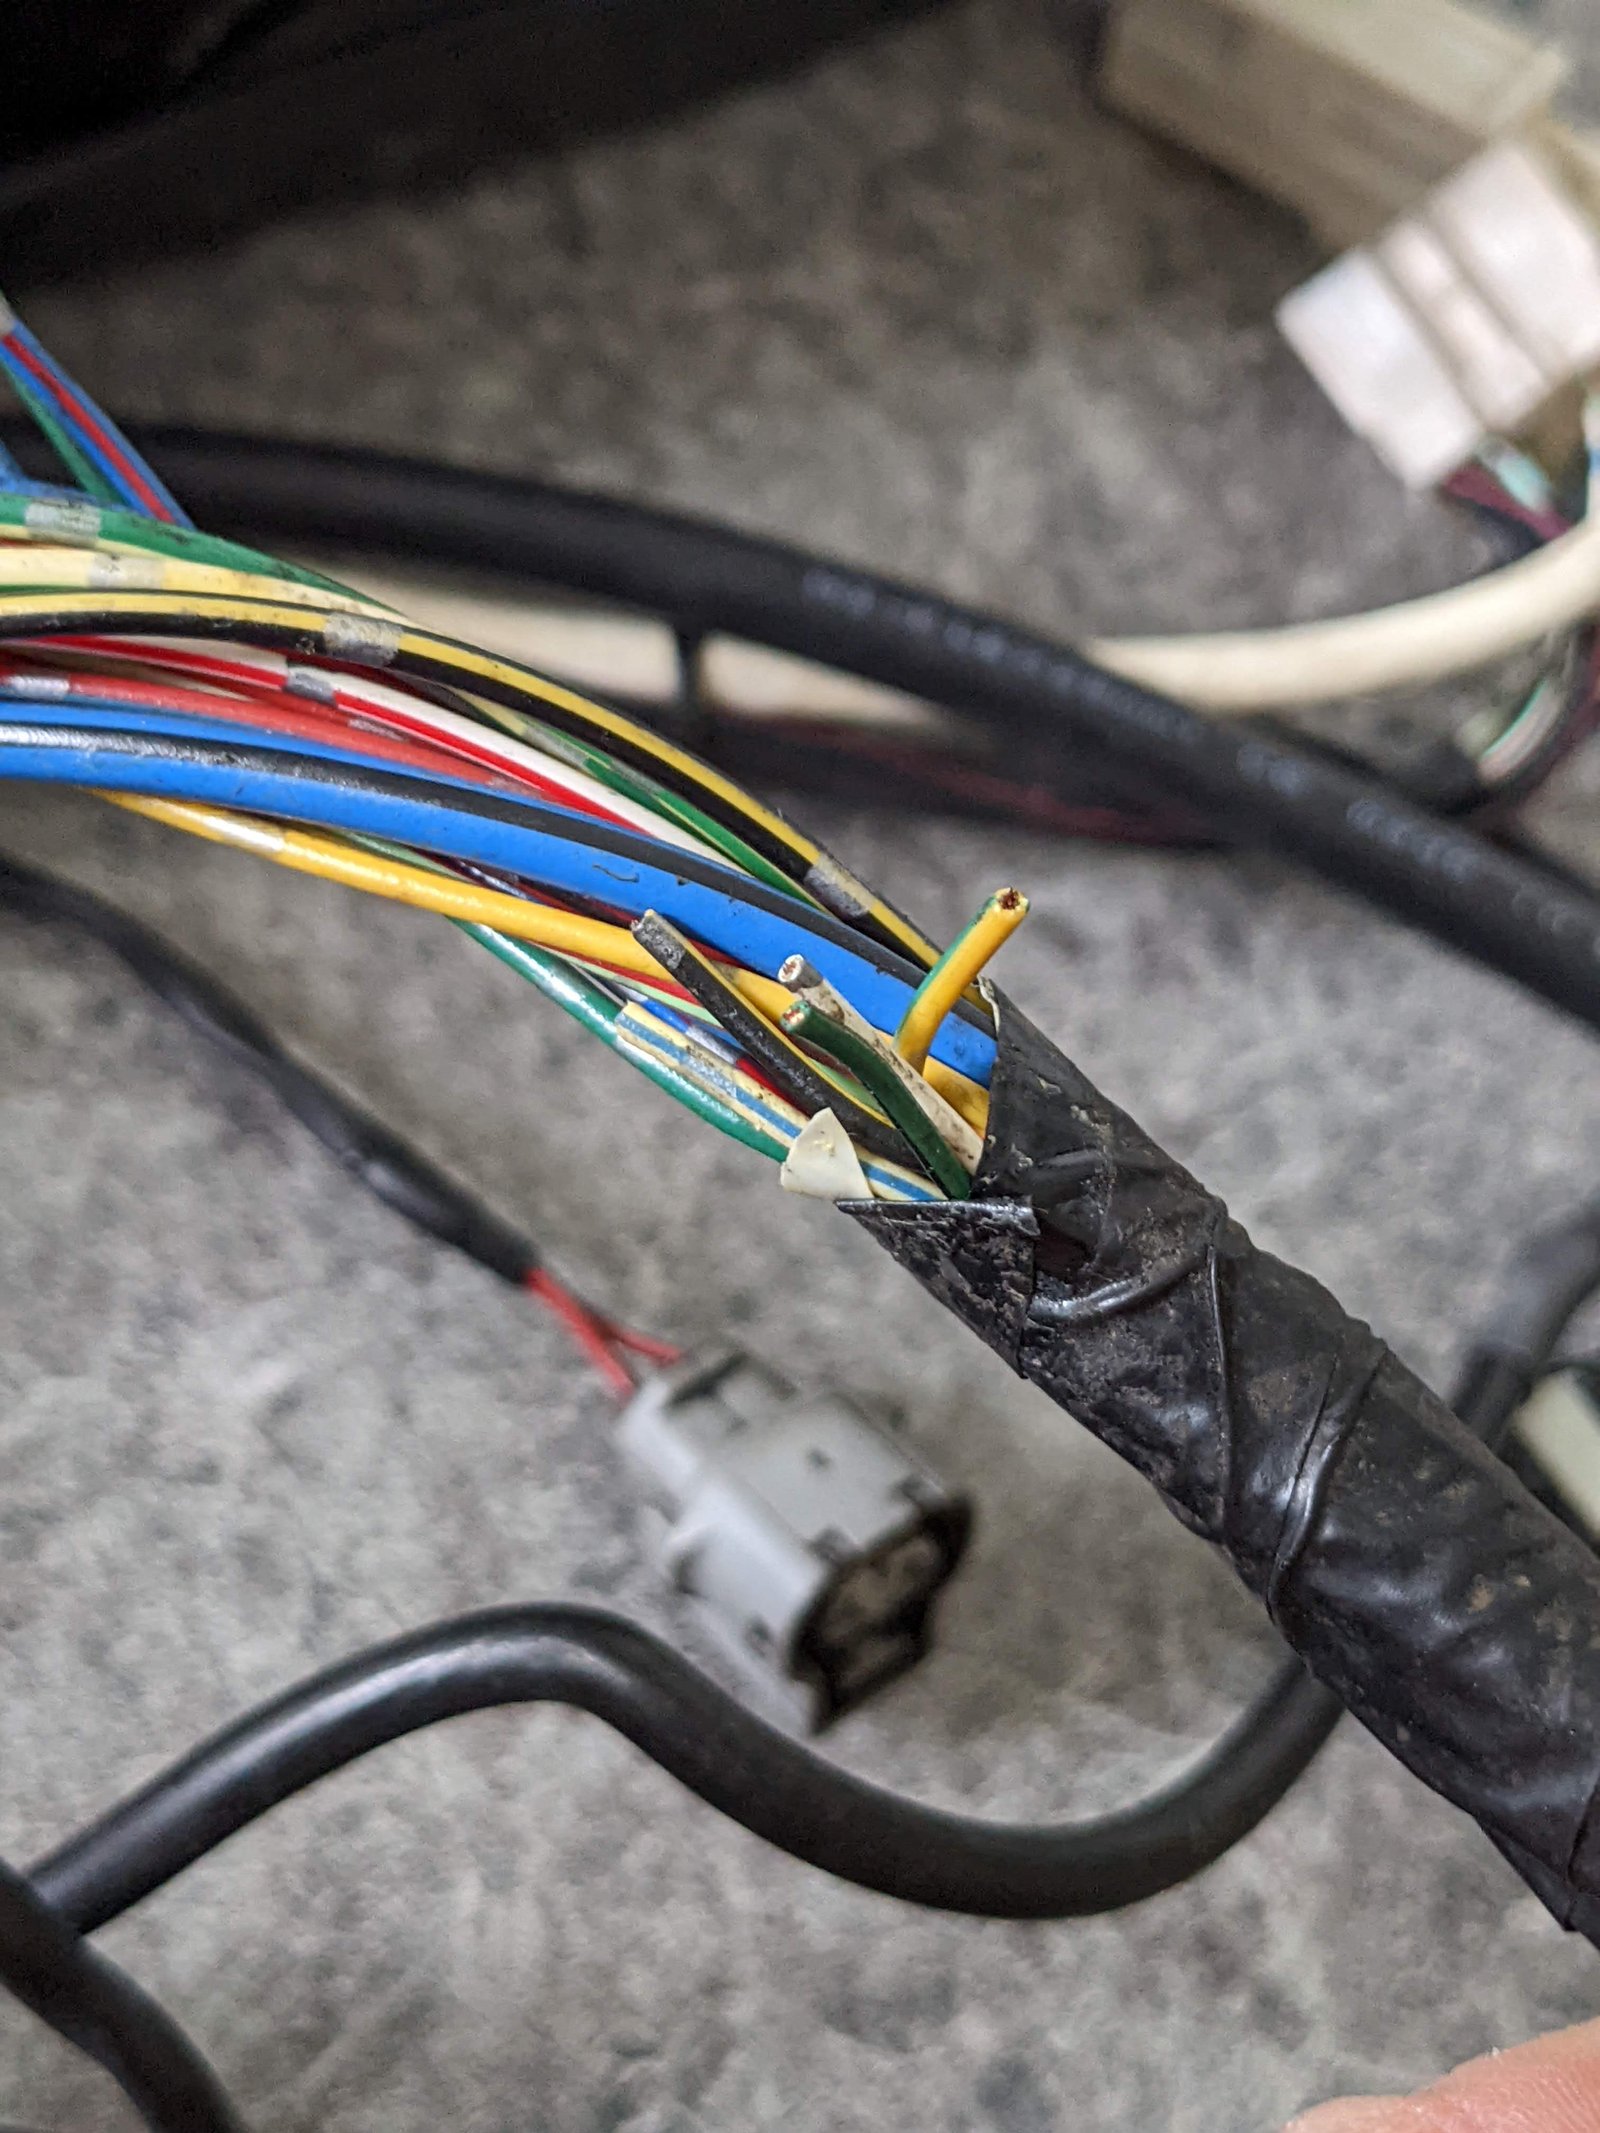
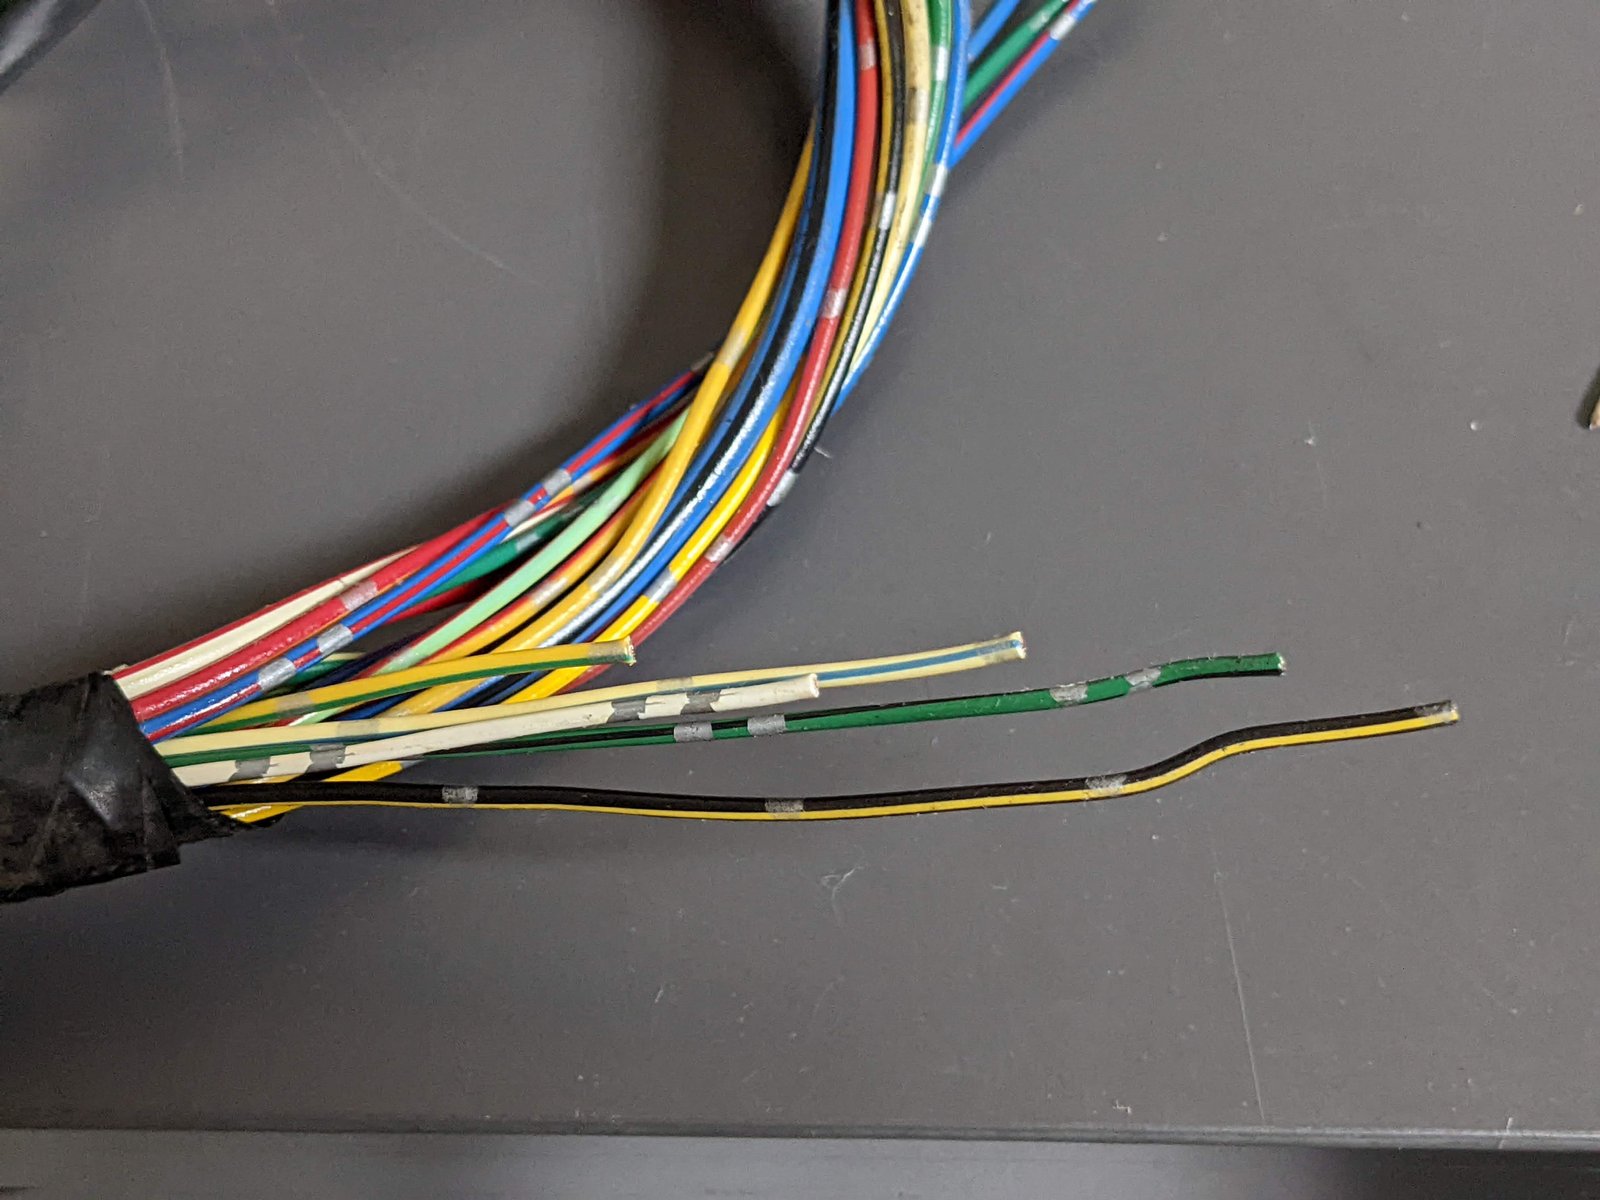
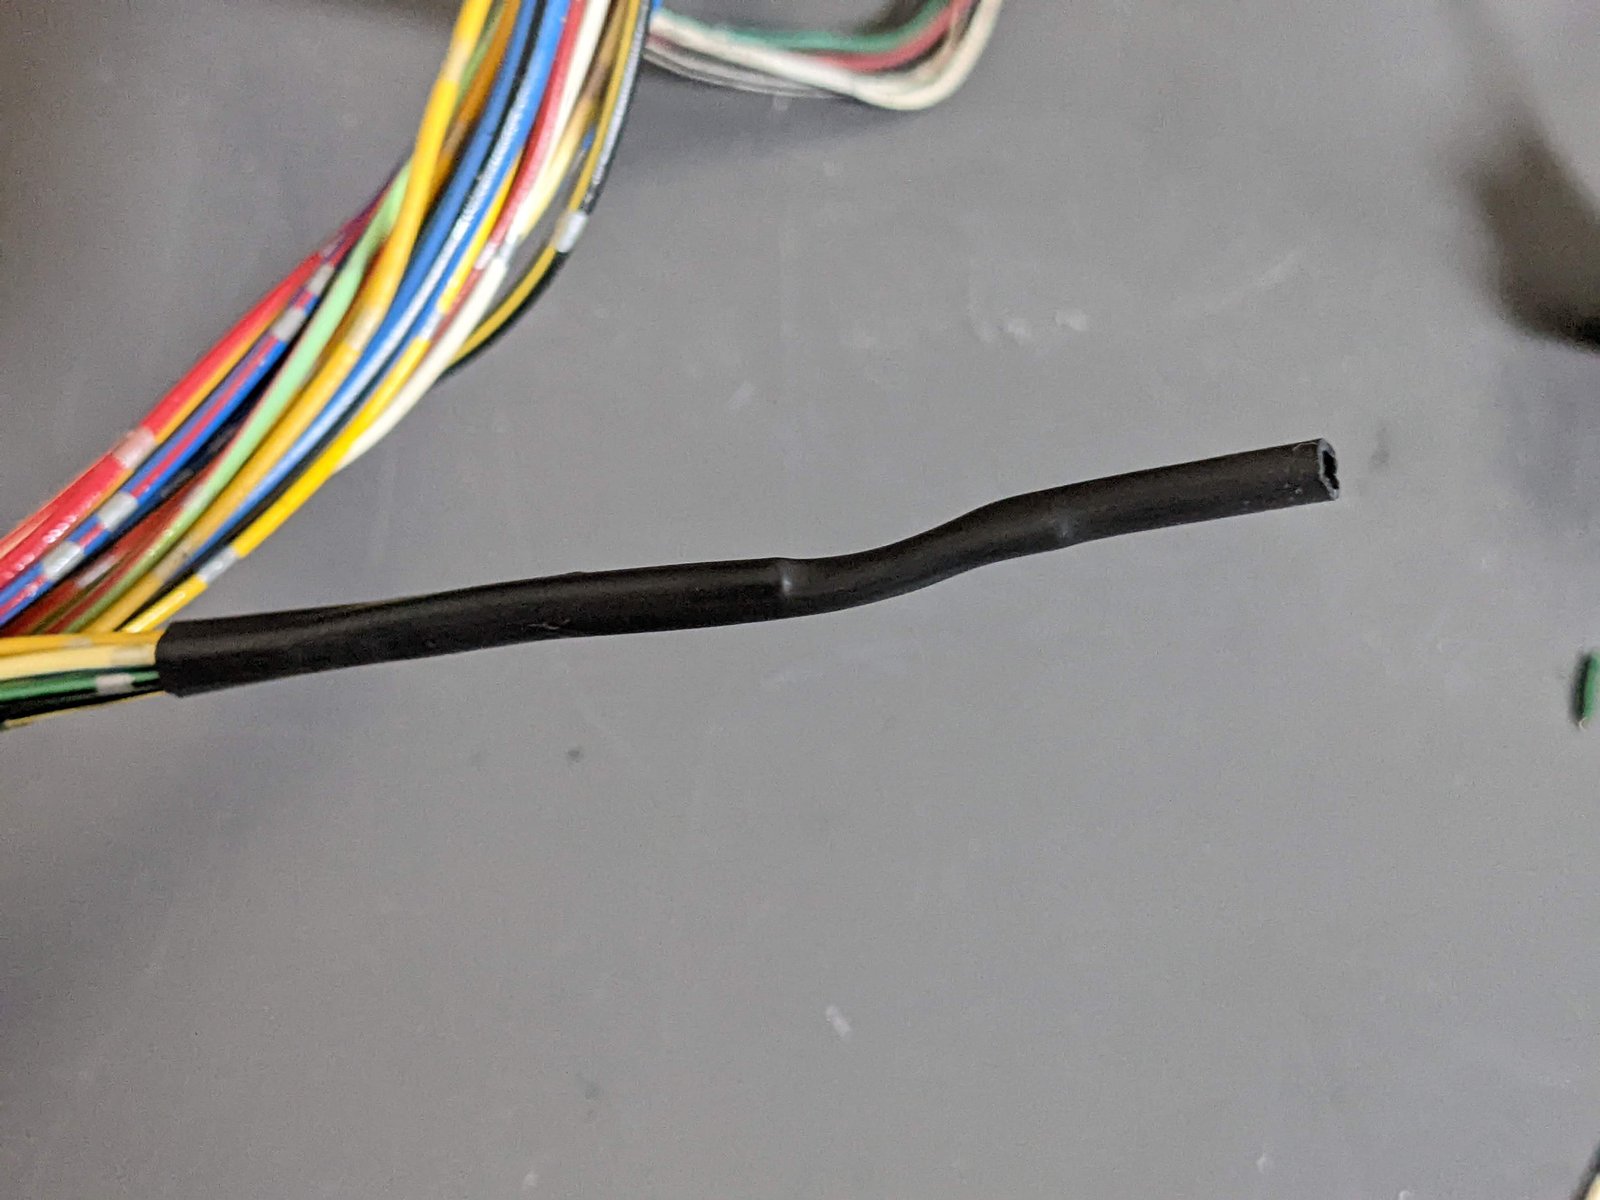
Found this hidden gem in the oem harness, not sure what it was originally for but the wires could have been touching each other so I've cut them at staggered lengths, covered with heatshrink and taped it up so at least its safe now
Here is the alternator, starter, windscreen wiper, reverse light switch and brake level sensor wiring fed into the AC blanking grommet, still need to terminate fan relay and a few other things on a dtm connector in the car

Repaired washer wiring, new terminals, heat shrink and cleaned the connector body as couldn't source a replacement

Remade my horn wiring, it will do the job. Ideally I would seal the terminals onto the horn and use new connectors but this should be fine.
New ground for the horn wiring
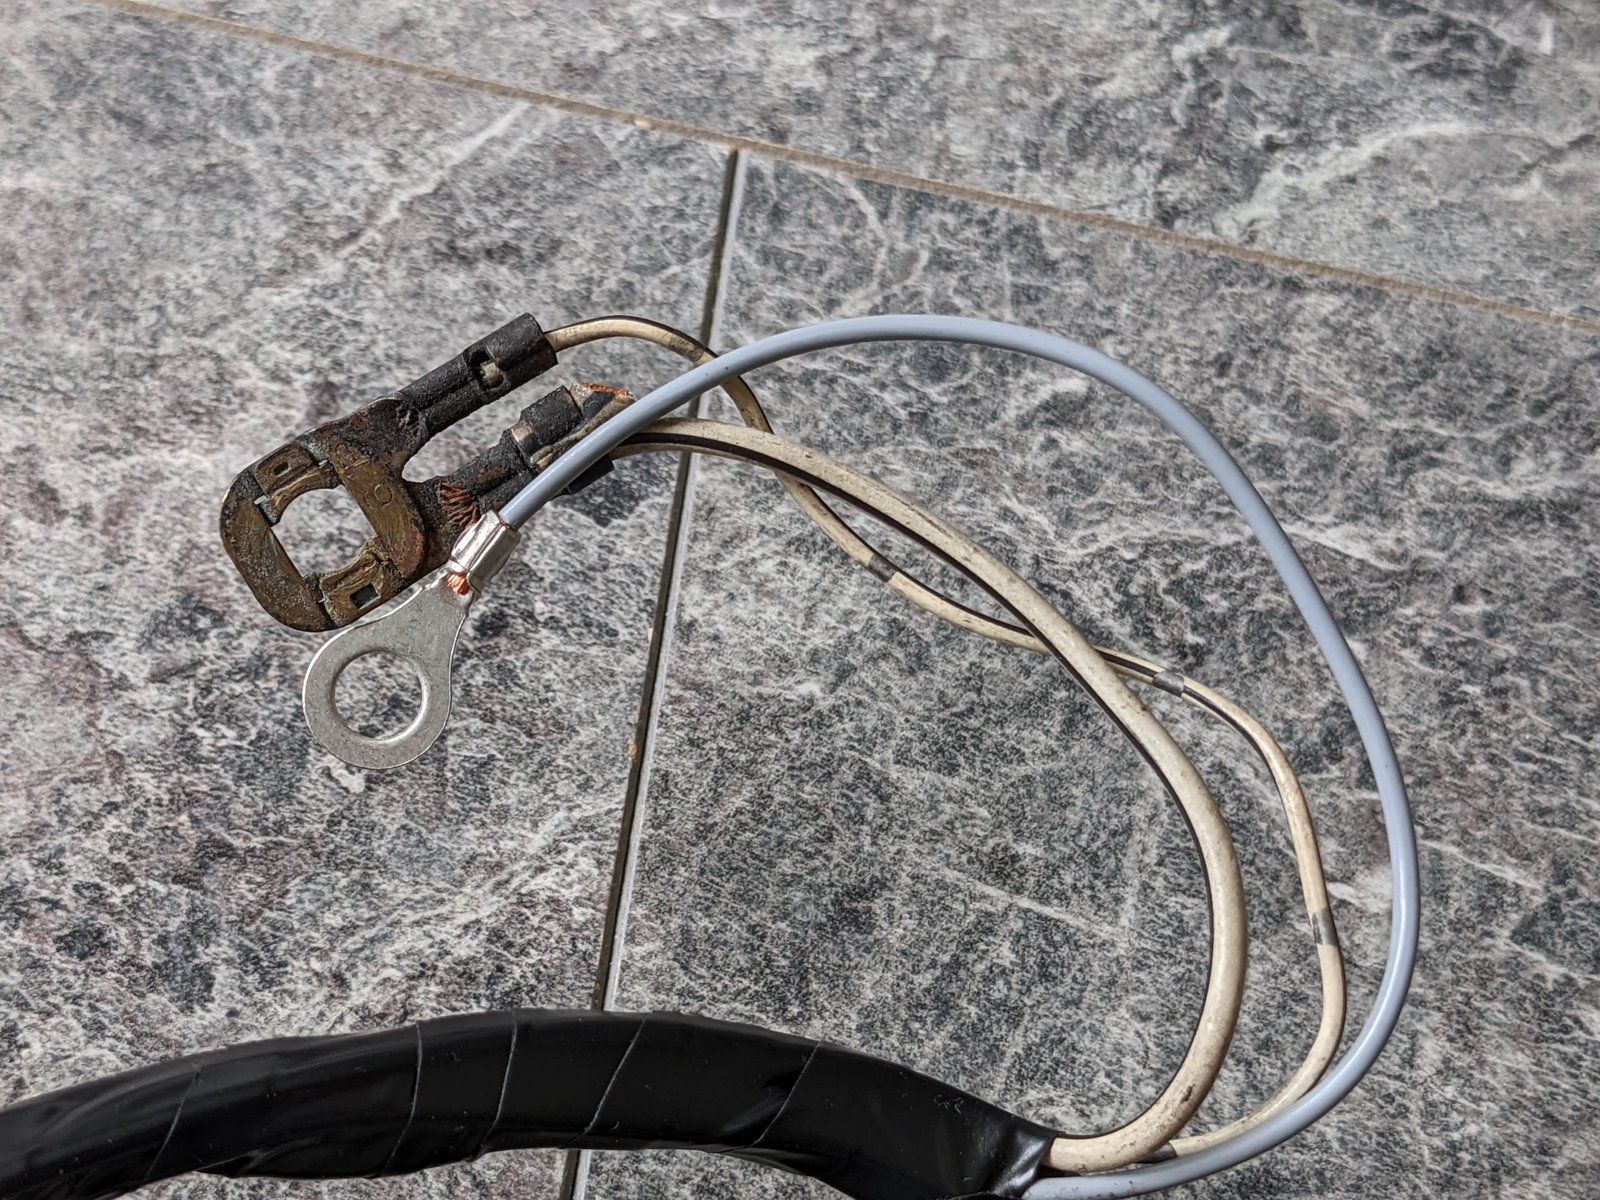
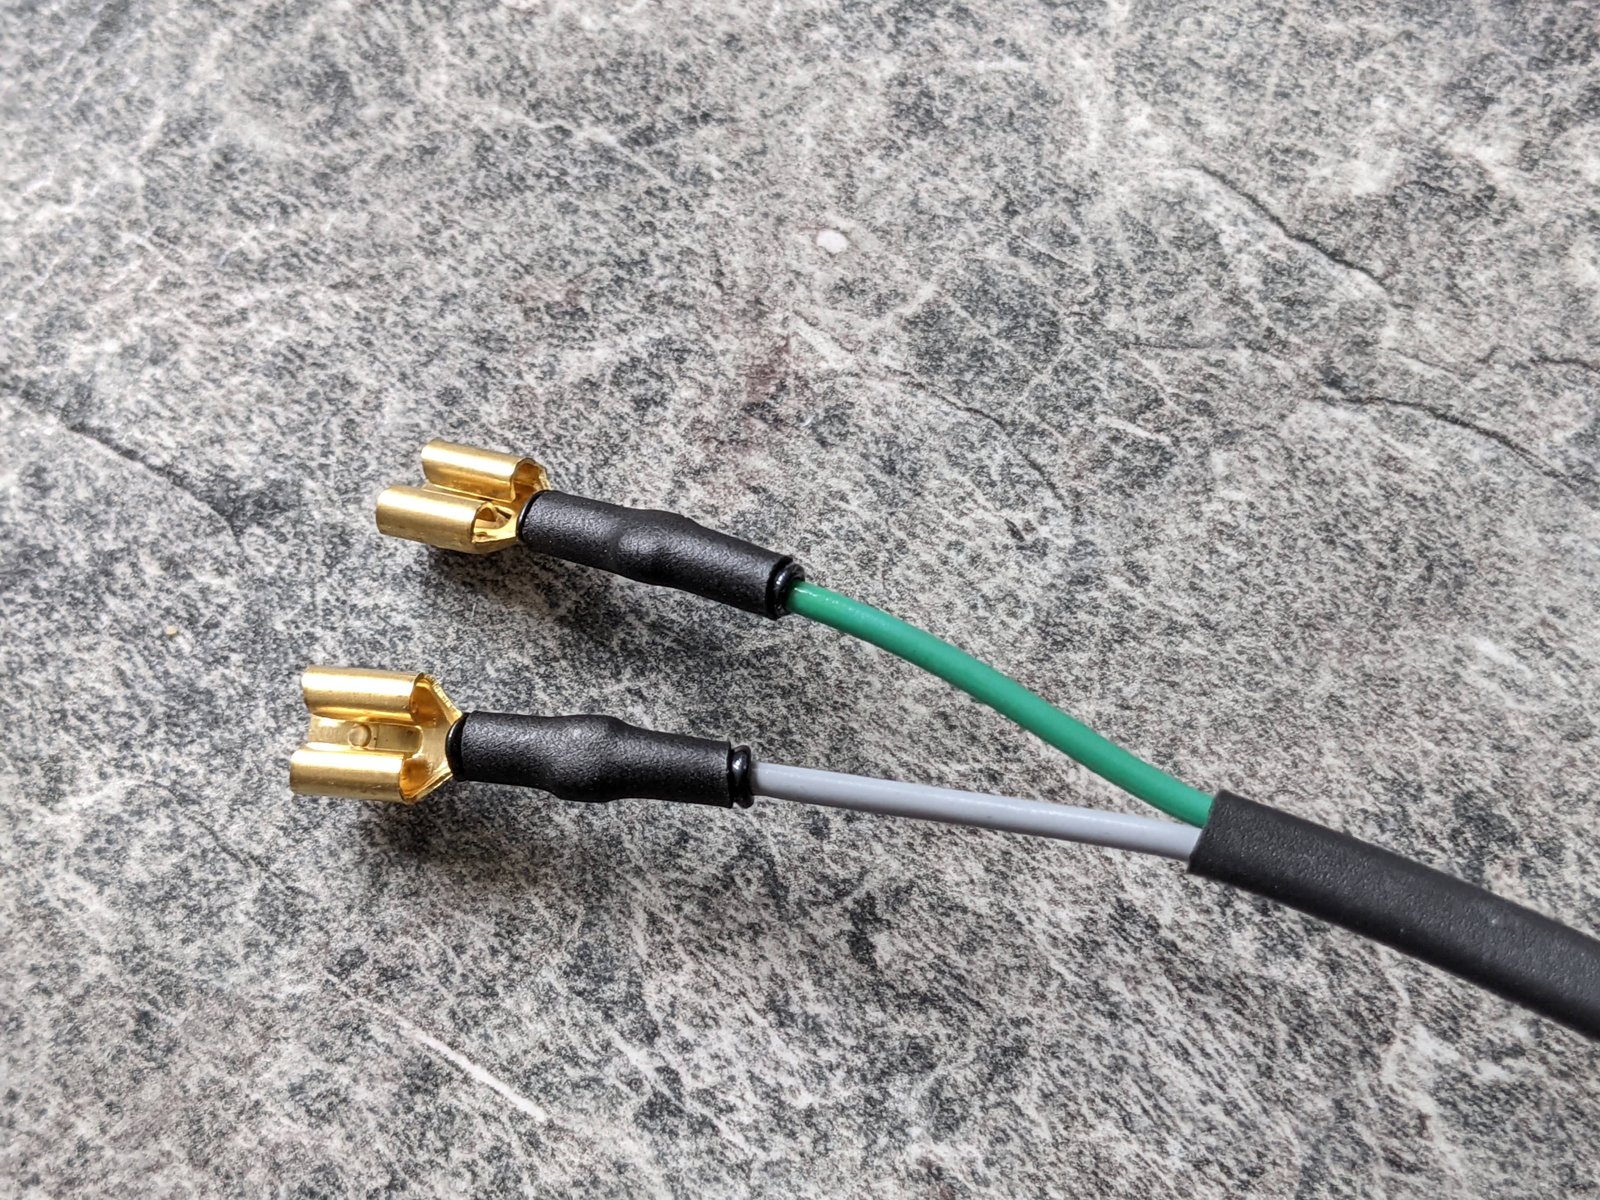
Knock sensor wiring, terminating the shield and one of the wires to a new wire for the sensor ground


-
Ha nice one dude!
-
Still working away on the wiring loom. I've completed repairing and tidying up the chassis so that's ready to go back in now.
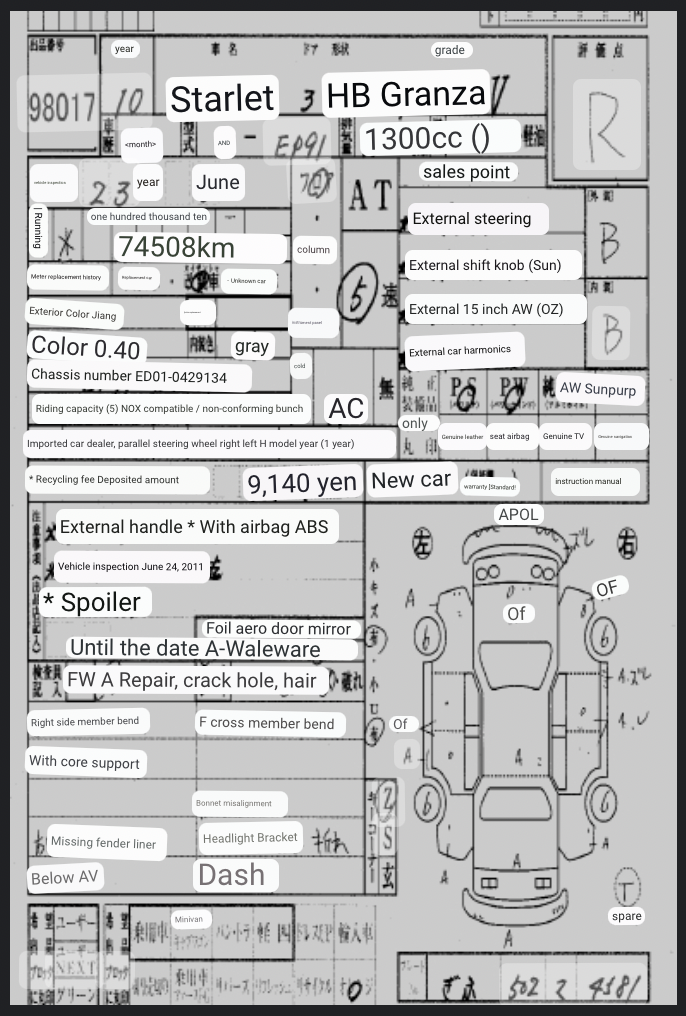
As a side note I have been trying to import a Alphard or Vellfire as a family car and found this site myauctionsheet.com where I was able to verify the auction sheets for cars already imported. Costs about £7 per search so I decided to have a look to see if I could find my original starlet I bought in 2012 from DCY Europe (the shady cunts they are) It was a grade R and using google translate it says all over it "cross member bend" etc. At the time I paid £5k for it which was a lot and it was really clean aside from the smash but they made me sign sheets of paper saying it had no accident history in Japan etc 🤣 absolute wankers

-
10 hours ago, peter.ep80 said:
Hi Everyone,
Hope you are doing well first of all. I am not that much active onto this site, but I do come here once in while to check some topics, updates and so on.
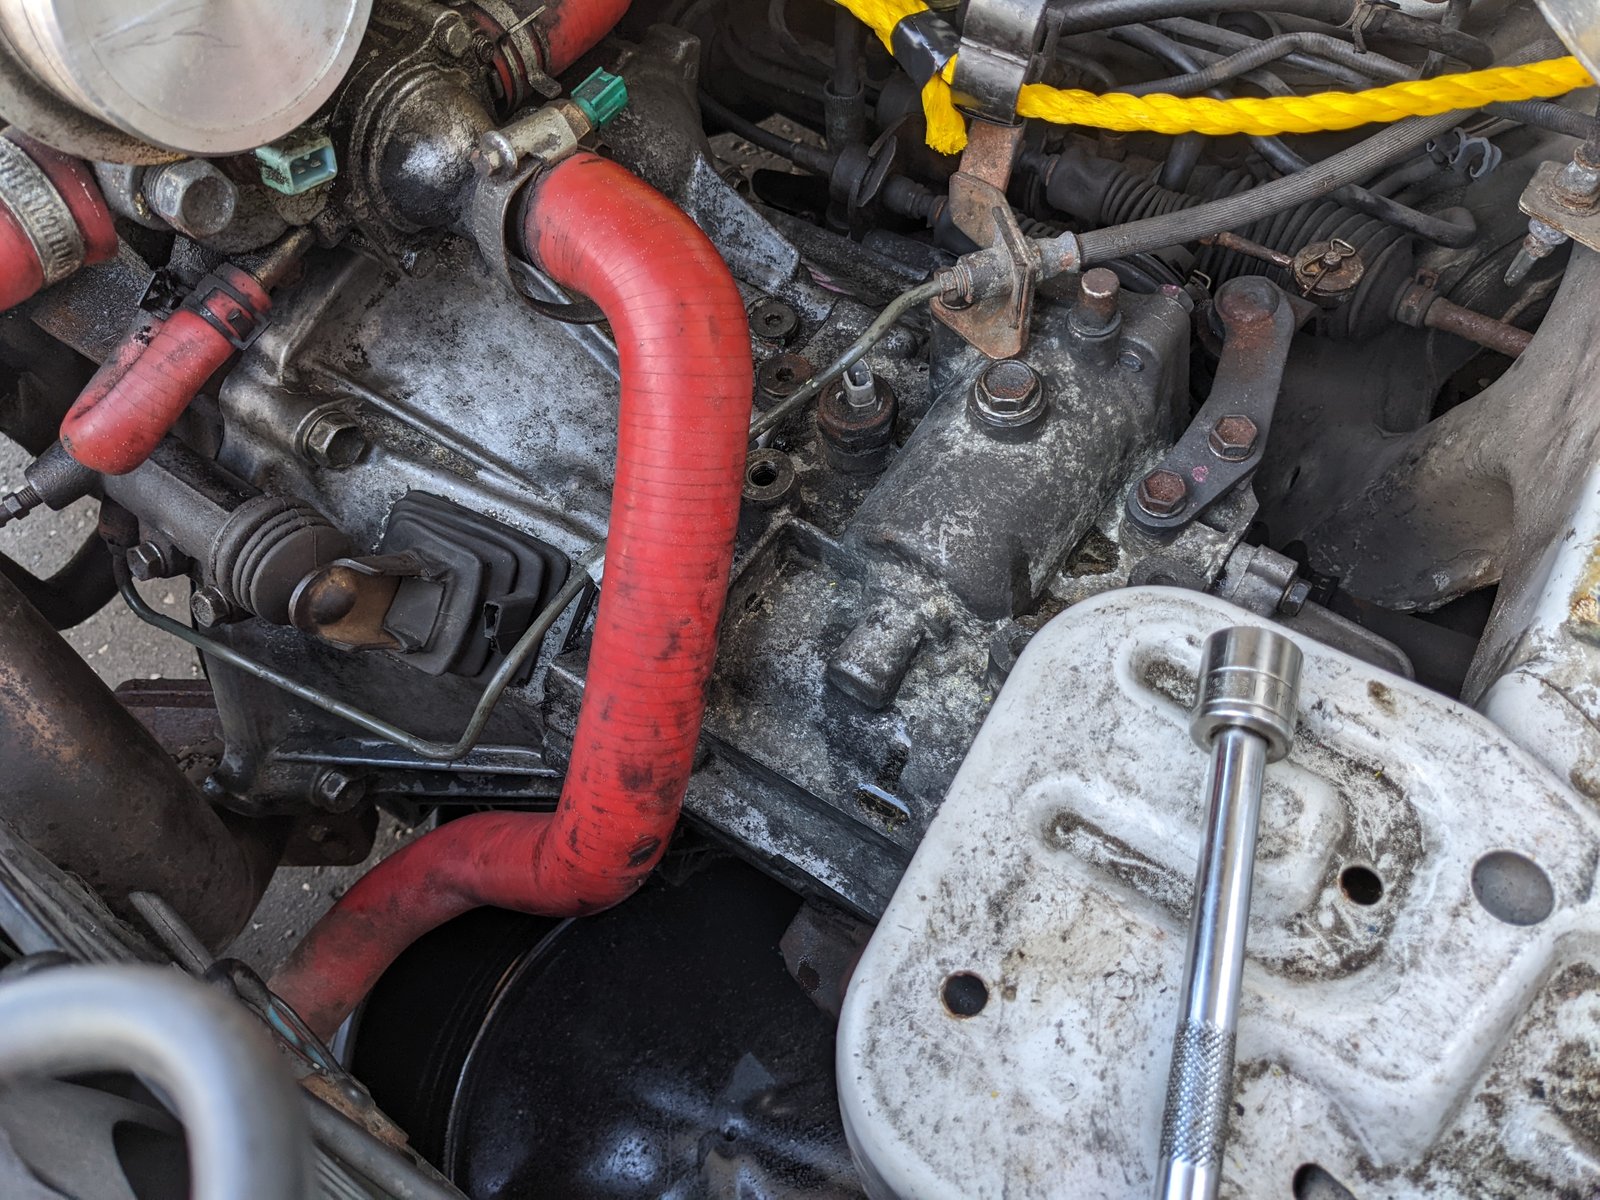
So basically the problem I am having is that Recently I've built a freshly new fully forged 4efte engine (My mechanic did the build) and for some reason it started to leak oil right away from behind the lower timing belt cover. I just finished the running-in for the time being.
The below is what has been done to try and troubleshoot the issue:-
- We removed both oil pump and sump twice and re-sealed.
- Pump oil seal and Crank oil seal were replaced twice.
- Removed top cover, camshaft plug and camshaft cover and re-sealed everything.
Funny thing is that when we removed the timing belt cover, we didn't see any oil or anything near the timing chain, or the pump or the crank but for whatever reason it leaks. The specifics of the leak is that it starts to drop from underneath the lower timing belt cover (between the sandwich plate at the crank) and the oil will end up going everywhere from the driver's wishbone, up to the steering rack. Now I've just ordered the oil pump bolts, just to make sure that we have replaced everything down there, but I am not that much hopeful. Once on another engine, I had oil leaking but just leaking a drop here and there and it was only the crank seal. We replaced that and was fine. The type of leaking I am having now its a bit problematic and looks to be a big one, considering its a freshly built engine. Timing belt cover will be a bit wet from the outside near the crank pulley.
Do you think it is worth taking out the engine, separating the block from the head and closing everything back together? Block has had the surface of the block face done, cylinders bore and honed, main strips, crank polished and balanced, head cleaned, ported and polished, machining of valves and valve seats, face and shimming, replacing of guides so pretty much everything. Head gasket, I used a Cometic one and pistons did them 74.25 oversize.
Have also attached some H.W. that i've done to compare and contrast everything related down there from a normal 4e to a 4efte engine. Any help, to what might be causing this strange oil leak, would be really appreciate it and thanks a lot to everyone
BR,
Peter

Hi Peter,
I'm not that clued up with this sort of issue but wanted to mention 2 things in case you weren't aware already.
- The 4e-fte had 2 different oil pumps, one with a seal on the pump and the other with the seal on the block so you might want to double check you have the correct oil pump.
- The parts diagram on the left shows what looks like a 5e oil pump as it has a crank sensor on it which (I don't think) was present on the 4e engine.
If you can get a video of the engine running with the timing cover off then that might help people see where the oil is coming from.
-
On 6/10/2022 at 12:42 PM, Giannis said:
Hi
I need some advice step by step
How can I adjust ignition timing
Regards
https://www.toyotagtturbo.com/community/index.php?threads/how-to-set-timing.41744/
-
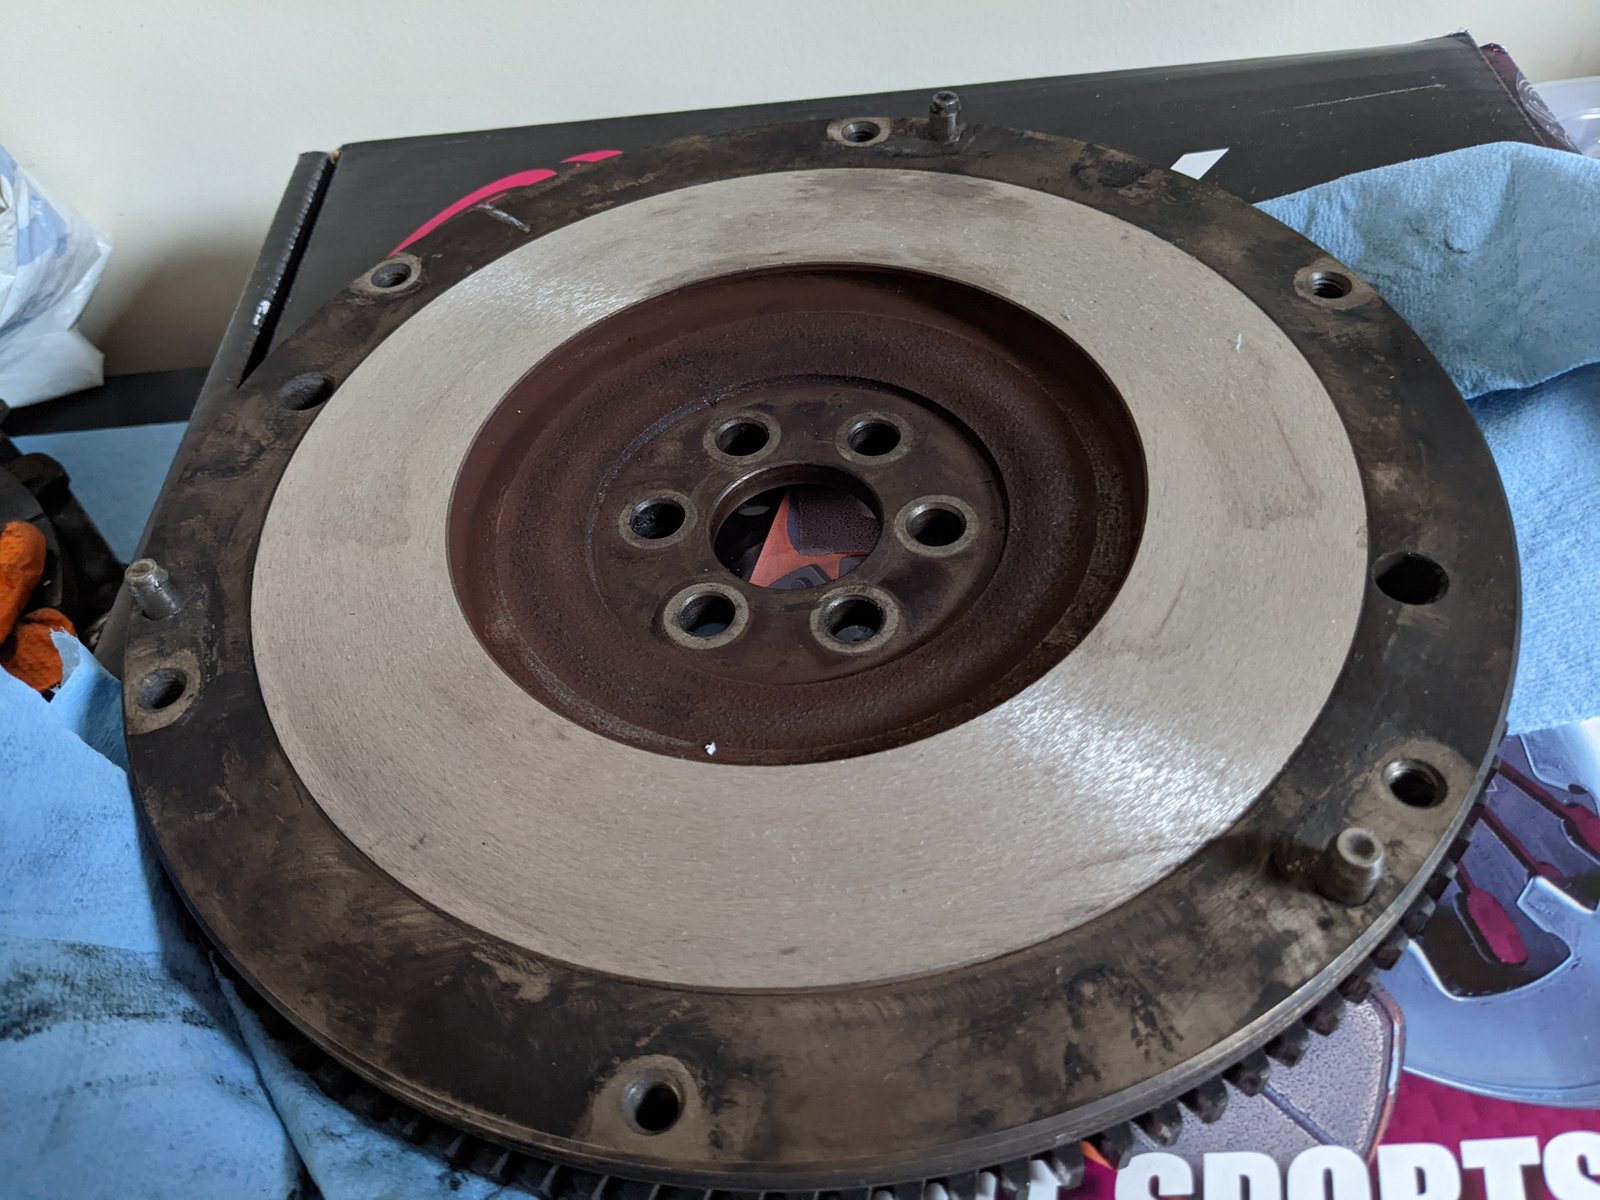
While the gearbox was off I got the flywheel skimmed by the gearbox rebuilder, can't recommend Craig at D. Gilmour Engineering in Glasgow enough, he's been great for all the gearbox work and machining I've had done so far.
I've got the gearbox back on which was also a nightmare as I really struggled to get my drivers side front wheel off as it had corroded onto the hub. Ended up loosening off the bolts a tiny bit and kicking it while under the car, once I got the wheel off it wasn't too bad.
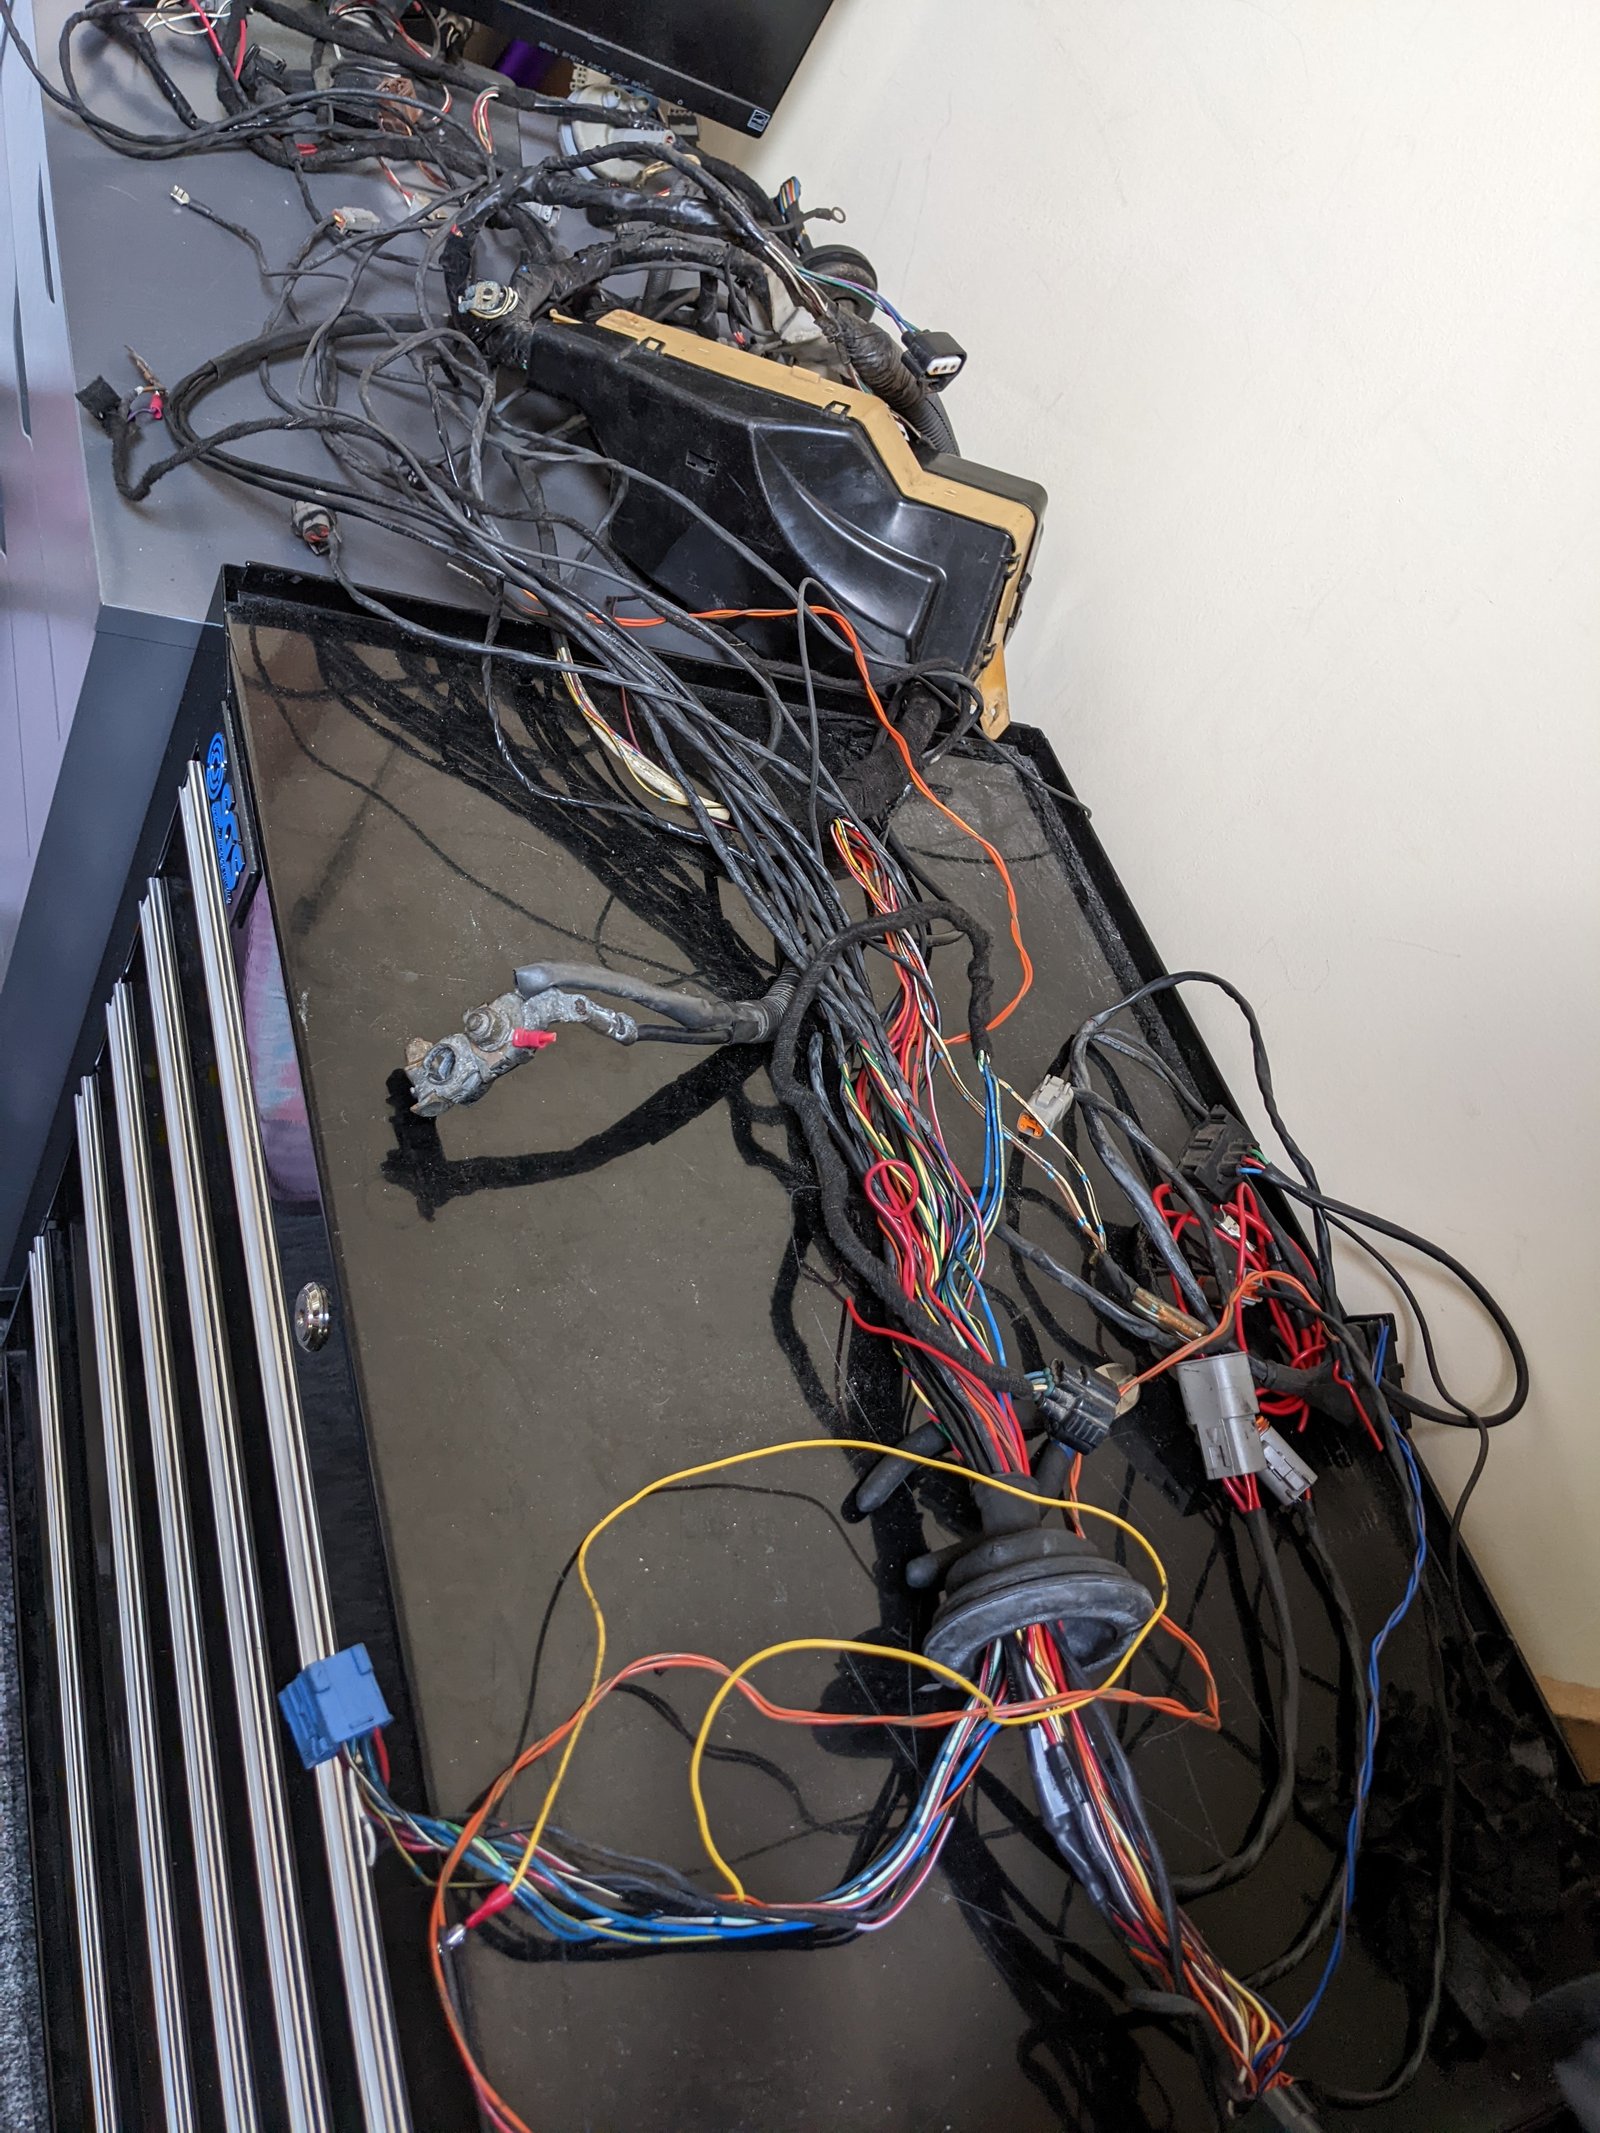
Took the loom off the car to give it a proper inspection as I knew there was some bodged bits the first time I wired the car, I also want to split the chassis loom, charge harness and the engine loom so I can easily remove one at a time.
Found some right dodgy crimps! This is what happens when you rush a job, have to do it twice haha! I've got decent RS Pro uninsulated ring terminals and a pressmaster crimp tool to do my own grounds so no more red plastic insulated terminals.

Having a problem with washer pumps failing, found the issue... corroded terminals so ordered a new connector with terminals and seals from auto-click but cancelled the order as after a full week they still hadn't posted it. In the end just cleaned the connector and seals up and used new Sumitomo terminals which I could source from automotiveconnectors.com
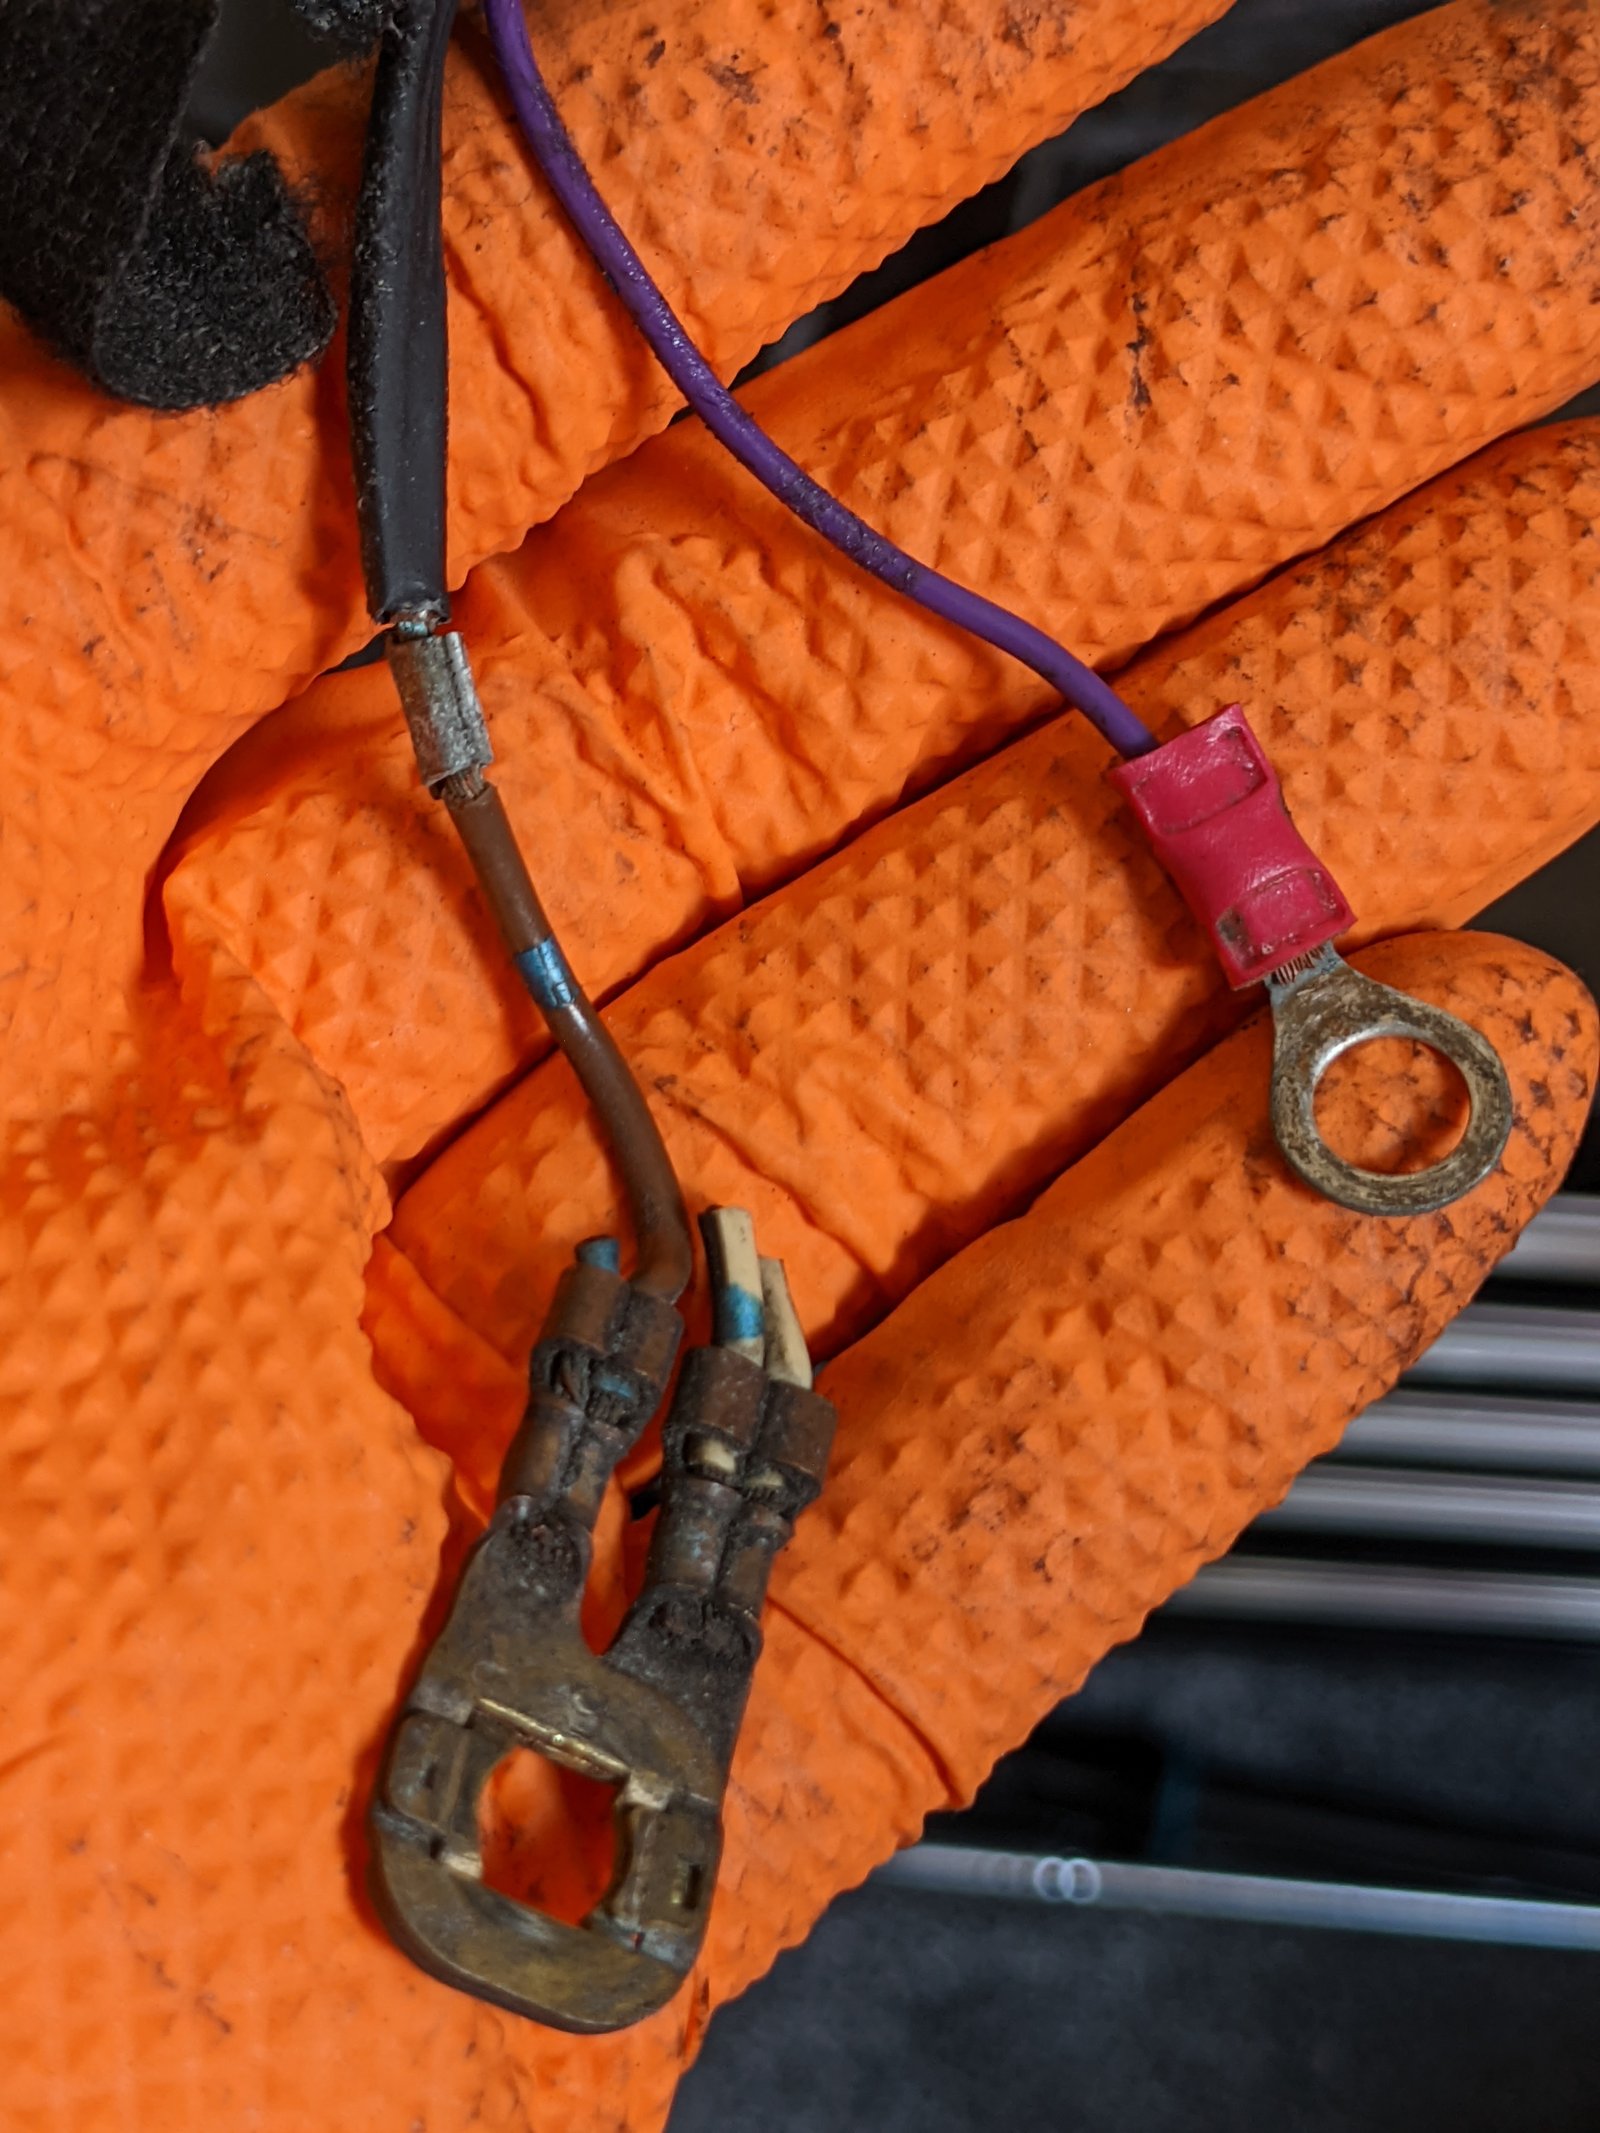
Also found the reason why my car struggles to start when the engine is hot, this cable has seen better days
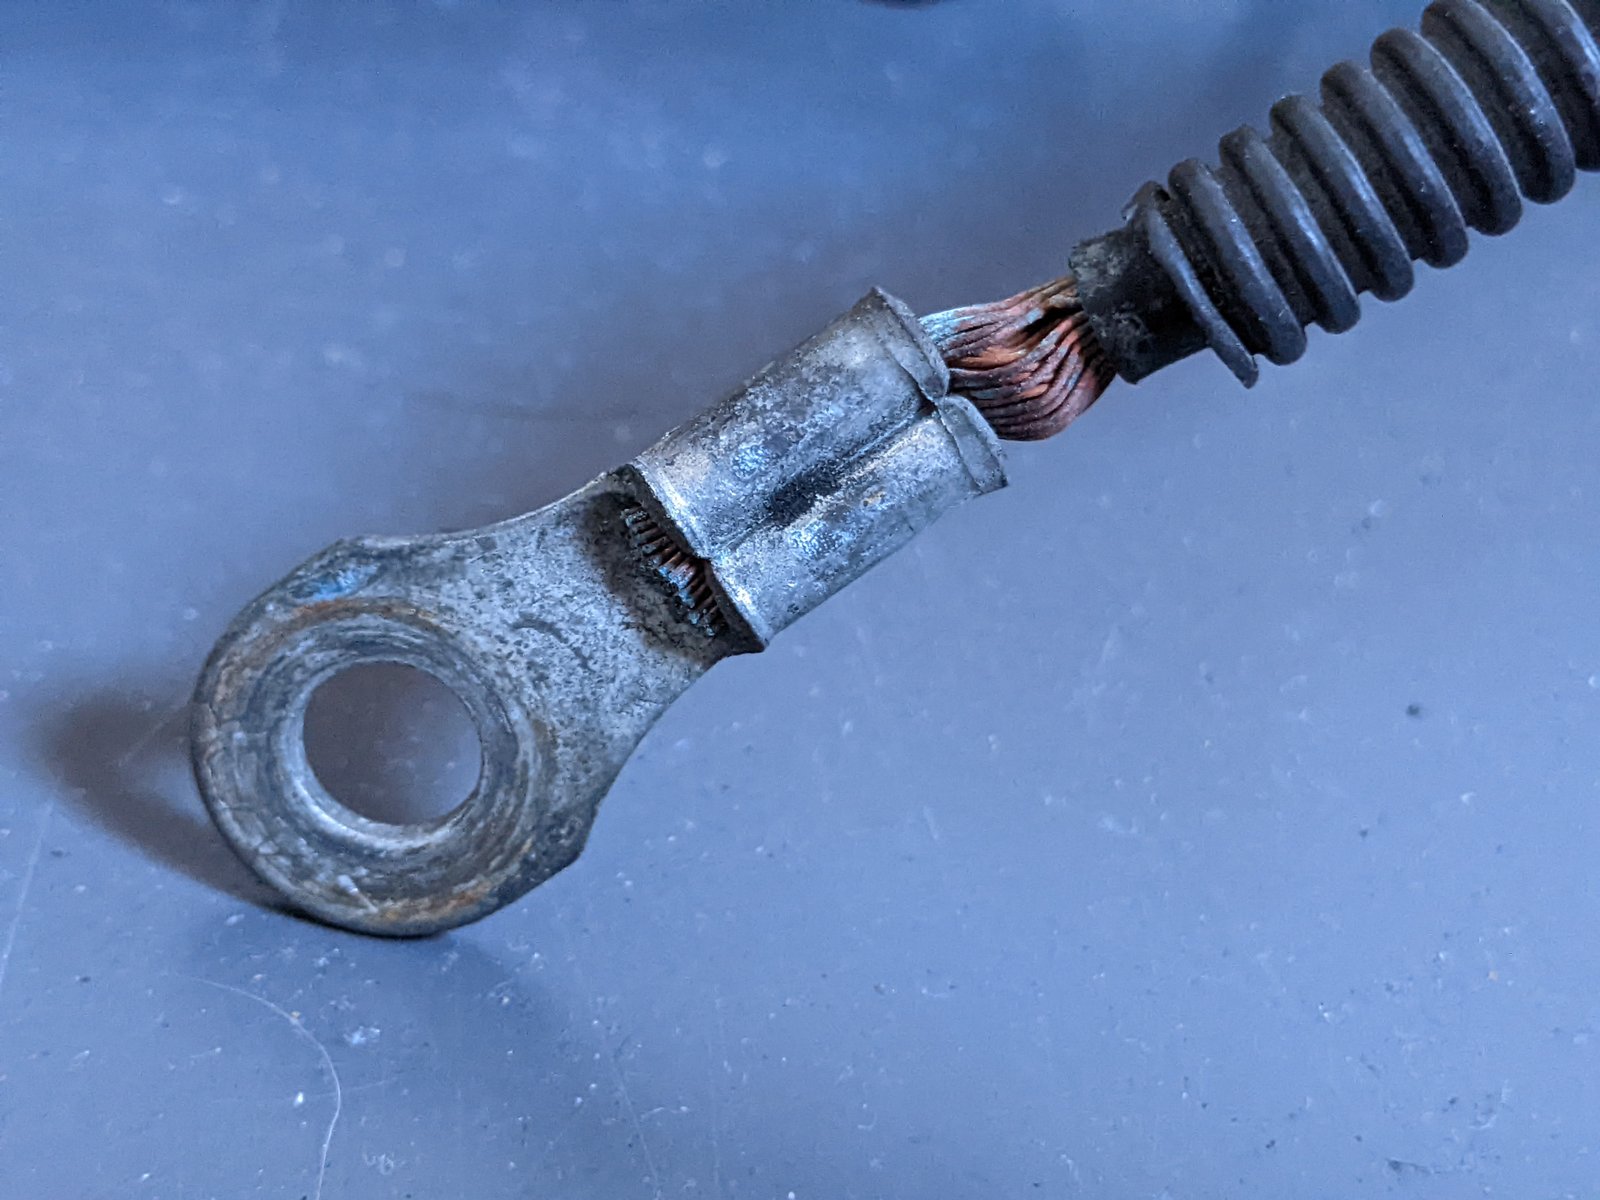
This is the starter terminal so ordered a new custom made 25mm2 cable of 800mm with M-8 terminals at each end to replace this section from the battery positive to the starter.
While the loom is out I bought some rope to mock up a loom so I can make it in the house which is 100X easier than hunched over in the car.
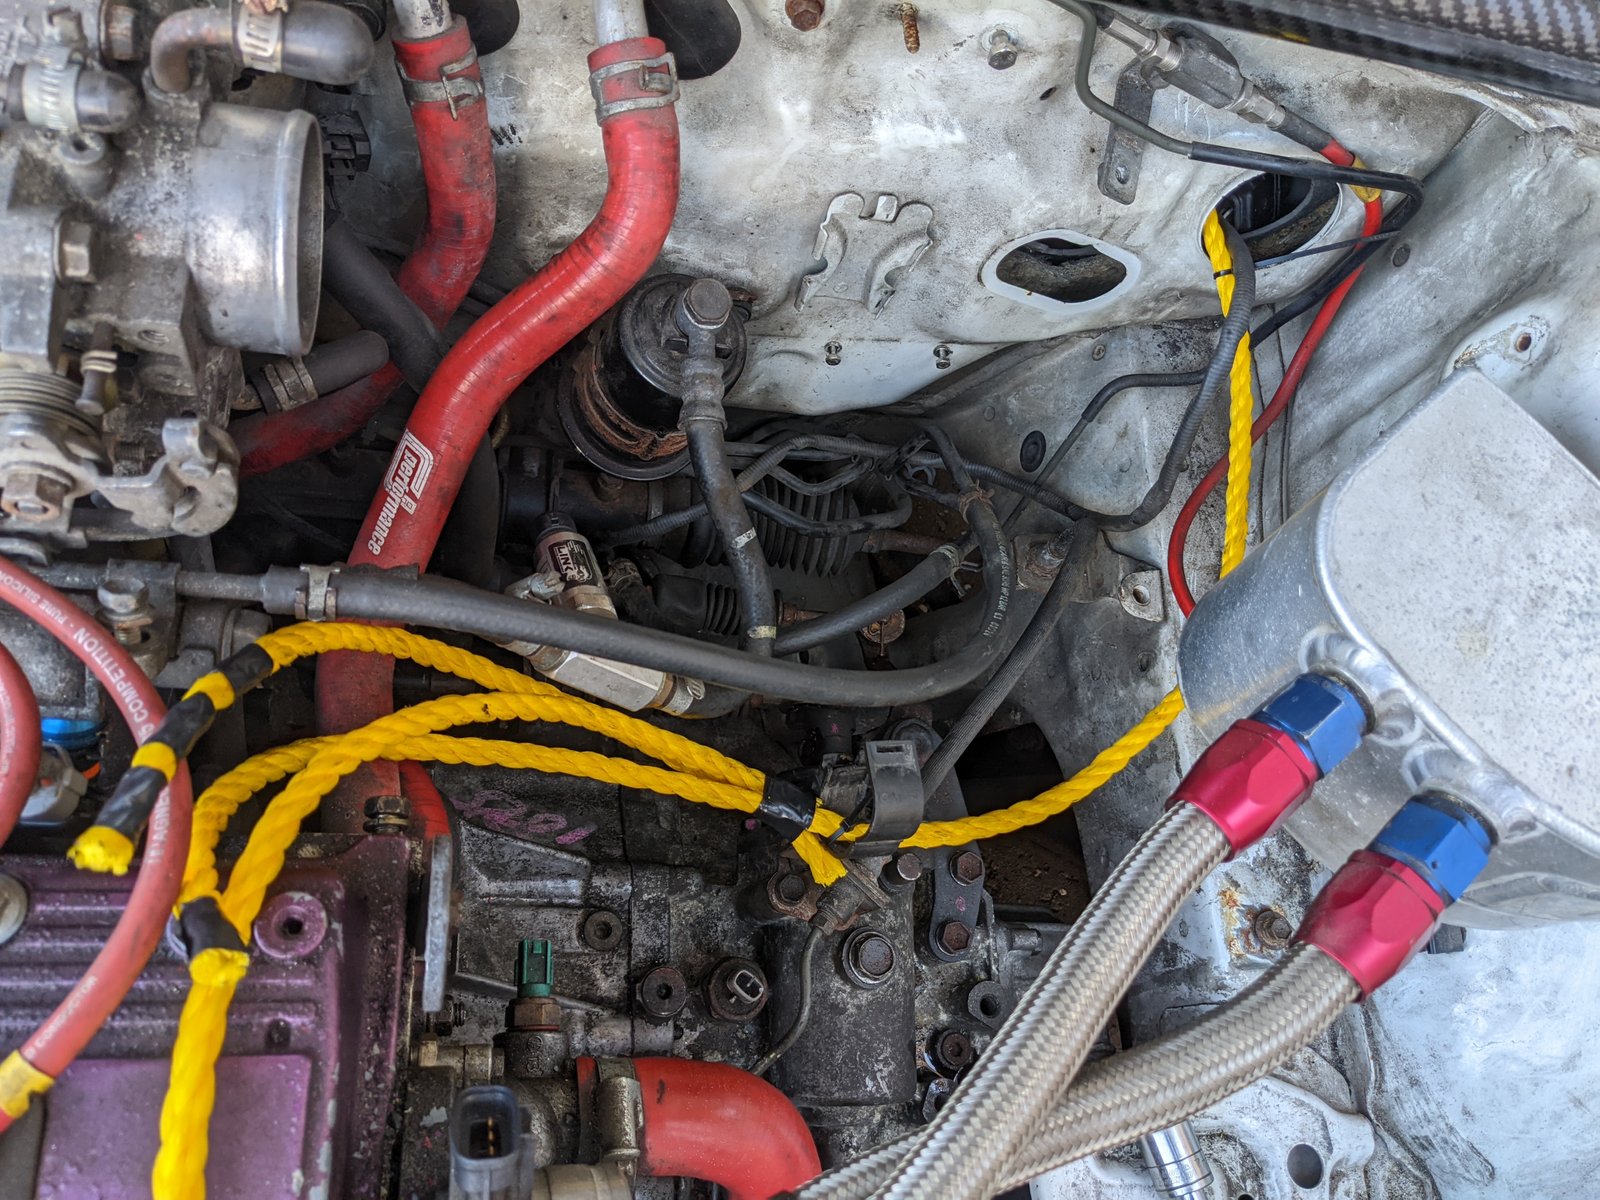
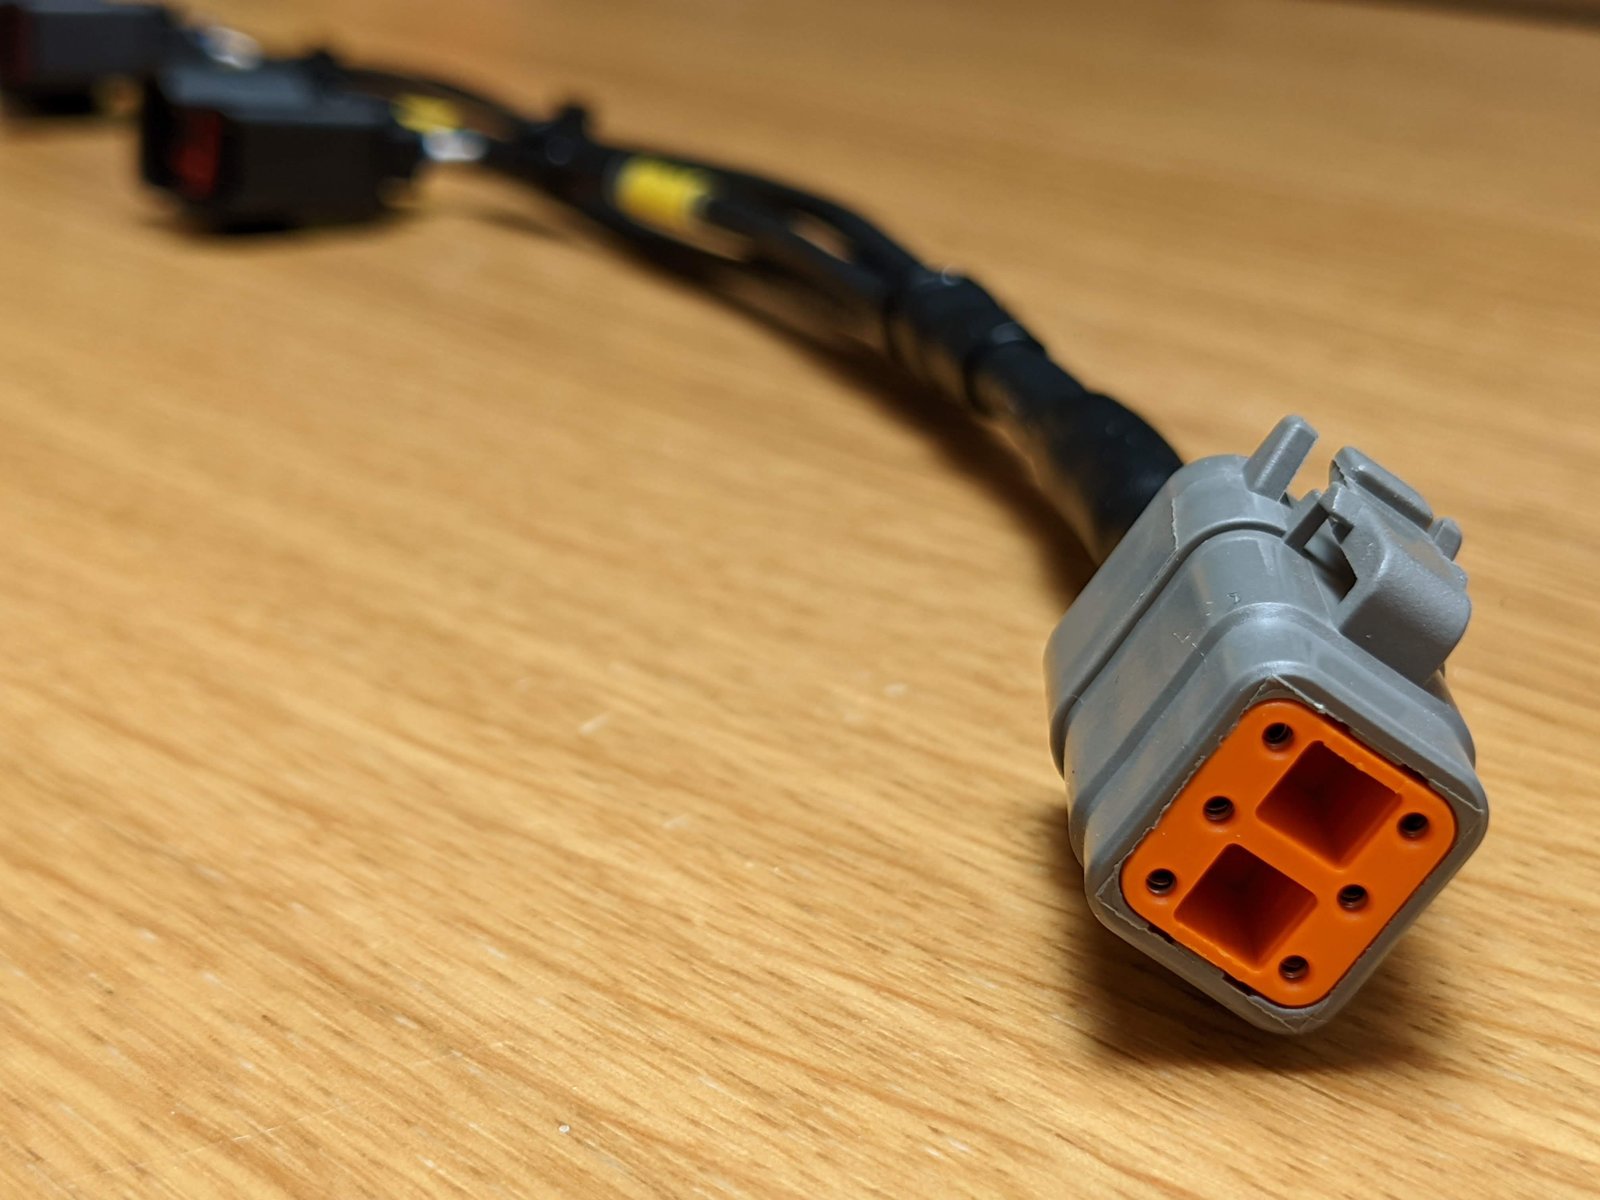
Also made a start on the K20 coil harness, this it the mocked up version made using the leftover twin core shielded wire from the Link ECU Loom A

-
Removed my current gearbox and it was the clutch release bearing which was totally destroyed! Didn't get any photos of it. Taking the gearbox off was a total nightmare, would have been easier removing the whole engine and box then splitting but I sold my crane ages ago.

The gearbox builder got some pictures of my diff which I had never seen before so it's a plate diff, think it's a TRD but no markings on it. At least I know I need the friction modifier LSD oil so got 2 litres of Millers Nanodrive CRX LS 75w90 NT+
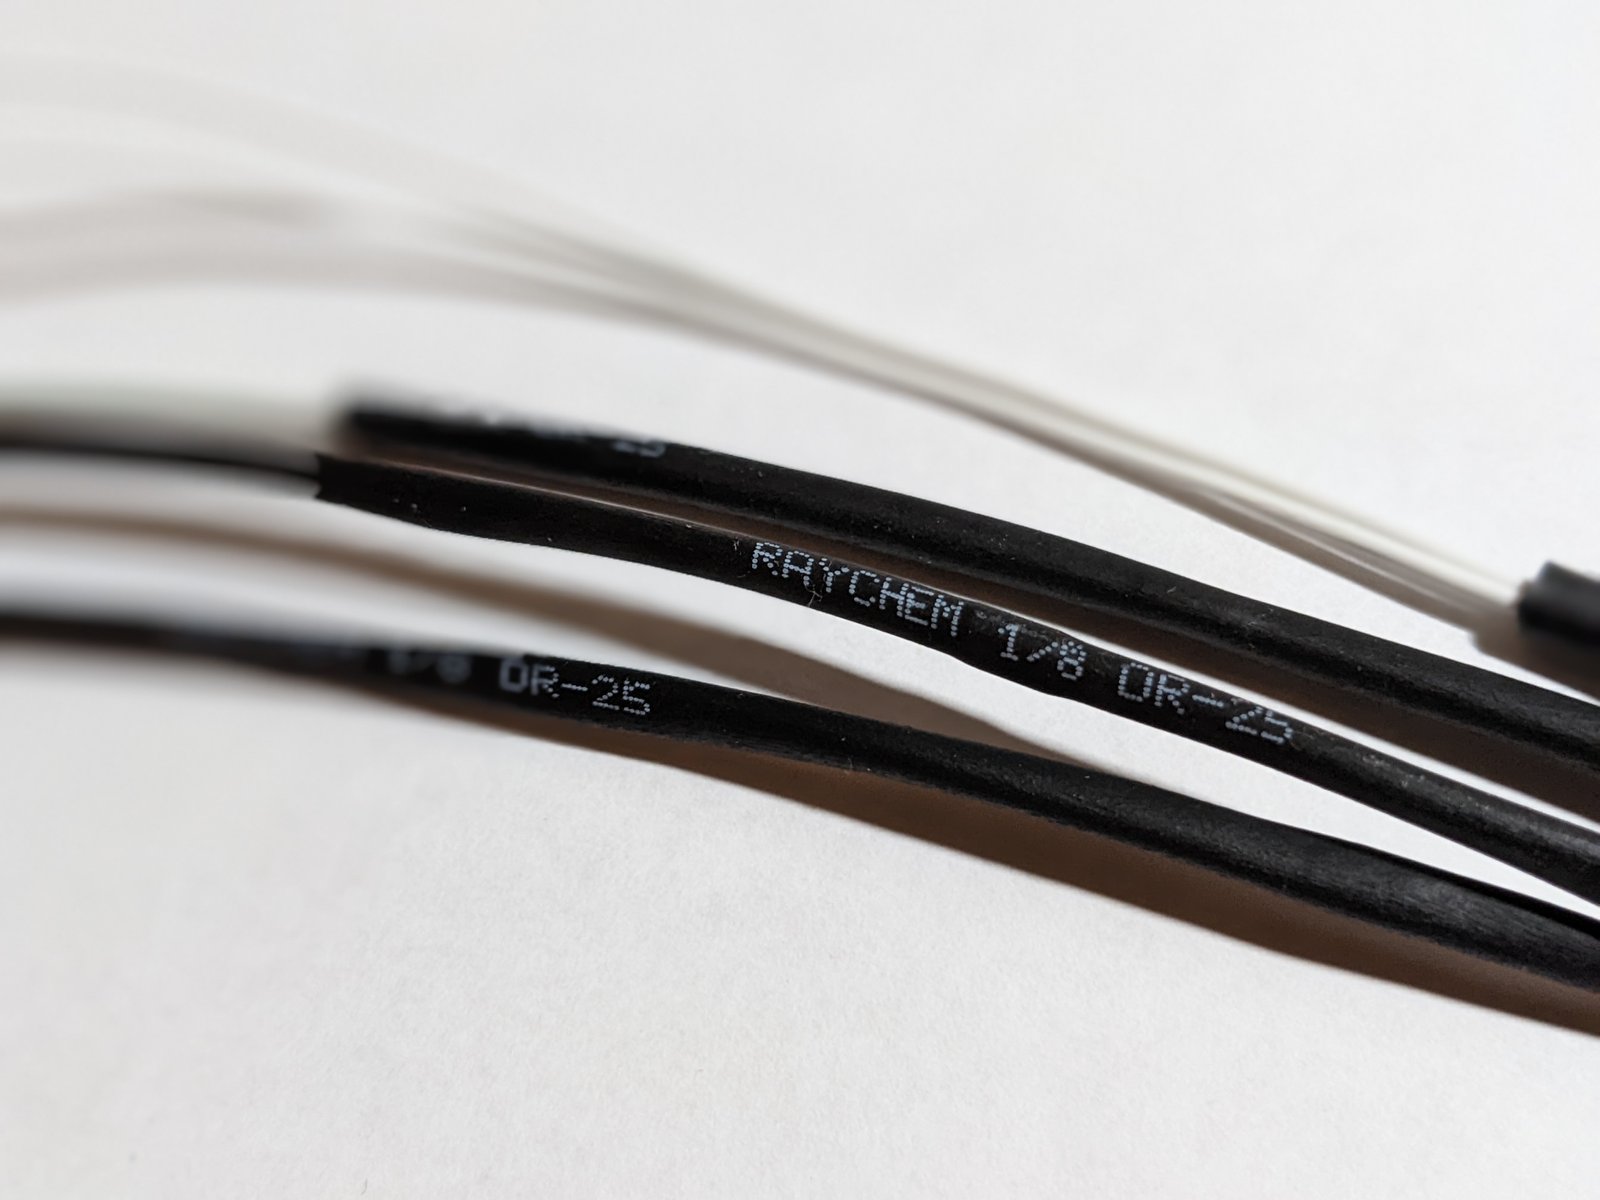
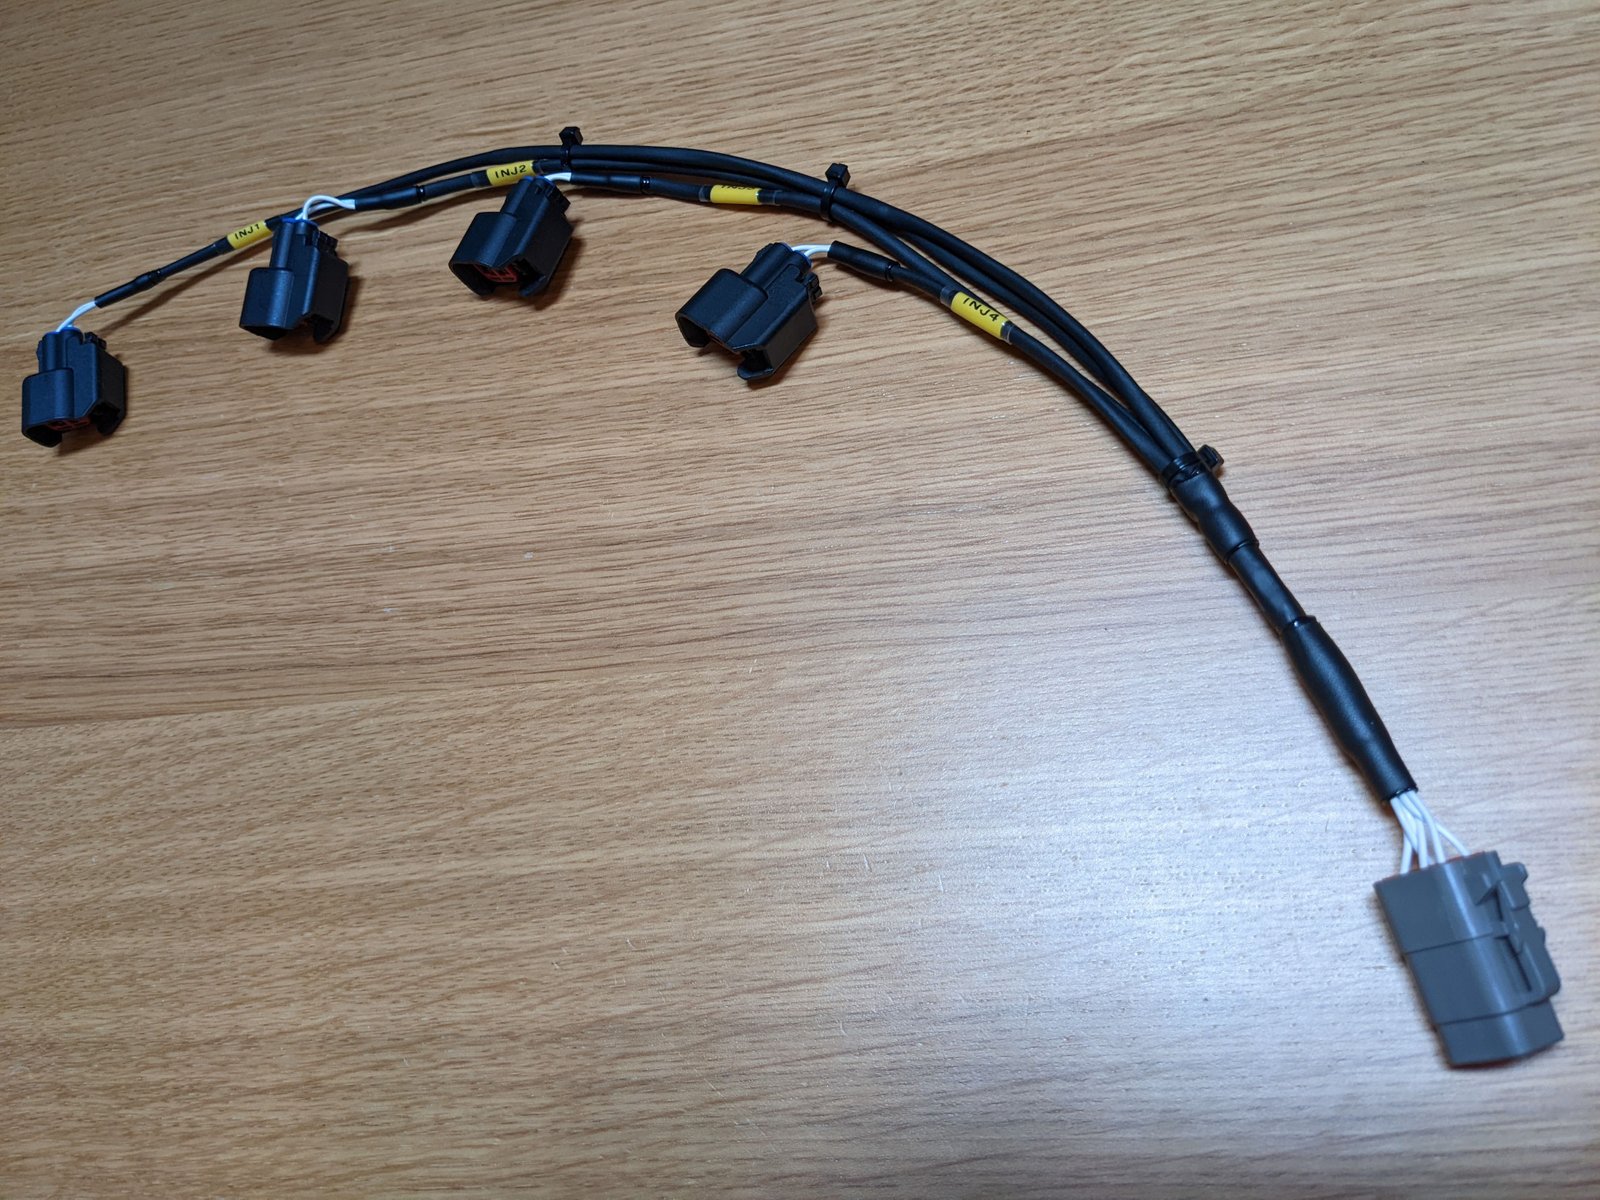
In the meantime I've been remaking parts of my loom and doing it properly by measuring correctly and making it in the house rather than on the car which is much much easier. Starting with and injector subloom as I swapped from RX8 injectors to Bosch EV14 550cc (0280158117), I was using clip on adapters but the loom was a mess and needed redone anyway. I accidentally wrecked on of the terminals on the denso connectors I had and instead of waiting a few days for a replacement I just reused a pigtails from the original loom! Looks awful! i also used 14AWG wire for the power feed which was overkill. New injector loom is 20AWG Spec55 wire, DR-25 heat shrink, Raychem SCL for the splices and booting with DTM 6 way connector using 2 terminals for the power which I will splice into a single 18AWG power supply wire.
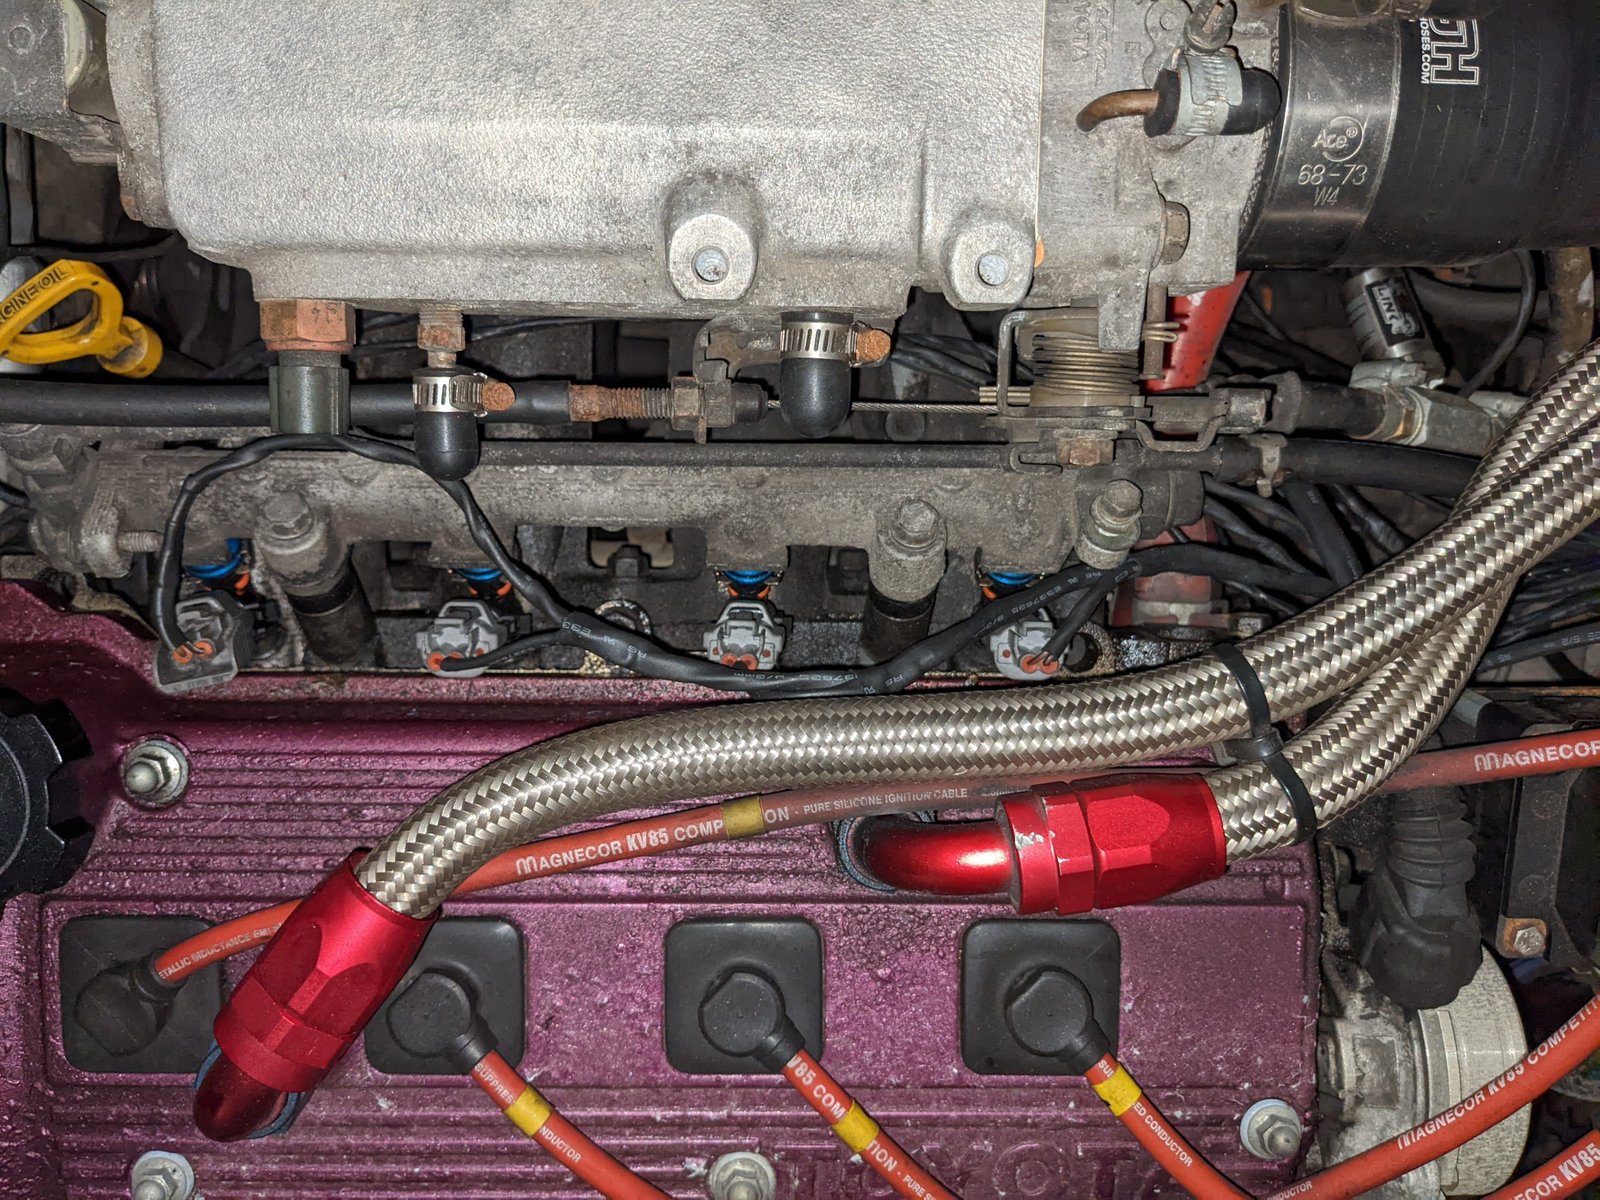


I also picked up a set of K20 coils for £48 delivered as I need to reseal my rocker cover anyway so might as well get bosses welded on at the same time. I've struggled to find good quality K20 coil connectors so in the end had to buy genuine Sumitomo ones from KVS Looms in America which wasn't cheap but at least they should last.
Here are the cheap shite K20 coil connectors which broke on the first test fit.

-
12 hours ago, Sam44 said:
At least I've measured them. That's what I go off. Auto data is not always right.
For instance if I drop my 5efe or 4efe+t pressure bellow 2.5bar all the plugs become fouled with cement boil. this is fuel as a luquid boiling off the plug surface (poor injector atomisation). 3bar is the point at which there's a big improvement.
Any one that would like to do the same and comment please do. This is a good topic of interest.
I have also seen a tuning development setup and there fuel regs are set at 3bar on factory injectors, emanage blue piggy back.
What claymore has put up is a valid point. Also when I first started researching factory pressure 2.4bar was the answer.
Have you?.
Or is that you on your period. Give that keyboard a bash. It's your comment that is not helpful.
I haven't measured it in stock form no, at what point did I say I did? I've not tried to answer his question as I honestly don't know. I do have a Link 150 psi sensor on my fuel line and I have a wideband sensor, which is far superior than reading plugs, but my ECU is aftermarket and my fuel pump is the TD 340ltr/hr and the stock reg can't handle the pressure so any readings I have are absolutely pointless to share.
If the pumps and regs you have apparently measured on this random fuel pressure data collection mission you went on with 3 cars you don't own... they are 20+ year old stock items I would take those readings with a pinch of salt, I also doubt you have opened each of the fuel tanks to check they all have the stock pumps.
I see you on here all the time offering "advice" and it seems to me that it's more important for to you to help people than it is for them to get the right answers. This is dangerous as wrong advice on some of these topics can be costly mistakes for others.
-
Point is, what you "measured" is irrelevant, there are many factors which could affect the readings (age of parts, accuracy of measuring tools, technique, aftermarket parts etc).
People don't need made up random shite for answers, if you don't know what it should be then you don't have to answer.
-
4 hours ago, Sam44 said:
Your welcome. I've only tested about 4 factory regs. The one that measured 2.8bar didn't increase the pressure so I would say that one was nakered. The others have been 3bar regulated.
All on the same car? With what pump?
-
1 minute ago, Frankieflowers said:
I did so and it stopped ticking while rpm raised.
what shall I do now? Should I buy a new one or can I repair?
It's pretty common, I don't actually know if a new one would solve the issue. They are pretty expensive from Toyota and they are shit 🤣
If the car runs ok I would perhaps ignore it.
I've actually made an adapter which replaces this valve with another more modern idle valve and removes the wax stat from the throttle body as well. You would need an aftermarket ECU to control it.
-
3 hours ago, Frankieflowers said:
I will try to unplug the black hose and see if something changes. Thanks.
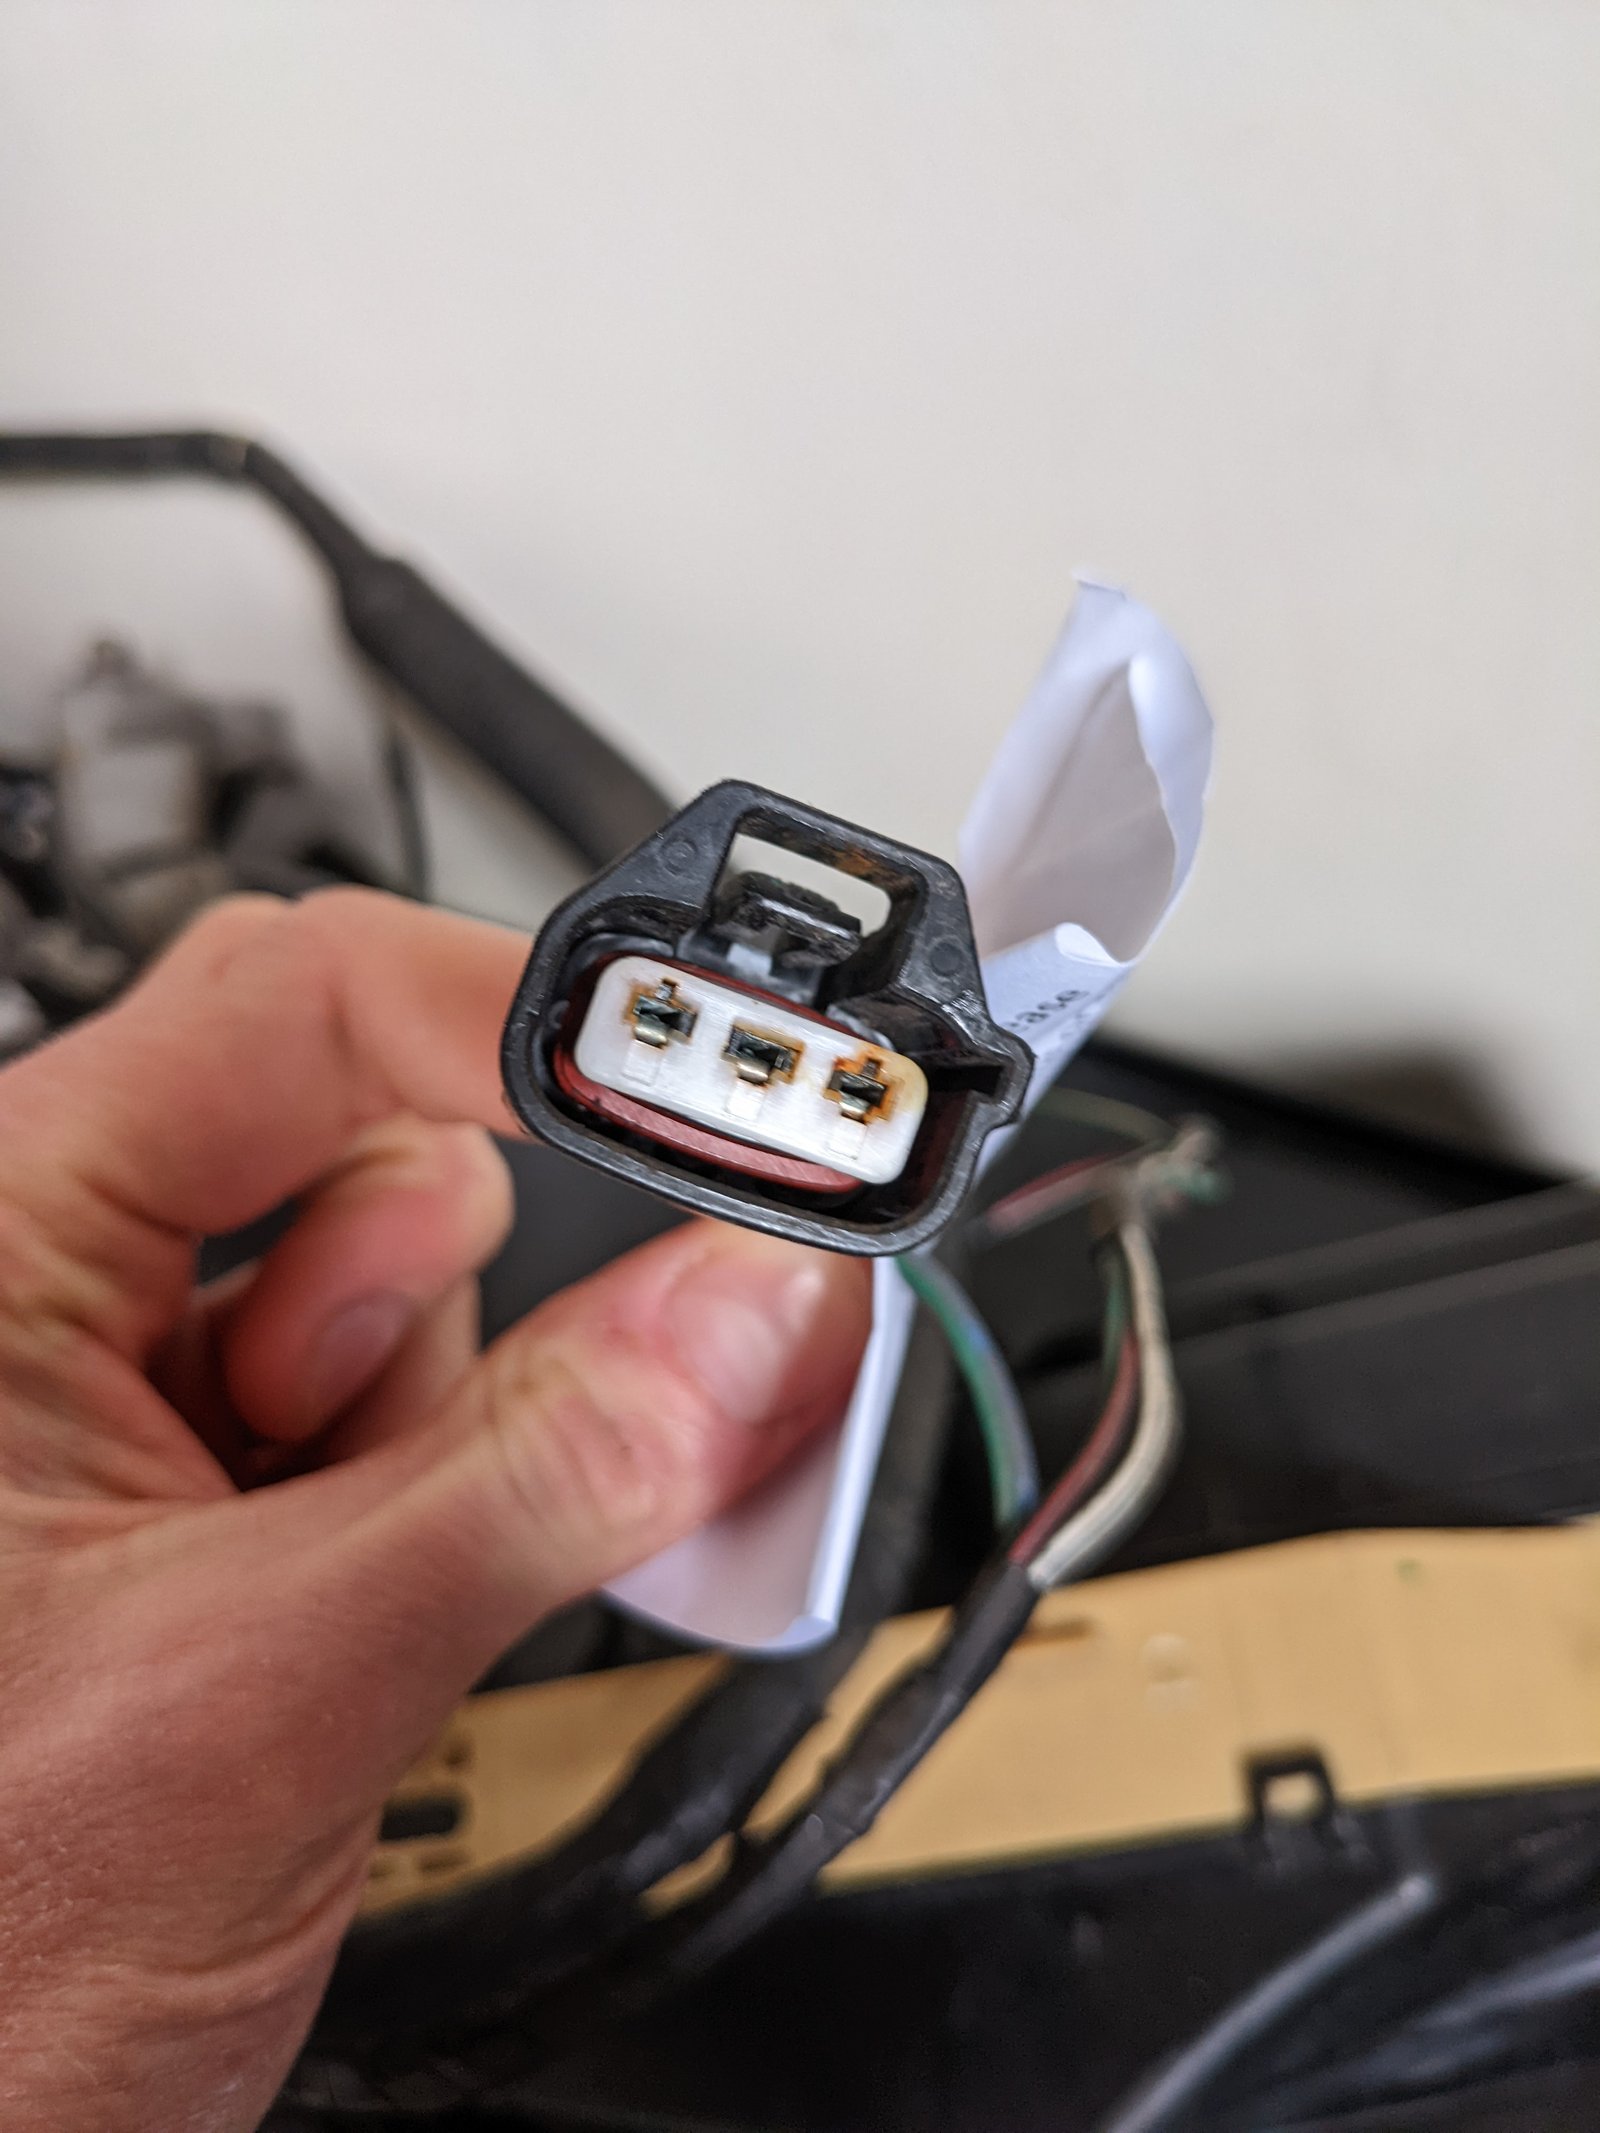
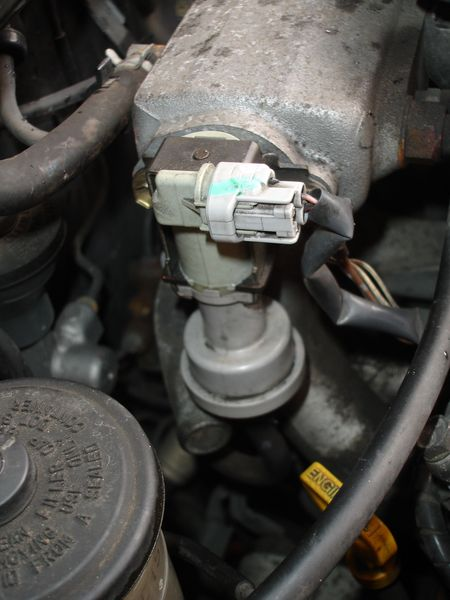
Don't unplug any hose. You want to unplug the grey connector you can see here
-
On 1/15/2022 at 11:54 AM, Frankieflowers said:
Hi guys.
My engine starts ticking not on idle but when I start driving it and I press the throttle. It does it for a few hundred meters (around a minute) and then it stops doing it. If I give more gas the engine is not running properly. As soon as the ticking fades everything turns to normal. It does it when I fire it in the morning and it’s still does it when the engine is warm. At first I thought it was the oil missing on top of the engine for the valves hydraulic but I am not sure and I would like someone to help me find out. Thanks.
This can sometimes be the idle control valve. Assuming you have a 4e-fte, unplug it while the engine is running and see if the ticking stops.
-
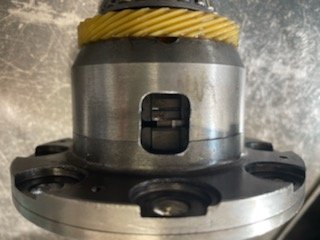
So it turns out you can store a gearbox in a garage for 9 years without oil or sealing the driveshafts and it will be fine 😃 no rust at all inside the box which I was a little worried about!
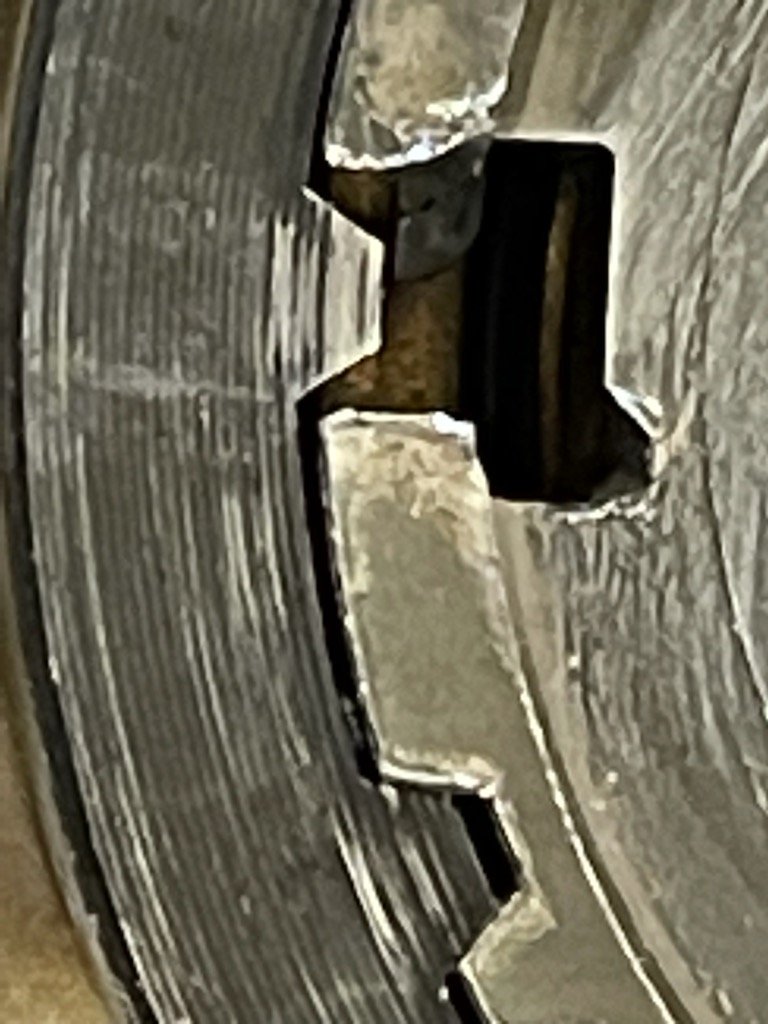
Gearbox rebuilder has sent over some pics of an interesting bit of damage at the 5th gear synchro hub, its broke a wire semi circular clip at some point and the hub finger, these were stuck to the magnet. Because of this there is a little bit of damage to the gearbox casing which is a shame but all these parts are replaceable so I've to pop over and have a chat to see what it needs.

-
Small update
My stored gearbox is at a local rebuilder to get stripped down and inspected and have the open diff removed to swap into the box that's currently on the car. I've ordered seal kits for the 2 gearboxes from Nengun (Toyota - Gasket Kit, Transaxle Overhaul (mtm) Part number 04331-12080 for anyone interested) as its £42 for 2 shipped from Japan instead of £38 each here in the UK.
Once he has the box opened up and he's happy with the condition of gears and synchros etc I think I'm just going to have all new bearings fitted, I think the bearings are marked with the part numbers from Koyo/NSK etc so it should save a lot of cash rather than getting them from Toyota. Once the box is ready I will take the gearbox off my car and bring that down so he can open it up and swap the diff over. Ideally I want the other box repaired and probably sold but the issue is the synchro's changed in the C56 (it might even be a C52) at some point and you really need the VIN number for the car the box came from to identify the correct parts you need. Tim at TB developments reckons he could probably rebuild it and source the parts but I would have to send it down via a pallet and it could be a lot of £££ lost if he can't get parts.
I got my Exedy Stage 1 clutch but thought it was the wrong friction disc in the box as it only had 4 springs in it. Turns out after a lot of back and forth and speaking to Exedy UK that they changed the friction disc form a 6 to a 4 spring model, I'm assured it's the same material and will hold the same power but should be nicer to use. We will find out soon enough.
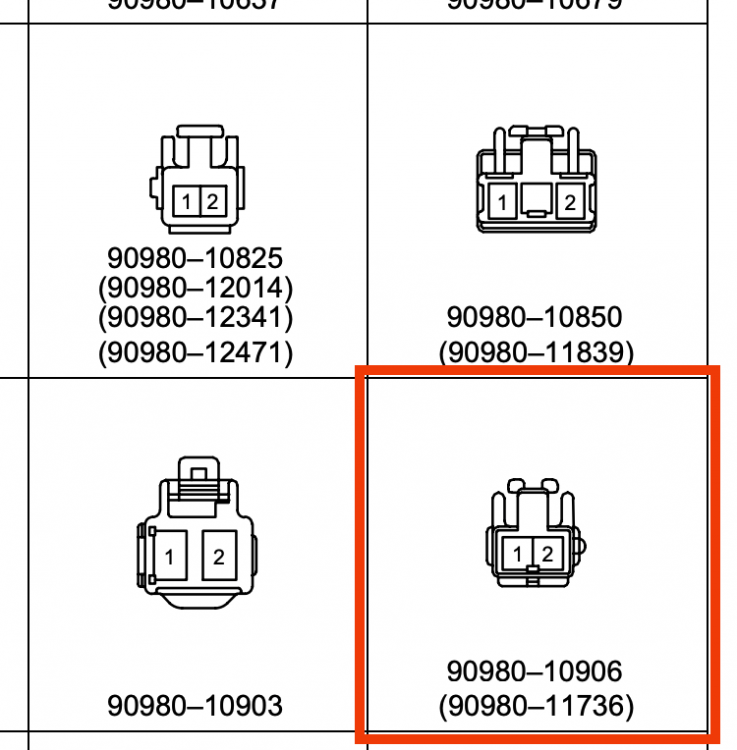
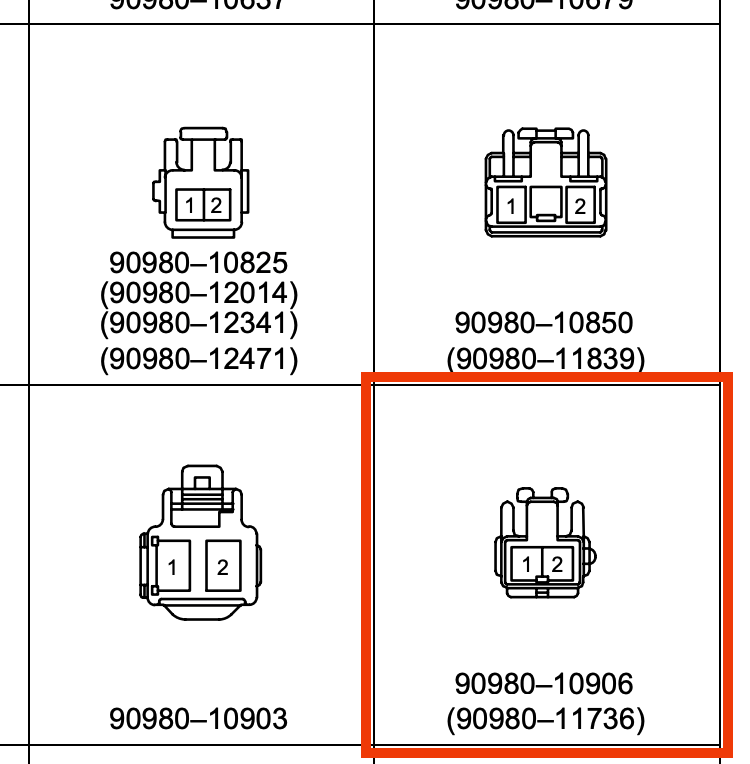
Other than that I've got a Supra clutch switch (Part number 88280-14030) for enabling launch control. Hopefully this will fit onto the clutch pedal instead of the adjustment bolt that's there now, I haven't even measured it haha. I've also spent ages trying to source the connector housing for it which looks like its Toyota part number 90980-10906. This uses Yazaki 090 II female terminals I will report back if this fits
-
19 hours ago, BMX-RIG said:
I know what your issue could be with the box. My gearbox started going noisy which i put down to clutch release bearing. Upon removal the centre spline on the trd clutch had worn loose so that got replaced with an excedy stage 1. Bearing was fine but new bearing fitted along with a new clutch and the noise was still there. It was some of the shaft bearings in the gearbox in the end.
New bearings in the gearbox and the noise completely went. Not only that the gearbox now feels the best its ever felt. Engagement is perfect and the difference really was night and day.
TRD diff in my gearbox also and think its just harsher on the bearings over time prematurely wearing them out.
Ah cheers for the reply! Yeah when the box is off and open I'll be replacing all the bearings anyway for piece of mind.
I think the clutch release bearing looks quite rusty anyway having a look at the original image I got sent back in 2013.

Thinking the plan is to get both gearboxes rebuilt with all new bearings and synchros (if necessary). That is of course if the sorted box is worth saving. I hope it is, will open it up and have a look over the next month or so.
-
11 hours ago, CallumWellens33 said:
Thankyou for the confirmation Sam, any opinion on best/lightest off the shelf flywheel? Not arsed about inertia, I'll have to man up and teach myself some clutch control😂😂
I don't think there will be many people in a position to tell you which one is the best as I doubt many have tried them all. There are a few options on fensport, rhdjapan and perhaps id workz or tegiwa

James's 96 Glanza V
in EP91 Glanza Progress Blogs
Posted
Well done finding all those syncros! I wanted to find a new set for mine but couldn't get all of them, think 3rd gear one was the one I couldn't get in the end