raffa_mk Posted February 2, 2010 Share Posted February 2, 2010 EDIT>>>> Proper build from beging to current date starts from post 8 Quote Link to post Share on other sites
EP91Bon Posted February 2, 2010 Share Posted February 2, 2010 HI pal, looks like u have a good base to start with, never seen the brows on a na before! i think they look sweet, whats your plans? Quote Link to post Share on other sites
raffa_mk Posted February 2, 2010 Author Share Posted February 2, 2010 HI pal, looks like u have a good base to start with, never seen the brows on a na before! i think they look sweet, whats your plans?Same here, not seen them on n/a before so i though i would give it a go, i've had alot of people looking twice because of this. Got quite a few plans lined up, will keep posting as i go along,going to continue with the front and put leds bulbs and hids, and also to change the lights in the fogs ive fitted. Quote Link to post Share on other sites
Sparky Posted February 2, 2010 Share Posted February 2, 2010 I like the uniquness mate :harhar: Quote Link to post Share on other sites
redz11 Posted February 26, 2010 Share Posted February 26, 2010 looks tidy, i was going to do that with the brows for mine but funds cant allow.another green n/a, the color really grows on you in time, mine has should be a nice build Quote Link to post Share on other sites
Liam_D Posted February 26, 2010 Share Posted February 26, 2010 As said its nice to see another green one buddy!! Really not feeling the headlights or the brows but each to there own. Quote Link to post Share on other sites
raffa_mk Posted June 28, 2011 Author Share Posted June 28, 2011 alot has been done over the year and i will be updating the this build thread so watch this space in the next few days.... Quote Link to post Share on other sites
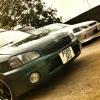
raffa_mk Posted June 29, 2011 Author Share Posted June 29, 2011 So here is where the story begins, I started of with the this starlet, Itâ??s a 6P3 CD model on a 96 plate, The car is totally standard with wheel trims and a sunroof, Look at what came through the post!!! Then I came across UKSC and after looking at what other members where doing and the potential that these cars can go along with Glanzaâ??s which I didnâ??t even know things started to change and the: Today Tomorrow Toyota Starts Here: The 1st thing I was to change is the indicator lenses with clear ones that made a nice little difference Then I had blue fog lights below with strobe lights in them for show purpose After this it was LED sidelight bulbs followed by 6000K hid kit. Next was to carbon wrap the front grill and side strips which is unique to my car as nobody else has done it and it hides the horrid grey strip with lime green in it. Then customising and fitting eyebrows on the car wrapping up with carbon and tinting the lights and also having fitted the wind deflectors i have bought some glanza eyebrows and wanted to see how the will look on the car after i had put clear indicator lenses on the car after trimming the eyebrows to a perfect fit i decided to wrap them with carbon vinyl i had then stuck the eyebrows on after the second attempt with some really strong clear grab adehsive from screwfix and then tapped them on the car to hold them in place for 24hours and here are the finished brows, pictures don't do it justice but they look the Bizz when you see then in the flesh. i have also tinted the front lights and indicators black and heres a pic of the Green Spider parked up Quote Link to post Share on other sites
raffa_mk Posted June 29, 2011 Author Share Posted June 29, 2011 Then here come the sound system install in the car Here's some pics of the gear: Specs as follows, Subwoofers: Daily Running subs were: 2x 12" Alpine 1242 type R running 500RMS and 1500Watt Peak Each (Total 1000RMS and 3000watt Peak) Loud and clear ;) Then for competition/pleasure with 2x 12" Alpine 1242 type x subwoofers running 1000RMS and 3000Watt Peak Each (Total 2000RMS and 6000watt peak) SQ and Mega Powerful ;) you could not drive the car whilst on half volume as the pedals vibrate from the bass! Crazy LOL! To run this I had 2x alpine PDX 1.1000 amps and 2x 1 farad power Caps running off a yellow top battery The boot was dead matt along with double sealed box as ported needed a bigger box and had to be assembled in the car which I couldn't be arsed with. For the mids/highs I was using: Alpine SPX 17 Pro components running: 100RMS and 300Peak with crossovers and tweeters Alongside alpine type R components running: 100RMS and 300Peak These are fitted to modified door cards with dead matt behind it The amp to power them is Alpine PDX 1.400 which runs 400RMS (100RMS per channel) I had been trough many stereos, Pioneer deh-6900ib (1st) Alpine (2nd) can remember but slighty better but too fiddly Pioneer deh-p80mp Pioneer p88-rs 2 (best one bar far and paid the price for it too, awesome, competition grade) Quote Link to post Share on other sites
raffa_mk Posted June 29, 2011 Author Share Posted June 29, 2011 So next for the exterior came the front square number plate, the place had no smaller ones so thought I would do it and get it changed at a later. Also came the custom n/a bonnet with scoop and extended at the front at the lights, here are some test pics whilst it was getting prepped. I liked it better with the eyebrows but they had to come off as the bonnet will not fit ;) So here it is fitted! And the eyebrows off. You can see the difference between standard and tinted lights LOL After having this fitted the car attracted a lot of attention Further more I had to tint the windows so you canâ??t see the gear in the rear of the car I decided to go back and rear window 30% dark and then do the front to the legal 70% and I does make a difference at the front. The film is kind off thick too so good if someone tryâ??s to decided to smash the window. I had then had a 4â? back box welded on the car and made a nice note- (replaced the gay exhaust tip clamp I had fitted lol) Pics of the car at night along my mateâ??s old car I then purchased some rims for the car and went for Lenso RS5â??s wrapped in toyo t1râ??s and replaced 2 of them for new 1s These are 15" 195 50 and 6.5J After this I decided to go for the black and green colour scheme and decided to wrap the roof in gloss black. It was a pain in the arse especially the sunroof Here are some pics: Before Alignment and prep And finished after 2 hours! And love it! after using alot of soapy water and a hairdryer I also had a quick go at the side pillars on the door and then gave up and could be bothered to do the rest of the door frame More pics of the total car A spoiler is now need on the back to complete the top. Spoiler is now ordered and ready to go on the car Heres the car now with spoiler: Quote Link to post Share on other sites
ali_legend Posted June 29, 2011 Share Posted June 29, 2011 Boot looks sik man.!! i need to do that but wouldnt know what to get or how to do it ;) nice so far though bro ;) Quote Link to post Share on other sites
SiCaln Posted June 29, 2011 Share Posted June 29, 2011 door pockets look awesome, how did u do them Quote Link to post Share on other sites
fattony Posted June 29, 2011 Share Posted June 29, 2011 get it lowered man, it will finish it off nicely!!! (if you havent already!) nice sounds, love the big bass!!mines all hidden away! but i like showy installs to! Quote Link to post Share on other sites
miib14 Posted June 29, 2011 Share Posted June 29, 2011 looks really nice bro Quote Link to post Share on other sites
raffa_mk Posted June 29, 2011 Author Share Posted June 29, 2011 Boot looks sik man.!! i need to do that but wouldnt know what to get or how to do it ;) nice so far though bro ;)Took me about 2months start stop trying to do the audio system the way I want, had been though 3 stages for this result and would have gone stage four but that requires a bigger car as I would have done a wall install with an Orion audio and multiple door speakers and on the dash, was even thinking of doing water proof speakers in a rally style lights attatchments lol! But for what I use my motor for it's spot on and alot off people know I like my music loud and clear. It's even funny when I come up to red lights behind a car a blast music off that they jump the red lights lmao!door pockets look awesome, how did u do themI had them professionally customised at the audio shop, it's basicall a wooden frame packed with mdf and fibre glass over then they had the same colour material as door trim to finish it off. Cost me alot of money, but that's uni days for ya, still got some of the door pocket left to fit CDs in them ;)get it lowered man, it will finish it off nicely!!! (if you havent already!) nice sounds, love the big bass!!mines all hidden away! but i like showy installs to!Its not lowered just yet...but soon it will, roads here are awefull, had a front under brace and kinked in middle on a bump! Was well gutted as it was only on car for a month. Having speakers in the door pockets were best thing to do as under the dash is awefull.looks really nice broThanks bro...alot still to put up and write up... And your part is still to come lol! Quote Link to post Share on other sites
Ryan5793 Posted June 29, 2011 Share Posted June 29, 2011 Door cards look real smart man, get these engine mods up ;) was good to see this crack the 90's. Quote Link to post Share on other sites
raffa_mk Posted June 29, 2011 Author Share Posted June 29, 2011 Door cards look real smart man, get these engine mods up ;) was good to see this crack the 90's.Thanks pal, yeh I will get the rest up in next few days, just trying to sort it all out an get the pics off different phones. Was well chuffed with 90 but now aiming min 100 next time. Some supprises will be lined up in next few months. Quote Link to post Share on other sites
raffa_mk Posted July 1, 2011 Author Share Posted July 1, 2011 Here's more to add to the build Winter was coming up so I was on the hunt to buy some winter wheels and I came across these from paul as they were on his Black GT that he broke. Bought them at a good time as I had a puncture in one wheel so here they are test fitted the rear ones first and going for a remix look for a while Here its is parked next to a standard n/a thatâ??s local to me Next was front seats that I bough from another member, was fitting the passenger seat at the time, better pics will be done later. Went square no plate at the back and got a resized one for the front, I had stuck on black gloss vinyl so that I could then stick the double sided tape to it without damaging the car when taking it on and off and looks smart too. Then I had had problems fitting a c-pillar brace as it would fit using exciting bolt so I had to file the size hole out and managed to get it to fit I was happy with the rear but then came across this and had to put it on the car. So I started to mark off the cut out point and started to dremmel parts from the boot And the next day the clutch and gear box went on the car and damaged the gear box so had a new clutch and a gear box in the car, here it is after RAC towed it to the garage. Bad Times : ( I removed the swaure no plate as this was going in the glanza no plate surround and screwed the old one back in place. You can notice the c-pillar bar fitted After 2 days the car was out of the garage and back on my drive running smooth as ever. Decided to buy better brakes and went with EBC Red stuff for the front and they make a lot of difference from the standard pads, I even had half left on the old one and threw them in the bin as there no good to anyone really. After installing the new brakes I decided to have the front wheels changed over too. Here comes the snowwwww After the bad weather I gave the car a good was especially the wheels Handling was my next priority So I got this lot! Whiteline front 24mm anti roll bar Whiteline Rear anti roll bar Whiteline Panhard Rod Rear Strut Brace Got a Standard Front strut brace but didnâ??t bother taking any pics as its black lol Next was to fit the standard front strut brace from the glanza and then the rear strut brace. Came to the Manchester meet with the convoy from ladybower with drew and the crew one quick snap when it was there. Meet a few members and enjoyed the day with many fab cars there. Now hereâ??s how the car stands after a good wash with the number plate surround fitted. More to Come................. Quote Link to post Share on other sites
Ralph1 Posted July 2, 2011 Share Posted July 2, 2011 Great ICE install, and the outside is coming up a treat.cheersRalph Quote Link to post Share on other sites
raffa_mk Posted July 3, 2011 Author Share Posted July 3, 2011 Great ICE install, and the outside is coming up a treat. cheers Ralph Thanks pal, exterior will be looking better in the next few months hopefully, might get wheels refurbed and change them to a different colour too Quote Link to post Share on other sites
raffa_mk Posted July 3, 2011 Author Share Posted July 3, 2011 Next upgrade was the 98Spec lights, bought from momentum motorsport based in NI, Guy was a top lad and got them with the wiring loom, Kept exciting starlet loom to the car as not converted the reverse lights yet, Here it is parked next to my mates Toyota Soarer, Love both cars as they are green Quote Link to post Share on other sites
ryan lang Posted July 3, 2011 Share Posted July 3, 2011 mate, thats not a standard front strut brace got a bargain there by the looks if it was cheap lollooking good now mate, i need a rarb :/ and then im done lol im sure it was lowered? Quote Link to post Share on other sites
waseemrafiq Posted September 17, 2011 Share Posted September 17, 2011 love this car, have heard it rooarr past me a lot of times.theres this starlet and 2 more in sheffield that are modded up nicely Quote Link to post Share on other sites
glanzav.tee Posted February 14, 2012 Share Posted February 14, 2012 i've seen this nice chap to talk to, and a very nice modded starbo. Keep it up ! Quote Link to post Share on other sites

Recommended Posts
Join the conversation
You can post now and register later. If you have an account, sign in now to post with your account.