the-dalester Posted March 5, 2009 Posted March 5, 2009 thatll look proper nice , u startin on the body once uve finished the engine bay? Quote
RobSR Posted March 5, 2009 Author Posted March 5, 2009 ^ yea will be when theres some better weather Quote
Sparky Posted March 5, 2009 Posted March 5, 2009 Missed a bit around the VIN plate Good work mate, should of bought Si's Advans..... mmmmm matt black JAM kitted beast with white RG's Quote
RobSR Posted March 5, 2009 Author Posted March 5, 2009 Missed a bit around the VIN plate Good work mate, should of bought Si's Advans..... mmmmm matt black JAM kitted beast with white RG's yea i know its not finished yet!Yea i didnt have 500 odd quid tho would of looked nice tho! Quote
BenV Posted March 5, 2009 Posted March 5, 2009 how do the rear jam bumpers mount to the body with no bolt holes at the top of the bumper? Quote
RobSR Posted March 5, 2009 Author Posted March 5, 2009 ssshhh, its a rep. they dont have em, but the JAM ones do. bolts on at the sides, holds it just fine Quote
BenV Posted March 5, 2009 Posted March 5, 2009 nah man thats cool, its just im looking for one , whats the quality like? Quote
RobSR Posted March 5, 2009 Author Posted March 5, 2009 cant fault it tbh, im gonna mock something up so i can support it on the top aswell. Quote
BenV Posted March 5, 2009 Posted March 5, 2009 cool, i'll be watching this then to see how she goes together Quote
RobSR Posted March 10, 2009 Author Posted March 10, 2009 got all of the rest of the wiring out the front end today..i.e the fuesbox, wiring under the wings that goes into the cabin, headlight etc etc..ready for the glanza one to be put in Just need to sort out of a couple of bits with the V fusebox, and where it attaches to the engine loom... Can now also finish off the painting round the fusebox area and slam panel as its all clear and free from wires now...wings removed aswell as wiring underneathfusebox, and all wiring connected removedLooms...alot more bits on the V one Quote
RobSR Posted March 10, 2009 Author Posted March 10, 2009 more from this afternoon...starting striping bits of the inside down..Little collection of parts...TRD engine mounts, nardi wheel, yoshi can etc etc.. Quote
Galliano Posted March 10, 2009 Posted March 10, 2009 wiring is a beach to do! (removing anyway - hate to re-plug it in)good luck with the rest, its now moving quickly Quote
RobSR Posted March 10, 2009 Author Posted March 10, 2009 ^ yea the wiringz is going to be interesting, but not to hard hopefully..as i think i have all the glanza looms, so it should all just plug together Cheers, just need a couple more cans of paint, and then the engine bay wiring can all go back in! Quote
the-dalester Posted March 10, 2009 Posted March 10, 2009 looking good mate, are u strippin all the interior then? gettin rid of your electric windows and that?mark. Quote
Idrees Posted March 10, 2009 Posted March 10, 2009 Looks good.PM me if your selling the TRD mounts Rob. Quote
RobSR Posted March 10, 2009 Author Posted March 10, 2009 Looks good.PM me if your selling the TRD mounts Rob.cheers ! soz man keeping them for the build @streetracer... yes mate is that what you used in yours? cheers! Quote
Sparky Posted March 11, 2009 Posted March 11, 2009 Good progress, was the way I was going to do mine, same as streetrace yes, seems the easiest way Love the Trust sticker on the dash, I had Toyo on my n/a and looked identical Quote
RobSR Posted March 13, 2009 Author Posted March 13, 2009 Good progress, was the way I was going to do mine, same as streetrace yes, seems the easiest way Love the Trust sticker on the dash, I had Toyo on my n/a and looked identical cheers yea hopefully it isn't too difficult !getting rid of the trust sticker tho! did a bit of work today. was sorting out the glanza indicator stalks and... err they don't fit. so going to have to mod them a little to fit! more updates on monday.rob Quote
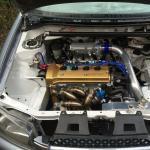
RobSR Posted March 17, 2009 Author Posted March 17, 2009 got quite alot of work done on it yesterday, engine bay is now fully painted, all the fusebox is in, and all of the associating wires got a couple of little bits painted aswell...some picsHow she stands at the min Quote
the-dalester Posted March 17, 2009 Posted March 17, 2009 this is gonna look so nice when its finished, how did u get your mirrors to bend in cuz myn feel asif theyd snap if i tryed do that lol Quote
RobSR Posted March 17, 2009 Author Posted March 17, 2009 ^ cheers! err, you push them , they'll be fine Quote
Galliano Posted March 17, 2009 Posted March 17, 2009 Bay looks good buddy, liking the lime touches Quote
RobSR Posted March 17, 2009 Author Posted March 17, 2009 the colours in the photos aren't realistic... its more a takata green ;) Quote

Recommended Posts
Join the conversation
You can post now and register later. If you have an account, sign in now to post with your account.