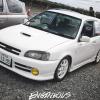
Aaronb93 Posted May 4, 2015 Share Posted May 4, 2015 (edited) So time I finally got around to a progress thread. I've owned this glanza for awhile now, have wanted to do a progress thread but the bad weather during the winter months has stopped me. But that the weather is getting better I've started doing work to it. I drive a seat ibiza as my daily and I've already put a good amount of money into it so it's now time to get started on my glanza. Here's some pics of it below. Quick spec list Tein HR coiloversHKS super sqv dump valverays engineering wheelsdecat exhaust with cobra sports back boxplug and play ecuBlitz turbo timer I'll try and keep the thread updated every time I get something new done on it Edited October 2, 2015 by Aaronb93 Quote Link to post Share on other sites
chris84 Posted May 4, 2015 Share Posted May 4, 2015 Lovely glanza bud look froward to the updates. Loving the parcel shelf Quote Link to post Share on other sites
mikey4410 Posted May 4, 2015 Share Posted May 4, 2015 parcel shelfs cool little touch ! nice starlet dude Quote Link to post Share on other sites
Aaronb93 Posted May 4, 2015 Author Share Posted May 4, 2015 (edited) Thanks guys the parcel shelf is just a rising sun flag I got of ebay. It dose add a nice touch to it. I've been really busy with the car over the weekend. I changed the door card fabric to black seude fabric and the center console in the dash. The door cards took me nearly 3 hours alone to replace the fabric. Then the center console was a pain to get right but I'm really liking how it looks now. Just need a set of bride seats but that's on my shopping cart Edited May 4, 2015 by Aaronb93 Quote Link to post Share on other sites
Cattanach Posted May 4, 2015 Share Posted May 4, 2015 Looks clean!Loving the door cards and centre console! Quote Link to post Share on other sites
adzy Posted May 4, 2015 Share Posted May 4, 2015 Looks well mate, parcel shelf is a cool touch! Quote Link to post Share on other sites
Aaronb93 Posted May 5, 2015 Author Share Posted May 5, 2015 (edited) Thanks adzy So I took my side skirts off today because they needed some attention and got them sanded down Side skirts off and the sills are in good condition. skirts all sanded down and one has a few cracks that needed attention a bit off bodyfiller was used to sort this out. That's all the filling done so the next thing for me to do is to get it primed then get the skirts round to a body shop and get them to spray it.I have a few cans of rattle 404 white from halfords but I'll give that a pass. wanting a more better quality finish. Also should I use a filler primer rather than normal primer? Edited May 5, 2015 by Aaronb93 Quote Link to post Share on other sites
Aaronb93 Posted May 16, 2015 Author Share Posted May 16, 2015 So quick update. I took the strut brace off and stripped the old paint off with a wire disc grinder and sprayed it metallic purple.Also ordered some purple hose lines so I should have them next week. Going to order a purple oil catch can too and some other stuff to dress the engine up abit. I took the rocker cover off today and started getting the red paint off. I'm wanting to get it polished. still not finished getting the paint off. Quote Link to post Share on other sites
adzy Posted May 16, 2015 Share Posted May 16, 2015 I'm debating wether to polish my rocker cover or paint it red and then just sand the Toyota and the lines back to metal. Mine isn't painted atm so polishing would be handy.Looking well, I was going to go for a purple bay but decided to go red in the end Quote Link to post Share on other sites
GlanzaJim Posted May 16, 2015 Share Posted May 16, 2015 Loving the centre console. Summit different no one else has done. Quality Quote Link to post Share on other sites
Aaronb93 Posted May 16, 2015 Author Share Posted May 16, 2015 I'm debating wether to polish my rocker cover or paint it red and then just sand the Toyota and the lines back to metal. Mine isn't painted atm so polishing would be handy.Looking well, I was going to go for a purple bay but decided to go red in the endI was going to go with red when I got my glanza but purple is abit different. Polished covers look super clean and fresh looking to me. red looks super clean too mate. Quote Link to post Share on other sites
Aaronb93 Posted May 17, 2015 Author Share Posted May 17, 2015 Loving the centre console. Summit different no one else has done. Quality Thanks man. was a proper pain to get the fabric to fit smoothly with the console. but it dose look well. Quote Link to post Share on other sites
Rich-k Posted May 17, 2015 Share Posted May 17, 2015 Looks great man!! Use high build primer on the skirts if you havnt already about 4 to 5 coats Quote Link to post Share on other sites
Aaronb93 Posted May 17, 2015 Author Share Posted May 17, 2015 Looks great man!! Use high build primer on the skirts if you havnt already about 4 to 5 coats I used just regular grey primer in a rattle can but there ready for the proper base coat now. That's getting done professionally Quote Link to post Share on other sites
Aaronb93 Posted May 20, 2015 Author Share Posted May 20, 2015 New updates for my glanza. I purchased some indiglo dials from socks, the level of service, quick dispatch was top notch really pleased I just need to connect them to a power source in the car now, try and get my hands on a solder kit. A lot of bits and dress up parts arrived too but I'm still waiting on my oil catch can which shouldn't be too long. I also took my rocker cover into work and got it glass blasted by my boss, he did a brilliant job with it. (Benefits of working for a aluminium car part company) Enough to keep me busy this weekend Quote Link to post Share on other sites
adzy Posted May 21, 2015 Share Posted May 21, 2015 Looks great! Where do you work? We have a vapour blaster in work but they'd have a fit if I used it on car parts lol. Also did you remove the needles to fit the dials? I have new dials here just don't know what way to go about it :/ Quote Link to post Share on other sites
Aaronb93 Posted May 21, 2015 Author Share Posted May 21, 2015 Looks great! Where do you work? We have a vapour blaster in work but they'd have a fit if I used it on car parts lol.Also did you remove the needles to fit the dials? I have new dials here just don't know what way to go about it :/I work for a big japanese firm in carrickfergus called Ryobi aluminium castings. We make car parts like engine blocks, transmission cases for all the major car brands like ford, peugeot ect. lol think most places have a fit when ever you do a homer in work. No mate do not remove the needles I simply placed the new dials over the old ones then screwed them in place. The needles are really delicate. What dials you get? Quote Link to post Share on other sites
adzy Posted May 21, 2015 Share Posted May 21, 2015 I thought it sounded like ryobi or montupet.Did you just slide them up the needle then? It's the temp/fuel one that's worrying me atmGot some of that polish company moman Quote Link to post Share on other sites
Aaronb93 Posted May 21, 2015 Author Share Posted May 21, 2015 I thought it sounded like ryobi or montupet.Did you just slide them up the needle then? It's the temp/fuel one that's worrying me atmGot some of that polish company momanYeah you take the screws off then slide them up the needle. With the temp/fuel dial you just need to bend the new dial ever so slightly then it should just go on. It took me like 15 mins to put them on then find a nice place to tidy your wires up. Quote Link to post Share on other sites
mitsuruki Posted May 21, 2015 Share Posted May 21, 2015 looking mint mate . im digging the indiglo dials .hope ID Workz resells them Quote Link to post Share on other sites
Aaronb93 Posted May 25, 2015 Author Share Posted May 25, 2015 So I decided to make myself busy over the weekend and today after I finished work. It's not something most people would be fussed over but I decided to spray and tidy up the boot area of the glanza.I had to strip all the trim out in the rear. It also gave me a good excuse to try my new electric impact gun this was annoying me so I had to sort it out Got stuck into it with the grinder but I didn't release that there was rubber under certain area's of the paint All primed with anti rust primer Done at last A strut brace in the back might finish it off nicely now Quote Link to post Share on other sites
ro55ifumi Posted May 26, 2015 Share Posted May 26, 2015 Nice work John Quote Link to post Share on other sites
Rich-k Posted May 26, 2015 Share Posted May 26, 2015 Million times better Quote Link to post Share on other sites
Aaronb93 Posted May 26, 2015 Author Share Posted May 26, 2015 Thanks guys It really dose freshen it up Quote Link to post Share on other sites
BMX-RIG Posted May 26, 2015 Share Posted May 26, 2015 That looks much smarter! Quote Link to post Share on other sites

Recommended Posts
Join the conversation
You can post now and register later. If you have an account, sign in now to post with your account.