SpikeyJp_68 Posted February 26, 2016 Author Posted February 26, 2016 Finishes it off nicely what a difference looks nice, cant wait to get mine thanks to you mate Yeah they're very good for the money, no problem buddy Quote
Westley Posted February 26, 2016 Posted February 26, 2016 Man that front end! This is a car to be proud of bud! Quote
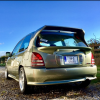
SpikeyJp_68 Posted February 26, 2016 Author Posted February 26, 2016 Man that front end! This is a car to be proud of bud!Cheers mate ! Yeah it's come a long long way from when I got it 3 years ago Quote
SpikeyJp_68 Posted February 28, 2016 Author Posted February 28, 2016 Not much to report today other than a quick wax Quote
SpikeyJp_68 Posted May 5, 2016 Author Posted May 5, 2016 Brought it for a spin today. Needs more power in a bad way haha Quote
SpikeyJp_68 Posted May 7, 2016 Author Posted May 7, 2016 Picked up an oem rear lip today, good bit of work to get it right but it'll get there. Also threw the backbox on. It's a bit wonky but will be getting a full system when it's turbo anyways Quote
SpikeyJp_68 Posted May 8, 2016 Author Posted May 8, 2016 The engine will be coming out soon, just getting fte pistons rods and crank and building a safe fe+t. I'll be painting the engine bay but I wondered if I should just stay with the he green or do it a completely different colour. As it stands there's just a bit on the bulk head that is still silver. Quote
SpikeyJp_68 Posted May 8, 2016 Author Posted May 8, 2016 The oem rear lip will look great dude!Cheers Rich ! Got the cracks fiberglassed and filled yesterday, just needs smoothing off now and painting Quote
SpikeyJp_68 Posted May 8, 2016 Author Posted May 8, 2016 Right so I got the rear lip painted today. The colour isn't too off but the quality of the finish is a lot different. So that'll be off to the paint shop to get done properly so it doesn't let the car down. Whilst that's there I may Aswell get a 98 oem front lip and maybe a mid spoiler ? Finally got the spoiler on properly sourced the varis screws that come with it from new Quote
SpikeyJp_68 Posted May 13, 2016 Author Posted May 13, 2016 Sorted the exhaust position today, looks mucho better. Rear lights are off as they were full of condensation. Anyone know why this is happening ? There's no crack in either lenses or housings and I added a strip of sticky foam tape stuff ontop of the gasket to no avail. Will new Toyota gaskets fix it ? Quote
SpikeyJp_68 Posted May 14, 2016 Author Posted May 14, 2016 Decided I'm going to strip out the back and paint the boot floor in the green and get a rear brace. Maybe powder coat the two and get a theme going ? Asked my painter to mix me up some extra paint whilst my rear splitter and electric mirrors are in for paint will also be doing the bulkhead whenever I get money for an FTE. This summer I'm hoping ! Washed it and took these today.... Don't be surprised if you see me on "my strange addiction" soon........ Quote
SpikeyJp_68 Posted May 15, 2016 Author Posted May 15, 2016 So instead of buying a rear brace, or cobbling one together, I've decided to use a front oem brace and make it fit. Not much involved just make it shorter and trim the mounts to suit the struts I've decided to get the C- pillar brace, rear brace, rocker cover and auxiliary pulleys powder coated in gold. Should look pretty good when the rear is stripped Quote
SpikeyJp_68 Posted May 15, 2016 Author Posted May 15, 2016 Also could anyone recommend me a brand of paint to do the rear plastics in ? Looking to get a dark grey colour but don't want a gloss finish that looks awful and tacky on plastics. Want the same finish just darker Quote
SpikeyJp_68 Posted May 15, 2016 Author Posted May 15, 2016 What c piller is that?It's a custom made one. A guy in Ireland made a bunch and I believe he's trying to sell the last ones he has. I can find him if you'd like Quote
Rich-k Posted May 16, 2016 Posted May 16, 2016 That looks ace mate, exhaust looks much better now! Love the colour Quote
SpikeyJp_68 Posted May 16, 2016 Author Posted May 16, 2016 Got my custom rear brace made today. Took 2 hours and was really straight forward. Got a standard front brace from my local starlet breaker for 15. I trimmed the rear plastics (yet to be tidied up don't worry) and trimmed the ends of the brace after cutting it into 2 workable pieces.After trimming the edges so I could bolt them down, I took 2" out of the middle of the brace and with a bit of smoothing it was near perfect. Disconnected the battery and tacked it into place while it was bolted into position. I did a weld the whole way round then grounded it smooth and another weld the whole way round as there were some spots not properly welded. Not bad concidering I'm still learning. Ground it off again until it's smooth and put it on. Looks good concidering it was only 15 and took 2 hours. This will be powder coated gold along with a few other bits. Doesn't look as good as a Cusco or whiteline one but does the job. For anyone thinking of doing this, it is not rear seat friendly without trimming the mounting pieces on the brace. Quote
SpikeyJp_68 Posted May 16, 2016 Author Posted May 16, 2016 Wrapped the tubular bit until it's powdercoated as it annoying me Quote
SpikeyJp_68 Posted May 17, 2016 Author Posted May 17, 2016 (edited) Got the rear stripped and partially cleaned today. Will look a whole lot better when it matches the outside.Anyone know of anything that can be done to the fuel pump cover to make it look better ? Seen they do Kevlar covers for civics just wondered if there was anything about for a starlet. Also ordered a few goodies will update when they're here Edited May 17, 2016 by SpikeyJp_68 Quote
SpikeyJp_68 Posted May 17, 2016 Author Posted May 17, 2016 (edited) Exciting times ahead, off to collect something next Thursday that I'm very fooking excited about......... Edited May 17, 2016 by SpikeyJp_68 Quote
Jasonp-glanza-s Posted May 17, 2016 Posted May 17, 2016 Really love the colour on this, cool idea on the rear strut brace too top work fella Quote

Recommended Posts
Join the conversation
You can post now and register later. If you have an account, sign in now to post with your account.