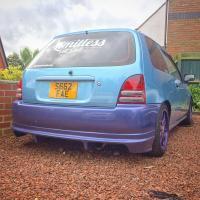
*Pete* Posted August 29, 2016 Author Posted August 29, 2016 Update been awhile quite a bit has been done but here goes:So far only a few days of the coilovers being fitted the tracking was so badly out, so did the camber and tracking done.Caught a sunset with the car Quote
*Pete* Posted August 29, 2016 Author Posted August 29, 2016 Also did a bit of work on the heater controlsAnother nice photo with my club flag Quote
*Pete* Posted August 29, 2016 Author Posted August 29, 2016 (edited) I kept this a bit quiet but I wanted bigger brakes so this is what I did:Calipers: Toyota Celica twin pots (ST202 I believe)Discs: 2005 Corsa C SRI 1.8 (260mm diameter)Master Cylinder: Toyota Rav4Pads: Brembo So it started out I got the calipers from a celica down my local scrap yard and there was a starlet down there so grabbed a hub too. The calipers share the same design in how the bolt to the hub so that was easy. Discs were bit harder to work out, I use the PDFs from WMS brakes but non of their discs would of worked. So I took the measurements from the discs and hub & brake I had on the bench and did a little search to which I found Corsa discs. So went to euro car parts and brought a disc to test fit. They fitted perfectly apart the bore was a little bigger. Went back you euro car parts a gave the disc back. Which point I brought some EBC turbo grooved discs. While I had the disc from euro I test fitted both my wheels which the purple CMS's only needed 5 mm to clear the caliper but the 3 spokes needed 13mm to clear. This is also the point I knew I'd need to look into new longer wheel studs. I had two rings machined, 55mm inner diameter and 60mm outer diameter, this is to fit the the disc to the starlet hub to keep the disc central etc. Painted and rebuilt the calipers with new seals. I also had to change to a lower profile tyre because of how my car sits and with having to space the wheels out. Saturday the brakes went on and I tried it without changing the master cylinder to which there was alot of travel in the pedal so Sunday I changed the master cylinder for the bigger one off the Rav4. Starlet bore of the master cylinder is 13/16 (about 20mm) and the Rav4 is 7/8 (about 22mm) Pictures: Edited August 29, 2016 by *Pete* Quote
*Pete* Posted August 30, 2016 Author Posted August 30, 2016 Nice job on the brakes!! PeteCheers can't wait for the pads to be bed in and to test them out on track at silverstone at Trax Quote
Walker96 Posted August 31, 2016 Posted August 31, 2016 Cheers can't wait for the pads to be bed in and to test them out on track at silverstone at Trax What time you on mate? Will keep a look out for you get some videos/pics! Quote
Walker96 Posted August 31, 2016 Posted August 31, 2016 9:20 I believe Early!! Best hope its nice and dry lol should be alot better with coilovers and brakes! Quote
*Pete* Posted September 1, 2016 Author Posted September 1, 2016 Early!! Best hope its nice and dry lol should be alot better with coilovers and brakes! Yer really cant wait, i have almost bedded in the pads already. had to an emergency stop at 20 mph the other day and as soon as I braked I stopped pretty much surprised myself a little Quote
*Pete* Posted March 8, 2017 Author Posted March 8, 2017 Right so there has been a massive change of plans with this and a big update to come but I have noticed most of my pictures on the thread are gone So will be editing the thread to get the photos back on here before the update. Its been awhile too Quote
*Pete* Posted March 8, 2017 Author Posted March 8, 2017 (edited) So it looks like I'm not able to go through the old posts and edit them as I realised that its done to stop people editing for sale posts for ever. Basically Im just going to do a brief overview of the missing pictures. If you want more on what it is PM me, always happy to help. So here goes:Mr2 SW20 seats fitted. Was previously made from my second build thread (Link in the first post of this thread) however I modified the seat buckle to make it more comfy with the belt and improved how they felt when your weight is pushing on them.Painted and added strut brace:Japfest:Clean engine bay:New Plates fitted:More pics of the 3 spokes: (Mod Nats)Things got abit horny hahhaShot of the interior:Coilovers: BC Racing Type RAJDM tsurikawa:Coilovers Destroyed my tires as they weren't set up right so set them at 0.75 degrees camber and re tracked (did use a camber gauge)Few Nice photos, one ft. Dad's E typeFew from the Brakes: Celica ST202 twin pot calipers, Vauxhall Corsa C SRI 260mm Discs, Spacer ring and Extended studs.Giving a car a machine polish and wax:Little bit of a play with the Heater control lighting:Had the rear windows tinted:At JAE: (Went a little sticker whore ish)Now from here is a little bit of update, more to come tomorrow hopefullyTrax: Much better which coilovers, bigger brakes and lower profile tyres, believe I was fast in the wet than when I went out at Japfest with just lowering springs.>https://www.youtube.com/watch?v=X8-oW_eHdKgPhoto of beading: early morning Japshow finale:PSo to fit the 3 spokes over the bigger brakes I needed 13mm spacers so a kind polish bloke at work machined these for me, also had a set of spacers made from my CMS wheels as they have different centre bores to the starlet hub.Looks like I'm going to have to do something with the front arches :/ That is all for now, big update/news on where this is going coming soon! Edited March 8, 2017 by *Pete* Quote
MR-2 Posted March 9, 2017 Posted March 9, 2017 What a beauty and that car color suits perfect <3 I also just modded SW20 seats to my EP91 with EP70 rails, so pleased for that modification Quote
*Pete* Posted March 9, 2017 Author Posted March 9, 2017 What a beauty and that car color suits perfect <3 I also just modded SW20 seats to my EP91 with EP70 rails, so pleased for that modification Cheers, such nice seat aren't they! But they will be changed following the next update! Quote
Fozzie Posted March 9, 2017 Posted March 9, 2017 That's really smart, will look forward to more updates Quote
*Pete* Posted March 9, 2017 Author Posted March 9, 2017 And Now for the Big update!So my plans have changed for this build, and here is how it came about. So a friend brought this car had it for a little while, he then sold it to a friend of his (which is his Co-Driver). Back in late September 2016 my Brother went with them to rally in Belgium. I received a text from my brother saying he was selling the car and for only £500, Bargain! This is said car: Yes, its a E11 Corolla, but this is why I brought it. That's right! 4efte!My Starlet is now going turbocharged! And yes that is a front side exit exhaust!The plan was to get this drive it for a few days to a week then take the engine out. Yer... That didn't happen brought the car Friday, Saturday came and it ran out of MOT, so got it a new MOT. Saturday night blew a boost pipe, fixed it Sunday. Sunday night, having play saw two of my mates driving and followed them. This is when the gearbox decided it didn't want a 3rd or a clutch anymore. Managed to drive the car home with no clutch or third gear.Monday came around and as the car was on my insurance and I couldn't switch it back to the Starlet till 9am I had the day off work.Right time to get the engine out. I had a spare 4efe sat around so tried to put that in but then had problems with the differences from Starlet to Corolla wiring. In the end took the engine out and the good bits and scraped the car after a few weeks. Week or so later I picked up another Corolla to daily, Facelift E11 Corolla SR. 1.6 6 Speed (3zz-fe is the engine code) makes quite a nice daily (probably make a build thread in other cars for this) this is how it sits at the moment. Yes I even modified it. TTE spoiler, WRC rep package wheels (freshly powder coated and made by MIM),1zz throttle body and inlet, exhaust, induction kit, light bulb upgrades and interior lighting changes. Right back to the Starlet So what started as just rebuild the engine with new seals and putting it back in and done. Well its taken a different turn, the car has turned into a complete project car! Its now engine is being forged and worked on, body is being worked on, interior is going to change and even a few tweaks to the suspension. Even got a stage 3 clutch for it! So engine is off at the machine shop along with the crank and soon the flywheel. Block is getting re bored and skimmed, Crank is being re ground and polished for .25 bearings and fly wheel with be lightened and balanced. Head will also be sent to be skimmed. Also new seats for the Starlet! Well when I mean new, I mean new for the car, they are my friends old Rally car seats which I brought off my brother as he brought them off him for his Volvo 240 which he has now sold :'/ Thats it for now! More to come soon! Quote
MR-2 Posted March 10, 2017 Posted March 10, 2017 You lucky bast... congratulations, turbo Corolla was almost free Quote
*Pete* Posted March 10, 2017 Author Posted March 10, 2017 You lucky bast... congratulations, turbo Corolla was almost free Well engine alone would of cost more, plus I got a ecu, ignition stuff and also a FCD but I'm getting a stand alone ecu and mapping so wont need it. Wheels and spoiler went onto the new Corolla after the wheels were refurbed. Quote
Budnbass Posted March 10, 2017 Posted March 10, 2017 That's a great bargain! I've often thought about dropping a FTE lump in my e11, it would certainly catch a lot of people off guard. Loving the red e11 aswell 👍 Quote
*Pete* Posted January 13, 2018 Author Posted January 13, 2018 UPDATE!! Shock! So progress hasn't been as quick as I have hoped by its now 2018, show season is just round the corner and I want this on the road again! Progress as follows: So I have decided to have a stripped interior and test fit bumpers, remix bumper is look epic! So the headlights, what I am doing is I have set of crystal lights which I am mounting projectors, switchback halos, RGB demon eye and switchback led strip. the halos and led strip will be wired to the side lights but when I indicate they will flash amber with the indicator. I had to build them up and unfortunately while in progress of building the projects I was trimming plastic with a craft knife and slipped, stabbing myself in the hand with the blade. More blood paid to build lol New years day I started fitting them and levelling the beam patterns. Pictures of head lights without the glass and with And the other day I picked up Glanza wiring looms and a rear axle which fitted in the boot of the Corolla nicely! Quote
whitestar Posted January 14, 2018 Posted January 14, 2018 Good job, looks brilliant! I've always loved these sky blue starlets. Quote
*Pete* Posted January 15, 2018 Author Posted January 15, 2018 15 hours ago, whitestar said: Good job, looks brilliant! I've always loved these sky blue starlets. Cheers dude, really cant wait for it all to come together! Quote
5T4R7ET N/A Posted January 15, 2018 Posted January 15, 2018 Good progress dude, forgot how good the remix bumpers look. nice idea with the headlights, 2018 should be a good year for this little motor Quote
*Pete* Posted January 15, 2018 Author Posted January 15, 2018 22 minutes ago, 5T4R7ET N/A said: Good progress dude, forgot how good the remix bumpers look. nice idea with the headlights, 2018 should be a good year for this little motor Hoping to have it back on the road by the end of May, when I first found out about remix bumpers I wasn't sure then I really started to like them and took awhile to find one but I love it! properly wont run the grill as I only have half of it but I think it looks good without it, and been having ideas for what to go behind there but there a little ssshh ssshh at the moment Quote
*Pete* Posted January 15, 2018 Author Posted January 15, 2018 Also forgot to add this, doing some head work, time consuming but thought Id give it a go. I have used an old head to practice on first Quote
maddox710 Posted January 16, 2018 Posted January 16, 2018 Looking good mate. When it comes to porting 4e head I'd just concentrate on the exhaust side, the back of the valves was soo tight I couldn't even fit my thumb in before I done my old head. After I had room and smoothed out the path down the exhaust runner so it didn't make a sharp turn once it was past the exhaust valve Quote

Recommended Posts
Join the conversation
You can post now and register later. If you have an account, sign in now to post with your account.