*Pete* Posted April 19, 2015 Posted April 19, 2015 First Starlet build thread:http://www.ukstarletowners.com/topic/84287-petes-white-sr-build-mr2-throttle-body-dynoed/ After an unfortunately meeting with a bush with my SR which put a massive dent in the rear quarter, I wanted another starlet and here it is. Brought it on Wednesday 15th for abit of steal for it, only 54,000 milesSwapped the wheels after an MOT at my brothers work as the tyres were a little bit gone and they were skinny little things so wanted to the bigger ones on. Also while up on the ramp (I was in the car to move the steering and stuff for the mot) my brother had a look underneath and was surprised as there is no rust compared to alot of jap cars he sees. Needed a good clean as the previous owner did wash or clean it inside and out so one night I pretty much stripped the inside and cleaned it and after getting all the rubbish & leafs out I replaced the seats with my SR seats as the front two were clean and the back seats were un touched after wet vac and put in the loft when I stripped the SR.As well used my SR rear trim panel and parcel shelf to use the wiring for the rear speakers that in all starlets even if they don't have rear speakers and then done the wiring to put in my head unit picture to follow soon.Before:After:But then on Friday before going fishing with my Dad, went to move it and didn't start and was struggling to turn over :/ but pushed it to the side went fishing. Got home replaced the battery in the remote locking shitty thing and it just about started, decided to swap the car battery with the SR one as the current one was only holding 10 volts. Come Saturday I ripped the crappy immobiliser system off which was installed very badly. You can see it in the bottom right of this picture. Quote
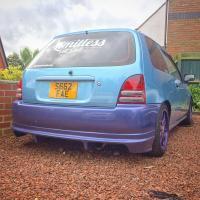
mikey4410 Posted April 19, 2015 Posted April 19, 2015 what a gorjus colour car you have there (same as mine) love it. they are always so grubby inside aint they,bloody scummers who own them lol. I clean mine and hoover it once a week,maybe a little to much but keeps it tip top nick thats a lovely low mileage there. superb find. Quote
*Pete* Posted April 19, 2015 Author Posted April 19, 2015 what a gorjus colour car you have there (same as mine) love it. they are always so grubby inside aint they,bloody scummers who own them lol. I clean mine and hoover it once a week,maybe a little to much but keeps it tip top nick thats a lovely low mileage there. superb find.Thats why I got that colour love it, and yer going to try not to ruin the engine by putting the mr throttle body on it I believe that didn't help to its oil burning Quote
Pete_A Posted April 19, 2015 Posted April 19, 2015 My names pete and ive a turquoise one too. if u crash this one as well can i have the f/ns wing. Keep up the good work! loved your sr build Quote
*Pete* Posted April 19, 2015 Author Posted April 19, 2015 My names pete and ive a turquoise one too. if u crash this one as well can i have the f/ns wing. Keep up the good work! loved your sr build Haha, its got a little rust on it anyways XD Quote
*Pete* Posted April 21, 2015 Author Posted April 21, 2015 Well looks like I won't be able to put the sr springs on this one :/ just think i was driving around with these as rear springs! No wonder the back end liked to make an appearance.Video of that spring:http://youtu.be/ZBNKimu6qKMThe other side, that dust was the spring Quote
*Pete* Posted April 25, 2015 Author Posted April 25, 2015 Replaced the passager headlight yesterday as the old one was smashed. Found out between either 97 and 98 or the SR had a slightly headlight design as just replaced straight up and it was miles out of alignment, couldn't figure it outs as the adjuster wouldn't bring it down from being miles high. Then i looked at the motor for adjustment and this is what i found, same part number too butThe shorter one is from my 98 SR and the longer one from this 97 sportif Quote
bdohohh Posted April 25, 2015 Posted April 25, 2015 seems to be loads of weird differences between 97/98 or maybe between sportif and sr.my boyfriend and I keep trying to do stuff to my SR thinking it'll be the same as his 97 sportif and it's not. Like just today we found out the pipe to the rear window washer fluid is slightly different, according to him. Not sure how as I've never seen it in a sportif but there's been a few things we've been surprised have been just a little different. love this colour, good thing you found out about the springs I guess! Quote
*Pete* Posted April 26, 2015 Author Posted April 26, 2015 seems to be loads of weird differences between 97/98 or maybe between sportif and sr.my boyfriend and I keep trying to do stuff to my SR thinking it'll be the same as his 97 sportif and it's not. Like just today we found out the pipe to the rear window washer fluid is slightly different, according to him. Not sure how as I've never seen it in a sportif but there's been a few things we've been surprised have been just a little different. love this colour, good thing you found out about the springs I guess! Yer i know the wiring loom for the headlights is different has a separate fuse box to sr, the loom behind the dash is different, the steering column is different along with the trim as 3 bolts in the sr and 5 bolts inthe sportif along with some metal gaurd aswel Quote
bdohohh Posted April 26, 2015 Posted April 26, 2015 Yer i know the wiring loom for the headlights is different has a separate fuse box to sr, the loom behind the dash is different, the steering column is different along with the trim as 3 bolts in the sr and 5 bolts inthe sportif along with some metal gaurd aswelYup Toyota like to make life difficult. Haha Quote
*Pete* Posted May 3, 2015 Author Posted May 3, 2015 Should of uploaded this sooner but on monday I gave it a clean and had a go at machine polishing it Then Yesterday I changed all the engine oil, gearbox oil, clutch fluid and brake fluid Quote
Walker96 Posted May 3, 2015 Posted May 3, 2015 love this colour mate! wanted one but couldn't find one close:( keep the updates coming bud! Quote
*Pete* Posted May 12, 2015 Author Posted May 12, 2015 Update:Finally after months of owning these MR2 seats and having a spare set of set rails I've made up rails and got my brother to weld them. Did the welding inside my SR which I'm breaking very handy and makes it much easier as bolt the brackets in put the rails in with the bottom part of seat and away you go. They are so comfy and so much support along with all the adjustments. Did have to take part the back rest abit to unbolt it :/Those zip ties skills Thats what it looked saturday odd seats for going out that night but had the the other rails ready for sunday.Then sunday they were both in needs a hoover though Quote
*Pete* Posted May 12, 2015 Author Posted May 12, 2015 Also started work on the spare engine, got it out and took the gearbox off Quote
*Pete* Posted May 12, 2015 Author Posted May 12, 2015 Seats look good man Cheers Sort have a very miss match interior at the moment but oh well Quote
*Pete* Posted May 22, 2015 Author Posted May 22, 2015 Update, bit late but owell. Over a couple of days before japfest I wanted to fit my rear bubble ligths with the dual tail and brakes but this time i want to have reverse and fog still aswell after a bit of thinking i came up with thisEven with it in you can barely see it Other sideVideos to come later Quote
Rich-k Posted May 22, 2015 Posted May 22, 2015 All your updates are good dude keep them coming! Quote
*Pete* Posted May 23, 2015 Author Posted May 23, 2015 Need to do it in the dark but heres a little vid of it>http://youtu.be/XIqDDeHk3Bs Quote
GlanzaJim Posted May 23, 2015 Posted May 23, 2015 Get it in the dark bro but looks good and different Quote
*Pete* Posted May 25, 2015 Author Posted May 25, 2015 another japfest prep was fitting my nardi steering wheel which I had to order a new boss as the one i used in my 98 spec sr wouldn't spin the inductor or have a horn but got one from hubsports and its so much better and much more reliable on the horn Did test fit the bumpers I got on the thrusday before japfest (also did get the side skirts) and the bumper I've had for ages but haven't done much to wanted to see how it fitted on this one and was hoping it would loosen the fibre glass which so I can do it properly with plastic welding a new grill bit in from my old na. So it went to japfest like this on the stand.Then on the monday the old sr shell and few bits went to scrap, just gave my mate the shell, got the balance just right with him using his skip lorry.Then one night the pin in my door handle went again so put a bit of hot glue in to hold it in and decided to fix the spring in the passenger side while i was there. Did make sure the handle didn't get glued but did have to shave the glue abit to get the handle to be normal. Another little mod I done was on the window runner on the drivers door i didn't remove it and just skill fully put the nut on the handle but on the passenger side I took out the runner and before putting back in I took a pair of tin snips on it and ended up making my life 100x time easier for future removal/fitting.Then went to modified nationals with normal bumpers back with fresh additions (mainly a group of friends) was a wild time camping did have a fair bit to drink on the nights was mental.here is the pics of her on the stand day 1Day 2: Subaru joined us, got to admit we had a very good spot for a club stand to be. And then finally today decided to fit my crystal lights and bonnet lifters off my white one. Also fitted my magncor leads to sort out a miss fire but will end up getting new plugs soon. Enjoy, Pete Quote
*Pete* Posted June 5, 2015 Author Posted June 5, 2015 Bit late but here is a video in the dark>http://youtu.be/8CNNkHYbCwE Quote
*Pete* Posted June 14, 2015 Author Posted June 14, 2015 been getting worst with updates, right this over a long time but this is where the 4afe throttle body is at:Milling the tps down to modify it, had a bit of spare time in college and yes not held the best but just took it very quickly.tps bracket i designed Then cut it on the laserwelded together could of bent but this was quicker and easier to get right.Then I grinded bits not needed to clean it up abit, then polished the inside and masked it up to primer it.Make shift paint booth going to buy a cheap tent at some point just to do painting in.Last sunday spent 7 hours on the old girlAnd got this picture the other dayAnd then come monday starting driving to college and as soon as I got out my road noticed something wasn't quite right so after a little more I decide to pull in the layby to have a look and foundThis also happen a few weeks ago decided to put my radio in properlyNo more need for thisStarted my colour theme with these leds but first need to put foil in it to work better Quote

Recommended Posts
Join the conversation
You can post now and register later. If you have an account, sign in now to post with your account.