Jump to content

Socks

Club Staff
  • Posts

    9779
  • Joined

  • Last visited

Everything posted by Socks

  1. http://www.ukstarletowners.com/page/articles.html/_/engineandtuning/turbo-mesh-r17
  2. The People That Sell DVs will tell you that It will be fine
  3. Be an interesting paragraph on the insurance claim form
  4. Its good to see Truly Knowledgeable people come back.... I hope your experience on here will be far better then before matey...
  5. Go with at LEAST 2.5" pipework, 3inch if u can Mr D you will love it
  6. Cruised Passed 229 Members Now! Big Thanks to Everyone!
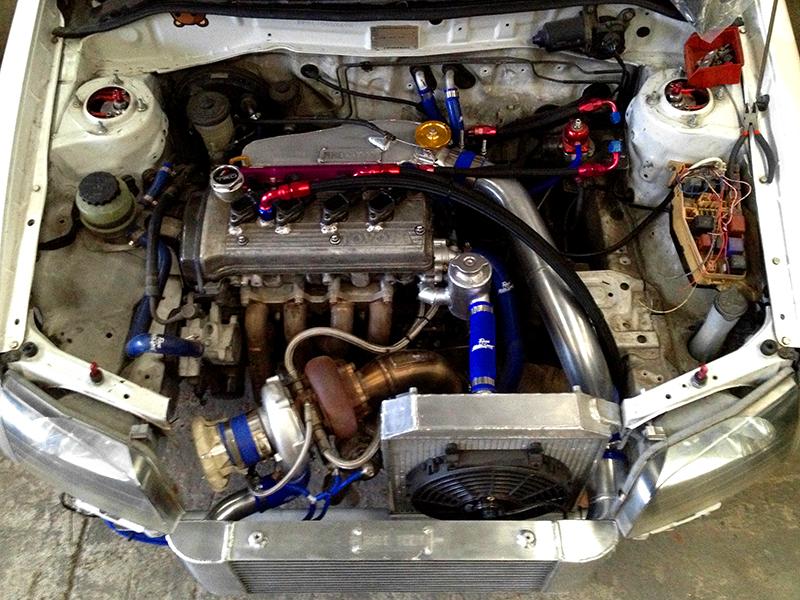
  7. As most of you know.... Didn't make it to Japfest... Was a big shame and I was gutted... Everything that could have fought us... DID JUST THAT! First issue, was a coil was down... So had to scoot to Manchester to a breakers for a replacement. Brought it back to Race-Tech about 4pm ish. Sticky Throttle Body, when we fixed it and re-sealed it on the sealant wanted 24hours to dry, we didn't have that amount of time and after 45mins we fired it up. It soon started leaking and the idle started to rise... Completely Dead Battery MAP Sensor came loose, which required Inlet to be taken off to fix. These are just some of the issues that fought us, ended up leaving Race-Tech at 10:30pm.... Got home for just after 11pm.... Got to bed 11:30pm, then up for Japfest at 1am.... Still awake now posting this having been awake for 37 hours! With very little sleep.... Ricky and his team worked SOOOO Hard to try and get it finished in time... But it wasn't going to happen.... 200miles+, Completely Untested and Unmapped Car, Many Bodges and temporary stuff just to try get it running for japfest! A picture of when we threw the towel in at 10:30pm.... So as of the start of next week, the bodges and temporary fixes can be undone and done properly... The ETA now is looking like next week, mapped up Really Looking Forward To Getting It Back Now!
  8. I got it on vid
  9. Added all the remaining UKSO Stand photos to UKSO Facebook Page! Check it out folks!
  10. We Counted Before anyone left for track time
  11. 82 Starlet's 4 Paseo's Excellent Work People! Most Starlets I've seen in person in the same place at the same time!
  12. Well done folks.... You were all a bunch of epic starleteers today! The Stand Looked Amazing and there was some stunning cars!
  13. Jammy Bastard! Knew he'd be undercover! Didn't spot him tho
  14. Boost Leak Leaky Dump Valve Worn Turbo Actuator In That Order...
  15. 1, The rads don't get that hot tbh.... And mad amounts of air id guess the pipe will stay icey cold... Only one way to find out tho hey! 2, Its going to be welded all the way round, it needs to come back off as there is no thermal gasket on there at the moment It was just to cover up a mark as RT moved the cable mount Thanks bud... The bay is still a mess like lol. But I will be at JF today is the moment of truth, first start! lol
  16. 320-330bhp would be my guess at 18psi What's the limiting factor stopping you from going further?
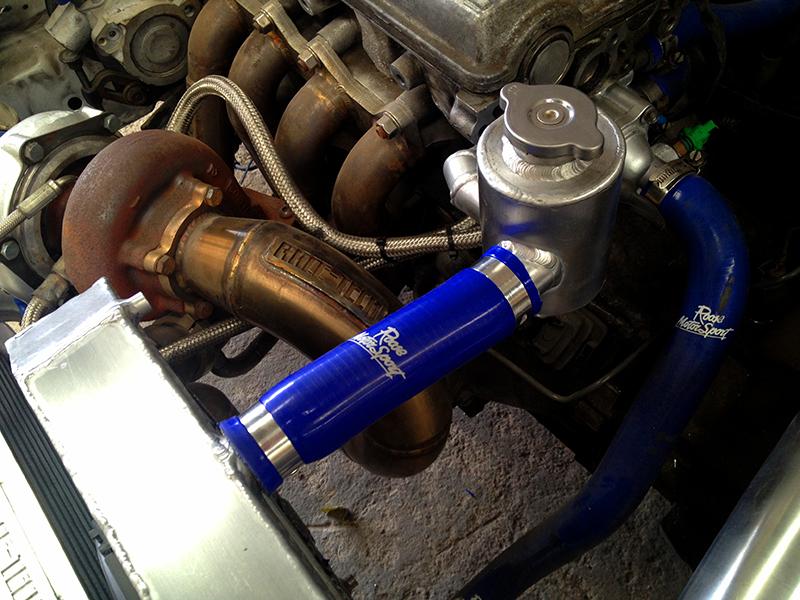
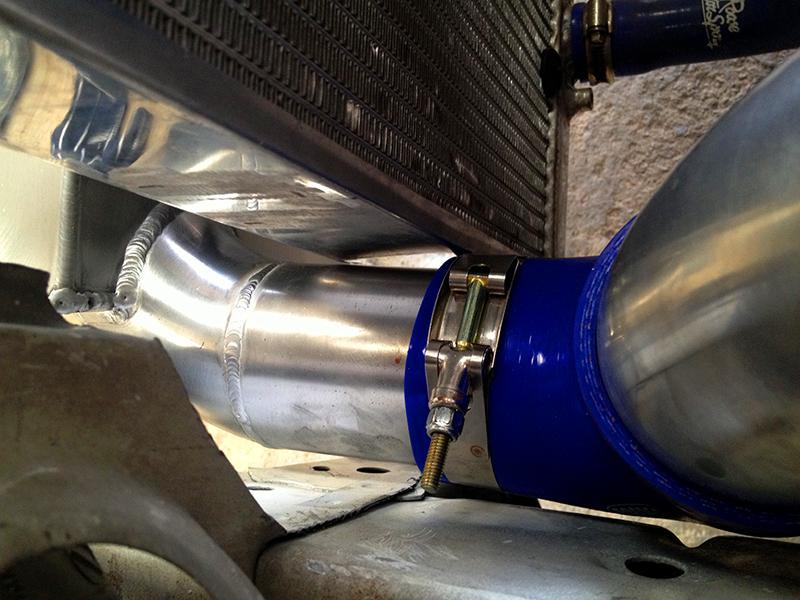
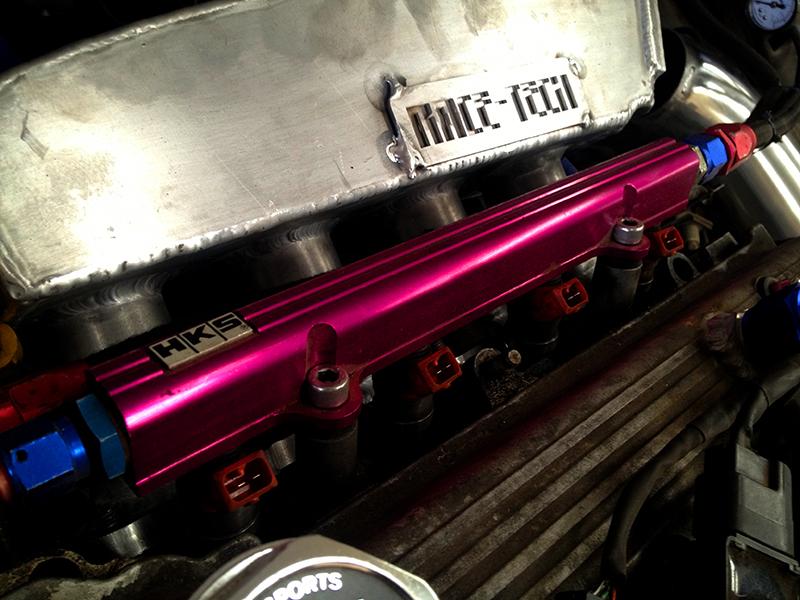
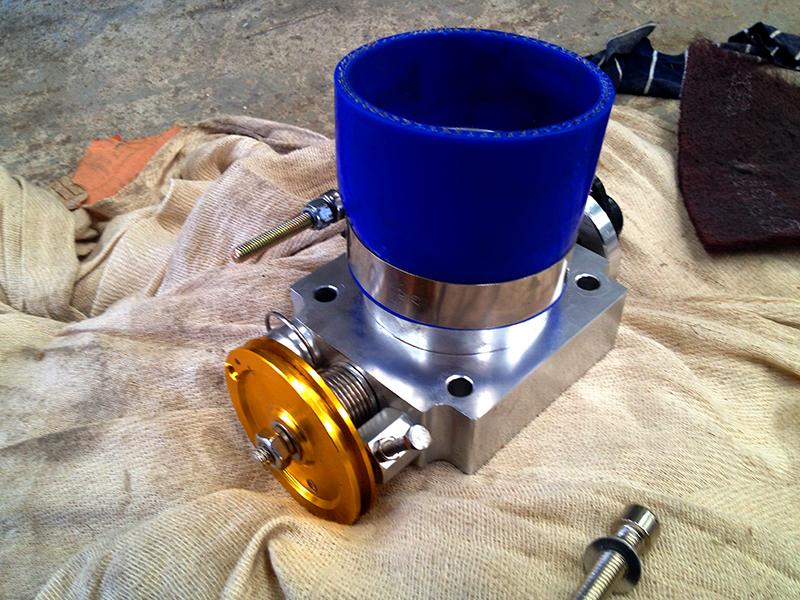
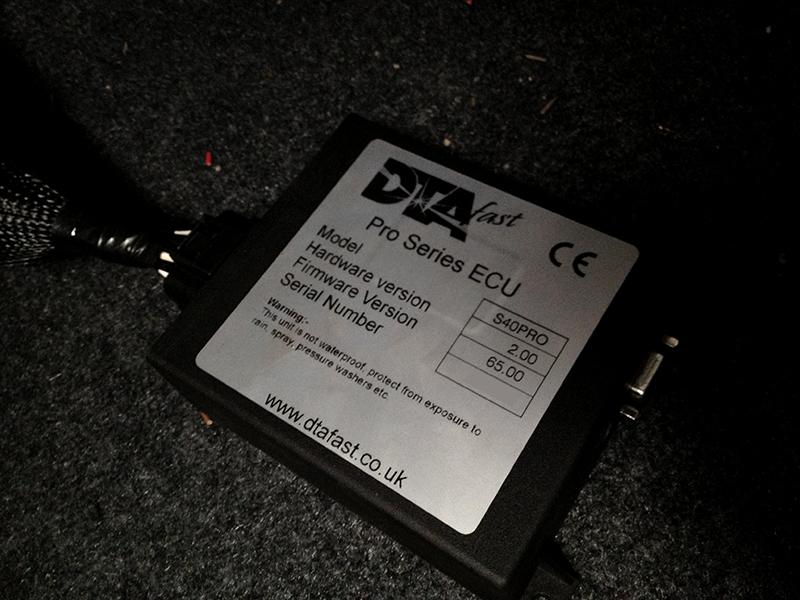
  17. Nearly Running for Japfest! In the nick of time too! Trigger Wheel & Crank Sensor - To Ensure the ECU knows EXACTLY where the pistons are.... New Top Rad Hose, Thanks to Paul at Roose Motorsport! 3 Inch Boost Pipe is a Snug Fit! Evo 9 Injectors, Cleaned and Flow Tested them, they flow 610cc and are all equal! 3 Inch Throttle Body DTA S40 ECU connected up ready to be mapped up! How the engine bay looks now: The Catch Tank & Expansion Tank wont be finished in time for Japfest so pipes are just going to drain to the floor for now... Going to use the standard expansion tank for now too! The bay is looking so much cleaner now, there is still more I can and will be doing to clean and simplify the engine bay further... Chances are tho, this is how it will look for those who will be at Japfest... So much unpolished metal and Im unsure how clean ill be able to get it before tomorrow as I'm not staying up till daft o clock or ill be soooo tired on way home from Japfest! Ricky will be doing as much mapping as he can too.... Unsure if it will have a completed map for Japfest so may not have all the bhp or boost.... Ill just be pleased if it makes it atm... haha.
  18. Swirl Pot Nearly Ready :)

    1. Manny

      Manny

      Are you refering to a turbo?

  19. A Toyota Brochure from back in 1998 that covers the S, SR & GLS all 3 of which are UK Models.
  20. How many cars have you been in that have got a Secret Box? Exactly... None... Just adds to how cool these cars are and how unique our fellow Japanese friends are! It is one of so many factory fitted options you could specify from your Toyota dealer in Japan when buying a Starlet brand new! This particular option was only offered on the EP91 Starle but will fit any Starlet that has a free DIN slot! It can be seen in the optional accessories brochure here: http://www.ukstarletowners.com/page/articles.html/_/jdm-scans/1997-ep91-original-accessories-r39 Based on the Toyota Multibox Optional Accessory the Secret Box replaces the Coin & Card holder on the right hand side. Lower the flap to reveal a 3 digit combination lock, where a code is needed to gain access to the dark blue velvet lined drawer! With the drawer open, to set the code to whatever you wish, push the silver pin up until it clicks on the back of the front panel of the drawer. Choose your desired code... Push the silver pin back down again, close the drawer and push up the black switch on the front panel. Then jumble the code up. Locked up safe and sound! Simple but effective! These are extremely rare, currently only aware of 2 in the UK (09/03/13) and go for big money, so if your starlet has one I suggest holding onto it!
  21. The original TRD brochure for 'sporty' and 'sporty' driving parts. How many cars these days could have come with a cage as standard!
  22. EP91 Original Accessories A large selection of optional extras and accessories for all varients of the EP91 in Japan
  23. Boost Withdrawal Symptoms! :(

    1. _shaun_

      _shaun_

      feel you pain been months since i drove a boosted starlet. will be worth the wait tho

  24. The TD04-13T (TD04L) turbo is a very popular turbocharger in the Starlet World! The standard CT9 turbocharger is out of puff at 200bhp where as the TD04 turbo is good for a further 50bhp on the stock engine! They are very easy to get hold of as they were fitted to Subaru Impreza Turbos for over 8 years! Being so popular there are a fair few out there that smoke and that means a rebuild is in order! So have a read through this guide, this very simple DIY process should stop any smoking from your exhaust from turbo seal failure! TD04L Rebuild Kit - Avaliable on eBay Hammer Flat Blade Screwdriver Socket Set WD40 Blowtorch Disassembly Remove all the hoses and clamps, including the vaccum lines to the wastegate and compressor housing. Then remove the clamp that goes around the center of the turbochargers core. Its usually a 10mm nut, once removed the clamp can be completely removed. Remove the 17mm banjo bolts for the coolant lines, be careful not to loose the copper washers! Remove the 2x10mm bolts that secure the oil return pipe to the turbochargers core. There may also be some sealant that may hinder the removal. Now for the hard bit! Due to a nice tight fit, plenty of heat cycles, rust and age. The exhaust housing and the core will be nice and seized up most likely! Use plenty of WD40/PlusGas (Penatrating Fluid) to try and loosen the join. Flat blade screw driver and a hammer, Rubber Mallet or even some additional heat from a blowtorch will all help. Once the exhaust housing is free from the core, the compressor housing then needs removing. You will need some snap ring pliers for this and it can be a little fiddley! IMPORTANT The turbocharger will be balanced perfectly and altering this balance will cause accelerated turbo wear. The exhaust and compressor wheels when removed from the shaft will need to be re-fitted in the exact same rotation as they were to ensure the balance is kept correct. Marking the shaft and wheels on the outsides will allow you to get this right on re-assembly. Use an 8mm socket for the compressor wheel nut and a 12mm socket to hold the turbine end. Please note that certain TD04's compressor wheel nuts are reverse threaded so be careful! Remove the compressor wheel, it should slide off the shaft and put it somewhere safe. Remove and bin the large rubber o-ring around the lip of the compressor side end of the core. Push/Tap the shaft and it should come out complete with the exhaust wheel. Be careful not to bend any of the fins upon removal! Using the snap ring pliers remove the visible snap ring on the compressor side of the core. The clip holds the compressor seal in place. Remove the compressor seal from the core, using multiple flat blade screwdrivers or knifes at opposites will allow you to pry it out. The compressor seal has a metal insert, it may have fallen out when you removed the seal. Remove the bronze seal plate. It pops out but may need a little persuasion. Remove the interior o-ring from the compressor side. Remove the small spacer found beneth the bronze seal plate. Remove the compressor side bearing. Re-Seal & Re-Build Lubricate with some oil the new bearing from your rebuild kit and fit it into the compressor side. Place the new bronze seal plate spacer on top of the new bearing, then install the new bronze seal plate. This should click into place and there is only one proper orientation. Fit the replacement o-ring. On the end of the compressor seal insert there is a piston ring type ring. Remove the old one and replace it with the new item from your rebuild kit. Ensure plenty of lube is used and fitting the new one is actually quite easy. Ensure its fully seated before carrying on! Assemble the compressor seal insert and compressor seal. Fit the snap ring back in place that holds the compressor seal in place. Replace the piston ring on the turbo shaft. Very similar to the one on the end of the compressor seal insert. Fitting the new one can be difficult due to a groove just above the ring. Reassemble the turbine side using plenty of lubricant. Slide the bearing onto the shaft and insert the shaft back into the core until it clicks into place, the shaft should spin nice and free inside the core. Slide the compressor wheel back onto the shaft and ensure the markings you made line up again and then tighten the nut. It will take you a few attempts to get it perfect be patient! Tighten the nut until it stops then give it a quarter of a turn to nip it up. Clean both the oil return faces and reassemble the remaining water lines & clamps. Then you should be good to go! This should stop your smoking turbocharger, there may be excess oil left in the exhaust of your car so take the car for a short drive and it should clear up! Remember this is a simple do it yourself guide, if you can afford to I would seriously consider having it done by a professional and purely because it will be properly rebalanced afterwards to ensure it is 100% perfect!
  25. Welcome you power hungry animals! If your wanting 200bhp then look no further I’m going to try my best to talk you through it! This is considered the limit on the standard engine and turbo, further tuning you’ll be looking at a bigger turbocharger! Check Your Health If you’re fat, how would you feel to be asked to run a marathon? Asking your engine to handle nearly double the stock boost pressure without work and additional help is just silly! So there are a few things we need to do to ensure your engine is healthy. If your engine is poorly or has issues, tuning and pushing it will only accelerate the problem and may lead to a failure! Free Power Everyone loves free performance! Air Conditioning The air conditioning system on these cars is very very annoying. Not only do they sap a serious amount of power from your car, turned on or off. But the weight of the system and the rotational drag on the engine also slows you down. With the system fitted it is also a chuffing joke to get to the oil filter! So removing this system has a huge benefit for tuners as the excess space created makes space for intercoolers and filter systems! Weight Reduction Nothing kills acceleration more than weight. The main reason for these cars being so nippy is because they weigh less then 920kg’s! So removing additional weight is free and helps even more. Back seats, Spare Wheel, Jack, Toolkit, your Mates or Girlfriend all slow you down! Boost Restriction The GT Turbo’s aren't affected by this, but the Glanza V’s are so check out the guide below for removing this restriction. Tuning Time! So you've now removed as much weight as possible, moving on to the good bits. The 4E-FTE engine is a very tuneable little lump. It’s actually very easy to get good power gains out of them, there are many different ways to get to the same results. I’ve read lots of information on forums and other websites, talking to lots of tuners and even fellow members. Below I’m going to go through the best way in my opinion. As on any car, putting an aftermarket exhaust system on a car is a great way to allow the engine to get rid of its waste faster and easier. Amplified on turbocharged cars, as they don’t require any kind of back pressure from an exhaust to generate more power. They just need to get rid of the waste as fast as possible. The Starlet Turbo comes with a very small diameter exhaust system that is restrictive at stock boost levels, but will become a real issue at any more boost pressure! The stock item will also be rusty, old, possibly collapsed inside, which will all restrict the engine further! The first part of the exhaust the change is the cat-back system. It connects up to the catalytic converter just under the engines sump pan and goes all the way to the tailpipe at the back of the car. There are plenty of choices of exhausts, anything that’s 2.25” to 2.5” will be plenty big enough for the standard ct9 turbocharger. The second part of the exhaust you should change is the catalytic converter. It bolts directly on to the side of the turbo and connects up to your cat-back exhaust system. The cat is effectively a very fine mesh to filter out harmful exhaust gases from going into the atmosphere. It’s very restrictive and removing it will see a very noticeable gain in performance. A De-Cat Downpipe replaces the entire unit with a straight through pipe. The final part of the exhaust you need to change is the manifold. On the 4E-FTE engine the manifold is a particularly poor design in terms of tuning/flow. The ports on cylinders 2 and especially 3 are very restrictive and can result in engine failure if boost pressure is raised with this restriction in place! An easy and cheap way of removing this restriction is to grind out the restrictions down the ports. This will do the job, but it won’t flow as well as a tubular manifold. An aftermarket tubular manifold will give the exhaust gases a nice clean, smooth and direct route to the turbocharger. Just like the exhaust system, the standard intake system is again, very restrictive. The standard route comes off the hot turbo, up and straight over the red hot exhaust manifold, down the side of the hot engine and to a sealed air box at the back of the engine bay! Not an ideal route for performance! Relocating the air filter to in front of the radiator is an excellent place to allow fresh air to get into your turbocharger! This will require removal of your air conditioning system however! We have a guide on how to relocate your air filter in our wiki section for less than £30! Coming Soon To stop debris going into the turbocharger, another option is to simply use mesh as a filtration system. This is a very cheap and probably the least restrictive way for an intake setup. There is also a guide in our wiki section on how to do this! http://www.ukstarletowners.com/page/articles.html/_/engineandtuning/turbo-mesh-r17 When the air has been compressed by the turbocharger, the air is very hot and passes through the tiny top mounted intercooler core before going into the engine. The standard top mounted intercooler does a very good job at the standard boost pressure, but again when we are planning on raising the boost pressure level and tuning the car it soon becomes a limiting factor. A front mounted intercooler is the best way to fix this issue. Relocates the intercooler system to the front of the car where the cold air is. The colder the charge temperatures of the air going into the engine, the much denser the air will be (more oxygen). The more oxygen the bigger bang you’ll get inside the cylinders and therefore resulting in more power. Now we have freed off the flow of air and gasses in and out of our engine, we need to ensure the Ignition & Fuel system is up to the job! The stock fuel pump can flow enough fuel to reach more power, however being as old as these cars are, means they are getting on a bit! A direct fitment Walbro 255lph uprated fuel pump kit is a very wise investment. They will provide a stable fuel flow for over 350bhp on these cars, so for the stock engine and turbo its more than enough. The stock ignition system will also most likely be just as old as the pump. The HT Leads are terrible and very small. The King Leads are usually the main culprit for these cars just starting to randomly misfire one day. Changing them is another very wise move. Spark Plugs, Distributor Cap and Rotor Arm are also worth replacing if they are showing signs of wear. There not expensive and worth it to ensure you get a perfect spark inside your engine. The final part that I’d recommend is a vented oil catch can. The standard breather port vents into the intake system, which can sometimes lead to a build up of oil in the pipework when the boost pressure is raised. Run a line from the breather port on the rocker cover to a tank somewhere in the engine bay. This is preferred over a breather filter fitted directly onto the port on the engine. They can spit oil vapour out making an oily mess in your engine bay, especially at 1bar of boost! At this point your car should be ready to handle the additional boost pressure, your nearly there! To allow you to adjust your boost pressure you’re going to need to fit an adjustable turbo actuator. The turbo actuator is what controls when the wastegate port opens and closes to bleed off excess exhaust gas. This allows fine adjustment of how much boost pressure is built in the system. The stock actuator has a very soft spring inside and is not adjustable in any way. Adjusting the length of the threaded rod to change the boost pressure, lengthen the rod to lower the boost pressure, shorten the rod to raise the boost pressure. This can also be adjusted by a Manual or Electronic Boost Controller. However a stronger adjustable actuator is always a wise investment to keep the boost pressure stable. You can use a controller with an uprated actuator! The standard ECU on the Starlet Turbo’s have a Fuel Cut Defend system built in. This will kick in if the ECU recognizes the boost pressure going higher than 0.85Bar by cutting fuel. It’s a very violent jerk that will come as quite a shock if you’re not expecting it. When setting boost pressure remember that you will always build more boost in higher gears at higher speeds. So set your boost perfect in 4th or 5th gear at a decent speed. If you don’t hit fuel cut then, then you won’t in low gears at slower speeds. Fuel Cut Defenders are devices which allow you to go beyond the factory fuel cut limiter by raising that limit. At this point you’re where your engine can be destroyed in minutes if you’re not VERY careful. Without excess fuel pressure and an aftermarket ECU to control your system, it’s only going to end in tears. Aftermarket ECU’s have raise the fuel cut limiter so a fuel cut defender is something I would suggest avoiding! There are three major tried and test ways for tuning these cars with aftermarket ECU’s. Each type have their own features and pro’s and con’s which are listed below. JDM Plug & Play Aftermarket ECU’s These ECU’s are basically a stock ECU that has been opened up and fitted with additional circuit boards to allow control over certain parameters inside the ECU. There provided by some of the major JDM tuners such as Blitz, JAM, MINEs, ZEP, TOMs and SARD. They all tend to have the same feature lists: Removed or Raised Fuel Cut Limiters Removed 112mph Speed Limiters Increased Rev Limiters (Varies 8000-8300rpm) More Aggressive Tuned Map There also great as they allow you to run 1-1.2bar of boost pressure without the need to visit a rolling road or get your car remapped. To fit you simple unplug the stock ecu and reconnect the new one. Simple! However there is a downside, because they aren’t mapped specifically for your own car and its setup. It doesn’t guarantee to be 100% perfect, they may run rich in some places in the rev range or lean in others. Usually its small amounts, but its worth getting your fueling check at a local tuners to be safe! There not available new anymore and tend to be priced second hand between £400-£550. Tuneable Piggyback ECU’s By far the most popular way of tuning these cars here in the UK at the moment. G-Reddy’s range of E-Manage ECUs are readily available and offer much more adjustability then a Plug & Play ECU. These ECU’s piggyback the stock ECU and override certain parameters needed to tune the car for more boost pressure. Plug & Play Wiring Harness’s do exist for these ECU’s but are rare, the majority come with a bare harness that will require wiring into the stock wiring loom in your car. Once wired in they also then require mapping on a rolling road by a professional tuner. They do all the same things the Plug & Play ECU’s do but the map will be custom made to work perfectly with your car and its modifications. These are still available new, but tend to fetch between £140-£240 second hand. The ECU will need to be wired in by a professional and then a Mapping Session by a tuner which will cost between £250-300. The majority of tuners here in the UK offer packages to supply, fit and tune an E-Manage to your car for between £500-£550. Tuneable Standalone ECU’s The final way is by far the best way of tuning these cars. A full standalone ECU gets rid of any factory ECU and all its parameters meaning you have full control over every element of the engines tune. This is usually considered overkill for the stock engine and turbo and the gains would be minimal at this level of power. However if you’re looking to go for a bigger turbo or engine work further down the line this would be a wise purchase. The majority of the standalone systems on the market for these cars are not plug and play and require wiring in with the exception of the Apexi PowerFC. These systems tend to start at the £800 mark and go up into the sky! So.... That’s it, if you've followed this guide you car should be producing between 190-210bhp depending on the health of your engine and turbocharger. It won’t take long for you to get used to this kind of power however and the search for more power will soon hit you. The next step will be a turbo upgrade on the stock engine. Another guide will be available soon on how to do this! The spec of my car back when I was on the stock engine & turbo: Blitz Access ECU Zisco Ram Horn Manifold Blitz Decat Fujitsubo Power Getter Exhaust System Toy Tuning Air Filter Relocation Kit HDI Front Mount Intercooler HKS Actuator @ 1.1bar Walbro Fuel Pump Kit Magnacore HT Leads Irdium Spark Plugs 202.6bhp & 173.4lb-ft
×
×
  • Create New...