-
Posts
9779 -
Joined
-
Last visited
Content Type
Profiles
Forums
Wiki
Media Demo
Events
Everything posted by Socks
-
We have various shock and spring kits in stock... http://www.jdm-ep.co.uk/index.php?main_page=product_info&cPath=121&products_id=678 http://www.jdm-ep.co.uk/index.php?main_page=product_info&cPath=121&products_id=687
-
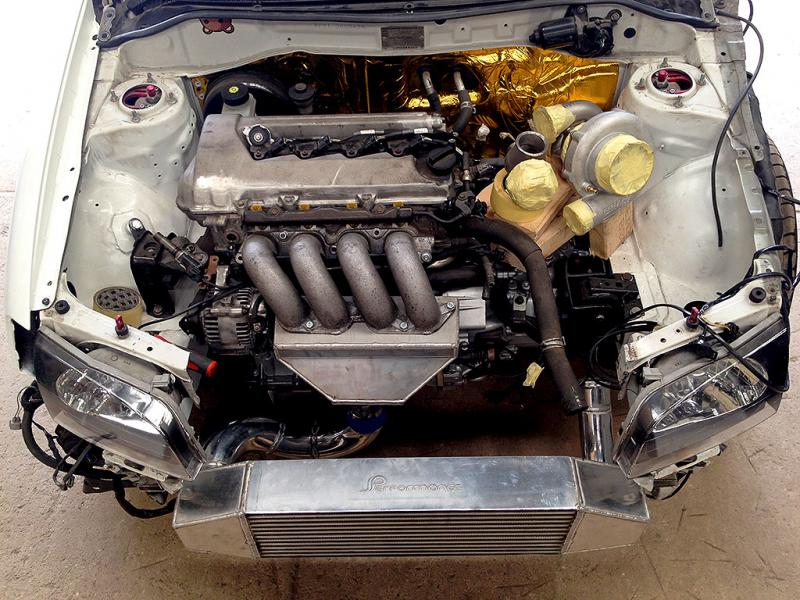
Hopefully some time next month bud! I will! Correct The slam panel is much lower down, thats the light support bar. It didn't have ANY strength anyways.. This is the MOST annoying thing for me, I cant wait to hear what it sounds like if I'm honest! -------------------------------------------------------------------------------------------------------------------------- Well. The inlet manifold is almost done. Finishing touches on that today. Im using the stock T-Sport TB. Should be plenty big enough for now! Cold side boost pipe (3") is done. Surprised by the shape. Always a big no no to have a tight 90deg off the TB. Best Flow Anyone?! Intercooler is also done, with new back door end tanks. Although you wont see them with the bumper on! Handy lumps of wood to roughly mock the position of the silly turbocharger. Still gonna be impressive to see how they get all that manifold and downpipe down the back imo! The waste-gate also shocked me. The thing is ridiculously big. Both the positions of the turbo and wastegate should be about right tbh. The screamer will be a bonnet exit affair. Simply no room to get it down the back! Jamie has started the collector and wastegate take off and is eager to progress, he loves it haha Ill keep you all posted!
-
Sweet dude. Get your result on the leaderboard! http://www.s314kba.co.uk/leaderboard
-
Why do I have to keep linking you. You will learn
-
Regardless of model number. All ep82 sensors are the same. We have 5+ in stock lee. http://www.jdm-ep.co.uk/index.php?main_page=product_info&cPath=131_136&products_id=365
-
Rare to find a crack free ct9 manifold these days, we have one tho! http://www.jdm-ep.co.uk/index.php?main_page=product_info&cPath=175_180&products_id=605
-
EP-Azz's Billet Wheel'd 300bhp forged slag
Socks replied to EP-Azz's topic in EP91 Glanza Progress Blogs
All about the weight dude. That merc is probably double the weight of that EP. -
Cheers Chaps. Rather chuffed with it myself already! Cant wait to go for a drive!
-
We have full sets of both Apex & TEIN Springs in stock.... http://www.jdm-ep.co.uk/index.php?main_page=product_info&cPath=121&products_id=678 http://www.jdm-ep.co.uk/index.php?main_page=product_info&cPath=121&products_id=687
-
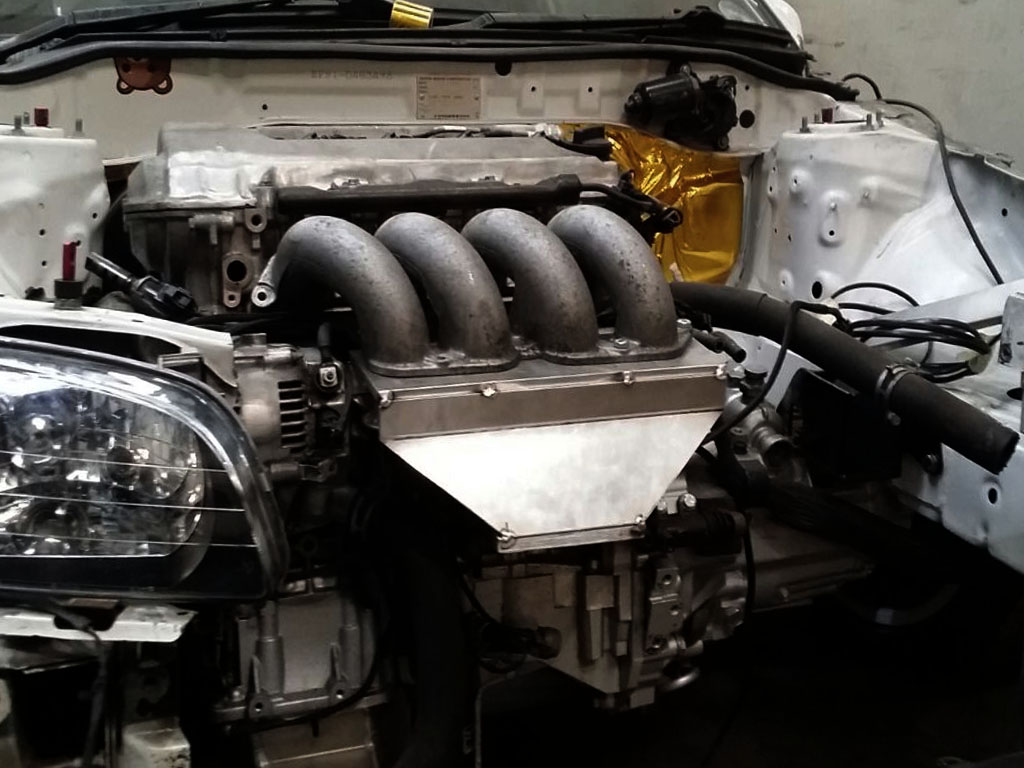
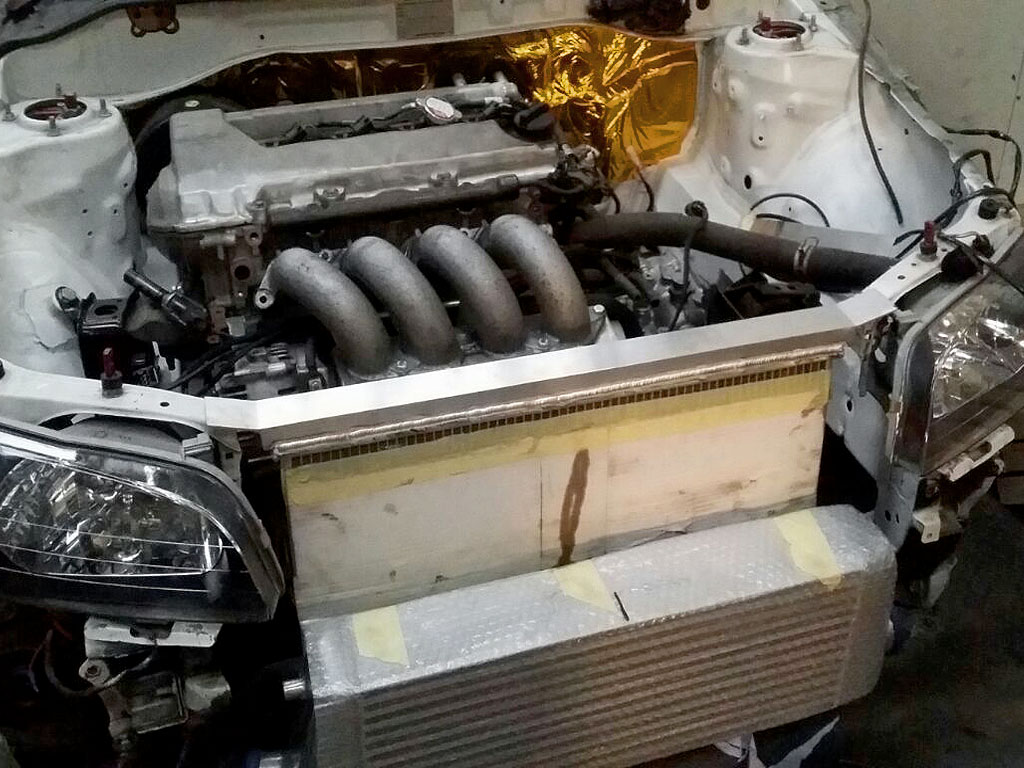
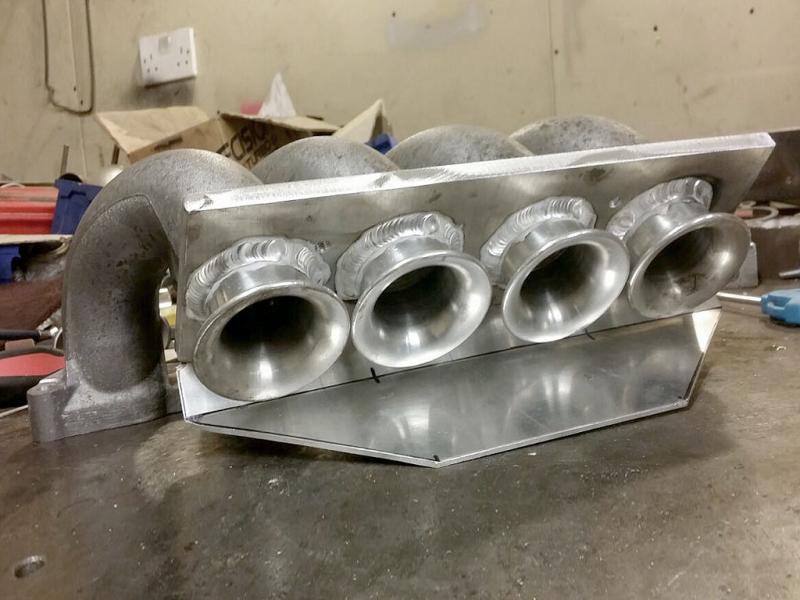
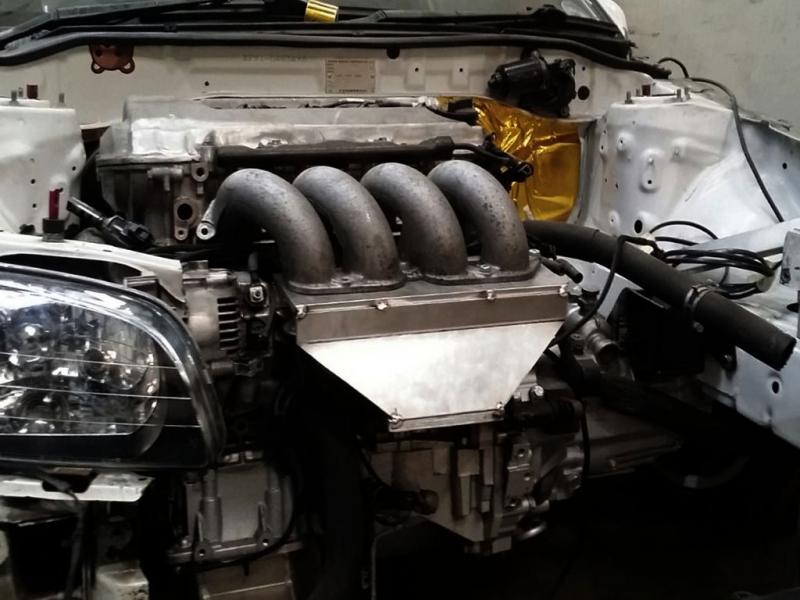
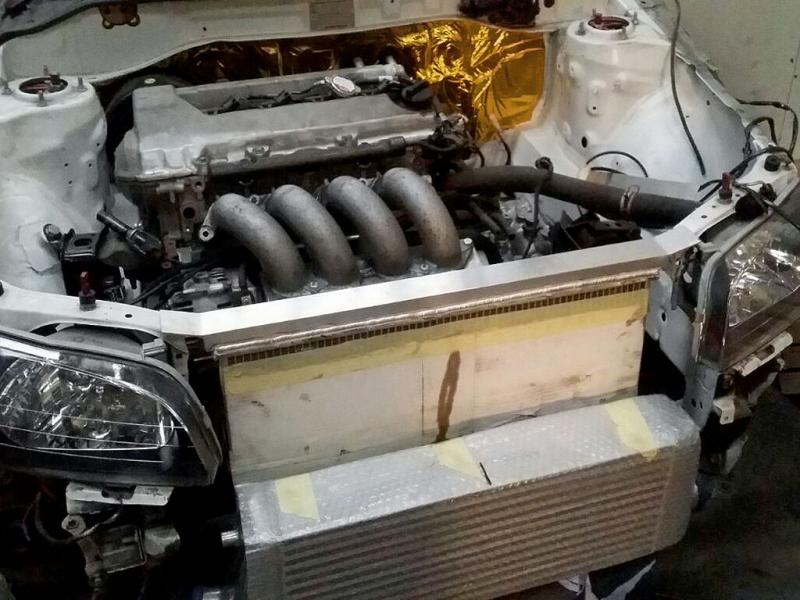
Cheers Chaps... Been too busy to update this! Anyhooo... They've been working on my Inlet/Boost Pipes/Intercooler & Rad... Got some mid-fab snaps here to let you all see... We decided to use the top half of the stock inlet... Its actually pretty optimised due to it needing to be good to extract high amount of power N/A.... We can swap it out at a later date for a complete one if needs be.... The inlet will get painted as a complete item when finished! Stacks... Of Course..... Going in... Part of the body of the plenum built. As you can see, we are making use of the space we have with a center feed design... and finally... Full Size Rad is so much better then a civic one, should cool much nicer! Ontop of that, the way its being incorporated into the front of the car is so clean. Very impressed myself, I must say! No shots of the I/C or Pipework yet, All in Good Time! Well impressed yet again with fab work. Ill be high fiving the guys when I next pop down!
-
We have one in stock bud http://www.jdm-ep.co.uk/index.php?main_page=product_info&cPath=122_162&products_id=560
-
Hey Sam... Handbrake Cables: http://www.jdm-ep.co.uk/index.php?main_page=product_info&cPath=194_197&products_id=561 Hubs with good bearings... http://www.jdm-ep.co.uk/index.php?main_page=index&cPath=133_161
-
-
Right, first of all you want to remove ALL the gas from inside, either go to a bodyshop and have it removed.. Or nuke the ozone and help heat our world up a bit more.. If you opt for the heat.. Find your refill cap.. Should have a plastic cap on with the letter H on. Unscrew that cap. Place a cloth over the pin, and poke it with a screw driver, which will release all the gas. Make sure to hold a cloth over it otherwise it will spray aircon gas all over your bodywork and face. (VENTING THE AIRCON GASSES TO THE ATMOSPHERE IS ILLEGAL IN THE UK AND OTHER PARTS OF THE WORLD. LEGALLY YOU SHOULD HAVE IT DEGASSED AT A BODYSHOP OR AIRCON REFILLING CENTRE.) (If you do happen to slip on the valve to vent it, DONT BREATH ANY IN) Next you want to unbolt all of the aircon radiator securing bolts from the slam panel, there is 2 x 10 mm bolts holding each corner of the radiator to the slam panel. 1 x 10 mm bolt holding the aircon rad fan to the slam panel. 1 x 12 mm bolt holding the horn to the slam panel Next remove the bonnet latch mechanism. 2 x 10mm bolts holding that to the slam panel. While your there, unbolt the bonnet latch panel, once you have the latch off , there is 1 x 10mm bolt at the top holding it to the slam panel, and 1 x 10mm bolt holding it to the chassis bar. While your taking those front bolts off, find the pump with the gas refill cap on. Remove the 2 x 10mm bolts on top holding the 2 lines on. And also remove the 10mm bolt from the bottom of it and pull the pipes off it. On the left hand side next to the headlamp, there is another aircon rad pipe connector. Undo the 10mm bolt, and pull the pipe out of its connection. Now for the bulk head pipes, these 2 will enter right underneath your stock airbox or airfilter if its still in oem position.So remove it to give you access to the pipes. Cant remember what size they are, but use 2 large adjustable spanners on them. 1 spanner on the first nut, and the 2nd spanner on the locking nut. Twist opposite ways, and once there loose, pull the pipes out of the bulk head connector. Now get underneath the car. find the aircon pump. It is directly underneath the oil filter housing. Cant miss it (big enough) You want to slacken the powersteering pulley off first to make it easier to get the belt off. Use a foot long extention and a 12mm socket on the end, and undo this tensioning bolt. Also use a 14mm long spanner to slacken this nut off. This should free up the power steering pulley. Get back up top of it and use a rubber mallet to tap the pulley as far down as it will go. This will let all tension off the belt. Back underneath, look at the aircon pump. It will have 4 x 12mm long bolts holding it to its housing. 2 x 12mm bolts at the bottom, and 2 x 12mm bolts at the top. (1 bolt is holding the oil filter drip trap on, remove the 12mm cap bolt, then the 12mm long bolt is underneath the capnut) This should drop the aircon compressor down. Undo the 10mm bolt holding the aircon line to the compressor pump. Pull off the pipe. Also unclip the electrical connection plug from the pump. Follow the line that went from the aircon compressor pump along the chassis, it is bolted to the chassis with a 10mm bolt, next to the water radiator lower hose. Again, whilst your under there, remove the oil filter drip tray if your haven't completely taken this off already. This will make it much easier to do oil changes with an oil filter strap. Also remove the aircon compressor pump brackets! weighs a hefty amount!! 4 x 12mm bolts. Now check you have all your lines unlatched from the aircon rad, and remove the lines from the engine bay.I have no intention of putting mine back in, so i cut through them with a hacksaw. Makes them easier to remove. Saves a lot of jiggling about. Otherwise if you have an EP91, you would have to remove the water coolant overflow bottle, battery, battery tray holder etc to get one of the main bulk head lines out. Make sure you have all your electrical connections unlatched from the front. If so, pull one side of the air con rad out to clear the driver side headlamp, this should allow you to pull the passenger side out and clear of the opposite headlamp. This leaves you this. So reattach all of your bonnet latch panel, bonnet latch, horn, clip all our electrical plugs back into the panel. Fit your shorter belt, tension the 12mm tensioning bolt up until the belt feels tight. (bit of common sense) Lock the power steering back in place using a 14mm long reach spanner. Make sure the aircon compressor plug isn't hanging freely, cable tie it otherwise. Recheck everything. This will leave you the finished article. TONS of room to play with.. Removing the air con helps when your removing the exhaust manifold, turbo etc. All you would have to do is drain your coolant from the rad, remove that and you have a huge open space. *** GT owners, you will have to bridge the connector for the pressure switch otherwise the fan will be permanently running from ignition on. *** Glanza owners don't have to worry about this to my knowledge. Article & Photos by Glanza_Ragger
-
Hopefully this will help a few people out, a quick and simple guide on how to change your front indicator lenses from either amber to clear or clear to amber It's a pretty easy job so don't be afraid to have a go. First off: tools, all you are going to need as a bare minimum is: Posidrive/cross head screw driver, fairly small one Flat blade screw driver That's it for basic straight swap; only other things you may want is something to clean them with. And if you are changing from amber to clear you'll want Silvatech or chromed bulbs to give it a cleaner look; these can be found on a quick eBay search or any decent car parts store should stock them as well Right so get your bonnet open and prop it up - first thing is the screw holding the top support in place, remove this. Once this is out you want to lift the light from the bottom and directly forward, no twisting etc, in order to pop the rear mount from the clip it locates into, like so (be firm but delicate, I broke my clip 1st time): This is the clip you are removing it from: Once this is free from this clip you should be able to wriggle it out from the body of the car. Once free either twist out the bulb and holder or unclip the connector to the holder. Repeat this for both sides, then head indoors with both units (it's winter so I'm staying warm ) Next step is to remove the lens; start off by removing the 2 small screws on the back, next to my finger and thumb. Now just gently pry the lens away from the side where you removed the screws from, just to break the seal (no glue just stuck from dirt and grime build up) but once it's broken stop as there's still some clips to remove! The clip on the top is the one you want to lift, this is where the flat blade comes into use. Be careful, don't lean on the lip on the lens as you will easily break it, do it on a flat surface and maybe use a cloth to spread the load if you need to! All you are looking to do is get the grey plastic to sit on top of the lens, this is the clip you want to lift, next to my forefinger. Once you have this clip lifted you want to pull on the same side you did earlier, the side the screws were removed from. It's a bit fiddly but it will come away like so: Once off you will be left with a grey version of this: Mine was sprayed because i thought it looked a bit funny with the grey behind on the non reflective area on a black car, I would test fit first to see if you want to spray yours or if you are happy leave it! Next remove the seal, give it a clean with a damp cloth and do the same with the unit and leave to dry. Once dry refit the seal, there is a gap at the bottom so don't worry about that Refitting: The new lens just pushes back on evenly all over, making sure all the clips locate properly. Refit screws on the back. Once done up, repeat for the second lens, then head back out to the car. Now if you have changed from amber to clear lenses this is the point you would want to change the amber bulbs for your Silvatech or chromed ones! Fit bulb and holder back in. Then the final bit, locate the bottom rear clip first then the top should just slide under the wing and over the little upstand where the screw goes into. Close bonnet, stand back and admire your handy work OId vs New or visa versa Hope this is of some use to some people! Photos & words by Morgey
-
Stage 2 is of UKSO's Tuning Walk-throughs is here! After the first guide was so extremely popular and showing owners how to boost performance from the factory 130bhp to around the 200bhp mark, people were soon wanting more and more and to extract that little extra performance from their cars without spending a huge amount of money! In Stage 1 of tuning your turbo starlet, we maxed out the standard turbo charger. The standard CT9 turbo runs out of puff at the 200bhp mark, however the standard engine is capable of pushing a touch more performance before the internals need changing to handle more power. Stage 2 is going to cover swapping out the standard CT9 turbocharger setup for a much bigger TD04L unit. The TD04L turbocharger is commonly found on the classic Subaru Impreza Turbo, and because these cars are so popular the spares and parts on the 2nd hand market are just as big. A standard TD04L in good working order can be had for between £40-120 depending upon mileage and their condition. A Few Things To Think About! Turbo Kits Race-Tech's TD04 Conversion Kit Companies such as Race-Tech & WEPR offer complete conversion kits including everything you need to convert your car, providing you have already tuned your car to Stage 1. If you're converting a standard starlet turbo to a TD04 then additional parts will be required. This guide is going to go through the conversion part by part, as if you were building your own conversion kit up and upgrading from Stage 1! Lag? Standard CT9 On Left & Standard TD04L on Right This always brings in a huge debate, its mainly from keyboard heroes that are still rocking CT9 turbos but here is my opinion on the subject. If you're considering converting to a TD04 turbo setup and you are worried about lag, try and find someone local to you that could take you out for a passenger ride. Until you've been in a well setup TD04 converted starlet then save your judgment. The additional torque and power available for a small sacrifice of maybe 700-800rpms is more than worth it. On top of this, CT9s are out of puff towards 6500rpm and TD04s pull to the limiter. There are many things that can done in the future to help reduce lag, shorter intercooler pipework, electronic boost controllers and even billet wheel hybrid TD04s. Engine Health As mentioned in Stage 1, when extracting more power from an engine, its health is a priority. When you're going to be pushing close to double the original power output, then health is a major priority. These engines were produced between 1989-1999, they aren't getting any younger and mechanical fatigue is going to get the better of them sooner or later. I would highly recommend you run a compression test to ensure the engine is of good health and service it every 4000-5000miles if you can to prolong its life. There's no reason why it wont last just as long as it would have on the standard turbo, providing it's cared for, treated right and not thrashed from cold every morning. Internal Wastegate or External Wastegate Both the CT9 and the TD04 are internal wastegated turbochargers, their boost levels are controlled by a spring loaded actuator which is connected to a flap that's built into the design of the exhaust housing. When the desired boost limit is reached the flap opens and dumps excess exhaust gas down the exhaust, making the exhaust louder. On an external wastegate setup, the standard internal wastegate flap would need welding up solid as it would no longer be used. Instead, the exhaust manifold will have a take-off to fit an external wastegate unit. Basically a spring loaded valve, which does the same job, but are far superior when holding a boost level. They usually also vent the excess exhaust gas through a screamer pipe. These are VERY loud and when your car comes on boost, the noise can only be described as a thrusting rocket jet type noise. An external wastegate setup is far superior over using the standard internal wastegate setup and will hold boost much better when going over 1bar of pressure. They do however cost much more to buy as will the manifold to suit, but it is money well spent! Collecting Parts Yourself! Manifold & Downpipe The first part of the conversion kit that you're going to need is a different manifold and downpipe. As the TD04 has different flanges on both sides and is a lot bigger in size, it needs mounting further away from the engine. This will allow you to physically mount the turbocharger on the engine. The downpipes are designed to bolt up to your existing 3 bolt flanged exhaust system. These can be purchased from UKSO Trader Race-Tech or from other companies such as WEPR or Zisco Performance. TD04L Turbocharger The TD04 turbocharger itself can be purchased from a few different places depending how much you wish to spend. Searching 'TD04L' on ebay will bring up lots of them for between £40-£120 depending upon mileage and condition. If you'd rather purchase new, reconditioned units can be purchased from many places including Traders on UKSO. The best and most expensive way is to purchase a Hybrid Billet Wheel TD04 from Race-Tech or Tuning Developments. Spooling much faster, yet still producing more power they are the best out of them all. They do however come with a hefty price tag. TD04 Oil Lines The standard CT9 turbocharger is cooled & lubricated by both Oil & Water. The oil lines are different on the TD04 turbocharger. An Oil Feed Line would be required to go from the oil filter housing to the turbocharger and a silicone oil return line to go from the turbocharger to the sump pan. The Oil Feed Line can be had from Race-Tech, Tuning Developments & Zisco Performance. The oil return pipe is just a simple 90 degree silicone bend which can be purchased from any decent silicone hose supplier. TD04L Oil Return Size - 16mm 4E-FTE Sump Oil Return Size - 19mm TD04 Water Lines The water lines aren't actually necessary on the TD04 turbocharger, many users have run them with and without water lines. There have been reports of much cooler engine water temps when not using turbo water lines. The water line kits can be purchased from the same traders as the oil lines. If you're going to run without them a simple 'U' shape blanking silicone pipe will be required to blank off the outputs from the thermostat housing. Hot Side Intercooler Pipework The hot side intercooler pipe is also different as the standard CT9 turbocharger outputs upward and the TD04 turbocharger outputs downwards. With the majority of front mounted intercooler kits, all that is required is a 90deg alloy bend and 2 silicone joiners. This will vary though depending upon the intercooler kit you have and which turbo manifold you've chosen. Air Filter/New Mesh The TD04's intake is also much much bigger then that of the CT9. So some new mesh or a new filter setup will be required. See a guide on how to do this here: http://www.ukstarletowners.com/page/articles.html/_/engineandtuning/turbo-mesh-r17 Adjustable Fuel Pressure Regulator This is not deemed 100% necessary on this conversion as the fuelling can be adjusted perfectly with the ECU. However it is a very useful bit of adjustment for any tuner to get your fuelling just right. A bit of extra pressure may also save you the hassle of having to go to bigger injectors! If you get hold of one with a gauge its also handy to get it setup perfectly! An adaptor will be needed to connect one up to the starlet fuel rail. Management/Mapping This is where you're going to save some money if you spent money on an E-Manage Piggyback ECU from the Stage 1 Tuning Guide. The plug and play ECUs aren't designed to work with a turbo as large as the TD04L so if you went down the mappable ECU route, be it Piggyback or Standalone, you can simply take a slow off boost drive back to your tuning specialist and have the ecu remapped again to suit the larger turbo. So.... Once again at the end of another stage of a tuning walkthrough! If you've followed the guide your car should now be producing 220-240bhp depending on the health of your engine and turbocharger. Just like Stage 1 it wont take long for you to get used to this kind of performance and the search for even more power will hit you again! Be warned though Stage 3 is where serious money becomes a factor and the engine will require an overhaul with stronger components to be able to handle more boost pressure! Please Check Back Soon for Stage 3 The spec of aaddzz123's car when he was running a standard engine and TD04L setup: Greddy E-Manage Blue WEPR TD04 Externally Gated Manifold WEPR TD04 Downpipe Demon 38mm External Wastegate @ 1.2bar Japspeed Exhaust System Meshed Turbo Filter J-Performance Front Mounted Intercooler Walbro Fuel Pump Kit Magnecor HT Leads Iridium Spark Plugs 242.3bhp & 179.8lb-ft
-
Having lightweight wheels keeps your starlet feeling like its much lighter on its feet. Below is a database that members of UKSO have put together to compare weights! The perfect Size & Offset wheels for these cars is considered to be 15"x6.5" ET38. The Lighter the wheels the Faster you will go! The list is going to be sorted via Weights, and it will only contain 14",15" & 16" Wheels as these are the most common wheel sizes to fit to our cars! 3.9kg - Desmond Rega Master EVO - 15x6.5 3.9kg - SSR Type-C - 15x6.5 4.0kg - Volk TE37 - 15x6.5 4.2kg - Volk TE37 - 15x7 4.3kg - Kei Office KS-CE - 15x6.5 4.6kg - BuddyClub P1 - 15x7 4.8kg - Advan Racing RG - 15x6.5 4.9kg - Enkei IRS - 14x6 4.9kg - Wedsport TC-005 - 15x7 5.0kg - Advan Racing ARS RR - 14x6 5.0kg - TOM's New Action - 14x6 5.1kg - OZ Superleggera - 15x7 5.2kg - TRD Sports T3 - 15x6.5 5.4kg - Rota Slipstream - 15x6.5 5.5kg - Sparco Crimson NS2 - 15x7 5.5kg - TOM's New Action - 15x6.5 5.5kg - Ultralite G-Spec - 15x6.5 5.9kg - Rota Grid - 15x6.5 6.1kg - Team Dynamics Pro Race 1 - 15x7 7.3kg - Advan Racing SA3R - 15x6.5 7.7kg - ATS Cup - 15x7 9.5kg - Speedline Safari - 15x6 (Factory Fitted Starlet SR) If you know of any more or have bare wheels in your garage, get them weighed and post up results! Regards Socks
-
-
How many cars have you been in that have got a Secret Box? Exactly... None... Just adds to how cool these cars are and how unique our fellow Japanese friends are! It is one of so many factory fitted options you could specify from your Toyota dealer in Japan when buying a Starlet brand new! This particular option was only offered on the EP91 Starle but will fit any Starlet that has a free DIN slot! It can be seen in the optional accessories brochure here: http://www.ukstarletowners.com/page/articles.html/_/jdm-scans/1997-ep91-original-accessories-r39 Based on the Toyota Multibox Optional Accessory the Secret Box replaces the Coin & Card holder on the right hand side. Lower the flap to reveal a 3 digit combination lock, where a code is needed to gain access to the dark blue velvet lined drawer! With the drawer open, to set the code to whatever you wish, push the silver pin up until it clicks on the back of the front panel of the drawer. Choose your desired code... Push the silver pin back down again, close the drawer and push up the black switch on the front panel. Then jumble the code up. Locked up safe and sound! Simple but effective! These are extremely rare, currently only aware of 2 in the UK (09/03/13) and go for big money, so if your starlet has one I suggest holding onto it!
-
-
-
The TD04-13T (TD04L) turbo is a very popular turbocharger in the Starlet World! The standard CT9 turbocharger is out of puff at 200bhp where as the TD04 turbo is good for a further 50bhp on the stock engine! They are very easy to get hold of as they were fitted to Subaru Impreza Turbos for over 8 years! Being so popular there are a fair few out there that smoke and that means a rebuild is in order! So have a read through this guide, this very simple DIY process should stop any smoking from your exhaust from turbo seal failure! TD04L Rebuild Kit - Avaliable on eBay Hammer Flat Blade Screwdriver Socket Set WD40 Blowtorch Disassembly Remove all the hoses and clamps, including the vaccum lines to the wastegate and compressor housing. Then remove the clamp that goes around the center of the turbochargers core. Its usually a 10mm nut, once removed the clamp can be completely removed. Remove the 17mm banjo bolts for the coolant lines, be careful not to loose the copper washers! Remove the 2x10mm bolts that secure the oil return pipe to the turbochargers core. There may also be some sealant that may hinder the removal. Now for the hard bit! Due to a nice tight fit, plenty of heat cycles, rust and age. The exhaust housing and the core will be nice and seized up most likely! Use plenty of WD40/PlusGas (Penatrating Fluid) to try and loosen the join. Flat blade screw driver and a hammer, Rubber Mallet or even some additional heat from a blowtorch will all help. Once the exhaust housing is free from the core, the compressor housing then needs removing. You will need some snap ring pliers for this and it can be a little fiddley! IMPORTANT The turbocharger will be balanced perfectly and altering this balance will cause accelerated turbo wear. The exhaust and compressor wheels when removed from the shaft will need to be re-fitted in the exact same rotation as they were to ensure the balance is kept correct. Marking the shaft and wheels on the outsides will allow you to get this right on re-assembly. Use an 8mm socket for the compressor wheel nut and a 12mm socket to hold the turbine end. Please note that certain TD04's compressor wheel nuts are reverse threaded so be careful! Remove the compressor wheel, it should slide off the shaft and put it somewhere safe. Remove and bin the large rubber o-ring around the lip of the compressor side end of the core. Push/Tap the shaft and it should come out complete with the exhaust wheel. Be careful not to bend any of the fins upon removal! Using the snap ring pliers remove the visible snap ring on the compressor side of the core. The clip holds the compressor seal in place. Remove the compressor seal from the core, using multiple flat blade screwdrivers or knifes at opposites will allow you to pry it out. The compressor seal has a metal insert, it may have fallen out when you removed the seal. Remove the bronze seal plate. It pops out but may need a little persuasion. Remove the interior o-ring from the compressor side. Remove the small spacer found beneth the bronze seal plate. Remove the compressor side bearing. Re-Seal & Re-Build Lubricate with some oil the new bearing from your rebuild kit and fit it into the compressor side. Place the new bronze seal plate spacer on top of the new bearing, then install the new bronze seal plate. This should click into place and there is only one proper orientation. Fit the replacement o-ring. On the end of the compressor seal insert there is a piston ring type ring. Remove the old one and replace it with the new item from your rebuild kit. Ensure plenty of lube is used and fitting the new one is actually quite easy. Ensure its fully seated before carrying on! Assemble the compressor seal insert and compressor seal. Fit the snap ring back in place that holds the compressor seal in place. Replace the piston ring on the turbo shaft. Very similar to the one on the end of the compressor seal insert. Fitting the new one can be difficult due to a groove just above the ring. Reassemble the turbine side using plenty of lubricant. Slide the bearing onto the shaft and insert the shaft back into the core until it clicks into place, the shaft should spin nice and free inside the core. Slide the compressor wheel back onto the shaft and ensure the markings you made line up again and then tighten the nut. It will take you a few attempts to get it perfect be patient! Tighten the nut until it stops then give it a quarter of a turn to nip it up. Clean both the oil return faces and reassemble the remaining water lines & clamps. Then you should be good to go! This should stop your smoking turbocharger, there may be excess oil left in the exhaust of your car so take the car for a short drive and it should clear up! Remember this is a simple do it yourself guide, if you can afford to I would seriously consider having it done by a professional and purely because it will be properly rebalanced afterwards to ensure it is 100% perfect!