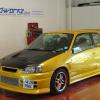
Idrees Posted April 15, 2009 Author Posted April 15, 2009 Thanks guys.Yep the heatshield is a pain. The cables are on but hand brake isn't working because theres two clips missing from where they fasten to the car. Need to order them from Toyota tomorrow.Anyhow, I managed to source some tyres for the NSII's along with a set of wheel nuts, so hopefully they'll be going on tomorrow and my car will look half decent again! A couple of pics..With the random rims. Negative camber ftw!! Trial fit The brakes look awesome behind the rims in the flesh.One downside to the wheels were they they have a crap silver paint job all over, including the polished lips. But me and a mate have spent a few hours taking the paint off the lips and polishing them back up, we have half of each lip done and so far so good. More pictures tomorrow. Quote
Russleh Posted April 16, 2009 Posted April 16, 2009 u work fast like good doin. noticed u buy alot aswell. ALOT be good to see the engine in likes Quote
Sparky Posted April 16, 2009 Posted April 16, 2009 Looking awsome havent you had that little sticker a while though? Quote
Galliano Posted April 16, 2009 Posted April 16, 2009 Need an Iddy Industries sticker next The crimsons look nice though bud, should actually look quite nice on the car as they are to be honest. Quote
Jozinobi Posted April 16, 2009 Posted April 16, 2009 Nice work all round Id.Some great additions there.Joz Quote
Liam_D Posted April 16, 2009 Posted April 16, 2009 Wheels will look epicly awesome dude, u gotta remove that damn balance weight though. lol Quote
Idrees Posted April 16, 2009 Author Posted April 16, 2009 Thanks guys. No Sparky you haven't been keeping up, this is a new bonnet I have therefore new sticker. Crimsons are on. Quote
Galliano Posted April 16, 2009 Posted April 16, 2009 Look amazing mate, love it. Now just sort your rear bumper out Quote
BenV Posted April 16, 2009 Posted April 16, 2009 please keep tese ones bud they look awesome on herhow did you get the negative camber? did you take it somwhere to get it all lined up? Quote
Idrees Posted April 16, 2009 Author Posted April 16, 2009 Thanks guys. Yeah the bumper will be painted when I can be bothered, but around now I really can't be arsed!The camber was done with the coilovers where they bolt to the hub it can be adjusted. I still need to get the geometry done when I have more money. Quote
Liam_D Posted April 17, 2009 Posted April 17, 2009 Dude you have gotta keep these ones, they look amazing!!! Quote
Idrees Posted April 18, 2009 Author Posted April 18, 2009 Thanks guys. I definitely want to keep this set Sparky two sets can't do much harm, I'd still keep these. Quote
Nanglebadger Posted April 21, 2009 Posted April 21, 2009 dude....that is totally lush!!!! she looks absolutely fantastic! everytime i get online u have new wheels lol!!! they look great mate!!!great work, simple as that!Phil. Quote
rob_bower Posted April 25, 2009 Posted April 25, 2009 wows sparco's look awesome idrees top work as always!!! Quote
Idrees Posted April 26, 2009 Author Posted April 26, 2009 Cheers Rob. Bought myself some new parts.TRD engine mounts that have done just a few miles. I had ordered the Powerflex but changed my mind to these because I didn't fancy all the rattles from the poly!A lovely blue cooling panel.GReddy oil cap.And a few other things I've done..FTE sump down to bare metal..and painted.Fitted the magnetic sump plug on it too.Cleaned up the inlet manifold (pic was taken half way though) I will polish it more and refit with a new gasket.Painted the Whiteline rear ARB.And finally, today I fitted my GReddy FMIC.Before: A big empty hole.Mocked up with some mesh to cover it up.Bolted on.I modified the brackets too, pushing the cooler as far back as possible.Cooling panel.My turbo plans have slightly changed too, but nothing that I'm revealing! Time for this face... :thumbsup: Quote
Galliano Posted April 26, 2009 Posted April 26, 2009 More of the blue, the blue looks lush Can't wait to see it all together now Quote
Idrees Posted April 26, 2009 Author Posted April 26, 2009 Hehe plenty to more blue to come, I love it too!And yep this has really got me going too, engine will be dropped in soon I hope. Well, when I've gathered a lot of parts that I need. Quote
Sparky Posted April 27, 2009 Posted April 27, 2009 I am undecided on all the blue tbh dude, but its the same colour as the emanage so can see what your doing :thumbsup: Quote
SiCaln Posted April 27, 2009 Posted April 27, 2009 lovely updates thanks man, you're heading in a good direction here Quote
Iwan Posted April 27, 2009 Posted April 27, 2009 A little question if you don't mind.Why do you need such a large FMIC for a N/A powerplant?, i'd understand if it was a turbo or an engine producing very high tempratures.Thanks, Iwan Quote
Nanglebadger Posted April 27, 2009 Posted April 27, 2009 dude....u just continue to impress me with your work each and everytime!!!!top notch!Phil. Quote

Recommended Posts
Join the conversation
You can post now and register later. If you have an account, sign in now to post with your account.