Browner Posted February 19, 2014 Author Posted February 19, 2014 It's ha enough to handle as it is due to the short wheel base... It's like a spinning top! LolDon't think running that power would be advisable lol Quote
littlegreenmonster Posted February 21, 2014 Posted February 21, 2014 Jesus Christ Connor I saw a visor of this ages ago and thought it was foreign or something !!!! DID NOT KNOW YOU OWNED IT !! What an absolute animal man !! I want and I want now Quote
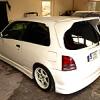
Browner Posted February 21, 2014 Author Posted February 21, 2014 Yeah it's came a long way from this... To this! Quote
littlegreenmonster Posted February 21, 2014 Posted February 21, 2014 On a serious note is the engine the normal way or have you had to mount it the same way as a supra ?? (can't remember the names its transverse and something else ) or is it 85 running gear ??Oh and are you at japfest this year?? Quote
Fozzie Posted February 21, 2014 Posted February 21, 2014 On a serious note is the engine the normal way or have you had to mount it the same way as a supra ?? (can't remember the names its transverse and something else ) or is it 85 running gear ??Oh and are you at japfest this year?? Transerve and longitudinal buddy And I think the spec is something of a secret haha Quote
littlegreenmonster Posted February 21, 2014 Posted February 21, 2014 That's the one !!! I can't remember what one is what either tbh but from the names I can peobz figure it out lol:P and wouldn't supprise me lol its an animal though Quote
Fozzie Posted February 21, 2014 Posted February 21, 2014 That's the one !!! I can't remember what one is what either tbh but from the names I can peobz figure it out lol:P and wouldn't supprise me lol its an animal though Transverse is when the engine is mounted across the car, with the crankshaft running perpendicular to the direction of travel, longitudinal has the engine mounted lengthways in the bay, like a supra Quote
morgey Posted February 22, 2014 Posted February 22, 2014 (edited) Longitudinal can also be called inline. Aka rb26's and 2jz's are called inline 6's Edited February 22, 2014 by morgey Quote
Fozzie Posted February 22, 2014 Posted February 22, 2014 Longitudinal can also be called inline. Aka rb26's and 2jz's are called inline 6'sI thought inline was referring to the fact the cylinders are inline rather than the engine? :/ Quote
Browner Posted March 6, 2014 Author Posted March 6, 2014 Well guys I've been mental busy with Starlets and parts the past few weeks so finally got time to get this sorted in good time for Japfest.I blew the engine before Christmas doing rings (it died happy!)Can't understand it really the engine never overheated and was full of oil when it went. The bottom end started knocking slightly. I think it was all the oil going to one side of the sump whilst doing rings so I think a baffled sump is in order.After looking quite a while I finally got my hands on a very good replacement engine with very good compression across all four cylinders. With great difficulty the car was eventually on the ramp ready for it's new heart transplant. The low kit, especially the sideskirts are a pain to get on to a ramp without damaging them. She's ready for the off... A good friend of mine car over and took the engine out with me...The dead 4efte...I'm not taking any chances with one and want it to be right so I went and got:Brand New Genuine Toyota Oil PumpBrand New Genuine Toyota Water PumpBrand New Genuine Toyota Timing BeltBrand New Genuine Toyota Crankshaft Oil SealsBrand New Genuine Toyota Oil FilterGenuine Toyota Red Coolant10w40 OilNew Blue Magnetic Sump BungWhilst the engine is out I am going to fit a complete blue engine hose kit.I am also fitting a blue adjustable cam gear and brand new clear timing belt cover.I picked up this cool Zisco manifold today which is almost new...I also picked up a brand new clutch kit. I opted for an OE spec clutch again as it was lovely to drive with and easier to control when doing rings than a jumpy paddle clutch.Whilst I have the box apart I was thinking of fitting a ZEP Racing lightweight flywheel but I am worried it might make the car too revvy. I will decide on this in the morning when the engine is going back together.I also have a Tongs hybrid CT9 turbo here which I think I will fit also.More updates and more pictures tomorrow as work progresses.Regards,Conor. Quote
Browner Posted March 7, 2014 Author Posted March 7, 2014 Well what a day!Only got back from the shed very late last night but after a day of headaches, bleeding knuckles, frustration, several tantrums, "why won't it fit" and around 400 cigarettes later the engine is in and running! It was an absolute pig of a job but it's in now so happy days.It took a lot longer than expected because I basically completely lost the plot with the car when we were putting it back together! (It's dangerous having a well stocked shed full of rare performance parts when you are rebuilding a car!) haI started off by cleaning the engine bay before the new engine went in...New OEM timing belt kit, water pump, ancillary belts etc fitted with new clear timing belt cover. All timing set to a tee... The bottom timing belt cover was damaged so this was replaced with a mint one also...I decided that while I was at it I would try the ZEP lightweight flywheel in her whilst the gearbox was off. The flywheel guard had to be changed anyway. The weight difference between the ZEP flywheel and the standard flywheel was very noticeable.New flywheel guard, ZEP lightweight flywheel and new clutch kit all bolted up...I had a brand new engine polybush kit here so while we were at it that was fitted also. The mounts were polished before fitting. The front gearbox mount and engine mount were okay but to do but the rear gearbox mount was a little pig! After over an hour of thumping it with a hammer and chisel and cutting away with a hacksaw the old mount was out and replaced with a new polybushed version.I just got in this mint Tongs hybrid CT9 Turbo. The turbo is in excellent condition no shaft play, no wet seals and what's more the wastegate is absolutely mint as you can see belowThis was matched with the Zisco CT9 manifold which I really like!We made some custom Intercooler piping with matching blue hosing so the HKS Dumpvalve was visible just behind the Tom's grill when fitted. However the flange for the hotpipe wouldn't fit with the Zisco manifold so we had to notch the hotpipe flange slightly so it would fit with the new manifold.This is how it sits now. The Intercooler piping is visible behind the grill.The current rad doesn't sit great so I am going to replace it with a brand new one with a slimline fan and nice mounting kit. It rang like shit with the Magnecore leads on but I replaced them with standard leads to check and it ran perfect. The ICV was sticking causing it to run very lumpy so this was also replaced.There's a few small bits to tidy up today and then it's time to re-fit the bumper, grill and bonnet. More updates soon! Browner Quote
pick1 Posted March 7, 2014 Posted March 7, 2014 ^^^^^^ that pic ooooooffffffft god I love the way that motor looks kudos sir Yeah it's came a long way from this... To this!Awsome transformation Quote
yaristurbo Posted March 7, 2014 Posted March 7, 2014 Good work man got your snap chat, tick took on jap fest Quote
Darraghmh91 Posted March 8, 2014 Posted March 8, 2014 nice work there browner .. goin balls out on the car latly but worth every bit of it Quote
AlancEP82 Posted March 12, 2014 Posted March 12, 2014 looking savage man,black indicators look mint Quote
Browner Posted May 1, 2014 Author Posted May 1, 2014 Well lads the panic to have this ready for Japfest is well underway!As a lot of you know after fitting the new engine a few weeks ago I then snapped a rear half shaft drag racing down in Tullow (This car loves giving me shit lol)Anyway I tred everywhere for a half shaft and couldn't source one. I went to Toyota but they were discontinued. I tried to source one for breaking and couldn't so I bought a complete 5 door ep85 4WD Starlet just for the shaft...expensive fix but this car was going to Japfest and that was that!The old half shaft was removed and it was broke in 3 pieces... I don't do things in half measuresThe all important diff was fine thank god The replacement shaft was removed from the 5 door ep85 and... disaster! The half shafts were different! Back to square one and a pointless purchase of a full car just for the shaft! Not to worry...I removed the half shaft from the red 4WD drag car for the time being and thankfully it was the same shaft. I am going to get uprated shafts machined for the drag car.The new half shaft was fitted and the car was driving again... Phew!The rear diff oil was drained and replaced with Fuchs 90LS LSD Diff Oil.Still loads to do but getting through it... We made good progress yesterday and will be working on the car again today.First on the to do list was fit a brand new set of Meister r EP85 specific coilovers...Next on the list was change the drivers side hub as the wheel bearing was gone. The old hub was replaced with an EP82 non ABS hub which fitted fine. Everything was tightened up and the wheel put back on but when we put the car on the ground the tracking was out a mile on it. Back off with the hub only to find the one we took off was slightly different. The EP85 hubs must be different to the ep82? Can anyone help with this as I am a bit stuck now so will probably have to go down to Toyota to try and sort this and order the correct part which will be cutting it very fine for Japfest.Next up was change the rad for a brand new fresh one and see about fitting it flush with the top of the front panel. The old rad sat up past it and vibrated very badly. In went the new rad and it wouldn't fit... It was hitting the Intercooler piping causing it to sit up too high. We tried running the Intercooler piping in different ways but the side exit exhaust made it next to impossible. In the end we fabricated this custom made intercooler piping which just about gives us enough room to fit the new alloy rad and slimline fan...The rad was held securely top and bottom with a half rad mounting kit which was very tidy. They needed slight modding to fit with the exhaust and intercooler piping. I fitted a rubber grommet to the top bracket to absorb a slight rattle while the engine was running.All fitted:In with a new blue battery to match the bay and also a brand new blue alloy rad stay...The front bumper is off and gone for paint to tidy up a couple of tiny stone chips that were bugging me.While it was off it was time to fix the intercooler. The intercooler always sat a bit crooked previously so that was next to be addressed. I hated it in some pics. (Yes I'm an anal bastard lol)Some adjustment on the hoses and a bit of "gentle persuasion" lol soon had it sitting level again I also fitted my newly polished Carbing front strut brace...The engine bay as it currently sits...This polished billet power steering reservoir arrived last night and will be fitted today...I am going to buy a catch can and braided breather hosing today also. I also need longer blue hosing to reach the radiator fromh the expansion bottle.The next piece of the puzzle I am stuck for is rear boot plastics. Mine are cut for a Cusco rear strut brace and I also need the housing which holds the parcel shelf so I can fit my optional extra Toyota Livesounds parcel shelf. Does anyone have a clean set of these?Once that is done I need to fit new speakers, optional extra Toyota tweeters and a new radio (I am looking out for a Toyota radio / CD player). Recaro doorcards have then to be fitted.I must then modify the passenger side Recaro rail to suit the ep85 floor and fit new belt buckles to both seats as they currently have none.Once all that is done then a full valet and bodywork detail and hopefully she arrives in the UK safely!It will be a fun drive over! Quote
kevmcc90 Posted May 1, 2014 Posted May 1, 2014 First time I've read this mate. I love it! Great work. Quote
Mikeyallgood85 Posted May 1, 2014 Posted May 1, 2014 I love this car this would be the one from your collection that I'd love to own! One of a kind Quote
daniel_g Posted May 1, 2014 Posted May 1, 2014 Love this build Conor, by the way i think the rear boot plastics might be different on the 85 because the boot floor seems higher up. Didnt know the hubs were different either thats something to watch out for then. Quote
lew777 Posted May 1, 2014 Posted May 1, 2014 Good call on the coil overs that ride height was in desperate need. Quote
Billy SR Posted May 1, 2014 Posted May 1, 2014 shorty tries to sell his 5 door 85 for ages and the minute he decides to keep it someone goes and buys one haha Quote
Jamie_VF22 Posted May 1, 2014 Posted May 1, 2014 This looking awesome conor can't wait to have a nose at it at japfest Great build Quote

Recommended Posts
Join the conversation
You can post now and register later. If you have an account, sign in now to post with your account.