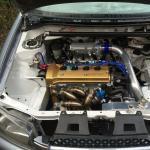
RobSR Posted April 3, 2014 Share Posted April 3, 2014 (edited) So, the other day i decided to go and buy another Starlet. Got it as a little run around whilst the track car is being built with my brother. Got it for a pretty good price seeing as its an SR.. she is a little leggy with a fine 217k miles on, however its got years of Toyota history from day one. Engine runs sweet, however i wasn't going to expect a totally perfect car.. A few pics once home. First thing was to give it a good wash down, the paint looks fine in the pics, up close, its not great as its abit swirly, but a detail will get it all back. That'll be happening in a few weeks. The ole boy before decided at some point to fit some 'rally style' fog lights..the brackets clearly had to go Engine bay, needs a good tidy. Cant have a messy bay. The Classic noob error, needs to be swapped around The next hilarious find..One KYB SR special on the left...Standard on the right...Nice one ! As you can see from those pics its had some neglect underneath, a serious amount of mud a little rust, so that was the first thing i set about sorting. Make it clean underneath and mechanically. Then worry about everything else. One of the first pics starting to attack the rust. Thankfully its only surface, so started taking it back to the bare metal to re-coat Further progress, stripped, zinc primed, stone chipped and painted. A damn site better and will provide future protection. Got the one side done, will attack the other this weekend. Then onto the front, then engine bay! I would of liked to keep the SR stickers however they were so faded they had to go..Sorry guys. More updates after the weekend I'm guessing! Edited August 6, 2014 by RobSR Quote Link to post Share on other sites
scutch0 Posted April 3, 2014 Share Posted April 3, 2014 Good job!Can't wait to see it! Quote Link to post Share on other sites
RobSR Posted April 4, 2014 Author Share Posted April 4, 2014 Indeed! You'll have to pop by afterwork one evening! Quote Link to post Share on other sites
RobSR Posted April 5, 2014 Author Share Posted April 5, 2014 Nothing to exciting to report just yet.. Made some more progress today.. Mainly swapping the rear shocks and prepping the other arch for stone chipping.. If anyone doesn't know this spanner trick you will be forever grateful..saved myself a lot of times! The reason why the rear end was all out of whack.. Spring off! Standard shock on the left wouldn't rebound atal.. Springs on replacement shocks fitted up on the ride hand side..Hopefull the backend will be all freshened up and finished tomorrow.. Quote Link to post Share on other sites
Aamir Posted April 5, 2014 Share Posted April 5, 2014 Was looking at this myself but the mileage put me of. Good progress though mate Aamir Quote Link to post Share on other sites
RobSR Posted April 5, 2014 Author Share Posted April 5, 2014 (edited) I thought it would of a lot of people which is why the price was what it was.. The body doesn't show the miles it has on it apart from abit of surface rust, which could happen to any EP regardless of miles. The engine still runs sweet as a nut, but i have a spare anyways, and lets be honest, an FTE will be in there within the next year! Edited April 6, 2014 by RobSR Quote Link to post Share on other sites
ro55ifumi Posted April 6, 2014 Share Posted April 6, 2014 Nice start and good to see you have found the love for starlets again look forward to seeing this progressJohn Quote Link to post Share on other sites
Bluebear Posted April 6, 2014 Share Posted April 6, 2014 Ooooh! Quote Link to post Share on other sites
Nanglebadger Posted April 7, 2014 Share Posted April 7, 2014 great to see u in another EP dude!!!! some fine progress and restoration going on so quickly as well! Keep it up! Phil. Quote Link to post Share on other sites
Socks Posted April 7, 2014 Share Posted April 7, 2014 Quality Stuff! Good man to tackling the car and saving it! Quote Link to post Share on other sites
Jamie93DLZ Posted April 7, 2014 Share Posted April 7, 2014 Cracking looking car for the miles, whats the sills like? Mine wasnt great with 114 on it Quote Link to post Share on other sites
Starlet-Joshy Posted April 7, 2014 Share Posted April 7, 2014 looking good mate! Glad someone's giving it the tlc it needs Quote Link to post Share on other sites
maddox710 Posted April 7, 2014 Share Posted April 7, 2014 Because rally car!! How did it handle with the funky suspension setup? Quote Link to post Share on other sites
Lukee Posted April 7, 2014 Share Posted April 7, 2014 Nothing to exciting to report just yet.. Made some more progress today.. Mainly swapping the rear shocks and prepping the other arch for stone chipping..If anyone doesn't know this spanner trick you will be forever grateful..saved myself a lot of times!The reason why the rear end was all out of whack..Spring off! Standard shock on the left wouldn't rebound atal..Springs on replacement shocks fitted up on the ride hand side..Hopefull the backend will be all freshened up and finished tomorrow..Just a tip bud, dont crack bolts loose with a ratchet spanner as it can damage the mechanism might save ya some spanners lol. Good progress look forward to more mate Quote Link to post Share on other sites
RobSR Posted April 7, 2014 Author Share Posted April 7, 2014 Cracking looking car for the miles, whats the sills like? Mine wasnt great with 114 on it They are really good! Like a tiny tiny bit of surface rust again, so ill just rub them back and stone chip them for future proofing again. Because rally car!! How did it handle with the funky suspension setup? Unbelievably it wasn't too bad, but you could see the rear alignment was well out just looking at it. Just a tip bud, dont crack bolts loose with a ratchet spanner as it can damage the mechanism might save ya some spanners lol. Good progress look forward to more mate Yea i know you've gotta be careful, but i have never broke a ratchet spanner in 5 years of starlet fettling! Quote Link to post Share on other sites
Matts Posted April 8, 2014 Share Posted April 8, 2014 I also travelled to see and purchase this car the first time it was listed on eBay before the auction came to an end however it was in no state for me to be happy to buy it! Glad you are restoring it to what it should be. Not many left around. Quote Link to post Share on other sites
RobSR Posted April 8, 2014 Author Share Posted April 8, 2014 It was just abit tatty thats all, nothing major and easy fixes. Backend is now all done with matching shocks, will tackle the front and put the matching springs on. Rear bumper, bonnet, front bumper and lip are being resprayed next week. Wheel refurb then the exterior will be basically done! Happy days. Quote Link to post Share on other sites
Si@Fiske Posted April 15, 2014 Share Posted April 15, 2014 (edited) Just a tip bud, dont crack bolts loose with a ratchet spanner as it can damage the mechanism might save ya some spanners lol. Good progress look forward to more mate think they are lifetime guarantee mate.... for whatever its worth Edited April 15, 2014 by fishy89 Quote Link to post Share on other sites
RobSR Posted April 18, 2014 Author Share Posted April 18, 2014 (edited) Managed to get a few more hours in on the car this morning. Made some reasonable progress. The car finally has matching suspension, and all the arches are stone-chipped/undersealed. I got some Glanza skirts the other week for her so i set about bonding those on, aswell as a TTE lip from idress, so got that fitted aswell. Car is still covered in desert dust, so excuse the state of it! Bonnet and bumpers can now be painted this week. Was meant to be happening last, but i miss judged how long the lip would take to turn up! A couple of pics.. Next on the agenda is tidying up the engine bay. Quite happy with the height its sitting at now.. Being a bender with some "scene tape" holding the skirt in place whilst the adhesive was going off. Its screwed in either end aswell, but a bit of tiger seal won't go amiss. Front lip bonding on.. and a pic loosely offered up to the bumper..(yes excuse the dirt) Not really sure whats next, finish tidying it up, a detail then probably new poly bushed lower arms, new FARB, and RARB.. Edited April 18, 2014 by RobSR Quote Link to post Share on other sites
ryan lang Posted April 18, 2014 Share Posted April 18, 2014 looks like it needed rescuing ever more tempted to get another but i know i shouldnt haha Quote Link to post Share on other sites
RobSR Posted April 18, 2014 Author Share Posted April 18, 2014 Oh it did indeed lol. It'll be clean example again soon enough Ha you should, i have missed working on them. Quote Link to post Share on other sites
Starlet-Joshy Posted April 18, 2014 Share Posted April 18, 2014 Updates are good buddy!, Liking the care for it Quote Link to post Share on other sites
Rich-k Posted April 18, 2014 Share Posted April 18, 2014 What a beauty! Quote Link to post Share on other sites
RobSR Posted April 19, 2014 Author Share Posted April 19, 2014 Cheers boys, its not a beauty just yet...give it another month and it should be there Quote Link to post Share on other sites
Si@Fiske Posted April 19, 2014 Share Posted April 19, 2014 love dat progress........ Quote Link to post Share on other sites

Recommended Posts
Join the conversation
You can post now and register later. If you have an account, sign in now to post with your account.