The Toffinator Posted August 14, 2013 Author Posted August 14, 2013 (edited) Take a look here bud http://www.toyotagtturbo.com/forums/showthread.php?35344-Con-Rods-Gt-V-Glanza-Pix&highlight=glanza Nothing in conrete, but I don't think it's the rods themselves to blame, I think its something to do with the big ends, either poor oil supply, spun bearing, or just the fact the journals aren't all that wide and being able to spread the load efficiently. If you get the time pull the engine apart and do a bit of CSI on it Exactly what me and my dad are thinking. Im thinking its span a bearing due to something, If it was mega high load in a high gear i would possibly think rod failed, Im thinking at the moment a rod bolt failed or it spun a bearing when the torque came in. And yeh i will be stripping it down when i have the new engine sorted! Edited August 14, 2013 by The Toffinator Quote
The Toffinator Posted August 14, 2013 Author Posted August 14, 2013 Finally got the head a little bit better tonight, semi polished up with autosol will finish it tommorow to a mirror finish, A lot better anyway. Will take it back in for cleaning at work when its done Rest of the parts for the engine build should be ordered tommorow so i can crack on with getting the engine assembled!Also picked up some 3SGE Pink injectors so they should be ideal for the 5E For now before im running mega power,as my standard ones where at about 90% Duty at times! Few more pics anyway Injectors TT Quote
maddox710 Posted August 14, 2013 Posted August 14, 2013 Nice fuel rail dude I was thinking about smoothing mine off, what cc are the 3sgte injectors? I've just got some nicely polished 460's of lew for my build Quote
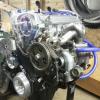
The Toffinator Posted August 18, 2013 Author Posted August 18, 2013 Nice fuel rail dude I was thinking about smoothing mine off, what cc are the 3sgte injectors? I've just got some nicely polished 460's of lew for my build Finally finished it mate, takes the piss mind lol. And they are 330s, They are 3SGE. I also have some of the 390cc Green ones if these are no good. Cracked on with a removing stuff today ready for refurbing/polishing etc etc And found another hole in the block along the way lol All the bits are ordered up courtesy of idrees, Should be one hell of a bottom end on this engine when its done! Here are a few pics Looking sorry for itself Before the stripdown Turbo Kit removed. Ideal time to fully port and enlarge everything on it while its off, Polish it all up also:) See anything wrong here? Took the rocker off and found this on the cam also?? Lovely hole in the block also How i left it this evening Also finished the fuel rail, and the porting and polishing of the head Also ordered an adjustable camgear (CJ Performance one), and once the engine bits arrive the block, crank, pulley, flywheel and clutch are off to the machine shop to be balanced and hopefully a nice lightweight flywheel to be machined (Same as the JAM Ones) Plenty to be getting on with!! TT Quote
AdamB Posted August 19, 2013 Posted August 19, 2013 That pic with the cam lobe, most tend to have slight nicks, but that does seem a little excessive. Probably won't be doing anything good to the duration on that valve. Quote
The Toffinator Posted August 20, 2013 Author Posted August 20, 2013 That pic with the cam lobe, most tend to have slight nicks, but that does seem a little excessive. Probably won't be doing anything good to the duration on that valve. I know i have no idea where it came from either Engine is nearly out now, Only basic stuff holding it in now really And also started on making this... Pain in the arse to do but will be worth it! Thanks Quote
akyakapotter Posted August 21, 2013 Posted August 21, 2013 Cam cover looks mint what did you use to do that ? Quote
Broony Posted August 22, 2013 Posted August 22, 2013 good job on chucking a rod lol, musta know you were cheating on it with a 5e hahaha! keep up the good work mate!! Quote
The Toffinator Posted August 23, 2013 Author Posted August 23, 2013 Cam cover looks mint what did you use to do that ? Thanks mate, And painstakingly with a dremel and a carbide bit lol... Need to flat it off a fair bit more then get the wet and dry on it, then some polish! good job on chucking a rod lol, musta know you were cheating on it with a 5e hahaha! keep up the good work mate!! Lmao i know proper job:/ And haha you know me ;) Do it once do it properly and all... All the engine parts arrived from ID Workz yesterday, so the block crank and everything rotating is off to machine shop to be polished, statically and dynamically balanced and a Lightened flywheel machined TT Quote
shorty Posted August 23, 2013 Posted August 23, 2013 Mate thats rotten luck on the 4e :(still least you should have a 5e in there soon enough Quote
The Toffinator Posted August 30, 2013 Author Posted August 30, 2013 Mate thats rotten luck on the 4e :(still least you should have a 5e in there soon enough I know i wouldnt have minded so much if it happened a bit later but i still need a few bits for the build, will be pushed for money and i refuse to cut any corners when doing it! Car is having the full front end stripping down, struts brakes etc. All the ABS Sensors and charcoal filter, and anything else is being removed and the loom shortened, tucked and retaped/tidied up as im going along. Still need to source a crank pulley and having a nightmare! TT Quote
The Toffinator Posted September 5, 2013 Author Posted September 5, 2013 Engines been dropped off at the machine shop along with everything that rotates to be checked, Lightened and dynamically balanced, they are also building me a lightweight flywheel.Engine is out of the car, and got a few more photos of the damage...I Have spent a few hours on the bay mainly removing the ABS, Redundant loom, relocating and tucking a few bits, removing the charcoal filter, and giving it a damn good clean, just needs a polish next! Looks a million times better i thinkI also spent a while rewiring and retaping every inch off the loom, Absolute pisstake but looks alot neater than factory shit wiringAlso cut the front panel and support out, and made a custom alloy one. Plans next are to finish off the bay, Repaint all the arches and everything exposed, Finish off the engine and once its all painted drop it in, Then when its ran in a decent ECU And a good map for 1.5Bar on the VF24. Should see 340 Odd HP at max effiency but we will see. Give it a major porting also which should help with the top end! So far every single gasket face, manifold, turbo etc etc (Basically anything that flows, even the bottom end oil ways and into the head) Has been ported and gasket matched/Polished. There is a decent step into the manifold now i have worked that also. Many hours have been spent but hopefully i will have an amazing fully blueprinted engine by the time its finished, which i have never really seen done before!Very anal i know but do it once do it properly i suppose... Anyway here are a few photos Bay before Bay after Turbo After a good clean and polish/port Engine damage lol Thanks for looking! TT Quote
maddox710 Posted September 5, 2013 Posted September 5, 2013 Engine bay looks loads cleaner, what did you use some. Rubbing compound?? Quote
The Toffinator Posted September 5, 2013 Author Posted September 5, 2013 Bit better isnt it, That first photo is after a good pressure wash too! I used a bit of gunk and a pansponge/brillo pad. Still needs a polish though i tried a little area and it came up like new so i will soon see! Quote
dazzi0 Posted September 10, 2013 Posted September 10, 2013 I wanted mine cleaning inside bay but my lumps just been dropped in dirty Quote
The Toffinator Posted September 10, 2013 Author Posted September 10, 2013 I know daz its a shame they didnt tidy the bay before dropping it in, among other things but im saying no more... Finished off the Custom alloy front panel, and started polishing the whole bay and relocating yet more bits yesterday (Map sensor AVCR Sensor etc) Hopefully by the time the engine is in the whole front from the doors forward will be either new/Reconned or rebuilt and cleaned/painted TT Quote
jimlols Posted September 20, 2013 Posted September 20, 2013 I know for a fact this needs updating! Quote
The Toffinator Posted September 21, 2013 Author Posted September 21, 2013 Looking good here Toff Thanks matt appreciated mate.And i know yes updates to follow shortly of the refreshed and semi tucked bay!TT Quote
The Toffinator Posted September 29, 2013 Author Posted September 29, 2013 Another little update...Finally finished porting and polishing the cylinder head and lapped the valves in, Fitted the 4EFTE Springs and retainers and refitted the buckets i had in order. All uber free and clean, just needs an airline off where its been sat on the bench then it will be going on the block!Fitted new valve stem seals while i was on alsoOn that note it should be back early sometime this week, so the race is on to get it back together with my new clear cambelt cover i have bought as well.Also got a few photos of the new R2D2 Dumpvalve, the custom front panel, the front bumper i have cut out so it fits properly now, The polished radiator and the rest of the stuff. Also the photos off the front end all polished up and painted.I am also starting on the rear arches and i have done the sills, so will be painting the rear beam etc as well as the boot floor. On that note i removed all the BASTARD sound deadening while i was on, i may as well paint the lot! Do it properly i suppose! Lapping the valves inNew valve stem seals inAll done!New SARD R2D2 Dumpvalve Rad polished upFront end of the car picsFront panelFront bumperStart of the sound deading removalFinally out, Just left a bit of tar and staining which will soon be sorted!4 Thanks for looking Toff Quote
maddox710 Posted September 29, 2013 Posted September 29, 2013 Awesome update toff, can't wait to see the next update. I can't wait to get my head of in my forged lump and get goodies on that Quote
jimlols Posted September 30, 2013 Posted September 30, 2013 Get it done and take me out in it you fucker! Quote
The Toffinator Posted October 4, 2013 Author Posted October 4, 2013 (edited) Awesome update toff, can't wait to see the next update.I can't wait to get my head of in my forged lump and get goodies on thatThanks again mate, and its horrible having to wait, just want it back but dont want to rush at the same time! And just wait till your dropping it in, excitement will probably take over me lolGet it done and take me out in it you fucker!FFS Jim i know list as long as my arm to do before i do passenger rides! Hahahha Another little update, Engine is nearly done, all balanced and machined etc just had a bit of a delay on the ACL bearings so im praying its done for wednesday, so i can have the engine back in! Car is pretty much completed ready for the engine to be dropped in. All the painting is finished which consists offFront archesFront panel/Reinforcer etc (Whole front end really)Sills and underside (All straightened out etc)Rear archesBoot floorRear beamRear hubs and calipersInterior after sound deadening removalFront hubs + WishbonesFront ARBAnd thats pretty much it, Everything bar the centre tunnel off the car has been painted, refurbed/stripped and cleaned etcSpent a few hours cleaning and regreasing the BC Coilovers and the Wilwoods, hubs and driveshafts ready for the engine to go in this weekJust waiting on the ABS removal kit, and the engine back and i can get it fitted with my TRD engine mounts into the polished and cleaned/stripped/wiretucked bay! Few photos off the process anyway... Time consuming pain in the hoop this was but worth it! Impressed by the lack of rust etc underneath all this but glad i derusted/cleaned and painted everything before it ever got in there! Also sorted the Direzzas back out and give them a quick clean, temporary Paradas on for now as im a bit skint lol... The wheels Before paint/cleaning pics After pics Also cut the front bumper out as i was sick of it making the front end look all out of place when it was stretched over the HDI Before!Fitted a cheeky plate while i was on... Thanks for looking, hopefully the next update will be a bit more serious! TT Edited October 4, 2013 by The Toffinator Quote
maddox710 Posted October 5, 2013 Posted October 5, 2013 Thats fresh paint looks amazing makes it look brand new. Them wheels are very nice suits the 98 spec Quote

Recommended Posts
Join the conversation
You can post now and register later. If you have an account, sign in now to post with your account.