mikey4410 Posted October 28, 2013 Posted October 28, 2013 (edited) sooooo,here we go with my starlet sportif build thread,got this green starlet sportif this time last year OCT 2012.i bought it for £750 with 110,000 miles on and car was in pretty good condition really.i have had a few gt turbos and i fancied something different and had always fancied a "sleeper" starlet and i new potentially this could be my "sleeper" in time.First thing i did was get a decent cat1 alarm fitted and also a tracker.I feel an cat1 alarm is the least you should have on a car.For now i wanted a nice run around car that was tidy and reliable. This time round with this starlet i wanted to go all out on handling instead of engine tuning,so i did just that.pretty much all conceivable handling mods you can do to a starlet i have done and more !!! Ihave even fabricated up adjustable rear camber on my sportif. HANDLING MODS ARE/WERE AS FOLLOWS : #23mm rear wheel spacers,12mm front spacers # polybushed wishbones # polybushed whiteline panhard rod adjustable # rear anti roll bar fully polybushed # polybushed gt rear beam with discs # polybushed drop links # engine mounts polybushed # tein master mono flex coilovers (400lbs front,250lbs rear spring rate # battery relocated to left side of boot # corner weighted car myself with 8 sets of bathroom scales (55% front 45% rear with half tank fuel) # rainsports 3 tyres on 15" steel wheels # rear camber fabricated # front yellow stuff brake pads/ mintex 1155 front brake pads #braided hel braded brake lines all round # 3D alignment costing £140 (2* camber all way round and -0.3 toe up front) # front gt strut brace # rear 3 point strut brace custom fabricated mounts (no mountings as standard uk spec) #car has 10 kgs of ballast in wheel well,aswell as still retaining the spare skinny. These things make the car handle savagely well and i did a track day at brands hatch beginning of the year and showed alot of cars up even with just 70 bhp. I learnt that braking and handling are pretty much the most important things and power comes last.After the trackday i realised how much a standard seat doesnt hold you in so i got a cheap corbeau drivers seat and made my own mounts for £3.The seat made a huge difference in everyday fast driving but i have yet to try it on a track but im sure it will hold me very well.So after the trackday and having a great base of a car that handled and braked well i thought nows the time to get it turboed. Summer came along and i got a donor car which was actually a sportif turbo itself funnily enough,but it was in an awful way.Me and me mate drove 2 half hours to see it and it was a joke. Gearbox jumped out of 5th so that was for the bin.The only thing going for it was the 170 psi per cylinder over all four cylinders. This made me just buy it and get it home just about. It had a bad boost leak and that was all that was wrong and i knew it.Took me around 100 hours to do the turbo conversion as i wanted to take me time and really get it right and bang on. Obviously i did clean and spray the engine bay and tart it all up etc whilst doing all the work. It all went well and i am currently still running the n/a gearbox.I completed the conversion at the end of june this year and i am very happy with the car now it has the best of power and handling.i am running a td04 @ 10.5 psi just below fuel cut and am very happy how it goes.recently got a nice big j-performance front mount fitted with water jet sprayers,then i stenciled on the airtech logo as i like the look of it (i know its a ford brand but i dont care)below is engine being cleaned and prepared for fitting.all bolts checked etc etcengine stand shotanother of engine in engine standengine bay fully cleaned and sprayed/tarted up throughly prepared for engine to go in.it was immaculateengine all fitted up and running.note i wasnt running an intercooler at this point as i wanted to be different and stealthy.worked very well actually.my car Edited May 23, 2015 by mikey4410 Quote
Flynn Posted October 28, 2013 Posted October 28, 2013 Ah mate! You cant tell us all that and then stick one picture up...............more, more, more! Quote
rmsnoel Posted October 28, 2013 Posted October 28, 2013 I cant see why he spent 8hours on a top secret rear camber project then wouldnt share any details and the only evidence was one photo :-( Quote
russ78 Posted October 28, 2013 Posted October 28, 2013 (edited) Good to see you finally have a build thread mikey,What happened to the pics you had up ???? Edited October 28, 2013 by russ78 Quote
snails ep91 Posted October 28, 2013 Posted October 28, 2013 (edited) Definately more info/pics on the rear camber mod pleasee Edited October 28, 2013 by snails ep91 Quote
jimmymac101 Posted October 29, 2013 Posted October 29, 2013 Come on man that's just unfair ! We need pictures lots and lots of pictures James Quote
Aamir Posted October 29, 2013 Posted October 29, 2013 I have a 3 spoke steering wheel for sale in condition if your interested mate. £25 delivered Quote
mikey4410 Posted October 29, 2013 Author Posted October 29, 2013 cars staying stock as possible looks wise.not what i am aiming for,cheers anyway Quote
Aamir Posted October 29, 2013 Posted October 29, 2013 It's a standard one from an SR nothing special Quote
mikey4410 Posted October 29, 2013 Author Posted October 29, 2013 nope,dont want anything changed looks wise mate,cheers Quote
dan106 Posted October 29, 2013 Posted October 29, 2013 Im also very interested to see how the rear camber was done, by the looks of it, chopped the stubs on and just bolted them back on? Would be interesting to see what the toe angle is! But all in all, I like how this looks! Quote
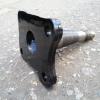
mikey4410 Posted October 29, 2013 Author Posted October 29, 2013 (edited) yeap just cut the rear stub axle of very very carefully and then spacered it out to add camber. Its currently sitting at about 2 degrees at the rear and same up front. Had the car 3d aligned at my mate neils workshop in bishops stortford. The alignment of a 3d machine is alot better than laser,more precise etc. Theres no toe in or out,just camber. And thank you very much ! Edited October 29, 2013 by mikey4410 Quote
dan106 Posted October 29, 2013 Posted October 29, 2013 yeap just cut the rear stub axle of very very carefully and then spacered it out to add camber. Its currently sitting at about 2 degrees at the rear and same up front. Theres no toe in or out,just camber. And thank you very much ! Hmm, this is really tempting haha, I need some camber to stop my scrubbing issues. Look forward to seeing this at some point, you going children in need this year? Quote
mikey4410 Posted October 29, 2013 Author Posted October 29, 2013 The difference it makes in handling is huge,back end feels planted and alot grippier.A must do in my eyes,would recommend it to any starlet owner. problem is its hugely harder than it sounds to do it,took me around 5 hours to do it properly and thoroughly and if you get the cutting wrong whatsoever you will adversely affect the handling instead of improving it.Took me nearly an hour per side to cut stubs PERFECTLY,then even then theres angle grinding to do,painting and refitting the whole axle back on the car.Its a BIG job and quite a hard one so please be aware. Yes i will be attending the C I N cruise for sure. Quote
dan106 Posted October 29, 2013 Posted October 29, 2013 The difference it makes in handling is huge,back end feels planted and alot grippier.A must do in my eyes,would recommend it to any starlet owner. problem is its hugely harder than it sounds to do it,took me around 5 hours to do it properly and thoroughly and if you get the cutting wrong whatsoever you will adversely affect the handling instead of improving it.Took me nearly an hour per side to cut stubs PERFECTLY,then even then theres angle grinding to do,painting and refitting the whole axle back on the car.Its a BIG job and quite a hard one so please be aware. Yes i will be attending the C I N cruise for sure. I dunno if you read my thread but ive been having wheel bearing issues anyway, after ive sorted them out I may look into this a bit more in depth. I know how much of a job it will be, will be the kinda thing I'll do with a spare beam aha! After all, even if its cut slightly wonky custom shims could sort any off angles couldn't they? As long as ive sorted mine out ill be down for children in need, I don't suppose you know if many starlets are going? Quote
mikey4410 Posted October 29, 2013 Author Posted October 29, 2013 probably not,just cut it bang on in the first place,aslong as u take ure time you will do it right for sure. there is a children in need thread started by russ78 i am sure Quote
mikey4410 Posted October 30, 2013 Author Posted October 30, 2013 ahh thanks for the kind comments under bonnet pics coming soon...... Quote
Turkish91 Posted October 30, 2013 Posted October 30, 2013 I find it hard to believe that a shit load of negative rear camber is going to make the car handle better?Otherwise, car looks good. Proper sleeper! Quote
mikey4410 Posted October 30, 2013 Author Posted October 30, 2013 (edited) camber AND alot of setting up of handling mods make the car handle. camber makes a huge difference, and cheers Edited October 30, 2013 by mikey4410 Quote

Recommended Posts
Join the conversation
You can post now and register later. If you have an account, sign in now to post with your account.