RobSR Posted May 19, 2015 Author Share Posted May 19, 2015 Did some more on the car today Bulkhead drilled for rear brake line that will be going to an adjustable bias valve inside next to the driver. HEL Performance kindly sorted me out with a custom line. IMG_1305 by Rob Fisher, on Flickr IMG_1303 by Rob Fisher, on Flickr Started removing surplus wires from the front headlight loom in preparation for moving the fusebox..always fun! IMG_1307 by Rob Fisher, on Flickr Nicely reduced!IMG_1308 by Rob Fisher, on Flickr Fun Fun!IMG_1309 by Rob Fisher, on Flickr Labelling wires upIMG_1310 by Rob Fisher, on Flickr IMG_1311 by Rob Fisher, on Flickr IMG_1314 by Rob Fisher, on Flickr Nice little pile surplus to requirements!IMG_1315 by Rob Fisher, on Flickr Extending wires from front of the fusebox so it can be mounted inside under the dash..All individually soldered and heat shrinked.IMG_1317 by Rob Fisher, on Flickr IMG_1318 by Rob Fisher, on Flickr IMG_1321 by Rob Fisher, on Flickr IMG_1322 by Rob Fisher, on Flickr Who doesn't love stickers haha? Not sure ill keep em there..looks alright i suppose!IMG_1324 by Rob Fisher, on Flickr Quote Link to post Share on other sites
_shaun_ Posted May 19, 2015 Share Posted May 19, 2015 good to see your keeping the high standards up! fuse box tucks awlays joyfull ha! mine went really well apart from losing my windscreen washer wiring somewhere along the lines had to make my own up! the route the wires take is absolutely mental isnt it! Quote Link to post Share on other sites
RobSR Posted May 19, 2015 Author Share Posted May 19, 2015 Cheers bud! Haha if you think the routing on thats bad...strip down the dash loom, now that is some weird routing lol! Quote Link to post Share on other sites
_shaun_ Posted May 19, 2015 Share Posted May 19, 2015 aye ive striped one before ha! its pretty impressive when you think how much R&D prob went into that loom just how much wire is actauly wasted. i supose theres likely reasons like plugs for optional extras and what not that contribute and works out cheaper to make one loom that all the different variations but still seems a waste id hate to see the inside of a modern car loom with all its extra electrical systems! Quote Link to post Share on other sites
jellybaby Posted May 20, 2015 Share Posted May 20, 2015 Cheers bud! Haha if you think the routing on thats bad...strip down the dash loom, now that is some weird routing lol!IAgree on that did mine got rid of all the abs gunk but did fancy the challenge ofDoing a tuck but I just cba lol Quote Link to post Share on other sites
RobSR Posted May 20, 2015 Author Share Posted May 20, 2015 Haha indeed. I've got all the interior to do on mine again.There is a lot of surplus wires when there's no heater matrix etc ! Quote Link to post Share on other sites
Ryan5793 Posted May 20, 2015 Share Posted May 20, 2015 Nice work Rob Wanted to take things out of my loom when doing the conversion but didn't know what I would and wouldnt need so left it alone ha Quote Link to post Share on other sites
RobSR Posted May 20, 2015 Author Share Posted May 20, 2015 Cheers bud!Haha yea it's a tricky one. Thankfully I've never mucked one up! ... Yet... Quote Link to post Share on other sites
jellybaby Posted May 20, 2015 Share Posted May 20, 2015 Did u just trace the wires to the fuse box from the connectors in the engine bay ?? Quote Link to post Share on other sites
RobSR Posted May 20, 2015 Author Share Posted May 20, 2015 Essentially yes, some are spliced so that can be abit more difficult! Quote Link to post Share on other sites
jellybaby Posted May 20, 2015 Share Posted May 20, 2015 Ah fair enough I did that with the abs crap in the engine bay to the fuse box then cut the wires and removed the fuses lol. I reckon I will chop out all the air con crap next as that went ages ago lol Quote Link to post Share on other sites
jellybaby Posted May 20, 2015 Share Posted May 20, 2015 Ah fair enough I did that with the abs crap in the engine bay to the fuse box then cut the wires and removed the fuses lol. I reckon I will chop out all the air con crap next as that went ages ago lol Quote Link to post Share on other sites
akyakapotter Posted May 20, 2015 Share Posted May 20, 2015 Ah fair enough I did that with the abs crap in the engine bay to the fuse box then cut the wires and removed the fuses lol. I reckon I will chop out all the air con crap next as that went ages ago lolI wanna do that but I'm scared I'll cut things that are needed lol Quote Link to post Share on other sites
RobSR Posted May 20, 2015 Author Share Posted May 20, 2015 Just give it ago! Whats the worst that could happen lol End of the day it'll cost you about 30 quid to buy another loom from a breaker. Quote Link to post Share on other sites
mitsuruki Posted May 21, 2015 Share Posted May 21, 2015 wow thats what i call dedication nice engine bay man details woot Quote Link to post Share on other sites
RobSR Posted May 24, 2015 Author Share Posted May 24, 2015 ^ Thanks man Quote Link to post Share on other sites
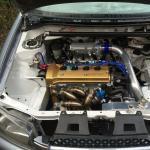
RobSR Posted June 10, 2015 Author Share Posted June 10, 2015 Biggest update yet i suppose! Got the lump back in last night..and got a few other bits done. Pics below Refreshed inlet on:IMG_1434 by Rob Fisher, on Flickr New injector seals to go in with the polished rail:IMG_1438 by Rob Fisher, on Flickr Cleaned and painted box:IMG_1442 by Rob Fisher, on Flickr Brackets/mounts back on:IMG_1443 by Rob Fisher, on Flickr Going back in!:IMG_1445 by Rob Fisher, on Flickr Offering up the ORC flywheel:IMG_1446 by Rob Fisher, on Flickr Don't have a tool to lock out the flywheel? No bother!:IMG_1447 by Rob Fisher, on Flickr Some general pics of it back in..happy with how its starting to take shape Ignore the head cover - wanted to get it back in before sending it off to have the fittings done and painted so i didnt ruin it! IMG_1454 by Rob Fisher, on Flickr IMG_1456 by Rob Fisher, on Flickr IMG_1457 by Rob Fisher, on Flickr IMG_1458 by Rob Fisher, on Flickr IMG_1459 by Rob Fisher, on Flickr IMG_1460 by Rob Fisher, on Flickr IMG_1461 by Rob Fisher, on Flickr IMG_1465 by Rob Fisher, on Flickr Next up to finish the fuel setup and rear brake lines! Quote Link to post Share on other sites
_shaun_ Posted June 10, 2015 Share Posted June 10, 2015 looking clean as ever! only one thing that bugs me is your clutch fork ha! only thing that doesnt look 100% prestine Quote Link to post Share on other sites
RobSR Posted June 10, 2015 Author Share Posted June 10, 2015 thanks mate..Haha maybe ill have to touch that in then! Quote Link to post Share on other sites
_shaun_ Posted June 10, 2015 Share Posted June 10, 2015 ha its always the small details! am currently fitting the last of my parts to get it running mechanicaly bang on for this year then over winter its getting all removed to have everything painted and polished just mental how much time it takes to put into something to get it to that level for someone just to look at it and go aye thats pretty clean! Quote Link to post Share on other sites
RobSR Posted June 10, 2015 Author Share Posted June 10, 2015 Haha yea for sure..it is time consuming, and i don't have a lot of time to work on it so not ideal! Quote Link to post Share on other sites
Calum122 Posted June 10, 2015 Share Posted June 10, 2015 Mate this looks awesome! Quote Link to post Share on other sites
RobSR Posted June 10, 2015 Author Share Posted June 10, 2015 Mate this looks awesome! Thanks bud Quote Link to post Share on other sites
davies700 Posted June 11, 2015 Share Posted June 11, 2015 cant wait to see this finished now Quote Link to post Share on other sites
Nanglebadger Posted June 11, 2015 Share Posted June 11, 2015 inspirational work as always sir!!!! very enjoyable read seeing this come together! Cleaner than showroom spec!!!! Phil. Quote Link to post Share on other sites

Recommended Posts
Join the conversation
You can post now and register later. If you have an account, sign in now to post with your account.