Claymore
-
Posts
660 -
Joined
-
Last visited
Content Type
Profiles
Forums
Wiki
Media Demo
Events
Everything posted by Claymore
-
All sorted, pics showing. I'm fine with the lights they're an upgrade from stock which is a 👍. Lexus style lights are ricey (if people remember them!) I think they're actually Glanza 98 spec rear lights (grey plastic, bubble lenses) as opposed to starlet reflet lights (red plastic, bubble lenses)? Not really my area. I'm sure Toyota or maybe even eBay have the replacement caliper sliders, use an online parts catalogue to get the part number, then start googling. Sometimes its a nice surprise from the dealer, sometimes its scary how expensive parts are, doesn't seem to be any reason either!
-
Couldn't agree more, welcome back. Looking forward to the updates.
-
Sounds like some good progress, but I can't see the pics on my phone or laptop mate.
-
Claymore's sleeper 4efe+t-t+t build (R.I.P. the Nanza)
Claymore replied to Claymore's topic in EP91 Progress Blogs
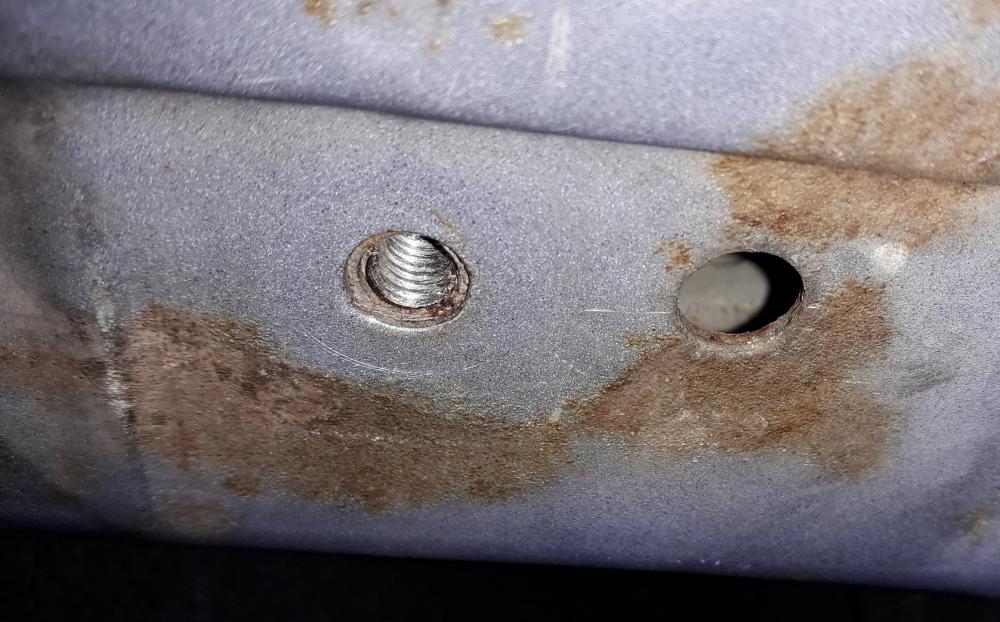
Tiny update, one of the screws that snapped off whilst removing the undertrays is required to attach the lower civic half radiator bracket. Needed to drill it out and re-tap the hole. Thankfully the screw snapped off flush so was easier to deal with, centre punched the remaining stud. Its very important to get this mark in the centre as it is where the drill bit will start and as I had to drill out to 5mm to tap m6 the closer to the centre the better. Ideally the drill hole will remove only the snapped bolt body and none of the nut, then you just use a tap to clean the old bolt out of the existing thread. Most of the time when freehand drilling it will be slightly off and you cut a new thread instead. Using my impact driver with step drill (confined space) I started drilling. Not easy with the limited clearance so I made a lever device to push the drill up with extra force whilst I kept the trigger pressed. Sort of a reverse pillar drill. Re-tapped m6. Should do the job, I can always go bigger. Test fitted the bracket. Chipping away at it.

-
Claymore's sleeper 4efe+t-t+t build (R.I.P. the Nanza)
Claymore replied to Claymore's topic in EP91 Progress Blogs
Thanks mate . How's yours coming on? -
Claymore's sleeper 4efe+t-t+t build (R.I.P. the Nanza)
Claymore replied to Claymore's topic in EP91 Progress Blogs
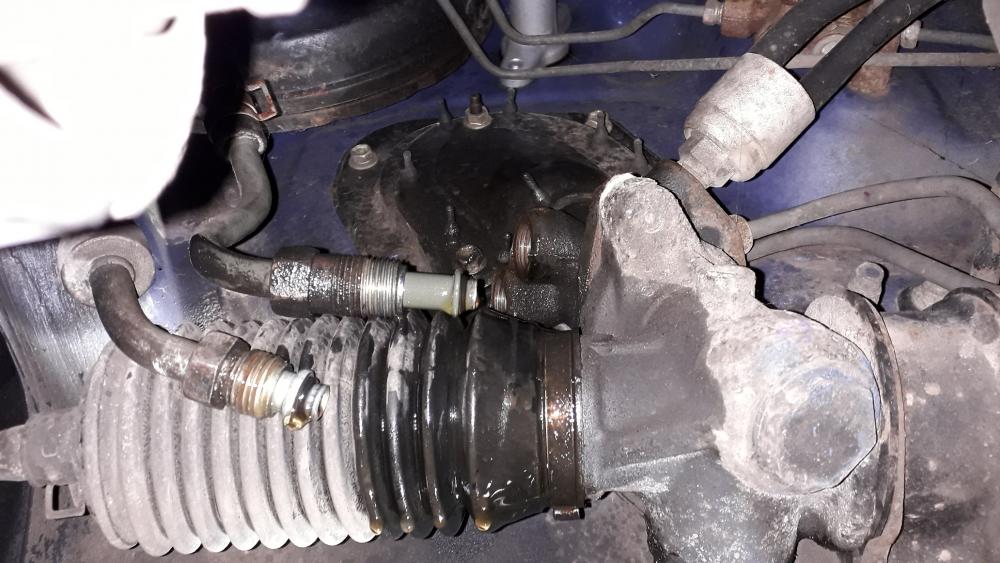
Re assembly was the reverse of dis assembly, cleaned the threads of the mounting bolts / nuts out (even less access this time) and re attached the res. and pipes loosely into position with copper grease on the bolts. Re-attached the lines to the rack (snugged them down). Attached the pump to the upper bracket and lower bracket loosely. Fully tightened the res. and pipes to the bay. Clipped the wiring loom holder back onto the pipe mount bracket. Attached the lower tensioning ("third arm") bolt into place and set the belt tension, locked it in place. Nipped up the upper bolt and then fully tightened the lower adjuster clamping bolt. Fully tightened top pivot bolt. Frustratingly the Toyota lower clamping bolt I bought was a superseded part and the nut was also nla. It was a m10 fine thread and of course I didn't have the nut available so this had to do. Thanks Toyota for making a simple bolted connection "special". Topped up with ATF and bled the system by turning the steering wheel from side to side until the bubbles stopped appearing and the fluid level stabilised. Pipes in place. Not a quick task but fairly simple nuts and bolts stuff. I quite enjoyed it and atleast I know the pump I bought 6 months ago works!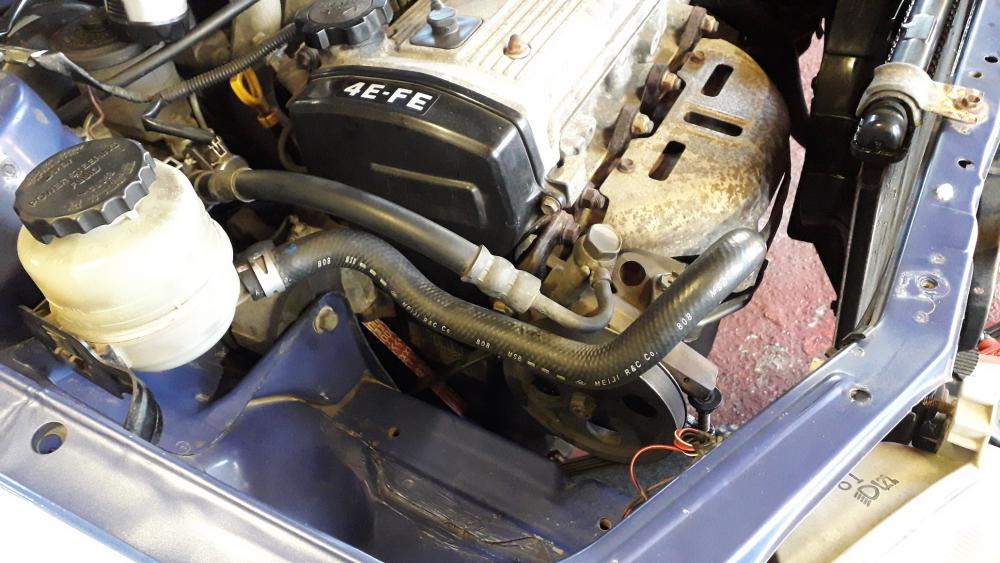

.thumb.jpg.f4ac44d1e0ae02ac8f092f2698380fbb.jpg)
-
Claymore's sleeper 4efe+t-t+t build (R.I.P. the Nanza)
Claymore replied to Claymore's topic in EP91 Progress Blogs
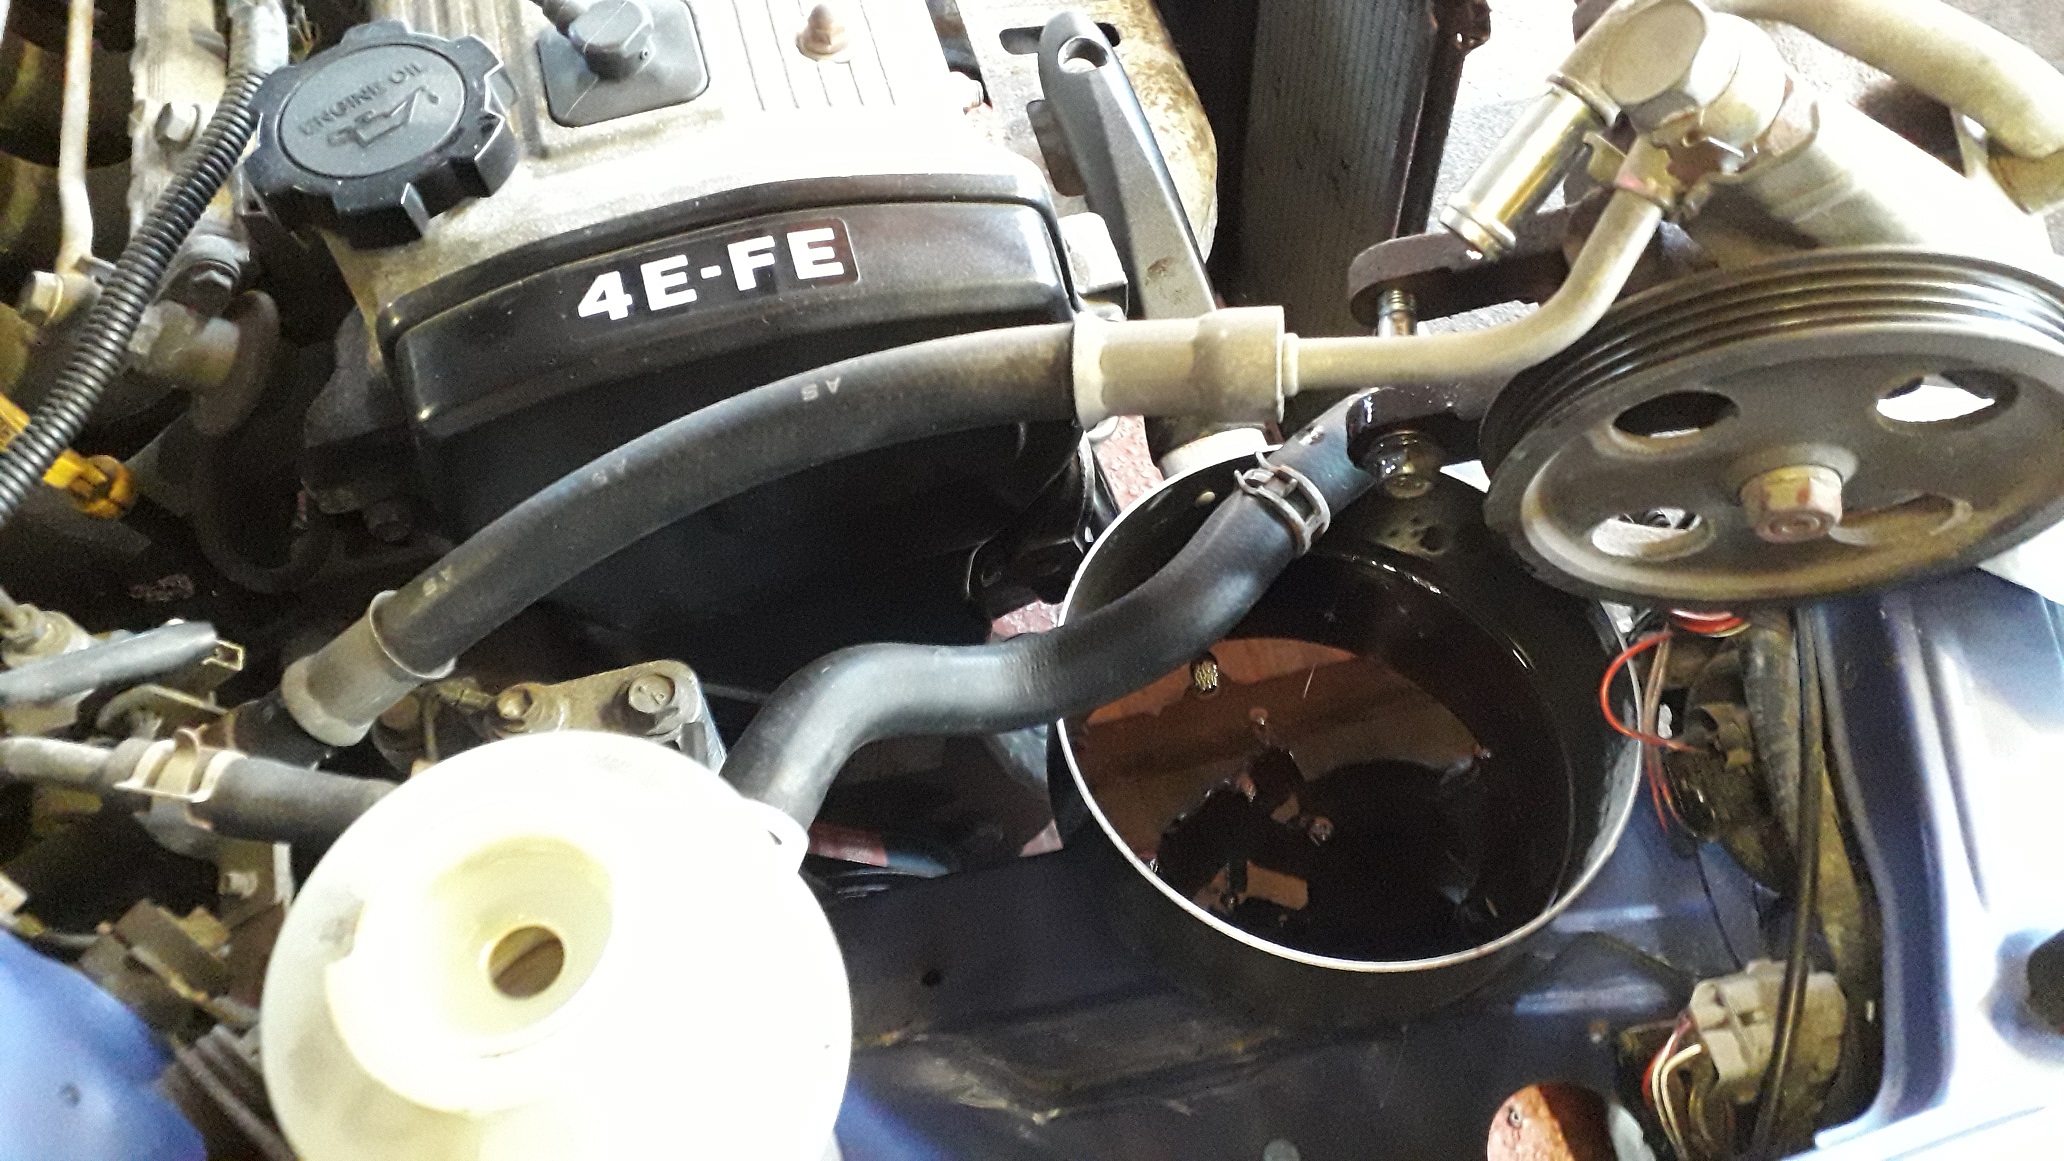
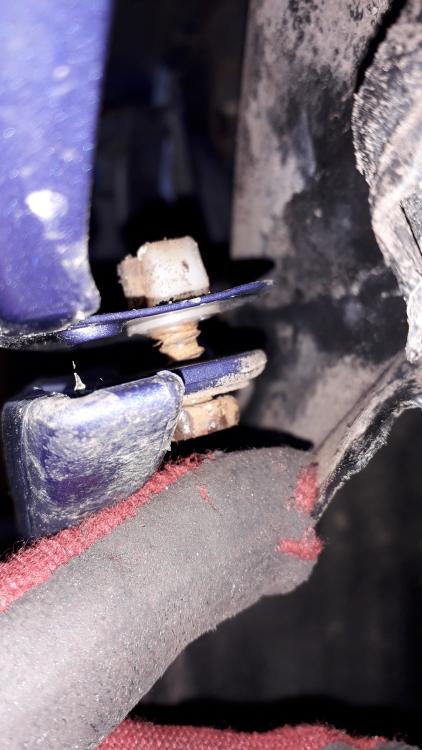
Next up it was time to remove the 4efe pump, lines and reservoir as a complete unit. Its easier and cleaner than separating it out in the engine bay. First needed to drain as much fluid from the reservoir as possible, so used a turkey baster to start and then removed the pump feed hose and drained the rest. With the car safely supported on jack stands, I undid the high pressure feed pipe and the low pressure return. The pipes are only snugged down tight and loosened off without a fight. The pipe located closest to the firewall is the low pressure return line, it has a hook shaped metal pipe, a longer hex section and has more thread showing out of the rack when fitted. The pipe located out towards the engine is the High pressure feed line, it has a 45 degree bend metal pipe, thinner nut section and little thread showing when attached. Thankfully I took photos before disassembly! Drained the rest of the fluid, then attached an old vinyl glove to the fittings to keep them clean. Next I removed all the bolts holding the reservoir and pipes to the engine bay. Starting on the inner wing by the headlight it's 3 x bolts for the reservoir, then 2 x bolts for the pipes. The last of the 5 was difficult to access even with a ratchet spanner so I fashioned this "apparatus" to unscrew it from the other side of the bay. 🙃 Unclipped the wiring loom holder from the pipe mount bracket. Lifted out the assembly and here it is next to the 4efte version. Swapped the reservoirs as the fte one was grotty as. Then fed the whole lot back in.

-
Claymore's sleeper 4efe+t-t+t build (R.I.P. the Nanza)
Claymore replied to Claymore's topic in EP91 Progress Blogs
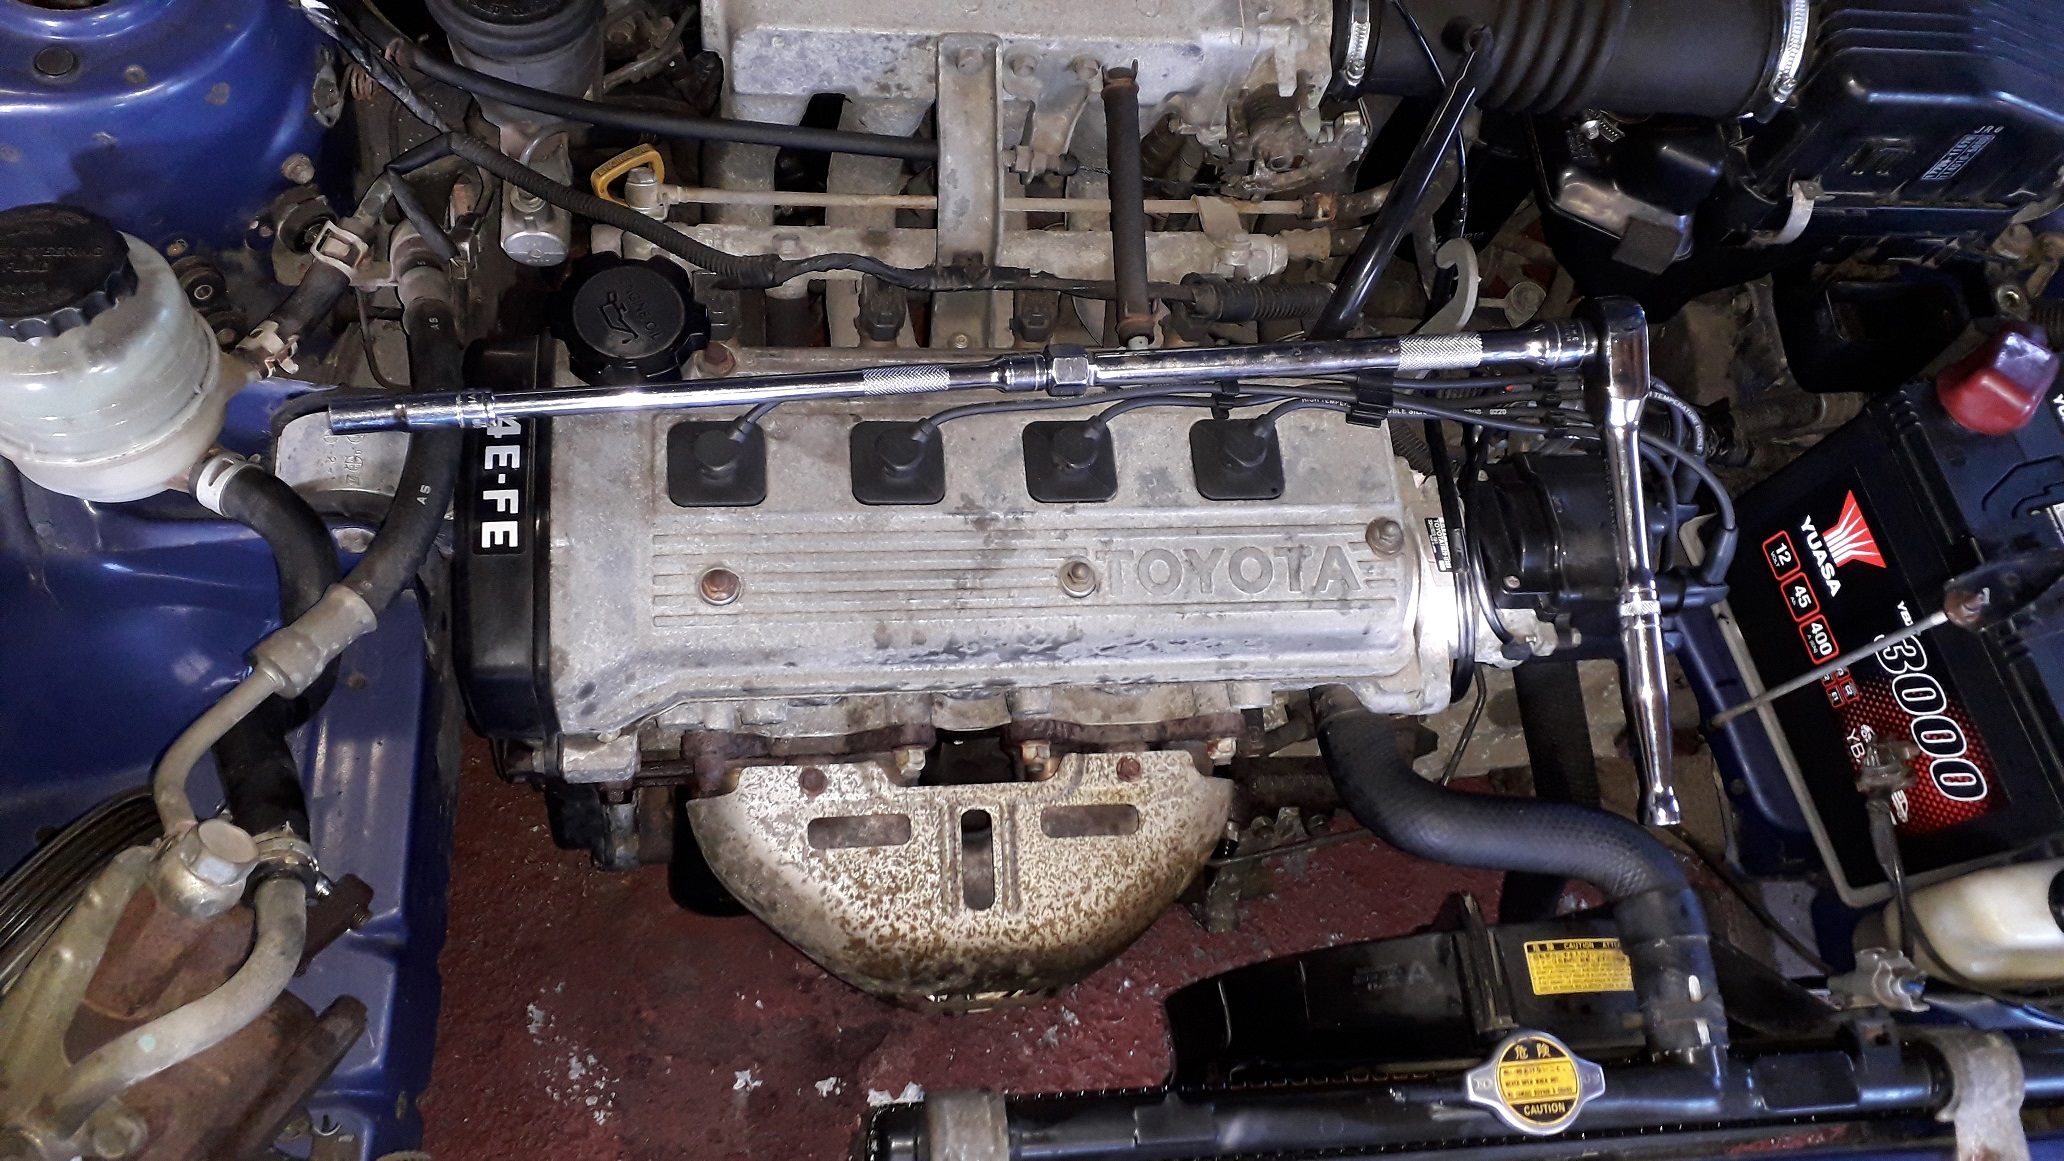
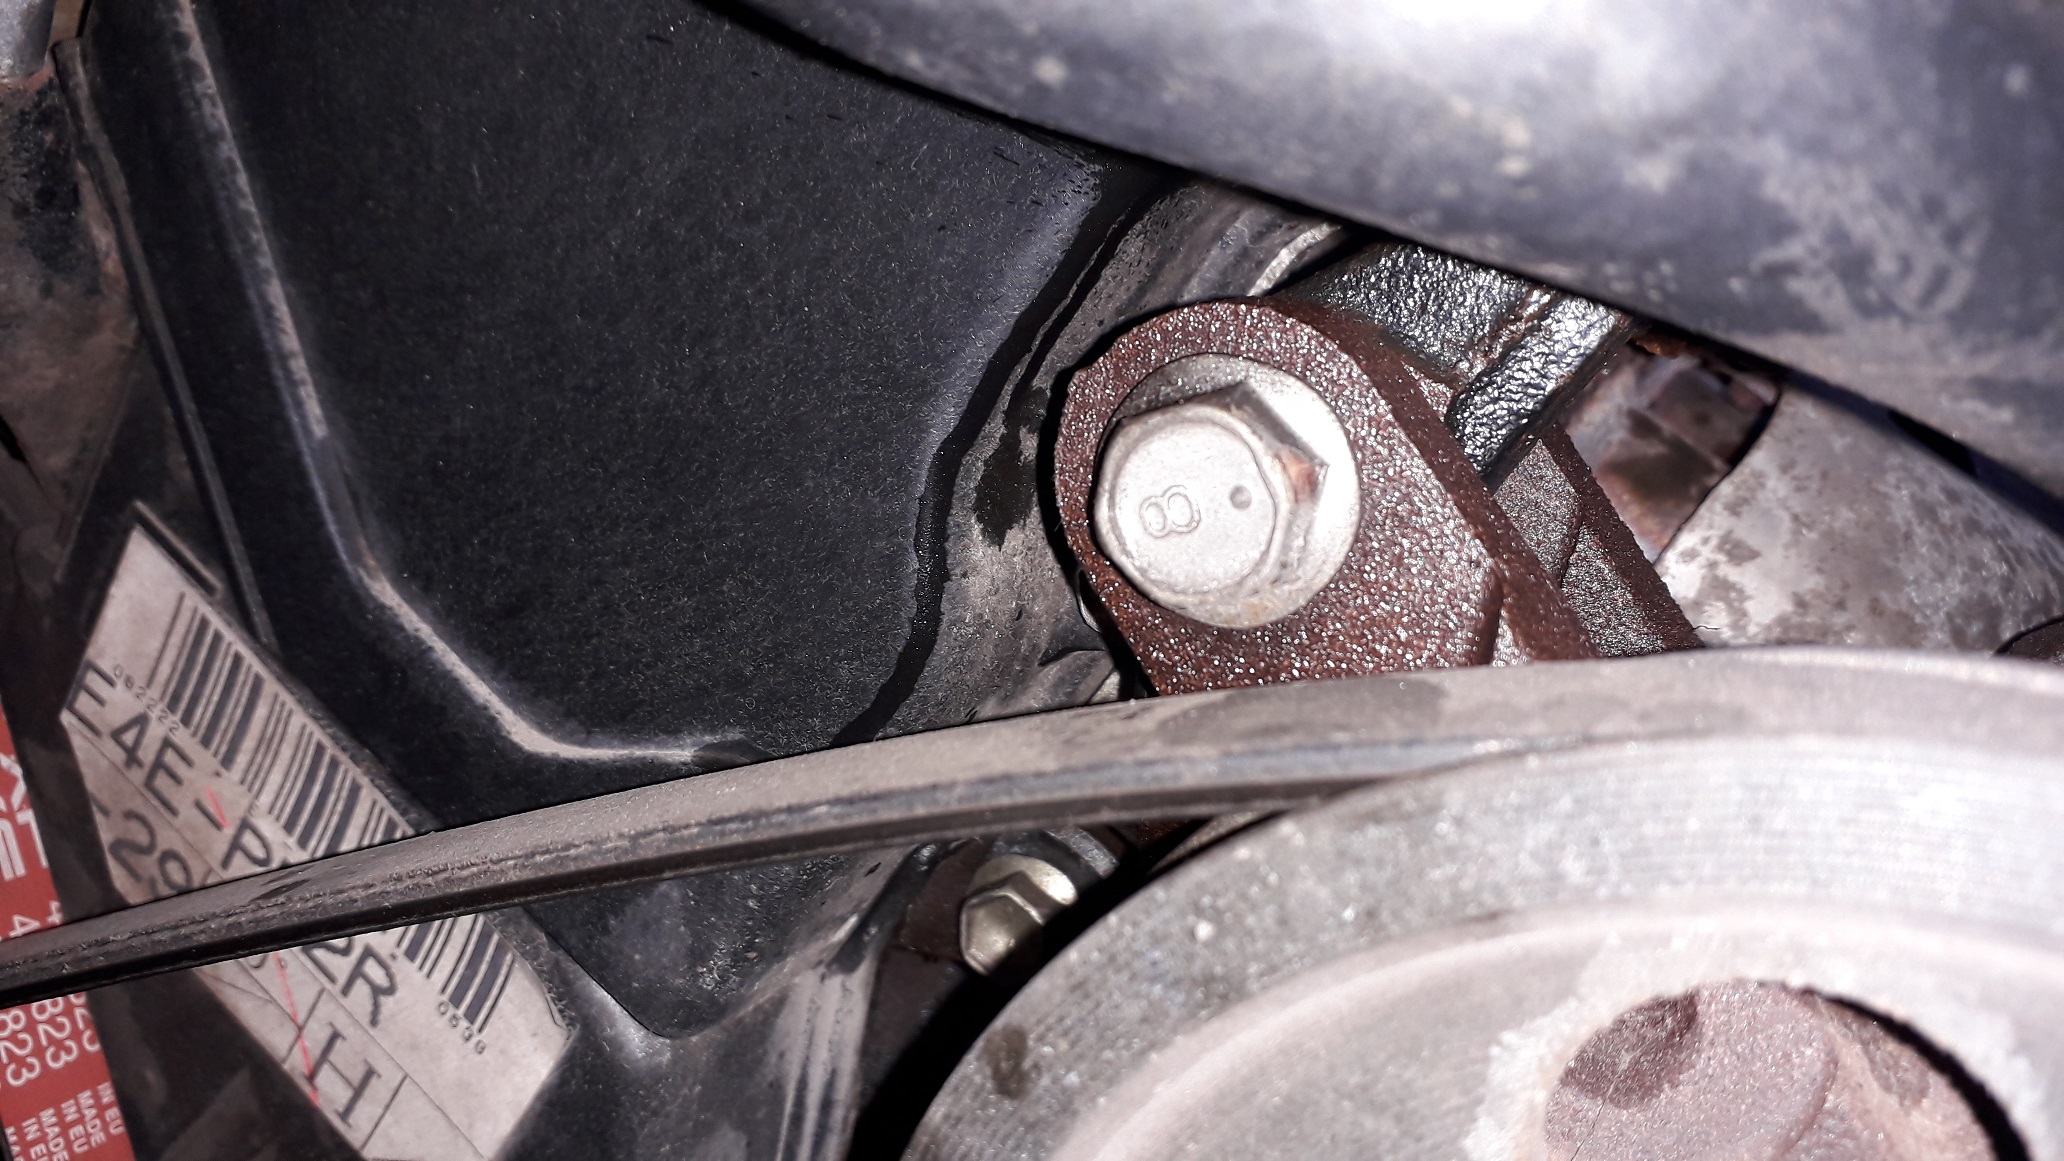
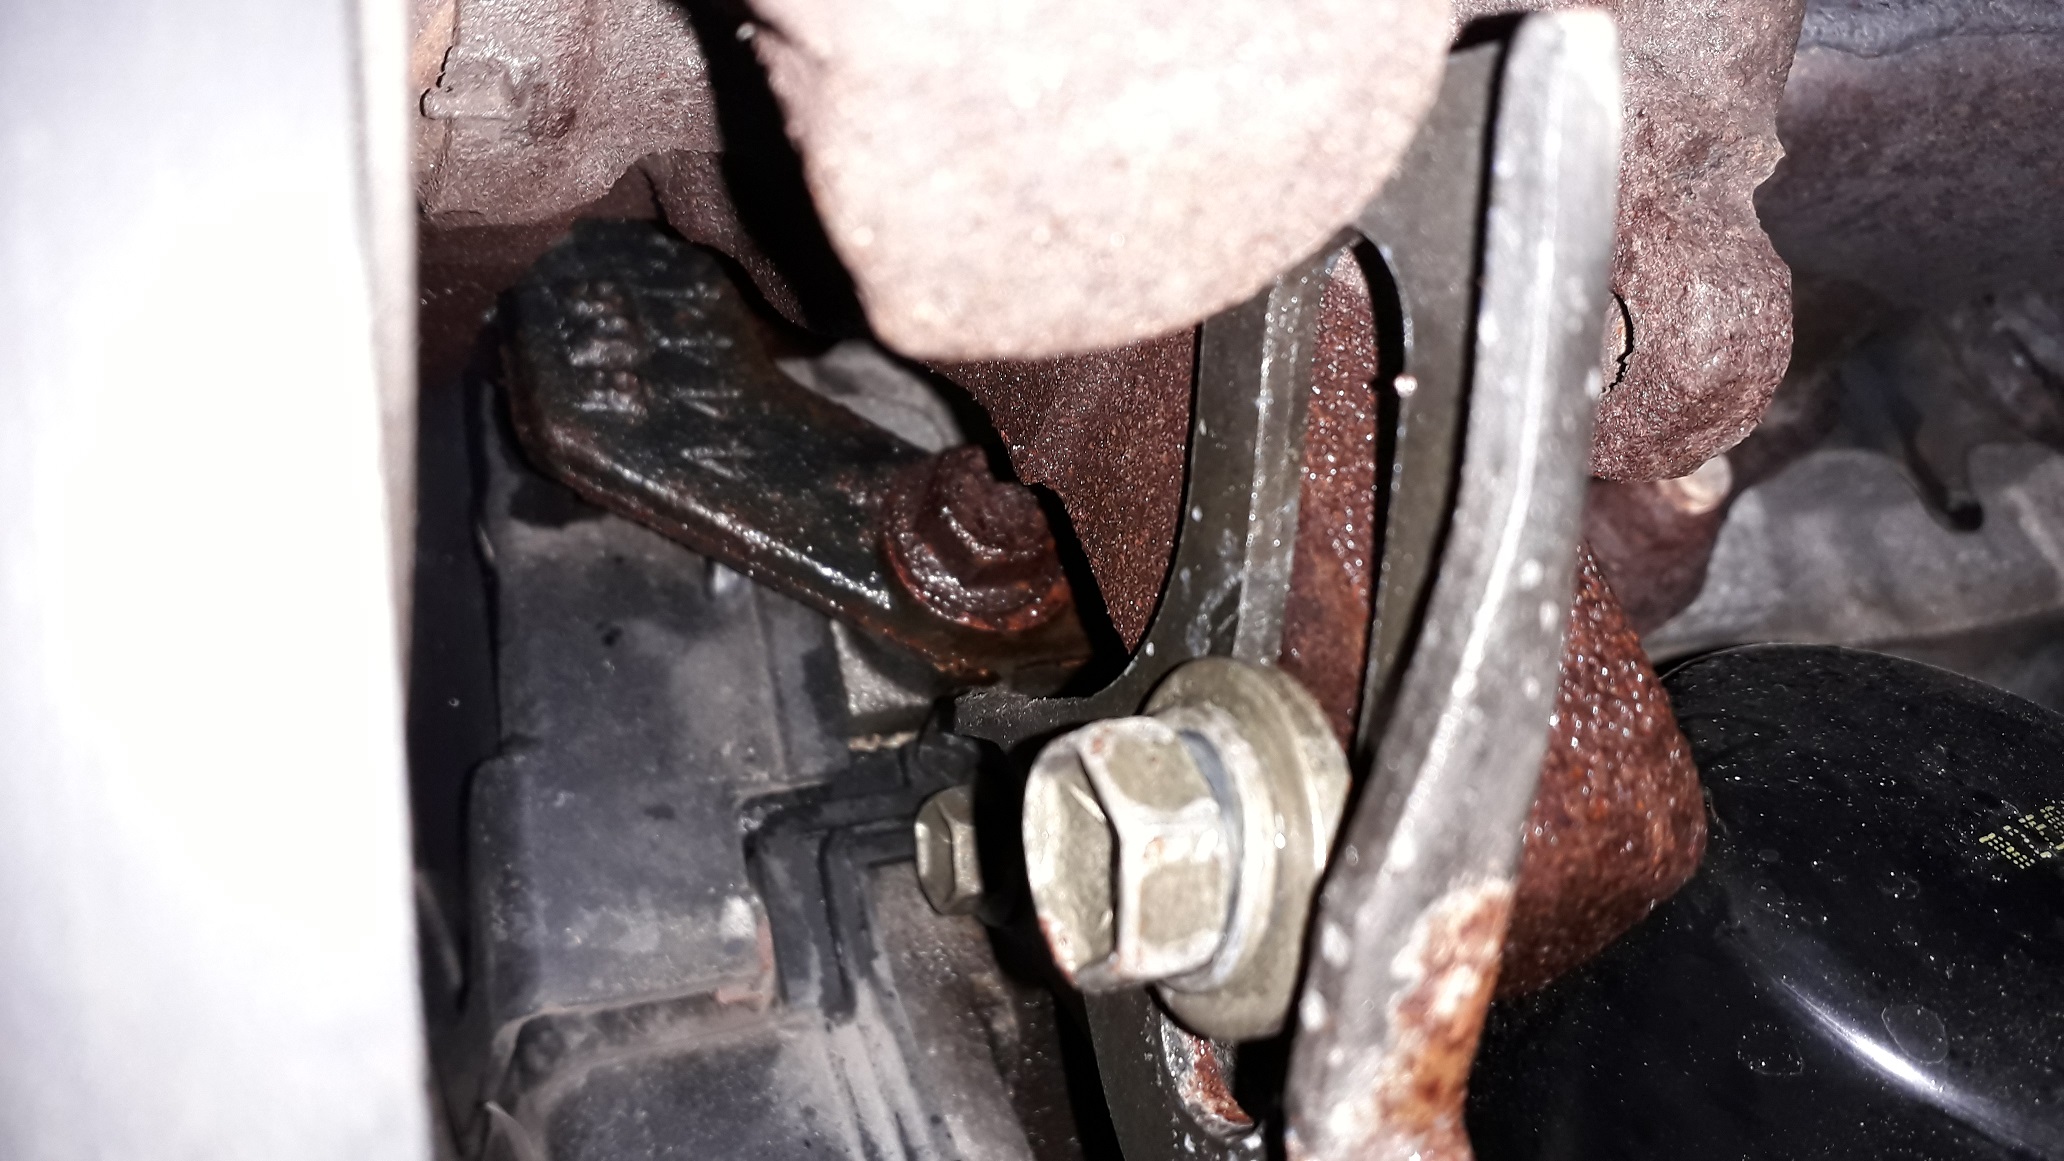
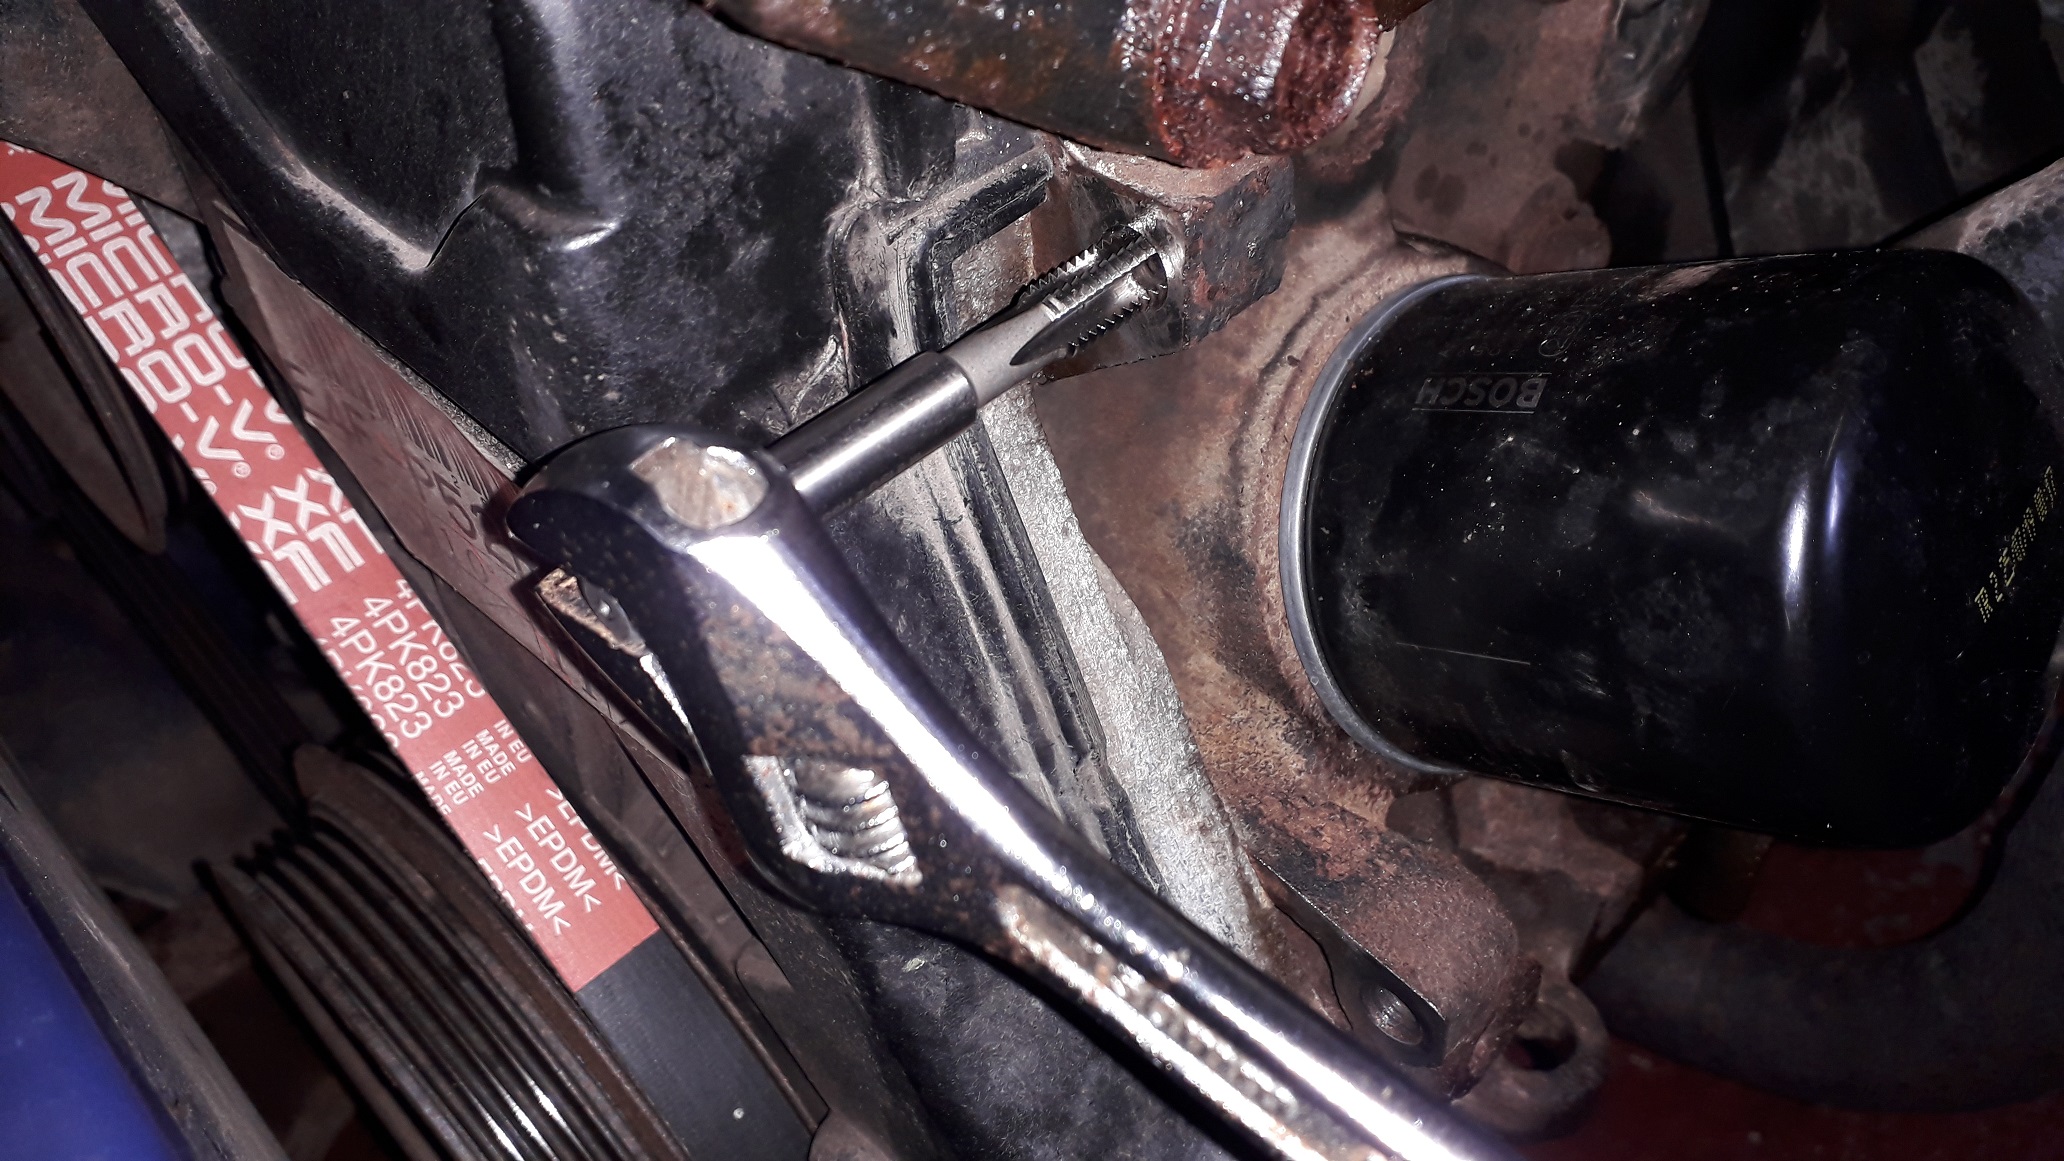
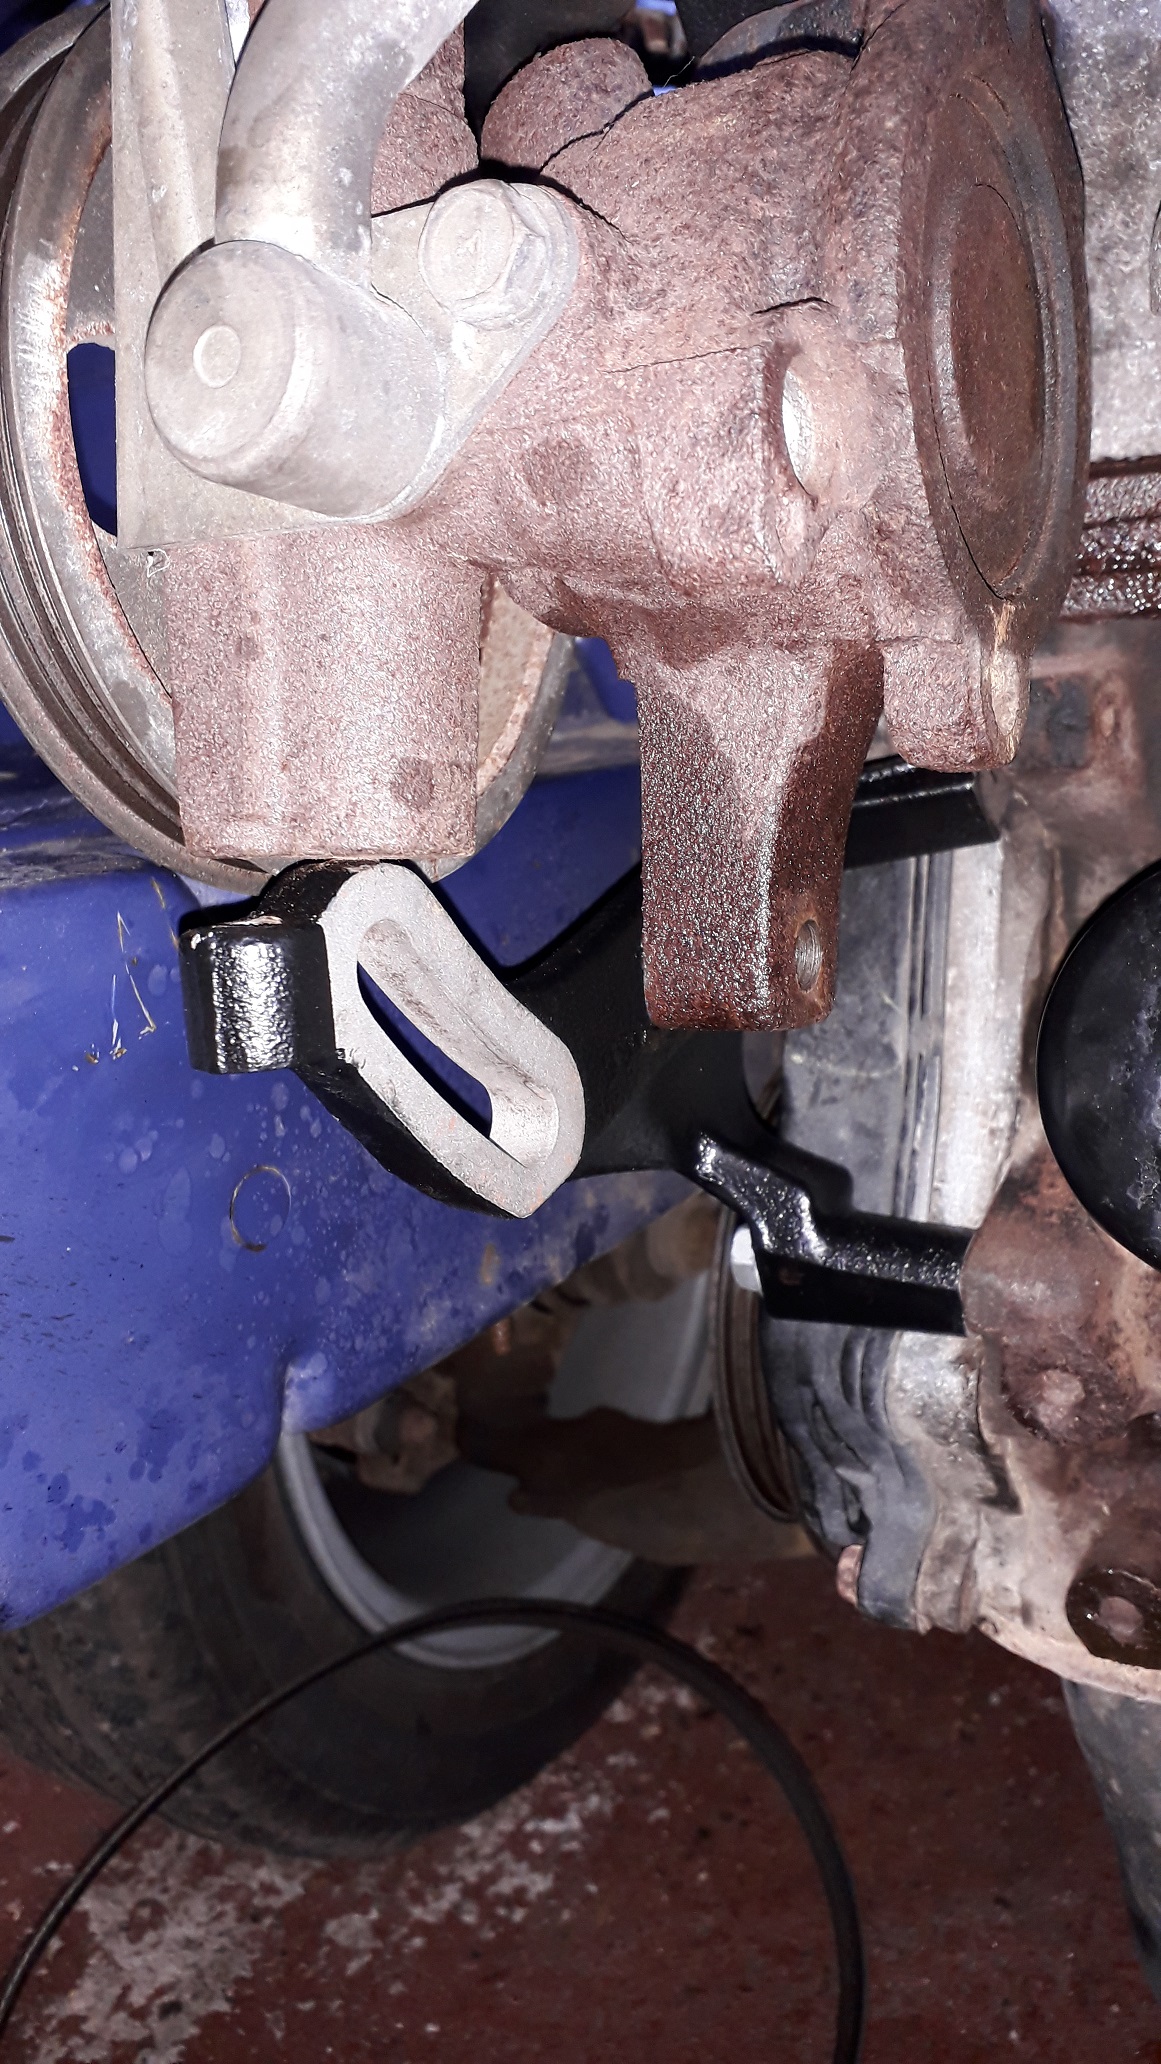
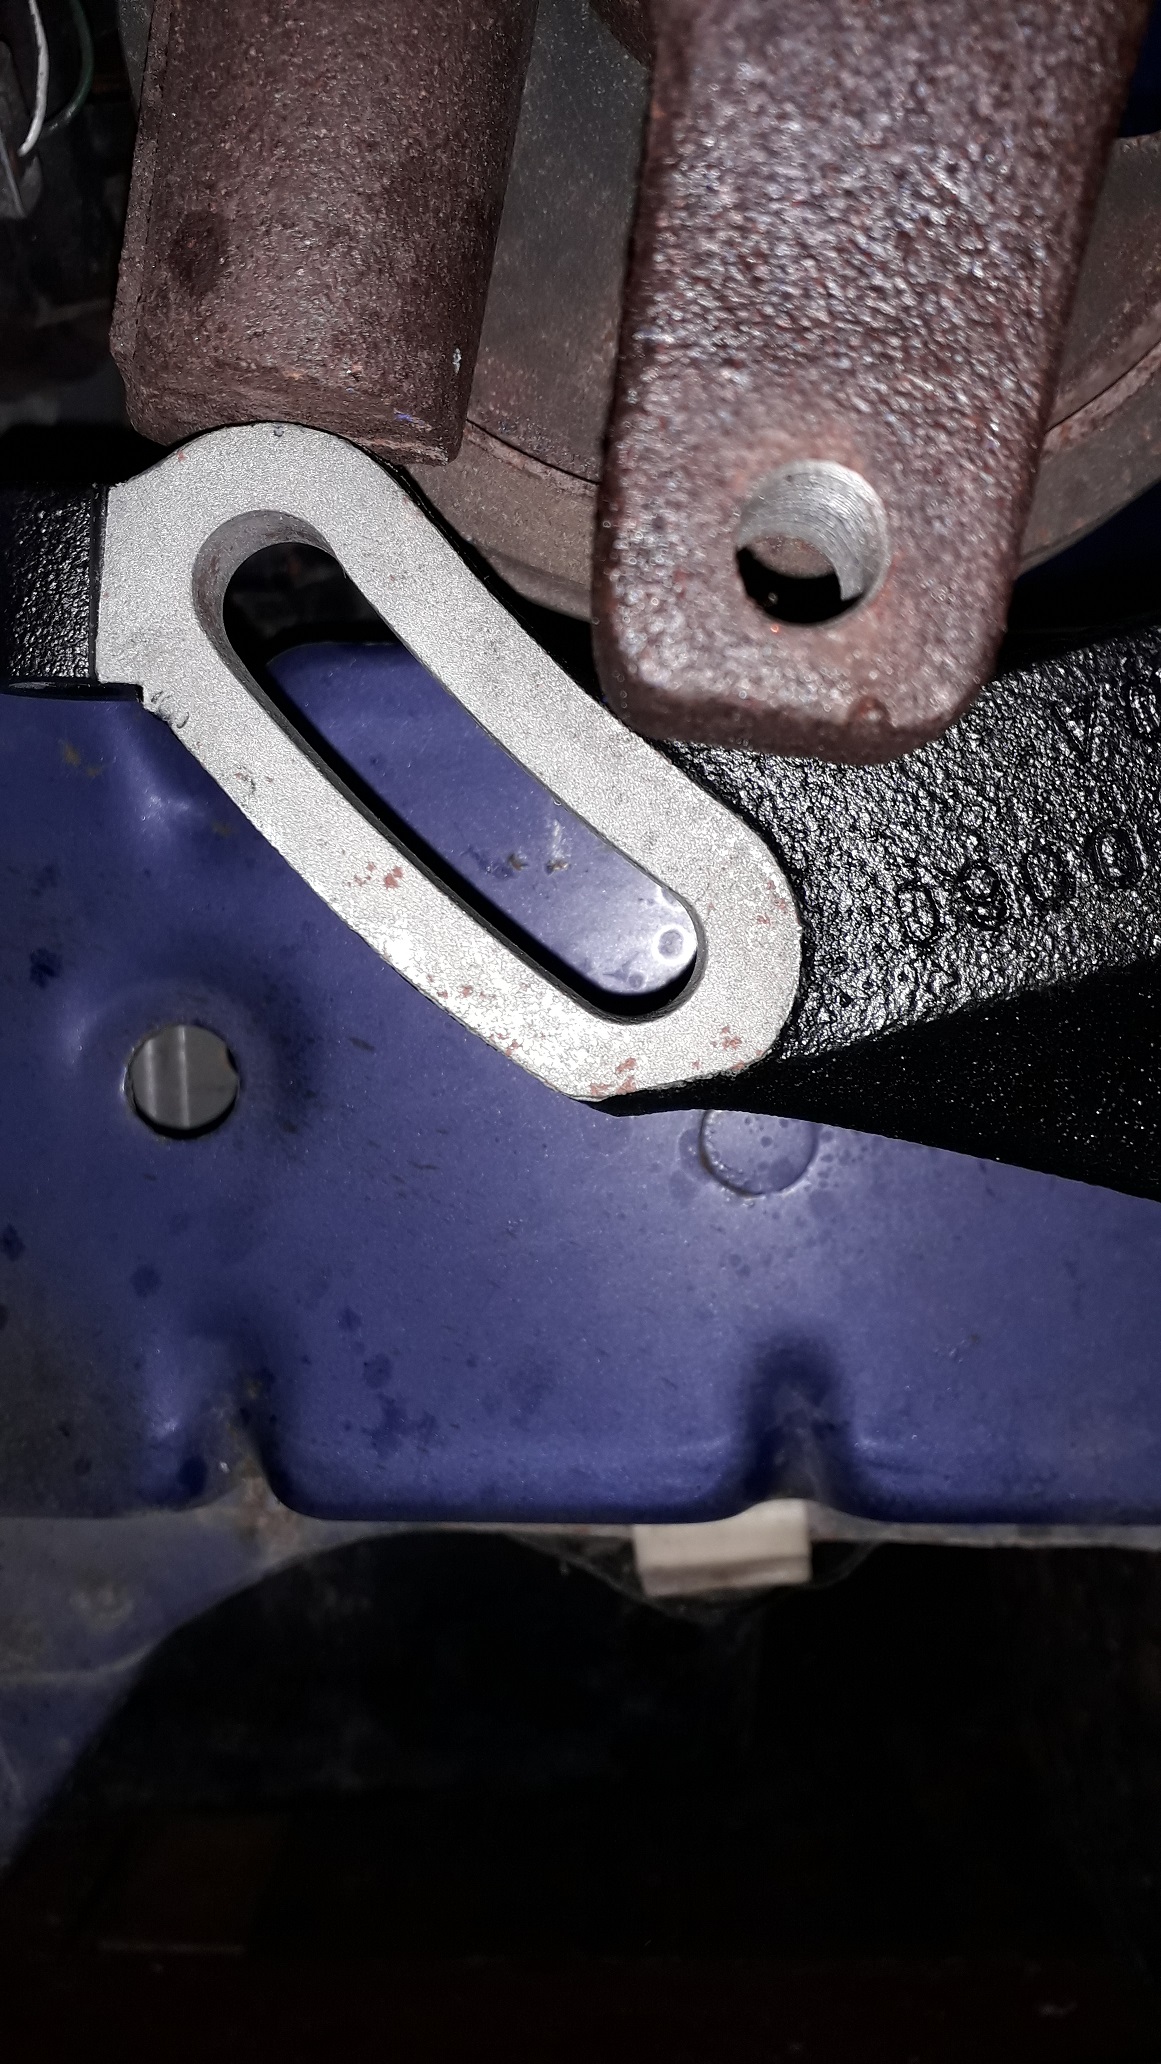
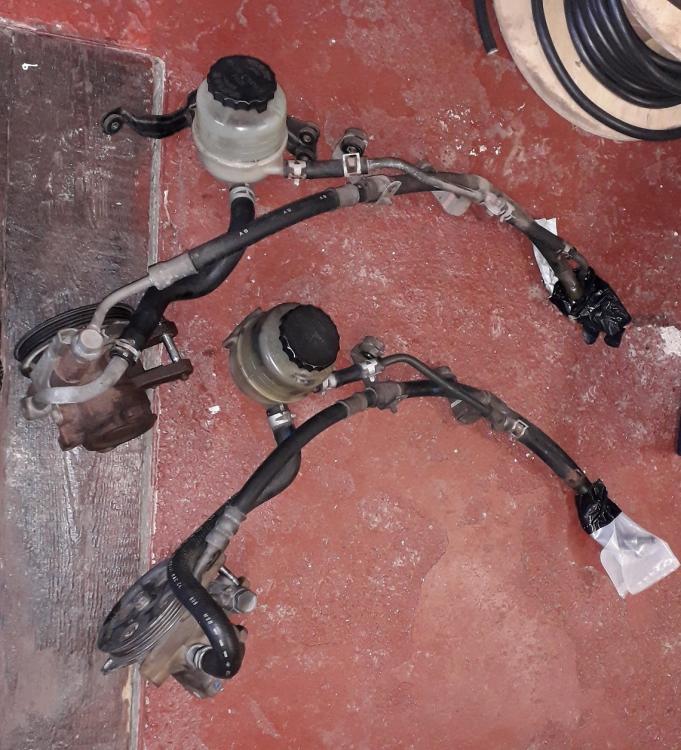
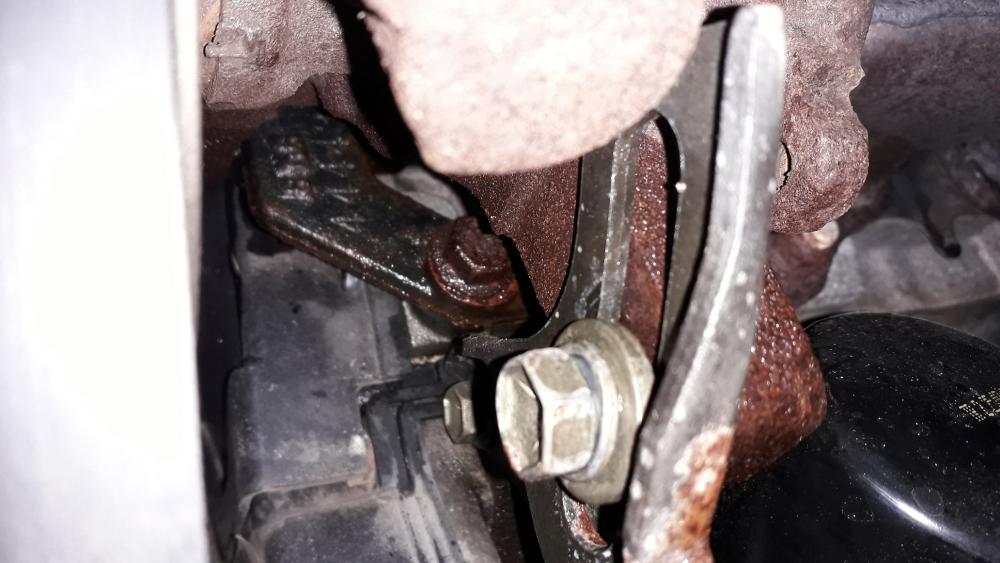
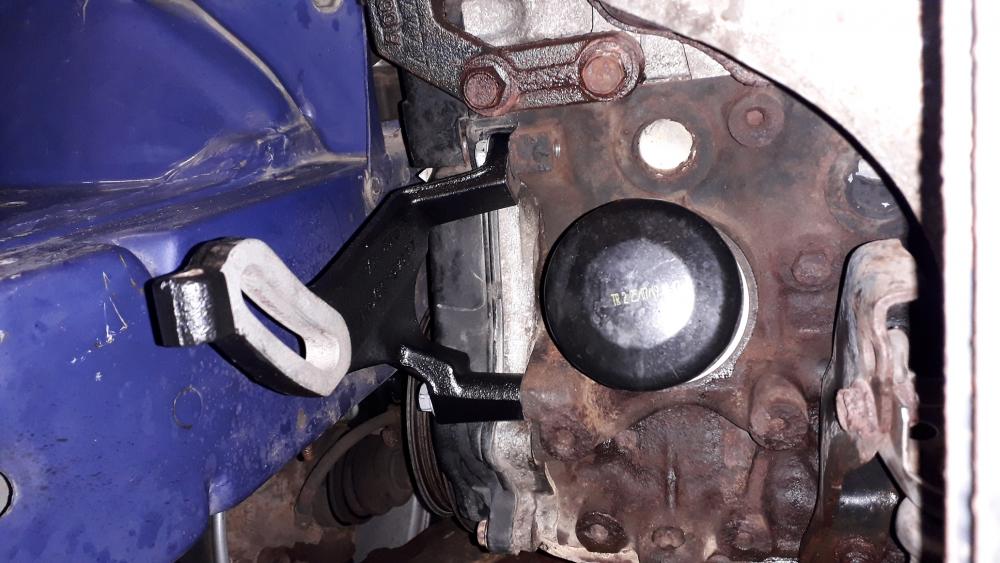
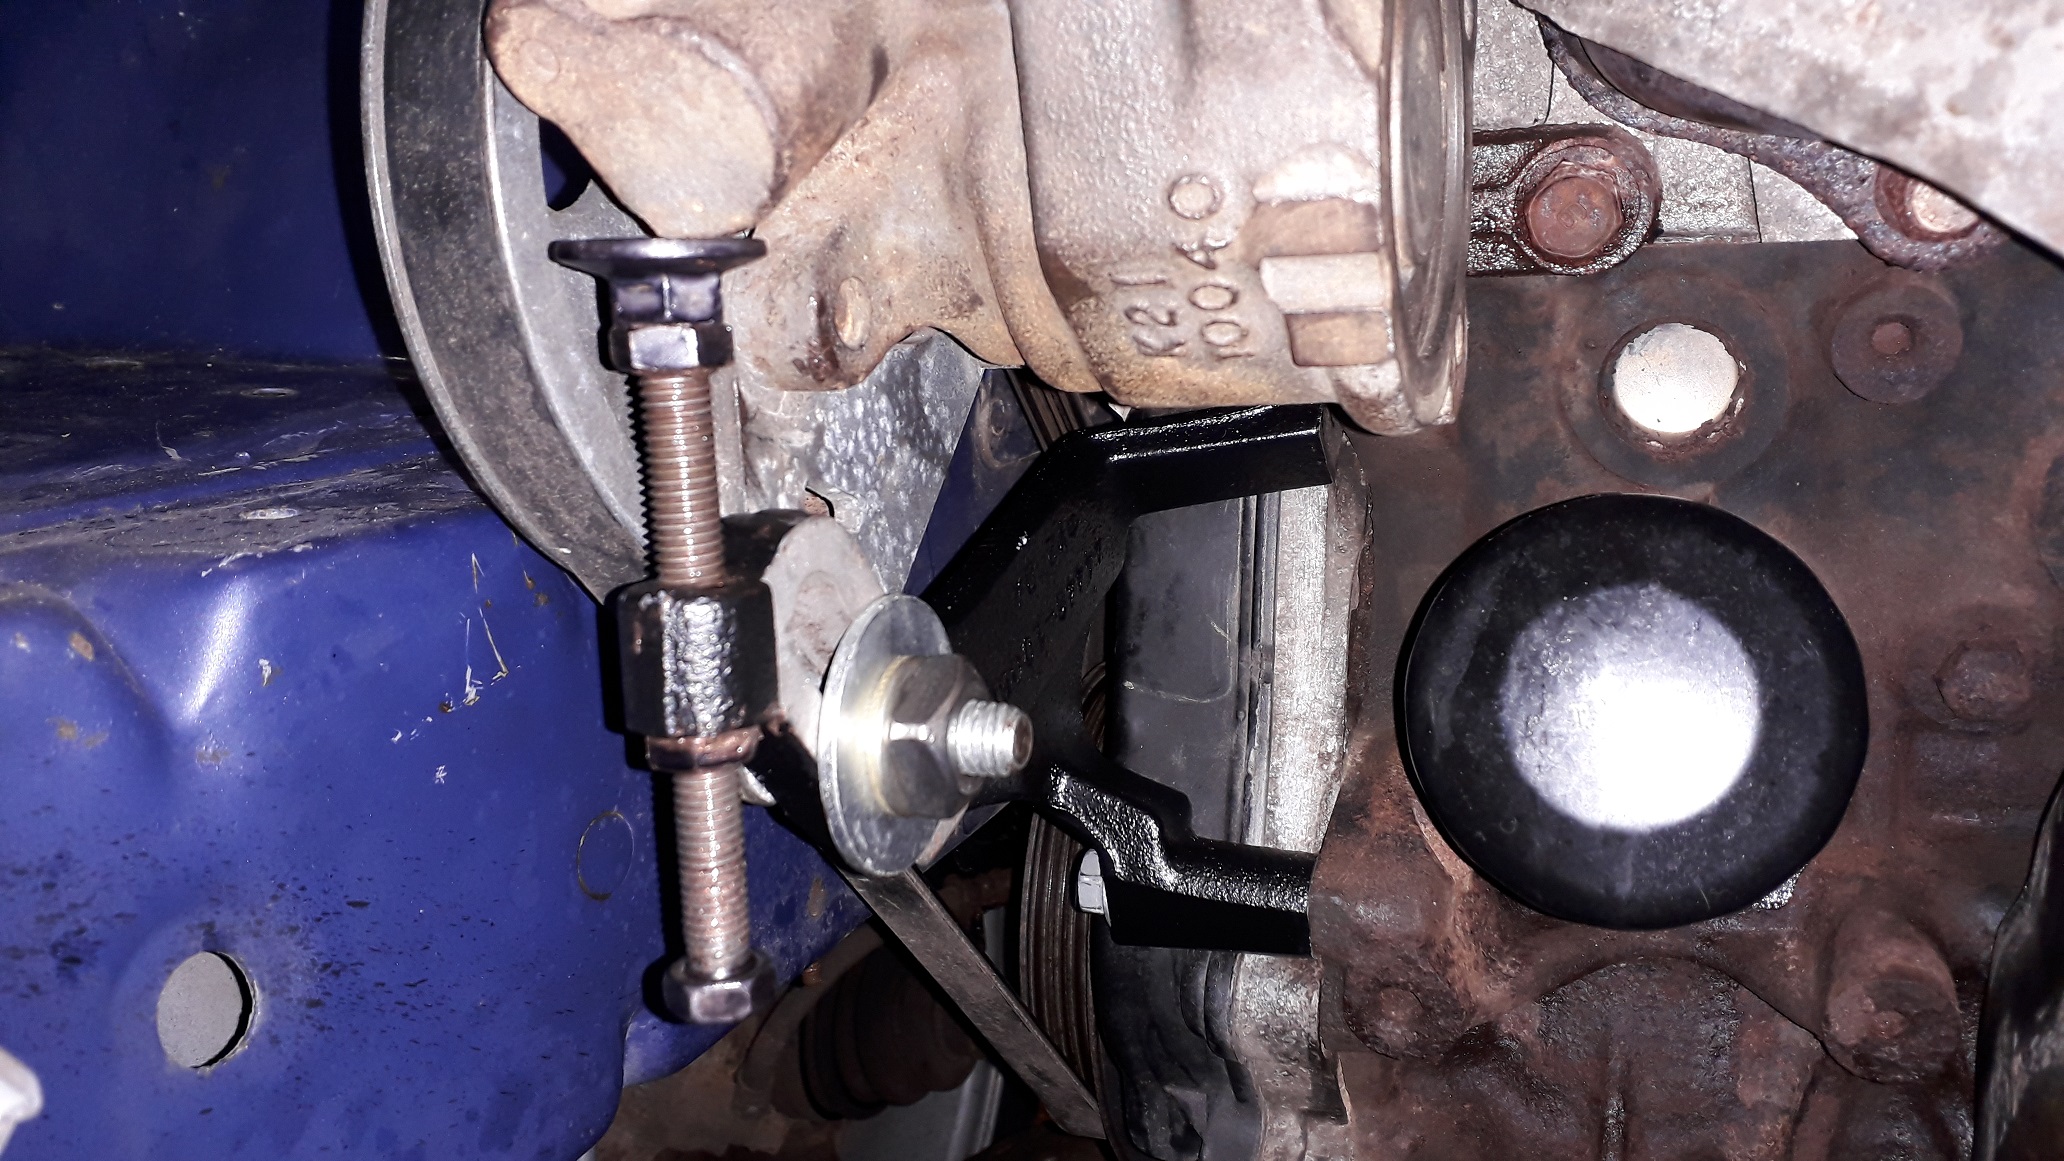
4efte power steering install. As we know, to fit the 4efte oil relocator as Toyota intended you need to change the lower power steering bracket to make room, you then need the 4efte pump and pump feed hose. I have seen people use the 4efte pump and the 4efe lines but it puts a sharp bend in the high pressure line just after the clamp section and this can't be good. Also the 4efe low pressure return line would be fine to use as it's already fitted to the car from rack to reservoir anyway. I decided to do the lot as I had managed to source the components already. So I'll be using the 4efte pump, high and low pressure lines, lower adjuster bracket. Kept the 4efe reservoir as they're the same. First step was to remove the lower adjuster bracket. Loosened off the pivot bolt at the top of the pump followed by the tensioner clamp bolt. Removed the lower 4efe bracket by unscrewing the 2 x m 8 bolts that hold it to the block. The replacement bolts for the fte bracket were longer and the threads had corroded so needed cleaning out with a tap. Couldn't fit the tapping handle in the space available so had to use the farmers wrench 🐮. Fitted the fte lower bracket. For a laugh I fitted the 4efe pump back on and the required work to make it fit became more apparent. The lower section of the pump sits on the bracket, the clamping hole and slot don't line up, the belt is too short and the clamps that hold the pipes to the engine bay are not the right shape. It may be possible to modify the angle of the pipe location brackets to allow the pipes to move up / back and the pump to pivot up, fit a longer belt and make an adapter plate to bolt from the pump to the lower fte bracket. Didn't try any of this but it looks doable if you only have the lower bracket.


-
Claymore's sleeper 4efe+t-t+t build (R.I.P. the Nanza)
Claymore replied to Claymore's topic in EP91 Progress Blogs
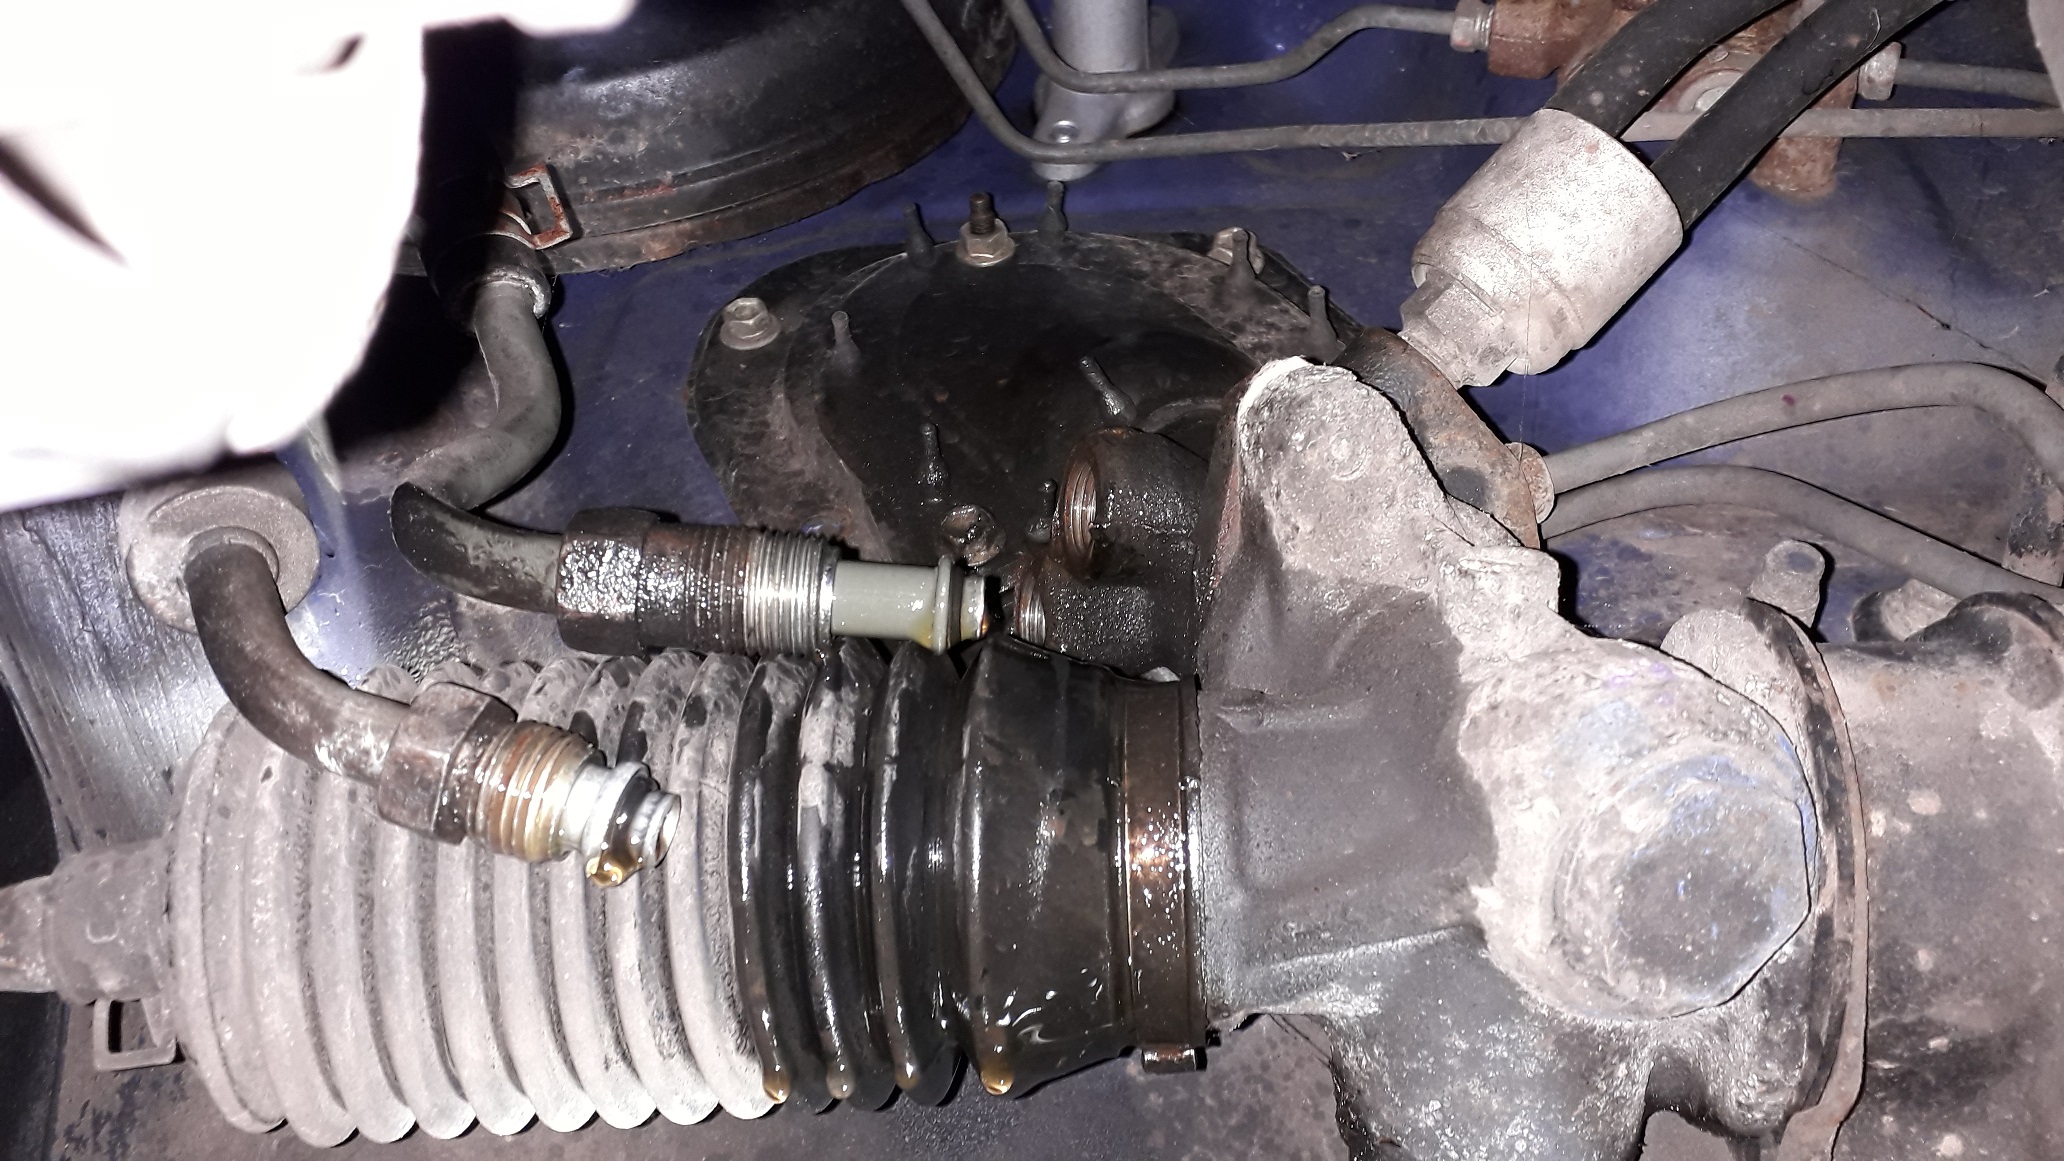
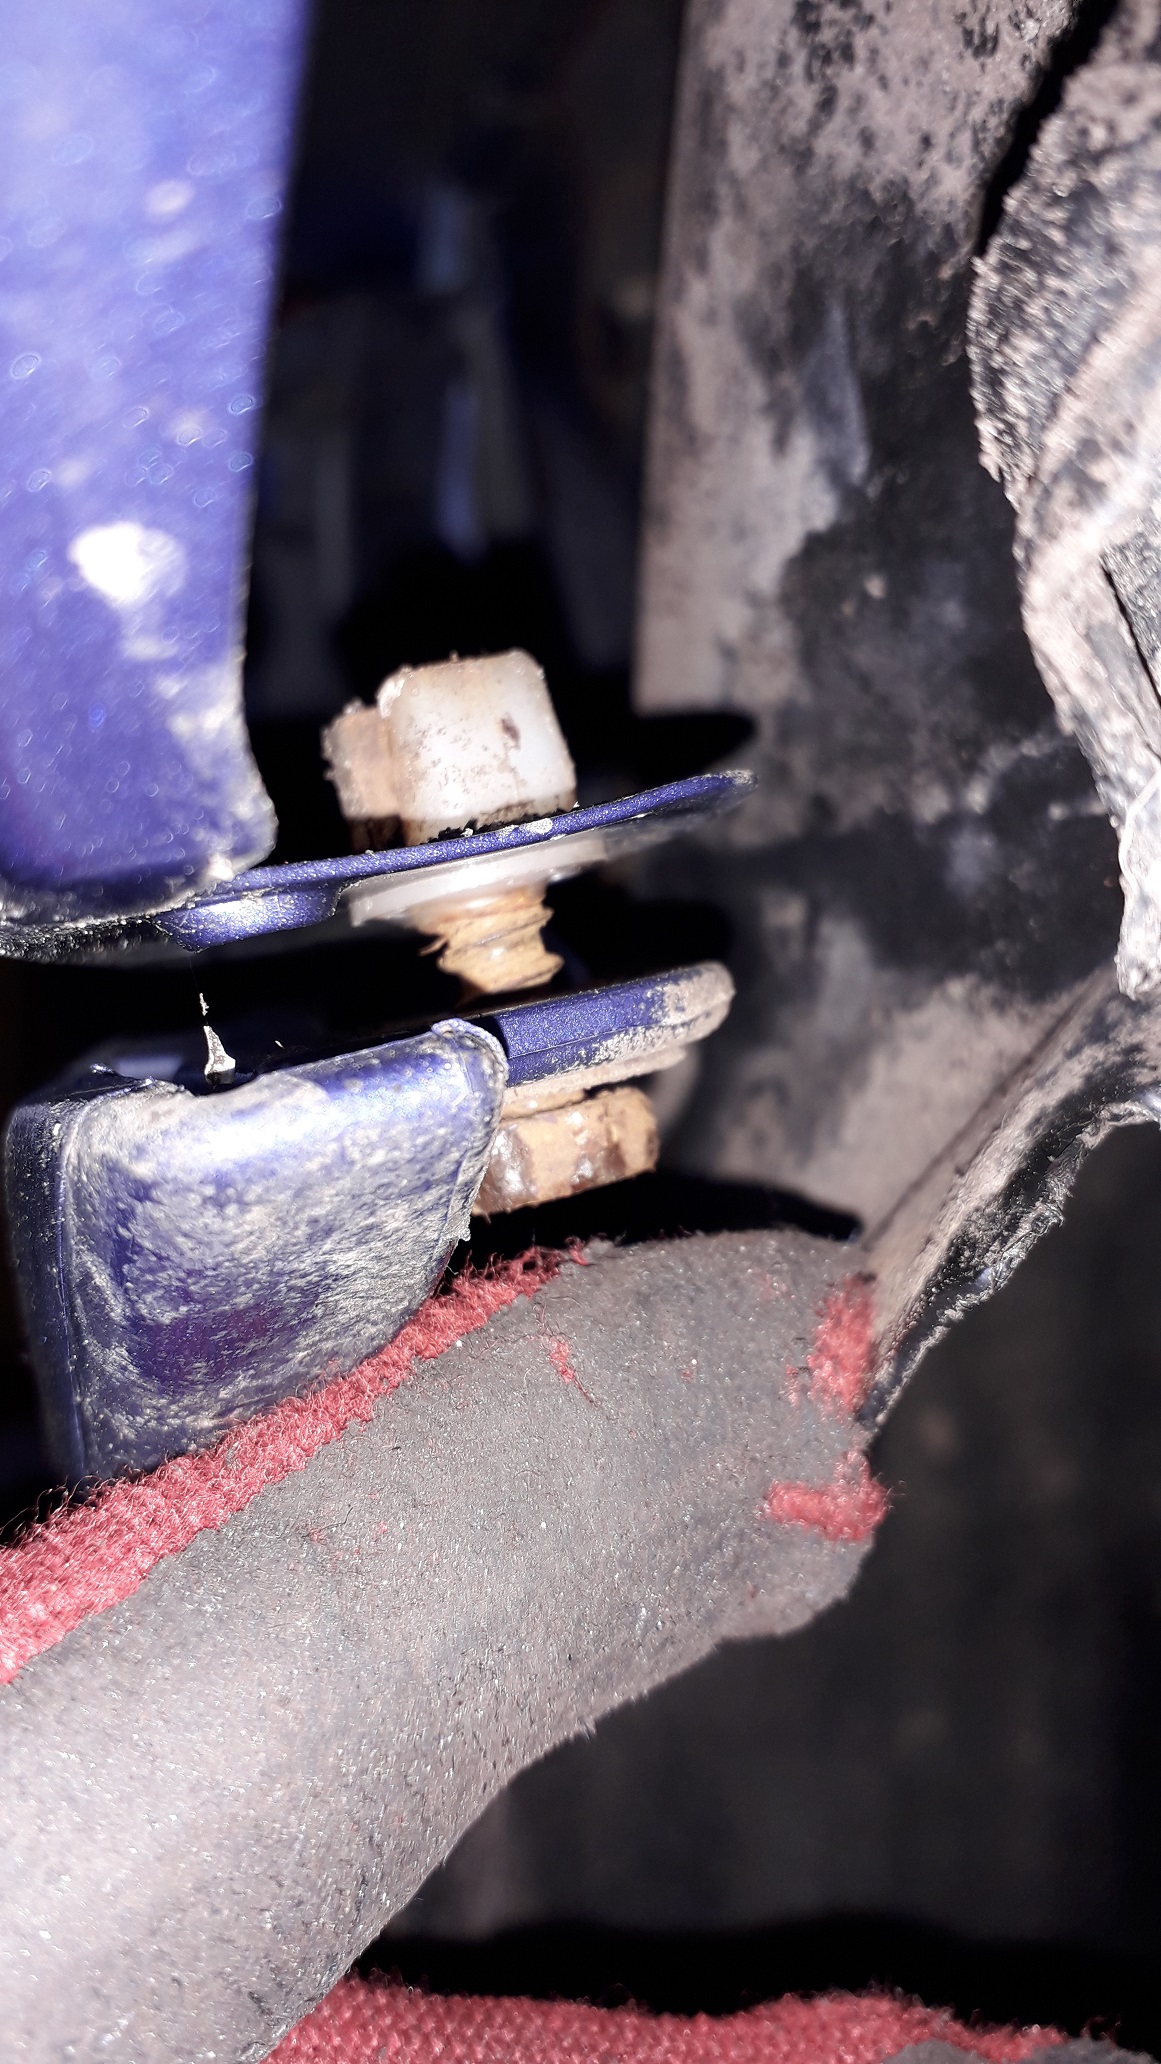
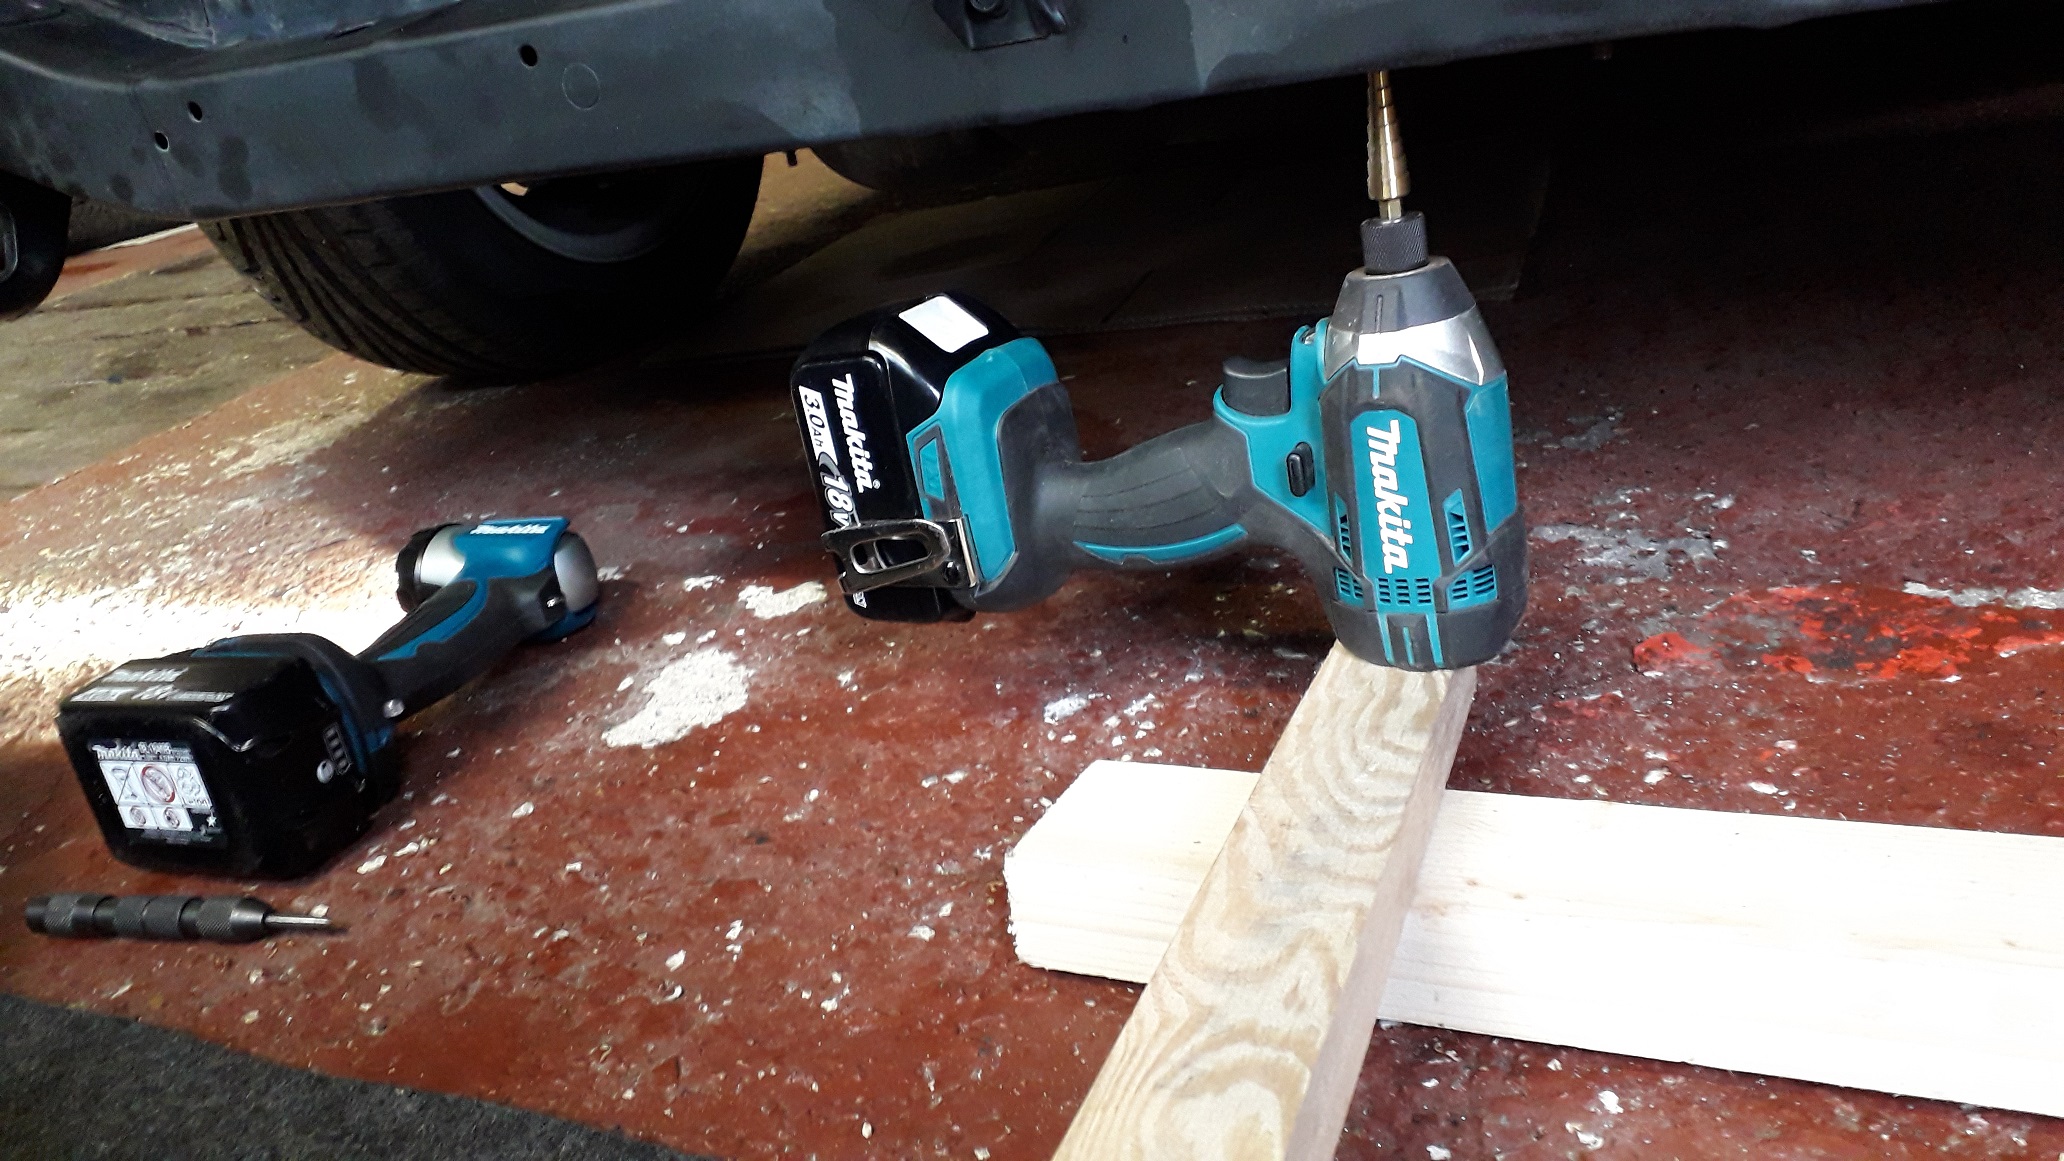
So after 320ish glorious N/A miles it begins....... Removed the undertray and front bumper to give access for the upcoming work. Undertray is easy to see the fasteners, 2 x nuts down each side and 4 x bolts across the front cross member. Managed to get all the nuts off fine but the bolts were rusted quite badly, 1 came out, 3 snapped 😲 (par for the course with stuff this old). I even tried the old trick of loosening them 1/2 a turn and then tightened it back up and then loosened a full turned then tightened a half back and repeated to try and "work" the rust off the screw threads. Not really a problem. Then the bumper, 2 x philips self tappers on the top edge of the grille, 2x bolts in the lower grille opening (one each side) 4 x bolts along the bottom of the front cross member (2 out, 2 snapped this time. 🤠), then there are 2 more each side, one at the bottom connecting to the arch liner.... and one behind the arch liner connected to the wing. Unhooked from top grille area and slide forward off brackets under headlights. Currently playing with the power steering setup....more to come.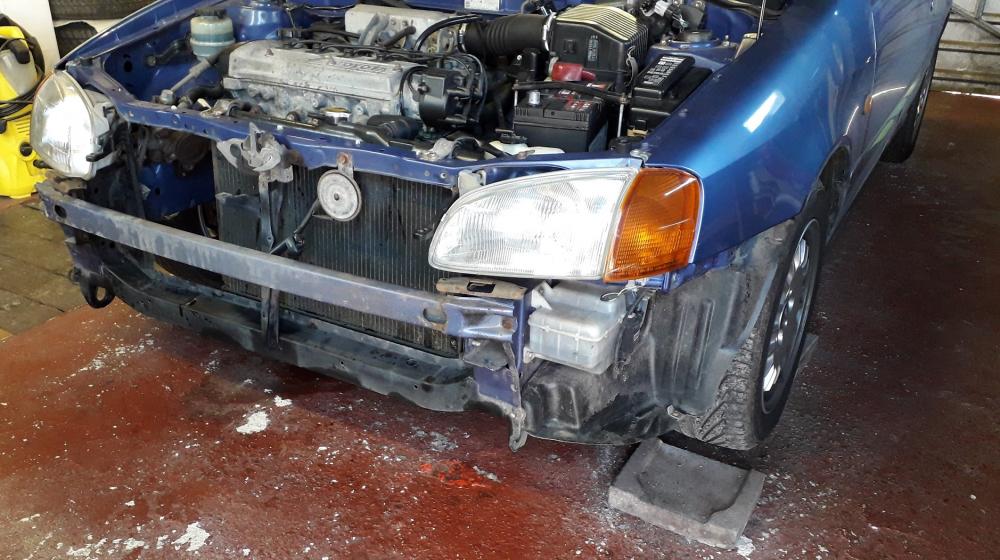

-
Looks good.
-
Claymore's sleeper 4efe+t-t+t build (R.I.P. the Nanza)
Claymore replied to Claymore's topic in EP91 Progress Blogs
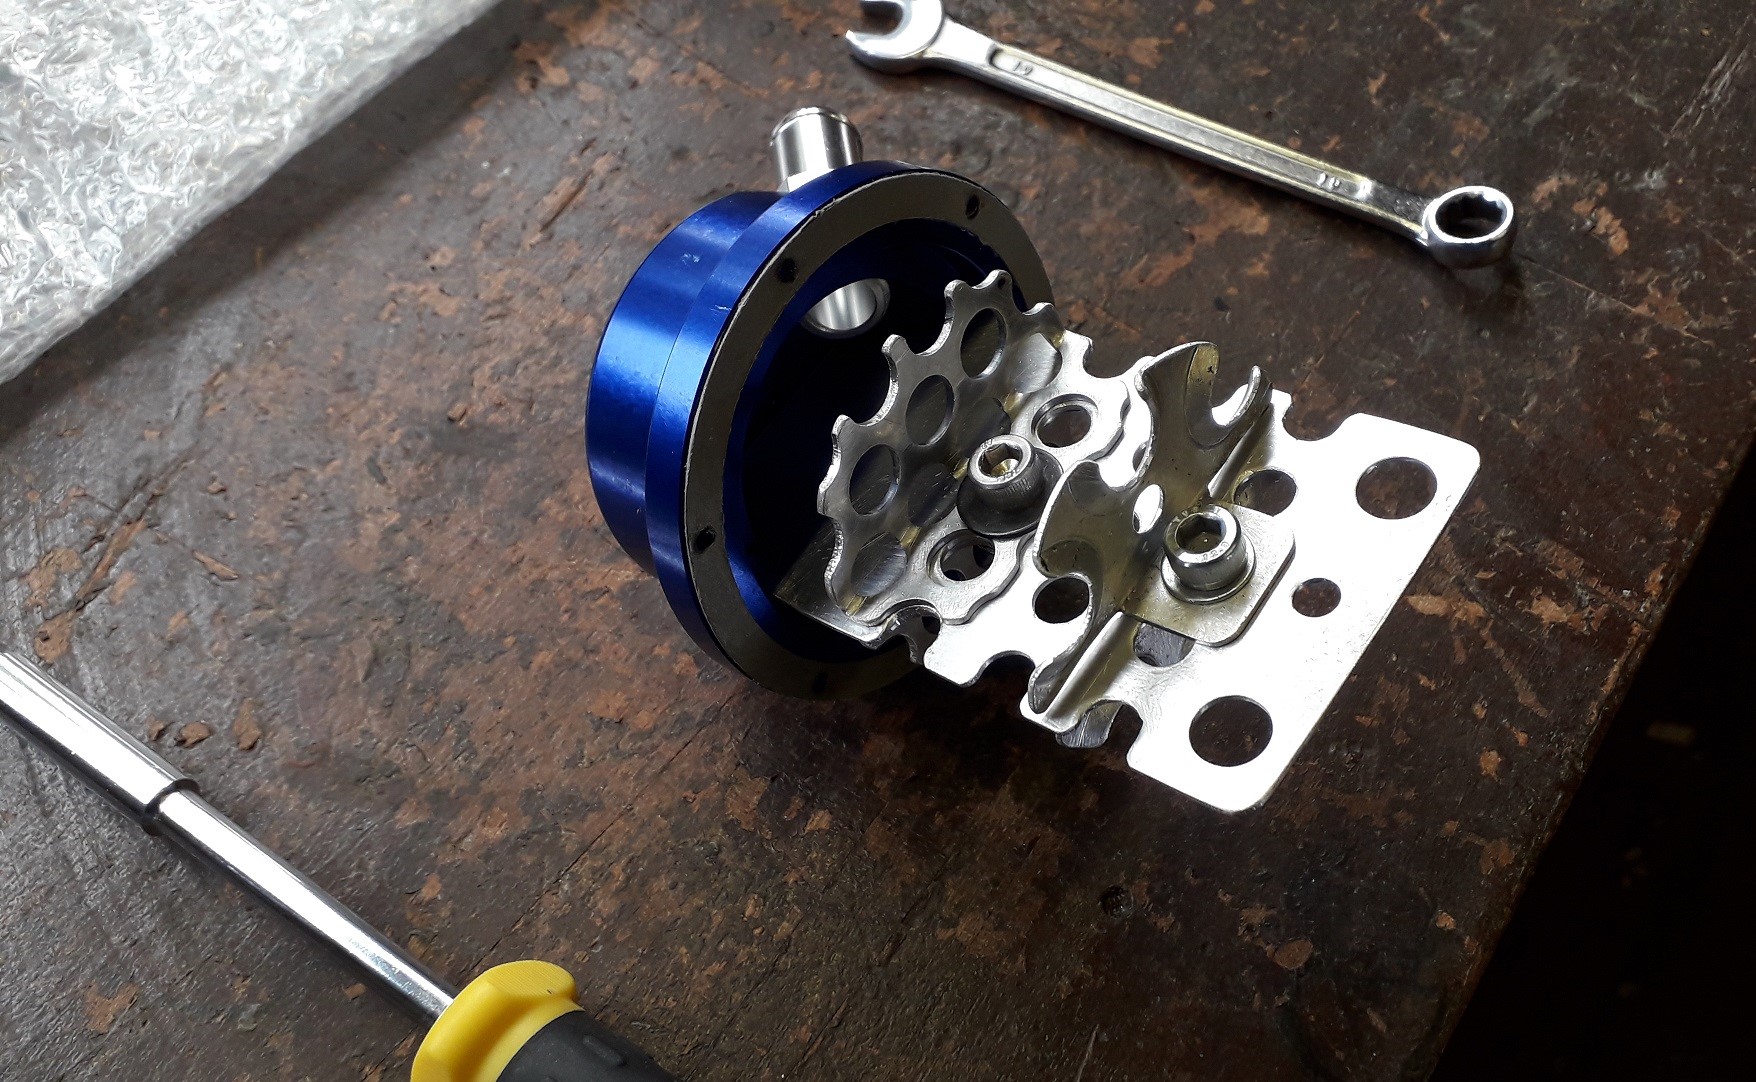
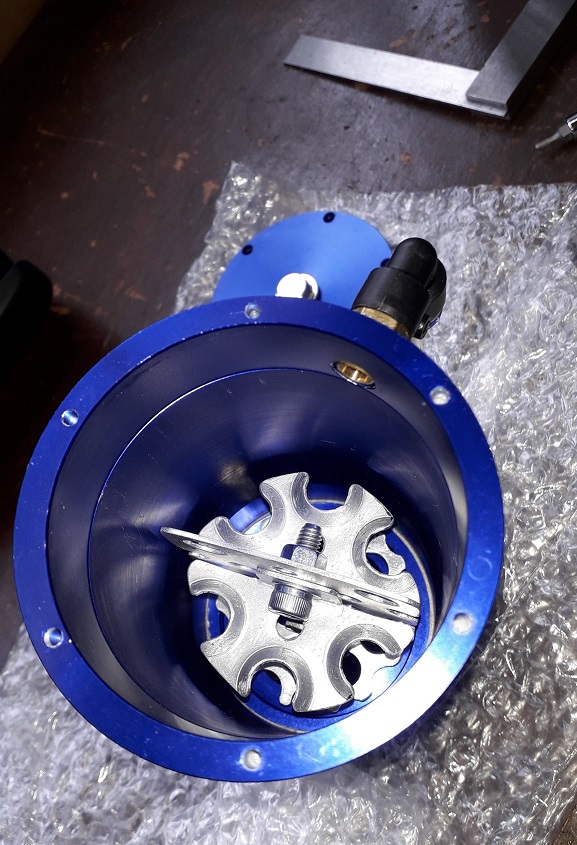
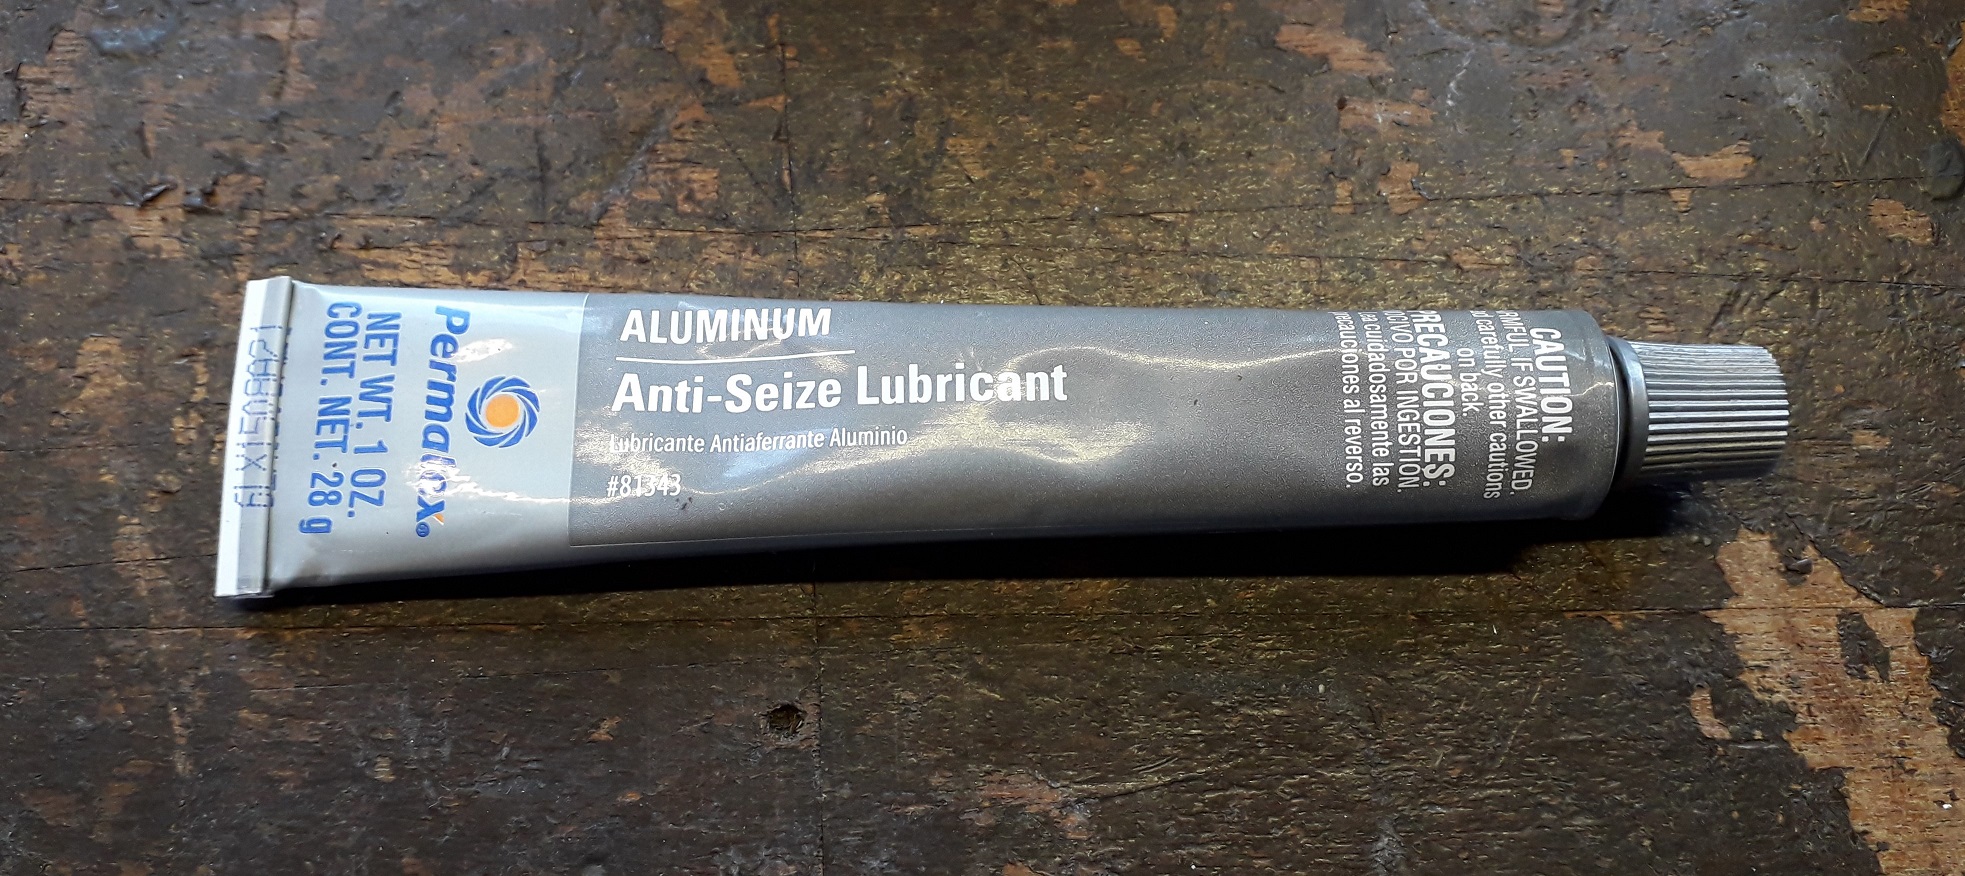
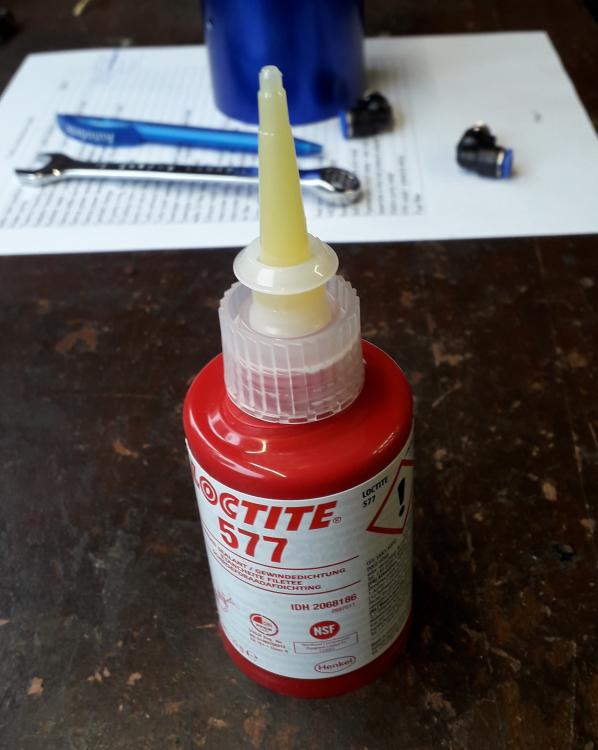
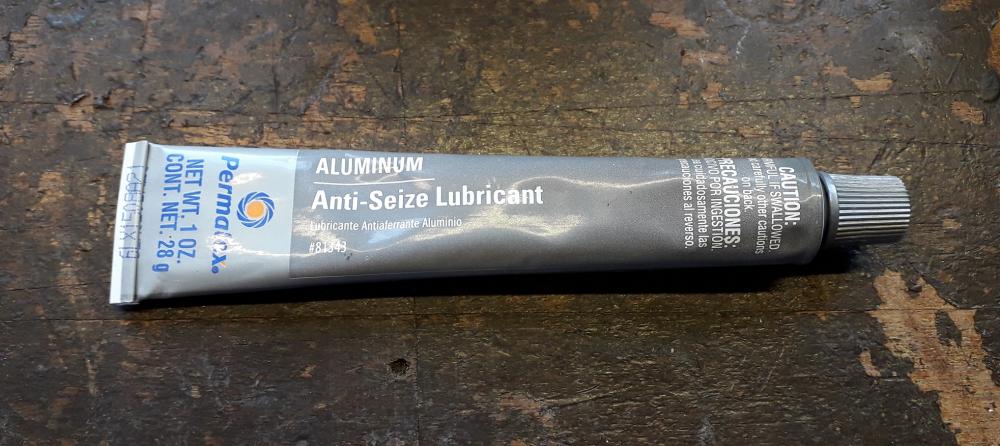
Just a quick update, finally received my thread seal so I could do the final assembly of the catch can. Once test assembled the lower baffle plates rattled on the side walls of the can when it experienced shock impact, and over time this would have eroded alu particles that may have entered the crankcase or turbo so......after a lot of swearing I took it apart and modded the internals. It didn't help that the top of the can is slightly off centre due to its cheap construction. Trimmed the centre baffle for width and cut a section off the bottom. Also reduced the size of the baffles. Assembled with fresh locknuts. Thread sealed the level indicator fittings to the can body with Loctite 577. Top of can installed with smear of instant gasket on both sides of the rock hard card gasket that was supplied. No chance of it sealing without. Overall 5mm clearance between the baffles and can wall. No more contact / rattling. Might be less effective, but better than the alternative. Used aluminium anti-seize on the threads of the assembly bolts. They're stainless steel going into aluminium. The "little blue bastard" is now ready for install time.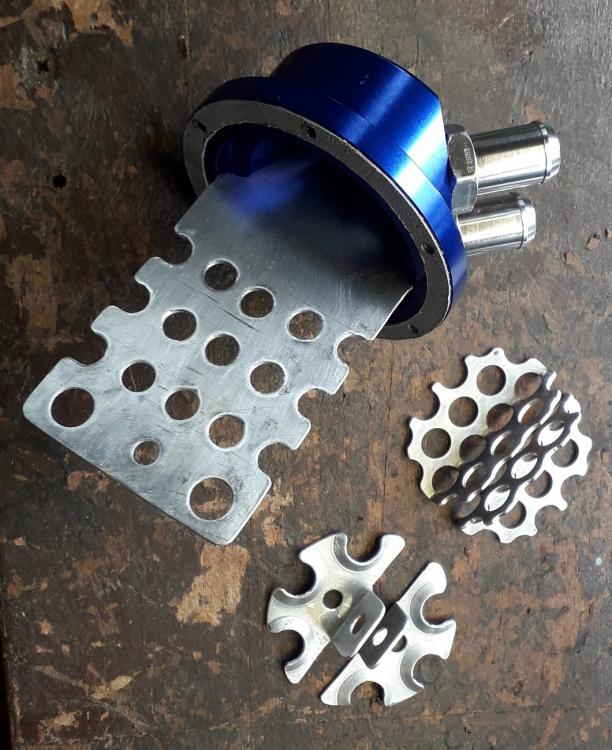


-
Thanks, I like to help out when I can. Always good to double check before install. There are 3 different types of Walbro 255lph which relate to the location of the fuel entry. Centre location, same side as exit or opposite side to exit. They have different part numbers and the choice depends on positioning in the tank and filter choice. The starlet / glanza kit will have the correct pump orientation entry to fit the stock pump hanger, just need to check which kit you get sent and the pump numbers match the first post above.
-
Not sure if you're using this for monitoring / datalogging or warnings so.... I'll add: fuel temp (see what the 2 pump setup and fuel cooler do, also see the relative relationship to EGT), Intake Air Temp. (pre and post intercooler relating to intercooler efficiency and EGT, knock threshold), Maybe gearbox oil temps. (not so bad on a manual but interesting to see what happens when the LSD gets a thrashing, if it's a clutch type.)
-
If its disaster aversion warnings, personally I would keep it simple and have one Big Red LED that means stop rather than individual lights that tell you a specific problem. It doesn't matter what's wrong you just need to stop now or check the info on a dial / readout to see what's up. Then you can check the log to see the data after you've saved the engine. How will these sensors be reported and logged? Piggy back? separate gauge with logging / warning outputs? I'm sure you know but a standalone engine management setup would have all the necessary I/O (inputs and outputs) wiring to do all of this and display it on a sexy dash aswell (Haltech anyone!). Obviously price is a factor also but the install and wiring would be simpler / neater than separate add - on systems not to mention the better engine control.
-
Claymore's sleeper 4efe+t-t+t build (R.I.P. the Nanza)
Claymore replied to Claymore's topic in EP91 Progress Blogs
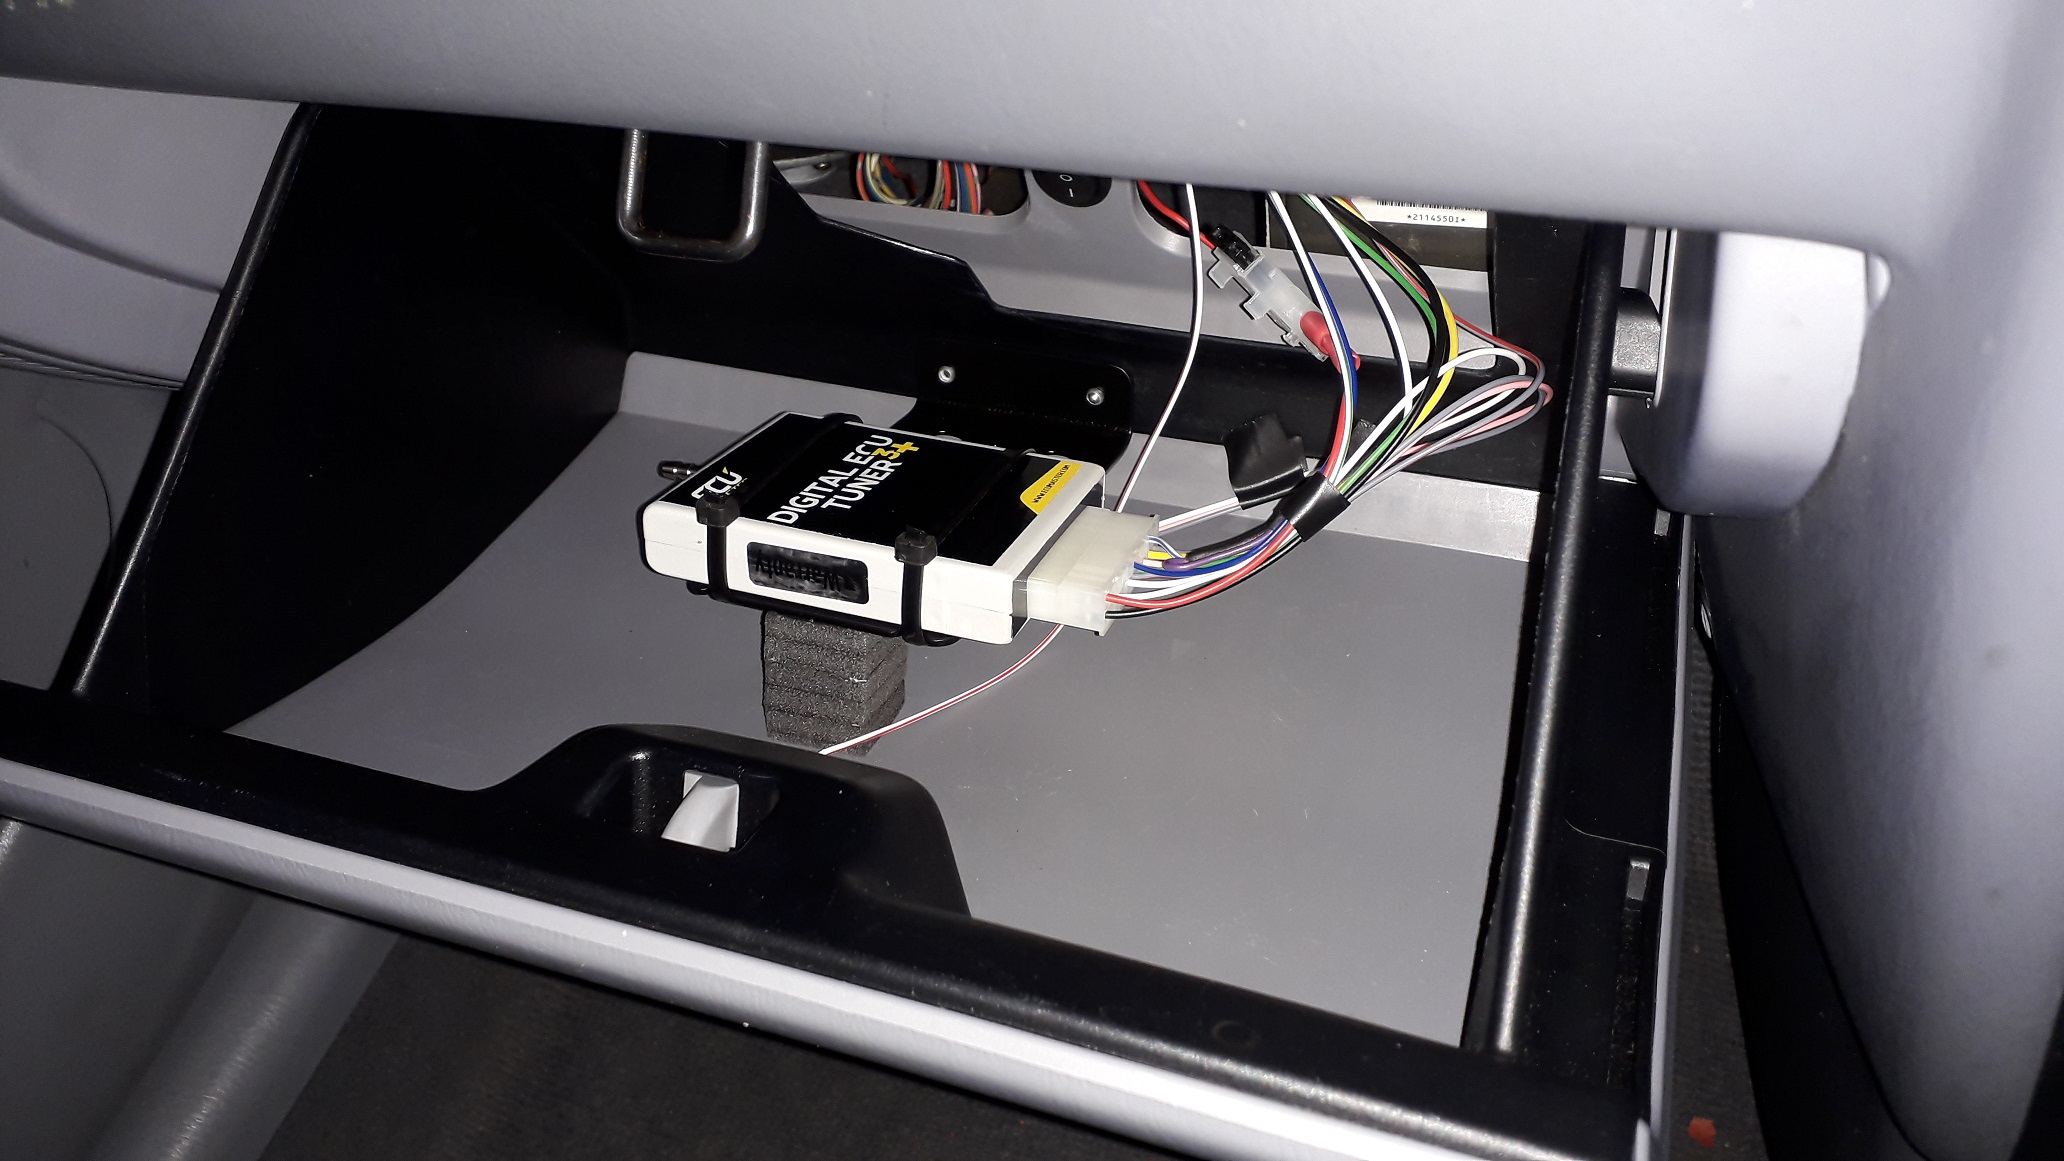
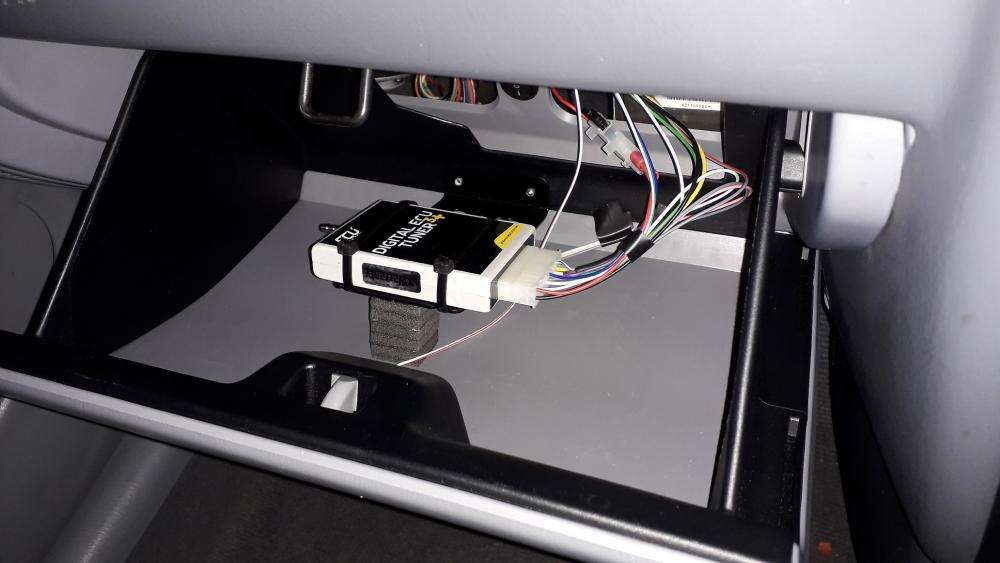
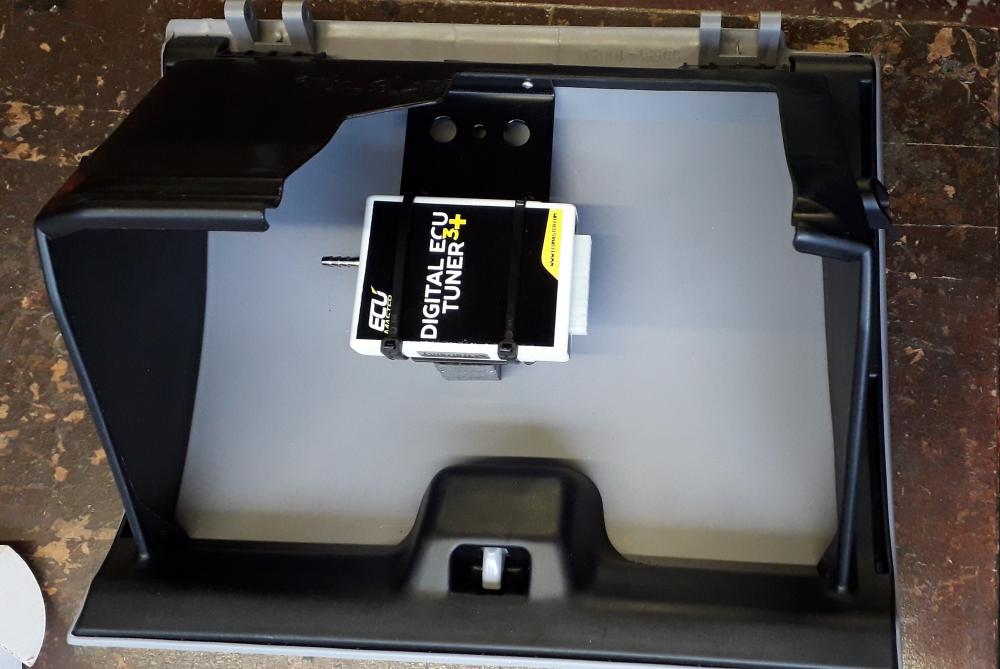
Fitted the box back into place (2 x plastic axles with arrow clip ends. Can be fitted to panel without removing panel from dash.) Hooked up the harness. There is plenty of room for the attachment of vacuum line and the USB cable access is fine also. Opens and closes without clashing, wiring moves neatly into glovebox.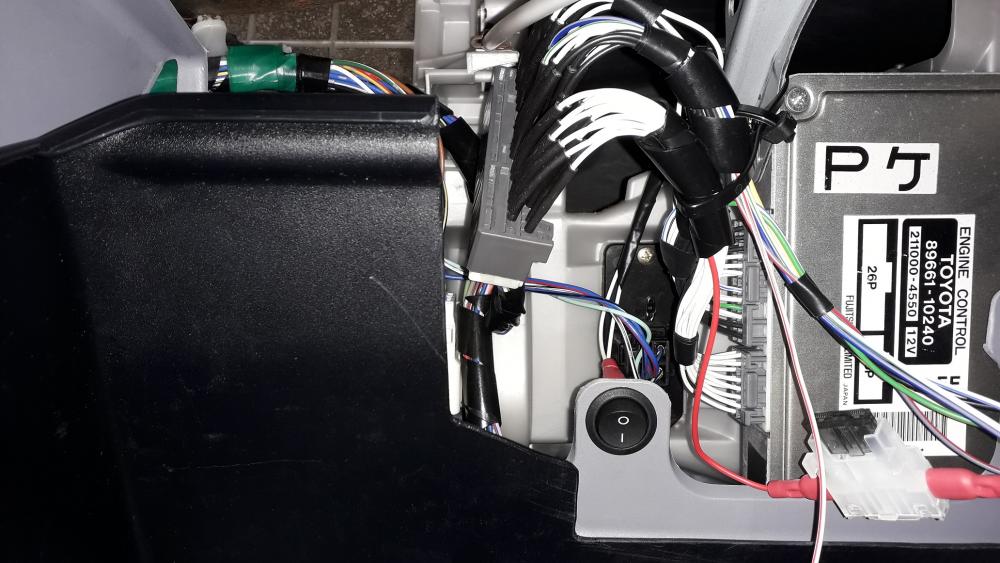
-
Claymore's sleeper 4efe+t-t+t build (R.I.P. the Nanza)
Claymore replied to Claymore's topic in EP91 Progress Blogs
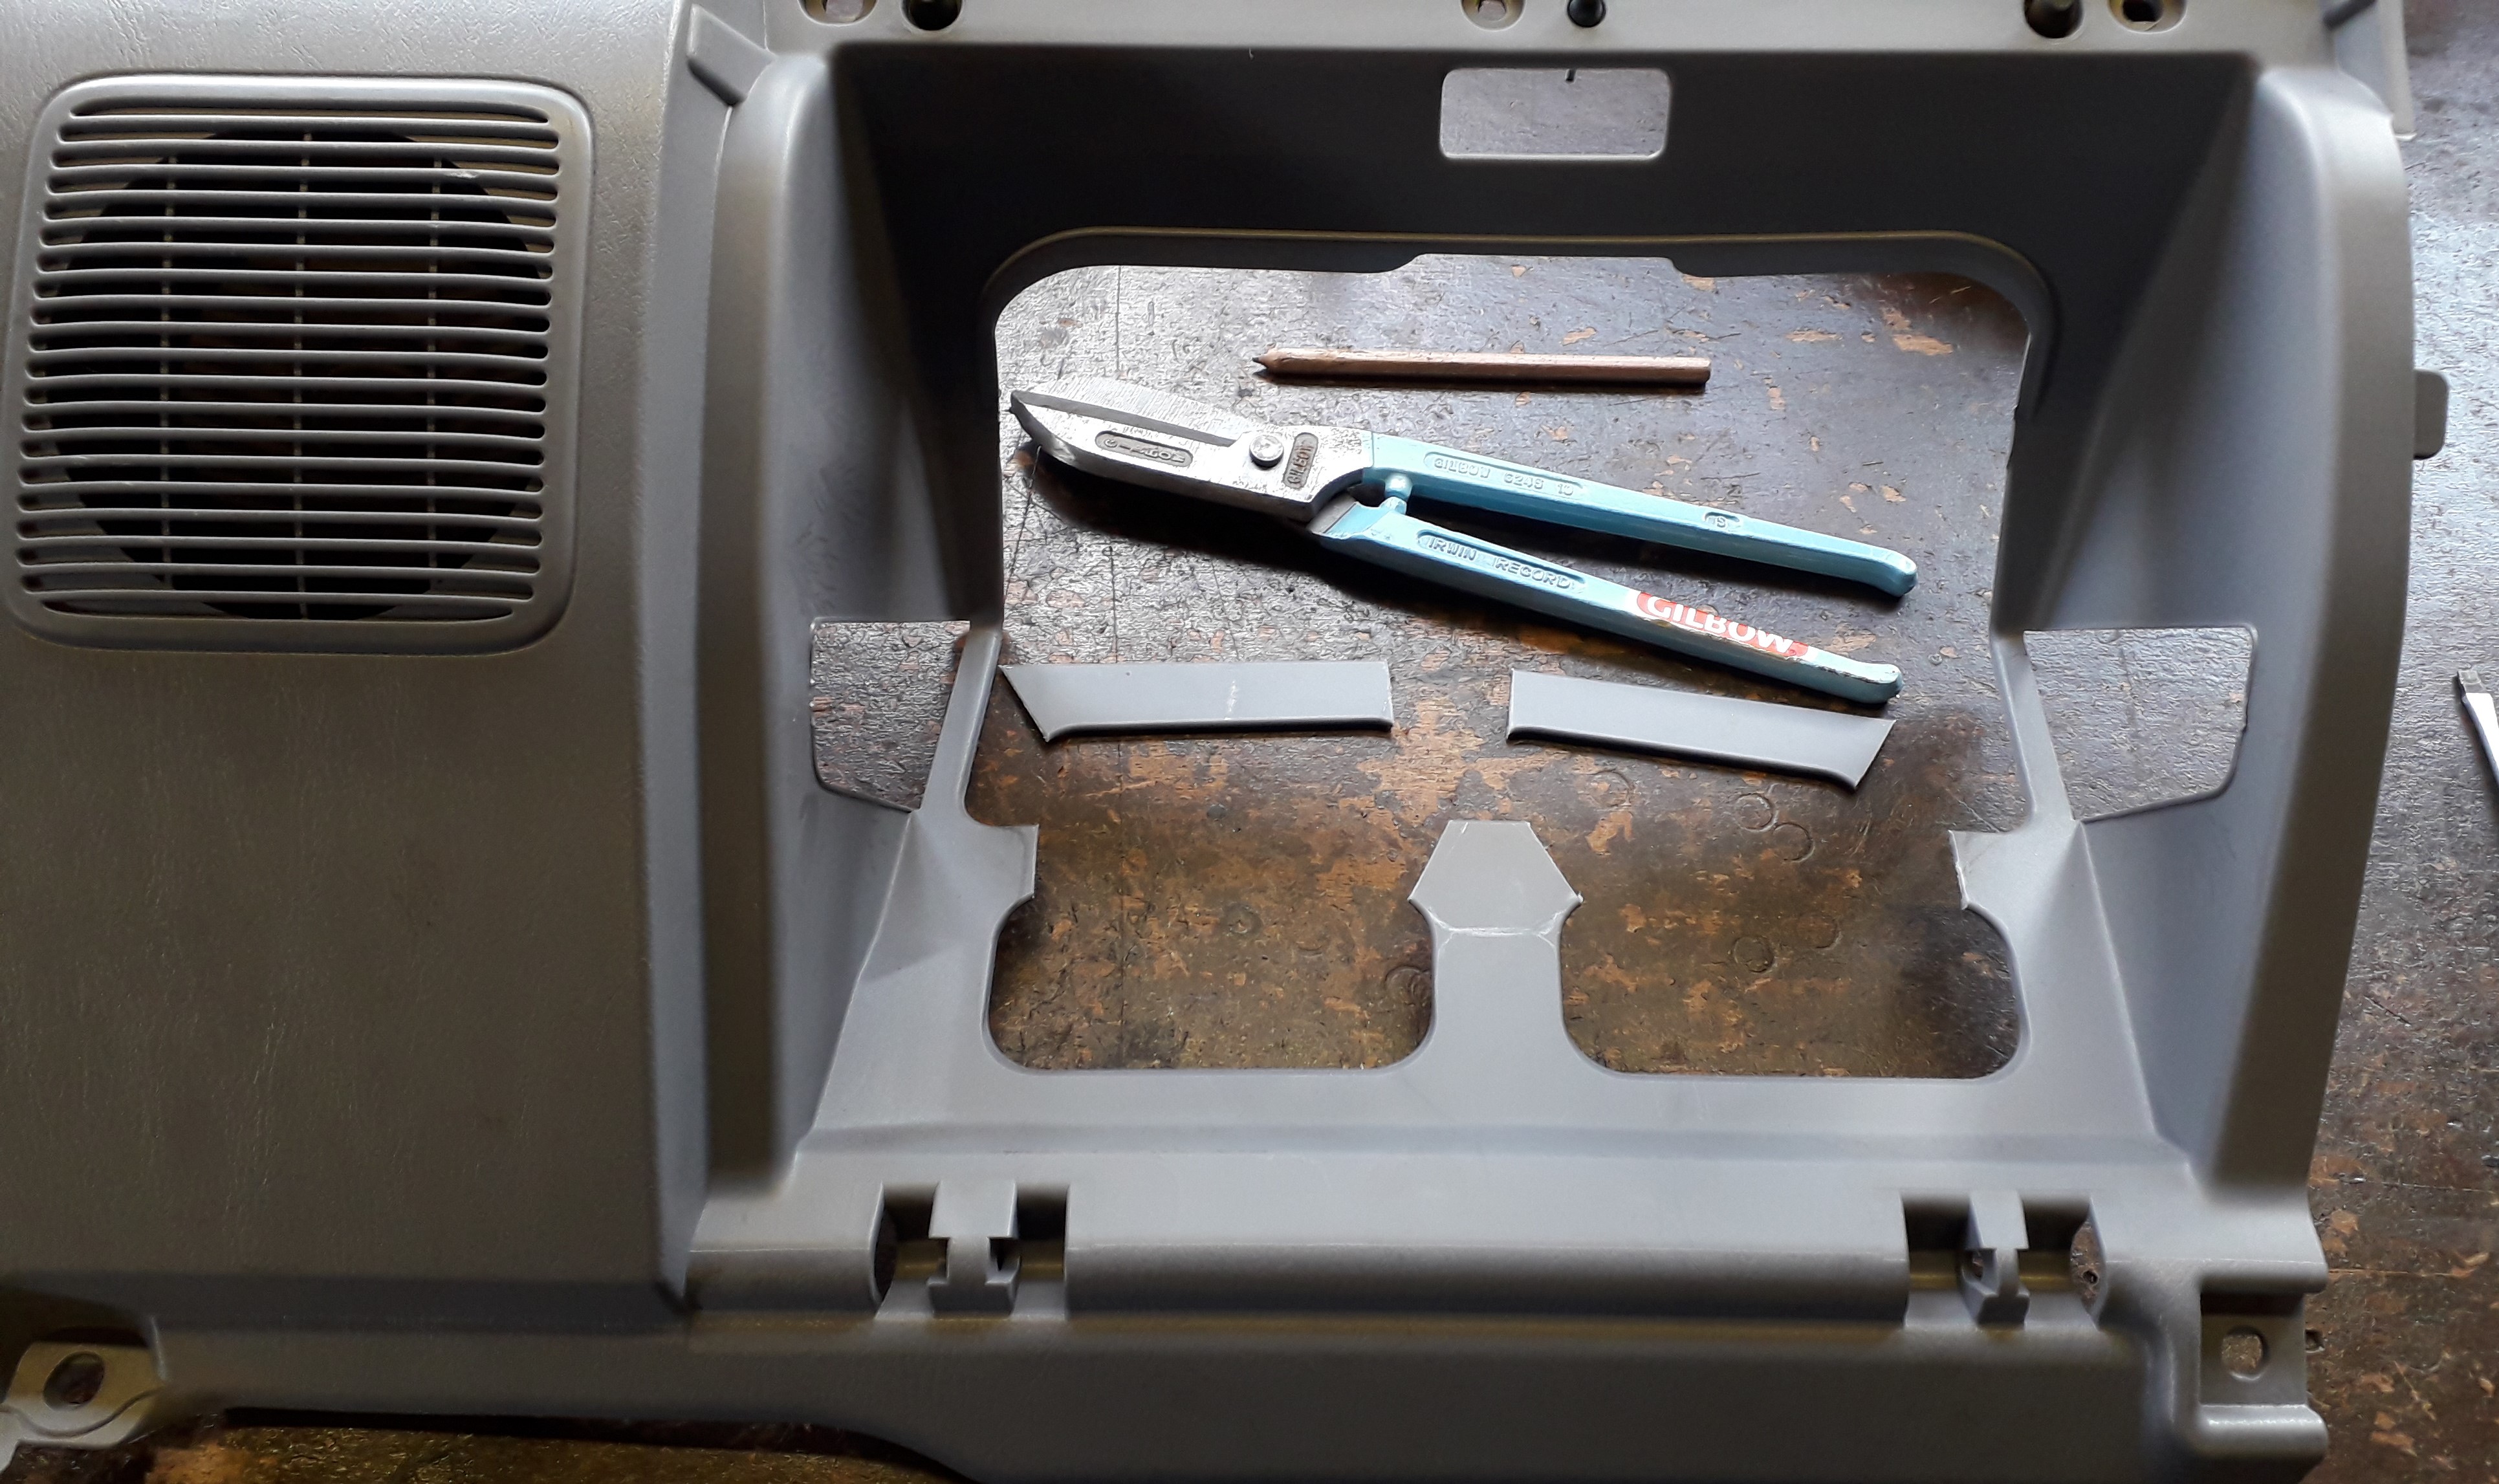
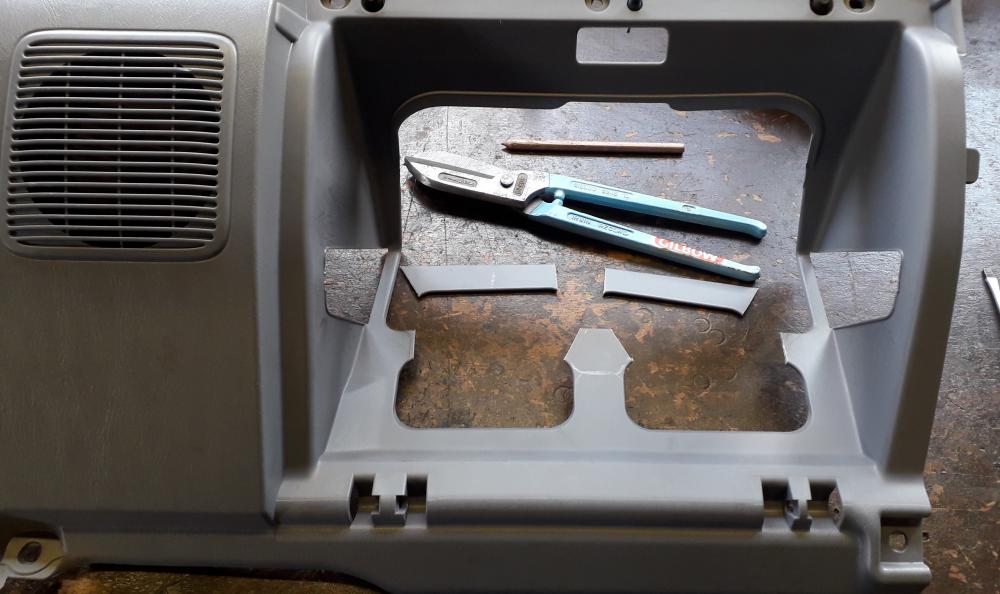
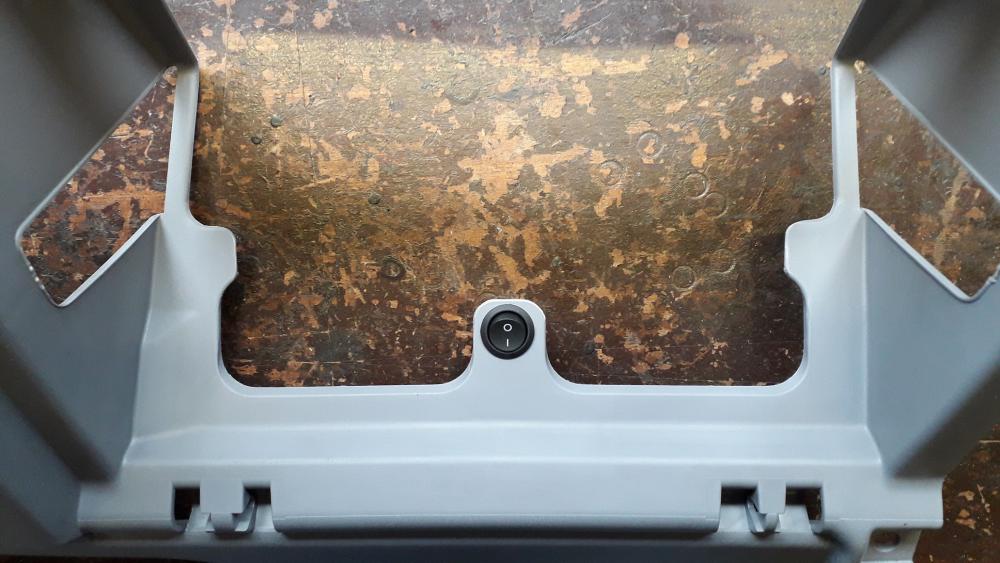
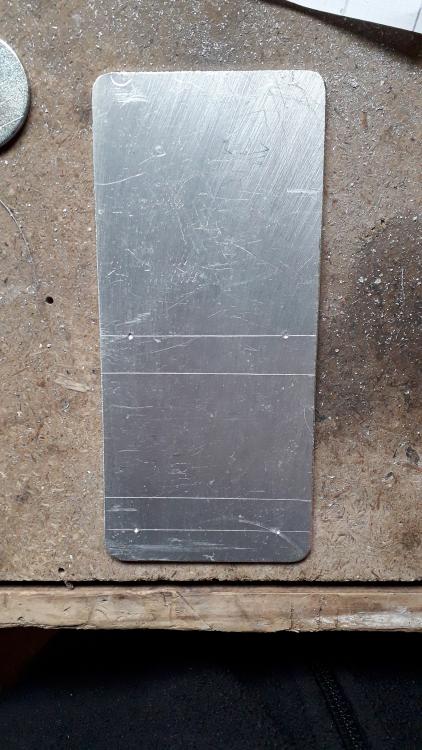
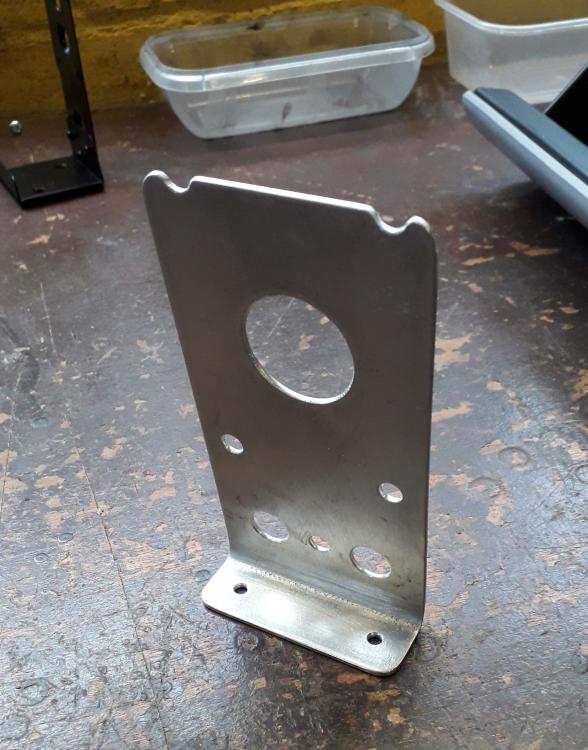
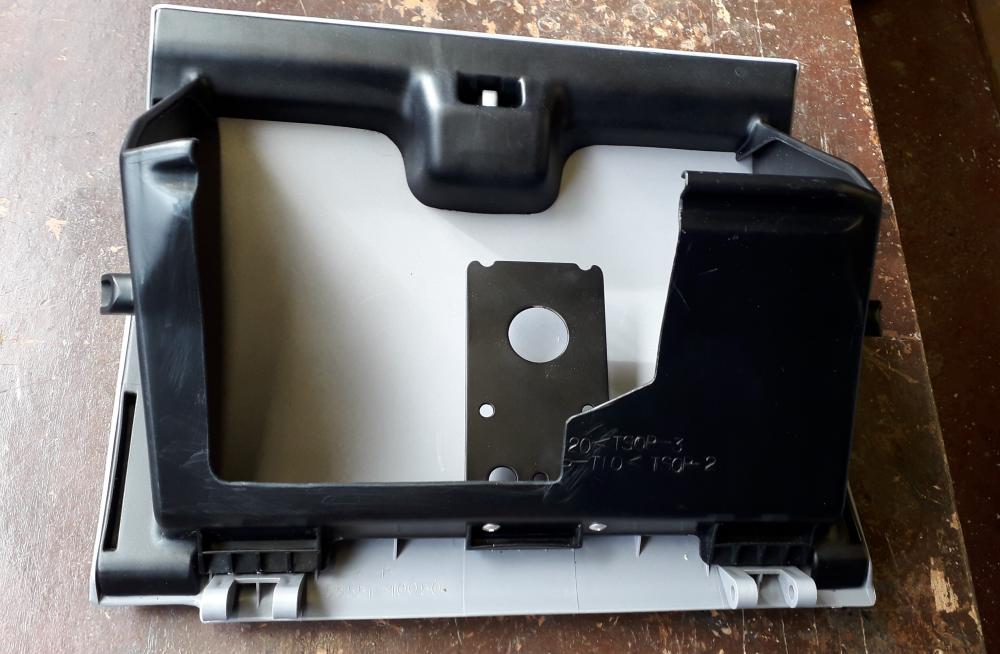
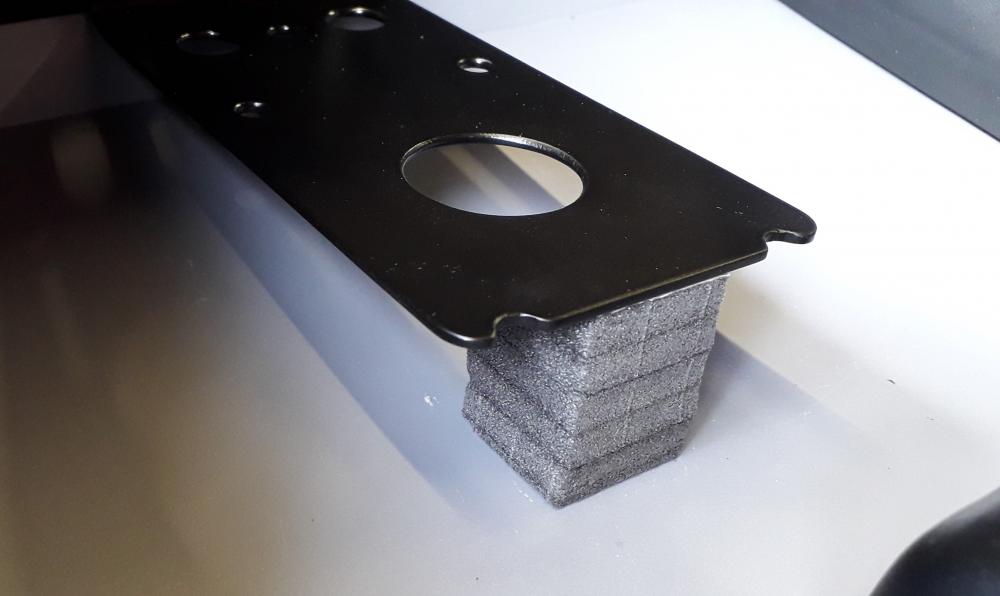
Needed to make some room for the new components and there isn't much room for the Toyota stuff so I cut out the "T" section of the panel. Drilled the hole for the O2 off switch (drilled the hole off to the left slightly on purpose 🙄 🤬) smoothed off the edges to prevent chaffing. Installed the PnP harness into the ecu and the car loom into it. I added spiral wrap plastic to prevent chaffing on the necessary areas (contact with parts / cable ties), bent it gently to shape and cable tied the harness up as far as I felt reasonable without causing any undue strain to the contacts at the header end. I could have moved it up higher and further back but I felt happier with its position here. This left an obstruction where the glovebox wants to be so it was time to chop the box up. First I drilled holes in the corners of the area to be cut out. This adds a curve to the corners where the cuts meet as you cant put it back in afterwards. Step drill and cutting disc to the rescue once more. Cut edges were scraped with a stanley blade to make smooth. Then I needed to make another bracket to hold the piggy back in place. Started by recycling another piece of scrap alu (2mm thick). Marked out the holes and bend line. Finished and folded up. The lower holes are to attach to the glovebox. The upper notches and related middle holes are for the cable ties to hold the piggy. The other holes are for lightness, no need to swage as the material was stout enough. Painted and riveted in. With the structural integrity of the box slightly compromised the bracket had a bit of spring to it and I countered this with some self adhesive foam blocks as a support foot. Strapped in ready to fit.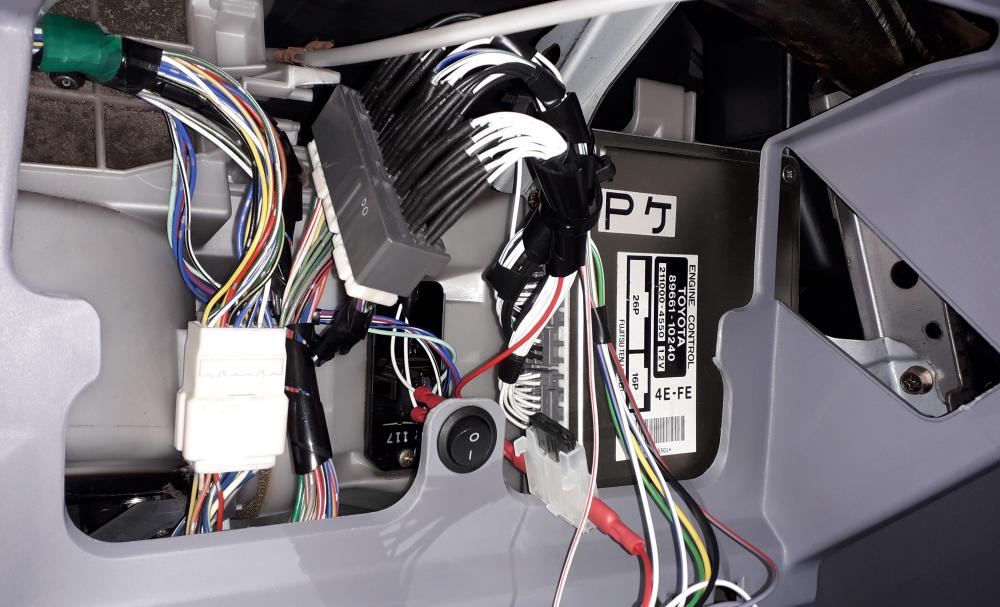

-
Claymore's sleeper 4efe+t-t+t build (R.I.P. the Nanza)
Claymore replied to Claymore's topic in EP91 Progress Blogs
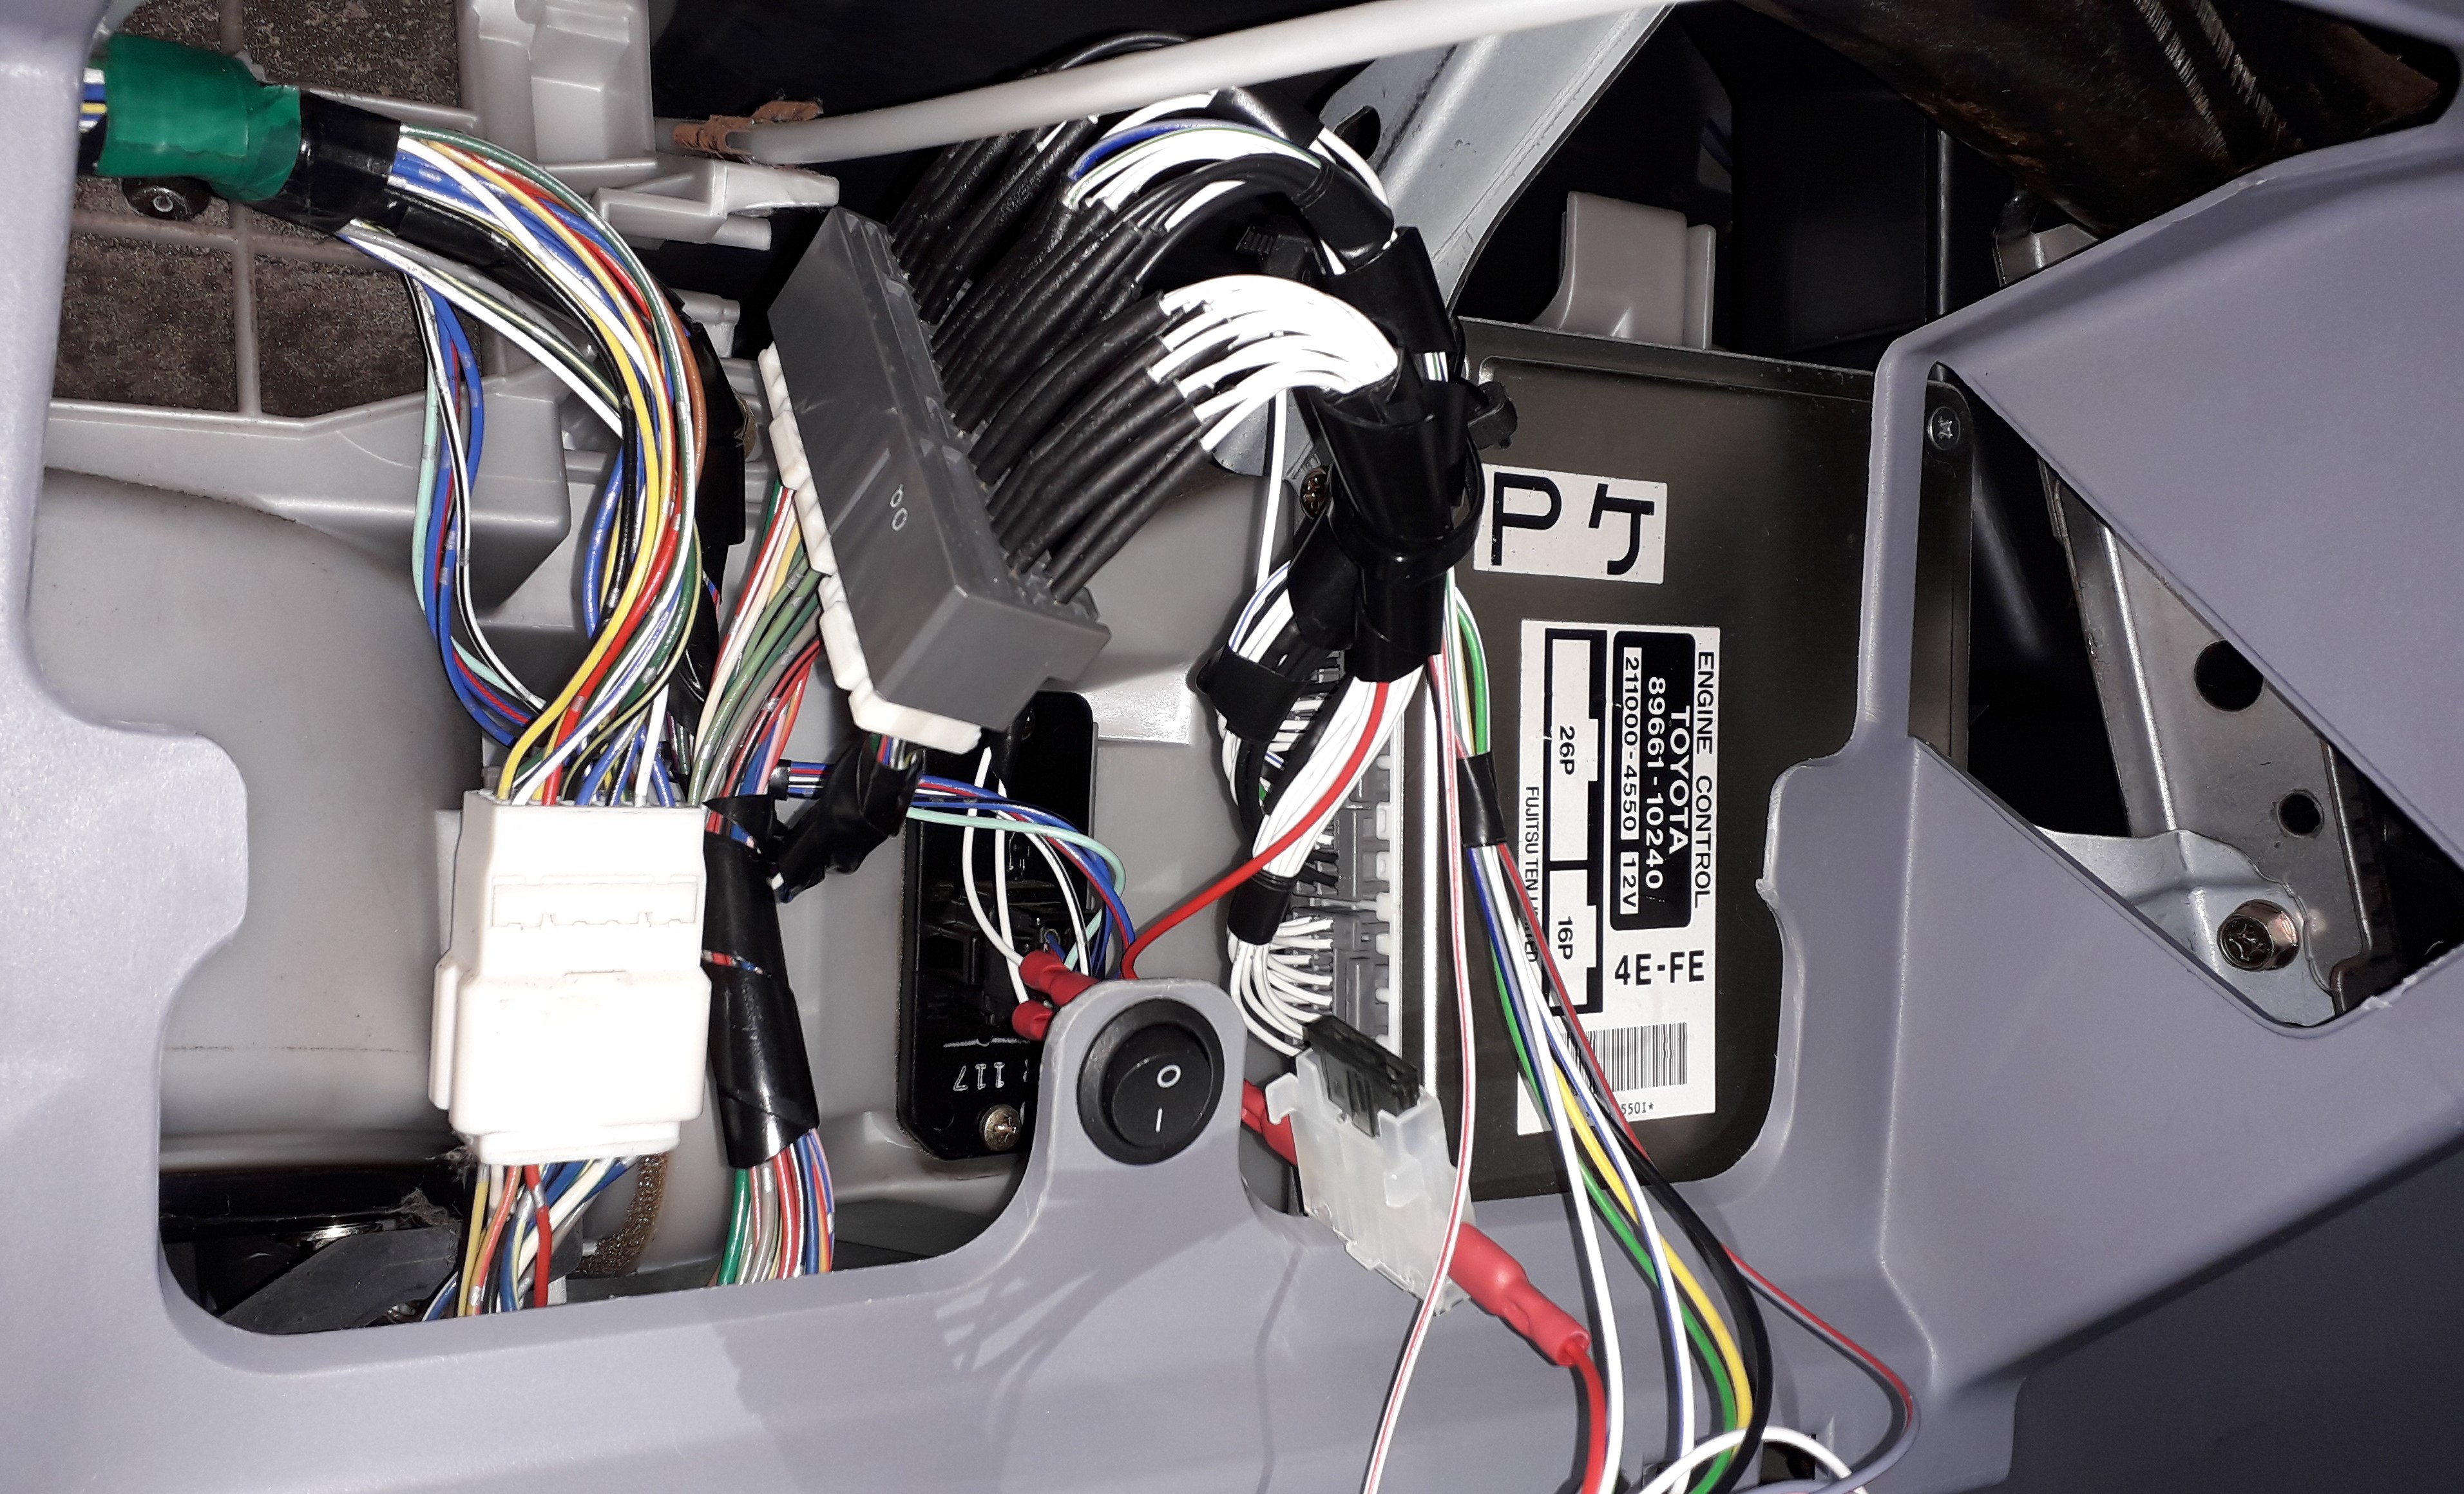
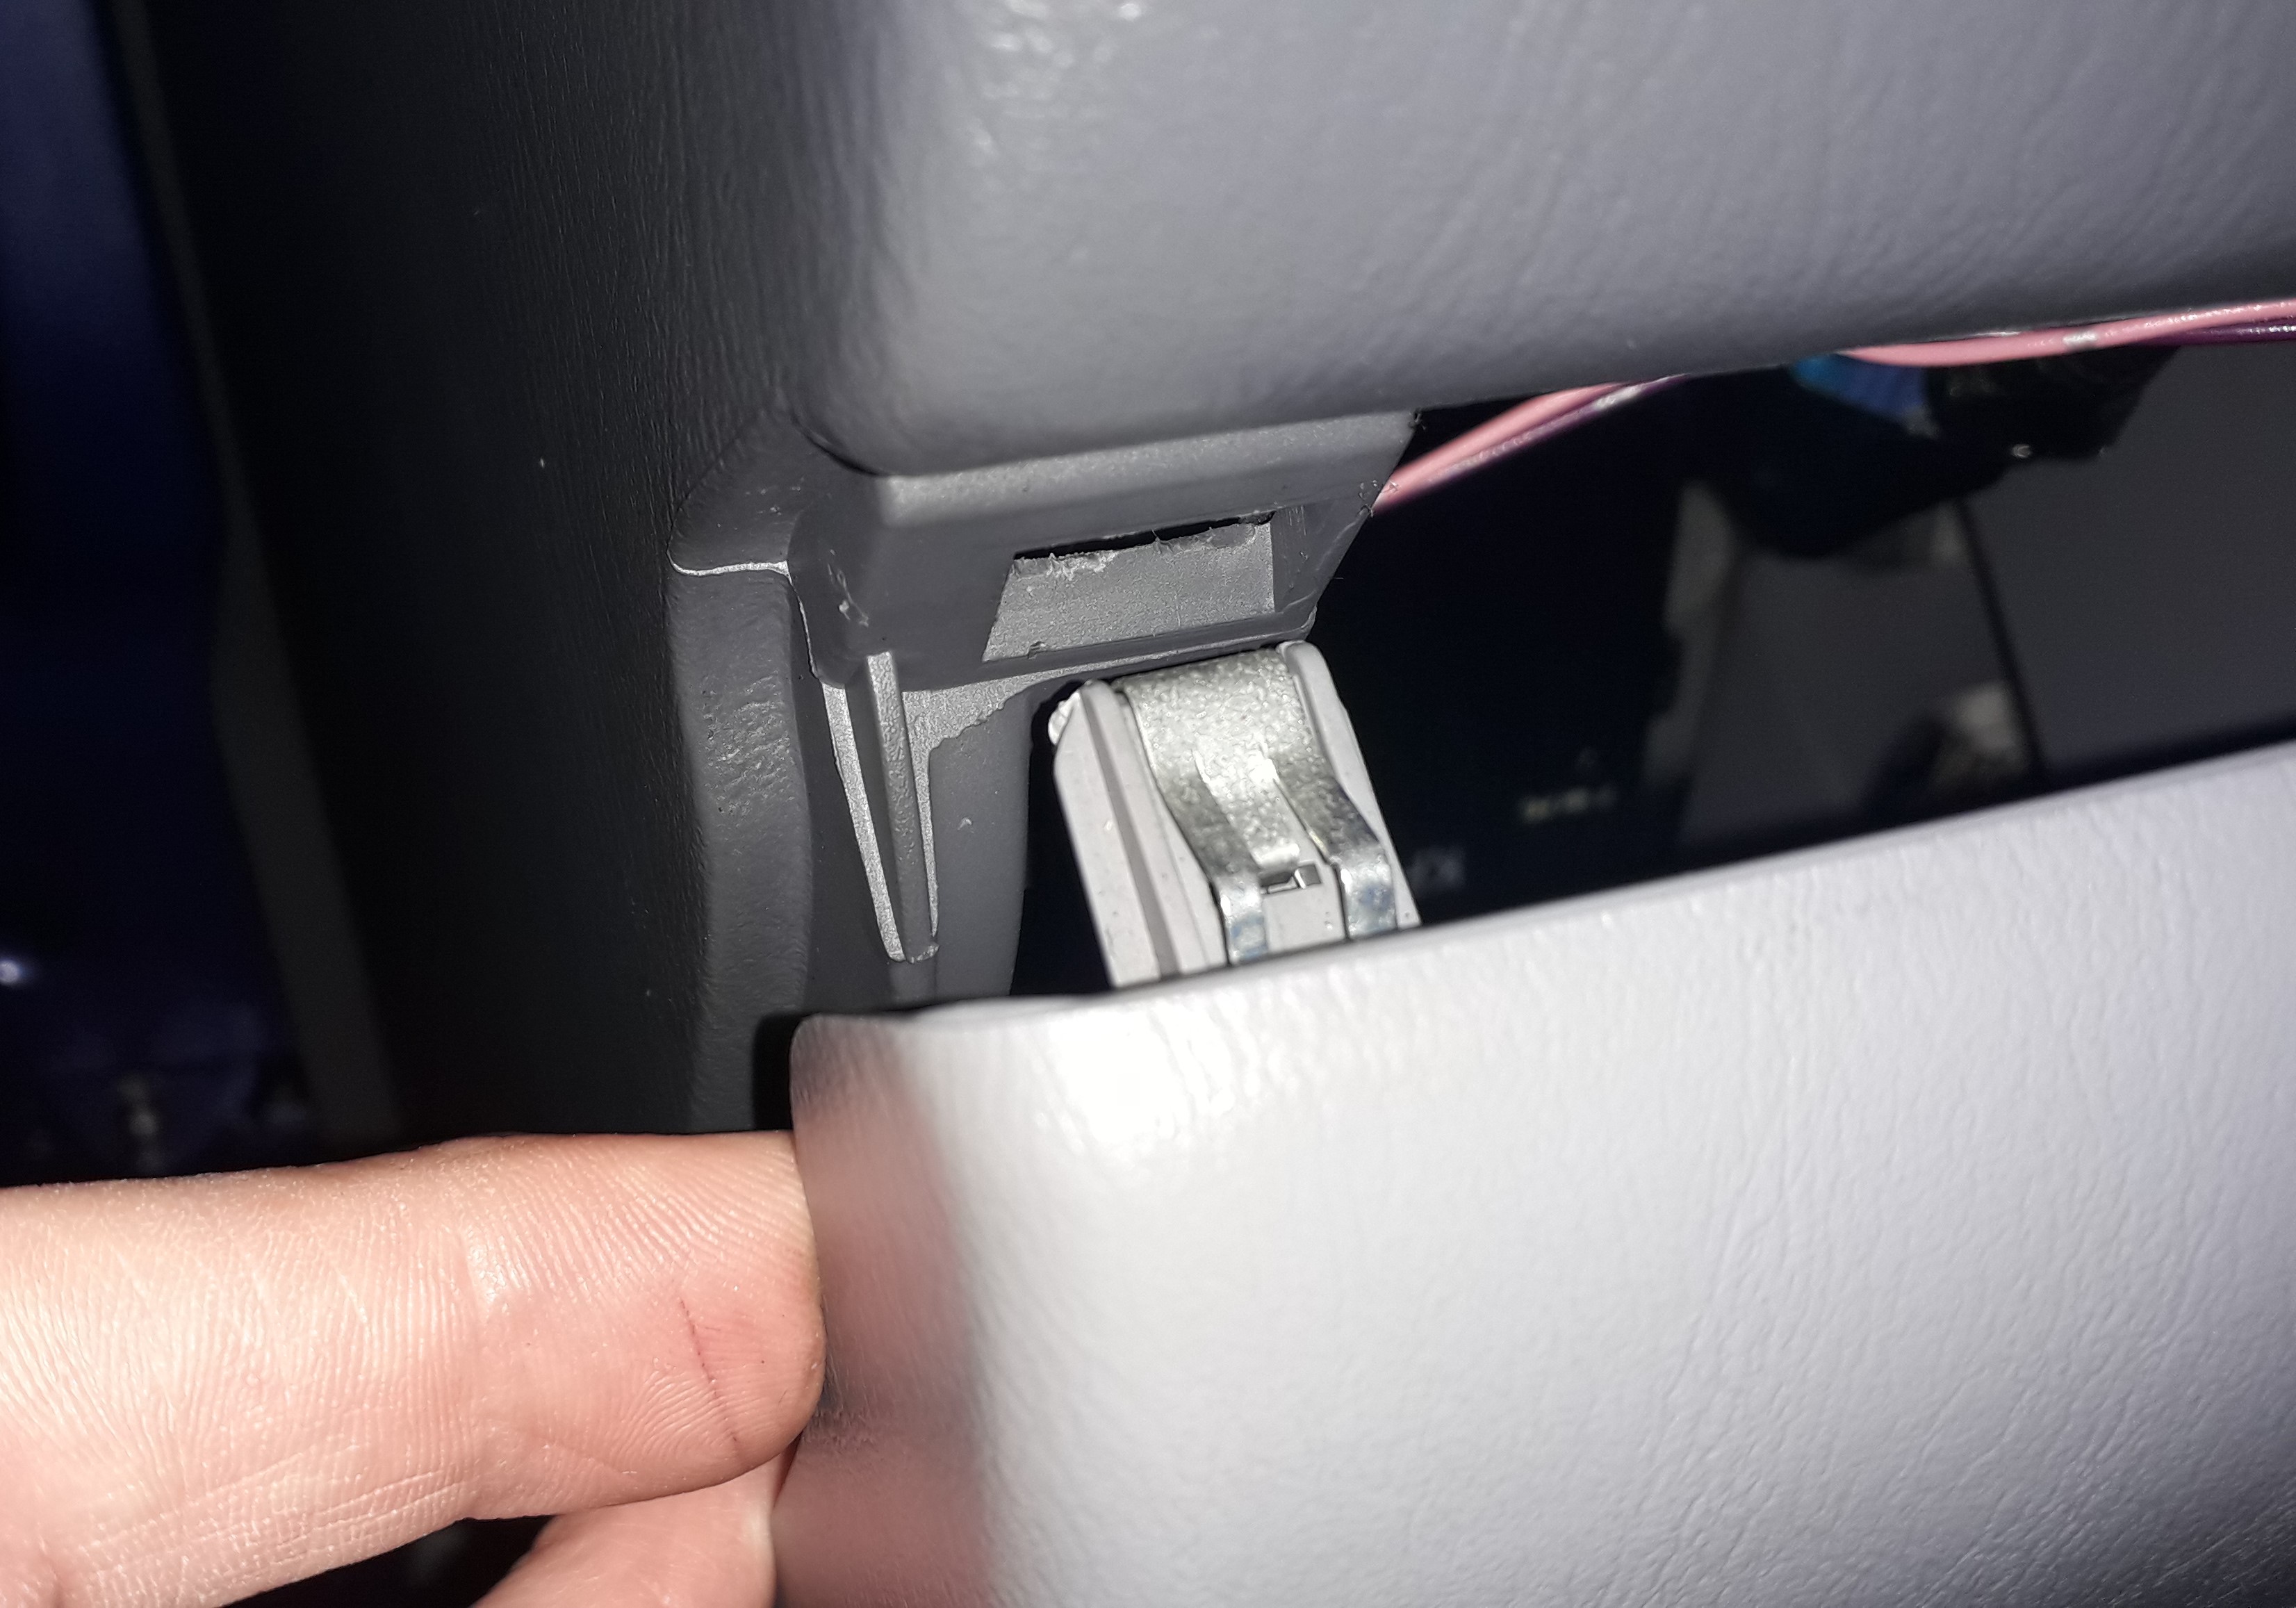
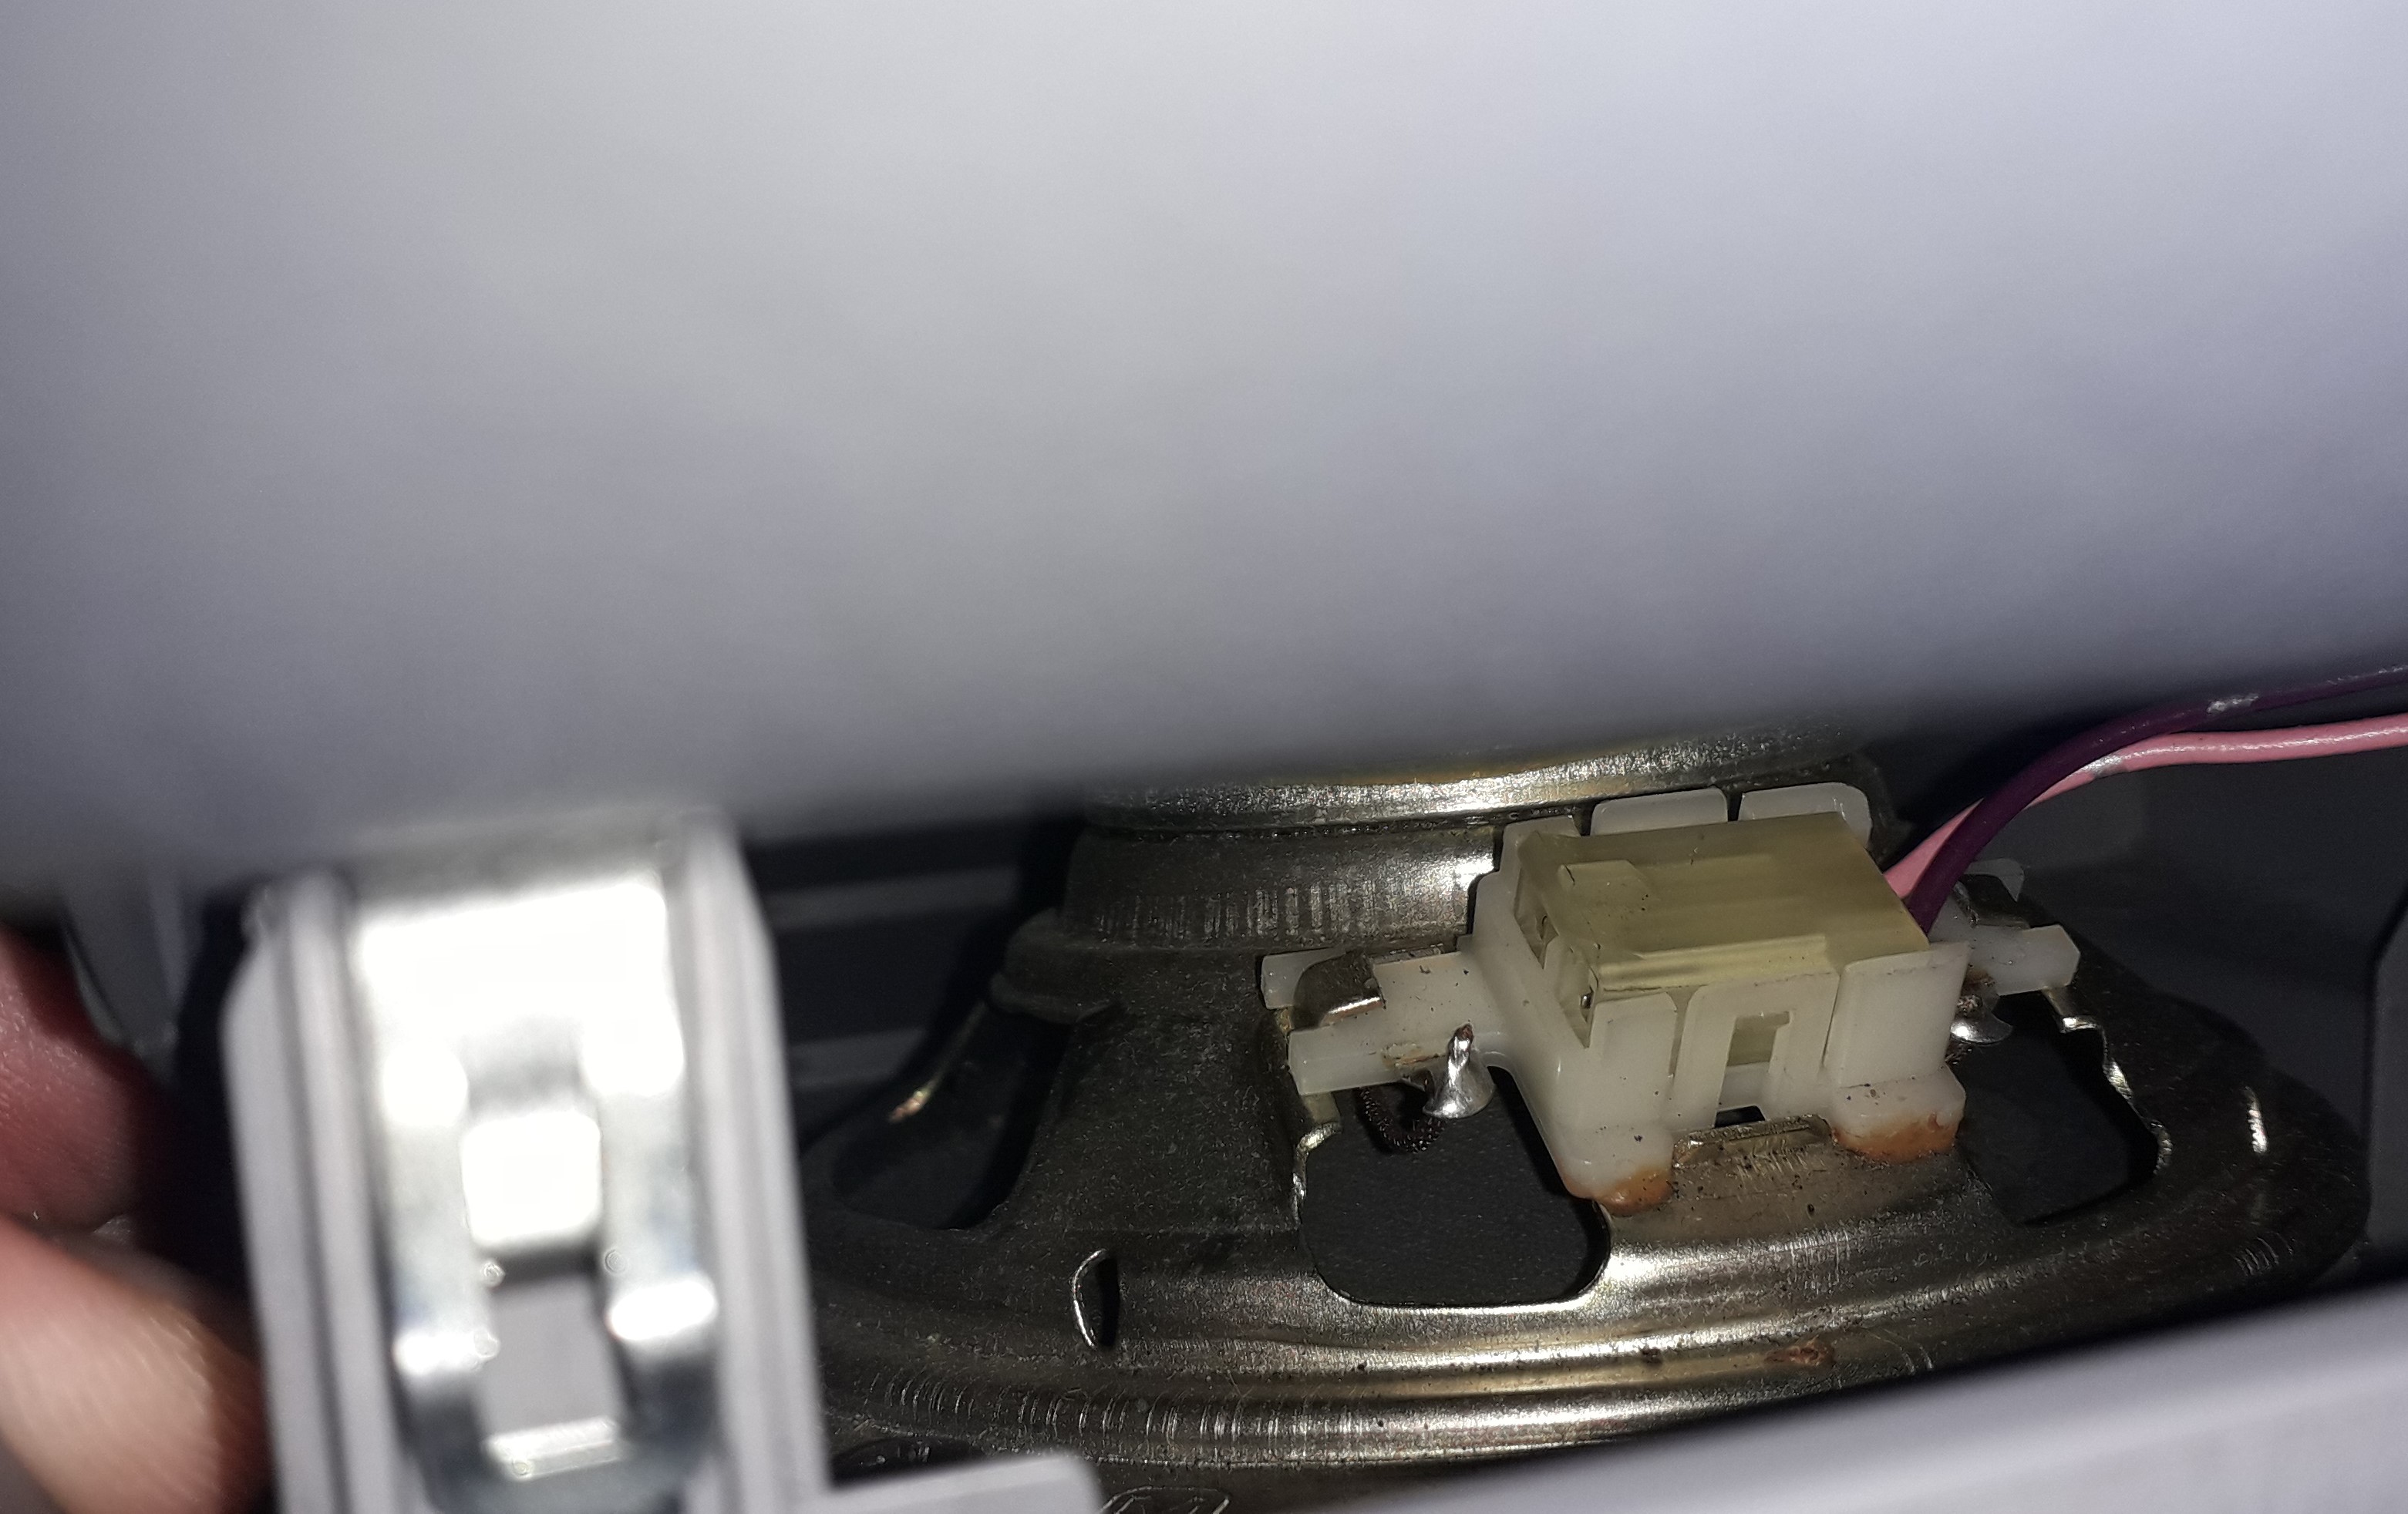
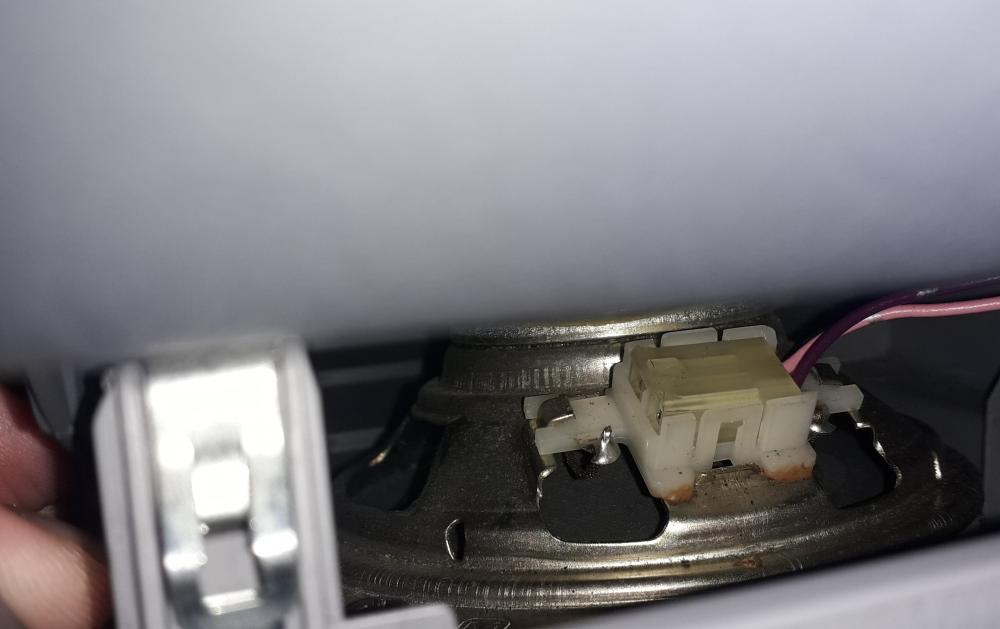
ECUmaster det 3 harness install. First I needed to remove the glove box and dash panel, there are 2 screws at the bottom to remove and once the glovebox is open there are three in a row at the top edge. Then I pulled the top left hand corner down to release a spring clip. The bent the plastic retaining clips off the speaker plug and disconnected it. The lower left corner of the panel needed lifting up and out from behind the sill corner trim piece, roll panel away from dash and out the door.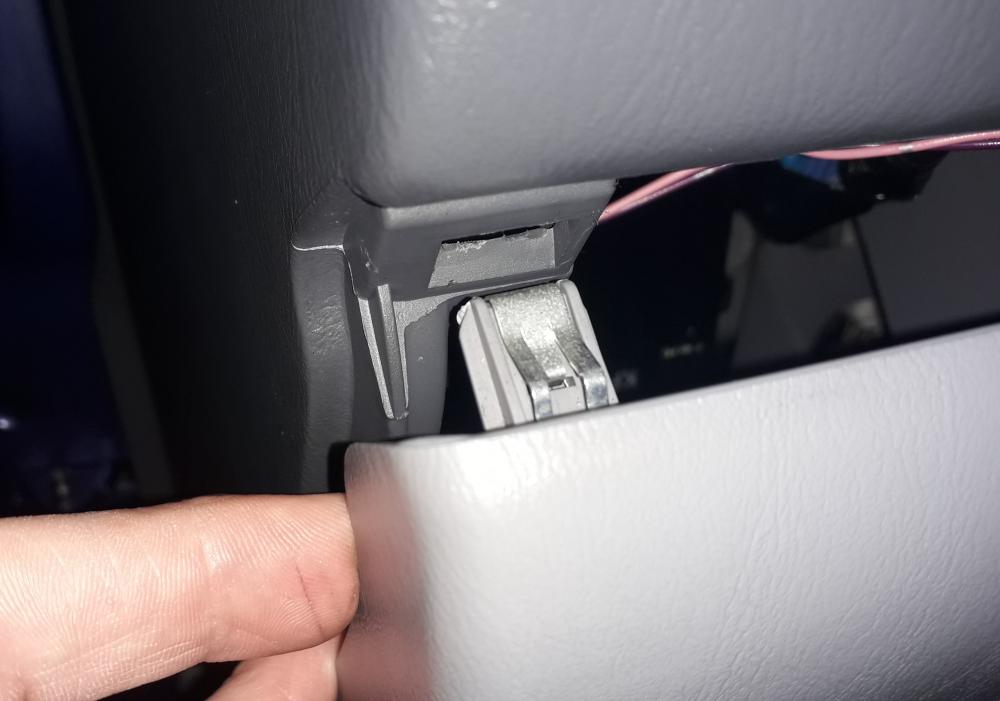
-
Great work mate. Well saved on the downpipe. What is it with number 3 runner restrictions!?
-
Claymore's sleeper 4efe+t-t+t build (R.I.P. the Nanza)
Claymore replied to Claymore's topic in EP91 Progress Blogs
Thanks guys. -
Silver on silver for me too.
-
Claymore's sleeper 4efe+t-t+t build (R.I.P. the Nanza)
Claymore replied to Claymore's topic in EP91 Progress Blogs
Thanks Dutchie, totally agree on the loom, parts are cheap but it took a few days to get it made that's why these looms sell for the price they do, man hours to design and make. I also had to buy 100 of each contact and splice (only used less than half including trial crimps) and needed to buy 2 pairs of different crimping pliers as I didn't have the specific ones for this type of work. But I learned a lot and no longer fear that side of things. The Haltech you tube channel has some great info regarding loom making etc well worth a look if you like that stuff. The road tax is about to run out, so I can take it off the road and the fun part of the build starts very soon.... -
Claymore's sleeper 4efe+t-t+t build (R.I.P. the Nanza)
Claymore replied to Claymore's topic in EP91 Progress Blogs
Thanks mate, appreciate the comment, would love an 8k9 glanza but these seem very rare. Congrats on the new addition to your stable also. Well done for saving another one. Would have been criminal to see that get broken. -
Thought I'd pass this on. Bought a Walbro 255 lph kit for the Starlet gt turbo / Glanza v and when it arrived it had the part number ITP231A. I freaked out a bit thinking it was a fake (because eBay) even though it looked very legit I decided not to risk it so I returned it for refund with the pump still wrapped. Bought another recently and the Part number was ITP231, opened it up to check everything and the fuel pump part number is GSS250. This fuel pump is not 255lph it is 190lph. I contacted Glencoe Ltd (UK supplier for Walbro, their website is on the warranty sheet) regarding this and their email response is below: "The ITP231 (GSS250) is 190LPH good for up to 350BHP, the ITP231A is the (GSS342) 255 LPH good for 500BHP. The GSS342 pump will swop with your pump in the kit." So just be aware there are 2 different kits listed for the vehicle and the pumps are the difference. The kit I bought was listed as a 255lph but I received the 190lph version.
-
Good stuff. Any info on the engine setup? Engine management, intercooler pics etc?
-
Claymore's sleeper 4efe+t-t+t build (R.I.P. the Nanza)
Claymore replied to Claymore's topic in EP91 Progress Blogs
Thanks mate, not a patch on your harnesses (geddit!🤣) but it's a solid first attempt. Would have liked to monitor coolant temps. also but I've runout of inputs 😕. I'm struggling to see the point of the onboard MAP sensor currently as I'll be using the Glanza 2 bar MAP sensor for the modify, load and datalogging signal. The non MAP det 3 would have an extra input which I could have used. Thanks again for the help via PM, it's much appreciated. By the time I'd built it I had learnt alot and I quite enjoyed most aspects, I got quite good at de-pinning connectors as well, but its a learning process. Currently wrestling the setup into the glovebox piggybackbox area. I apologise in advance to the designer at Toyota who worked so hard to package the ECU and wiring all those years ago........


.jpg.0ccadef078b2675d260366948ffbd55d.jpg)