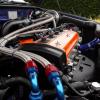
enzo_e492901 Posted March 7, 2010 Posted March 7, 2010 (edited) Some of you might of noticed that my old build thread and I disappeared a couple of weeks ago and I would like to explain. The day after I posted the finished engine bay on here I caught a couple of scum bags around my car. I did not know if they had seen it online or not but just to be sure I removed everything about my car from the net, not only this website. Anyway my paranoia has subsided and im back. I can resurrect my old thread with absolute accuracy because I drafted what I posted in Word first so I still have a copy of it. Old photo for reference How the engine stands now There will be updates about the bodywork soon. Thanks To Everyone Gavin Edited September 29, 2020 by enzo_e492901 Quote
enzo_e492901 Posted March 7, 2010 Author Posted March 7, 2010 (edited) I've had my 1997 Starlet Sportif for four years now un-modded apart from an engine from a Gi and a filter. I drove it hard and it started to burn oil lots of oil. I thought of a turbo conversion but I like instant N/A power so I decided to rebuild with one or two little tweeks. I love Toyota!! After an estimated 100,000 miles I pull this engine apart and there is very little ware. First this is a before shot I would like to take this opportunity to further confirm that I believe this engine to be assembled from mainly turbo components this is my guess... Rods = Looks like 4E-FTE Valve Springs = Look likes 4E-FTE Sump = 4E-FTE (It's Baffled) Head = Early 4E-FTE (Not to sure has an extra water channel in the head) Crank = Who knows This engine is going to be rebuilt with... New genuine toyota parts consisting of... Oil Pump Water Pump Gasket Kit Main shells Big end shells Piston rings Thrust bearings Distributor and rotor arm Trd 0.6mm head gasket a second hand Glanza/Corolla intake mani Some custom made (by me) parts consisting of Catch can Teflon manifold insulator (To insulate and to seal the extra water channel in the head) Teflon thtottle body insulator and some other bits... Stainless steel fasteners all round apart from critical locations (Head bolts, main bolts etc) Samco Silicone all round and I do mean all round Almost every metal bracket in the engine bay has been striped of rust chemically, etch primed and sprayed. I didnt decide to write this untill after I started so photos start half way through engine dismantling. Block on bench almost dismantled Block dismantled, acid cleaned, and cylinders horned Head hot tanked, decarbonated and skimmed still to be phosphorus brightened One piston cleaned (2 hours lol) Throttle body before dismantling and clean after Catch can Manifold Last for now colour engine block is going to be. orange my fav colour. Stay tunes for more soon Gavin -------------------------------------------------------------------------------------------------------------------------------------------------------------- Busy again today as ever I forgot to say at the beginning its getting a cam belt kit too but I guess that might of been obvious. Tools of choice for today Cleaned cams Cleaned another piston and rod Cleaned engine bay More painted brackets I missed in yesterdays post Manifold and TB insulators templates almost finished Don't know why I took this one I just kinda like the look of them. lol More soon Gavin -------------------------------------------------------------------------------------------------------------------------------------------------------------- First i'm going to share a brainwave I had eriler today... If you remove the stock air box you loose a place for the air intake temp sensor but if you keep the stock black rubber intake pipe I have a solution for you. Remove the intake resonator. Get ahold of a 25mm PVC plumbing end cap (I got mine from a aquarium supply place fishfurfeather.com). Use the grommet from the stock air box and make a hold in the end of the end cap and insert the grommet. Trim the round disk section of the air intake sensor and then insert that into the grommet. Now fit this assembly in the hole left by the resonator. Photos below... Now for todays update wicked, super, fantastic, chevy orange engine enamel And something I find really funny there is more ware on the oil seal riding faces made by the lips of the seal than in the rest of this engine. lol How can rubber do this? Gavin -------------------------------------------------------------------------------------------------------------------------------------------------------------- Sorry it's been a while since I mentioned a small orange coloured update above^^ which was going to be photos of the block and rocker cover painted. I had an orange artistic tantrum. in other words I didnt like the shade of orange so sent it all out to be acid diped again. Rocker cover and block painted but not cleaned up/polished. I hope to start rebuilding the engine over christmas so watch this space as I now have all the parts apart from head gasked and cam belt kit. Ryoal Mail lost the parcel after it took over a month on back order from TMD. I have now reordered a head gasked from RHD Japan and cam belt kit/components from Toyota. Gavin -------------------------------------------------------------------------------------------------------------------------------------------------------------- I just thought I would post a little update to let people know that im still working on this. I rebuilt the head last night and I simply cannot wait untill its finished. Its been in bits about 2 months now and I really miss my car but it is starting to look kinda like an engine again. yay Gavin -------------------------------------------------------------------------------------------------------------------------------------------------------------- Hello again. I have now finished cleaning everything and hope to start the rebuild on monday. I have lots of little assemblies cleaned and ready and waiting to make the rebuild easer. I want to stress how important I believe a clean rebuild is. I think pics are in order Sump cleaned before painting Crank cleaned Pistons Distributor cleaned and rebuild And I finally have my TRD head gasket. YAY I get lost in the detail sometimes and it takes too long and I loose motivation. But as they say the eye is in the detail. More on Monday or Tuesday Gavin -------------------------------------------------------------------------------------------------------------------------------------------------------------- Ok im a bit early I know but as I finished it early I just had to show you all my cleaned up rocker cover. enjoy Gavin -------------------------------------------------------------------------------------------------------------------------------------------------------------- Today I prepared the Block and installed the Crank, Oil Pump and Rear Oil Seal Housing. So this Plus this Equals this Gavin -------------------------------------------------------------------------------------------------------------------------------------------------------------- Busy again today. Photos speak a thousand words... I also machined the Throttle Body Insulator And trial fitted it with two bolts Gavin -------------------------------------------------------------------------------------------------------------------------------------------------------------- Ok I checked the Main Bearing and Big End Bearing Cap toruqes today after 48 hours and installed the Oil Strainer, Sump, Rear End Plate and Flywheel. Photos... I plan to have the Clutch and Pressure Plate installed Monday morning and the engine in sometime on monday afternoon. I am fitting it without the head on and with the gearbox still in the car only really because I dont want to take the bonnet off and thats the way it came out aswell. Gavin -------------------------------------------------------------------------------------------------------------------------------------------------------------- I installed the Clutch and Pressure Plate and got the Engine and some other bits and bobs in today. Will do Head, Cams, Timing Belt and few other bits tomorrow, then I have got to do the wiring loom in new black (not dirt gray) split loom. Still loads to do. Photos Gavin -------------------------------------------------------------------------------------------------------------------------------------------------------------- Today I installed the Water Pump, Head, Cams, Timing Belt, bottom Timing Belt cover, Crank Pulley, Starter Motor and the Alternator. Tomorrow a day doing the new split loom. Gavin -------------------------------------------------------------------------------------------------------------------------------------------------------------- Thought id update this. There has been a little delay. I decided to get ahold of the tees that go with the split loom and have had to wait for them. They are now here and I have startrd. While I was waiting I managed to get all the other little bits sorted and got the manifold insulator machined. I also got my earls today. Split Loom Tees Wiring taking shape Manifold Insulator Earls Fittings More soon Gavin -------------------------------------------------------------------------------------------------------------------------------------------------------------- I'm getting so excited now should only be a few days. I had a break from wiring looms today I will finish them tomorrow and installed the manifold/throttle body, distributor, a few other bits and some samco. Only one photo today. Please excuse the sheet youll see under it in good time. lol Gavin -------------------------------------------------------------------------------------------------------------------------------------------------------------- I didnt do the wiring loom today, I cound not be bothered. I did however get the air filter bracket made, made some new earths and fitted a new drivers side weather strip, passanger side tomorrow. I forgot to say yesterday that I fitted a new scuttle panel and with the weather strip it makes a real difference. I have new indicators for both sides to go on aswell. I will be replacing both headlights in the summer and when I do they will be the toyota clear ones. Also I have forgotton to say for weeks now I have replicated the rubber diped ends on some brackers, it had to come off for painting and it was peeling anyway. I used black Plasti Dip Earths Weather Strip Scuttle Panel Plasti Dip And from the recent snow. Shes standard on the out side but that is going to chance soon too. Spot me at the back. lol Gavin -------------------------------------------------------------------------------------------------------------------------------------------------------------- Yesterday I finished the wiring loom and today I made new starter and alternator cables, made my first earls hose and installed it, installed the radiator and expansion bottle along with a bit of Samco. Getting very close now. Gavin -------------------------------------------------------------------------------------------------------------------------------------------------------------- I am very happy to say that yesterday after building up oil pressure she started on the first turn of the key. Needless to say im over the moon. I did the ignition timing and took her out and everything seems ok, no leaks. Time for the good bit, photos... Photos are now in the first post. This update ends the engine phase of this build stay tuned tho because in the summer there is more to come. Gavin Edited September 29, 2020 by enzo_e492901 Quote
micky boy Posted March 7, 2010 Posted March 7, 2010 Good man Gavin looking forward to some updates mate Quote
Idrees Posted March 7, 2010 Posted March 7, 2010 Amazing build up and attention to detail there mate.Idrees Quote
Amjad Posted March 7, 2010 Posted March 7, 2010 Good to see you back buddy I know how you feel, I get really paranoid when people walk past/loiter by by car ;)Keep up the good work, if the bodywork will be anything like the job you've done with the engine, this'll be a truly epic project Quote
LukeSR Posted March 7, 2010 Posted March 7, 2010 Absolutely mint matey I love the attention to detail Quote
the-dalester Posted March 7, 2010 Posted March 7, 2010 great project mate, im liking the orange engine looks sweet Mark Quote
5T4R7ET N/A Posted March 7, 2010 Posted March 7, 2010 i was shocked when you removed it all, now shocked its all back!! LOLThis epic build needs to be on this forum.you get a lot SCUMBAGS nosing around looking inside cars and that,get a decent alarm if your a bit paro, when they see the bright blue flashing light from my Clifford they f**k off!keep up the good work mate Quote
Glanza-Love Posted March 8, 2010 Posted March 8, 2010 I dont care if people steal my car... i have insured everything! Quote
Guest cheshireglanza Posted March 8, 2010 Posted March 8, 2010 loving this build come do some work on my engine bay lol Quote
enzo_e492901 Posted March 8, 2010 Author Posted March 8, 2010 Thanks for the kind words everyone.Gavin Quote
enzo_e492901 Posted March 8, 2010 Author Posted March 8, 2010 loving this build come do some work on my engine bay lolWish I had the time because I would love to.Gavin Quote
lukEp Posted March 8, 2010 Posted March 8, 2010 I dont care if people steal my car... i have insured everything!You cant insure effort, time and passion mate insurers dont give a flyin *@$? about stuff like that!!! Quote
Russleh Posted March 8, 2010 Posted March 8, 2010 yeh dunno how you couldnt care about your car being stolen just because its insured. so much effort to go in for it to be stolen and then your premium to go up. i wouldnt be happy with that . anyhoo back on topic. i asked ya ages ago what paint was used on the block and i cant remember what ya said. any idea where i could get a hold of some ? Quote
enzo_e492901 Posted March 8, 2010 Author Posted March 8, 2010 (edited) The paint is an acrylic. I got it from an antomovive paint supplier, that's your best bet!Gavin Edited January 25, 2012 by enzo_e492901 Quote
Liam_D Posted March 8, 2010 Posted March 8, 2010 Glad this is back on the forum buddy,is a inspring build. Looking forward to seeing what you do to the bodywork on this mate. If the engine is anything to go by its gonna be pretty awesome!! Quote
Craig_N Posted March 8, 2010 Posted March 8, 2010 WOW thats some good work mateLooks like a lot of time and effort has gone into this. Quote
bucketep91 Posted March 8, 2010 Posted March 8, 2010 I dont care if people steal my car... i have insured everything!im going to steal your car Quote
Sparky Posted March 12, 2010 Posted March 12, 2010 Good to see the thread back mate, its top work!!Bet Love would cry like a baby really if his car got nicked Quote
enzo_e492901 Posted March 14, 2010 Author Posted March 14, 2010 (edited) As im getting close to starting the bodywork (next week hopefully) I thought id outline my plans. I have/want to ... Replace part of the drivers side rear quarter panel and sill. Remove the bump strips from both sides. Smooth the ridges that are under the bump strips. Drivers side only to start with and I bet no one notices ive only done one side for a month or two. (The only smoothing im doing youll be glad to hear) Mod the front bumper. Replace passengers side front wing Spray the complete drivers side of the car, front bumper and passengers side wing. I might if I have time do the bonnet aswell. Will do passengers side of car and rear bumper in a month or two. Try to get a TTE Spoiler, spray and fit. Compound and polish everything ive sprayed and the boot lid. The panel patches will be cut out of genuine Toyota body panels welded in then sprayed in a two stage 2k acrylic paint. Ive got a new spray gun and have ordered an air fed mask, a second compressor and some stupidly expensive compressed air preparation filters for breathable air. To try and save some money I am building an air cooler/dryer/condensator with a water trap for added protection before the filters . I have evicted the wide arch Peugeot 205 and cleaned the garage as a make shift workshop / spray booth. Its cosy at 3M x 5M but it will do. This is the damage after the MOT tester shot a bolt though it. when I took it to the test it was only bubbling paint. I believe its an old repair gone bad. New spray gun Diy air cooler/dryer/condensator water trap not present Improvised spray booth More soon Gavin Edited September 29, 2020 by enzo_e492901 Quote
Sparky Posted March 15, 2010 Posted March 15, 2010 Gonna be super smooth and clean, will compliment the engine work loads!!Looking forward to it Quote
enzo_e492901 Posted March 17, 2010 Author Posted March 17, 2010 Cheers for the kind words everyone.Gavin Quote

Recommended Posts
Join the conversation
You can post now and register later. If you have an account, sign in now to post with your account.