Krissyb Posted November 30, 2013 Share Posted November 30, 2013 Awesome project :-). Quote Link to post Share on other sites
mattyD Posted November 30, 2013 Share Posted November 30, 2013 looking forward to seeing these big updates Quote Link to post Share on other sites
The_Notorious_C_A_T Posted November 30, 2013 Share Posted November 30, 2013 Tidy work as ever bud! Quote Link to post Share on other sites
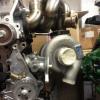
abbott Posted December 1, 2013 Author Share Posted December 1, 2013 Many thanks guysUPDATEWell Saturday 23rd I set off early with Krissyb to go and collect my engine from Rob and have a spot of breakfast with him. to say the least I was over the moon that time had come to collect and get fitted. once we had lifted it on to my van we set off back to surrey to crack on and get it fitted.got back to mine 11/2 hours later and krissy all the way back said lets smash it out and get it fitted so when we got back we got the front end up in the air with the engine hoist.We got the engine out the van and got the release bearing fitted to the gearbox and got it on the engine and bolted it up and fitted the rear vacuum bar and hoses to the inlet.Got the car a little hirer and lifted the engine in place ready to lower the car down ready to be hoisted up and bolt the mounts on.All bolted in place and started mocking things up and bolting more bits onthen it had to be done just a quick mock up of the HKS fuel rail fittedTurbo kit which was already fitted but external wastegate temp bolted upHT leads fitted upI ordered some new Cam belt covers from Toyota as mine had seen better days and got it fittedin the week got round to fitting power steering pump and brackets back on Ordered some braided breather line and some extra fuel line fittings which I needed and also a vice tool so it does not damage the fittings and purchased the correct spanner.Yesterday managed to fit the alternator and fit all the belts and tension them up. Fitted the standard injectors ready for when I start to run it in and connected all the loom.also fitted clutch slave cylinder, bolted all my earths on and fitted the driveshafts and wheels.Mate of mine Vit popped up and extended the lamber sensor plug as was a bit shorter to the new position of the sensor.today filled the gearbox up with oilthat's it for now just working through my to do list before I can turn the key updates to follow in the next week or so. Quote Link to post Share on other sites
Wardy Posted December 1, 2013 Share Posted December 1, 2013 Looking good dude! Quote Link to post Share on other sites
Phil Posted December 1, 2013 Share Posted December 1, 2013 Loving it Abbott. Phil Quote Link to post Share on other sites
00joeindastarb0 Posted December 1, 2013 Share Posted December 1, 2013 Looks the businessGet that loom tucked under the railMore pics please Quote Link to post Share on other sites
maddox710 Posted December 1, 2013 Share Posted December 1, 2013 How long till start up? Looks amazing! how come you've gone with the c56 gear box and not the c52? Quote Link to post Share on other sites
Jamie_VF22 Posted December 1, 2013 Share Posted December 1, 2013 As I've already said stunning buddy, Look forward to seeing this when complete , Quote Link to post Share on other sites
jayc-glanza17 Posted December 1, 2013 Share Posted December 1, 2013 awesome work buddy..keep it up. Quote Link to post Share on other sites
Zeldoz Posted December 1, 2013 Share Posted December 1, 2013 That's something to look up too.That is stunning! Quote Link to post Share on other sites
Gainzy Posted December 1, 2013 Share Posted December 1, 2013 You should turn the key for coutdown to new year haha what a machine it's that clean I wouldn't want to drive it Quote Link to post Share on other sites
Starlet-Joshy Posted December 2, 2013 Share Posted December 2, 2013 Clean as fook! , Looks awesome Quote Link to post Share on other sites
McGlinchey Posted December 2, 2013 Share Posted December 2, 2013 Real credit to you mate .. Quote Link to post Share on other sites
Krissyb Posted December 2, 2013 Share Posted December 2, 2013 Looking great mate, the pictures dont do it Justice. W ho's this Krissyb bloke pops up everywhere Quote Link to post Share on other sites
abbott Posted December 2, 2013 Author Share Posted December 2, 2013 Looking good dude! Thanks chap Loving it Abbott. Phil Thanks phil Looks the businessGet that loom tucked under the railMore pics pleaseThanks. I do want to tidy up the loom but all in good time will get it running first I will try and get more done today and get some pics in the day lightHow long till start up? Looks amazing! how come you've gone with the c56 gear box and not the c52? Got to get a few custom bits done before start up but hope to be this month. It's an ep82 box which is a c52As I've already said stunning buddy, Look forward to seeing this when complete , Cheers Jamie will have to pop up soon.awesome work buddy..keep it up. Thanks jayThat's something to look up too.That is stunning! Thanks zeldozYou should turn the key for coutdown to new year haha what a machine it's that clean I wouldn't want to drive it That sound a plan lol! It's clean alright and it's going to be driven very hard next year as building it for track / TSS / nurburgring Clean as fook! , Looks awesome Thanks starlet-joshyReal credit to you mate .. Thanks mate how far off is yours now?Looking great mate, the pictures dont do it Justice. W ho's this Krissyb bloke pops up everywhere I know pictures look ok but like you say much bettervin the flesh.Krissyb bloke mmm what can I say lol! ;) Quote Link to post Share on other sites
Liam_D Posted December 2, 2013 Share Posted December 2, 2013 Amazing mate, possibly my favourite build on here. It's perfect Quote Link to post Share on other sites
McGlinchey Posted December 3, 2013 Share Posted December 3, 2013 Just need time to run it in mate, trying to build another garage for it, so it isn't parked outside all the time.. It's not easy lol Quote Link to post Share on other sites
Jamie_VF22 Posted December 3, 2013 Share Posted December 3, 2013 Cheers Jamie will have to pop up soon. Defo or i will have to pop down and take you out in the GT pal Quote Link to post Share on other sites
Socks Posted December 3, 2013 Share Posted December 3, 2013 Looking Awesome There Abbott! Looking forward to seeing/hearing it! Quote Link to post Share on other sites
abbott Posted December 4, 2013 Author Share Posted December 4, 2013 Looking Awesome There Abbott! Looking forward to seeing/hearing it!Thanks SocksIm looking forward to hearing just trying to get it finished and make skre everything is 110% before 1st start and driving it Quote Link to post Share on other sites
ro55ifumi Posted December 5, 2013 Share Posted December 5, 2013 Absolute stunning credit to you for the attention to detail John Quote Link to post Share on other sites
Idrees Posted December 5, 2013 Share Posted December 5, 2013 Amazing work as always, looks incredible. Quote Link to post Share on other sites
abbott Posted January 9, 2014 Author Share Posted January 9, 2014 Bit more of an update just trying to find time due to family things andto get things done and making sure installation is perfect.Well next was to fit up the exhaust and when doing this found a problem as the front pipe was touching the sump and rear engine mount. so a phone call to Dean at RW developments booked me in to get the front pipe modfied and sorted. Discussed with Dean for me to bring my whole turbo kit and exhaust to fit on his so we can make sure it 100% on mine. So a week later hit the road bright and early to spend a day getting it done while i was there i wanted a few other bits done so installion was spot on.First we got the turbo kit fitted on Deans car and rotated the turbo for the oil feed to point straight down instead of facing the blockThen we started to deside the route of the front pipe to be modded. One thing i noticed im running a different sump to Dean so a bit of guess work had to be done and skimming through pictures of mine to see distance to allow. so got a new flange and started tacking once desided routeOnce we were happy and fitment was right Dean cracked on and welded the exhaust up few pics of the man in actionNext i needed a hot pipe made up and more guess work had to be done remembering were rhings are mounted on my car.Also last thing i needed making was a Fuel pressure reg bracket to mount on the back of the bayAfter these were done i headed back to surrey.Big thanks for Deans work that day was a great help and good to have a chat.Few days later i got the turbo kit mounted back on my engine and mounted the exhaust which i can is spot on fit all the way through and connected my wideband upAlso fitted the fpr on to the bracket and test fitted,i desided to trim the bracket down a bit just for better fitted to my liking Next up was to have a measure up for the hot pipe hoses and a custom oil return hose. Once got these i got on the phone to Paul at roose motorsport and gave him the details also ordered some vacum line. Next call was to sfs hoses to order murry clamps and j-clips. 2days later they arrived and got these fitted.Plumbed in boost controller to turbo and wastegateA mate got me a standard civic rad bracket which ive managed to bend and get a good postion just need to send away to powdercoat while i was there i mounted rad and got the roose rad hoses to fit top hose had to be cut a little to get correct lengthNext was to move on to the making the fuel lines up and checking the fittings out for fitment.The banjo an fitting i have bought was a bit wider to the standard one so i had to remove the new filter and modify on the half moon opening as uou can see below only a tiny bit of grinding away had to be done and hey we where thereAfter fitting the filter back in the bay it was time to give making up the lines a go watched a few videos and tutorials on how to make ptfe lines up. Well after alot of swearing and messing a couple of ends up i got there with a hand from krissyb and taking a bit more time. 1st line made up from filter to fuel rail just another 2x lines to do + oil breather lines.Next was to cut the fuel return hose pipe back and fit the hard pipe to an fitment fitting. After cutting the pipe the 6mm fitting which i had been supplied was not going to fit and was wrong. Measured it with a feeler gauge and turns out its 1/4" fuel hard pipe. Phoned about a few places and no one could help and supply me this fitting not even the big companys like earls, last resort i found speedflo on the net usa site so i called them and explained my issue and what i was trying to do, there answer was yes we can help you on this but will be better for me to go to the uk speedflo. So i phoned them yesterday went through it again and today this turned up Given me two options one with steel fitment to do 1st to crush the olive up on the pipe then replace with the alloy an fitting. Spot on fitting to 1/4"- an6 fitment.Also i purchased on monday from HBlade whos a member on here but went through ebay saw his user name and ended up pming him to get the glanza greddy oil cooler. I already own a ep82 one but never fitted it so thought i would go with the glanza one instead.Thats it for now will update again soon as this weekend is autosport show so no time will be spend on the car. But not that close now to firing time. Quote Link to post Share on other sites
TurboTobz Posted January 9, 2014 Share Posted January 9, 2014 Awesome I love this. Quote Link to post Share on other sites

Recommended Posts
Join the conversation
You can post now and register later. If you have an account, sign in now to post with your account.