RobSR Posted September 22, 2015 Author Posted September 22, 2015 Excuse the mess inside for the moment but this is how the fuel lines will be going. Need to p-clip / mount them to the tunnel too. I would of done it today but the weather is shocking so I'm not going outside! IMG_2335 by Rob Fisher, on Flickr IMG_2336 by Rob Fisher, on Flickr IMG_2337 by Rob Fisher, on Flickr IMG_2338 by Rob Fisher, on Flickr Quote
td04 turbo Posted September 22, 2015 Posted September 22, 2015 Excuse the mess inside for the moment but this is how the fuel lines will be going. Need to p-clip / mount them to the tunnel too.I would of done it today but the weather is shocking so I'm not going outside!IMG_2335 by Rob Fisher, on FlickrIMG_2336 by Rob Fisher, on FlickrIMG_2337 by Rob Fisher, on FlickrIMG_2338 by Rob Fisher, on FlickrLooking good What size are them an fittings buddy Quote
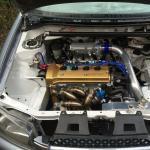
RobSR Posted September 30, 2015 Author Posted September 30, 2015 Sasha has kindly sent me some pics of the new finished manifold. 12077088_858188920955332_1687666134_n by Rob Fisher, on Flickr 12041789_858188754288682_1622783511_n by Rob Fisher, on Flickr 12081444_858188814288676_1307482539_n by Rob Fisher, on Flickr 12081363_858188967621994_1082939050_n by Rob Fisher, on Flickr Plenty of clearance for the 3" DP too 12064097_858190194288538_1561430595_n by Rob Fisher, on Flickr Quote
Socks Posted September 30, 2015 Posted September 30, 2015 Looking good there Rob/Sacha. Good to see some Top Rad Hose Clearance! The TD04 kits are extremely close with the screamer pipe! Looking forward to seeing figures on this weapon Rob! Quote
RobSR Posted October 1, 2015 Author Posted October 1, 2015 Thanks.Figures won't be crazy straight away as its on a standard engine. Didn't want to risk the first start on a new forged engine with a new fuel setup and different wiring ! Will be mapped to the limits of a standard engine then I'll build a forged lump over winter. Quote
Socks Posted October 1, 2015 Posted October 1, 2015 Thanks.Figures won't be crazy straight away as its on a standard engine. Didn't want to risk the first start on a new forged engine with a new fuel setup and different wiring !Will be mapped to the limits of a standard engine then I'll build a forged lump over winter. You'll get a good idea of your power band and be able to get alot of it dialled in at least. Any issue will raise there ugly head early on... Also. Be careful as V-Band housings it looks like sacha is using for 3" downpipe are alot more space efficient. If you have a older t3 4-bolt turbo setup it might be very tight!? Or is your bine vband? Quote
RobSR Posted October 1, 2015 Author Posted October 1, 2015 (edited) Oh it's gonna be a lag monster, the precision is a stop gap to get it up and running.The turbo in the pic is standard 4-bolt with a v-band welded on so I'll have abit more clearance. I'm contemplating welding a v-band onto mine too. Edited October 1, 2015 by RobSR Quote
RobSR Posted October 1, 2015 Author Posted October 1, 2015 (edited) On the standard lump I'll throw an emanage in it and get TD/RDT to do it. When it's forged with a standalone I've got my own mapper down here I use. Edited October 2, 2015 by RobSR Quote
RobSR Posted October 6, 2015 Author Posted October 6, 2015 New manifold arrived today! Thanks again to WEPR. Looks amazing. Now to get it running.... Quote
Calum122 Posted October 6, 2015 Posted October 6, 2015 Yes mate that is the tits lmao. My mate was looking at precision for his K20 civic. So I just linked him to a photo. I am sure he will love if. Literally texted me whilat typing this lol Quote
Phil Posted October 6, 2015 Posted October 6, 2015 Fantastic robI benefited from the manifold mix up! Looking forward to getting it sorted and on to my car Phil Quote
Essexglanza Posted October 8, 2015 Posted October 8, 2015 Wow, this build thread is unreal !! I'm loving the wire tuck and would love to have a go at doing mine, may have a PM heading you're way regarding the battery relocation and wiring etc.How long till she's drive able then ? Quote
RobSR Posted October 8, 2015 Author Posted October 8, 2015 Cheers guys.I can start her when I bolt the turbo kit on and finish the battery wiring. Just gotta put in the fuse and extend the wire from the fusebox. Could get it running this weekend but we'll see. Don't really need to rush anymore but when it's started there will be a vid In here Fantastic robI benefited from the manifold mix up! Looking forward to getting it sorted and on to my car PhilHaha I'm glad someone did! Look forward to seeing it on yours mate Quote
RobSR Posted October 16, 2015 Author Posted October 16, 2015 For the few that have me on Facebook you'll know I've now bolted up the turbo kit up. All fits nicely this time! Just need to tweak the oil feed as its a little tight round the filter housing for the fittings I have at the moment. Shall update here with some pics later Quote
RobSR Posted October 17, 2015 Author Posted October 17, 2015 Some quick pics of the setup mounted up. IMG_2428 by Rob Fisher, on Flickr IMG_2429 by Rob Fisher, on Flickr IMG_2430 by Rob Fisher, on Flickr IMG_2435 by Rob Fisher, on Flickr Quote
RobSR Posted October 18, 2015 Author Posted October 18, 2015 Appreciate the kind words all! Good progress this morning. Finished the battery live and fusebox live. Everything working so far..All dash is correct, ignition comes on etc etc. Just can't turn it over just yet as i need to tweak the turbo oil feed. Was a tiny bit of wiring left to do in the engine bay which has also been done. Some more pics : IMG_2443 by Rob Fisher, on Flickr IMG_2441 by Rob Fisher, on Flickr IMG_2440 by Rob Fisher, on Flickr IMG_2438 by Rob Fisher, on Flickr IMG_2445 by Rob Fisher, on Flickr IMG_2448 by Rob Fisher, on Flickr Quote
daniel_g Posted October 18, 2015 Posted October 18, 2015 Nice and tidy!Might have missed it but how much boost you planning to put through the standard lump? Quote
RobSR Posted October 18, 2015 Author Posted October 18, 2015 No idea... What ever it needs to make 240 bhp. I'd imagine just under a bar as it won't be in its efficiency range. Quote
RobSR Posted October 20, 2015 Author Posted October 20, 2015 (edited) Got loads more pics to upload to give you all an update. Some good news some worse news,Spent all day on the car today to get it to a point where I could start it. Modified all the boost pipes for the new turbo, fitted the rest of the IC piping, made the oil feed,Finished off pluming in the rad and all the water hoses etc.Started to fill her up with water, issue one - leaking from the thermo housing. All sorted with a nip up and a small bead of sealant. I think it's something to do with the non gen thermostat seal size. It was only temporary to get it running so will order a genuine item.Did and oil and filter change as when I was doing the work I left the old filter on there and some surplus oil in the engine. Now to prime it up... Efi fuse out, started cracking.. All good so far... Amazing how the battery still had some charge but did need a jump pack for the continuous cranking. Oil light gone out pretty quickly which was a good sign, a couple more cranks and then I had oil out of the turbo oil return so that had all come through and primed up nicely too.So, fuse back in king lead off to quickly prime the fuel system and get the pressure setup on the reg correctly. This is where I hit one of my issues. I'm pleased to report all the fuel lines / oil lines I made have worked perfectly, none leaking, not had to re-tighten anything which is was quite surprised by... My issue was that where the -AN fittings have been welded to the tank, there is a tiny crack / miss laid weld on the feed so it started gushing out of there unfortunately.So I couldn't get it started but everything seems to be working as should, just need to get the fitting rewelded which is no biggie and I may hear it run!! Edited October 20, 2015 by RobSR Quote

Recommended Posts
Join the conversation
You can post now and register later. If you have an account, sign in now to post with your account.