RobSR Posted October 24, 2015 Author Posted October 24, 2015 Thanks mate, couldn't work out how to embed it on my phone ! Quote
akyakapotter Posted October 25, 2015 Posted October 25, 2015 Thanks mate, couldn't work out how to embed it on my phone !Just to to change the be to. Com Quote
EP82 Touge Posted October 25, 2015 Posted October 25, 2015 No power steering? What is that like to drive on street/track? Cheers Quote
RobSR Posted October 25, 2015 Author Posted October 25, 2015 (edited) It's so much nicer. Parking is abit annoying tho. I just need to finish the plumbing for my electric setup so I can have it speed dependant. Edited October 25, 2015 by RobSR Quote
lewisV Posted October 25, 2015 Posted October 25, 2015 Nice love the attention to detail on this! Quote
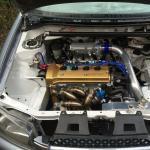
RobSR Posted October 25, 2015 Author Posted October 25, 2015 (edited) Nice love the attention to detail on this! Stunning. End of. Thanks guys! Started sorting the idle out - Still a little high in the vid but now sits at a happy 1k rpm. https://www.youtube.com/watch?v=IBqCCd3G7Nw&feature=youtu.be And some more pics lol! One being the state of the main 100A fuse. Yes that was all that was left. IMG_2491 by Rob Fisher, on Flickr IMG_2501 by Rob Fisher, on Flickr IMG_2502 by Rob Fisher, on Flickr Edited October 25, 2015 by RobSR Quote
lewisV Posted October 25, 2015 Posted October 25, 2015 Thanks guys! Started sorting the idle out - Still a little high in the vid but now sits at a happy 1k rpm. And some more pics lol! One being the state of the main 100A fuse. Yes that was all that was left. IMG_2491 by Rob Fisher, on Flickr IMG_2501 by Rob Fisher, on Flickr IMG_2502 by Rob Fisher, on FlickrSeen a picture of your bay on Instagram earlier... I can't get enough of it Quote
RobSR Posted October 25, 2015 Author Posted October 25, 2015 Ah cool. What's your Instagram bud? Quote
lewisV Posted October 26, 2015 Posted October 26, 2015 Ah cool. What's your Instagram bud?Not 100% but I'm sure it's lewisbuttress Quote
jiggaman_16 Posted October 31, 2015 Posted October 31, 2015 Perfectest starlet engine bay bro. Only comparable to the WEPR EP82 engine bay (for E engines that is)....... 1) Rotate those darned injectors.........even cleaner look2) That battery tray can be removed......non functional anyway3) Those leftover holes in the bay could have been filled out when the engine was out but.....meh Good goin mate Quote
decdd19 Posted November 2, 2015 Posted November 2, 2015 Where did you get the single core wire to run up the wheel arch? Need a role of quality cable yours looks very smart serious build Quote
RobSR Posted November 2, 2015 Author Posted November 2, 2015 Perfectest starlet engine bay bro. Only comparable to the WEPR EP82 engine bay (for E engines that is)....... 1) Rotate those darned injectors.........even cleaner look 2) That battery tray can be removed......non functional anyway 3) Those leftover holes in the bay could have been filled out when the engine was out but.....meh Good goin mate Thanks mate. Haven't rotated the injectors as the plugs would hit the fuel return with how I've p-clipped it to the inlet, at the end of the day its not been built to be a show car hence some of the holes still being left. Not sure what to do with the battery tray yet, might keep it as was going to mount a catch can to it. If not ill remove it. Where did you get the single core wire to run up the wheel arch? Need a role of quality cable yours looks very smart serious build Cheers mate, PM me and ill see if i can find the link. Quote
RobSR Posted November 22, 2015 Author Posted November 22, 2015 (edited) So I've been having some fun/issues with my fuel system. Where I've had the fittings welded on to the top of the tank, they just aren't seating correctly even after a couple of re-welds due to it being a plated material. So what I've decided to do is start making a new fuel pump hanger out of stainless, and then ill be able to weld the fittings to the take off plate vertically and weld it from both sides. I.e no leaks. Couple of pics stripping a hanger and template for the new top plate.This is whats currently causing the issue.IMG_1931 by Rob Fisher, on Flickr IMG_2635 by Rob Fisher, on Flickr IMG_2632 by Rob Fisher, on Flickr Edited November 22, 2015 by RobSR Quote
jellybaby Posted November 24, 2015 Posted November 24, 2015 Engineering atIt best funny enough if uDo make one would u mind pm meTheCost as I could b intrested in one for my build Quote
RobSR Posted November 29, 2015 Author Posted November 29, 2015 Once I've found someone I'll try and get a few done. Quote
RobSR Posted December 1, 2015 Author Posted December 1, 2015 Stunning! Thanks mate Yours is too - wanna paint mine haha? Been speaking to UKSO's resident fabricator and we've come up with a plan for the fuel setup so should have an update on that in the next week or two. Quote
RobSR Posted December 2, 2015 Author Posted December 2, 2015 ;) great news mate keep me postedWill do mate!Just need the bits to turn up which should be tomorrow. I'm starting to get the itch to drive it again! Quote
Rob H@RCH Engineering Posted December 3, 2015 Posted December 3, 2015 Thanks mate Yours is too - wanna paint mine haha?Been speaking to UKSO's resident fabricator and we've come up with a plan for the fuel setup so should have an update on that in the next week or two. Quote
RobSR Posted December 6, 2015 Author Posted December 6, 2015 :D Not loads has been happening recently as still sorting the fuel setup out, should of just stuck with the standard setup haha. There was a reason behind it though.. Ran the vac line from the Tial to the turbo, tried to keep it tidy and out of the way. IMG_2686 by Rob Fisher, on Flickr IMG_2687 by Rob Fisher, on Flickr She was also periodically being a little pig to turn over and i put it down to the lack of ground from the box to the chassis after i moved the battery. Made a ground up and now its all sorted. IMG_2688 by Rob Fisher, on Flickr Finished some more grounds on the battery too: IMG_2690 by Rob Fisher, on Flickr Quote
Rich-k Posted December 6, 2015 Posted December 6, 2015 Thanks mate Yours is too - wanna paint mine haha?Been speaking to UKSO's resident fabricator and we've come up with a plan for the fuel setup so should have an update on that in the next week or two.Wow thanks man i appriciate that! id love too be ace! Quote
RobSR Posted December 7, 2015 Author Posted December 7, 2015 ^ Also ordered some NS2-R ditch finders too so will see how these fair up.. Quote
Amjad Posted December 7, 2015 Posted December 7, 2015 Looking good Rob! Doesn't look far off completion now?Been using NS-2R (180TW) for about 6 months now, very happy with them myself Just wish they came in a 205/50/15! Quote

Recommended Posts
Join the conversation
You can post now and register later. If you have an account, sign in now to post with your account.