

NightSpirit
-
Posts
1264 -
Joined
-
Last visited
Content Type
Profiles
Forums
Wiki
Media Demo
Events
Everything posted by NightSpirit
-
 This how-to covers a few things, fitting a set of TRD coilovers, fitting Goodridge braided hoses on the rear of the car and fitting Outlaw 2000 4 pots and hoses to the front of the car...all on a 1991 EP82 Starlet Turbo. Righty, you will need... Axle stands, Jacks (stock one is fine), WD-40, Mole grips, 4" Grip clamp, Size 30 Hex head screw driver, 12mm spanner, 19mm socket, 14mm socket, 14mm spanner, 13mm spanner/socket, 10mm spanner, Arms like pop-eye. Ok, first things first...jack the front of the car up and insert the axle stands. Remove the front wheel... Next up, locate the two 17mm bolts that hold the disc and caliper in place (behind the caliper, one top, one bottom). Remove these and the caliper should come away with some gentle persuasion. I removed the caliper front first (2 12mm bolts, one top one bottom) as it made it easier to pop off the pads afterwards. Pop the disc off, might need a tap on the back side to free it but it should just pop off, revealing the hub. You should now be able to see the 2 very big bolts/nuts holding the strut to the hub. These are 2 19mm bolts/nuts. You should be able to release these using lots of WD and a large socket. My technique was to put a foot either side of the strut and pull. When it starts to give way (eventually) you need to attach the 19mm spanner to the other side and hold it in place so you can remove the bolt/nut. There is also a 13mm bolt holding the brake line to the strut near the back/base. Remove this as it makes things easier. With the hub now free, you should be able to push/pull...coax with a hammer the strut from the hub top. The strut is now free apart from the top end. With the bonnet open, remove the 4 12mm nuts holding the strut top in place, take care when removing the last one as the strut will drop. Make a note of how the strut fit at the top...there should have been a small gap in the centre hole towards the front, this is the way the new coilover will be fitted too. Make sure your jack is in place on the wishbone to stop the driveshaft/hub form dropping. With the strut now gone, you have room to remove the brake lines. As I was ditching the stock calipers I just removed the line from the back of the arch wall. This is done using a 10mm spanner or mole grips (worked better) pulling counter-clockwise on the drivers side, clockwise passenger side. When the bolt starts to loosen, get ready with a tray to catch the brake fluid. As you loosen the bolt, pull out (using pliers or mole grips) the holding braket/plate securing the brake line in place...to do this just wiggle it a bit and it'll come free. With the bolt removed and the caliper/brake line gone you can attach the new braided line and caliper to the fitting point...just do the technique above in reverse. I decided to remove the brake guard as it's too small for the new discs, to do this, just locate the 3 30 hex screws on the guard, rotating the hub to get better access...you may need to hammer the driver on as they are pretty rusty. With these gone, the guard should be free, but you need to lever it at the smallest point (easy to see) till it snaps then bend it free of the hub. Next you need to fit the new caliper fitting plates, mine needed some washers next to the original caliper bolts as spacers to stop the bolt running on the new disc. With this done...it's on to the coilover. Get your coilover and fit it through the strut top hole from beneath, making sure IT'S THE RIGHT WAY ROUND AS THE OLD ONE! Attach up the 12mm nuts to hold it in place at the top. Now jack up the hub to meet the coilover bottom and re-attach to the hub. With that done, pop the new disc onto the hub and after you've released the pistons/pads on the new caliper with the clamp...fit up the caliper and stand back to bask in the sexiness of what you've just done Do this on the passenger side aswell but leave the wheels off for now as we need to bleed the brakes at the end (the outlaw calipers have 4 bleed points per caliper!!) Onto the rear... With the wheel removed, you should see the bottom of the strut held inplace to the cross beam with 1 14mm bolt/nut. From the rear of the car attach the 14mm socket to the back side (bolt head) and a 14mm spanner to the front side (nut head). Again give it some effort to release this, making sure the crossbeam is jacked up under the hub. Once this is free, you can open the boot and remove the 2 12mm nuts from the strut top to release the strut. Using a hammer or just force, the strut should now pop out backwards and be removed from the car. (I removed the rear caliper...but it's not needed so ignore it in the photos) Now attach your coilover as per the front and jack up the hub to meet the bottom connector...you may need someone to sit in the boot at this point to counterbalance the car and bring the crossmember to the right height to fit. Refit just as you removed. You can turn your attention to the braided lines...Mine had a single line to the rear (and a mechanical one for the handbrake ofcourse). Same process as the front...only this time, there is a 14mm bolt on the bottom rear of the caliper holding the brake line to the caliper. Remove this aswell as the 10mm on the arch (as per the front)...now swap to your new braided hose. The next step is to remove the old brake line. This is done by removing the 10mm bolt (again) holding the hose to the caliper/hub area. Once this is gone, there is one final 10mm to remove that is hidden to the front underside of the hub area. Simply lever the holding plate out with a screw driver (don't even bother trying to remove the 10mm..too much effort I thought) and straighten the metal tubing and feed the pipe through the hole to remove it all. Repeat this passenger side and then bleed your brakes (rear left, right, then front right, left). Job done
 -
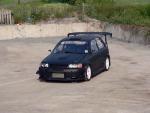
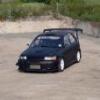
Got the new rims on and the rollcage in :)
NightSpirit replied to NightSpirit's topic in Lifestyle General
Hey Mr E I'm swapping from the stock EP82 Starlet Turbo suspension and front brakes to TRD coilovers and Outlaw 4 pots...not sure if that's any use to you? -
Got the new rims on and the rollcage in :)
NightSpirit replied to NightSpirit's topic in Lifestyle General
If we can get say 5 people wanting a set I can get some ordered? Saves on shipping you see Will get a price when we get a bit more interest but it'll be cheaper than anywhere else I'm fairly certain!! -
Got the new rims on and the rollcage in :)
NightSpirit replied to NightSpirit's topic in Lifestyle General
I hope so matey..that's what it's all for I got mine from Yahoo in Japan, they're a little cheaper than that now I think. Might get a few sets for people if they're interested in a group buy type thing -
Got the new rims on and the rollcage in :)
NightSpirit replied to NightSpirit's topic in Lifestyle General
Ben Affleck is a dirty slut..I've slept with him several times. My nuts (oo er) are Rays Duralum...£70 a pop with lockers included, they weigh less than air. -
Got the new rims on and the rollcage in :)
NightSpirit replied to NightSpirit's topic in Lifestyle General
Oh Grandson...the secret of the rich and famous....Toupe tape ofcourse. It's used by all the greats like Ben Afleck, Jennifer Aniston etc etc -
Got the new rims on and the rollcage in :)
NightSpirit replied to NightSpirit's topic in Lifestyle General
Maybe they could tune the Jag to 'not like a wobbly jelly on a bouncy castle' while they were at it. -
Got the new rims on and the rollcage in :)
NightSpirit replied to NightSpirit's topic in Lifestyle General
Awesome.... My settings will be 'balls out daddy grip in all sorts of severe stages' coupled with 'Lower than raping your best mates gran' Will Leda understand that like I do? lol -
Got the new rims on and the rollcage in :)
NightSpirit replied to NightSpirit's topic in Lifestyle General
5 minutes ey grandson? Are you speaking from experience there The rollcage will get some padding at some point in blue...only problem is it's £10 a metre!!! compared to the grey pipe cladding from B and Q...50p a metre. Ripping bastards (not B and Q for once) -
Got the new rims on and the rollcage in :)
NightSpirit replied to NightSpirit's topic in Lifestyle General
That'd be great Enzo Hopefully the blog will grow a fair bit over time... Ok then, I'll do my best to do a how to on both things this weekend if possible, not a job I've done before so watch this space! I am loving the rims, transformed the car already, they're in good shame to say they're a few years old too -
You'll piss all over it mate...lol They're a bag of wank in my opinion. There's only one Rolla...and that's the Hachiroku
-
Got the new rims on and the rollcage in :)
NightSpirit replied to NightSpirit's topic in Lifestyle General
the new rubber is immensely sticky...and the cage has made the car ultra stiff. It's pretty much point and squirt now like a precision instrument -
Anyone got a how-to or tips?
-
Anyone got one for this
-
You can read it on the blog, but here's a few piccys. This weekend I'm planning on doing the brake swap and coilovers...anyone done a how to on either of these?
-
From an early EP82, pre twin headlight? Cannot find one anywhere
-
What insane colour should I spray the track car?
NightSpirit replied to NightSpirit's topic in Lifestyle General
I worry about you guys sometimes... now what sort of macaroni would you use? I quite like other forms of pasta like penne. -
Which amazing colour should I spray the track car?
NightSpirit replied to NightSpirit's topic in Lifestyle General
Orange is in the lead then! I think blue will be removed as I painted the rollcage blue yesterday and it was the gayest thing I've ever seen -
Pick one
-
What insane colour should I spray the track car?
NightSpirit replied to NightSpirit's topic in Lifestyle General
How do I get a poll? and no I don't mean a hard faced imigrant from an Eastern European country.... -
What insane colour should I spray the track car?
NightSpirit replied to NightSpirit's topic in Lifestyle General
Once again, my grandson shows his lineage...aswell as the pubes, I was thinking of getting some of the small children to do some hand prints and potato shape patterns on the bodywork and maybe (if they're good) we can do that thing where you stick pasta to stuff. Awesome. -
What insane colour should I spray the track car?
NightSpirit replied to NightSpirit's topic in Lifestyle General
two for orange then... orange is good as my wife is dutch ;) -
What insane colour should I spray the track car?
NightSpirit replied to NightSpirit's topic in Lifestyle General
another one for lime green! -
What insane colour should I spray the track car?
NightSpirit replied to NightSpirit's topic in Lifestyle General
That's 3 for lime green then so far, obviously with a carbon fibre bonnet ;) -
As the paintwork on the EP is so poor, it's more 'spot the paint' than 'spot the stonechip' I'm thinking of giving it a respray. Outside the house using spray cans my first thought was matt black, but a friend suggested lime green....what do you chaps reckon? Not paying for a full spray as it's only going to get smacked on the track anyway.