Claymore
-
Posts
660 -
Joined
-
Last visited
Content Type
Profiles
Forums
Wiki
Media Demo
Events
Everything posted by Claymore
-
Found this on the gtt website from 11 years ago. Seems to have some errors. Can't say for sure what info is correct or incorrect as I've not measured anything but it would be interesting to see the differences when the cams are actually measured against this info for reference. Maybe the turbo cam lift increase was an update, perhaps the early gt's or the later glanza's had different specs? Perhaps Toyota were using up the N/A cams at the end of glanza production and this is the one example that was measured that has caused the confusion? I know you have lots of turbo cams knocking around, are they all the same increased lift? I also saw on a Matt berry youtube vid that the 5efhe's with and without ACIS have exhaust cam differences. Could be BS also. LOL. Looking forward to the results.
-
Claymore's sleeper 4efe+t-t+t build (R.I.P. the Nanza)
Claymore replied to Claymore's topic in EP91 Progress Blogs
Yeah its a good bolt on solution for fast road or light track use on the N/A models, the 100kg less weight compared to the Glanza should give them a slightly easier time too. Bedded them in today and they feel sharper already. Need to drain the old DOT 3 fluid and replace with 4 or 5.1 next. -
I'd be interested as well, the more build threads on the forum the more activity hopefully. Not many 5e builds are being done recently.
-
Great work as always mate. You might find in the colder weather that the boost increases slightly with the colder, dense air but you can always adjust it if necessary. It really is a great example of the early model. 👍
-
Claymore's sleeper 4efe+t-t+t build (R.I.P. the Nanza)
Claymore replied to Claymore's topic in EP91 Progress Blogs
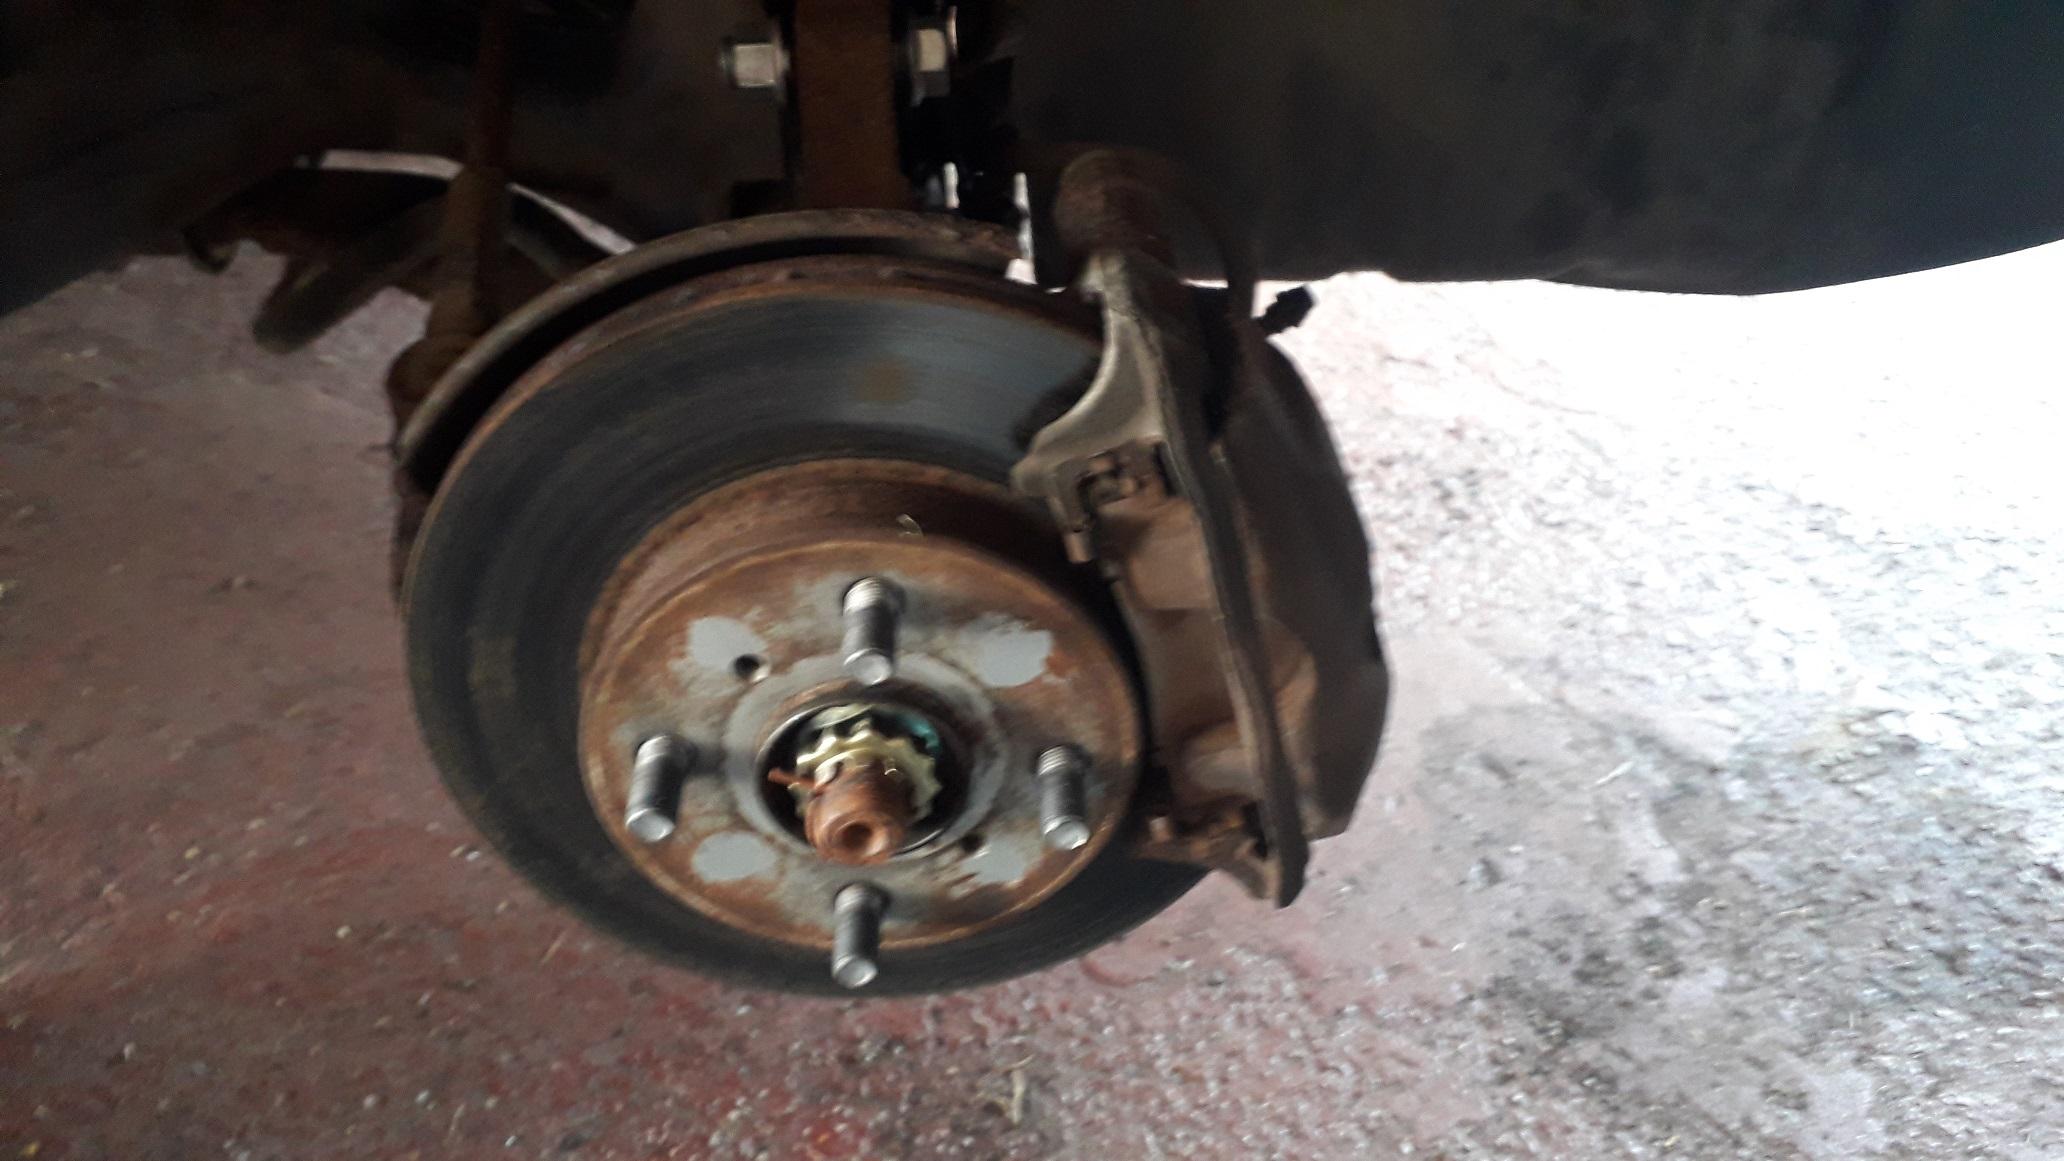
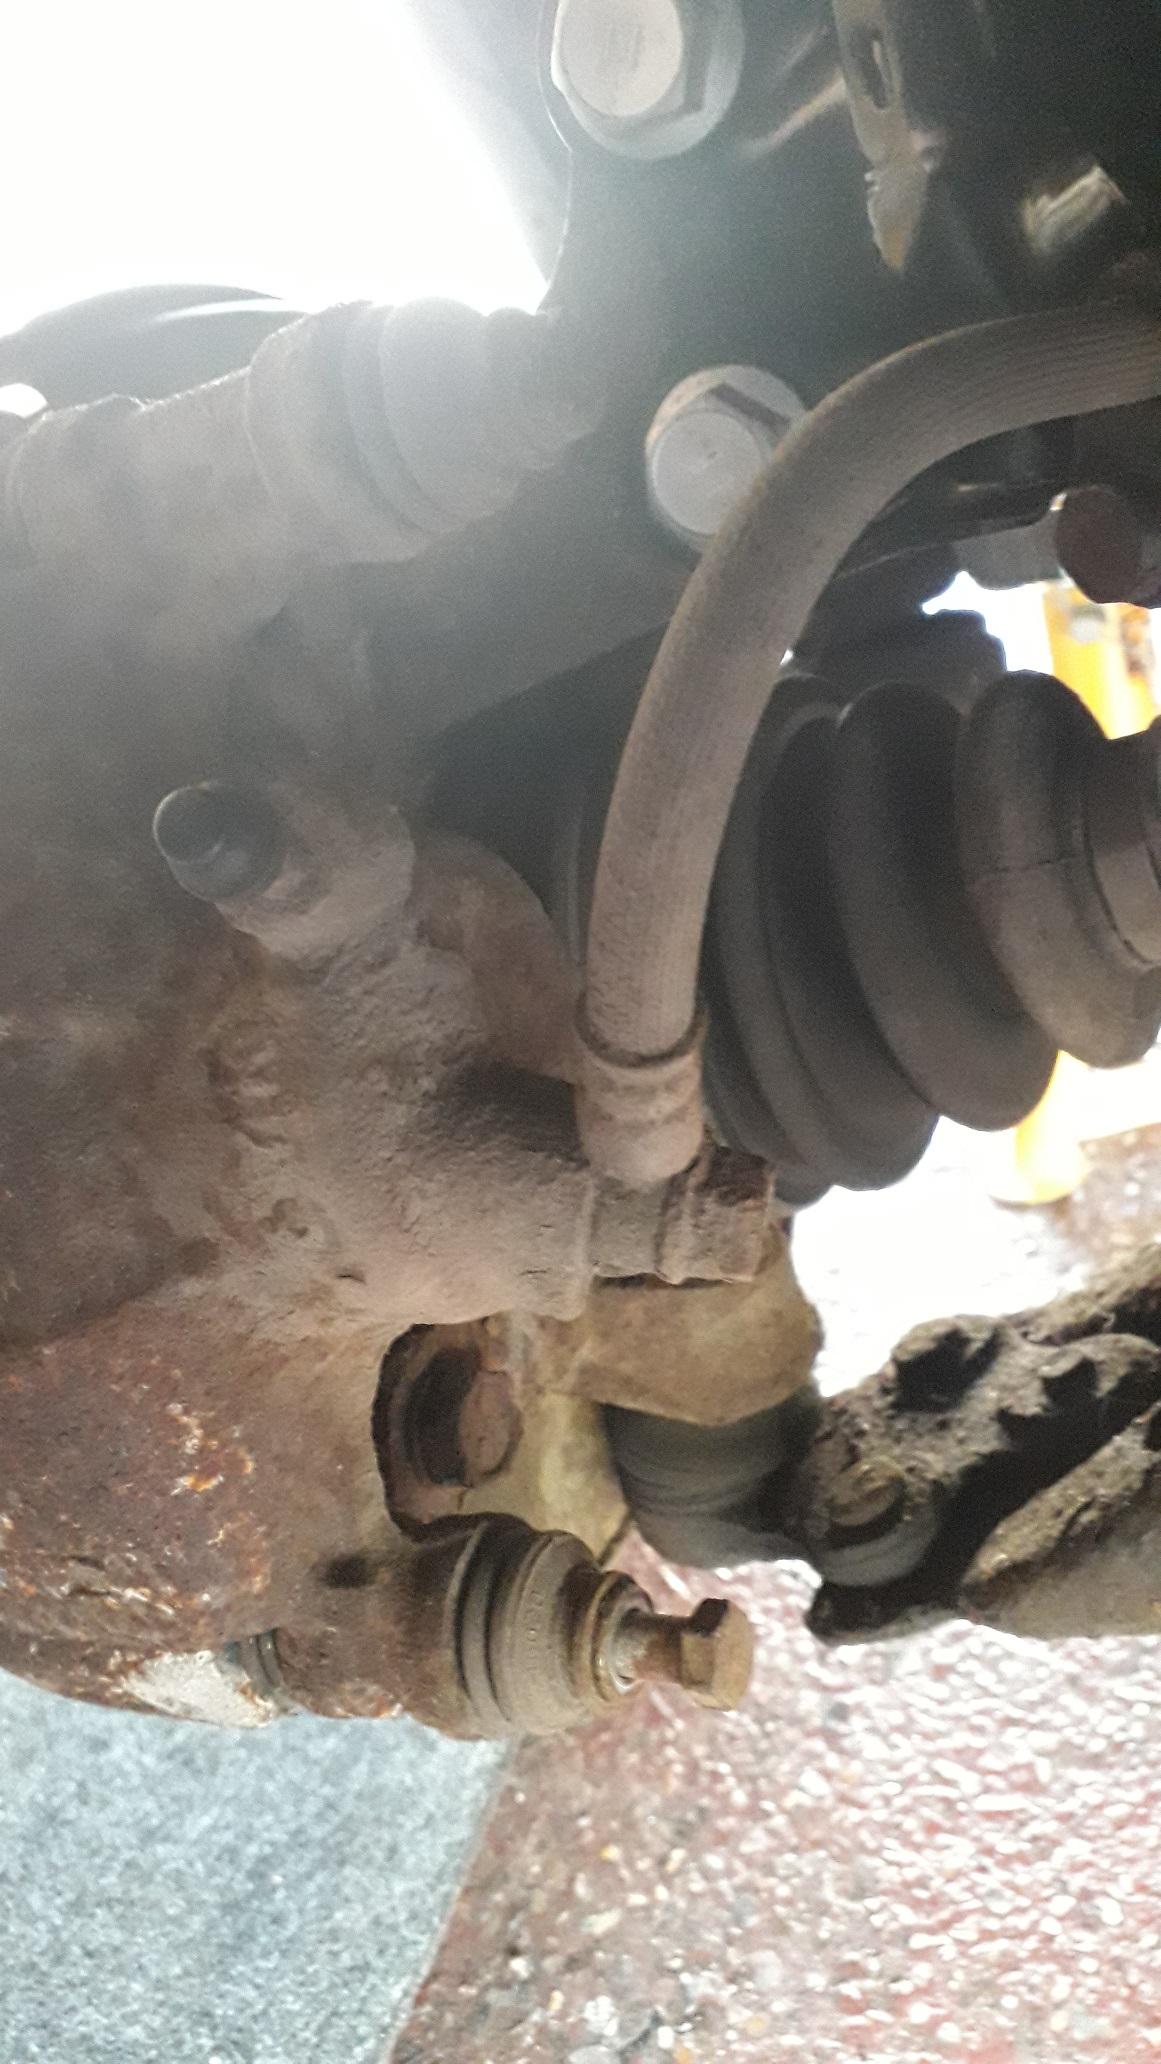
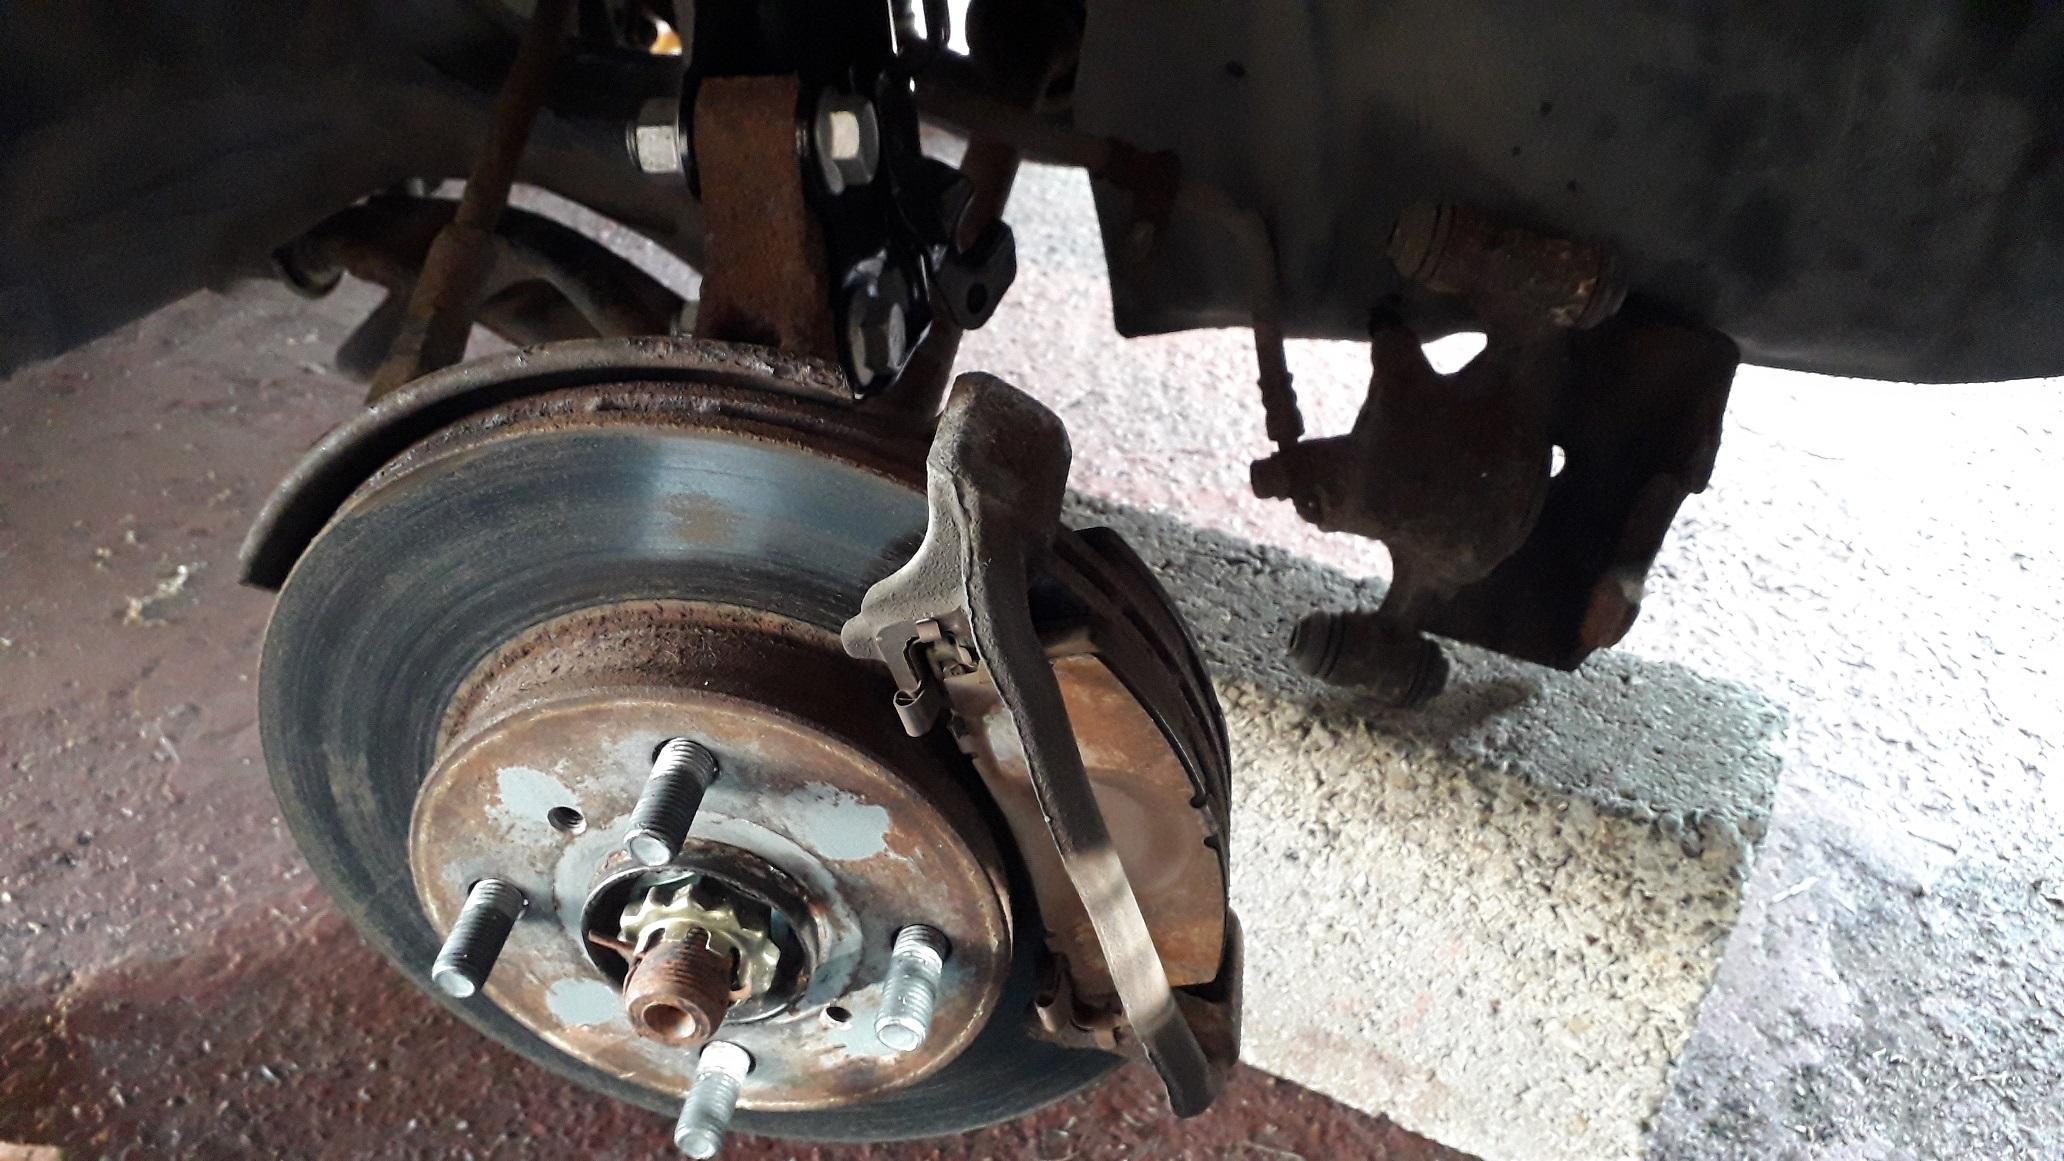
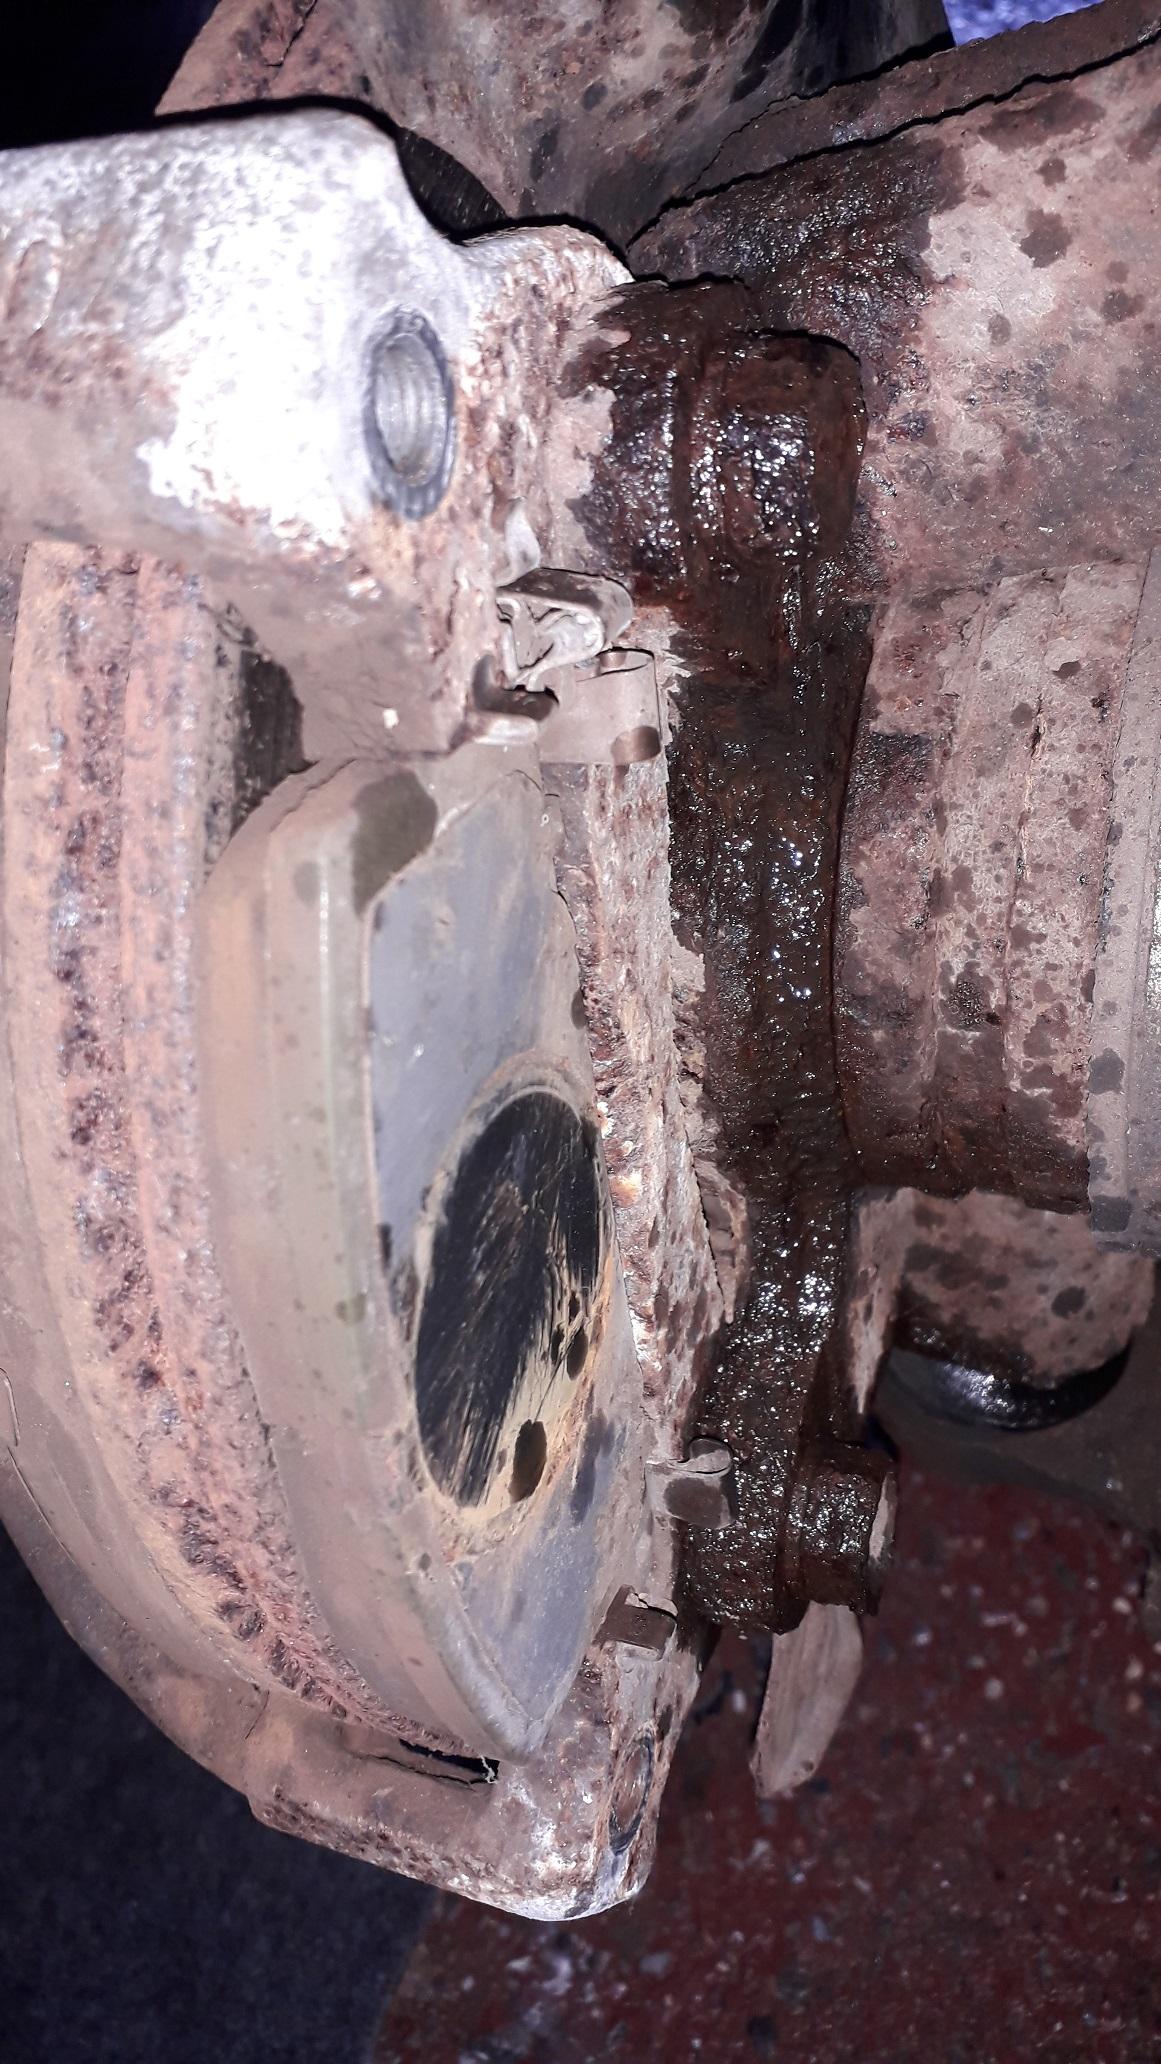
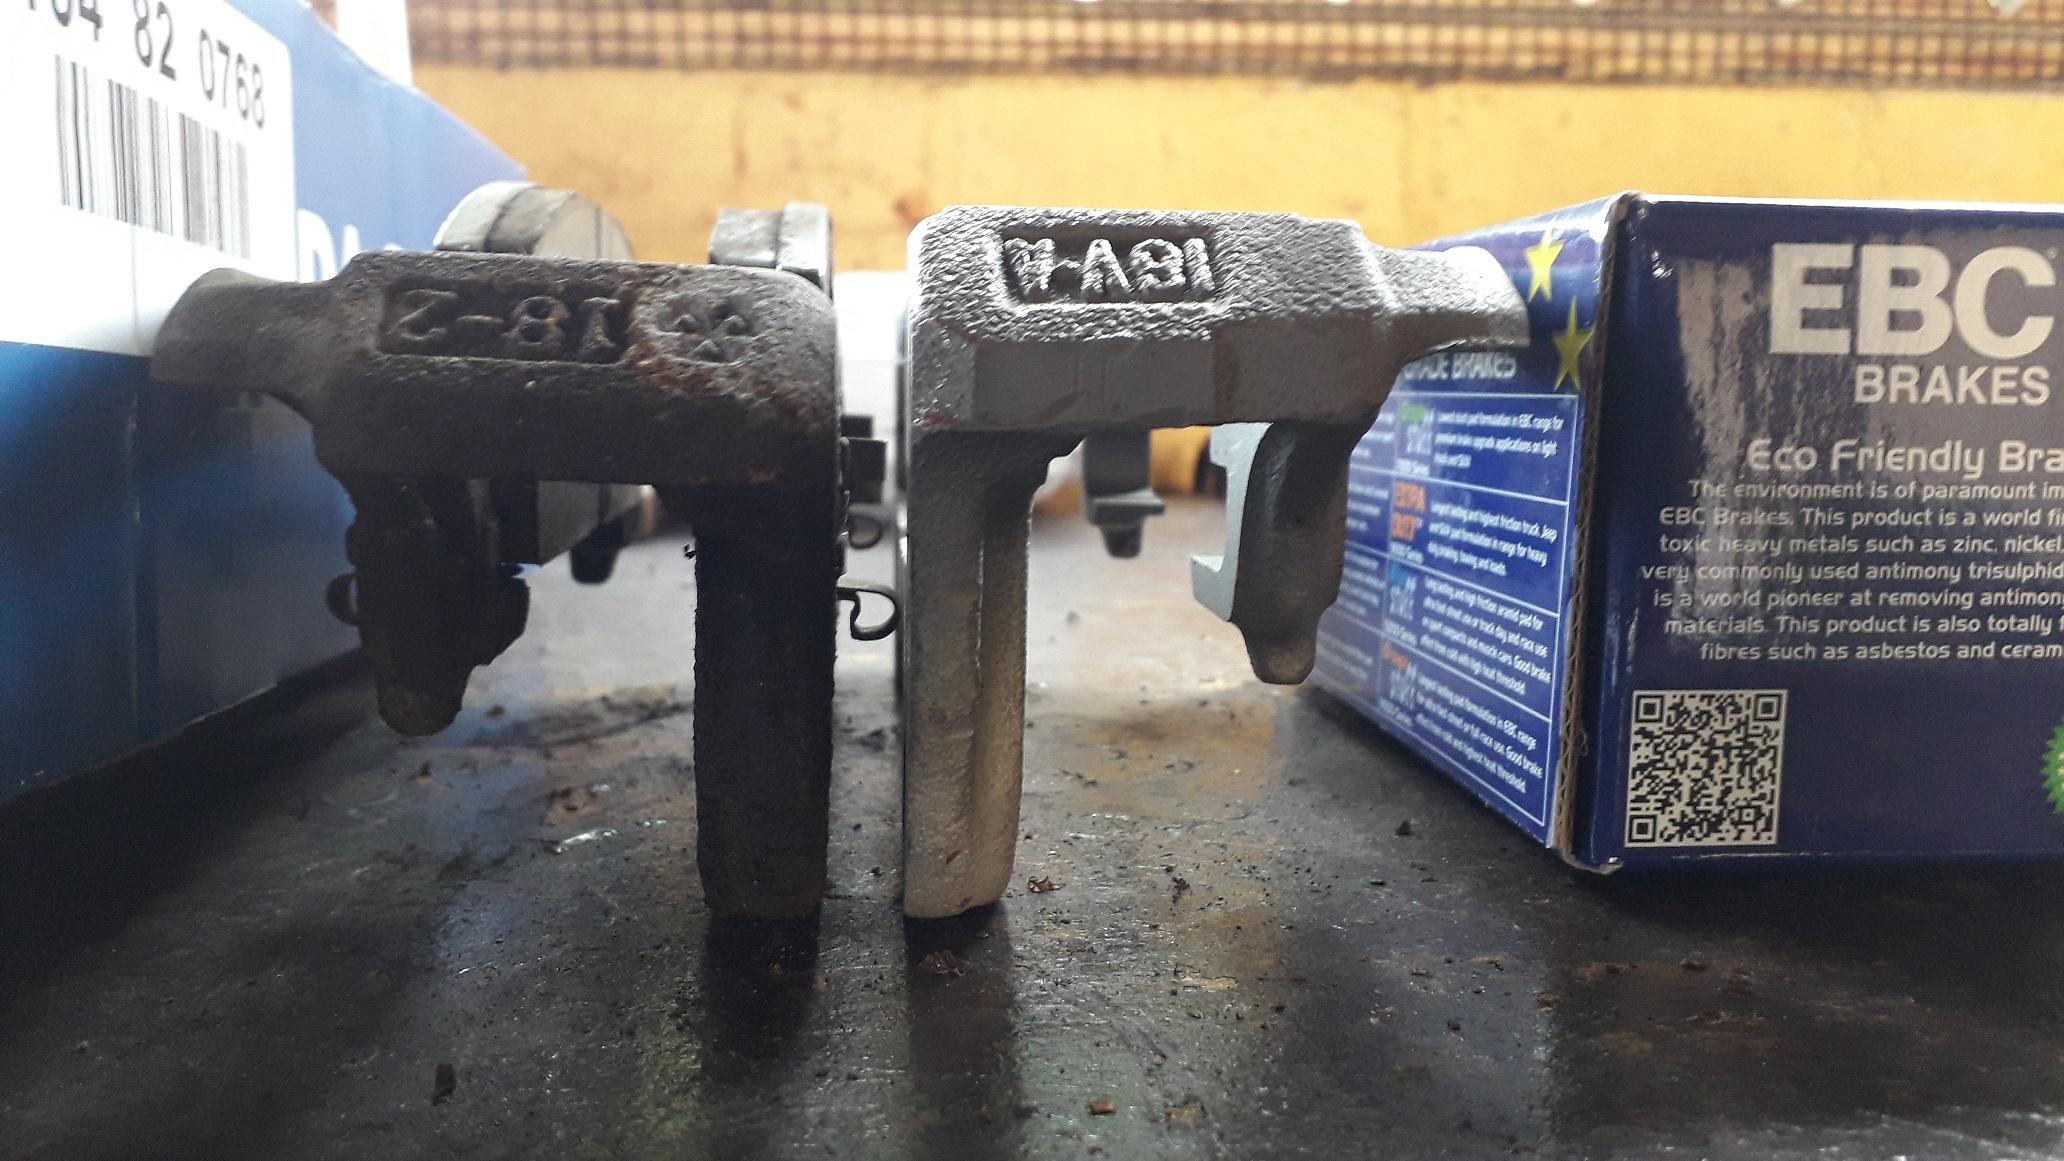
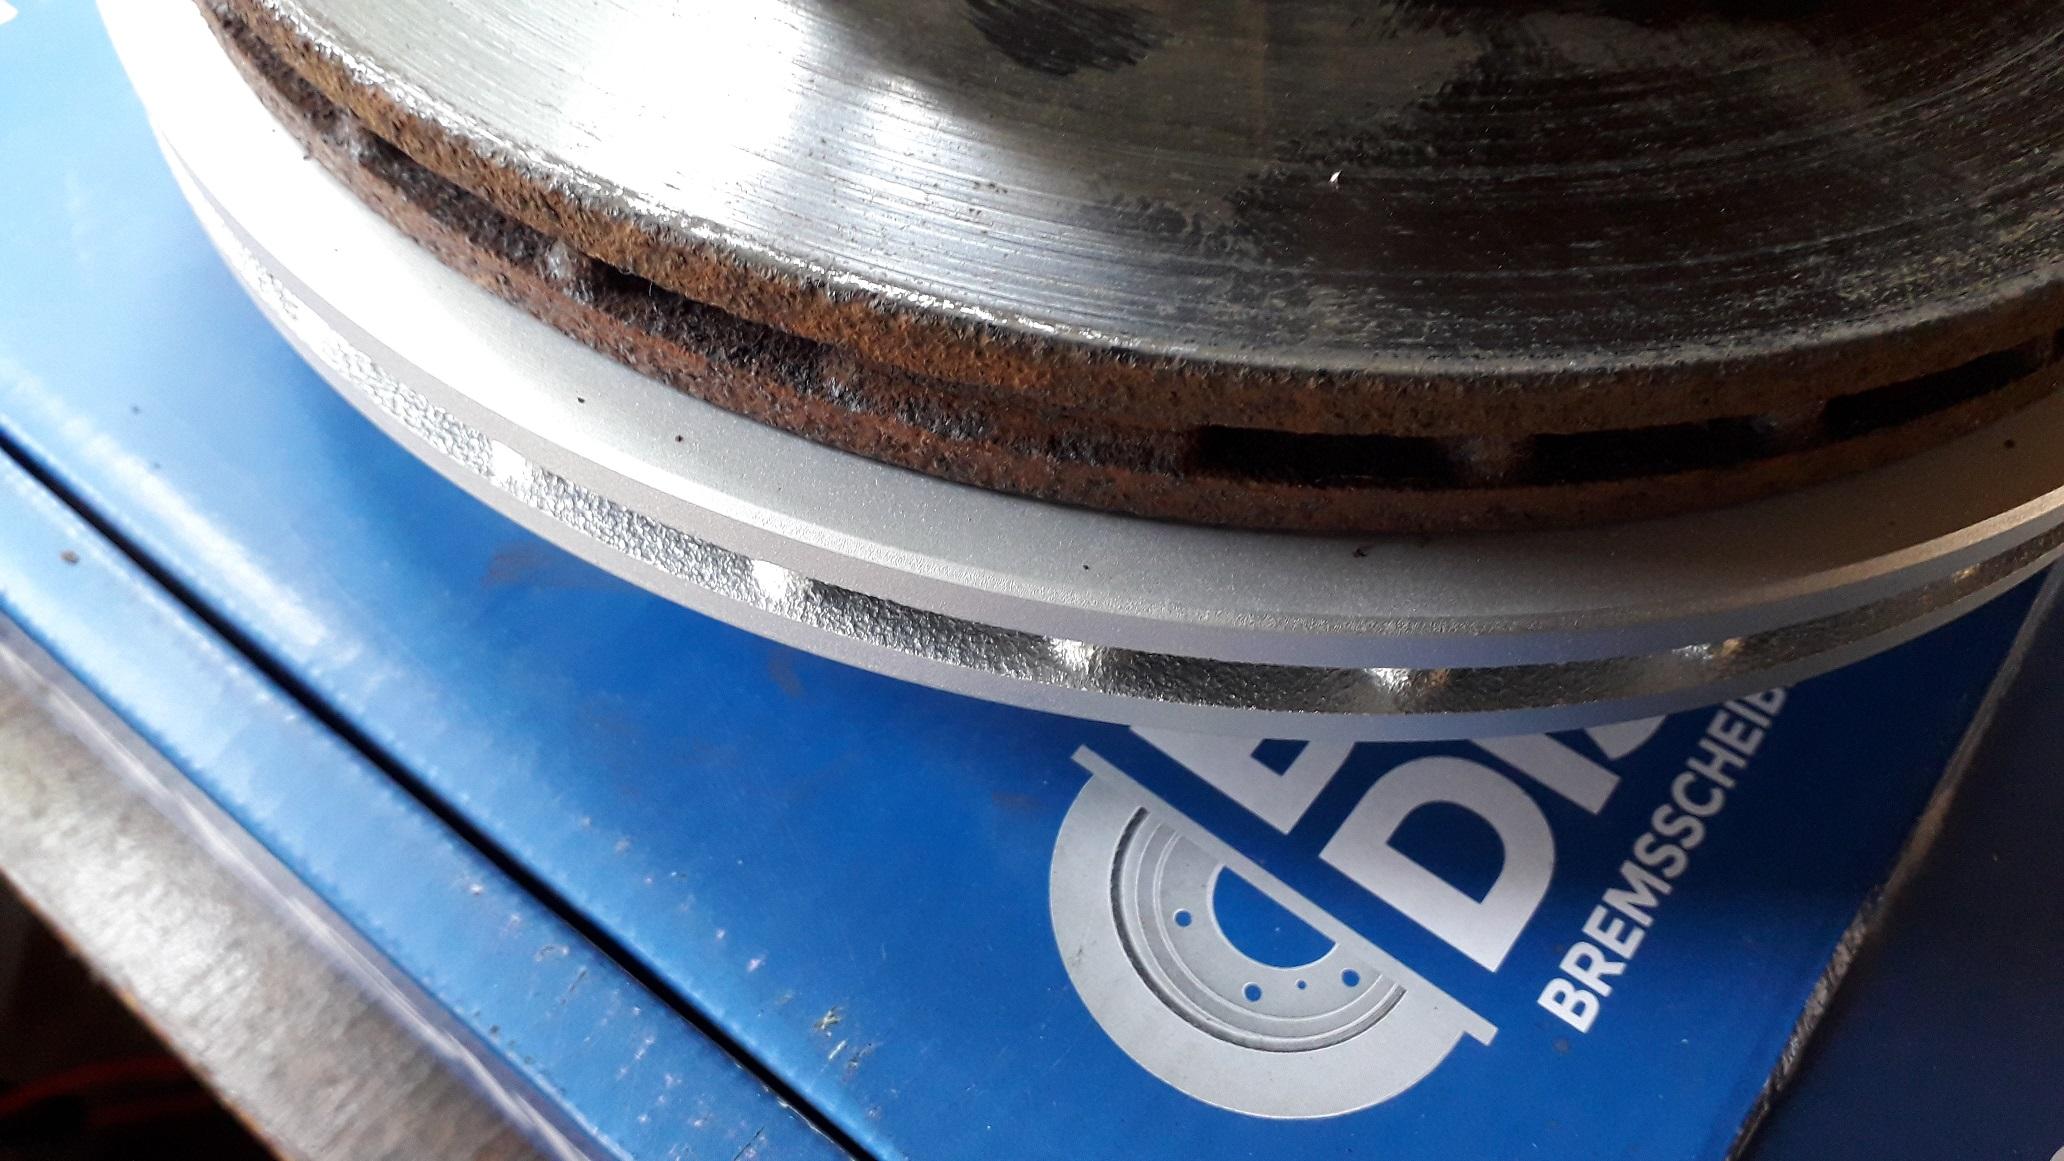
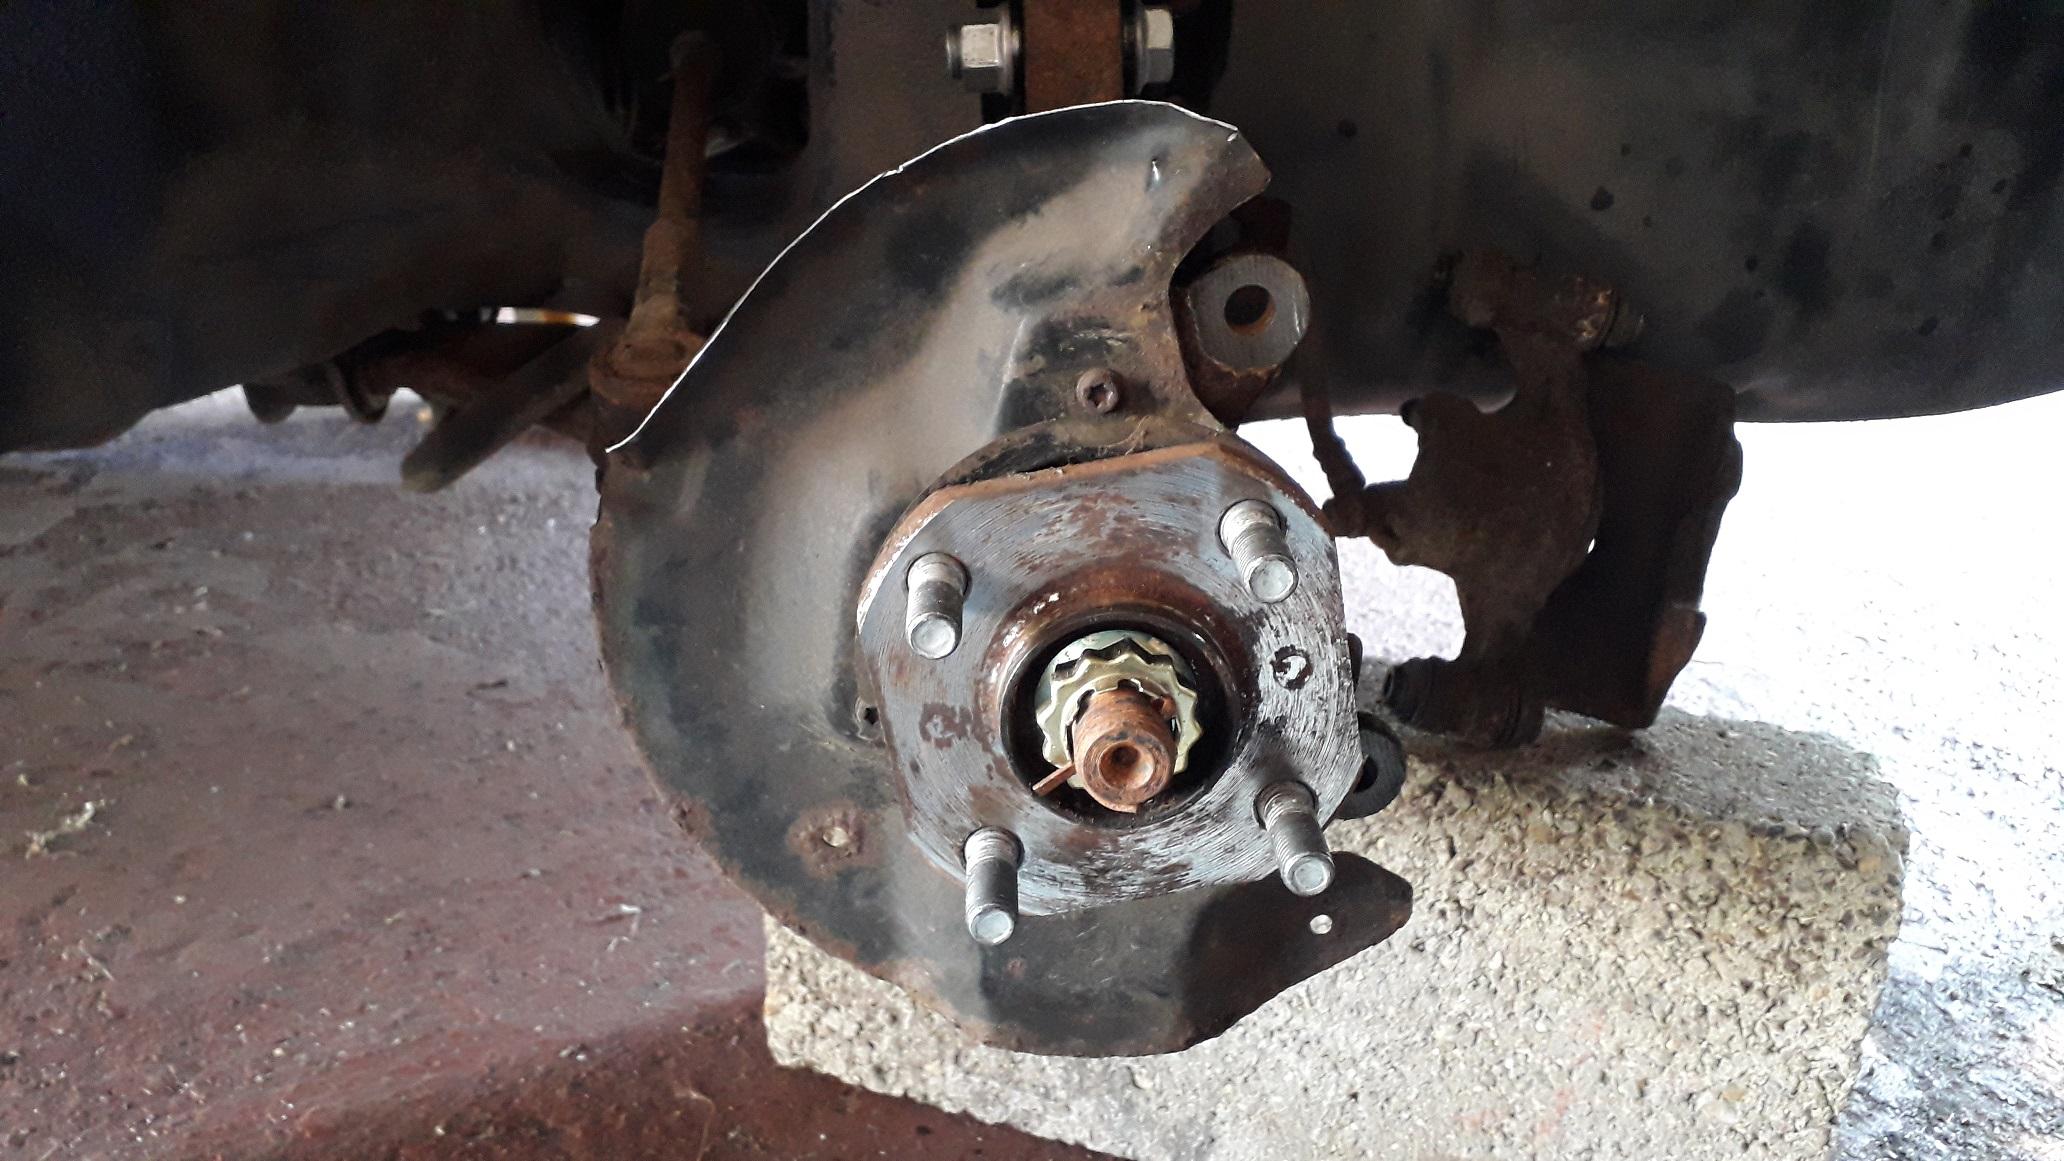
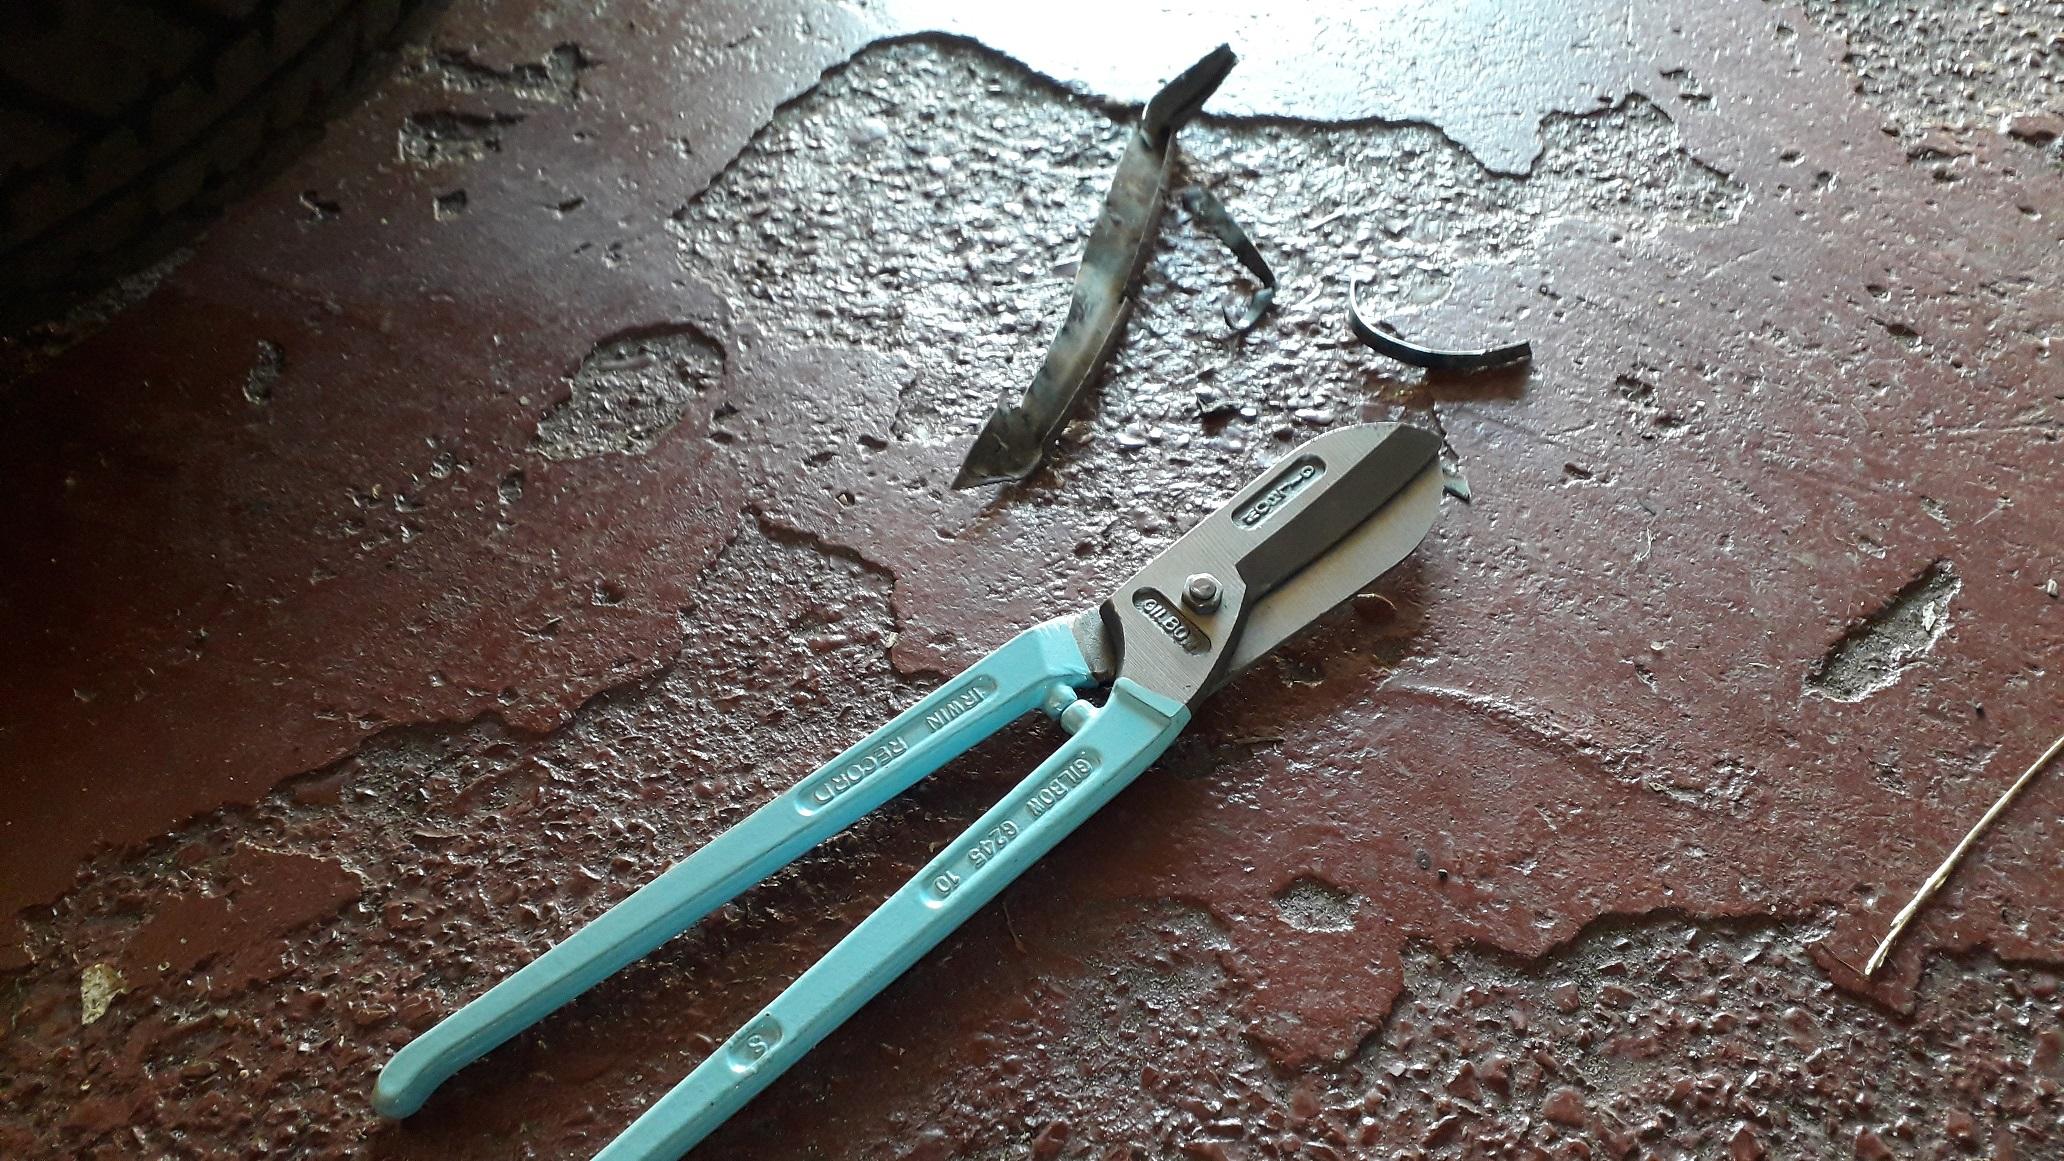
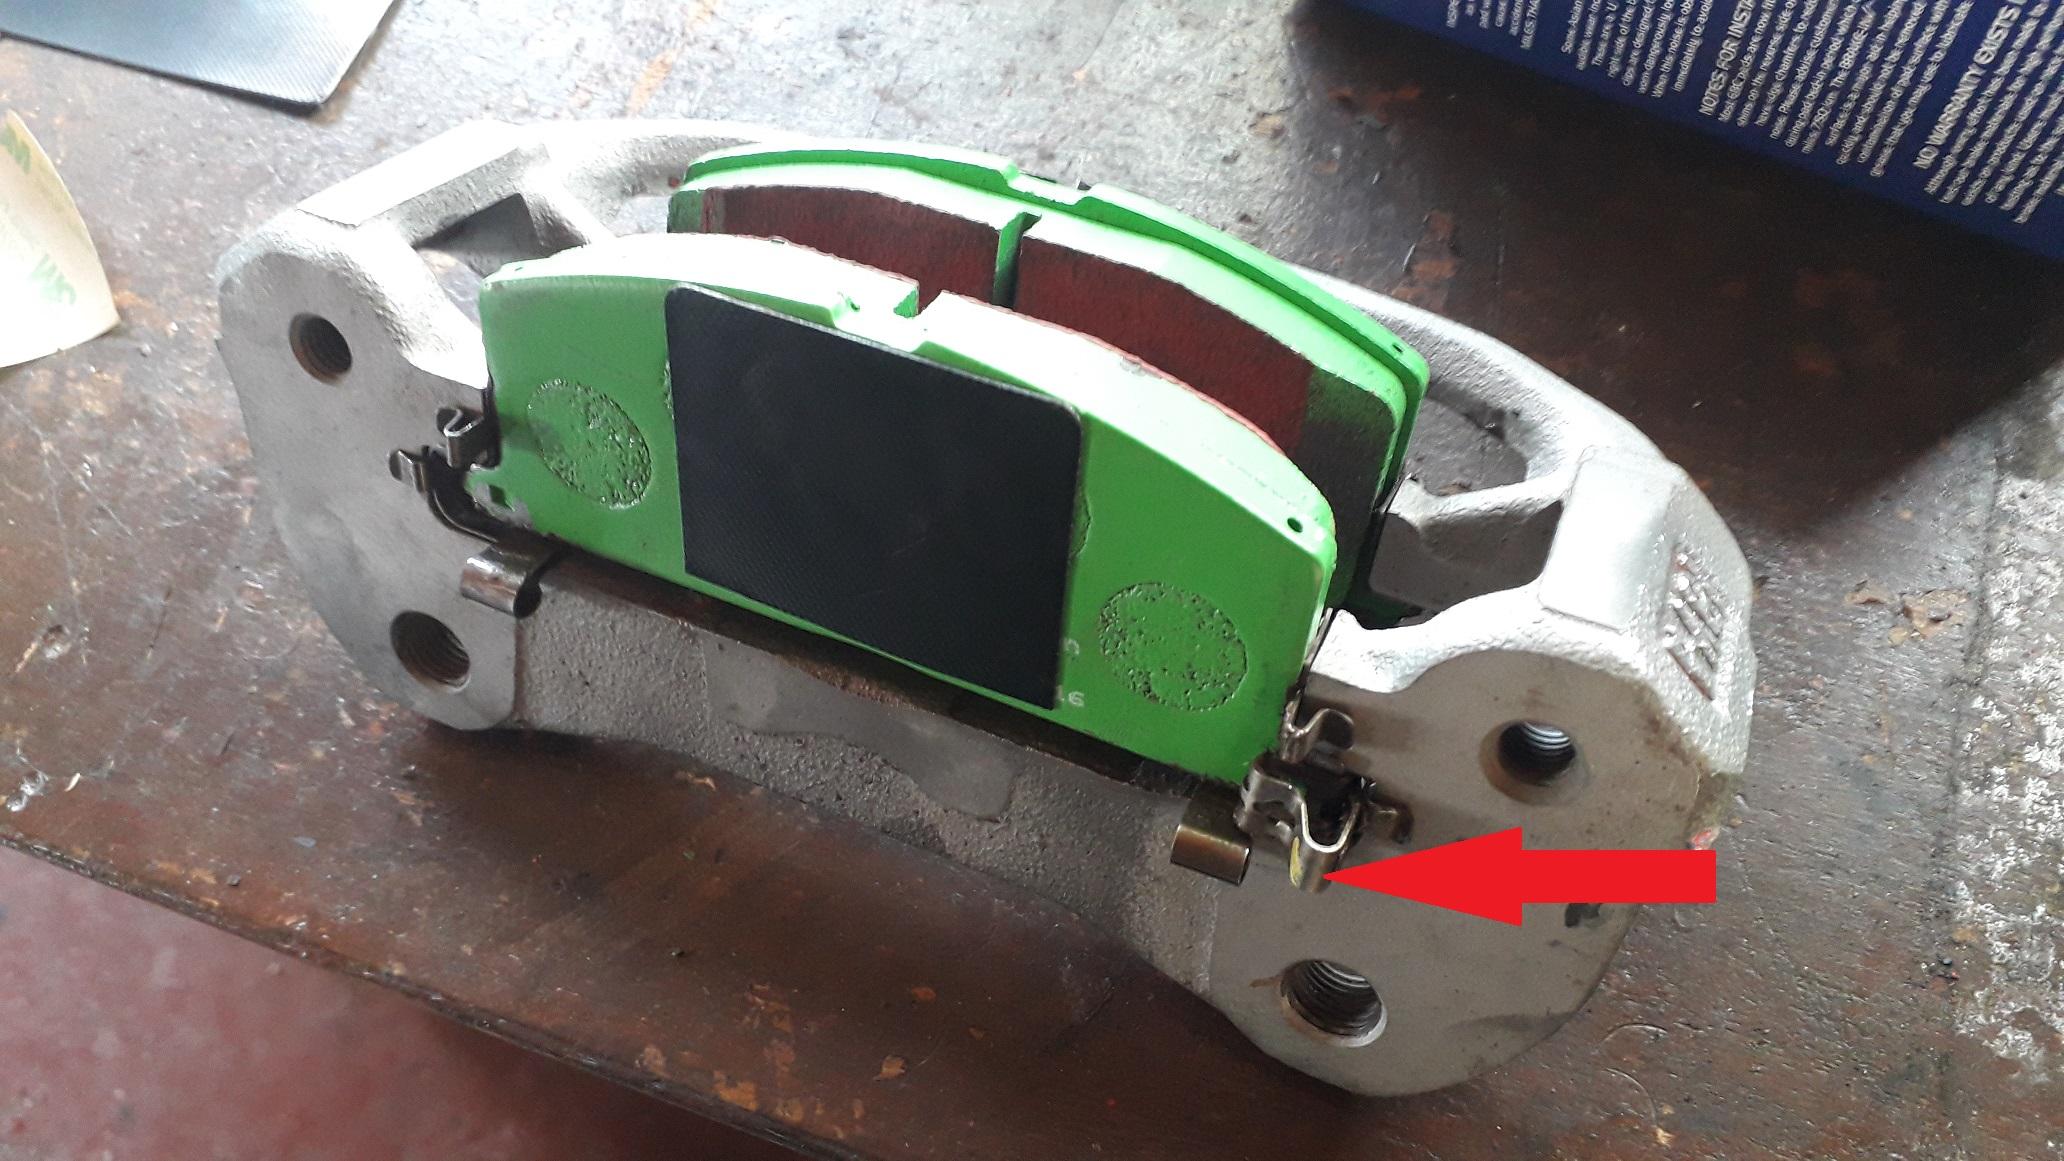
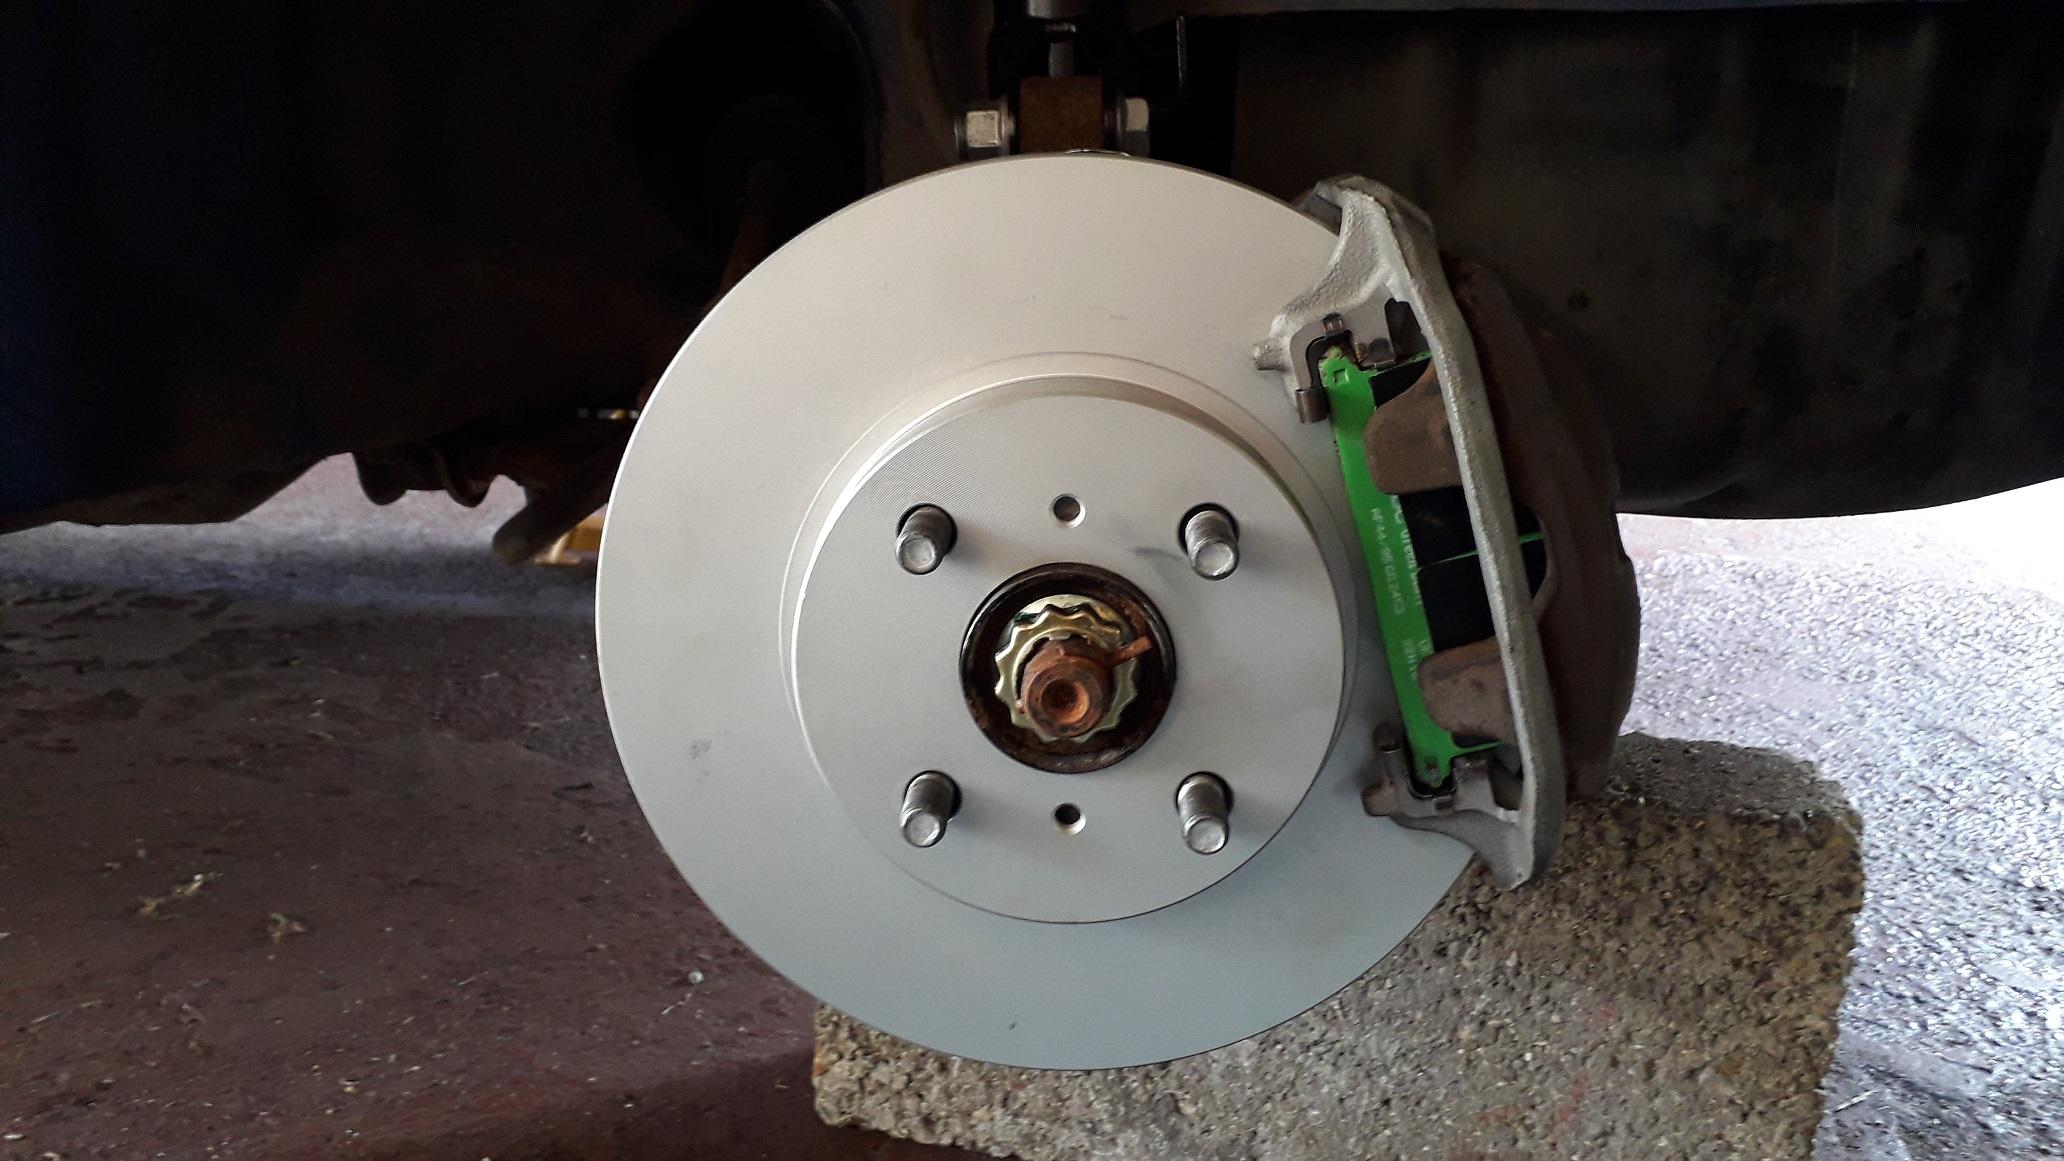
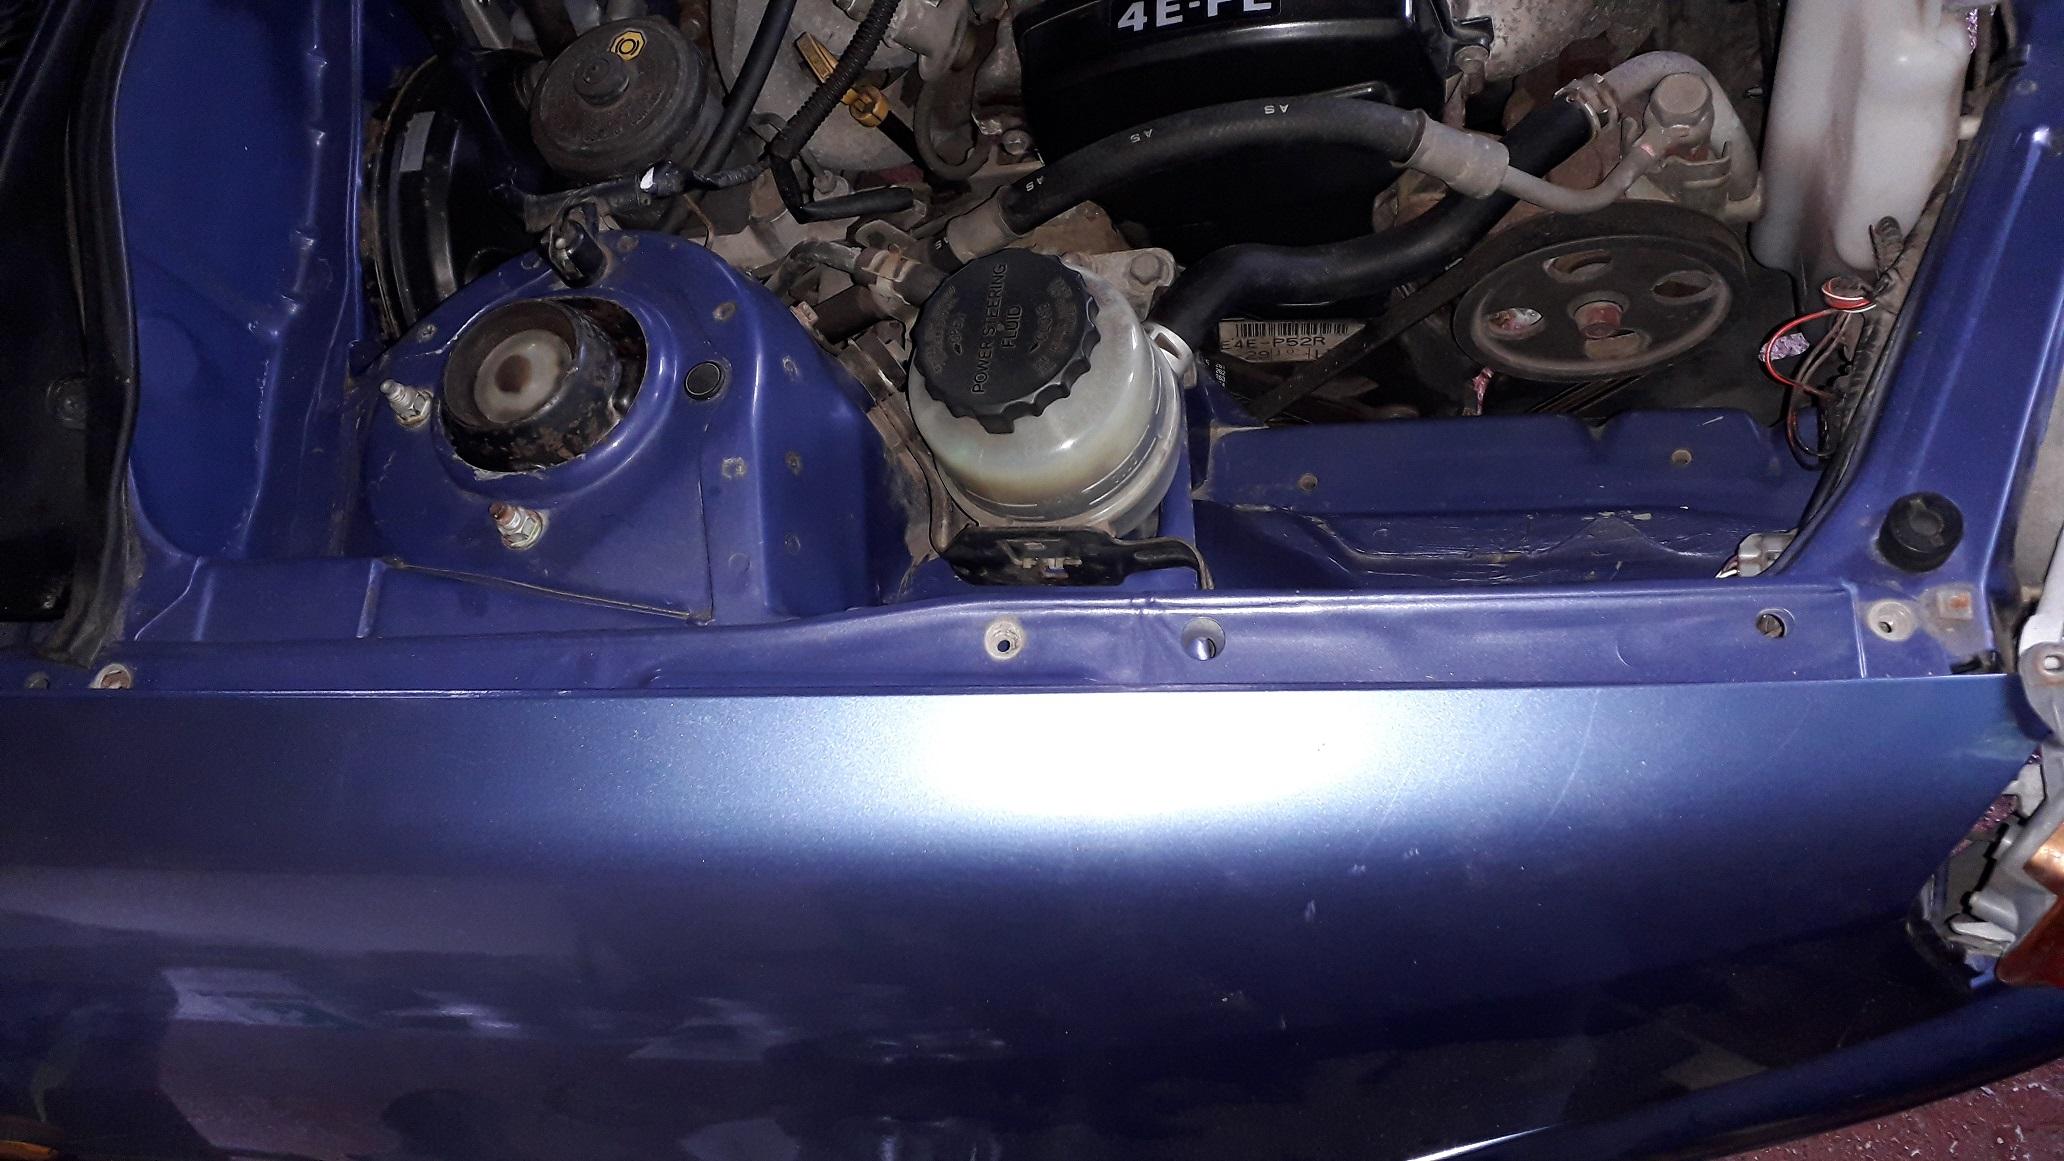
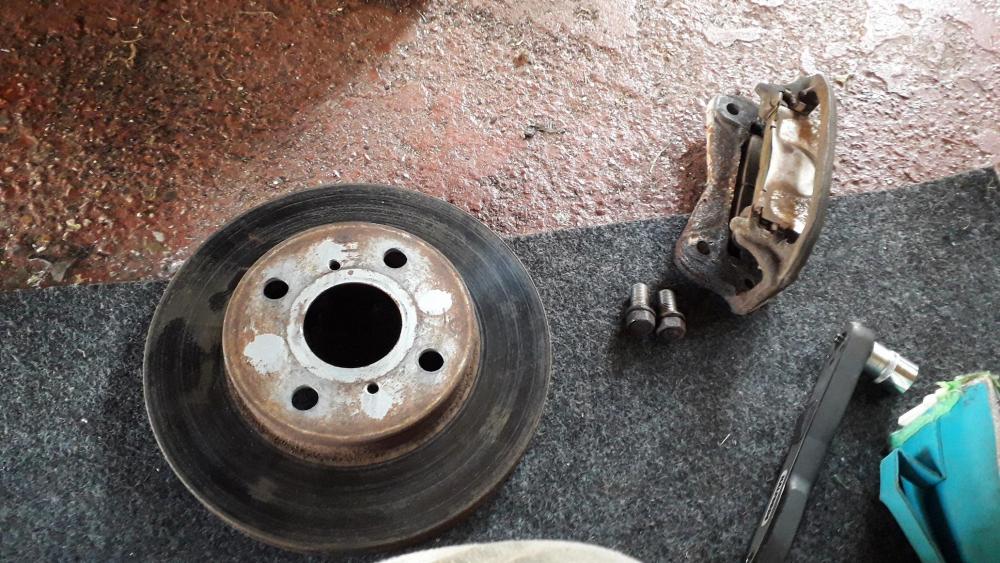
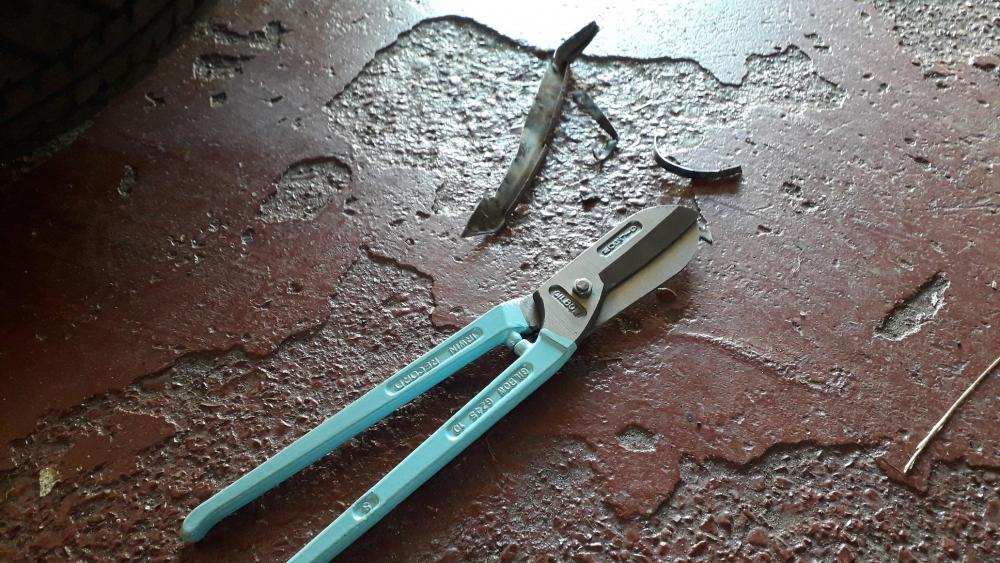
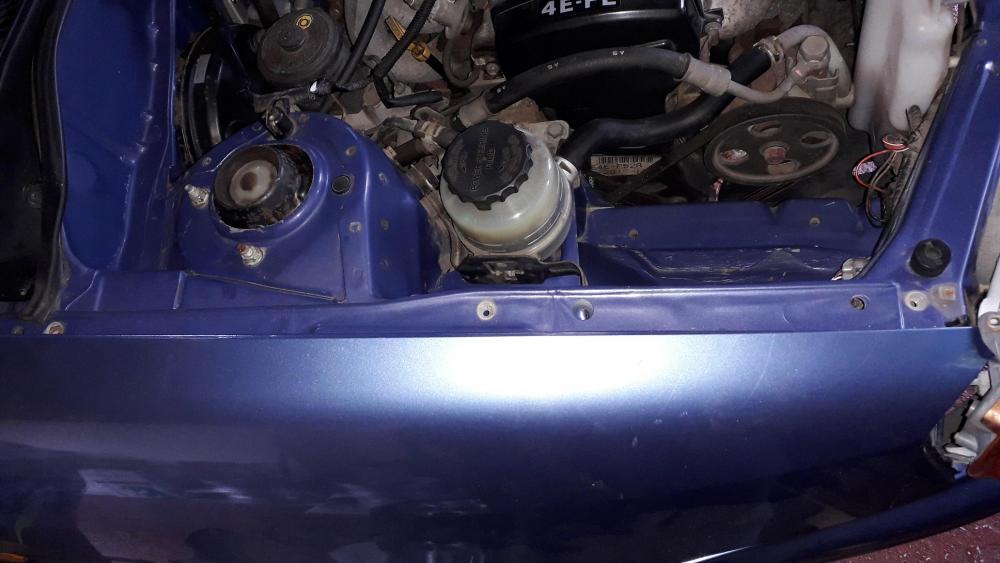
Well, the discs and pads arrived, big shout out to ID workz as always. Great price, well packed and quick delivery. 👍 Glanza discs and carrier fitment to N/A. Decided on Pagid replacement glanza discs (54146), EBC greenstuff pads (DP2453 for Akebono caliper) and glanza carriers I'd sand blasted earlier. Think the total came to £170 including a pair of Glanza calipers that I can sell on to recoup a bit of the £40 they and the carriers cost. So with the car safely supported on axle stands and the wheel removed; the standard caliper is the first thing I removed. 2 x bolts (top and bottom on rear, 12mm socket) released the caliper. Then I removed the brake pipe clamping plate from the strut with a 14mm. Caliper slid out and rested on breeze block to prevent strain on flexible hose. The caliper slide bushes has gotten stuck in the caliper through lack of use but were quite easy to free up by pressing them in with piece of wood. Once they started moving they operated smoothly. Also used an old pad and G-clamp to drive the piston back in ready for the thicker disc and pads. To remove the carrier I loosened and removed the 2 x retaining bolts (17mm socket). A breaker bar was required, but thankfully minimal corrosion on threads so they came out easily after the initial "crack, squeek, oh fuck, no it's fine" moment. Old disc and carrier off, pads were Aisin and still has the anti squeal shims both sides and the pad wear indicator clip (more on that later). The discs were in great condition with virtually no lip on them although they did look a bit blue. Old NA carrier (left) vs new Glanza carrier. Obviously larger in height by approx. 10mm to accommodate the larger disc. The bolt hole centres for mounting are the same when I measured them. Old disc vs new glanza. Old disc was 238mm diameter and the Glanza disc was 254mm. The increase in disc diameter means that the smaller NA dust shield will interfere with the disc, thankfully its only approx. 1mm thick steel and was no match for my tin snips 💪. Tidied up with a file and straightened the kinks out. Also carefully cleaned off some of the rust from the carrier mounting surface on the hub knuckle and the disc mounting surface on the wheel hub. Re assembly time, so in went the pad retention clips making sure they were orientated correctly (rounded spring sections out) Added the pads with their anti squeal strips (attached where ever contacted by caliper or piston) and some copper grease on the sliding surfaces. Note the original wear indicator clip, it features a small tab of metal on the inner face that contacts the disc when the pad material is approx. 1mm thick and causes an audible warning. Fitted the disc, slid carrier and pads over, bolted carrier to knuckle at specified torque. Slid caliper into / over carrier and disc and replaced the fixing bolts (long bolt at top short at bottom) and tightened to specified torque. Re-attached brake hose clamp to strut. Repeat for other side and then pumped the brake pedal to drive the caliper pistons back out pressing the pads to discs. Very important to do this or the first test drive the pedal goes to the floor, no braking effect and new pants required. Checked the brake fluid level and it was way over the max. mark so used a turkey baster to remove the excess fluid. Not too tough a job, glad it all essentially bolted on with no modding of important components required. The only thing I'd do differently would be to cut less off the dust shield (probably only remove the lip) and then straighten the material with some pliers instead. Need to bed them in for a bit, should be a nice improvement.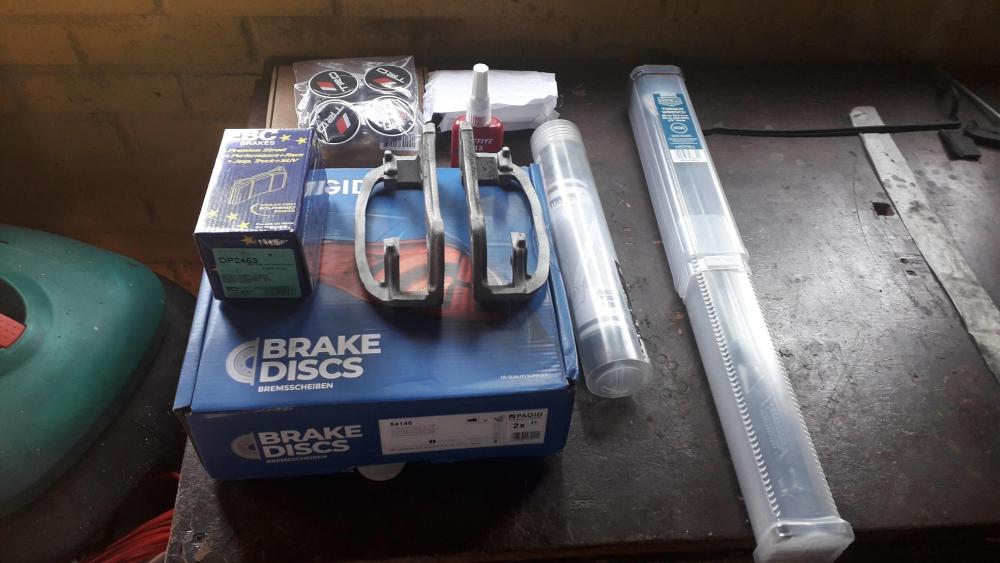


-
Claymore's sleeper 4efe+t-t+t build (R.I.P. the Nanza)
Claymore replied to Claymore's topic in EP91 Progress Blogs
Exactly my thoughts too, much prefer forums as a method of communicating with like minded people in the community. Can't see how social media can do it well at all. If everyone that read the build threads also started their own maybe forums will become more popular again. You can see from the views that peoples threads get there are clearly people out there reading this stuff. I hope that all the good threads that are on here inspire people to start their own. -
Claymore's sleeper 4efe+t-t+t build (R.I.P. the Nanza)
Claymore replied to Claymore's topic in EP91 Progress Blogs
Cheers, it takes ages to write sometimes but I enjoy it. If it helps others then I know it was worth the effort. 😎 -
Welcome mate
-
Don't understand why people can't be bothered to post (unless he works 7 days a week night shift?!) not difficult really. Fuel rails worth £100 imho. Free injectors worth £40 Lol https://www.ebay.co.uk/itm/Starlet-Glanza-V-Fuel-Rail/143740734302?hash=item21779d8b5e:g:qTYAAOSwmZJfYJFq No connection to seller etc. If I were closer I'd be on this like a puma!
-
Just noticed that the top mounts are mounted to the strut towers 180 degrees out. The screw with the arrow should be in the rear tower hole. This pushes the "hump" part of the mount to the back of the tower opening to have the correct caster geometry. "hump" at back of tower opening.

-
Agree on the bigger turbo as far as efficiencies go. Or maybe the TF035HM 6cm housing would be somewhere in between. Wouldn't want to run a CT9 at too high of a boost level due to boost creep, excess charge temps. and probably end up well off the compressor map. Should be fine under 1 bar, maximising the use of the parts Toyota gave you. Again, just my opinion.
-
No excuses required my friend, welcome to the sight. Personally I have always had the same outlook for street cars, I'd rather have less power and be able to use all of it, all the time than too much power and never be able to use it all. 200bhp per ton is plenty for the street. My advice would be to find the least modified, best maintained car you can afford. Decide on the intended purpose and power goals. Service and replace all key supporting components (upgrading were necessary i.e. fuel pump, spark plugs). Tuning developments are well respected in the Starlet scene and their website has stage 1 and 2 component lists for stock engines (the website is a bit out of date, don't buy Jperformance stuff as there have been rumours they've shut down.). These components pretty much outline the tried and tested modifications for up to 180hp (which in my opinion would be plenty). Tubular exhaust manifold, decat downpipe, cat back exhaust system, front mount intercooler, HKS adjustable actuator, heat range 7 spark plugs, 255 lph walbro fuel pump, piggy back ecu (with map sensor). Wideband O2 gauge and boost gauge. Method of controlling boost (in the piggy back or separate controller). Good mapping from an experienced tuner should see a reliable 170bhp ish and be fun to drive without being unruly or trying to kill your wallet! After this your heading into forging, big turbos and £1000's of pounds spent. Other opinions are available.
-
With all due respect a TD04/5 on a stock engine is probably the biggest risk (especially buying second hand). It's quite common (from builds on this and other sites) that adding a TD04 @ 1bar for 220bhp often ends in head gasket failure. Bit of a crap shoot as to how long it lasts. Often influenced by the tune / maintenance / engine health or supporting component failure. Then the "while I've got it apart" rule kicks in and might as well forge the engine. Some are then happy to use the forged components as a way of increasing reliability and stick to the 1bar and 220bhp result and with a well built, properly maintained and safely tuned engine they last for a respectable amount of time. Others are using the forged components to increase the power capability and have to accept a much reduced service life of the engine. Quite often multiple maps can be used on a daily driver, low boost running nearly all the time and high power map for special occasions. I sometimes wonder if there is also a bit of "be careful what you wish for" involved in some of these recently built then up for sale cars? 300+bhp through the front wheels of a small, light 25 year old hatch back was perhaps a bit of an animal and no longer fun to drive?
-
The slight frustration is that the cams are slaved together so adjusting them individually is difficult. Have seen a few modified gears but not really impressed. There are adjustable pulleys as you know. Don't mind the drop in solution of turbo cam or N/A cam. Easier choice to make. Seems weird to me that in the 30 odd years of tuning the fe and fte that no one noticed a cam lift difference?! Maybe no one cared about the fe enough to check.
-
Cool Cool, don't fancy my chances of finding anything other than a turbo cam but it'll be interesting to see. Can you measure overlap? Or just concentrating on intake cam?
-
Interesting, I take it the base circle of both cams are the same size?
-
Forged daily build from 55kw to 200kw+ (2023-01 updated)
Claymore replied to MegstuBMW's topic in EP91 Progress Blogs
Interested in this as well, do you mean the braces for the catalytic converter and intake manifold to take stresses off the head? Or are these different ones to hold the head to the block? Any pics or diagrams? -
Looking good,
-
Stumbled across this today, might be useful to some who are interested in compressor maps. Full credit to Kris H. https://rennlist.com/forums/944-turbo-and-turbo-s-forum/853894-turbocharger-compressor-and-turbine-maps-mega-thread.html
-
Glanza gearbox (non lsd) input shaft play.
Claymore replied to Claymore's topic in Drivetrain & Transmission
Don't worry about it too much mate. I've had a chat with a couple of gearbox re-builders and they confirmed pretty much what I thought. Based on the symptoms they believed it would be worn bearings at least and that the input shaft shouldn't move in and out or up and down. I've returned it for a refund. -
Forged daily build from 55kw to 200kw+ (2023-01 updated)
Claymore replied to MegstuBMW's topic in EP91 Progress Blogs
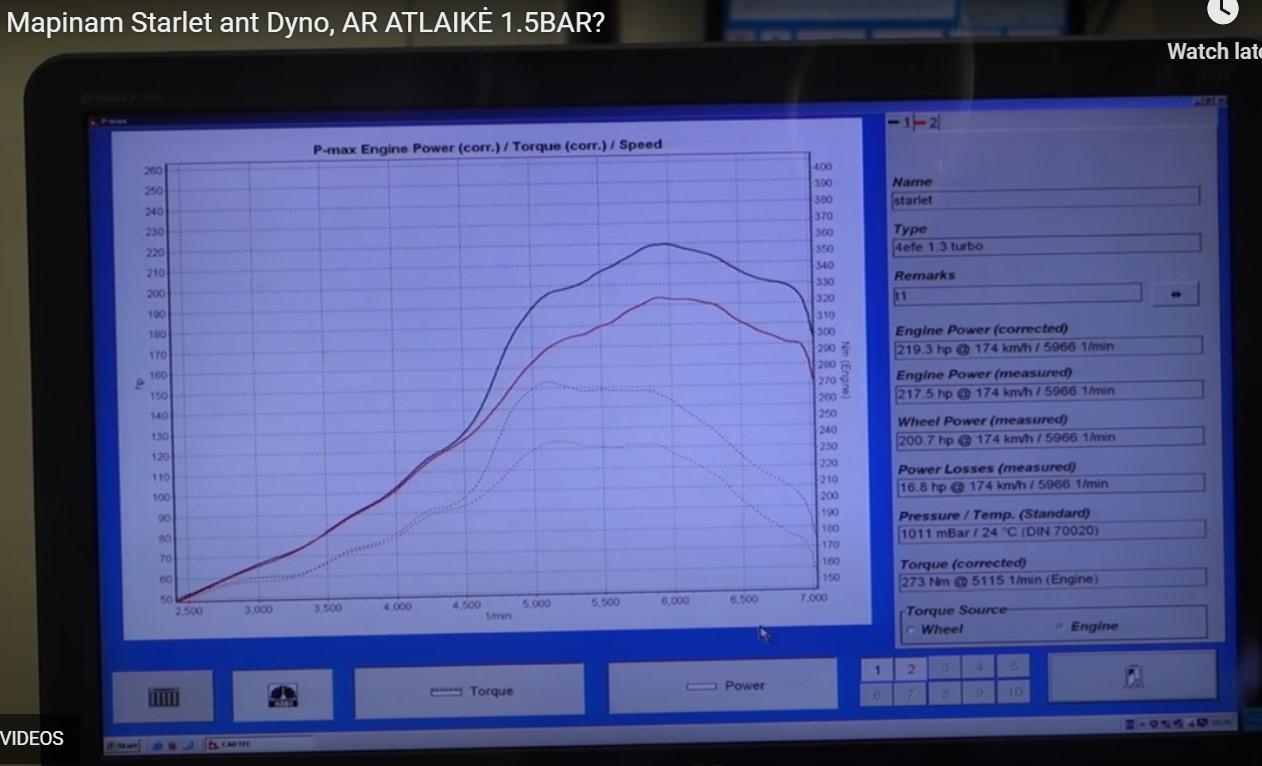
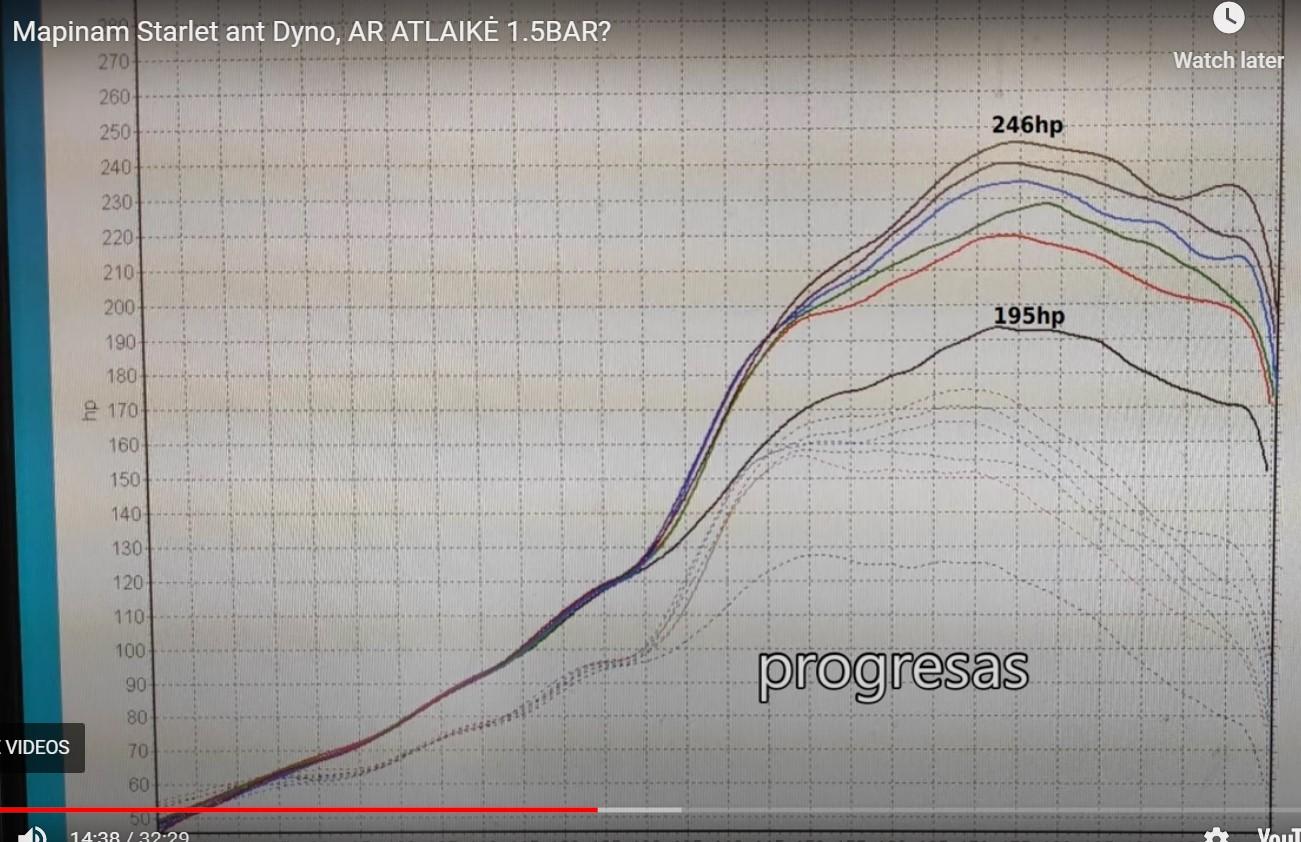
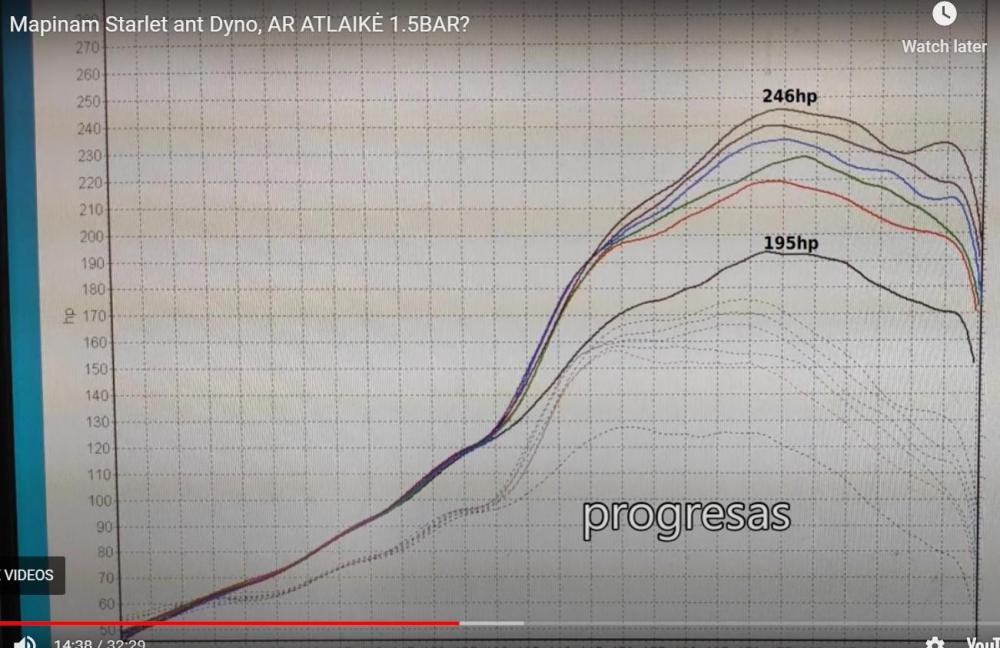
Snaffled some graphs from the youtube vid. Top shows all power runs, bottom shows first 2 runs with rpm as reference for top graph: Assuming its up to date, the thread mods list looks like: Block was decked, Head skimmed 1.3mm, Athena MLS 1.2mm HG, Walbro 255lph + 560cc injectors, possibly 1.5bar boost, K04-023 turbo (couldn't find the comp. map) 60mm exhaust, adjustable intake cam gear and adjustable exhaust pulley (unknown settings).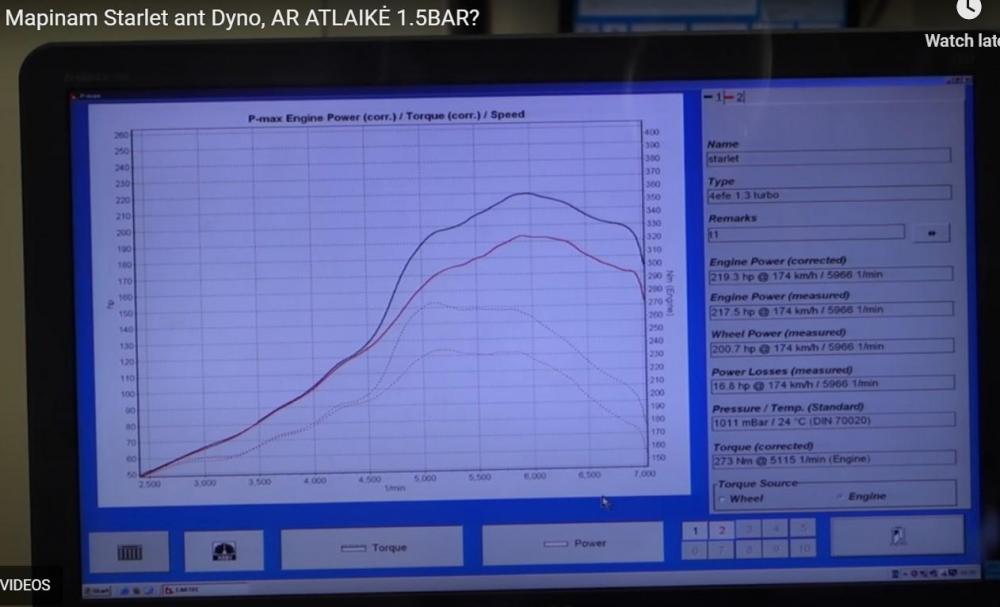
-
Claymore's sleeper 4efe+t-t+t build (R.I.P. the Nanza)
Claymore replied to Claymore's topic in EP91 Progress Blogs
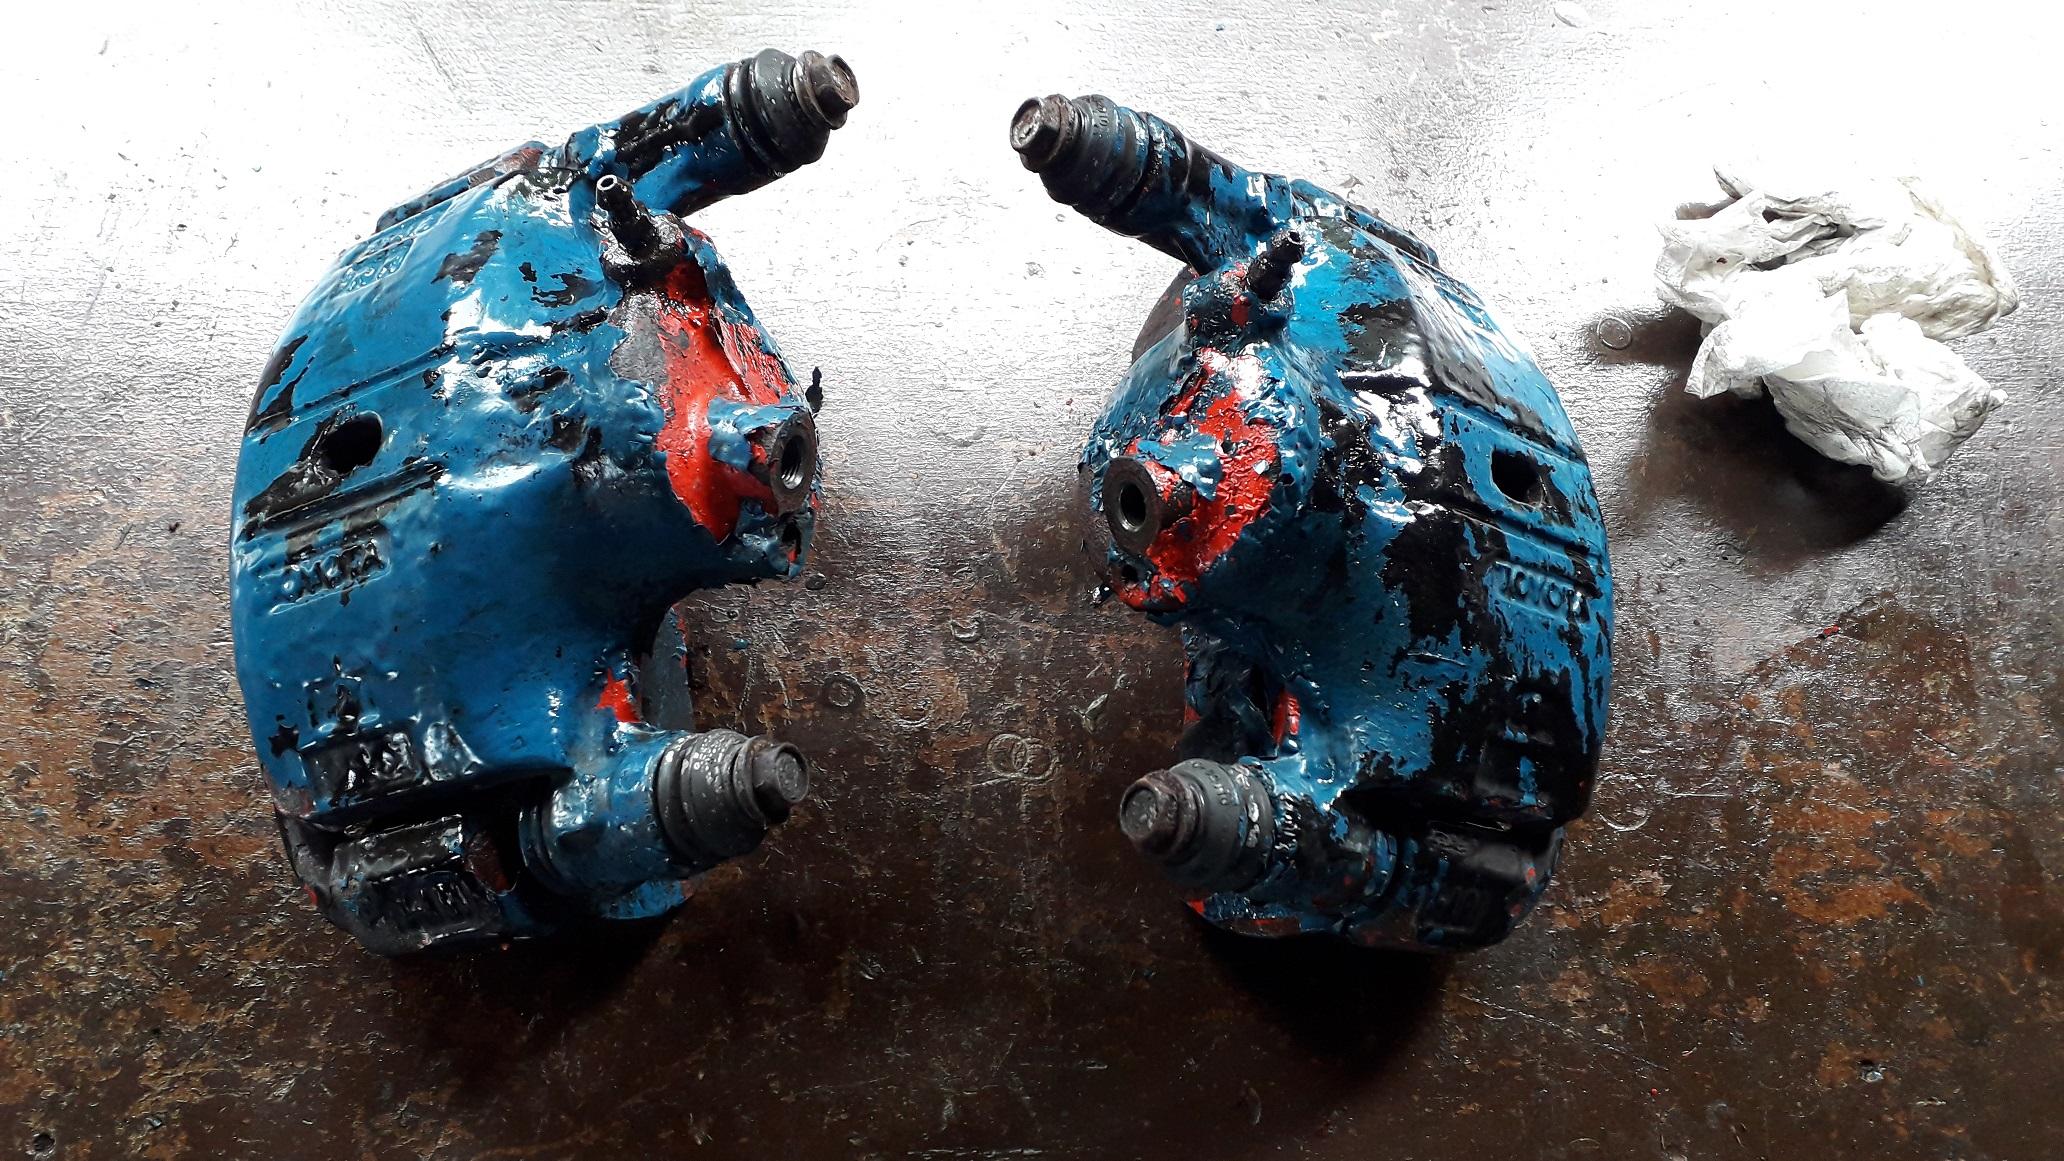
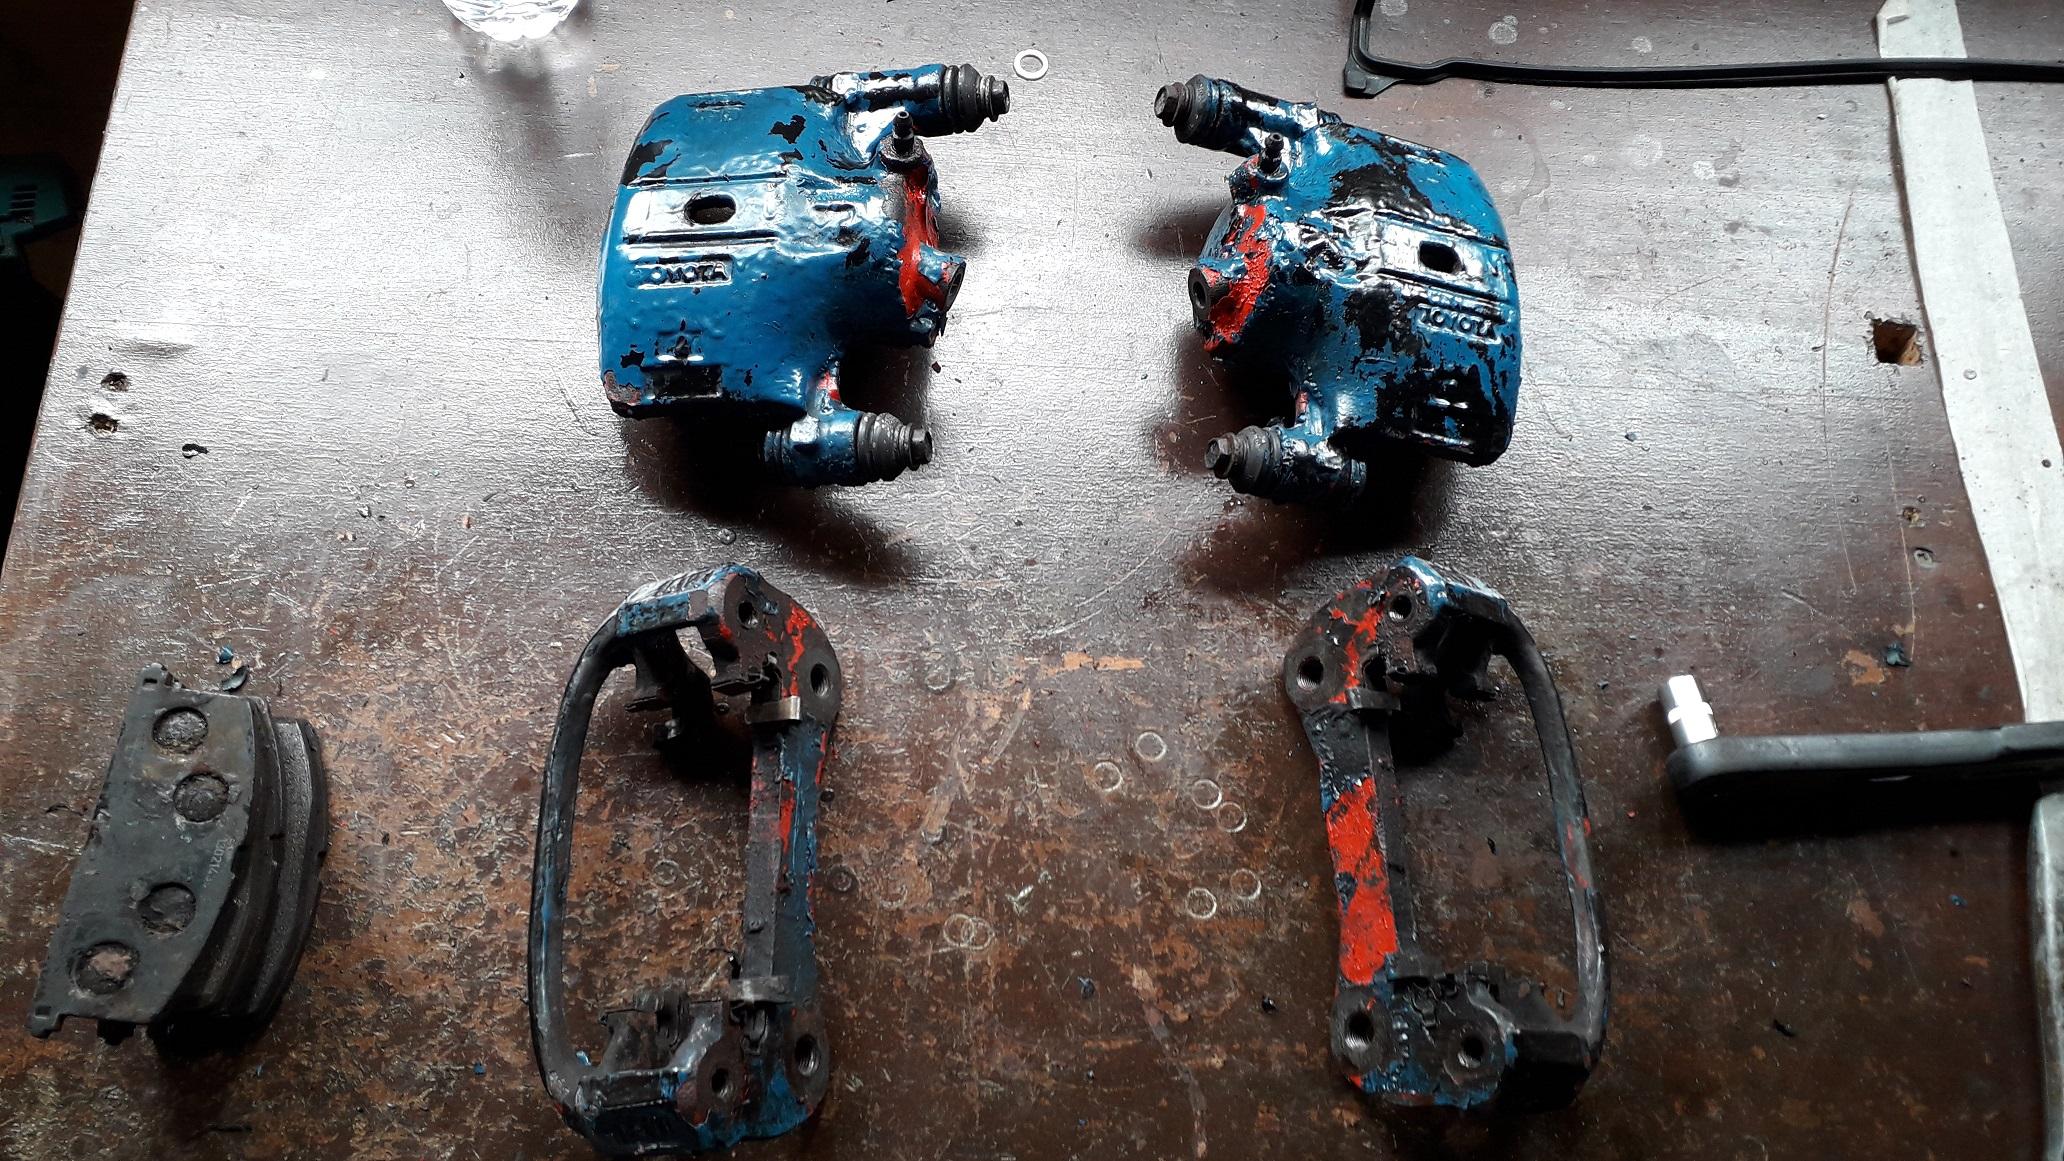
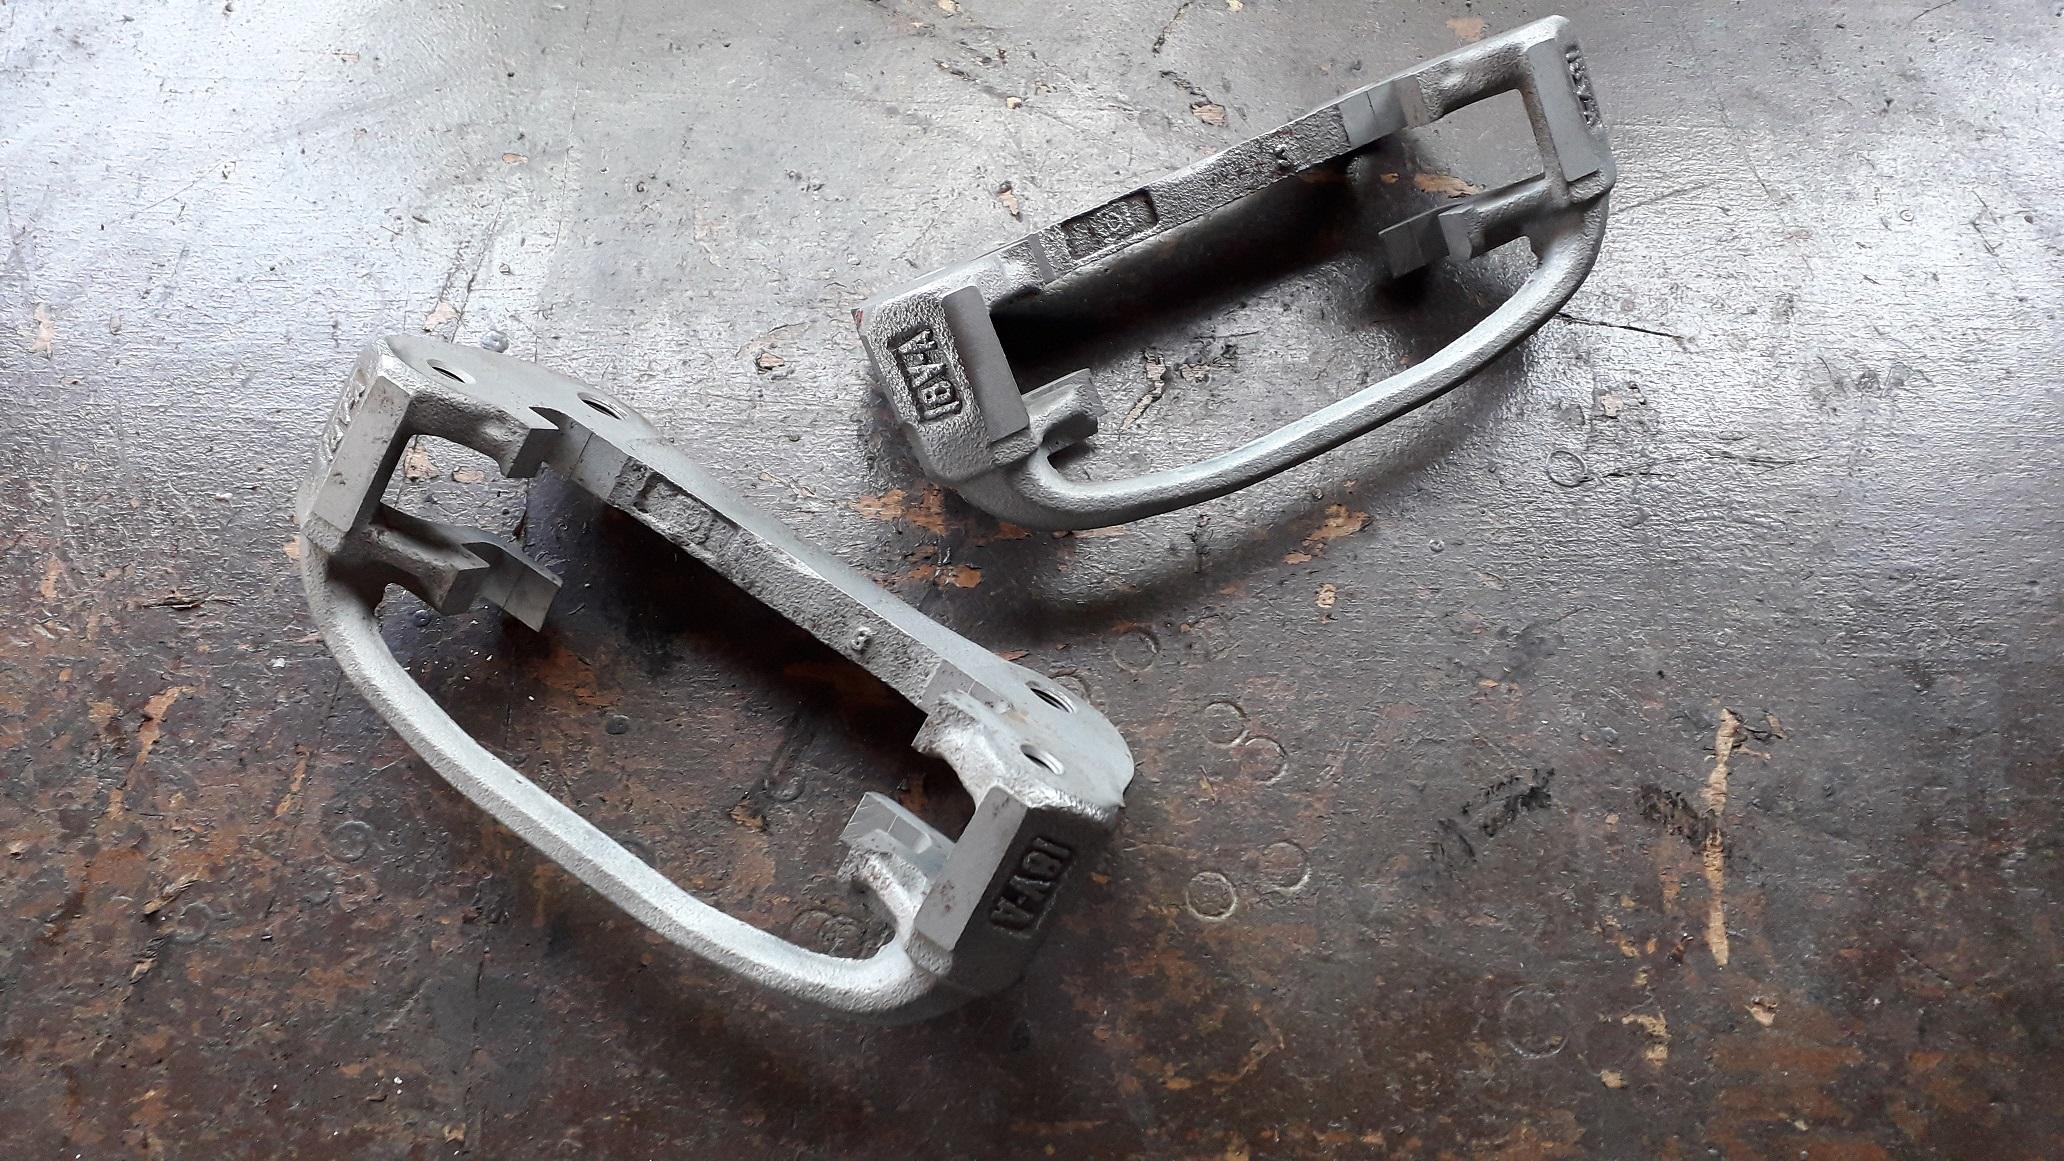
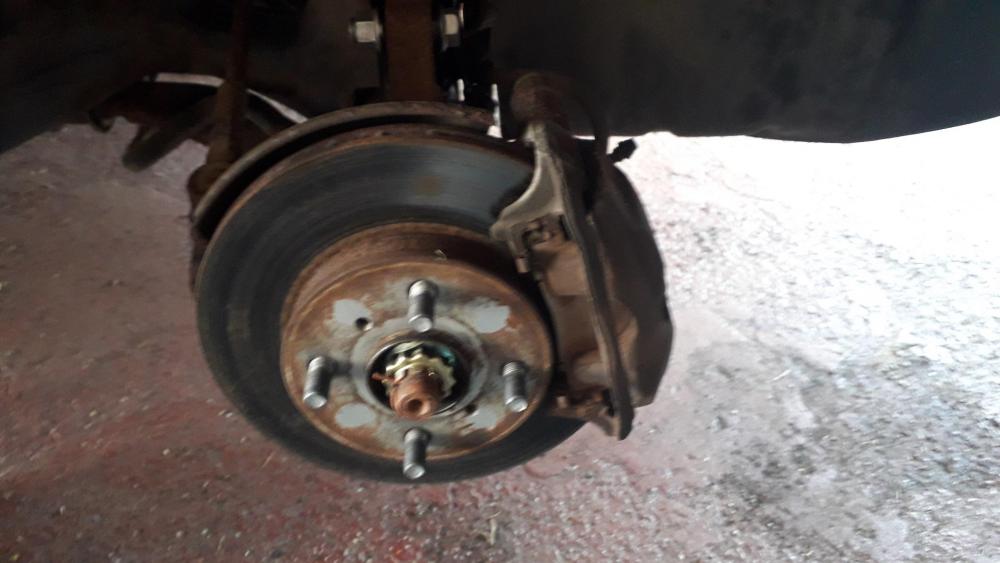
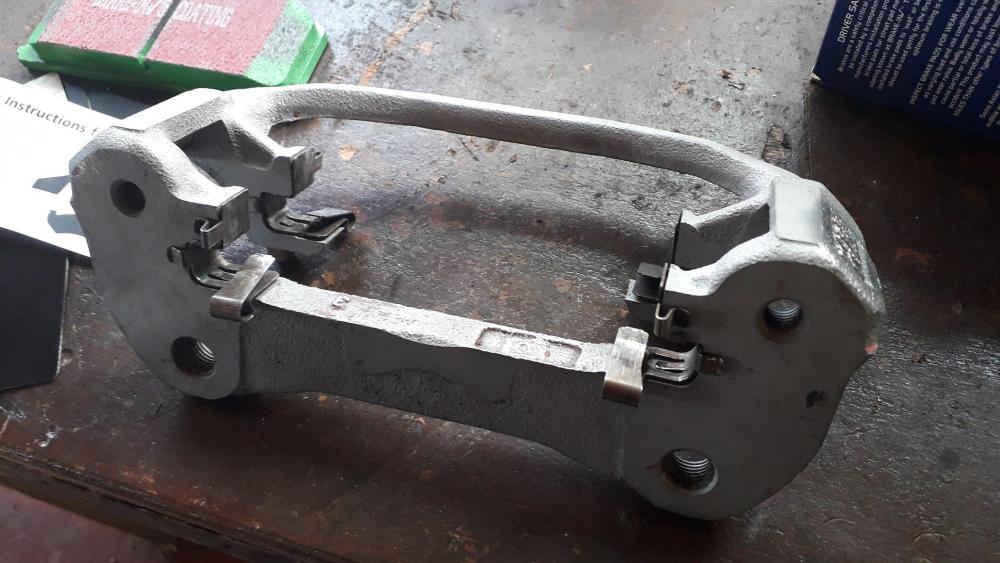
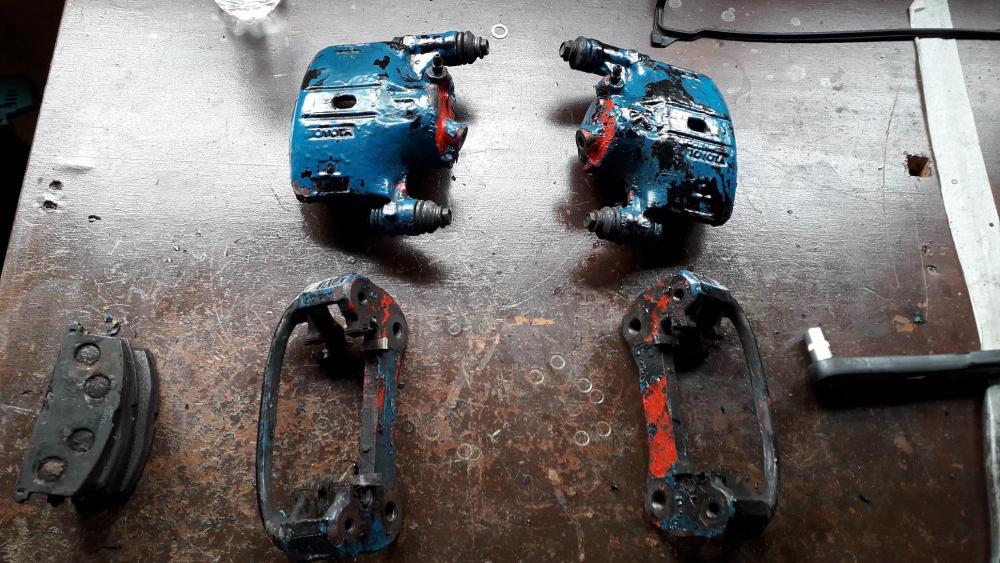
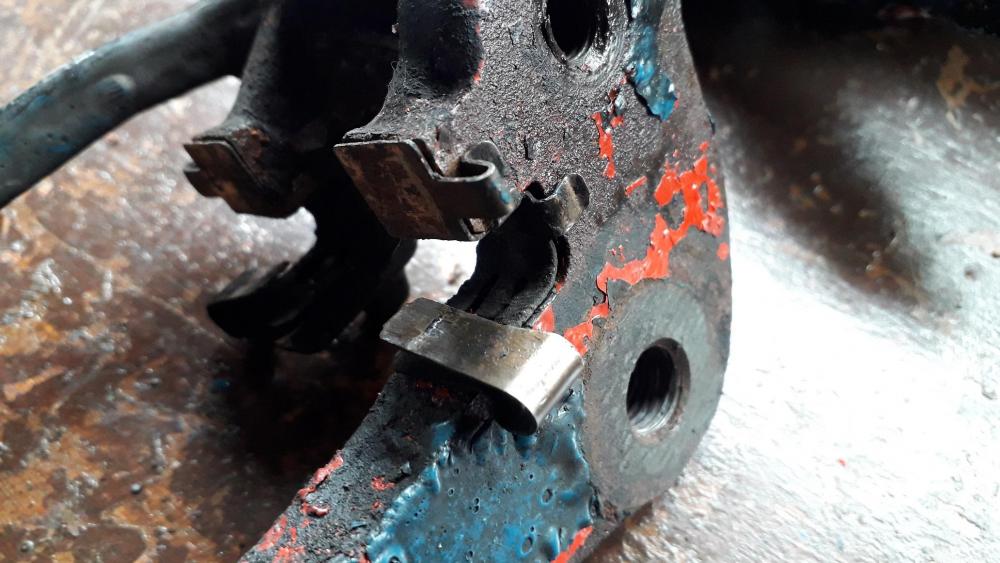
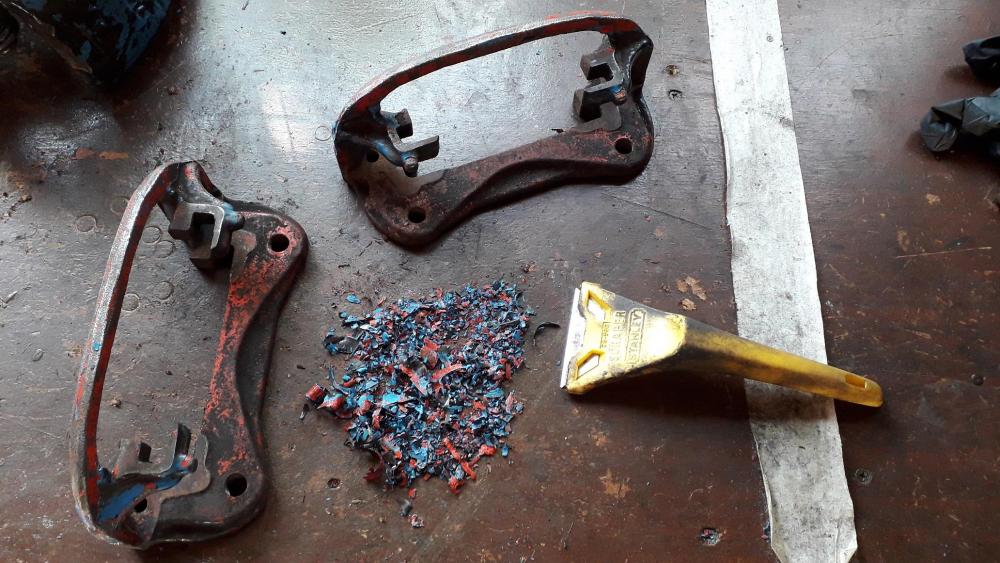
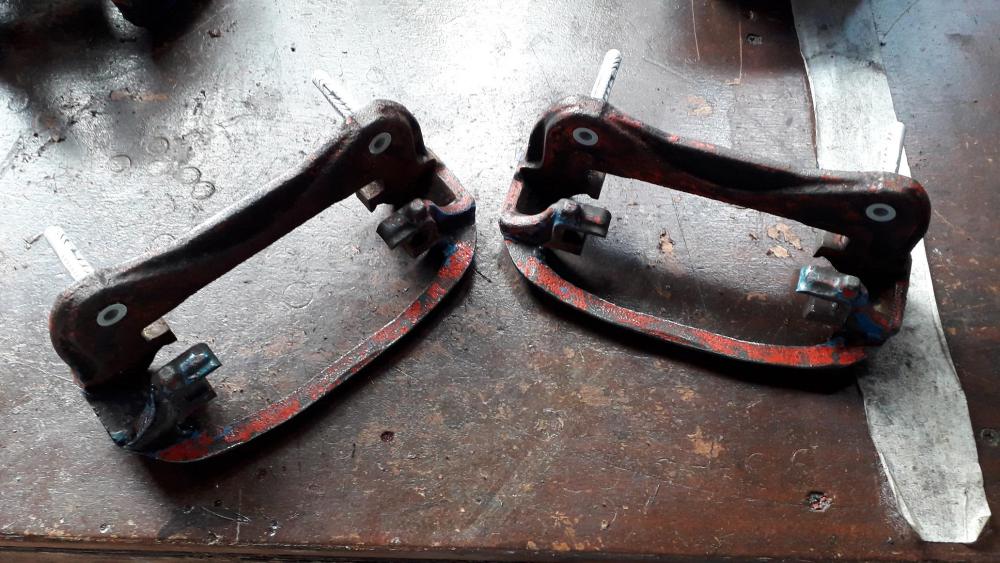
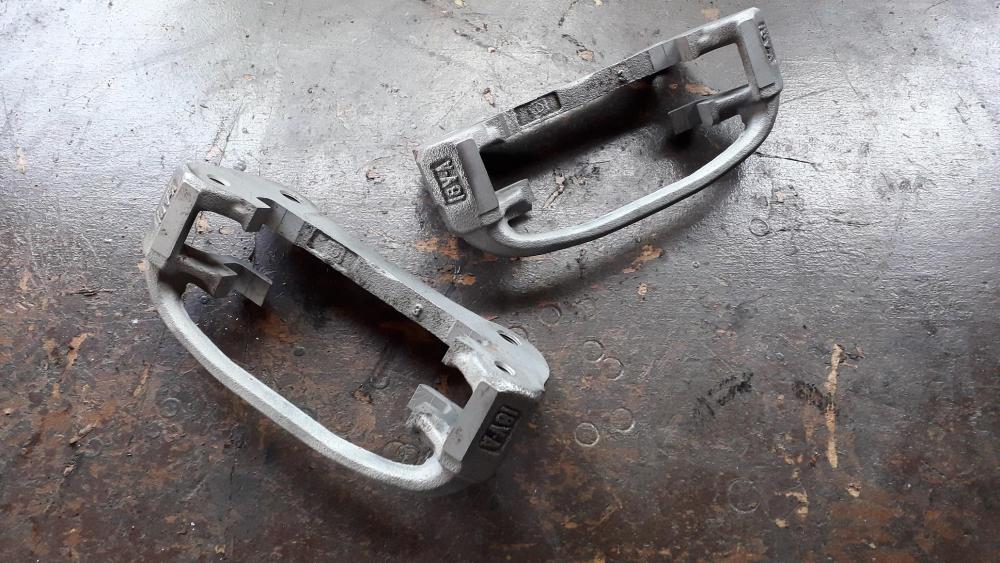
With the suspension side of things near enough done, it was time to look at improving the braking. As the car is being built for "fast road" levels of performance I decided what's good enough for the Glanza is good enough for mine. Glanza brake caliper carrier cleanup. Bought a pair of second hand calipers, carriers and they came with some half used pads also. As you can see the brake fluid had begun to strip the paint off the calipers and reveal that there had been 3 different colour changes. Red, black and then blue. I particularly like the level of detail Mr Black and Mr Blue had reached when painting over the rubber dust seals and pad retention clips! 🙈 12mm socket to undo the caliper slide mounting bolts, a sharp tap was required to get them going but after that they wound out easily. Close up of the clips, thankfully the mounting faces of the carriers were free of paint. After an hour with the scraper I'd managed to remove all the paint I could. Thankfully you only need the Glanza carriers as most N/A's calipers bolt straight up with Glanza discs and pads. There are however some very early N/A's that use a caliper with an integrated carrier (and a smaller disc). These won't work with the Glanza carriers. Masked up the threaded holes with rawlplugs to reduce the amount of sand that would get in. Then it was off to the sand blaster (where the genius rawlplug idea failed after being blasted out and blocking the sand return hopper 😒) Cleaned out and continued blasting... After blasting. Ready to attach when my discs and pads arrive.
-
Glanza gearbox (non lsd) input shaft play.
Claymore replied to Claymore's topic in Drivetrain & Transmission
Thanks mate, fingers crossed. -
I've bought a second hand Glanza gearbox and was giving it a clean up and checking it over and have noticed some play in the input shaft. If you pull the input shaft in and out (end float) it moves approximately 1mm total movement, If you pull and push it up and down (radial) it moves about the same, 1mm total. In the past, gearboxes from another manufacturer I've used had minimal end float and about 1-3mm radial movement. So my question is does anyone have a good C56 gearbox in their garage they can inspect to see if this movement is normal for a used box. Or is it more likely that it will need a rebuild? Also, do I need the glanza sandwich plate or is the N/A plate ok to use? Any help / advice greatly received.
-
Glad they fit well, looks like a TD manifold as they're the only mild steel "power up" design I can find available. The J performance downpipes have a tag welded on so probably the gravity one. Not far off being ready to turn the boost up! I did email Jperformance about one of their products and never got a reply. I have also heard of people buying stuff from them and having to pursue a refund through paypal when it didn't arrive and there is no contact number either. Sounds dodgy to me.