littlegreenmonster Posted May 30, 2015 Posted May 30, 2015 Tell your photobicket to fuck off and do as its told :'p Quote
Bluebear Posted May 30, 2015 Posted May 30, 2015 Where did you get those nuts from Conor? Been wanting a set of coloured steel ones for ages. Just not willing to go for alu ones! Quote
maddox710 Posted May 31, 2015 Posted May 31, 2015 My photobucket won't let me upload any more pics Galen hence no updates on here tinypic.com Quote
Russleh Posted May 31, 2015 Posted May 31, 2015 gonna be some car this. Started from your first post since if hardly been on here in 2 years so sat down and had a proper read through. Now I'm at the last post and must see more. Looking amazing so far man. Better catch up on other builds as well .Russell Quote
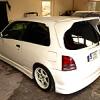
Browner Posted July 13, 2015 Author Posted July 13, 2015 Well hello again everyone!Due to problems with my Photobucket account I have been unable to upload any more pictures of the progress until now... But in that time we have really motored and we are finally almost ready for road.I'll pick up where we left off...Once we had the kit test fitted and all the panel gaps good, it was time for the exciting bit... Paint! I couldn't wait to see the car in its finished colour! Here's a few pictures before it was wet sanded, flattened and polished...The TOM's front bumper with new foglights fitted...Genuine TOM's Sideskirts...Rear bumper painted before the TOM's rear spats are fitted...The TOM's Quadlight front grill and Quadlight covers...The fibreglass vented racing wings and mouldings fitted and painted...We then proceeded to fit the lightweight polycarbonate windows. A generous amount of windscreen sealer was applied to the window edges... These windows were moulded from the original glass so the fit was excellent!We removed the black beading from the original glass and fitted it to the polycarbonate windows to give that oem original look. The windows were then clamped and held with tape until they were set...With the quarter glass now in, it was time for the rear screen. Finally it was beginning to look like a car again!Finally the two door windows were fitted. These were not as straightforward as the other windows but eventually we got them to fit well. While we were at it we lost some more weight too and lightened up the doors even more...The whole window kit fitted and left to set overnight...Next up was a job that both of us had been avoiding until we really had to... Fitting the spoiler to the lightweight racing bootlid...With that headache out of the way, it was time for an even bigger one... The lockable bonnet pins!Front end all back together. The clear indicators are a firm favourite of mine! It's nice to be a little different...Finally she was finished and ready for collection. We stopped to wash her on the way home. (forgot to close the boot... Oops!)I waited for this moment a long time... Fitting my TOM's sunstrip! It's these finishing touches that really finish a car in my opinion. It was a 2 man operation and with me being so fussy, it really was measured and re-measured... About 10 times! We got a good finish with no air bubbles using an atomizer and a squeegee...BOOM!!!Next up was the genuine TOM's rear window sticker. Again carefully measured and centered before application...People always moan that I am a hoarder and keep the best parts for myself... Well here is one part I knew would come in handy one day! Genuine Toyota EP82 door stickers... Brand new in the packet! I've had these a long time and they are discontinued from Toyota now for many years.I had one chance and one chance only to get this right so after a lot of careful measuring of the door stickers on other ep82's I had, I made up a card template to ensure they were fitted exactly millimeter perfect!A TOM's badge finished off the front grill perfectly!Like my RWD GT Starlet, I wanted to use a larger Toyota badge on the boot. After a trip to the scrapyard with a blade and a flathead I soon returned with a nice collection of Toyota badges. After finding the centre point of the bootlid, the badge was fitted and taped flush while it was left to set. You can see the size difference in the picture below...I seen these stickers at a recent rally I was at and had some creative inspiration. I was thinking of adapting the rear boot badge to match number 97 or 98. I think it would look well in chrome... "The Red Devil" ha Side exit buddies Chilling with my RWD GT Starlet...I had a HKS mushroom filter here and a front filter relocation kit to fit. I bought new red foam filter media but there wasn't enough space to fit the filter behind the grill... It was too bigAfter much searching I finally found this filter which was the perfect size for the end of the turbo...Levin twin pot conversion and red HEL braided brake lines fitted to the front...This brand new Defi boost gauge just arrived. It will match my other gauges well...Added to the massively expanding list of rare goodies are these rare TRD 280kph clocks. I am not fitting a dash so these will be mounted straight to the crash bar behind the windscreen...Did someone say grip? New ultra lightweight drag wheels and drag slicks!We recently had a TV crew on site filming for a new documentary on the Irish car scene. The 4WD TOM's Starlet got tons of attention and they couldn't quite get their heads around the exhaust and the screamer pipe lolA few small odds and ends to tidy up and a bit of wiring to finish and then the next step is the mapping! Quote
matty gt Posted July 13, 2015 Posted July 13, 2015 (edited) by jesus conor what an update of epic Tom's proportions i absolutely love this car. porn at its finest Edited July 26, 2015 by matty gt Quote
Browner Posted July 26, 2015 Author Posted July 26, 2015 Cheers Matty! It's great to be able to see the end in sight Quote
starletgt-shady Posted July 26, 2015 Posted July 26, 2015 Amazing, work defiantly paid of. Great car 👍🏻 Quote
jimmymac101 Posted July 26, 2015 Posted July 26, 2015 Jesus Conor........ How many of those cars in the bottom pic are yours ? Your have to link us up when the programme is aired! James Quote
Browner Posted July 26, 2015 Author Posted July 26, 2015 All the cars in the pic are mine mate apart from Matty's GT Advance Quote
Kazi Posted August 4, 2015 Posted August 4, 2015 what a bloody build! top work! out of interest, that red 86 corolla... is that a 84 model? if so whats the paint code because I cant find the chassis plate for mine and cant find the paint code anywhere! Quote
Bug679 Posted October 30, 2015 Posted October 30, 2015 Anymore news on this as i can't fucking wait to see this finished.Beautiful build Quote
richglanzav Posted October 30, 2015 Posted October 30, 2015 if a cars minty mint i say its porn, but this has gone beyond a car, its actual porn lol Quote
Browner Posted May 4, 2016 Author Posted May 4, 2016 It's been quite some time since I've updated this thread as I don't have the time to be on the forums as much anymore.I picked up a few more nice parts for the car and sent it off to a specialist who builds rally cars, to get the wiring etc finished and ready for it's first start up.I picked up this Zisco high flow polished fuel rail which was a nice bonus...This was fitted along with some new braided lines etc. At this stage we also got talking about injector choice... My 1000cc RC Evo injectors were complete overkill for the power I wanted... so I opted for 560cc Evo injectors instead. Along with these an Evo resistor box was also wired in to the loom as it is needed to prevent shorting out the HKS V Pro Gold ECU. The last few odds and ends were tidied up in preparation for its first ever start up!Then the day came... The moment of truth. We primed the cams, primed the turbo and got good oil pressure, everything was checked and double checked and a wideband fitted... Then the key turned and she roared into life for the first time!I was over the moon and couldn't stop smiling from ear to ear! Finally the dream was a reality! The car sounded absolutely brilliant with the 3" side exit exhaust and big cams! Finally the wait was over and it made all the hard work seem worthwhile! Here's a couple of quick videos...http://vid206.photobucket.com/albums/bb31/conor05_/Mobile%20Uploads/trim.097431FD-031D-448C-97B0-9911B569B748_zpscnmfm1nv.mp4http://i206.photobucket.com/albums/bb31/conor05_/Mobile%20Uploads/th_trim.FFB4272C-5193-4616-92E3-744B56D7A668_zps3mk1eawi.mp4I initially said I would have no dash in the car and mount everything on the crash bar but I decided a dash top would be a lot neater and much simpler for mounting the clocks and gauges etc. I am going to cut off a dash top and mount it in the car. This has still to be done then we can begin wiring in the Defi boost gauge, Defi oil pressure gauge, AEM Wideband, Apexi AVCR etc...This is her as she currently sits... More updates very soon! Quote
diller Posted May 4, 2016 Posted May 4, 2016 Conor serious job bud as always nothing spared matey. Quote
aarzlp Posted May 5, 2016 Posted May 5, 2016 This has been a fantastic feed to read it looks stunning and I hope to see it in person one day.fantastic work! Quote

Recommended Posts
Join the conversation
You can post now and register later. If you have an account, sign in now to post with your account.