Claymore
-
Posts
660 -
Joined
-
Last visited
Content Type
Profiles
Forums
Wiki
Media Demo
Events
Everything posted by Claymore
-
Claymore's sleeper 4efe+t-t+t build (R.I.P. the Nanza)
Claymore replied to Claymore's topic in EP91 Progress Blogs
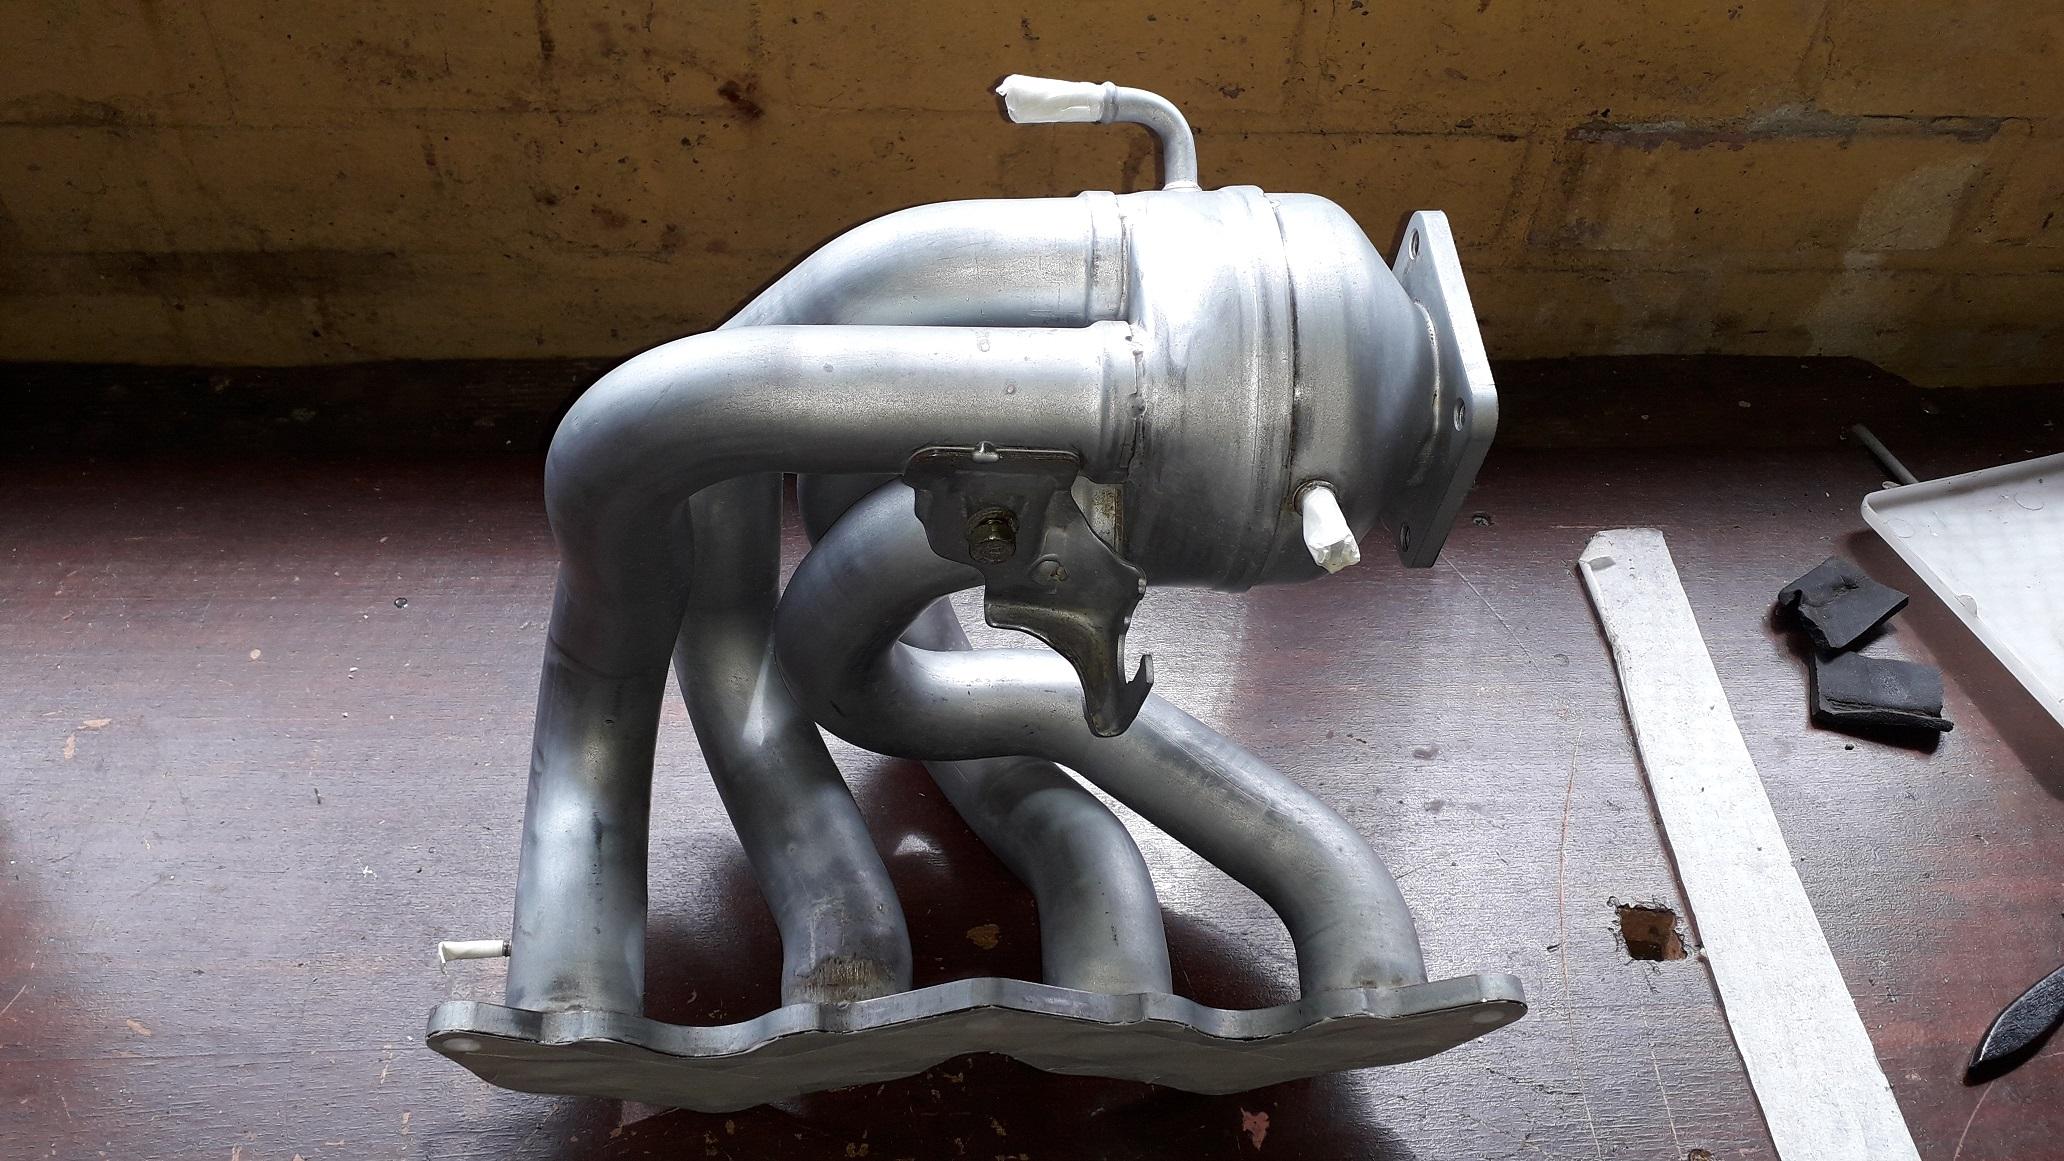
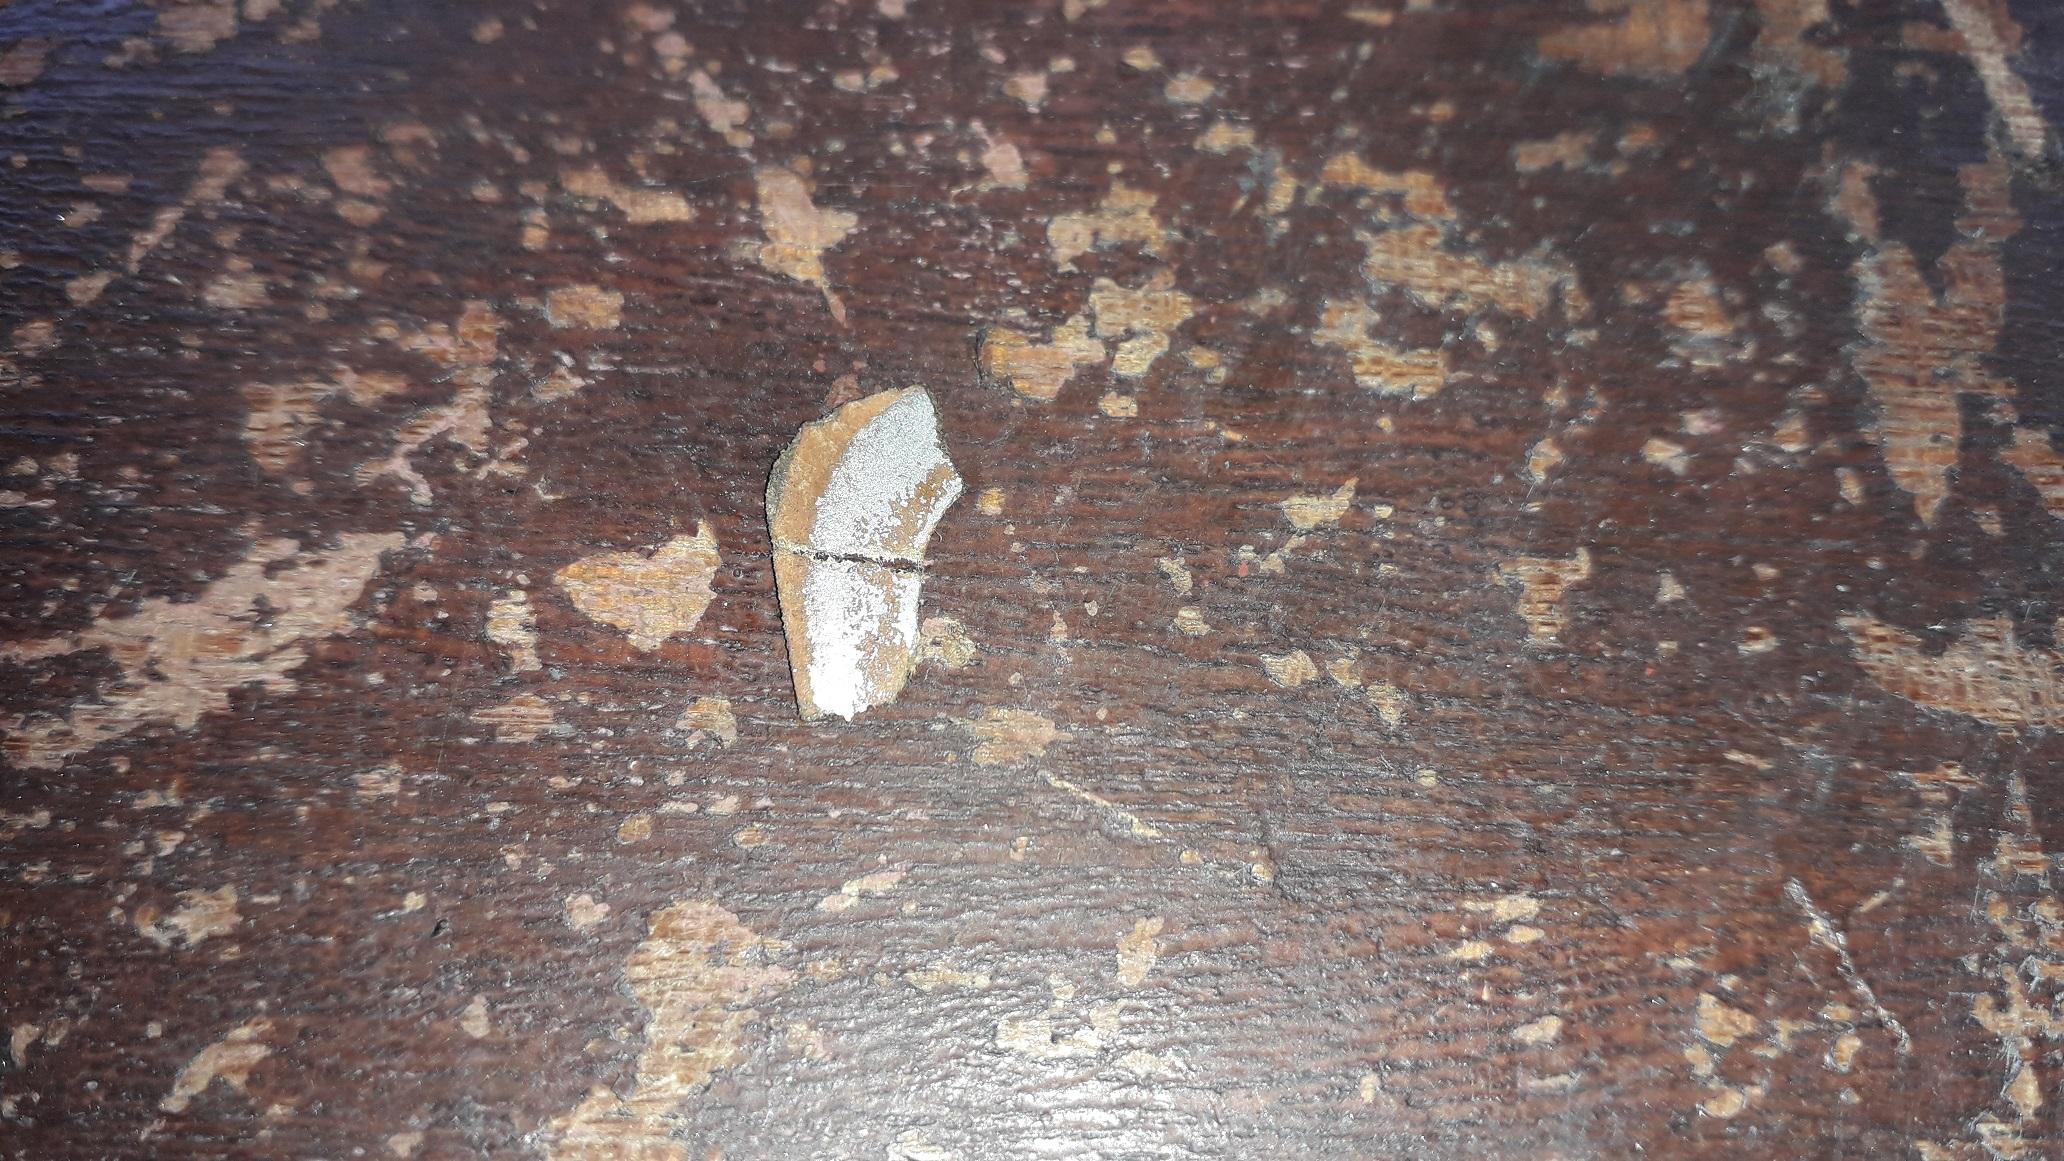
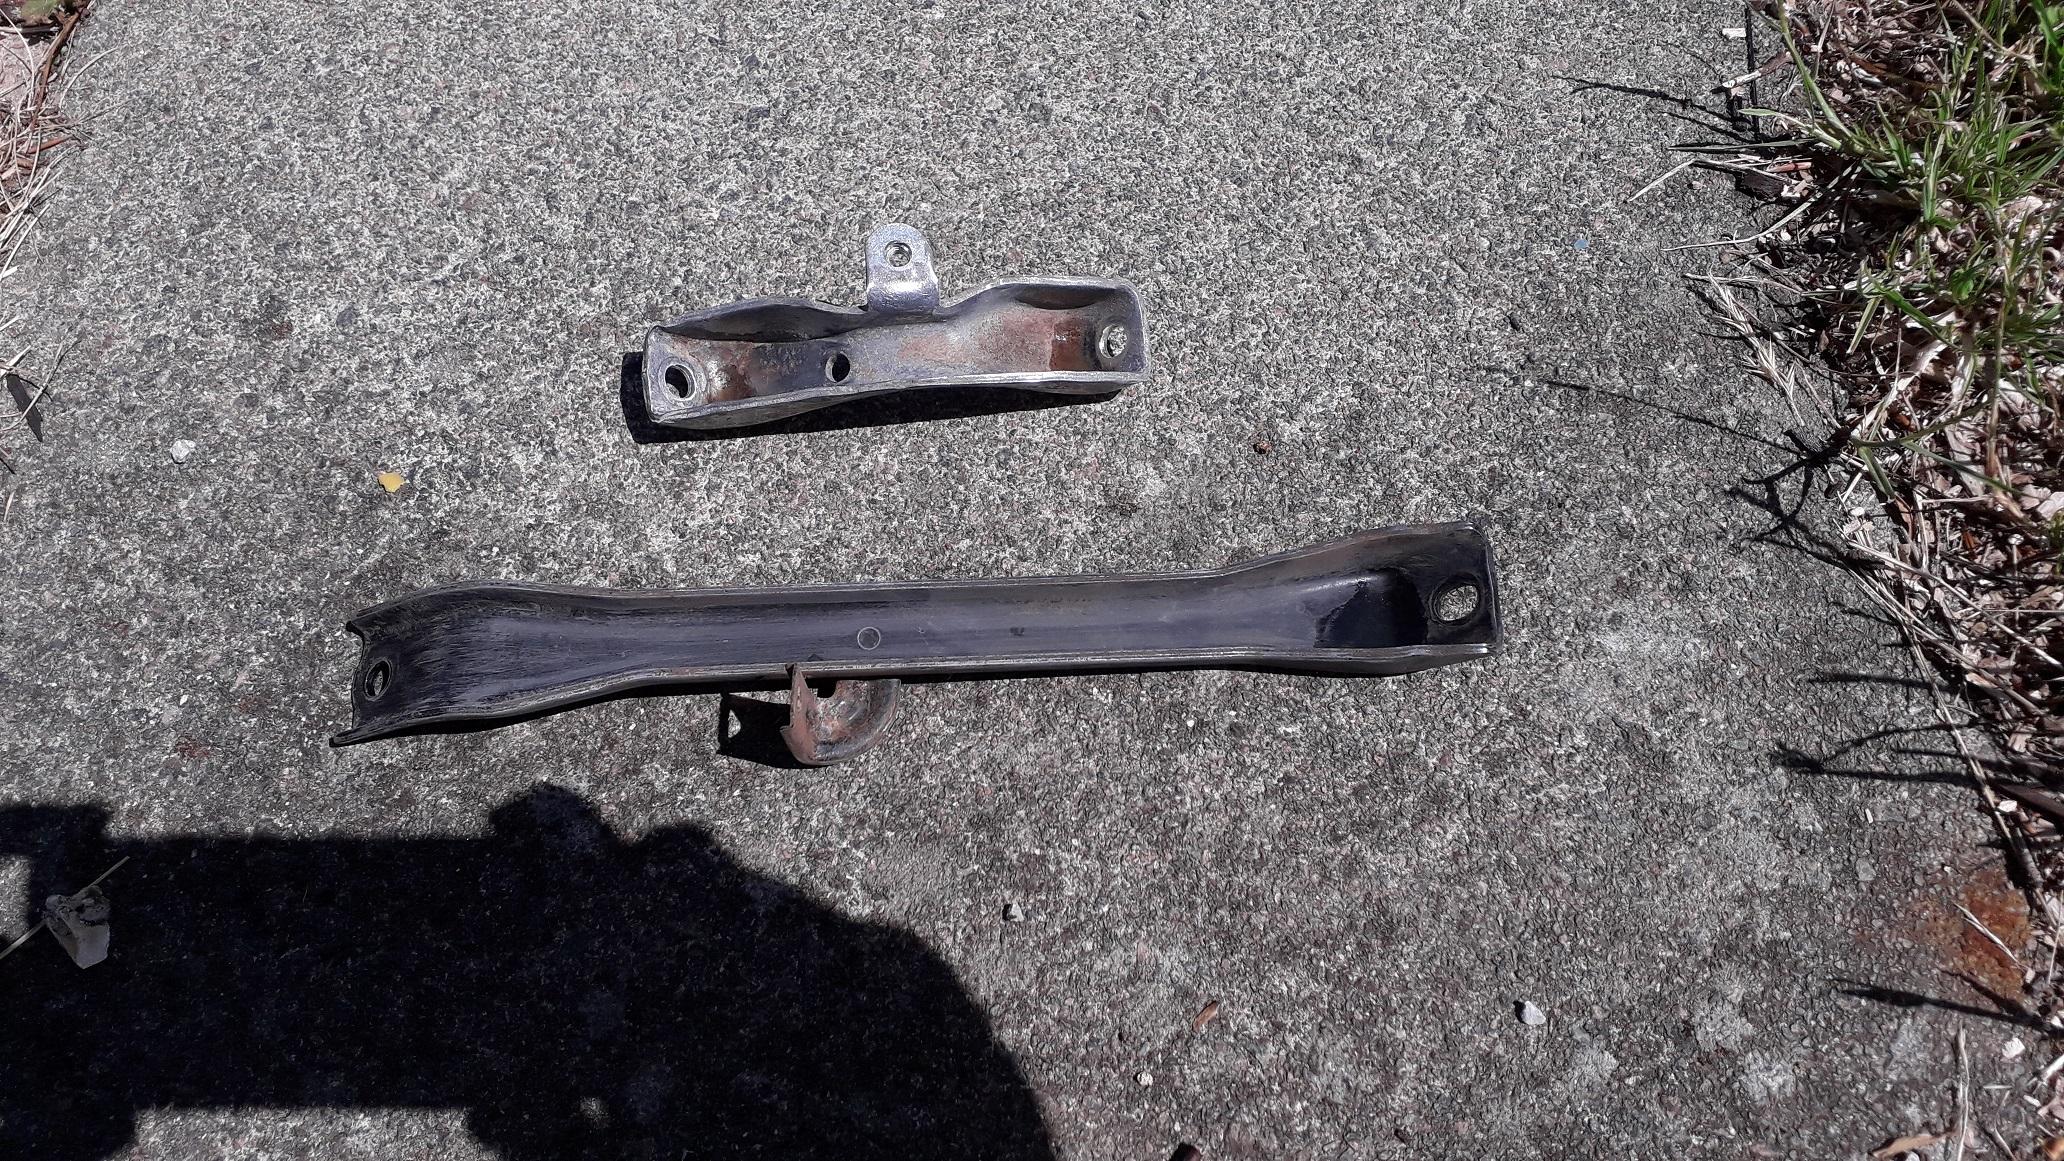
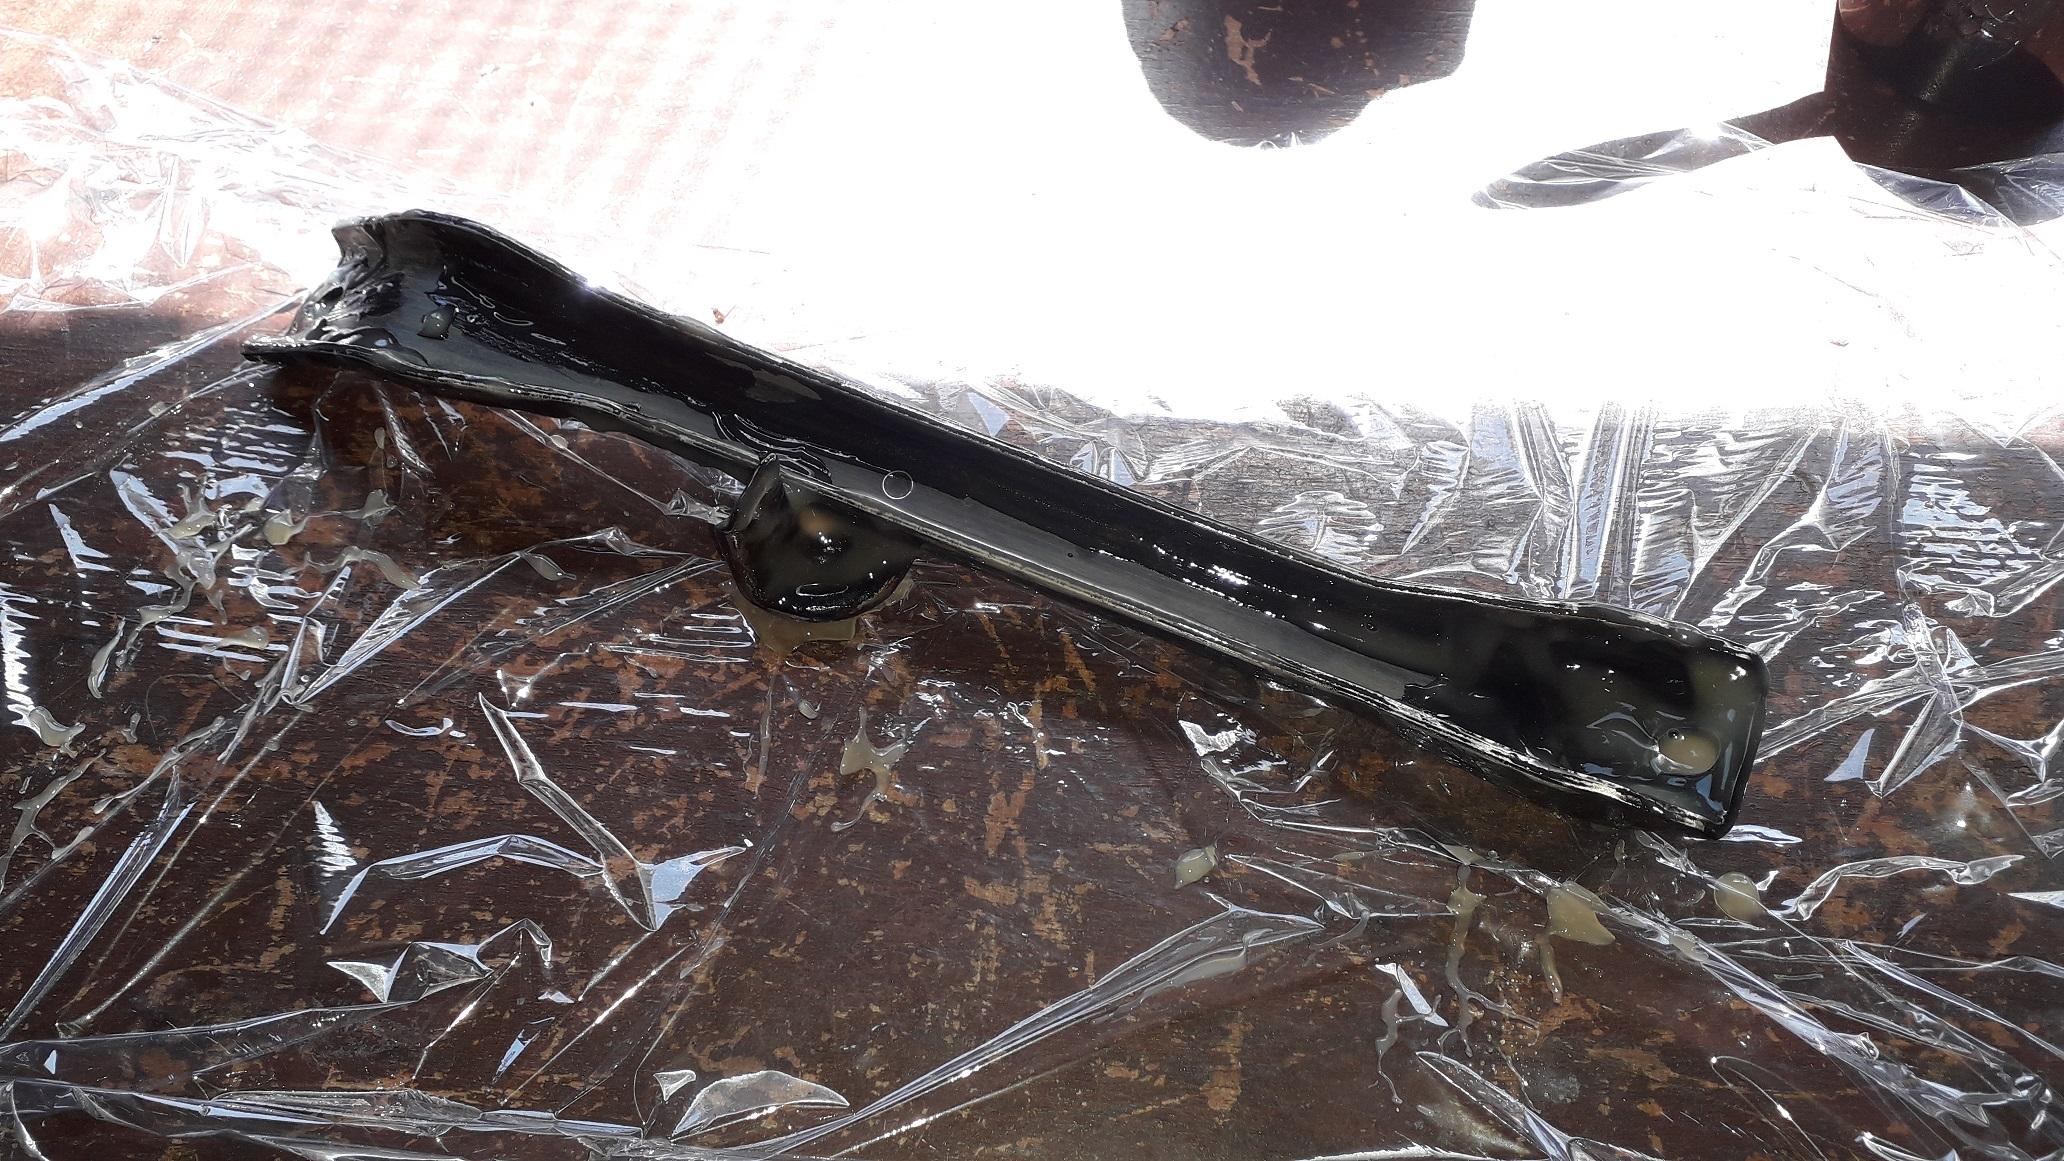
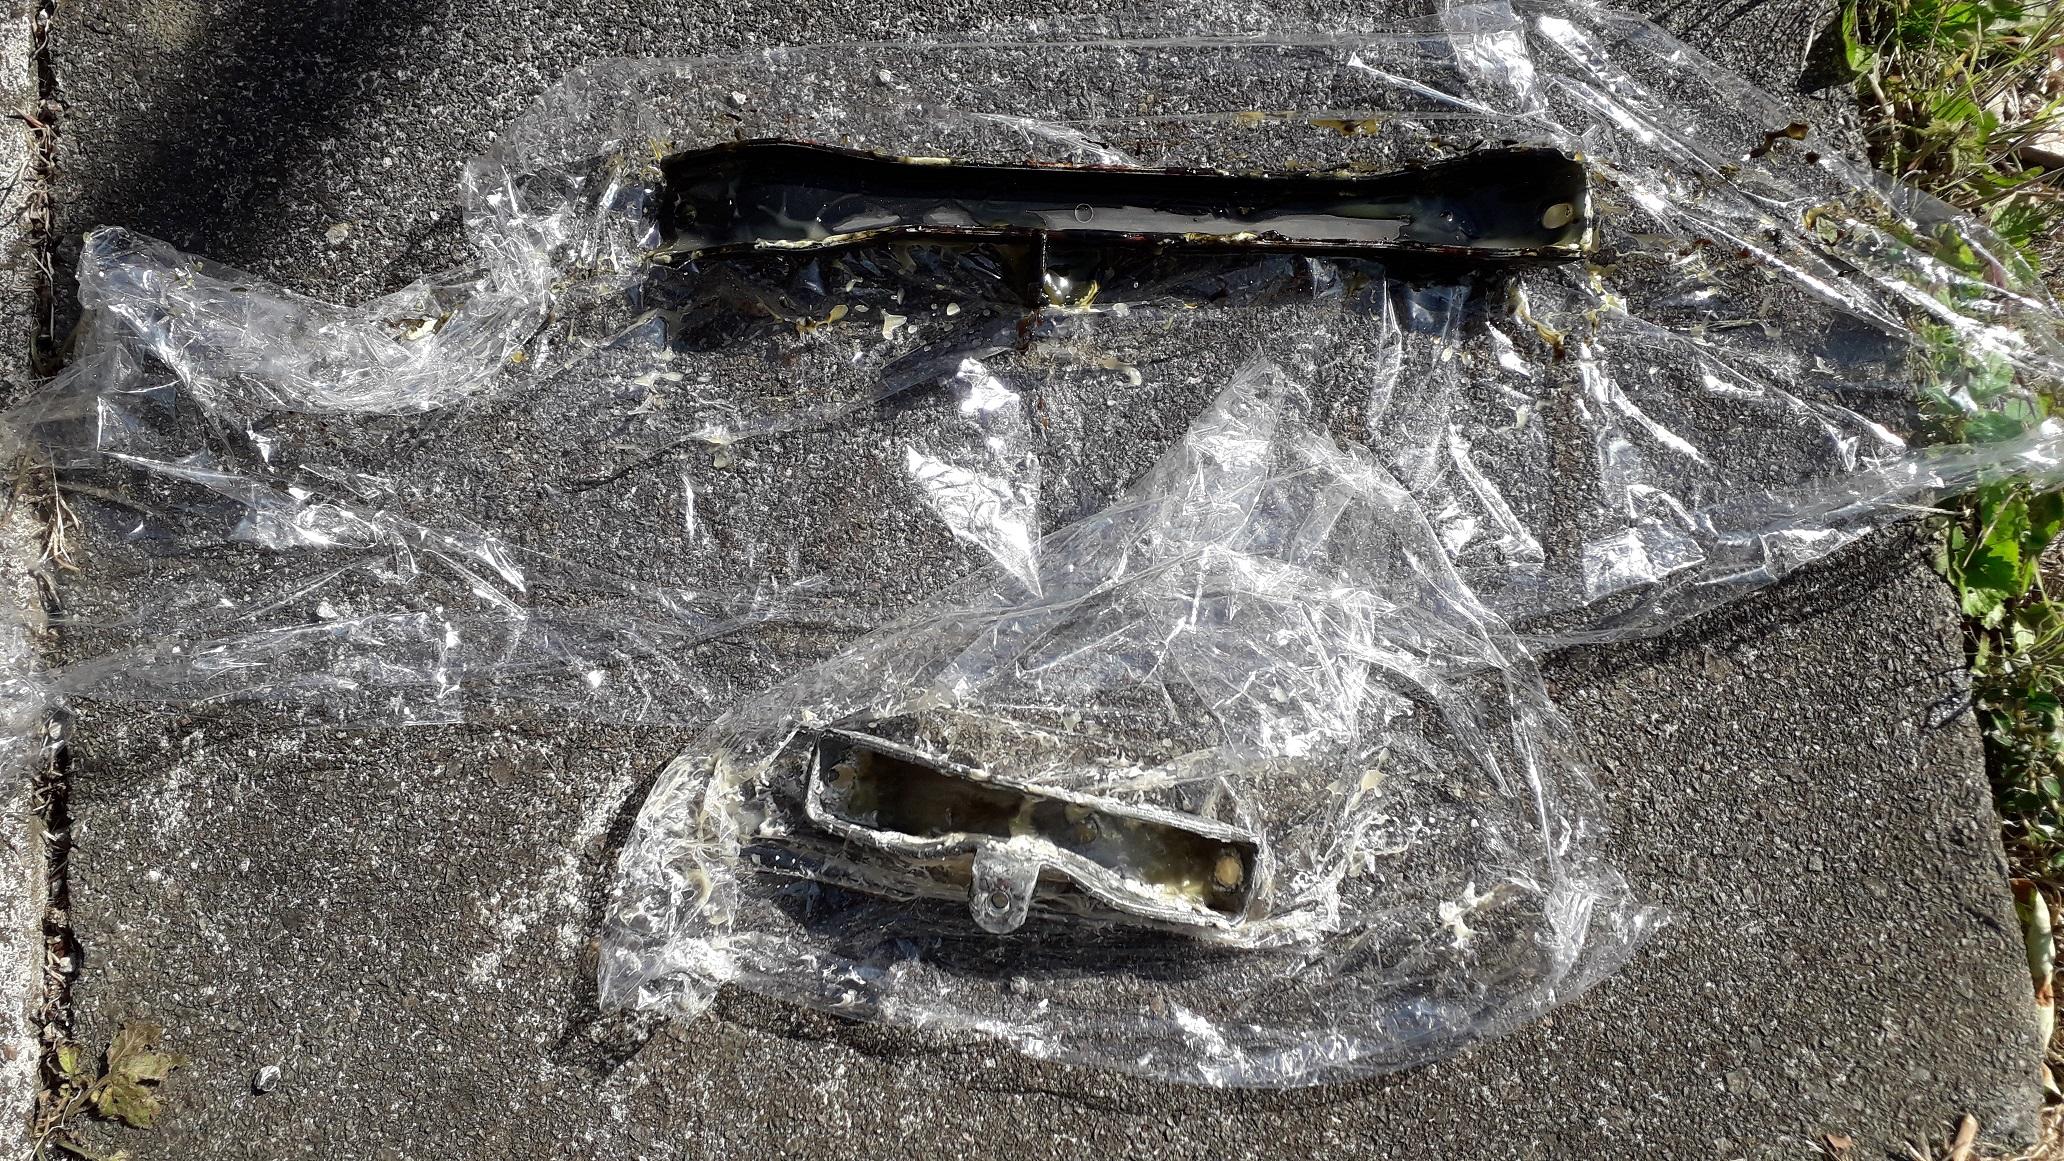
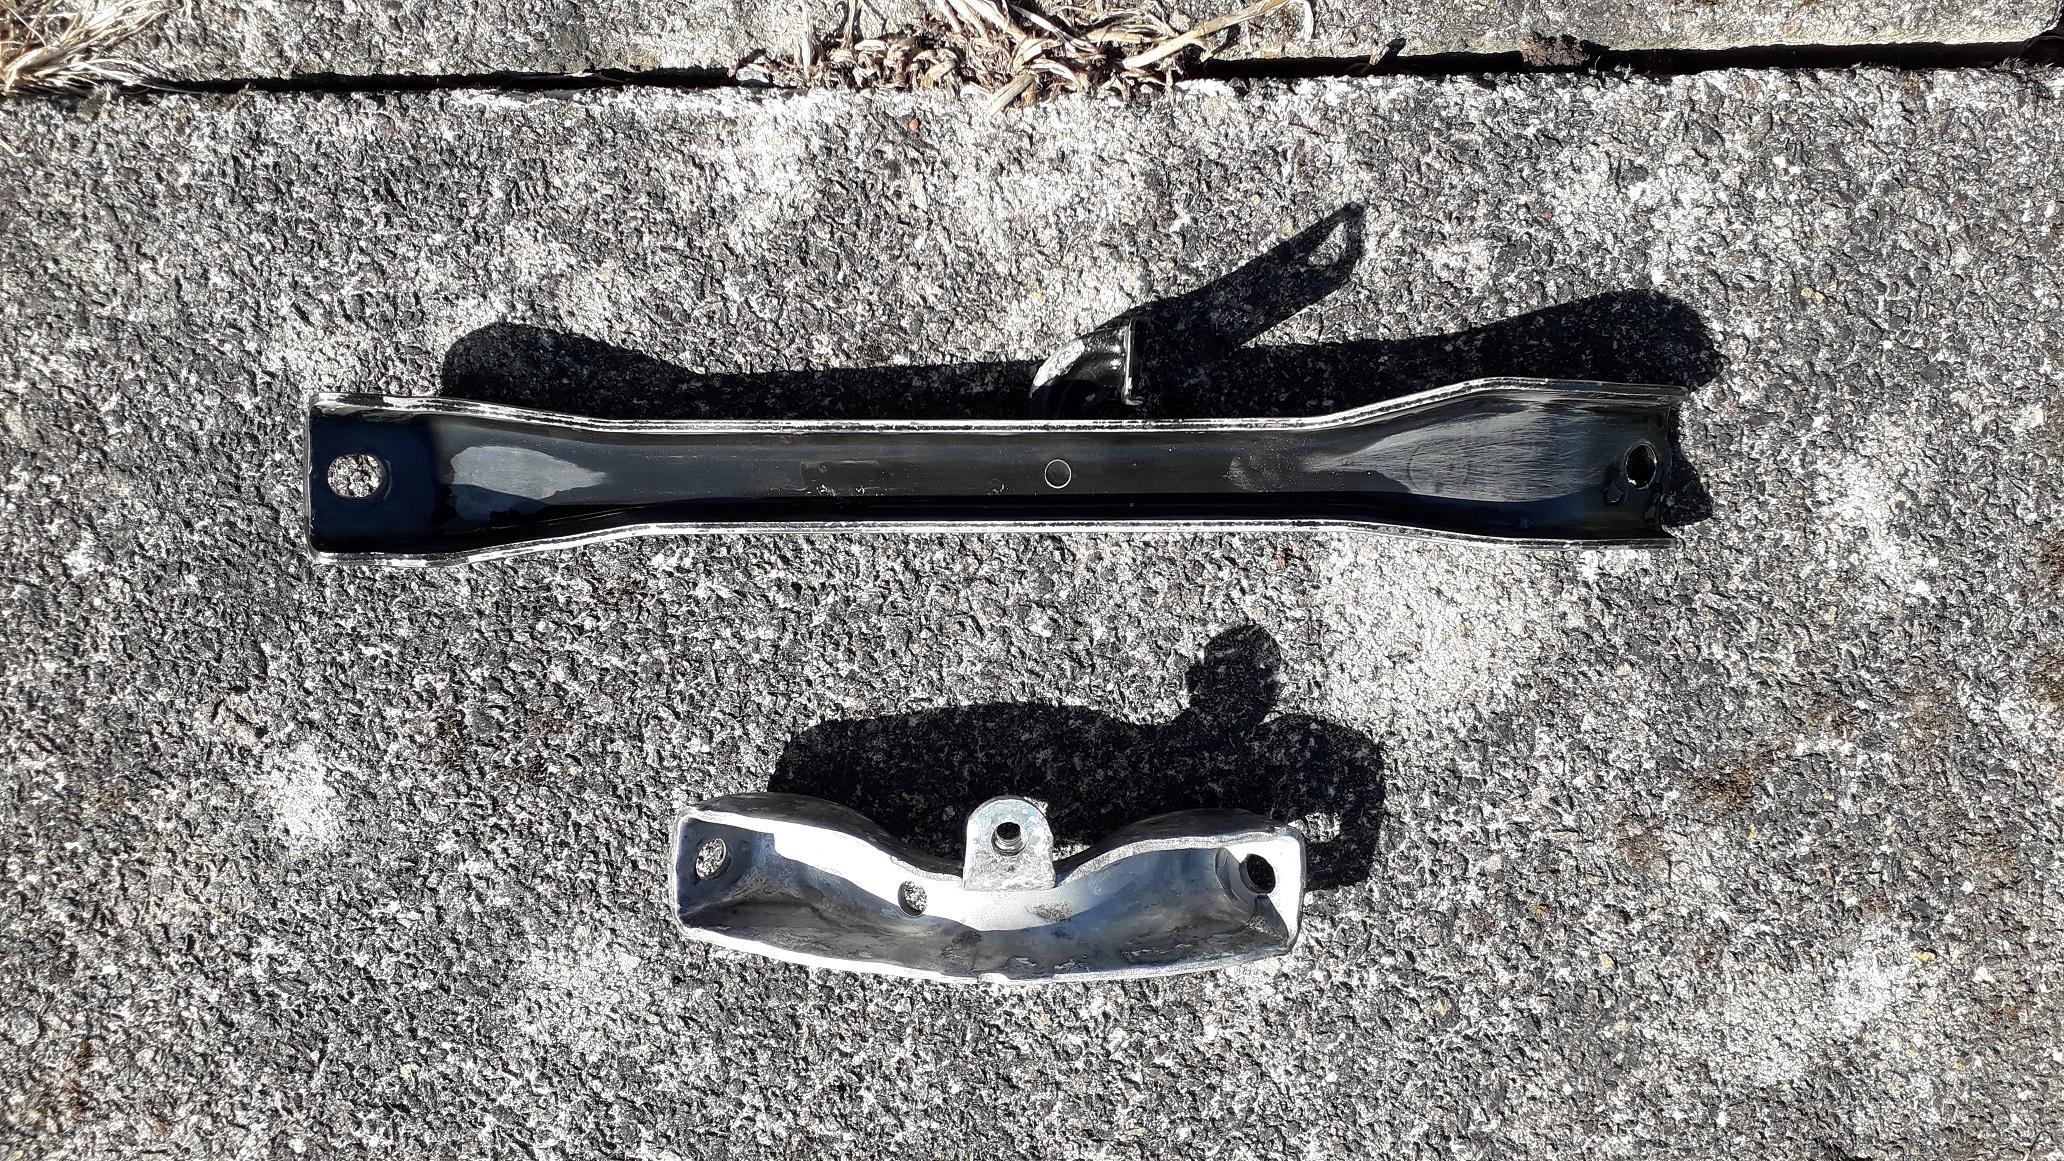
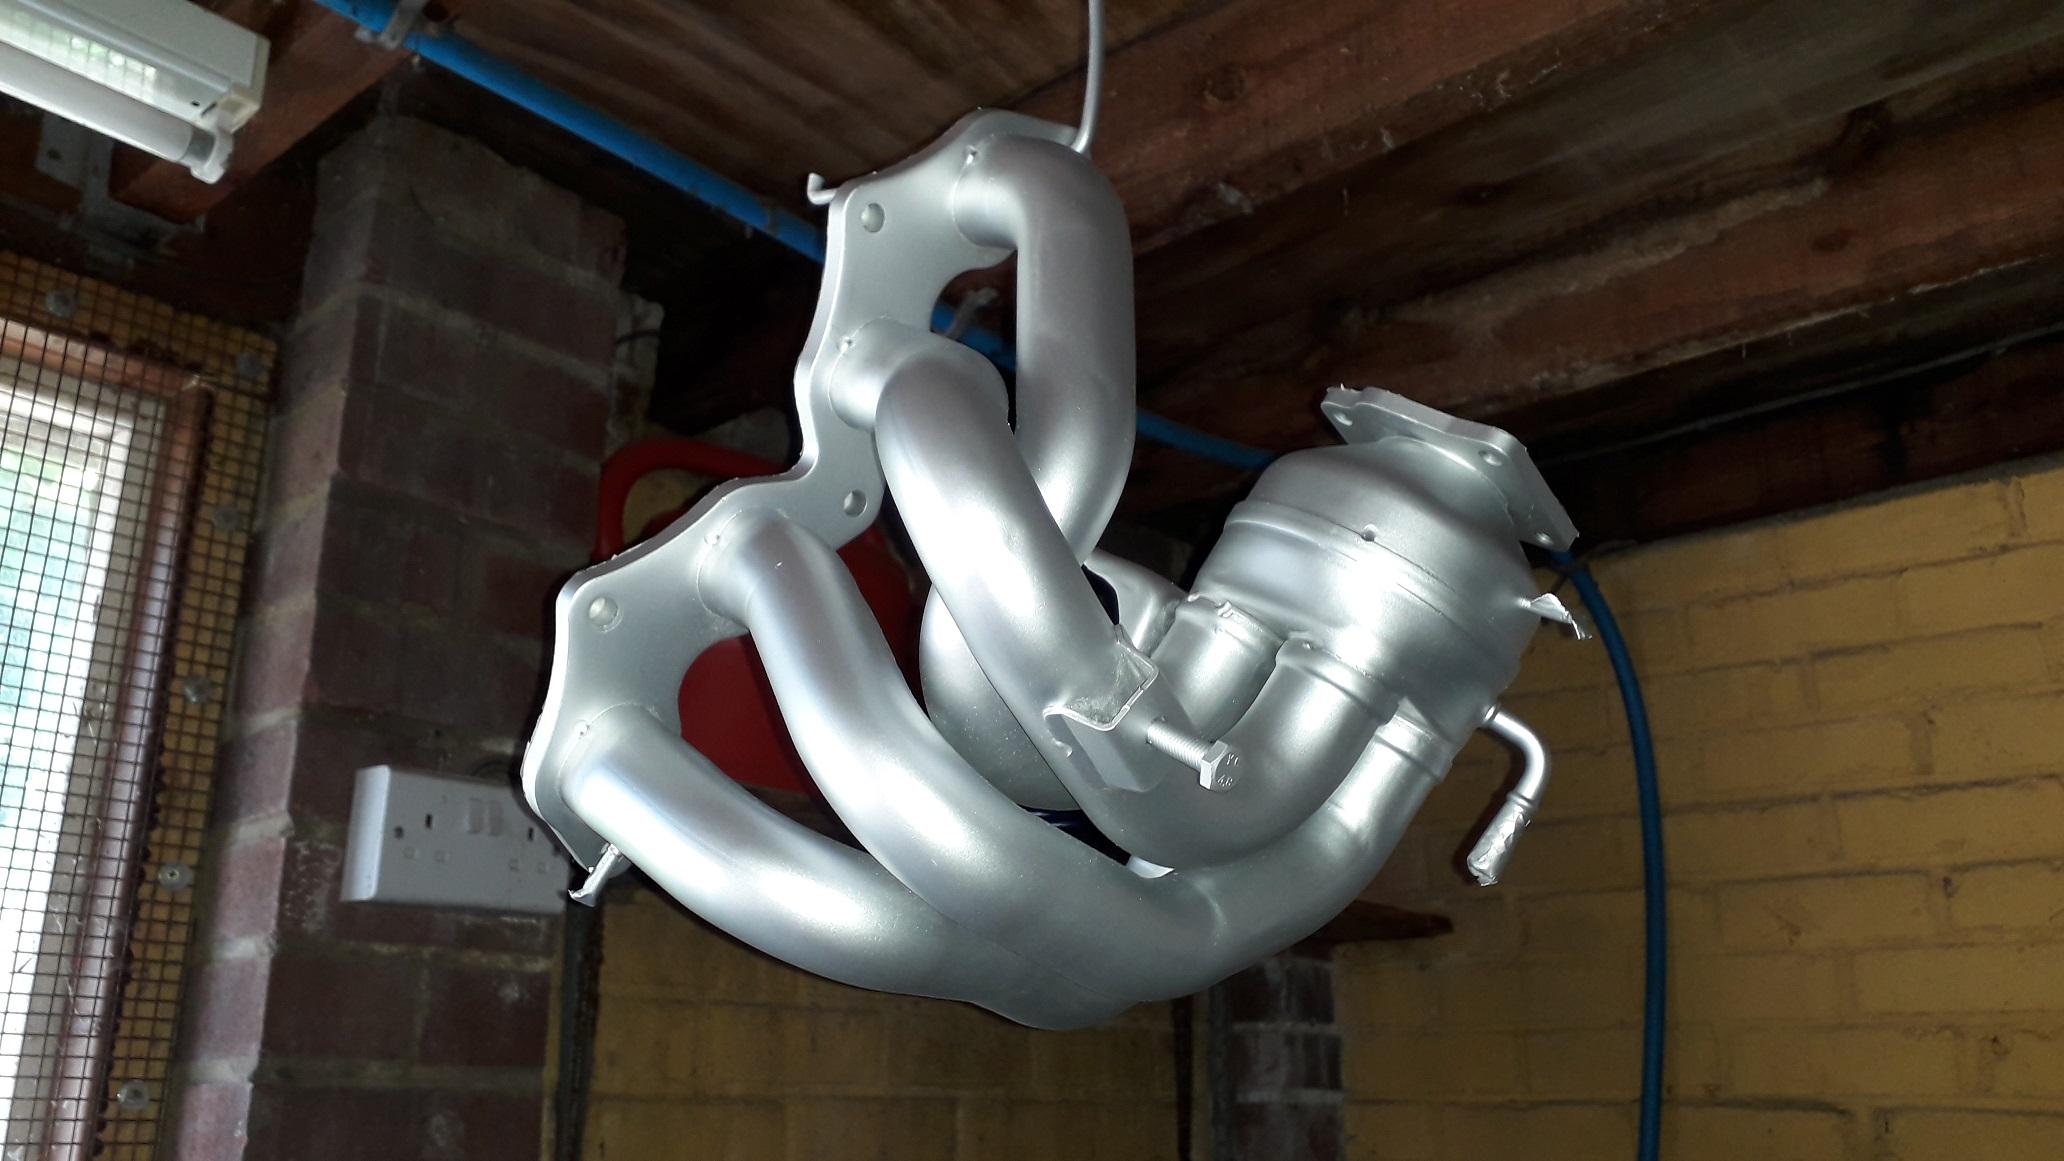
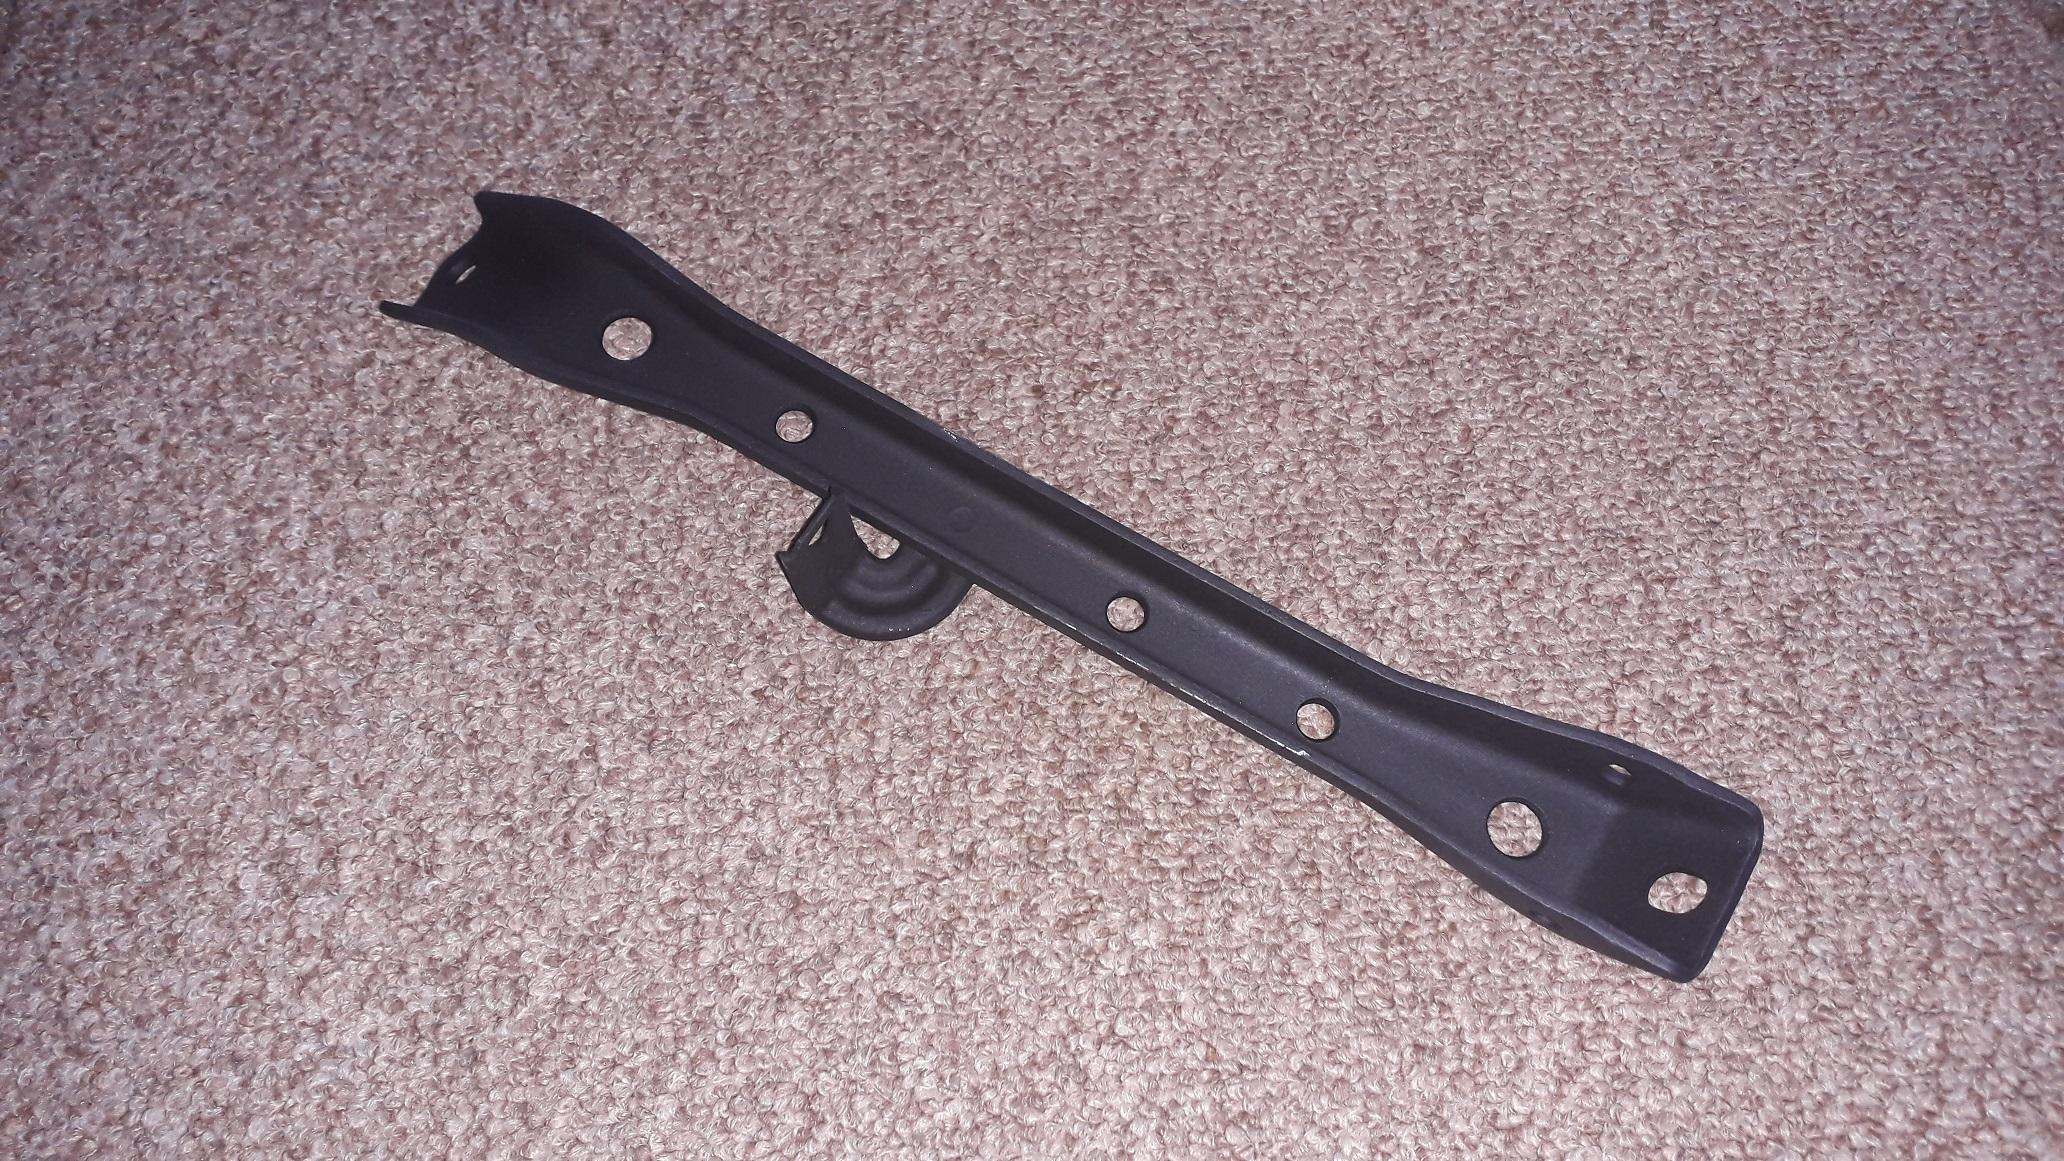
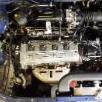
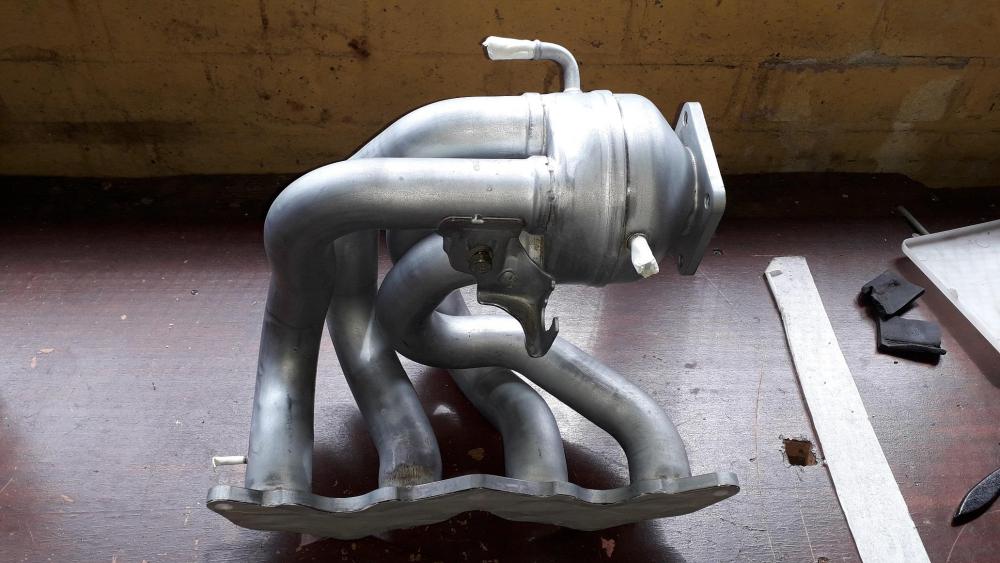
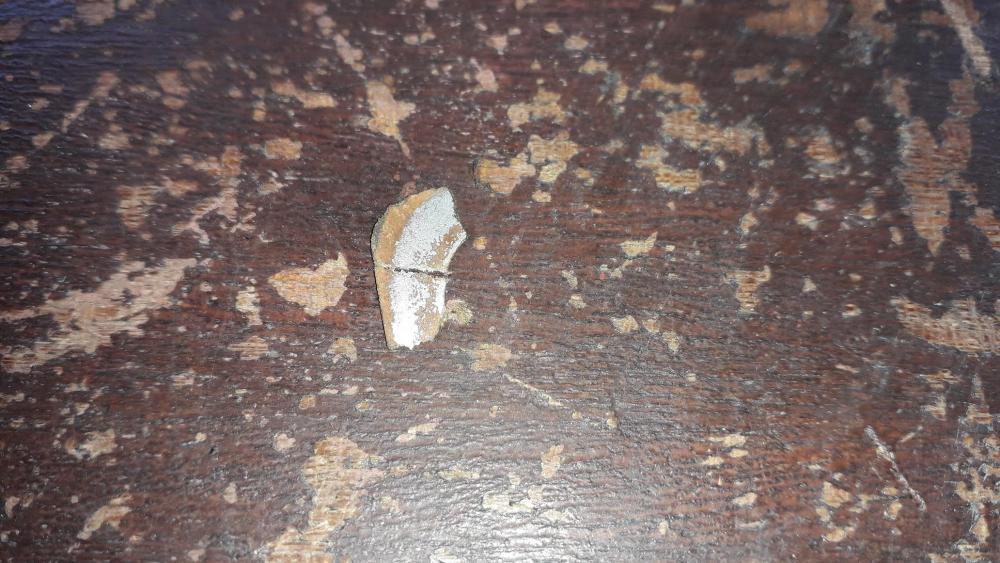
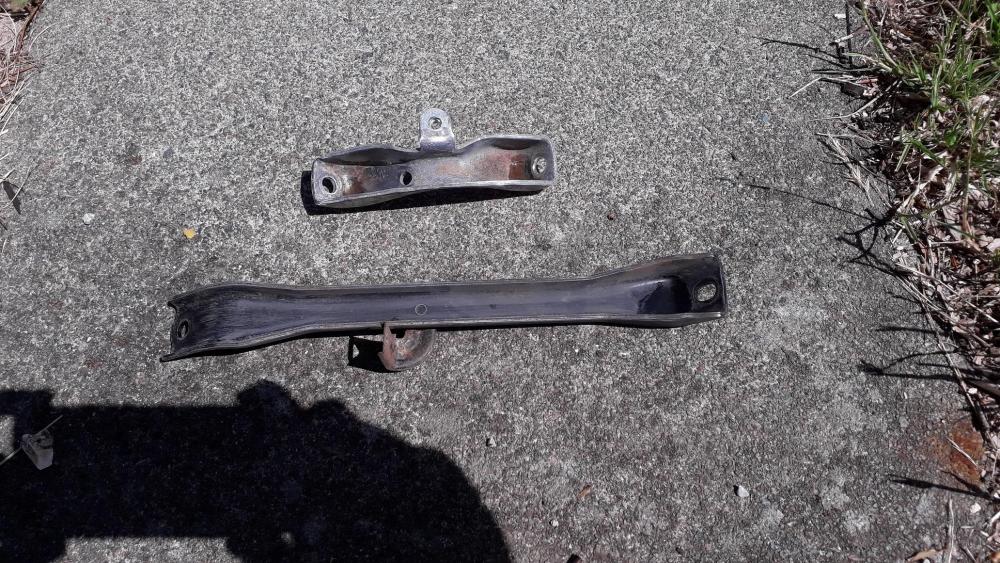
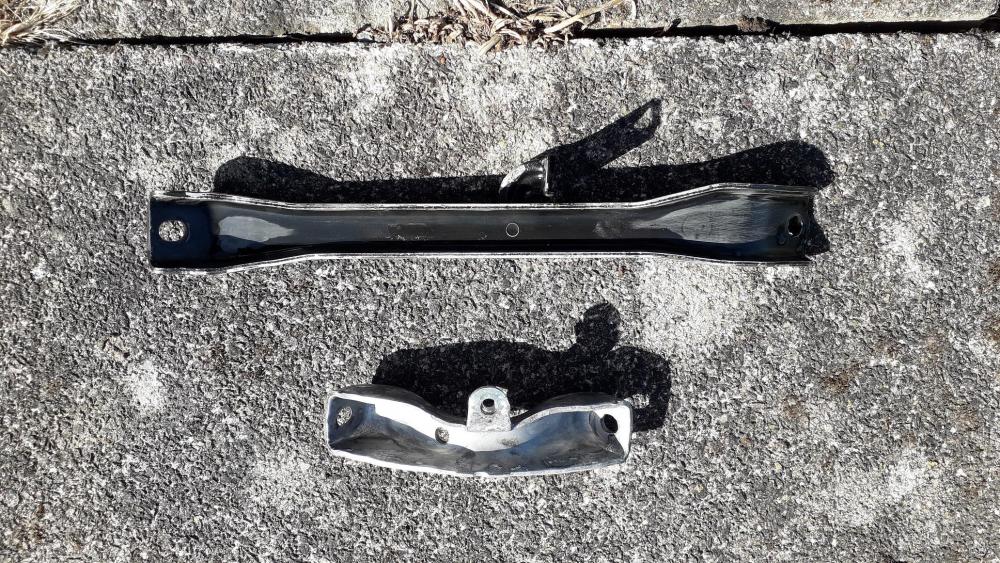
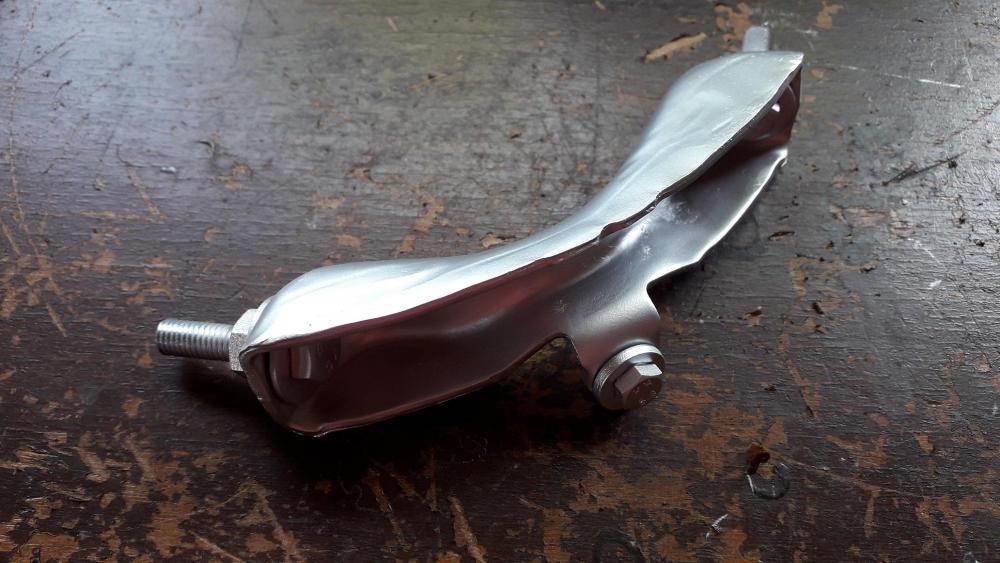
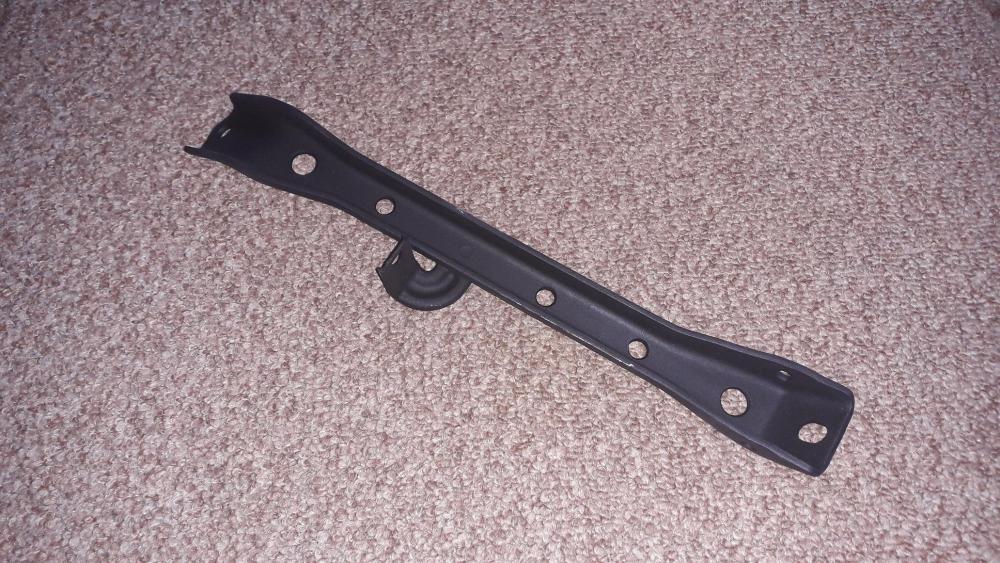
Corolla manifold and brackets tidy up. With the excellent weather we've been having decided it was time to get some painting done. As it started. Cleaned off the worst of the rust with wet n dry and gave it a quick rub over to help key the new paint. The manifold has an aluminised finish from Toyota. Cleaned out the inside also using brake cleaner and sloshed it around inside, it was quite greasy from the PCV system. Glad I did as I managed to rinse out a piece of old throttle body gasket (approx. 10mm x 5mm). Don't want that in the engine! Brackets (front and back) were rusty also and again wet n dry to remove the worst of the rust. Then Bilt Hamber Deox gel to chemically remove the remainder. 24hrs later All cleaned ready for paint. Manifold masked up and painted VHT silver. No primer or lacquer obviously. Used sacrificial nuts and bolts to mask off the bolt and ground attachment holes prior to paint for the front bracket as well. Rear bracket drilled for lightness and painted VHT matt black.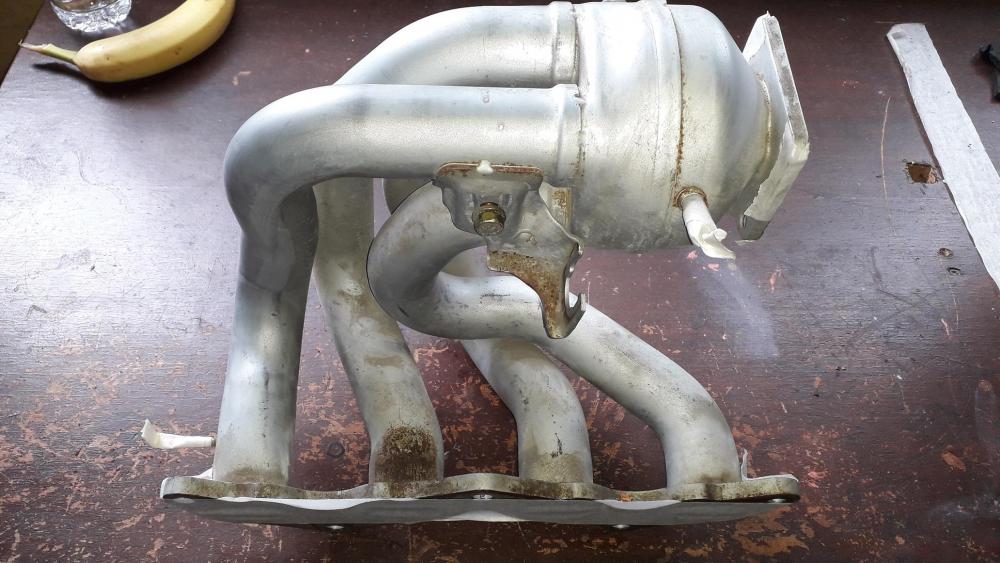


-
Yeah, I only went by what I'd read on the forums. The further I look there appears to be a rubber layer on some shown examples. I'll check mine when I change the cambelt. There are differences in weight though between fe and fte which some are worried about but then some say that they've run it with the fe pulley and its been fine!?
-
Claymore's sleeper 4efe+t-t+t build (R.I.P. the Nanza)
Claymore replied to Claymore's topic in EP91 Progress Blogs
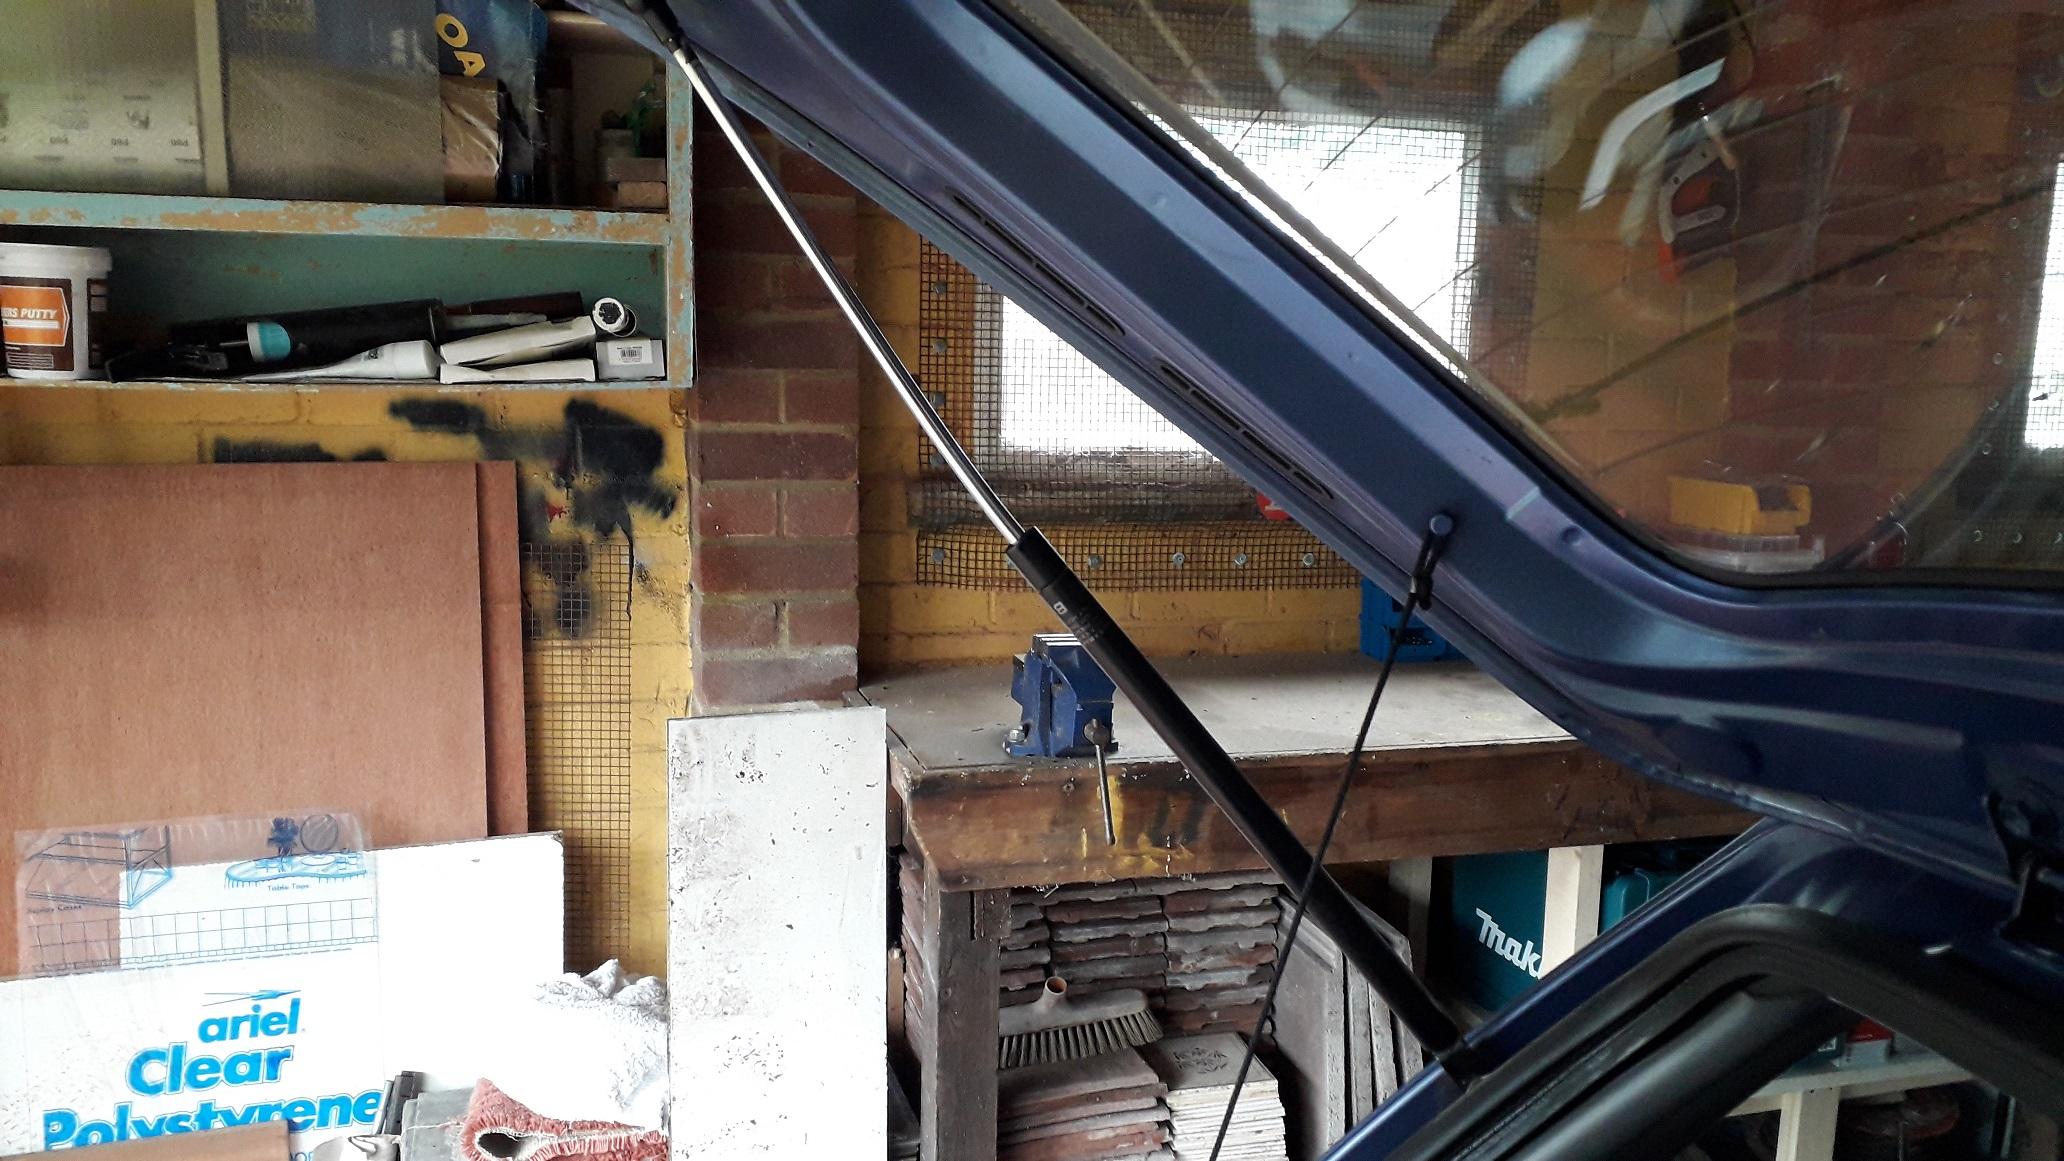
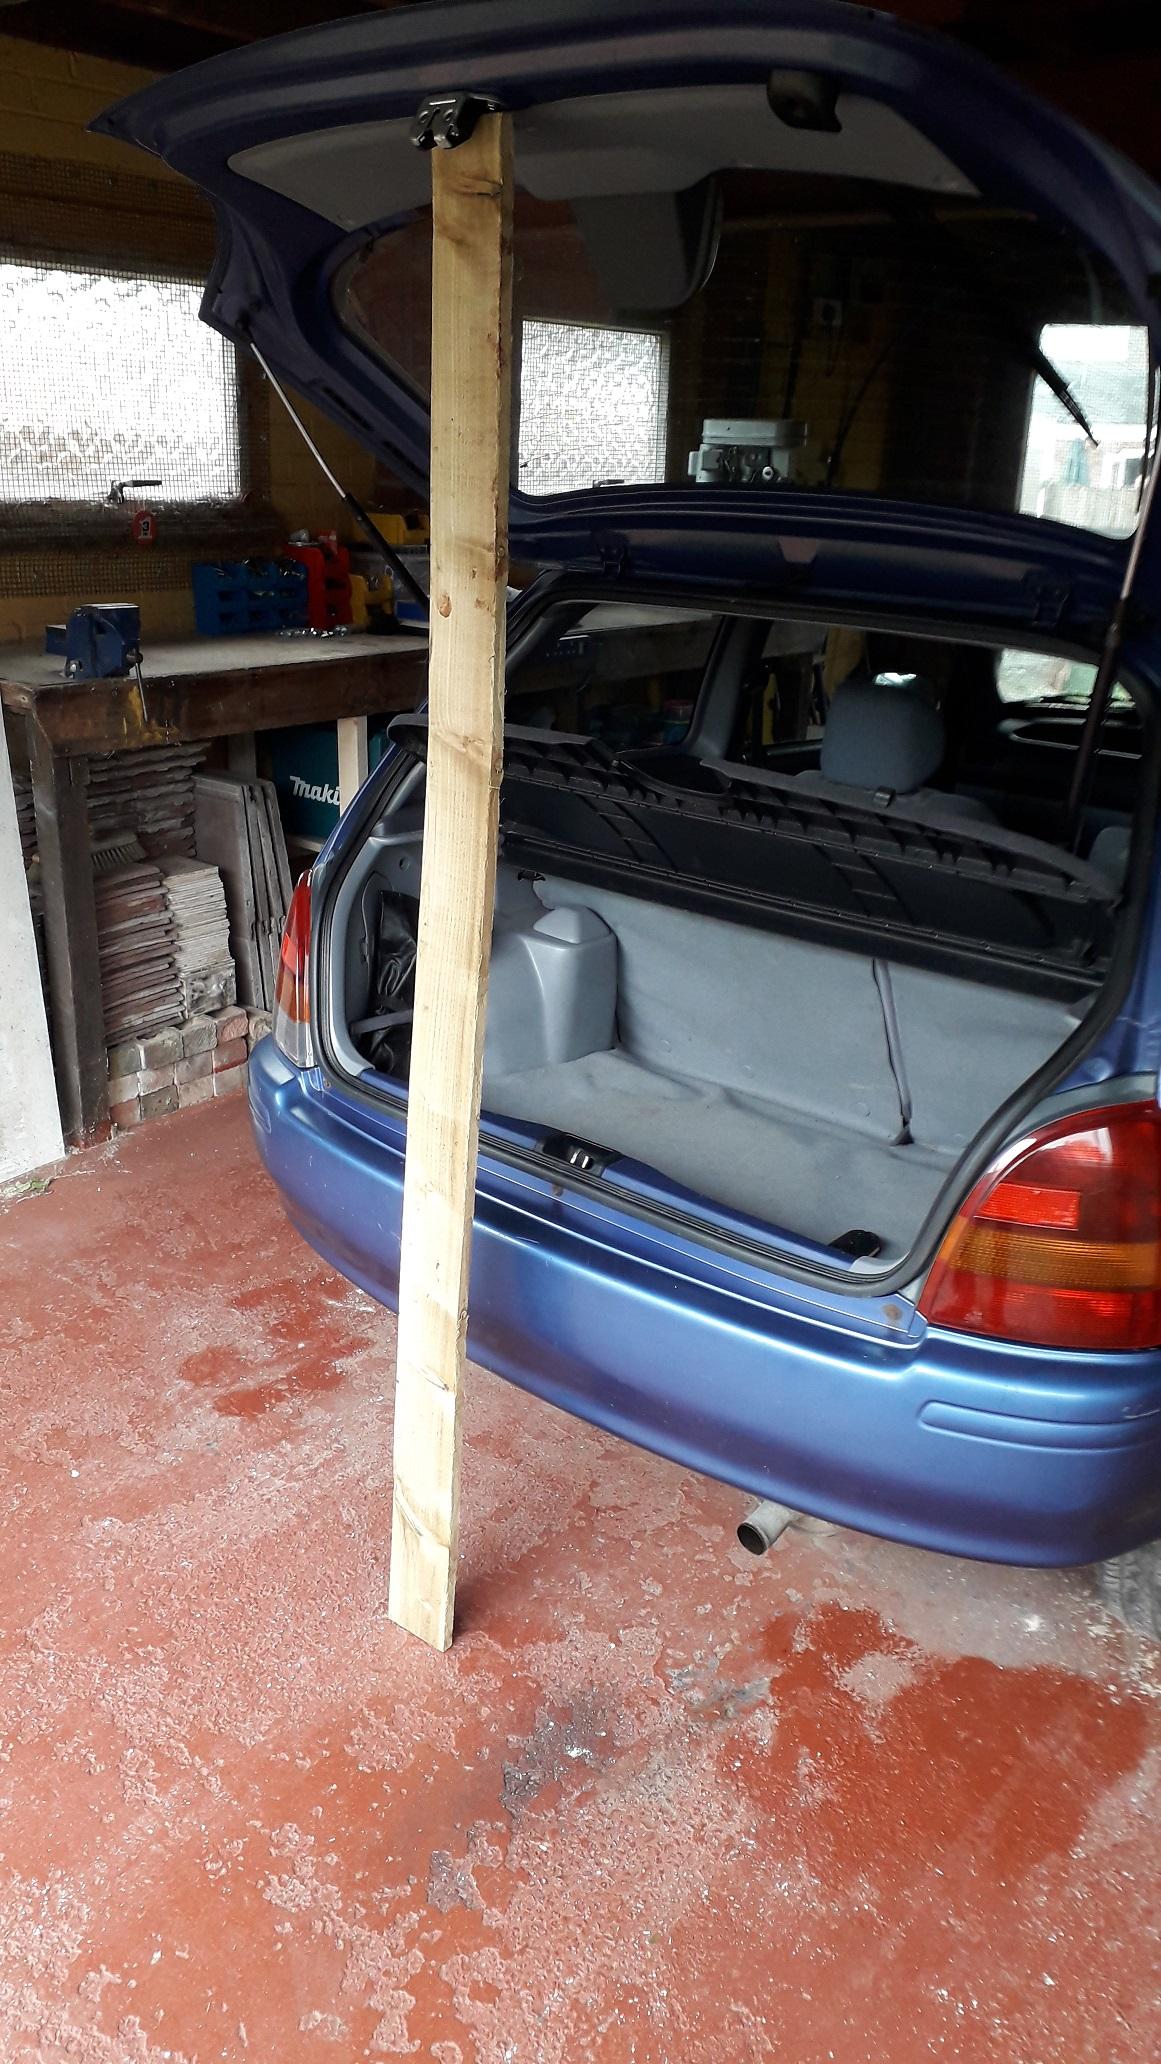
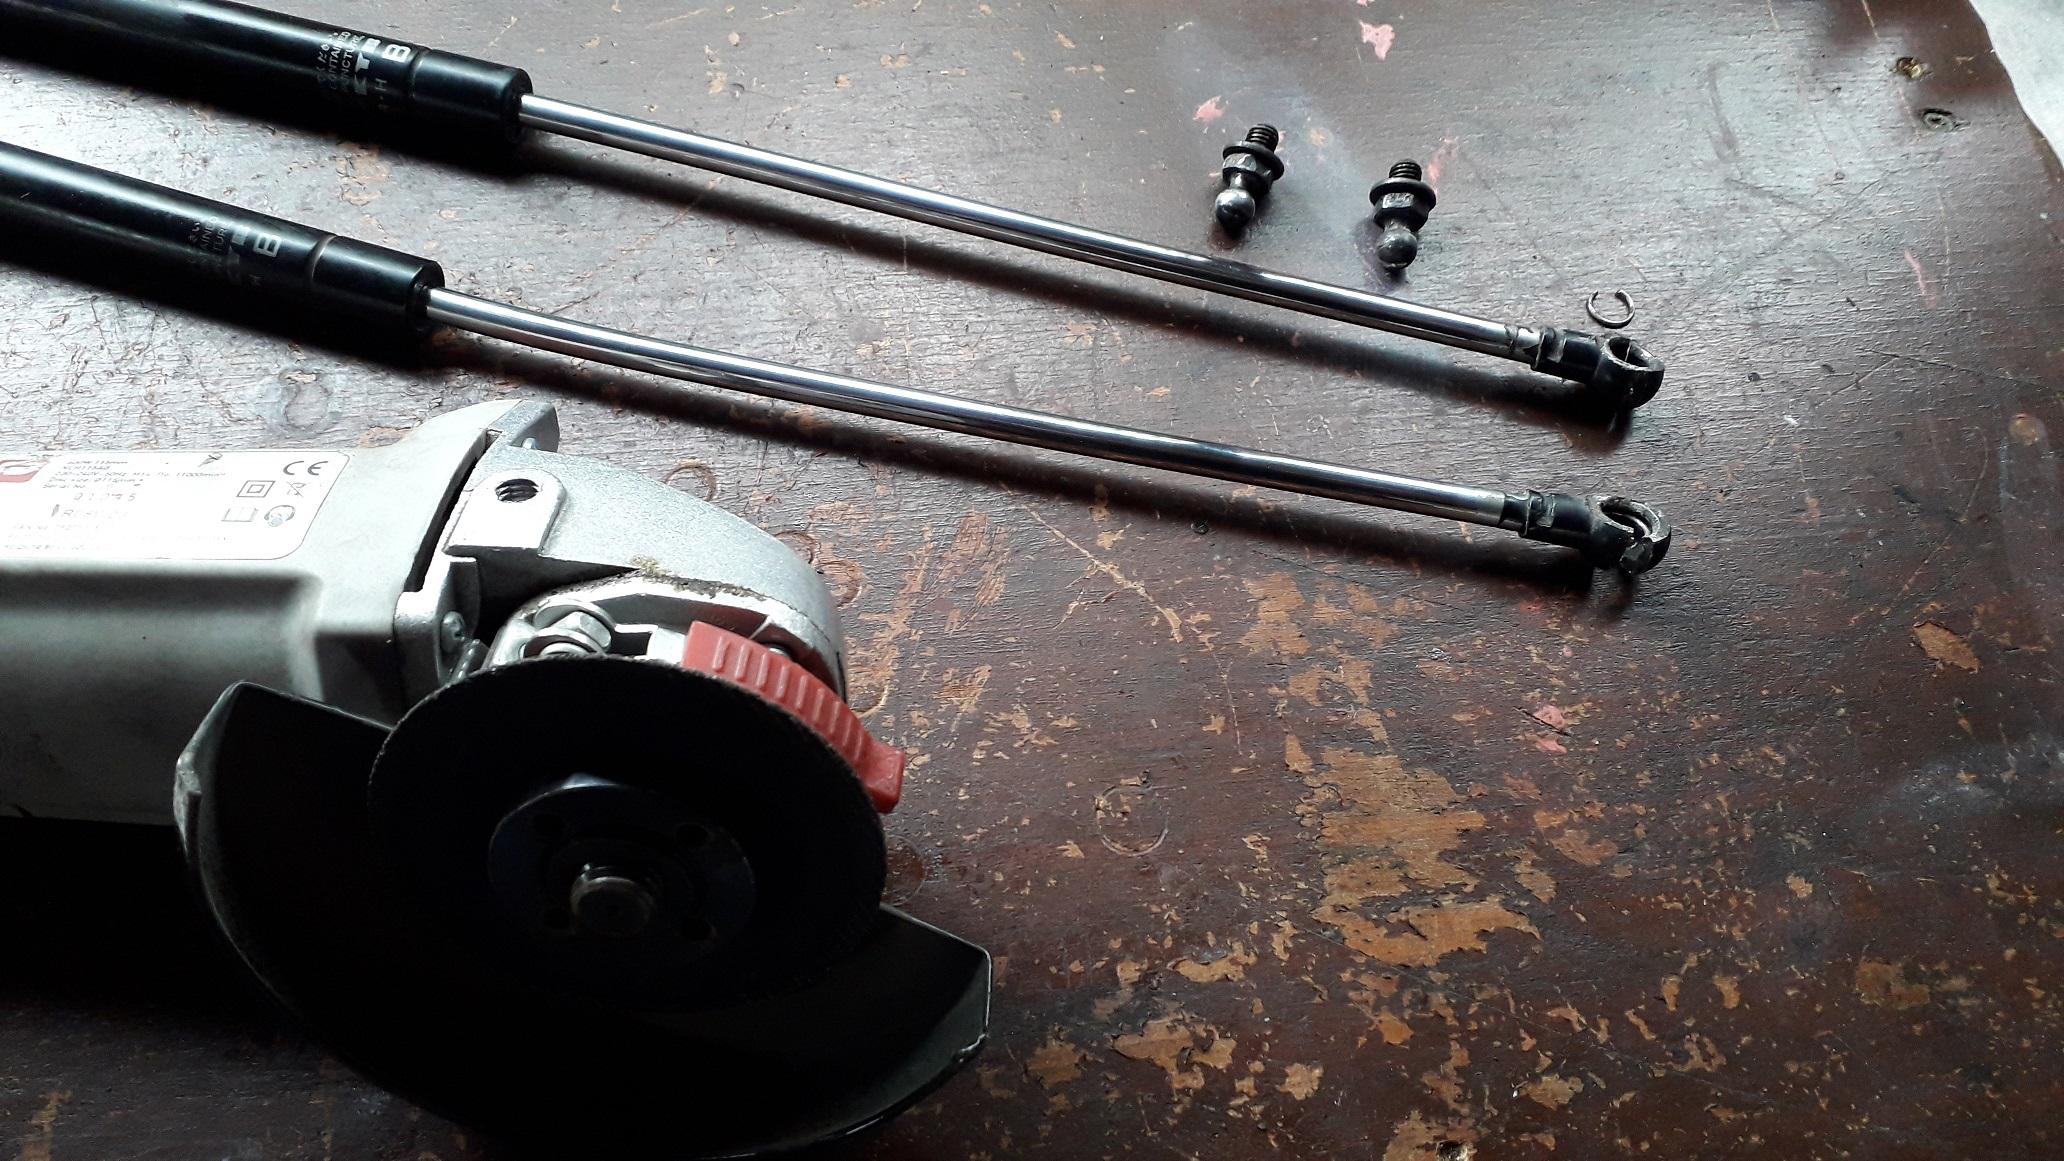
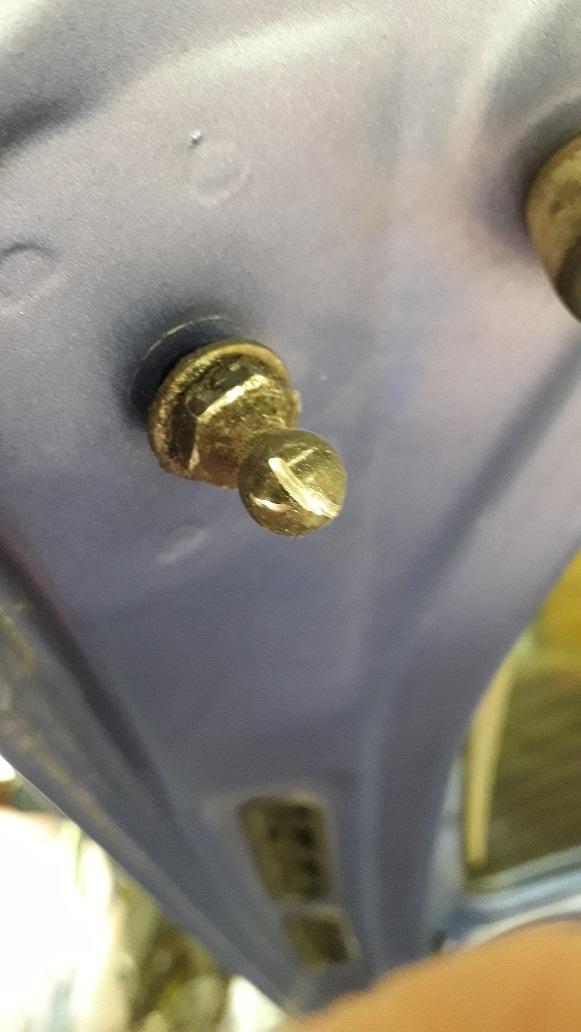
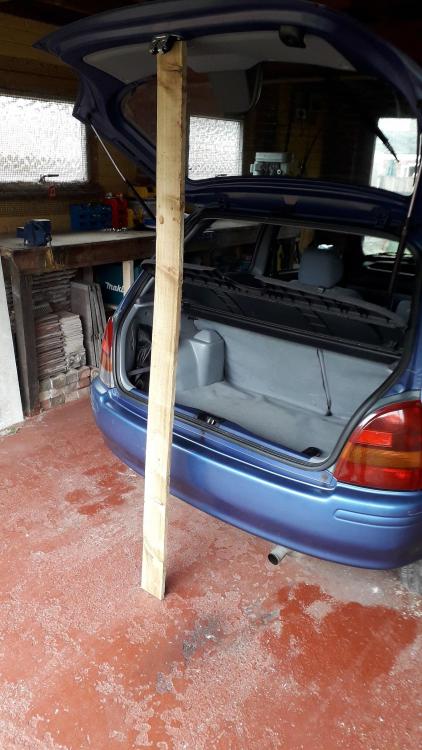
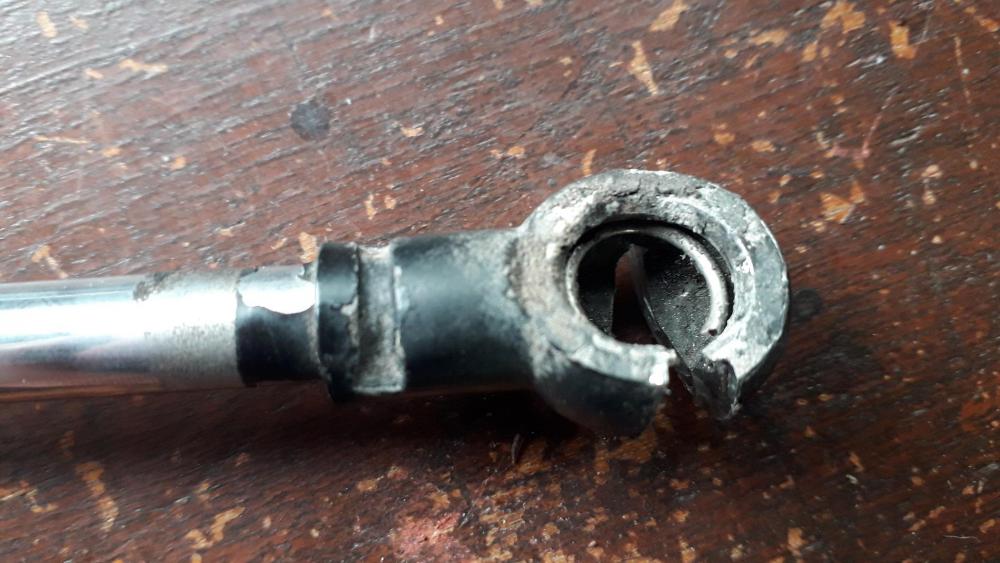
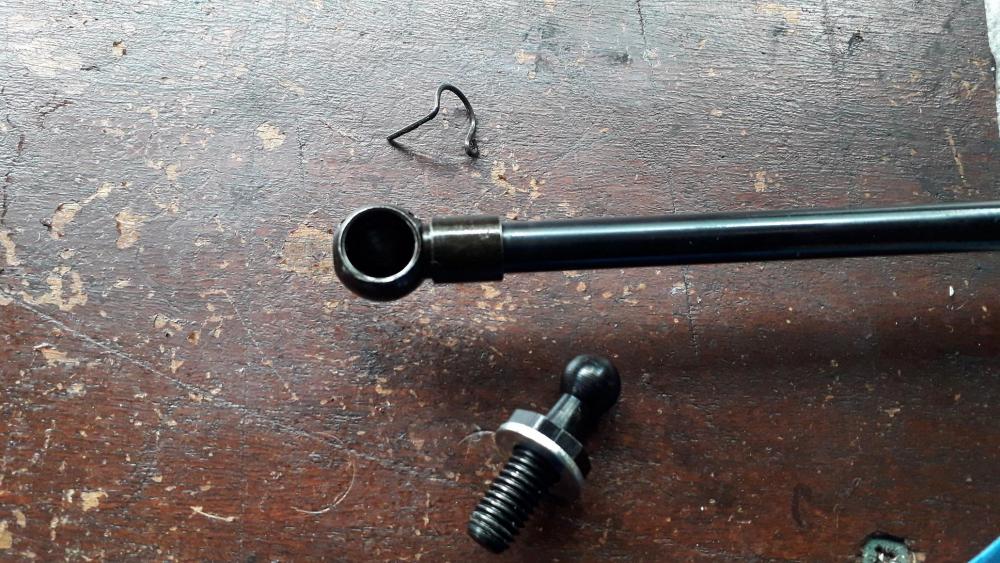
Boot Gas strut replacement was overdue. It was difficult to open the boot and it turned out that the gas struts had lost their pressure so some genius had bent one of the strut shafts to increase the resistance. 🤠 move. First I propped open the boot and unbolted the 2 x M6 bolts from the bracket at the car end of the strut. These had thread seal on them and you could feel it upon turning them. Removal at the other end was not as easy as I'd hoped for, the ball and socket joints don't have an external retaining clip to remove (only an internal snap ring). It was not possible to disconnect the strut from the ball. It also turns out that the ball joint is red thread locked to the boot panel so my attempts to unscrew it with a thin 12mm spanner started to round the nut. After changing into my big boy trousers I grabbed the trusty angle grinder with a half used cutting disc (smaller diameter to fit into the confines of the area) and carefully cut 3/4 through the socket. Pried them open and released the socket end from the boot. I could have used a dremmel and cut off wheel instead but hey ho. Unfortunately manged to slice my balls quite badly with the grinder (Oh matron! 🤣) but the new struts were supplied with replacements. A 12mm wall drive socket was used for removal to prevent any further rounding off. Internal snap ring and sliced socket. So, I removed the gaskets from the old strut brackets and fitted them to the new brackets with silicone gasket maker (both sides of gasket) to prevent water ingress. Bolted them back onto the car loosely with new thread seal on the bolts, refitted the ball joints with washers to boot panel using thread lock. Clipped the socket end onto the ball joint, installed the retaining clip. Tightened the 2 x M6 bracket bolts to the car. Repeated for other strut. Awesome I thought, pulled out the prop and the boot fell down and hit me on the head! FFS 🤬 Long story short turns out the new replacements I'd bought had leaked and when I tested their force after removal on my calibrated bathroom scales turns out the worst one only had 20N force, not the required 300N. So I got a refund from the seller and bought another set of gas struts (Stabilus this time), repeated the whole process AGAIN (thankfully no angle grinder required as these ones clipped off the ball joints) and now I finally have a boot that opens and stays open.


-
Did a bit of research and found these threads. I know one relates to code 52 but it may help with the function and wiring side of things. Looks like the Knock sensor signal wire is shielded and both the signal wire and shielding must be wired correctly. It talks about the shielding on the knock sensor signal wire and how it should be connected (this is for an EP91 so may not be exactly the same). Hopefully it describes how it works and then you can compare if yours is different. I looked into Code 53 and I also came up with different explanations from "knock sensor loose" to "detonation signal". Stu's post looks quite helpful. http://dub-se7en.toyotagtturbo.com/useful_info/OTHER_PDFS/4EFTE_4EFE_Engine_Diagnotsic_Code.pdf
-
Great to see this, really like the SR's. Looking forward to the progress. 😀👍
-
track tyes - can i have your opinions please?
Claymore replied to snails ep91's topic in Alignment & Alloys
The wider front track can be a mixed blessing, it can increase grip and stability at one end but I found on my previous car it affected the steering feel and created an increase in self centring. Not bad but still "different". The tyres were wider than standard and the wheel offset decreased to have a wider track all round. I think the switch from a good road tyre to an R-compound track tyre will be plenty improvement anyway! Just remember they take a few laps to get heat in them so no "banzai" first lap bravery and remember if you run out of grip it will usually be at a higher speed so take care. Use spacers if you need to rather than worry about missing out on what effect they may or may not have. You can always add them at a later date assuming you don't need them to fit the 205's (no idea if that size fits the ep91) Change one or two things, see how the car behaves and then you know what the next area is to work on. Have fun Edit: This is for a track car not for a road car? I wouldn't recommend R-compounds for road use. -
Hello, Any updates on this? It seems to have progressed quite a bit from when you started. Would love to see an engine bay shot with all the new developments I know people are getting busier again but this looked like a totally different project.
-
I would suggest fitting a wideband o2 sensor and gauge to read the AFR's as well as timing check (when you can). Also be aware that the 4efe crank pulley isn't a harmonic balancer type like the 4efte one is. Some have expressed concerns about using the non harmonic type. A lean condition and too advanced spark is a recipe for melted pistons. You have done the right thing to be cautious. I'm certainly not an expert in reading spark plugs but after doing some internet research, soot on the outer part can be rich at idle, might not be rich at full throttle though.
-
Welcome to the forum mate, its been busier than ever recently, I much prefer the format of a forum. It has plenty of helpful info and a lot of build threads started too. Get a build thread up yourself, will be interesting to see. 😁👍
-
Good times, shame about the hassle though, genuine mistakes do happen but there are a lot of arse holes out there. As you said always pay strangers with Paypal and add the 4% for fees if you have too for the guarantee. Never bank transfer. Good luck sorting her out, always liked the Gt's
-
That's the coil dude, The ignition module (igniter) is a different component. If it was from eBay you can start a resolution case against the seller for an item that didn't arrive. eBay customer services will get you the money back no problems. I've had to use them in the past and they're really on it.
-
track tyes - can i have your opinions please?
Claymore replied to snails ep91's topic in Alignment & Alloys
As far as track tyres go I've had good experiences with Toyo 888 on my previous car, the new design gets good reviews and is usually cheaper than the advans. Advans are excellent though. Keep the widths the same front and rear or you will upset the handling, wide on the front and thin on the rear is for drag racing to reduce rolling resistance which is no good when corners are involved. Can't comment on preferred size though. -
Claymore's sleeper 4efe+t-t+t build (R.I.P. the Nanza)
Claymore replied to Claymore's topic in EP91 Progress Blogs
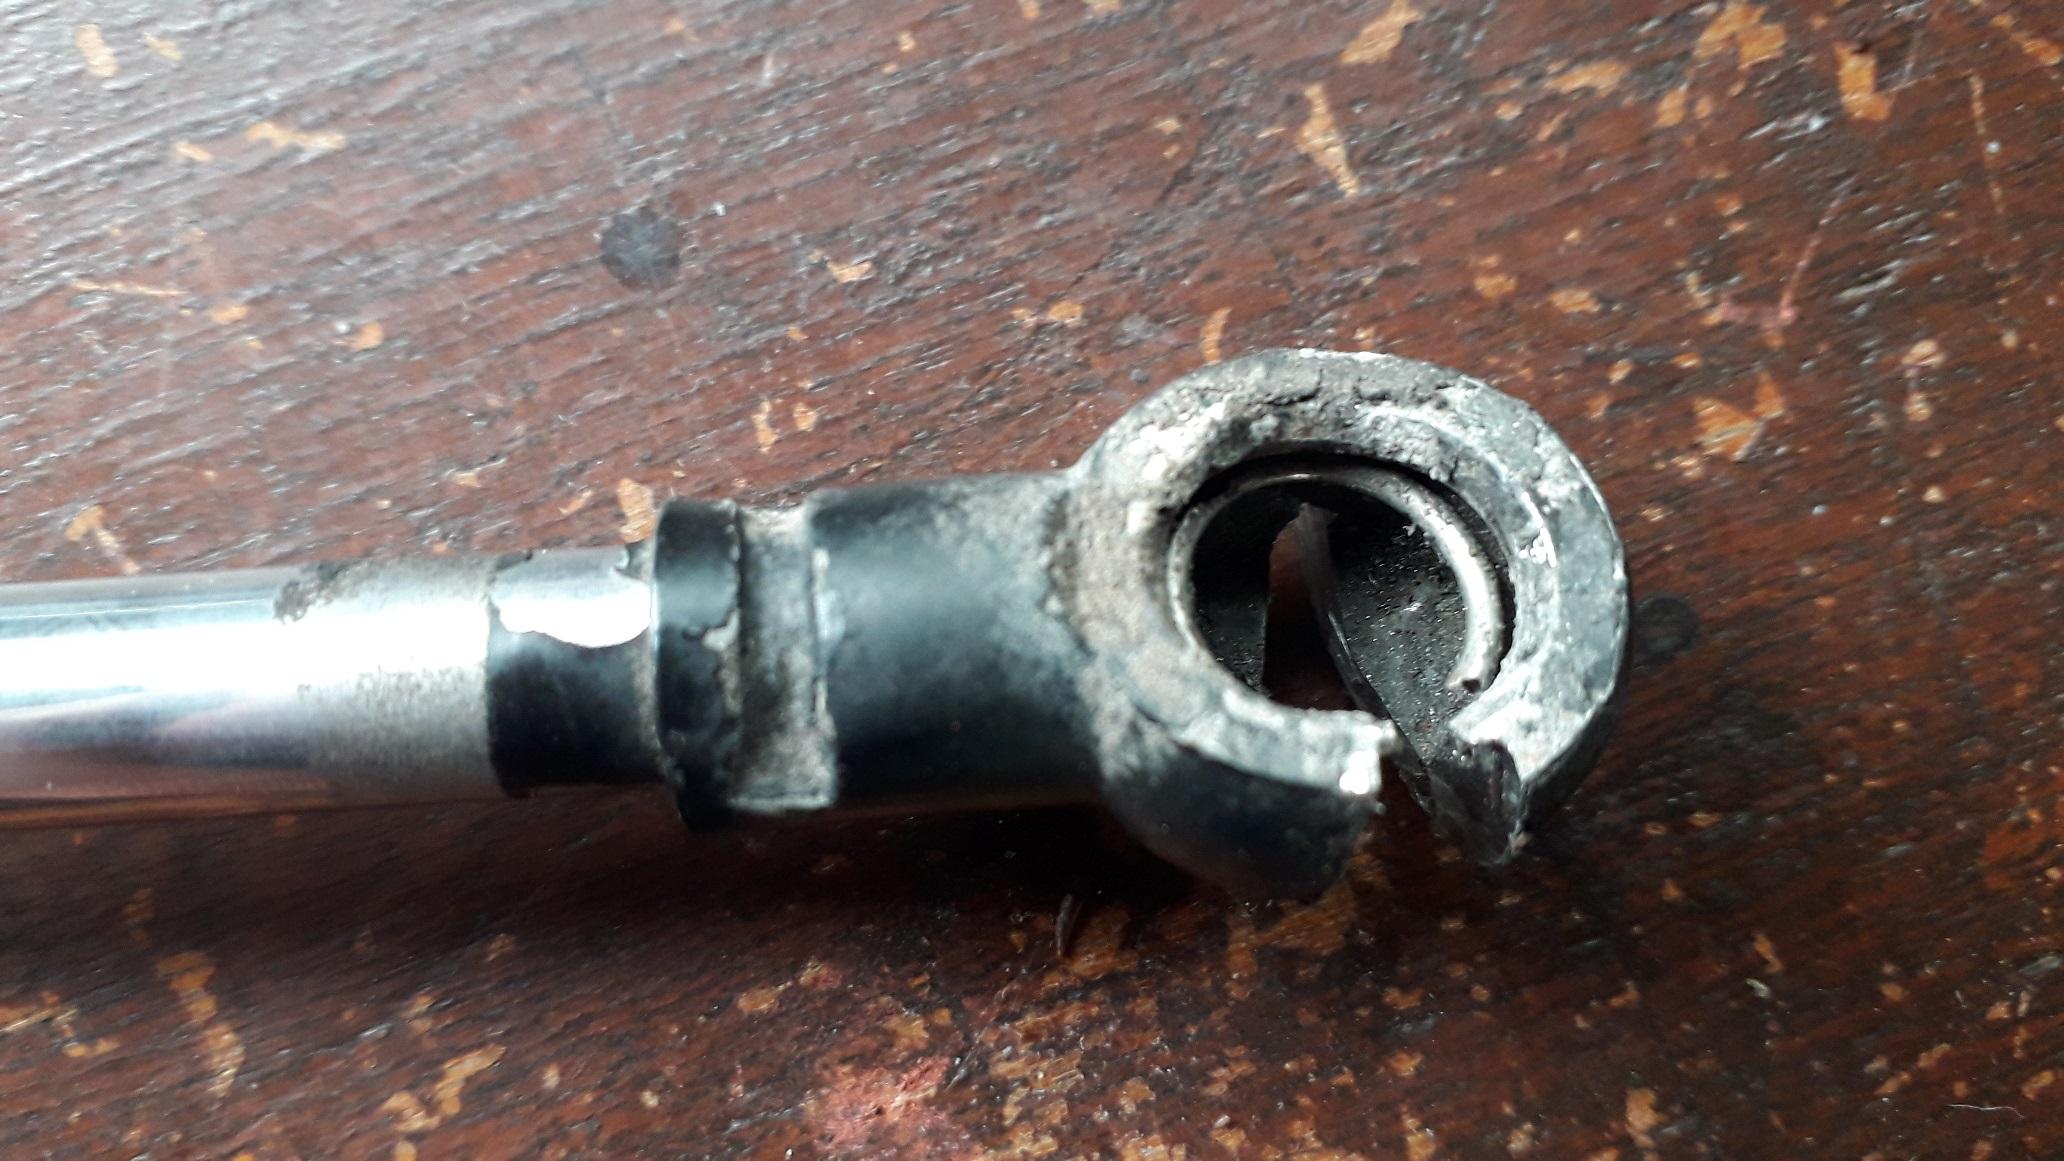
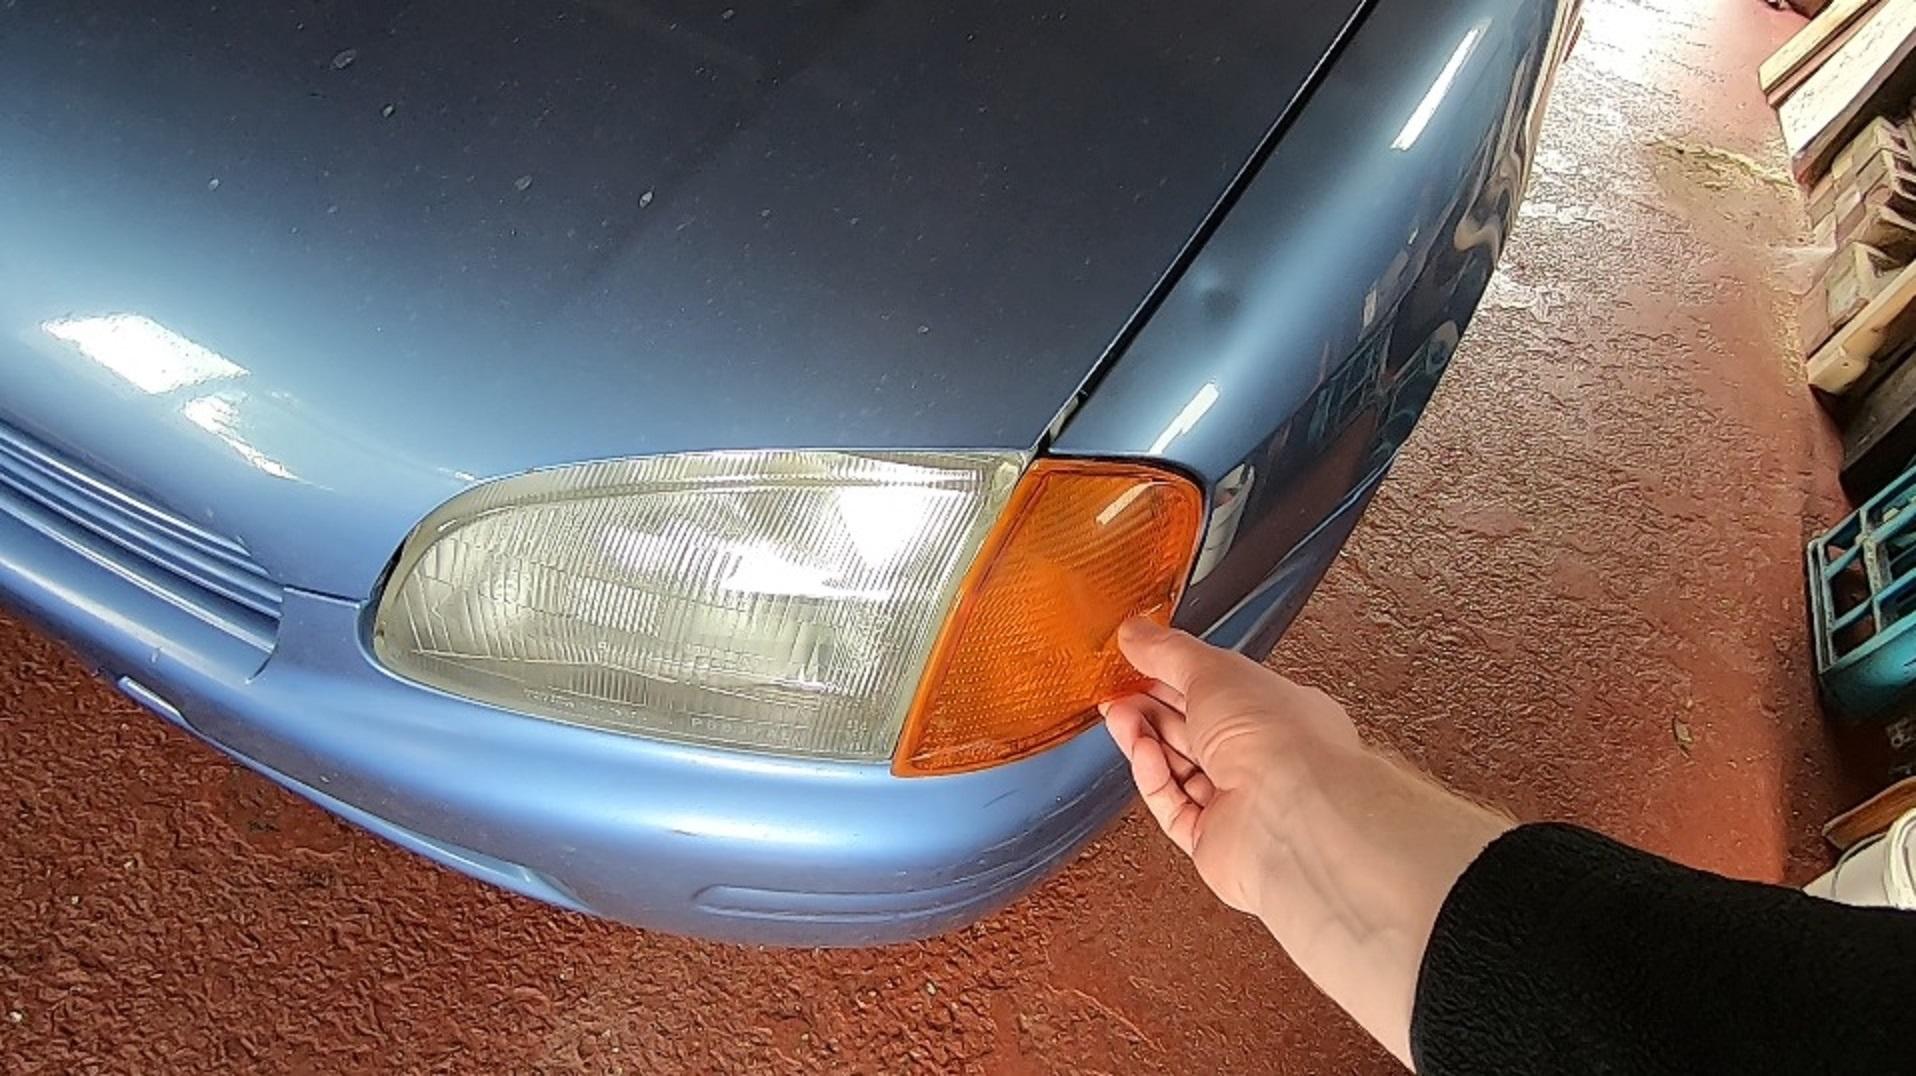
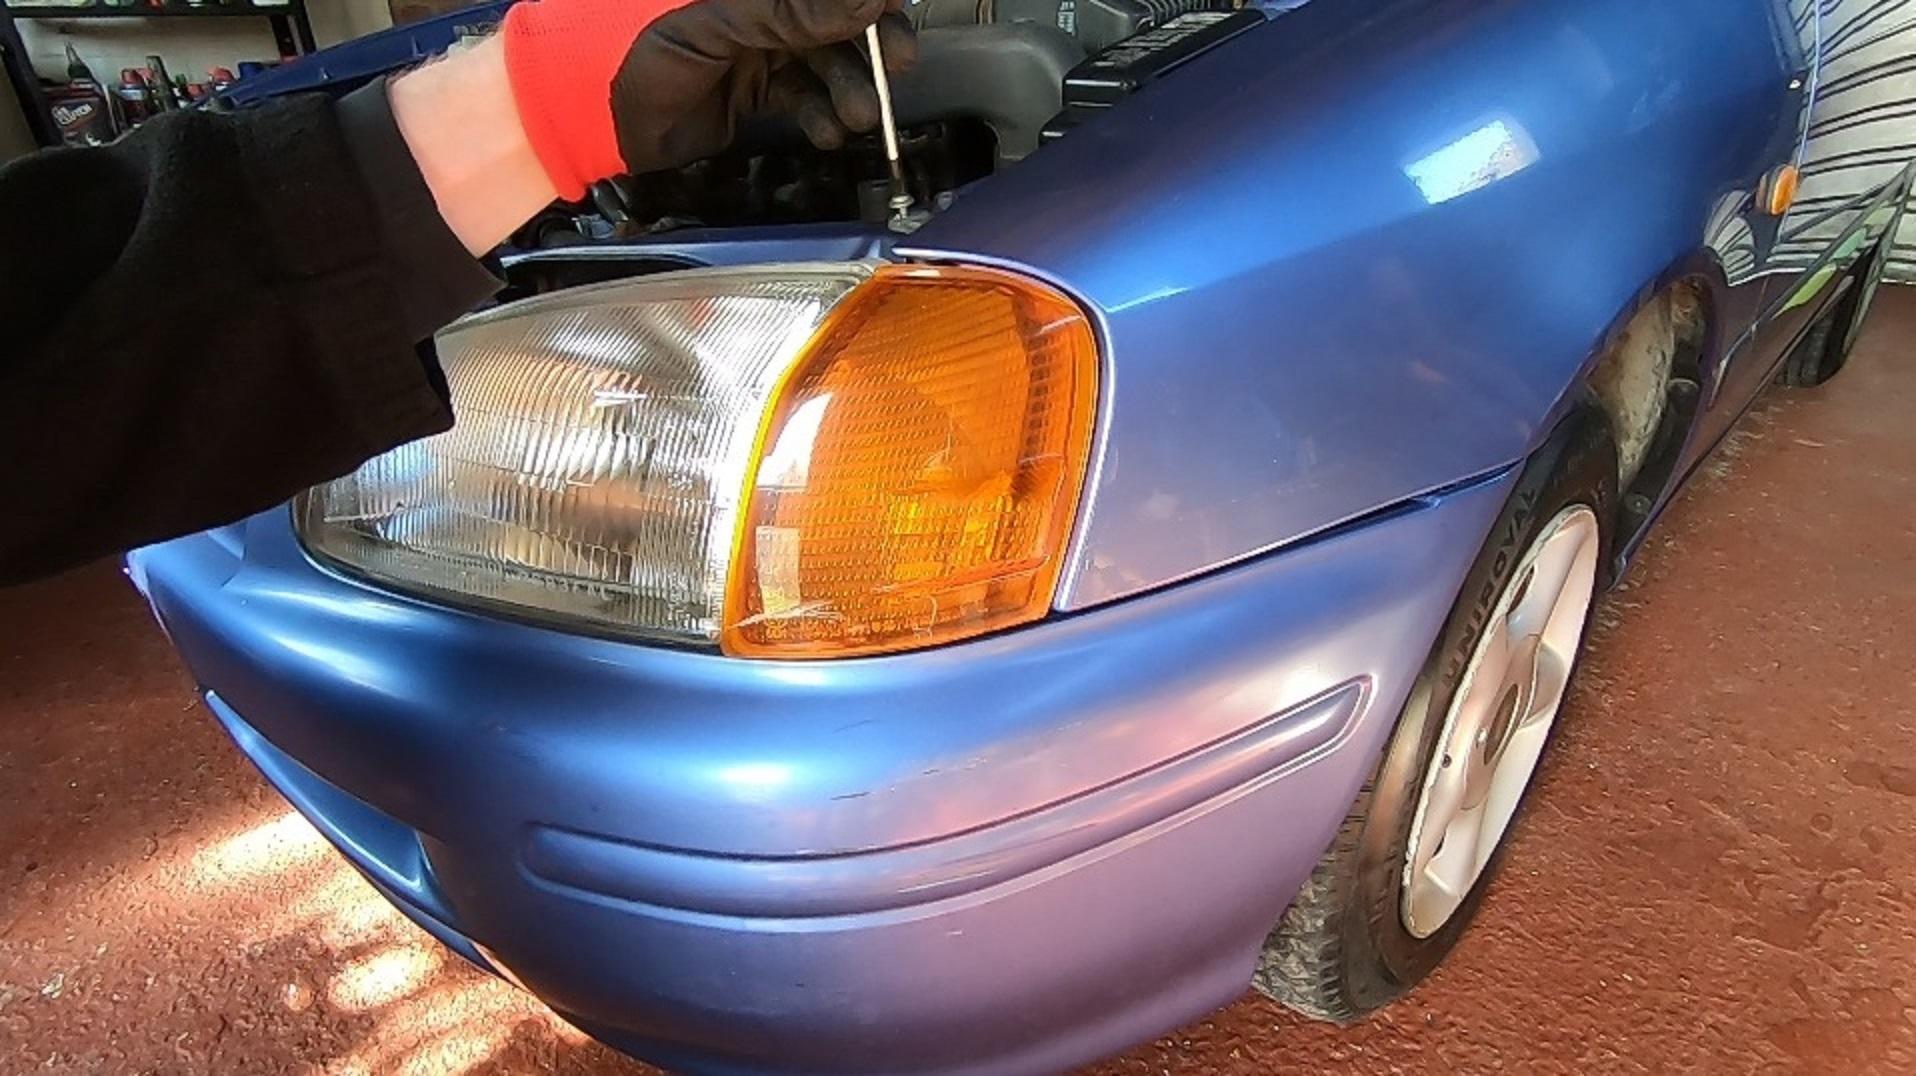
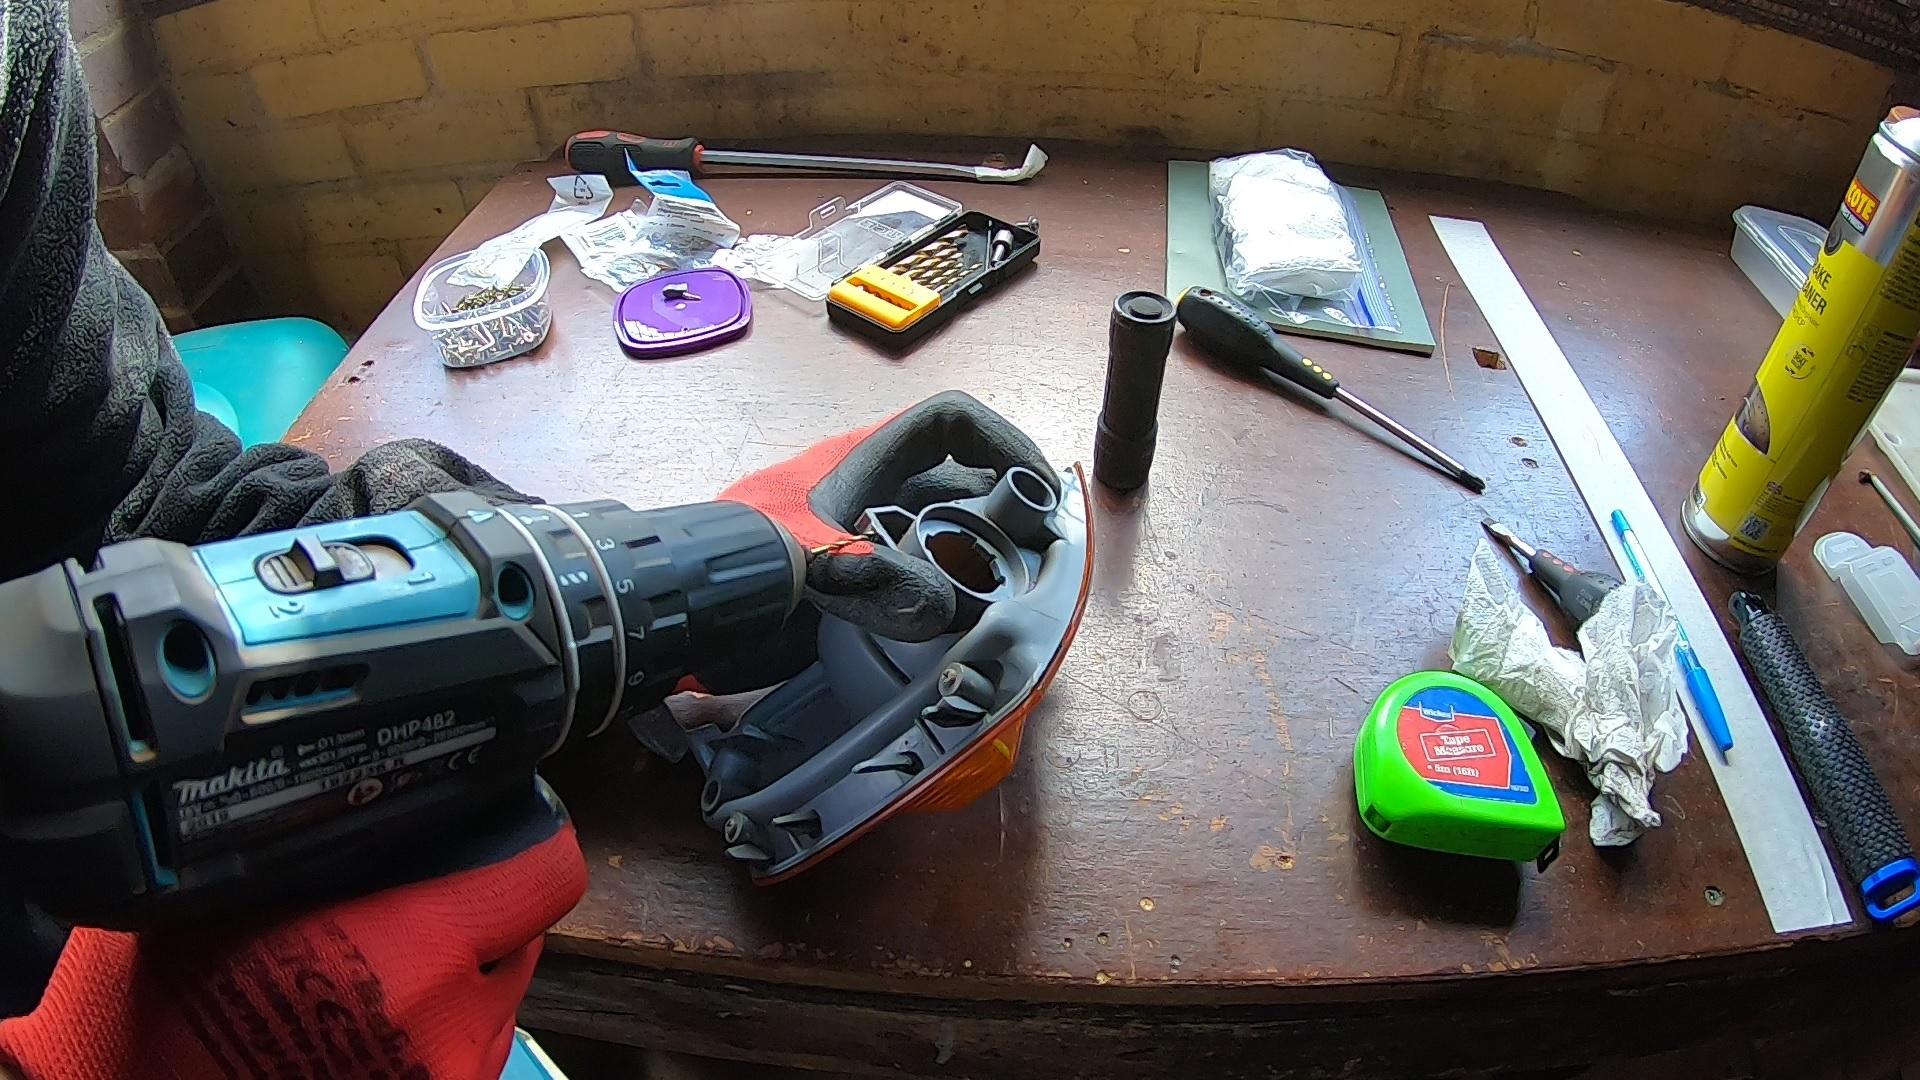
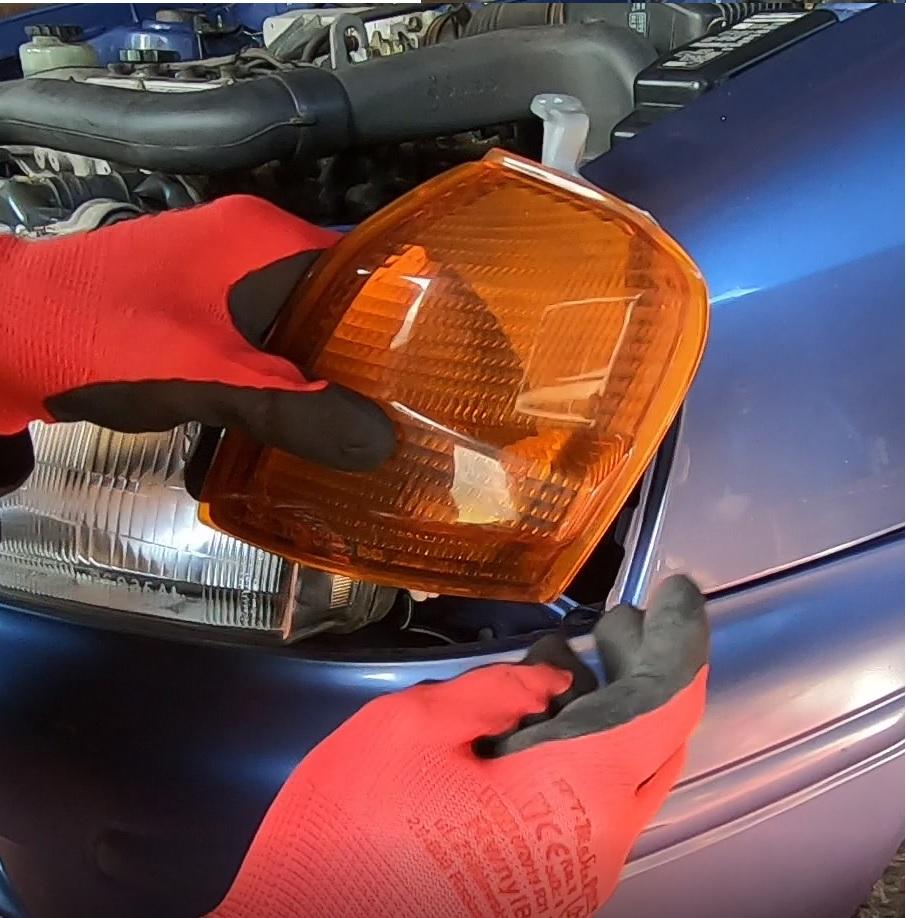
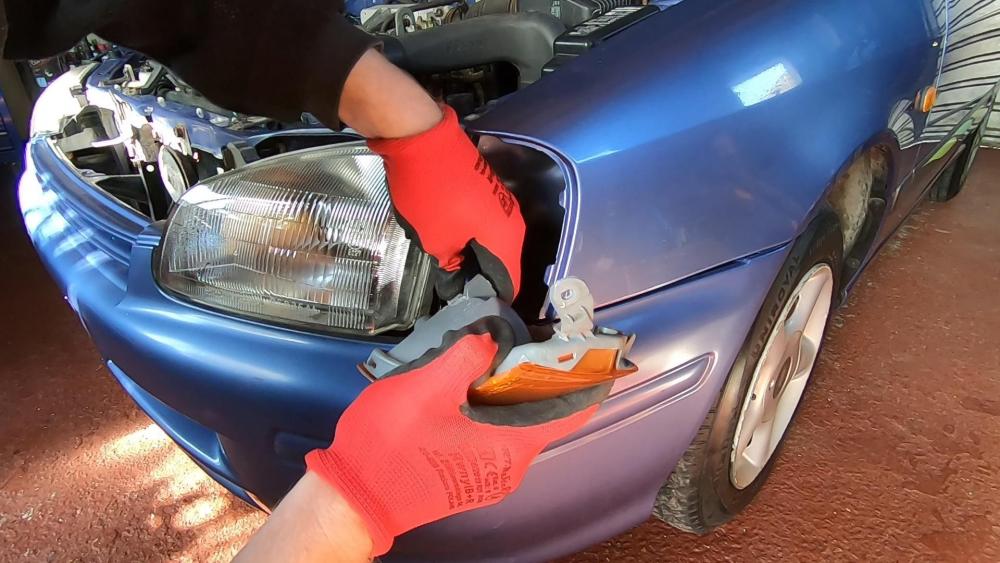
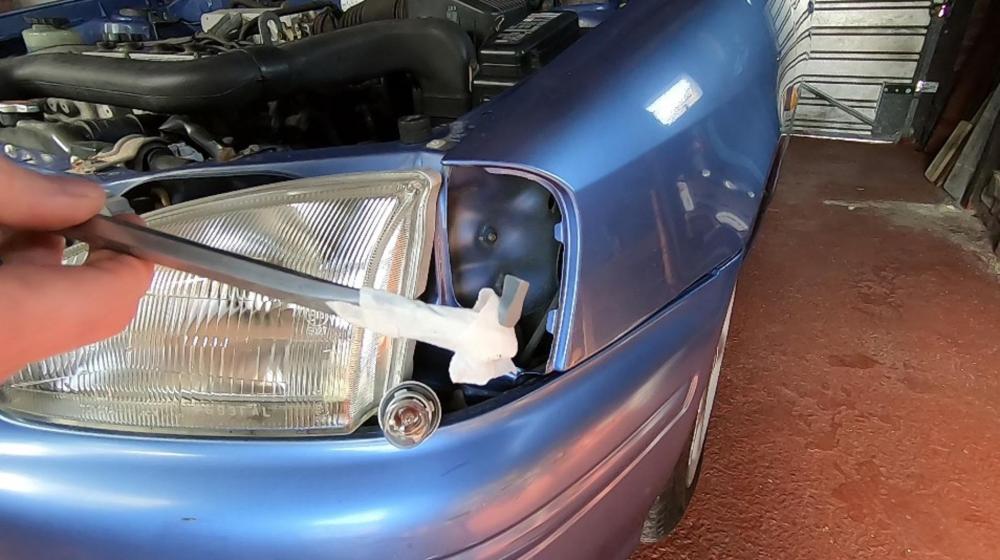
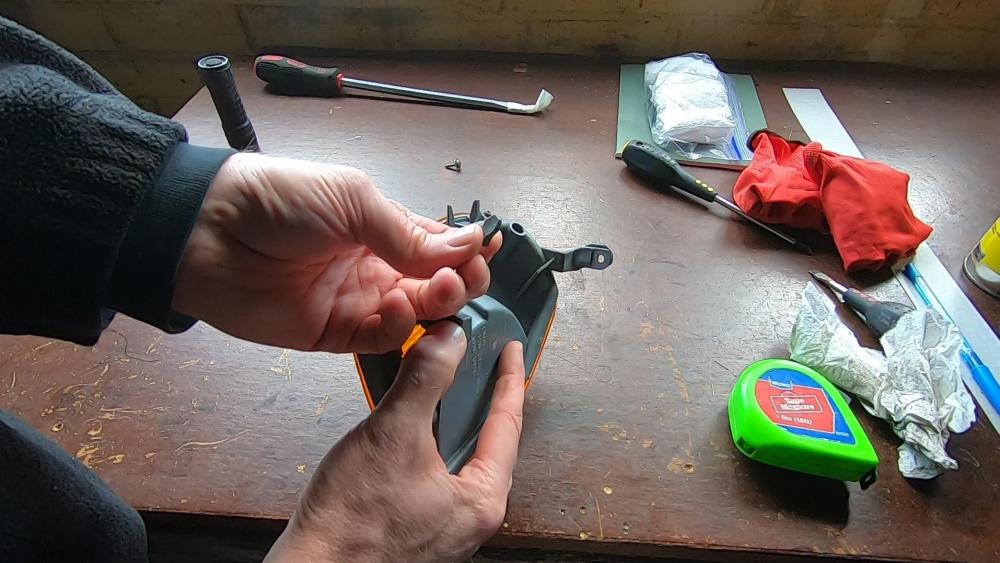
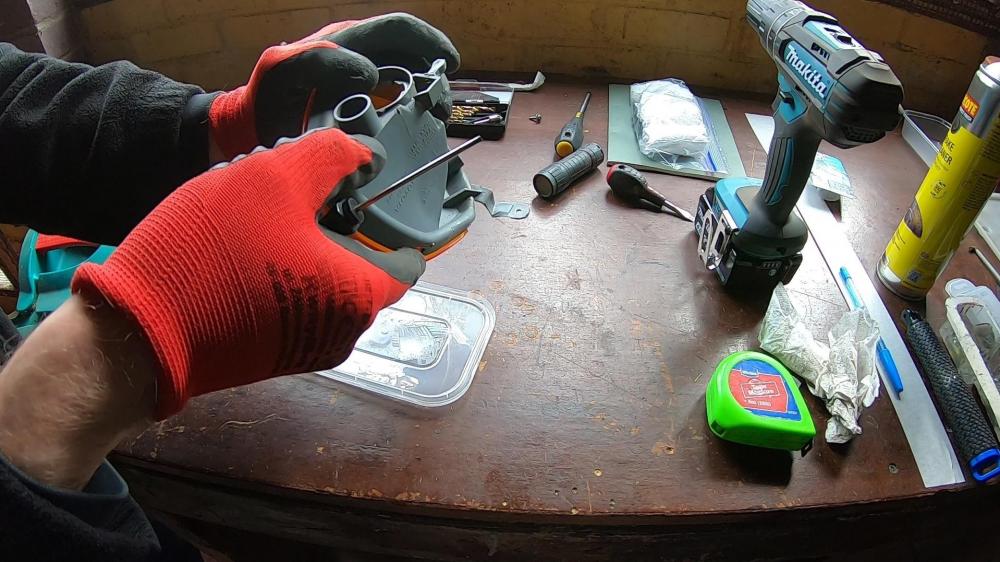
Indicator removal and repair time: https://www.youtube.com/watch?v=fWBOrM646ow I noticed that the indicator was a bit "flappy" so I removed it to investigate: Unscrew at top and slide forward (if the tab at the bottom is broken off like mine was then no need to slide forward) Quarter turn bulb holder to remove. It was quite obvious that the bottom tab that fits into a plastic holder in the wing was missing, but quite luckily for me it had stayed in the bumper for god knows how long. A retrieval device was fashioned from a long screwdriver and adhesive tape and the tab was all mine! Tab and indicator housing location. Drilled a hole in the housing to receive the smallest screw (2.5mm) I have ever used. Drilled a corresponding hole in the tab to receive the screw. (Mind your fingers!) Epoxy 2 part glue and screw to fix tab back into place. Let glue dry for 24hrs to prevent permanent attachment to car then re assembled. Managed to save myself the cost of a replacement indicator housing for an hours work 👍


-
90119-10596

-
Josh's forged 5E Massive spec forged build! 370BHP!!
Claymore replied to wakeabby14's topic in EP91 Glanza Progress Blogs
Good times . Tell the dyno operator to send it! -
Josh's forged 5E Massive spec forged build! 370BHP!!
Claymore replied to wakeabby14's topic in EP91 Glanza Progress Blogs
Really sorry to hear about this, the build looks like its going to be a monster! Might be worth checking the big end bearings, crank journals, main bearings for similar scoring damage. Start with one and see where it takes you. If particles have ended up in the oil it may have been round the engine and produced similar scoring on the bottom end bearings. Also cut open the oil filter with tin snips so you can check for debris (if you still have it) Hope you get it sorted soon and 🤞 its all ok at the bottom end. -
Claymore's sleeper 4efe+t-t+t build (R.I.P. the Nanza)
Claymore replied to Claymore's topic in EP91 Progress Blogs
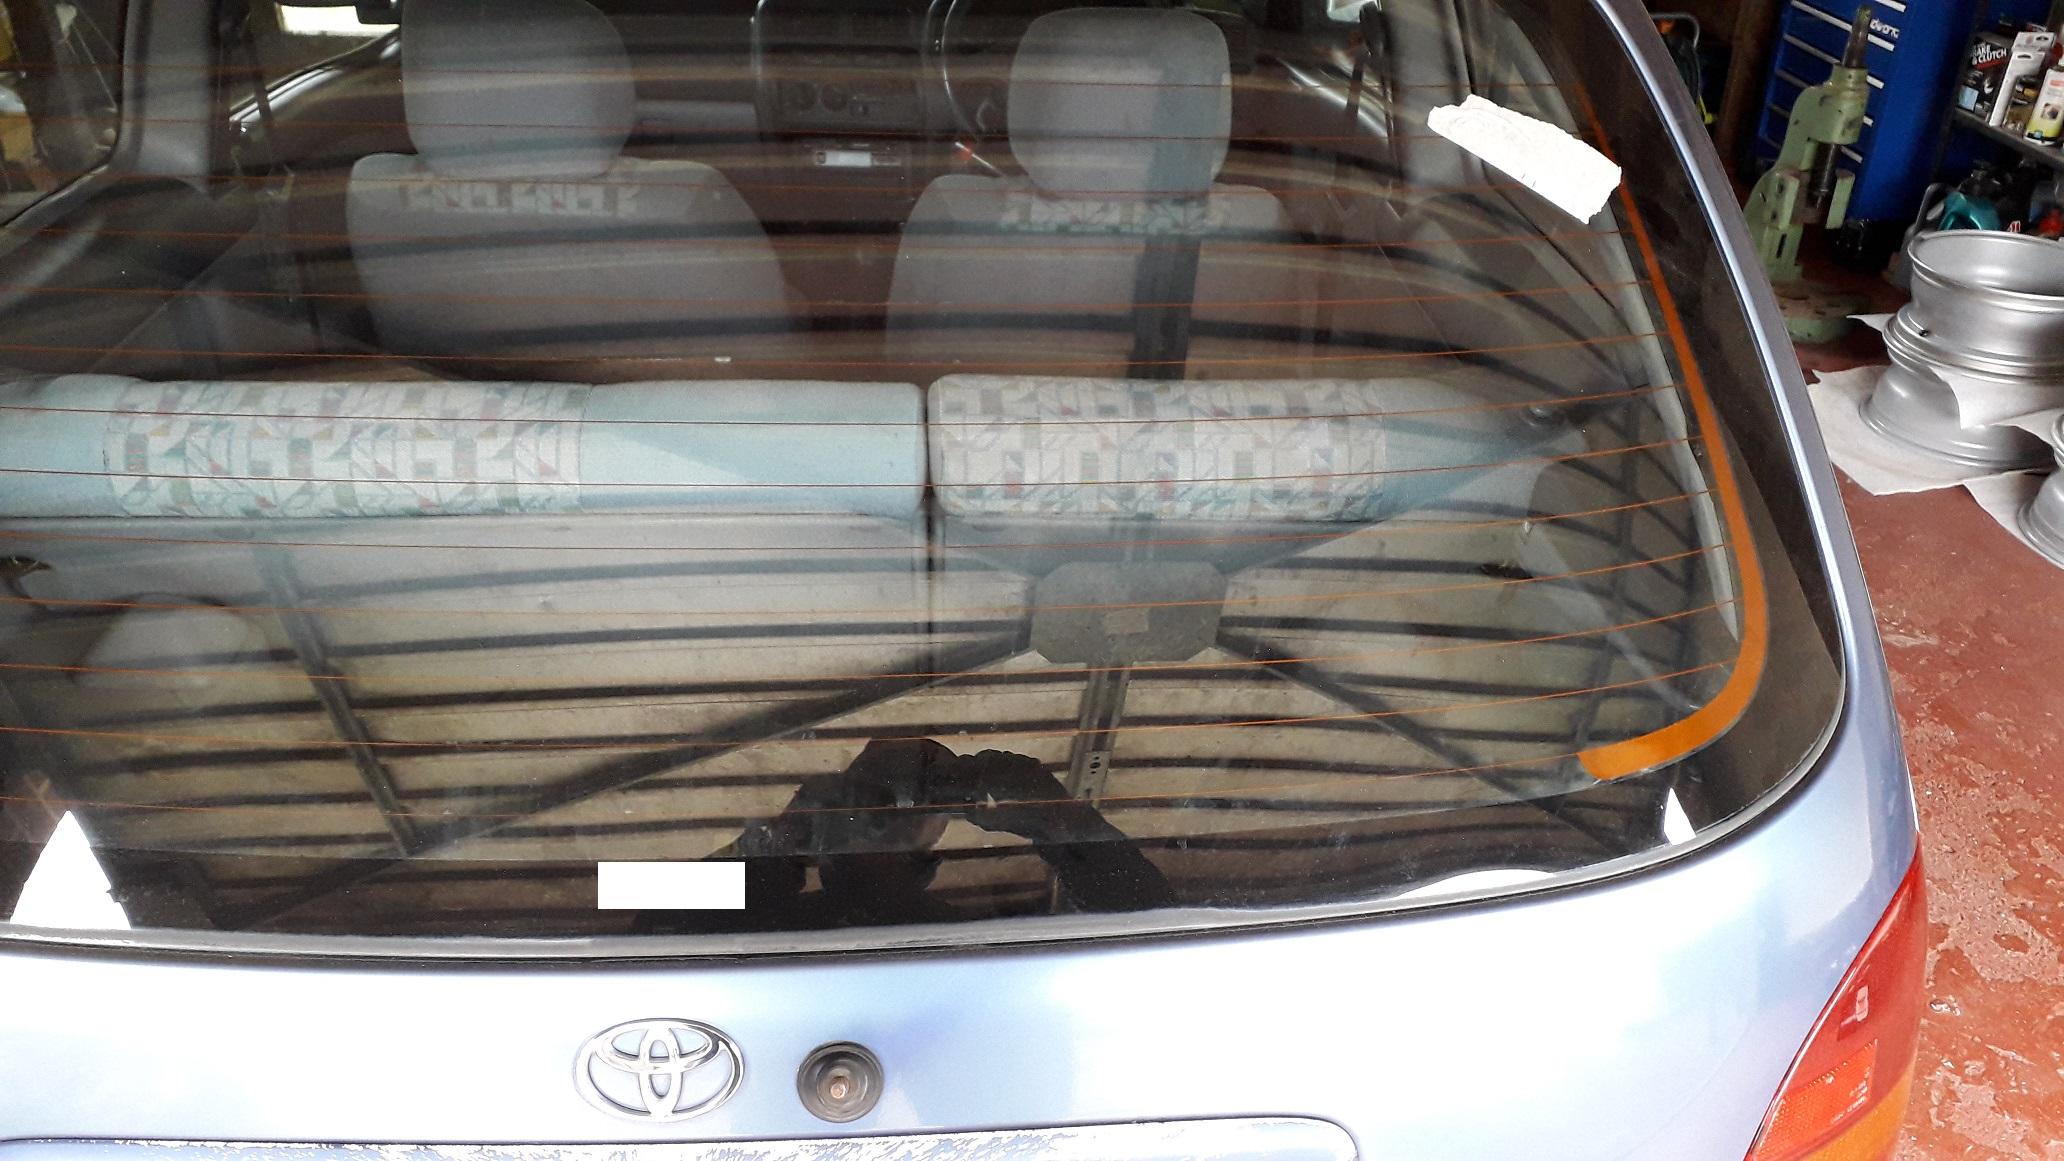
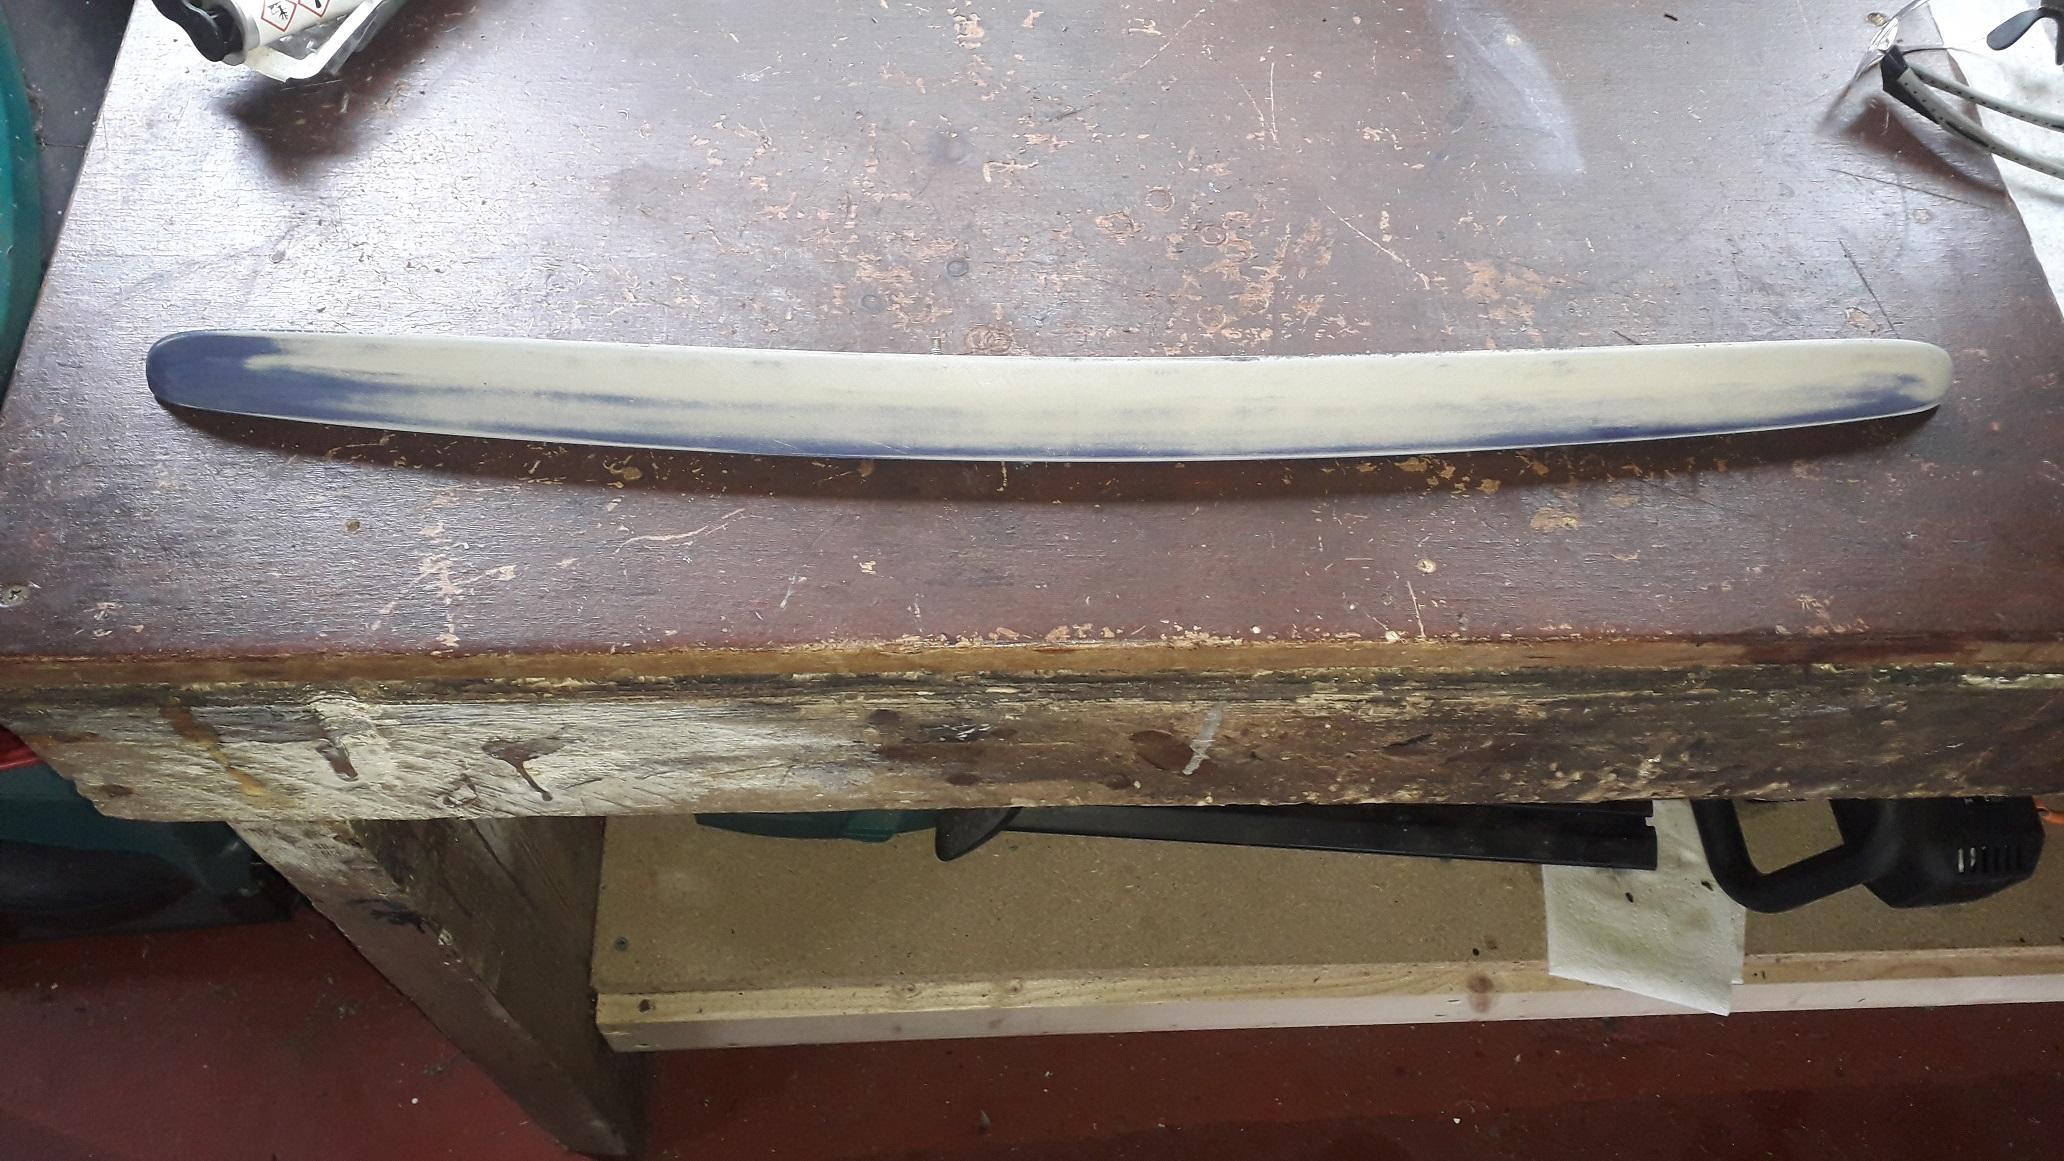
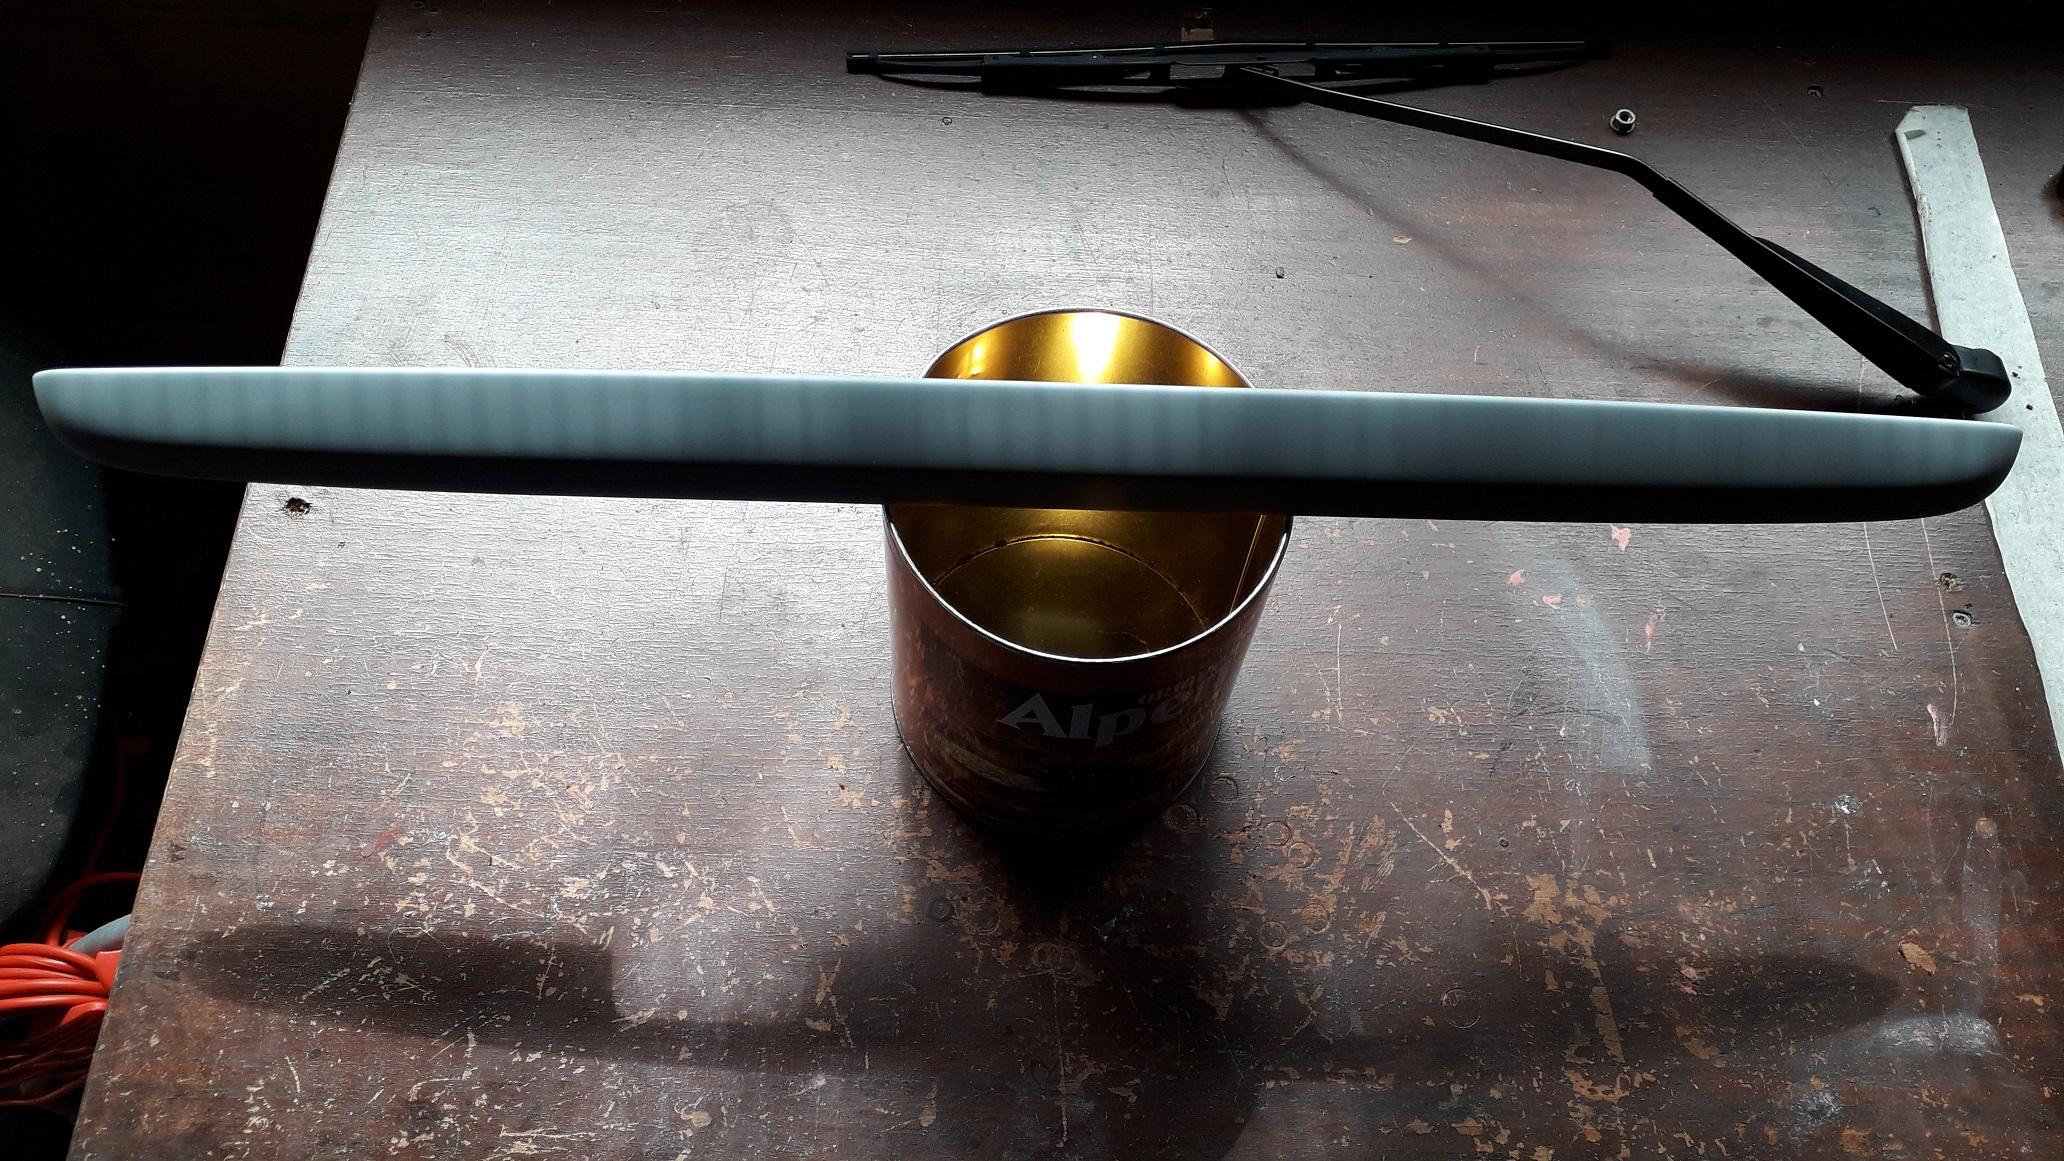
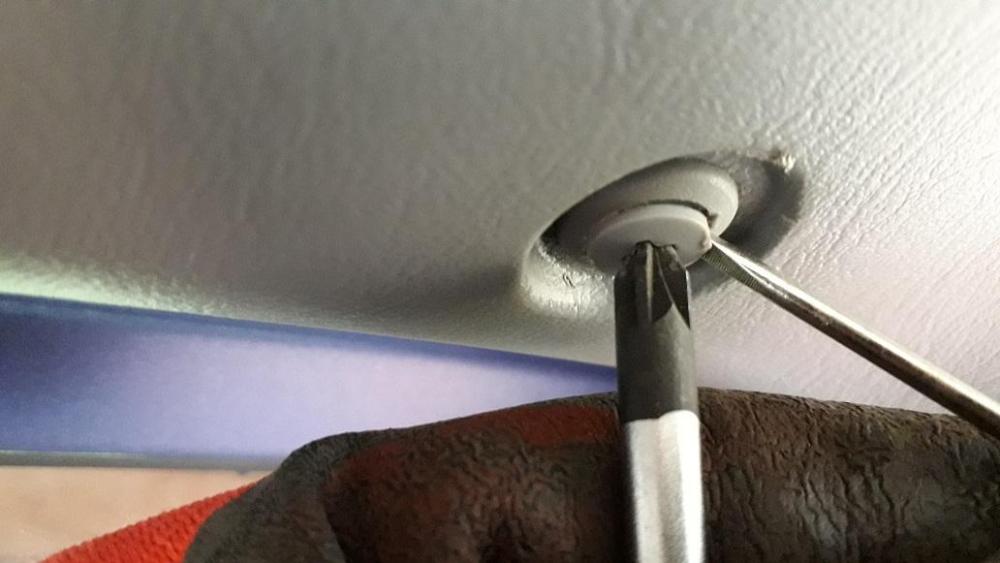
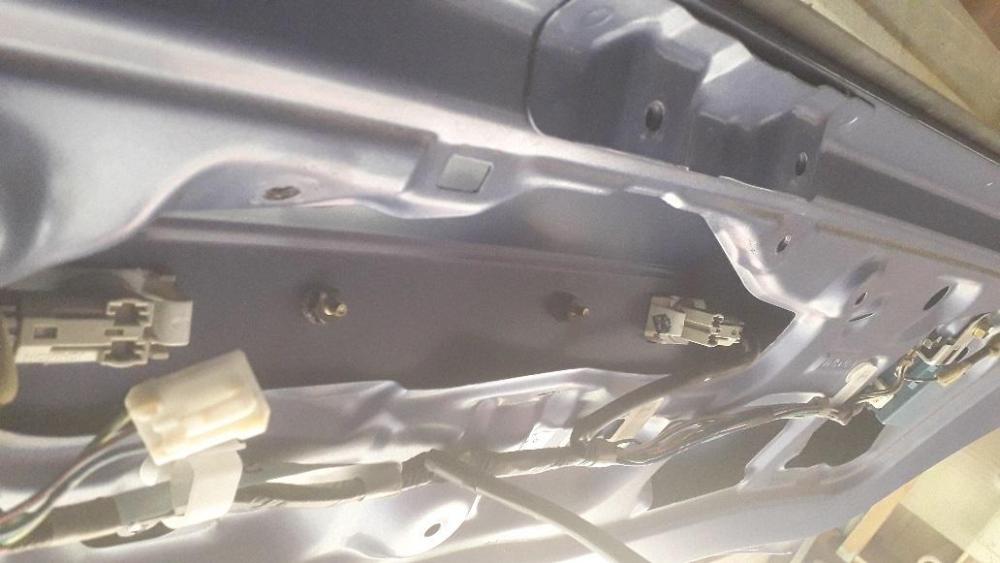
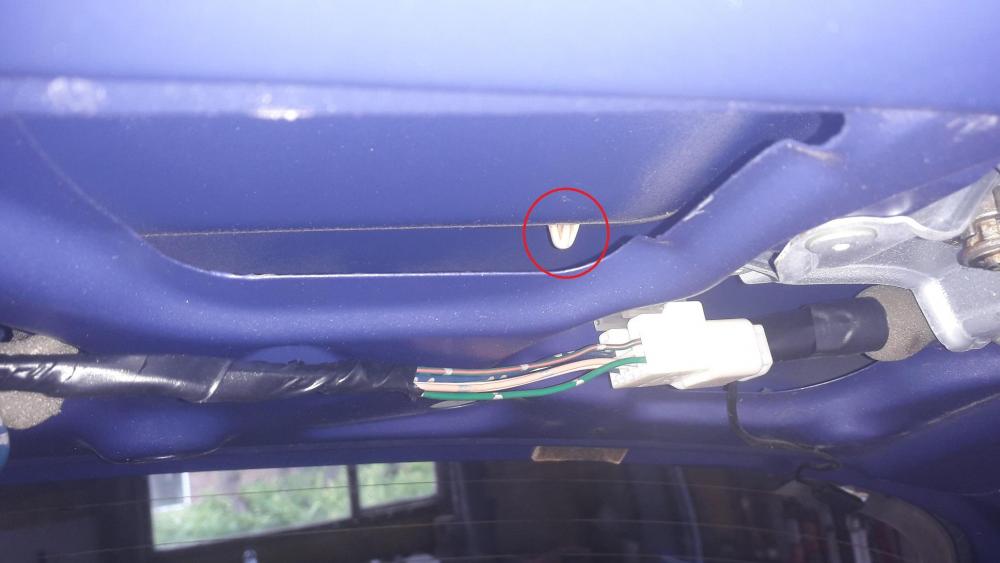
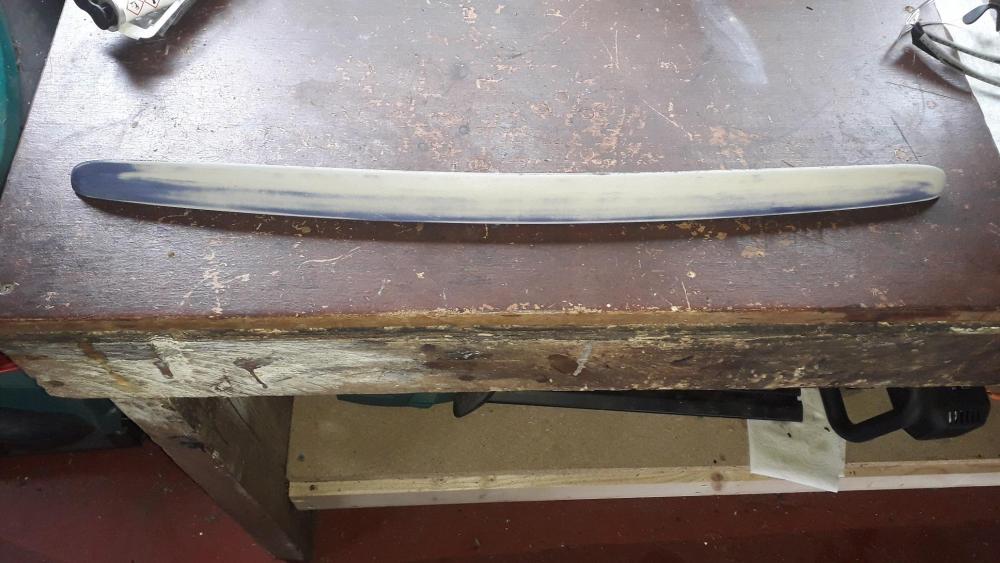
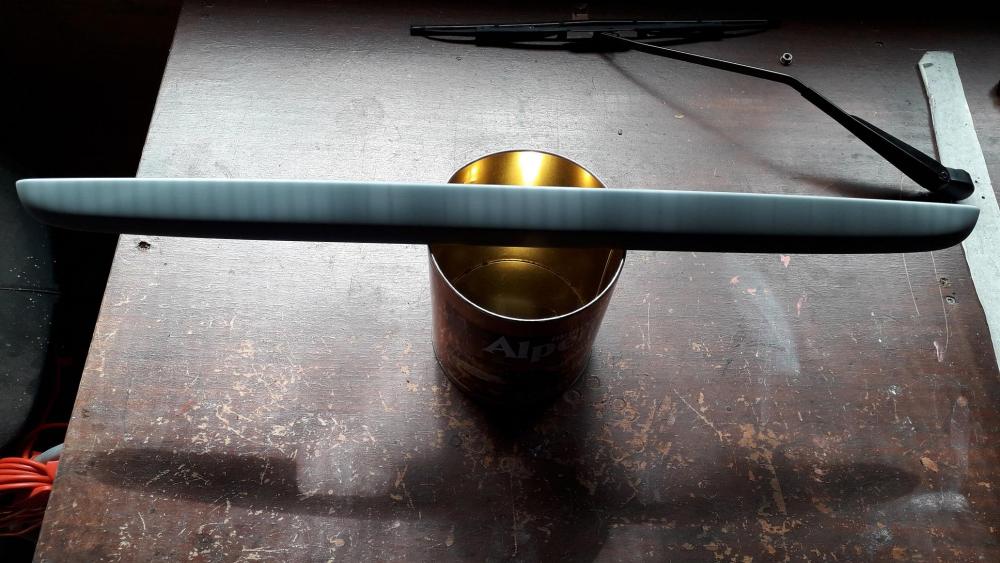
The rear wiper arm and boot handle were letting the side down so they were next for some attention: Used masking tape to mark the position of the wiper tip for easier re-install, Undo 10mm nut under cap and had to use a tiny 3 legged hub puller to pop the arm off the spline. Painted arm satin black. To get the handle off first need to remove inner boot cover, it's held on with push fit clips, I used a phillips JIS screw driver to hold it still from spinning whilst using a small flat blade screw driver to lever the middle button out. Remove all clips, then pull cover off third brake light, remove 2 x M6 screws, disconnect bulb socket wire, slide light housing up towards top of boot. Pull down on boot cover at top edge, unhook lower edge and remove. Un plug wiper motor, undo 3 x M6 bolts (think they're shake proof thread as mine felt "lumpy" whilst turning) remove motor. Now you can see the 2 nuts that remove the handle and there are also 2 plastic arrow clips also. Pressed arrow clip sides together with long nose pliers or 2 x screwdrivers to release. One of the nuts on mine was seized and the T-bolt broke free of the handle (oops) managed to find the required plastic pieces for the Industry approved 2 part epoxy repair process! 😉 Sanded, plastic primed and painted satin black (was never going to be able to match the faded body work with Purplish blue). In hindsight I would probably leave the handle on the car and mask it off but I thought "I'd do it properly this time". All re-assembled. Removed the crusty badges also and polished the areas, you can still see the outline as the labels protected the paint from UV. That's all for today.
-
Claymore's sleeper 4efe+t-t+t build (R.I.P. the Nanza)
Claymore replied to Claymore's topic in EP91 Progress Blogs
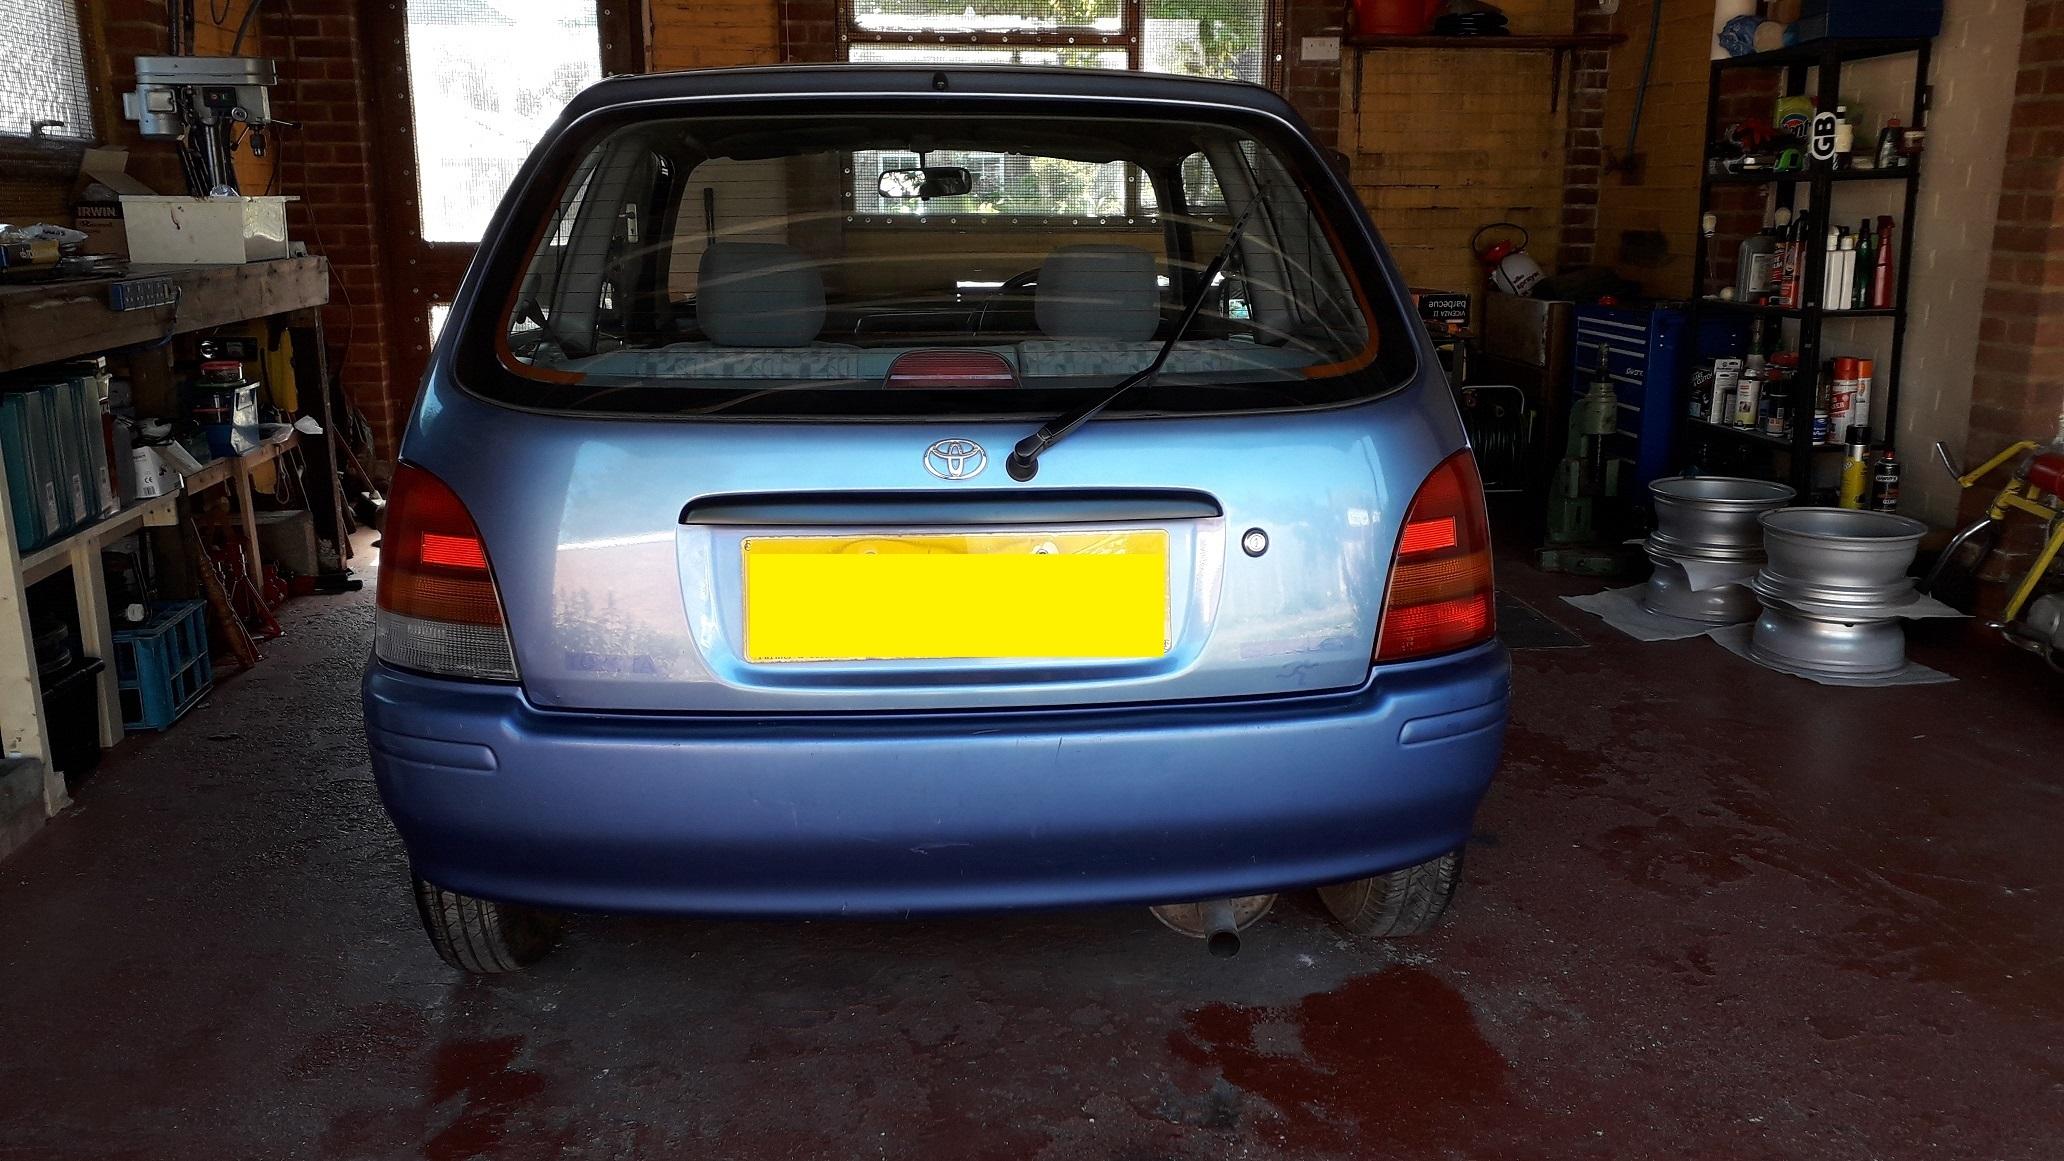
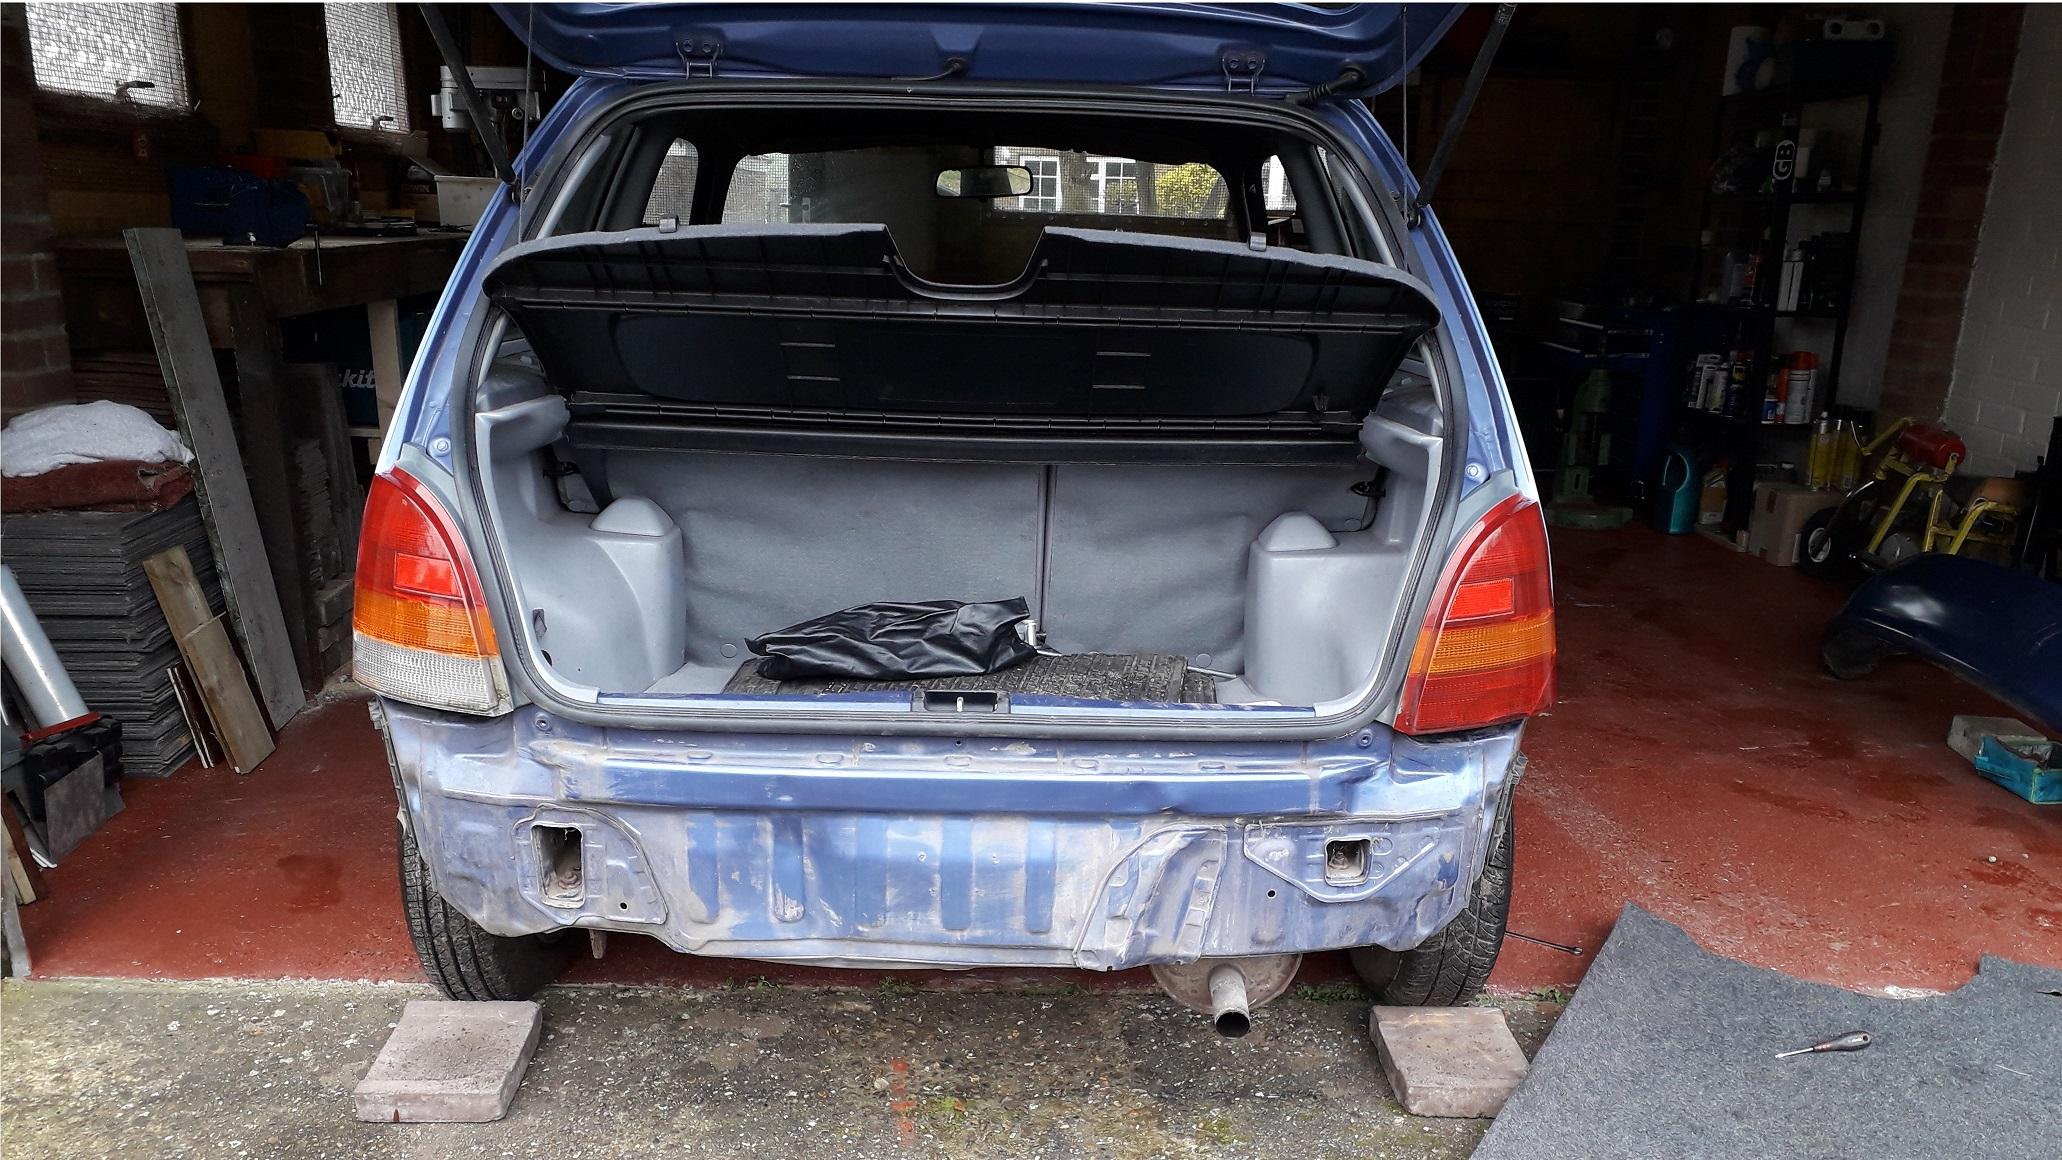
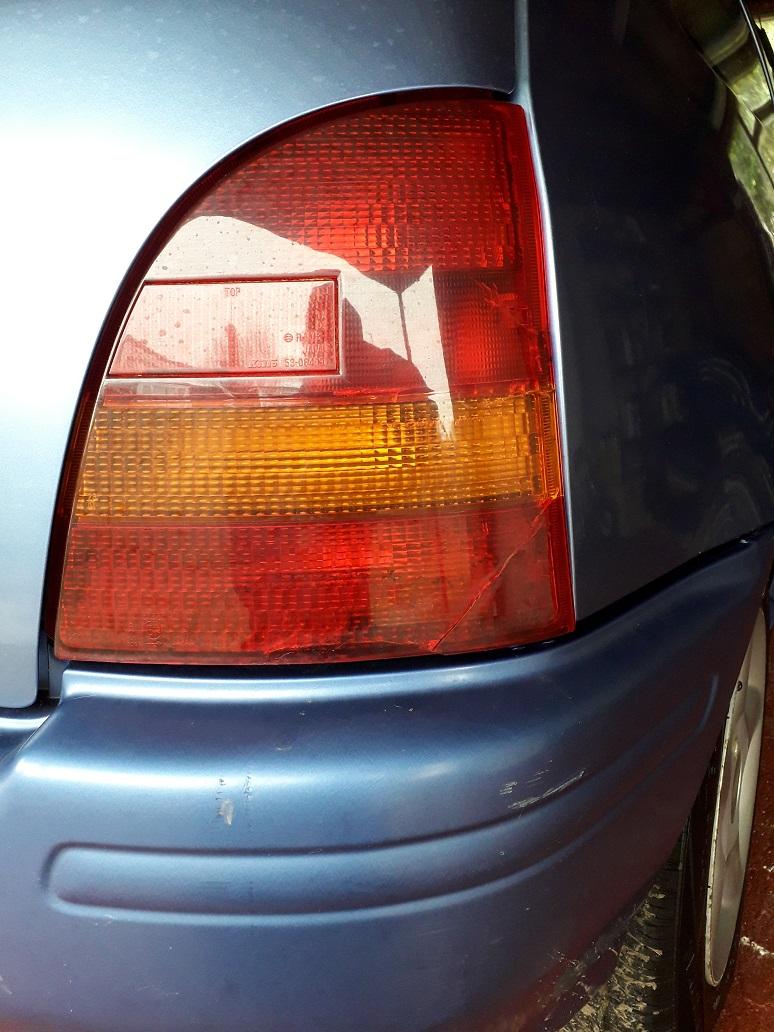
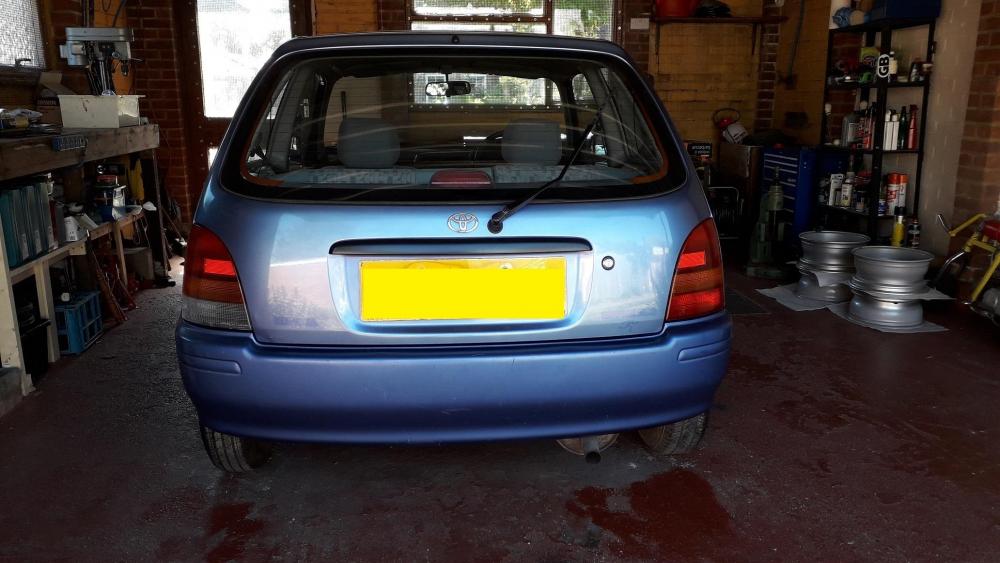
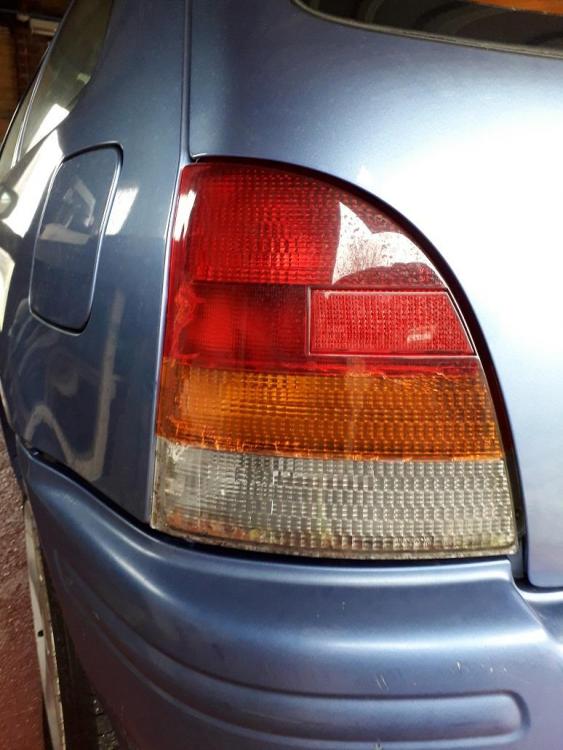
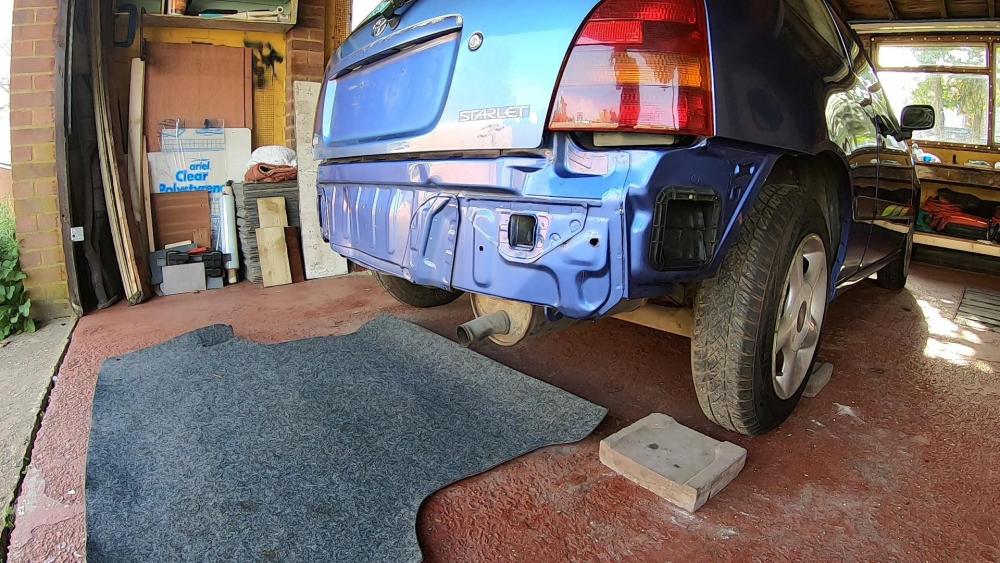
Time to tidy the rear end of Nanza: First had to remove bumper (3 bolts in each wheel arch, 3 bolts at top, 1 bolt underneath with 2 plastic clips). The rear valance has seen some parking / reversing into posts action but I already new this when I bought the car. Thankfully nothing too serious. Then the cracked rear light clusters, the left one actually has fungus growing in the reverse section! Cleaned up well with all rust spots treated as per the usual method. Replacement rear light clusters fitted.

-
Claymore's sleeper 4efe+t-t+t build (R.I.P. the Nanza)
Claymore replied to Claymore's topic in EP91 Progress Blogs
I will most likely use a tf035hm (I do have a TD04l also that may be tested). If both turbos are in need of a rebuild I may end up with a hybrid of the two but I am still sourcing the rest of the parts. Which leads me to: WANTED: TD04 ram horn exhaust manifold and downpipe. Preferably WEPR, Zisco, Race Tech or Tuning developments. PM me if anyone has one for sale (no eBay tat please) 😁👍 More updates to come, mainly chassis mods before the engine stuff but its on the way. Been checking out your build thread too, nice to see it back up and running. -
Could be lots of things, but from your description: You could do an Engine check readout to see if there are any fault codes registered. Start with the obvious stuff, check that the throttle pedal, cable and throttle body butterfly move freely without sticking. Vacuum leak (as mentioned above) Check that the Throttle position sensor is adjusted correctly (search forum for how to test the TPS with multi meter and adjust if necessary). Many other things but its a process of elimination.
-
Was reading it last night. Page 7
-
Forged daily build from 55kw to 200kw+ (2023-01 updated)
Claymore replied to MegstuBMW's topic in EP91 Progress Blogs
Really like the use of the later crank trigger wheel and sensor. Toyota o.e. parts upgrades should work well. This is from the 3rd generation 4efe? Used in the 97-02 corolla? -
Claymore's sleeper 4efe+t-t+t build (R.I.P. the Nanza)
Claymore replied to Claymore's topic in EP91 Progress Blogs
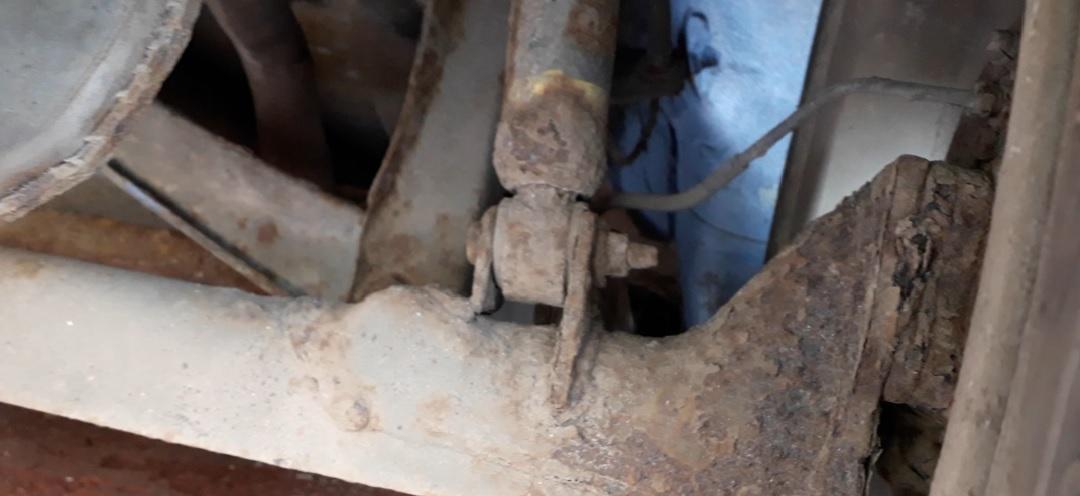
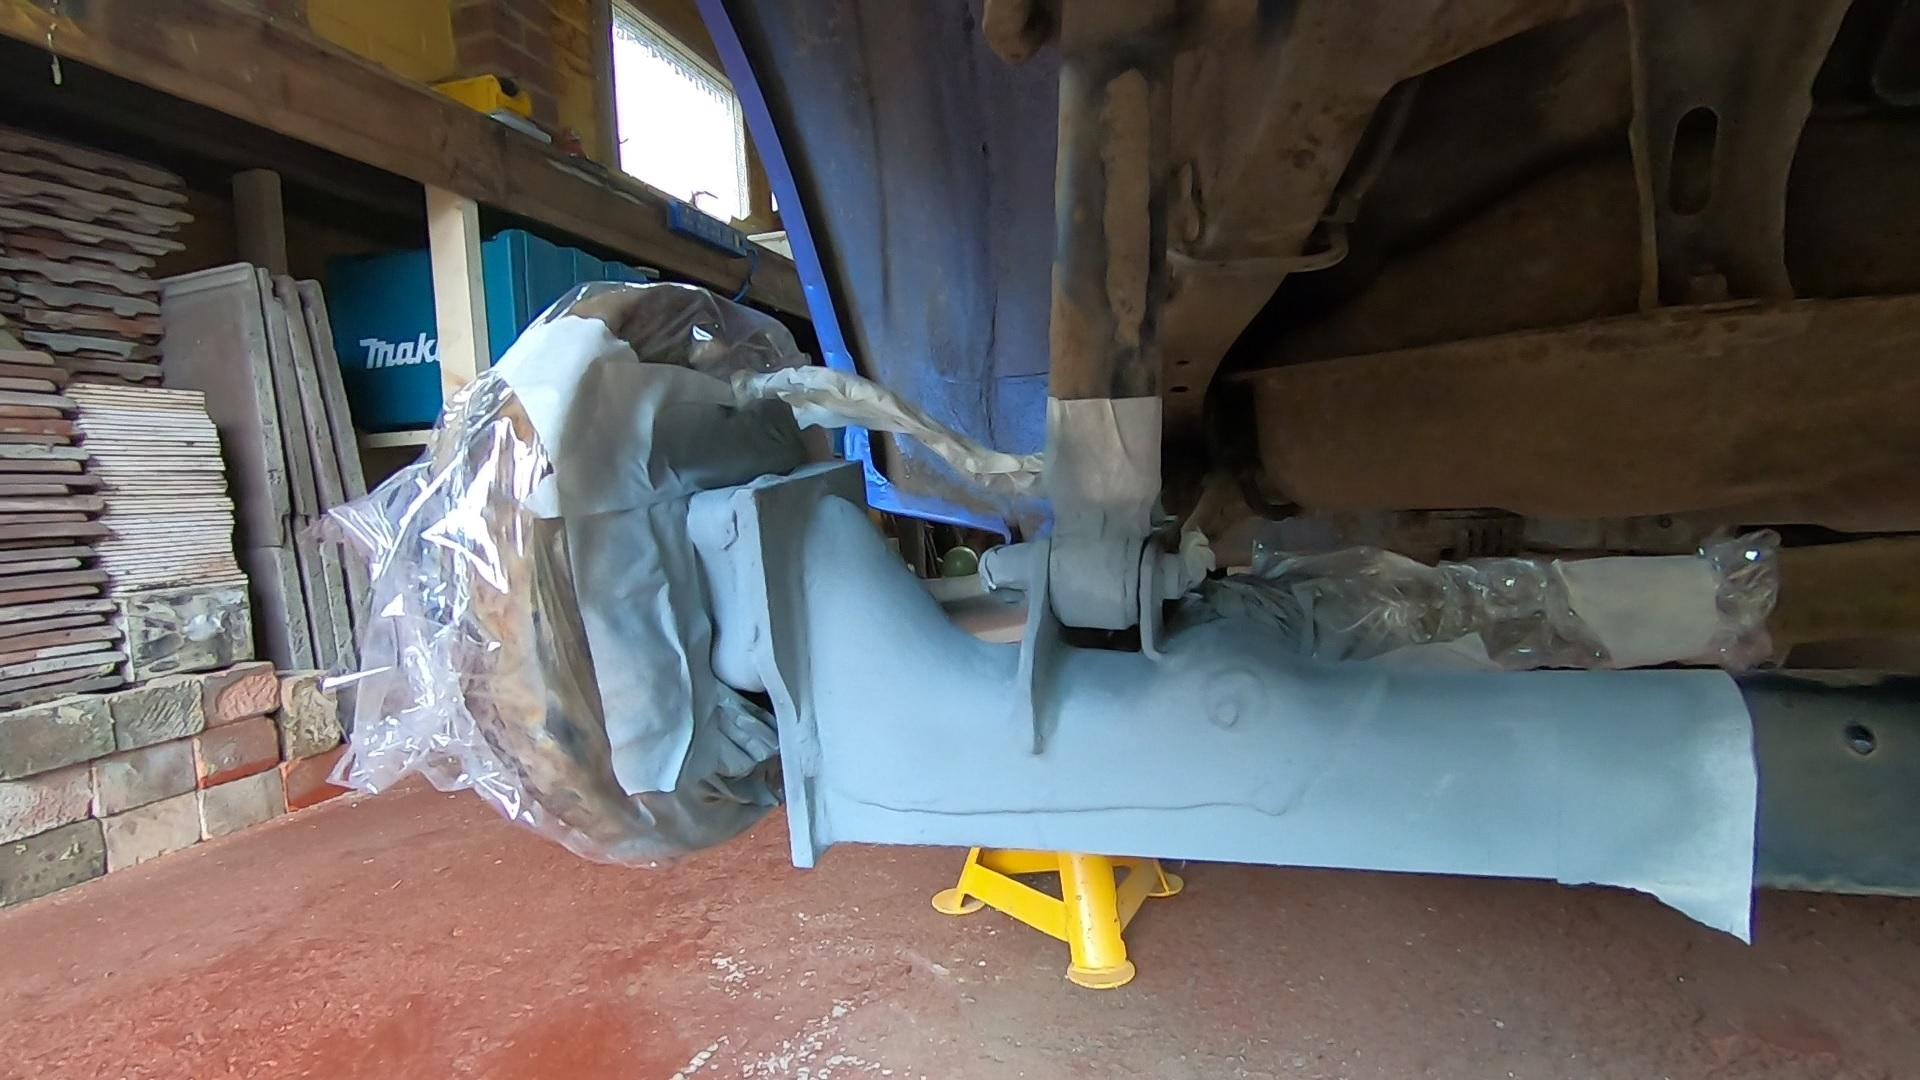
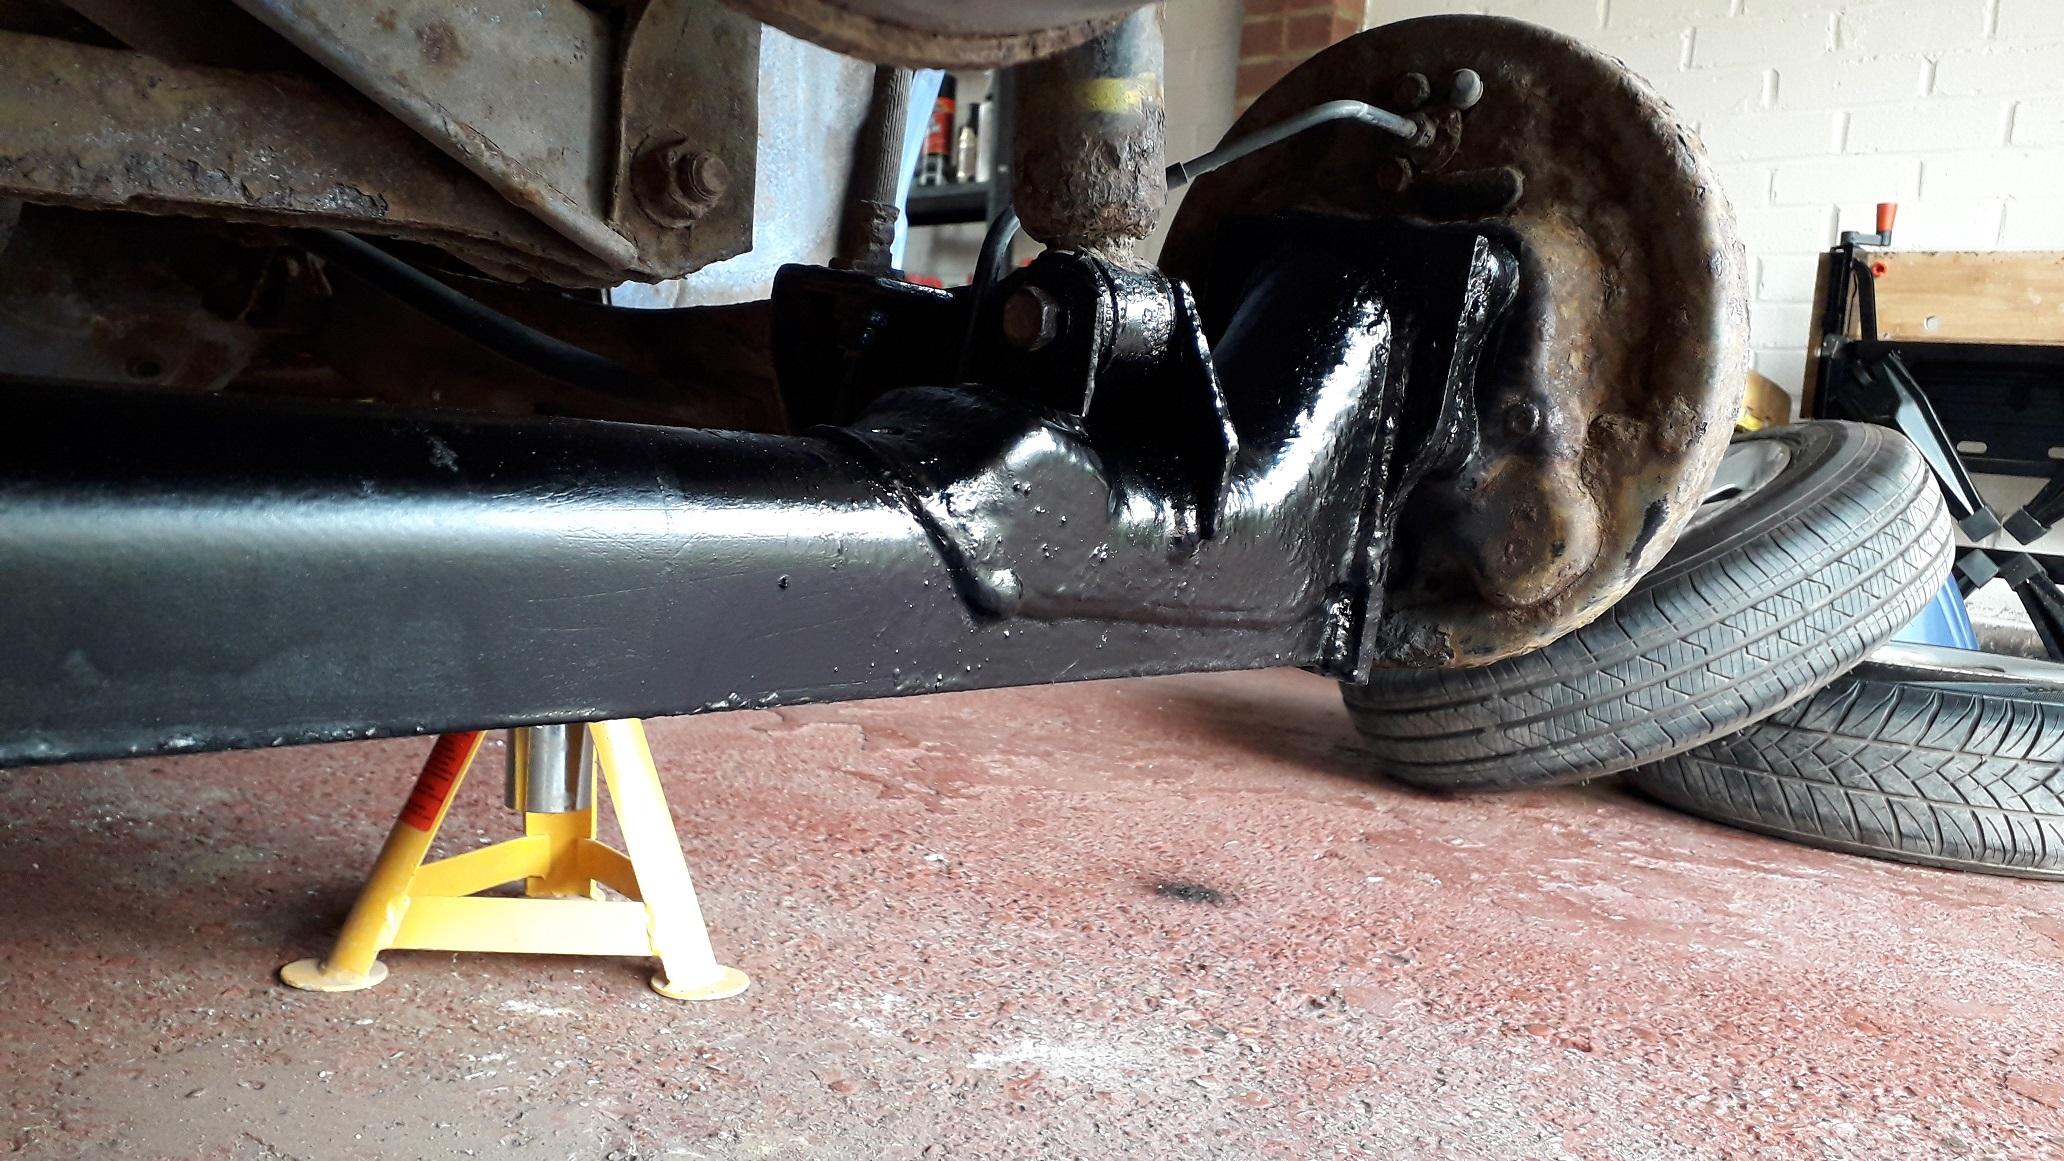
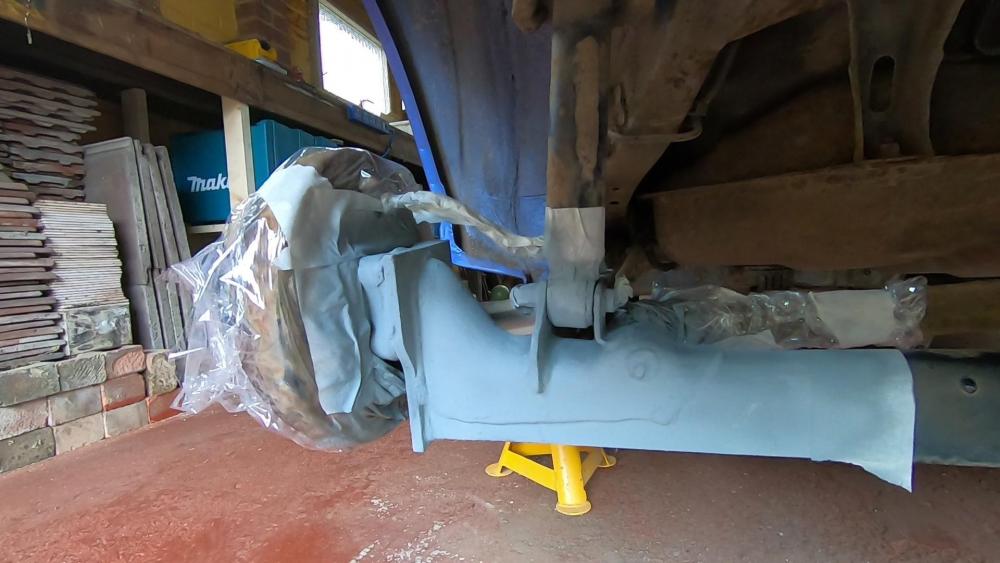
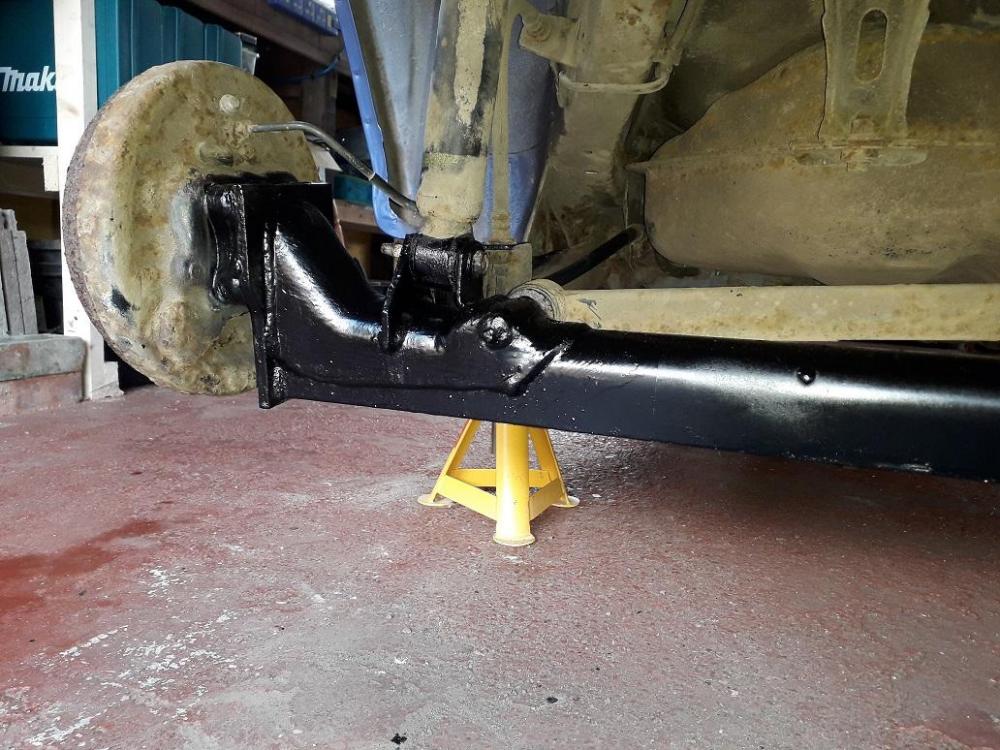
The rear beam was in ok condition drivers side and good condition on the passenger side. Same deal as chassis really but access was better, remove loose rust, treat, zinc prime and paint satin black. https://www.youtube.com/watch?v=G10548Wb54s Drivers side gusset looked worse than it was, I was dreading it being as crumbly as a danish pastry but thankfully really solid, cleaned up well. Treated and then primed. Top coat The drum backing plates and rear beam arms will get the same treatment when the beam comes out for bush replacement.

-
Claymore's sleeper 4efe+t-t+t build (R.I.P. the Nanza)
Claymore replied to Claymore's topic in EP91 Progress Blogs
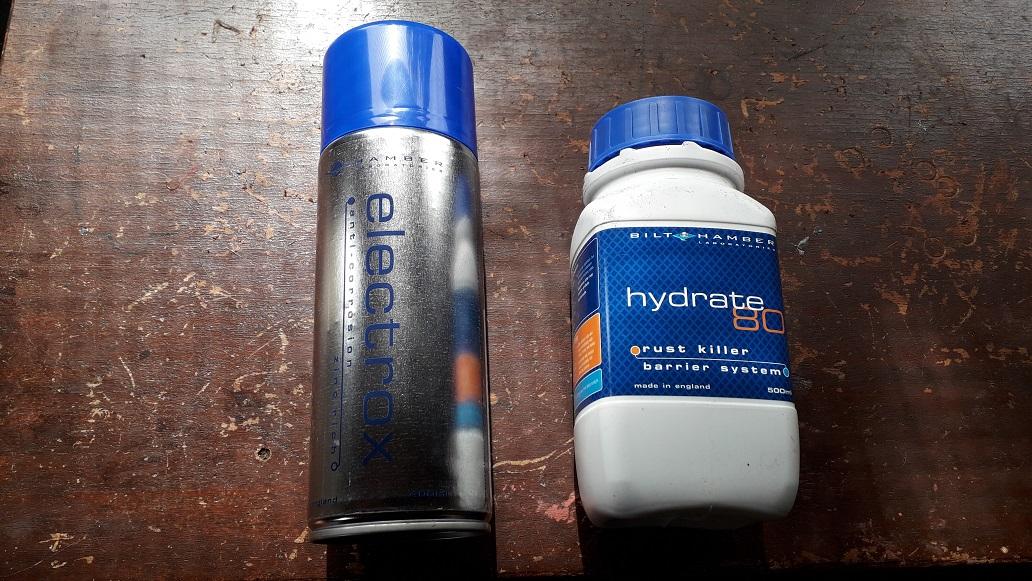
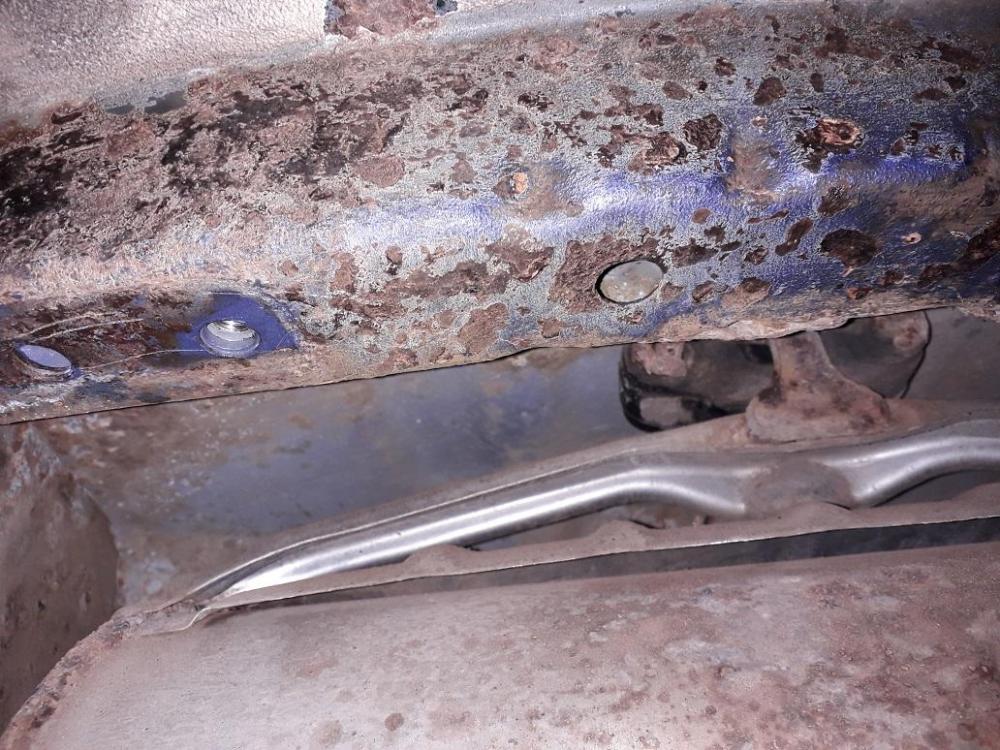
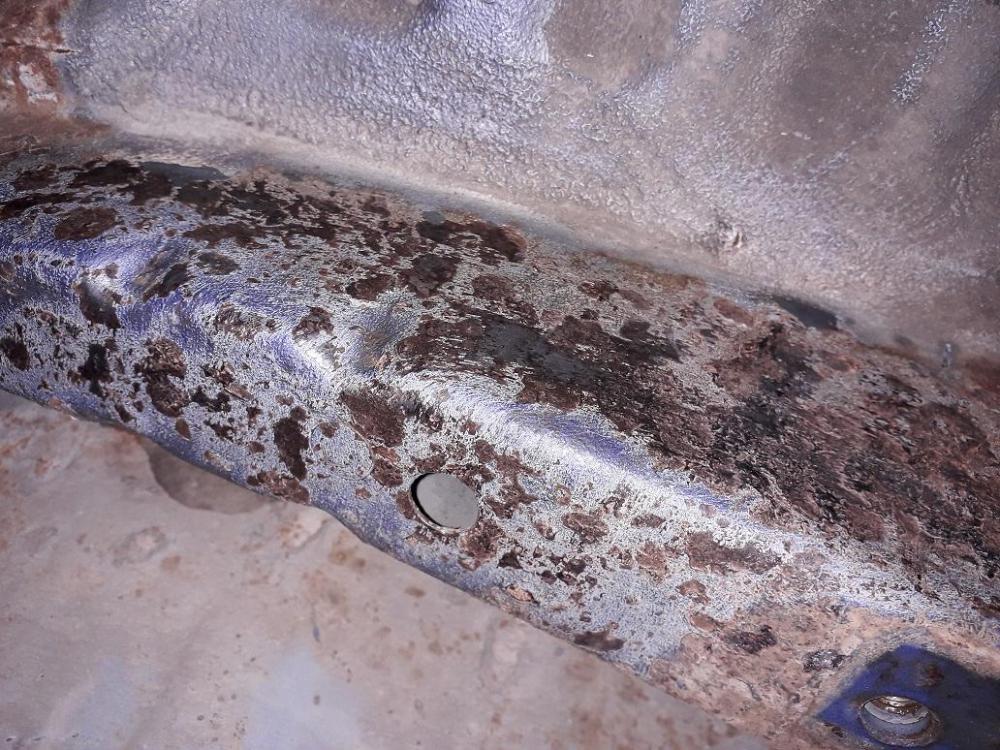
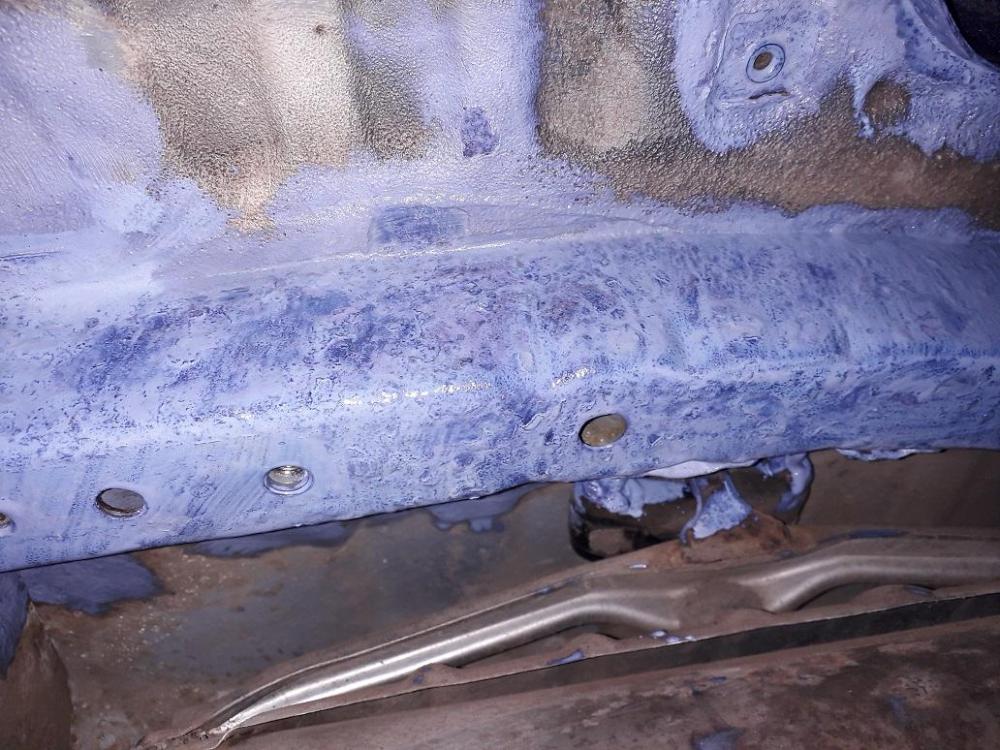
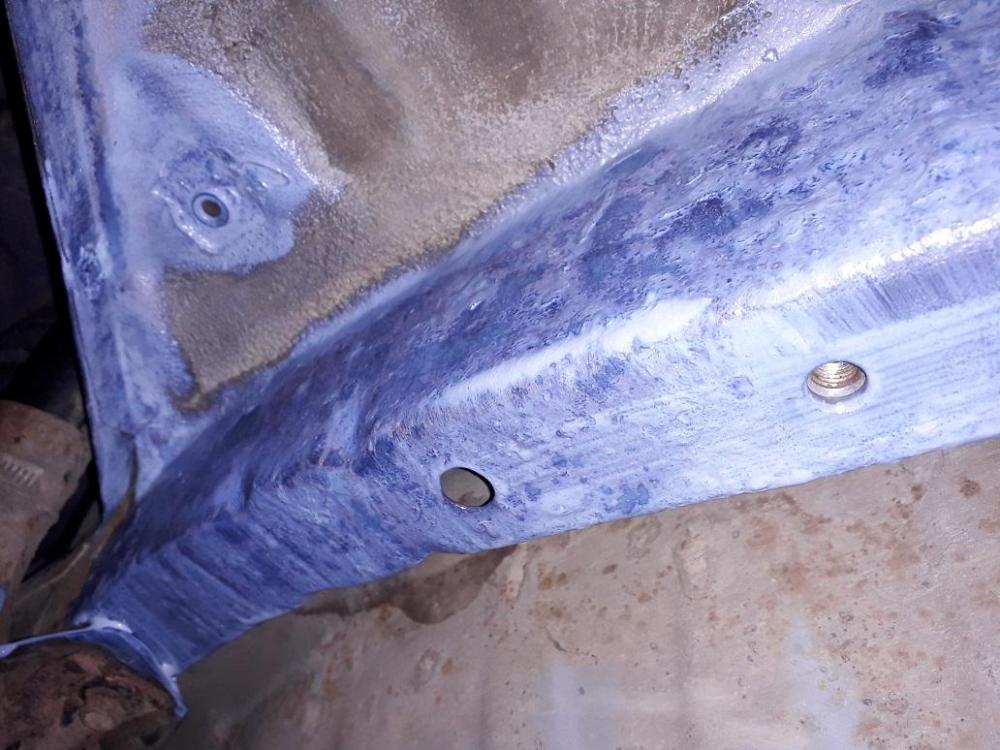
Had some surface rust on the rear chassis rails to deal with. https://www.youtube.com/watch?v=Ewy2M9LiEWY&t=6s Access is pretty limited, I could only use a wire wheel on a drill to remove the worst of the loose rust, so decided to then treat what was left to neutralise it then paint to protect. I really rate the Bilt Hamber range of products. I've had good success with use on previous cars so bought these: Removed more mud from the wheel arches. Loose rust removed. Rear chassis legs a bit scabby still but solid at least. 2 coats of Bilt Hamber Hydrate 80 to neutralise rust High Zinc primer Top coat. The actual colour match is pretty good in real life, camera and flash make it look more blue than purple. Painted the towing eye brackets while they were off Rear beam next.
-
Nice work on the cold side pipe, smoother with more pie cuts.